
7. Formatting Documents and Sections
This chapter is about the types of formatting that affect entire documents or sections. So before getting too far into that, let’s review what those terms mean.
A document, obviously, is the entire document file. Document-wide settings affect every page in the document and include vertical alignment, margins, line numbering, newspaper-style columns, page watermarks, and headers and footers. The settings that affect the entire document are stored in the hidden, nonprinting end-of-file marker for the document.
However, sometimes it’s useful to have different “document-wide” settings in various parts of a single document, such as unique margin settings for certain pages or diverse column types. A section is an area of a document that can have its own separate values for settings that are otherwise document-wide.
You create sections with section breaks. Inserting a single section break can divide a document into two sections—one before the break and one after. One dramatic example of a document with a section break, for example, is a letter with its envelope. The envelope, in its own section, has a different paper size and page orientation.
![]() To create envelopes, see “Addressing Envelopes,” p. 318.
To create envelopes, see “Addressing Envelopes,” p. 318.
The section break stores the same types of settings as an end-of-file marker, so the section can have its own set of “document-wide” settings.
Working with Section Breaks
There are five types of section breaks:
• Next Page—Starts the new section on a new page. Useful when you want different margins, headers/footers, or paper sizes (such as plain paper and an envelope).
• Continuous—Starts the new section without beginning a new page. This is useful when you want different numbers of columns on a page, for example, such as with a newsletter. You can’t use this type of break between sections that have varied page orientations or paper sizes.
• Even Page—Starts the new section on the next even page number. This is useful when you want to make sure that the section starts on the verso (on the left side) of a two-sided spread.
• Odd Page—Starts the new section on the next odd page number. If the current page is odd, a blank page is inserted between the current page and the new one. This is useful when you want to make sure that each new chapter starts on the recto (on the right side) of a two-sided spread, for example.
• New Column—Starts the section in a new column, applicable only in a multiple-column document layout. This one isn’t on the menu in Figure 7.1, but you can select it by inserting one of the other types of section breaks and then changing the break type in the Page Setup dialog box.
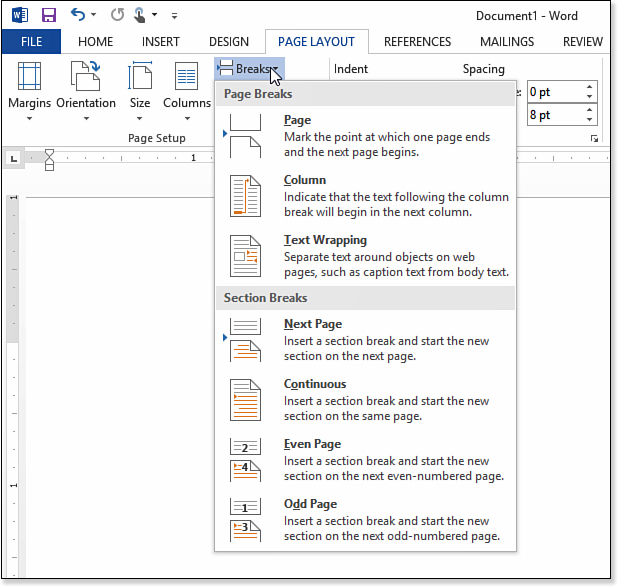
Figure 7.1. Insert a section break.
![]() To set up multiple columns, see “Working with Multiple Columns,” p. 277.
To set up multiple columns, see “Working with Multiple Columns,” p. 277.
Inserting a Section Break
To create a section break, display the Page Layout tab and click the Breaks button. On the menu that appears, select the desired type of section break (refer to Figure 7.1).
You can also create section breaks indirectly by selecting a block of text and then applying some formatting to it that would normally apply to the entire document, such as changing the number of columns. When you do this, Word creates two continuous section breaks—one before the selected text and one after it.
Section breaks are nonprinting characters, like paragraph breaks. You can display them by switching to Draft or Outline view (see Figure 7.2) or by enabling the display of hidden characters by clicking the Show/Hide (¶) button on the Home tab.

Figure 7.2. A section break is a nonprinting character.
Deleting a Section Break
To delete a section break, select it or click immediately before it and press Delete.
Deleting a section break combines the text that was previously above the break with the section that follows it. For example, if you deleted the section break between the envelope and its letter, assuming the envelope was above the section break and the letter below it, the envelope’s layout would change to that of a regular 8.5-inch × 11-inch portrait-orientation sheet.
Changing a Section Break’s Type
You can switch section breaks among all the types listed earlier. One type in particular, New Column, can be set up only by changing the type of an existing section break; it does not appear on the Breaks menu.
To change a break type, move the insertion point into the section (anywhere above the break line) and then click the dialog box launcher in the Page Setup group on the Page Layout tab. The Page Setup dialog box opens.
In the Page Setup dialog box, display the Layout tab, open the Section Start list, and select the desired break type (see Figure 7.3).
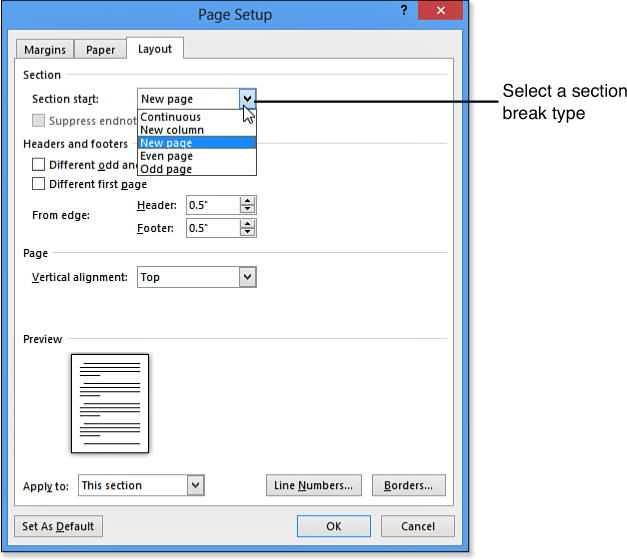
Figure 7.3. Specify the type of section break you want.
Changing Page Margins
Margins are the areas between the text and the edge of the paper on each side. The document’s initial margin settings come from the template (for example, from Normal.dotm). Word’s default margin settings are 1 inch on all sides.
Selecting a Margin Preset
The Margins button on the Page Layout tab offers quick access to a few of the most popular margin settings, including Normal, Narrow, Wide, and Mirrored (see Figure 7.4). The Mirrored setting changes the Right and Left margin settings to Inside and Outside, so you can have a larger margin on the inside if desired to account for the binding taking up part of the space. If you have previously created custom margin settings, Last Custom Setting also appears on the menu.
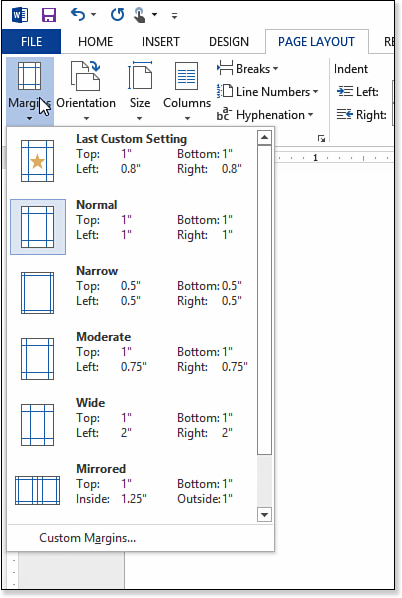
Figure 7.4. Select a margin preset.
![]() For more information about adjusting margins for binding, see “Setting Up Gutters and Book Folds,” p. 254.
For more information about adjusting margins for binding, see “Setting Up Gutters and Book Folds,” p. 254.
To set the margins for each section separately in a multisection document, click in the section to affect and then change the margins settings. The shortcuts from the Margins button apply only to the current section. Conversely, to apply the same margin setting in every section in a multisection document, select the entire document (Ctrl+A) before changing the margins.
![]() Tip
Tip
There can be two or more continuous sections on the same page, each with different margin settings. For example, if most of the document has a 1-inch left margin but a certain section has a 2-inch left margin, that section appears indented 1 inch compared to the rest of the document. (That’s worth remembering if you are ever trying to figure out why some paragraphs appear indented but no indents are set for them.)
Entering Precise Margin Values
For more control over margins, open the Margins button’s menu and choose Custom Margins. The Page Setup dialog box opens with the Margins tab active (see Figure 7.5). From here, you can set individual margins for Top, Bottom, Left, and Right in inches (down to 1/100 of an inch of precision).
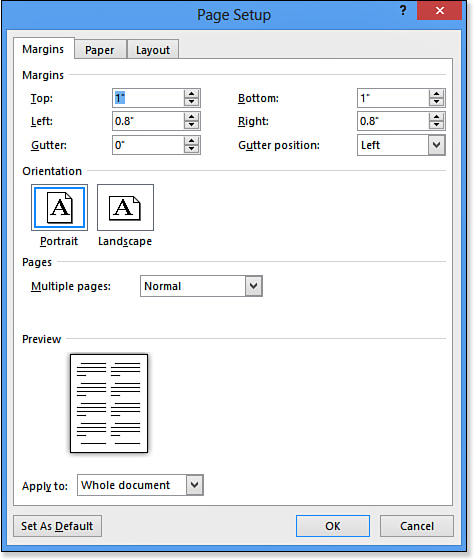
Figure 7.5. Enter margin settings in inches
By default, margin settings apply only to the current section (if the document contains multiple sections). To change this, open the Apply To list and select either This Point Forward (to affect the current section and all sections that come after it) or Whole Document.
Setting Up Gutters and Book Folds
When pages are bound into a booklet, you lose a certain amount of space in the center area, called the gutter. Therefore, when printing pages that you know will be bound this way, it makes sense to make the margin a little bit larger on the side of the binding. That’s the principle behind the Gutter margin setting (refer to Figure 7.5). You can specify a gutter amount (that is, an amount of additional space to use) and a gutter position (either Left or Top).
In a two-sided publication, though, you can’t simply add extra space on the left, because every other page will actually be on the right. The Multiple Pages setting takes care of this issue; you can choose from among these settings:
• Normal—No adjustment.
• Mirror margins—Odd-numbered pages will add the Gutter value on the left; even-numbered pages will add it on the right.
• 2 Pages per Sheet—Use this when printing two pages on one sheet of paper, either side by side (if Landscape orientation) or top and bottom (if Portrait orientation).
• Book fold—This is the same thing as 2 Pages per Sheet, except Landscape is the only orientation available, and you can specify how many sheets there will be per booklet. This is useful because Word automatically reorders the pages when printing so that they will come out right when printed two-sided and stapled in the center (see Figure 7.6).
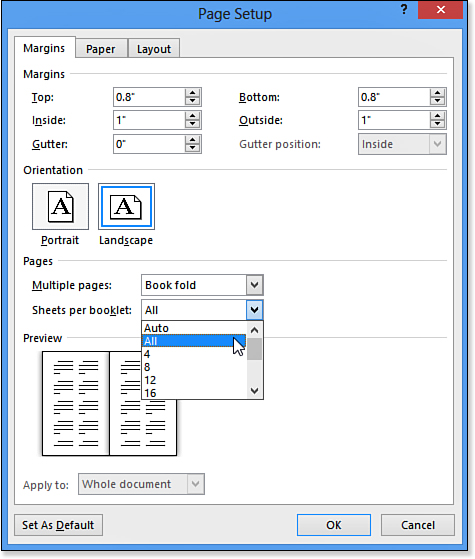
Figure 7.6. Setting up a Book Fold page layout.
• Reverse Book Fold—Available only when a language pack is installed for a language written right to left, such as Arabic or Hebrew, or a language that is read vertically, such as Chinese. It’s the same as Book fold, but the pages are oriented for that language’s pagination.
Setting Page Orientation
The orientation of a page is the direction the text runs on it. When text runs across the narrow edge of the paper, that’s called portrait. When it runs across the wide edge, that’s landscape.
To set page orientation, from the Page Layout tab, click the Orientation button and choose either Portrait or Landscape.
You can also set orientation in the printer driver, but in most cases, the orientation in Word overrides it.
Setting Paper Size
Word supports a variety of common paper sizes, and you can set up custom sizes as well. To pick one of the paper size presets, open the Size list on the Page Layout tab and select a size (see Figure 7.7).
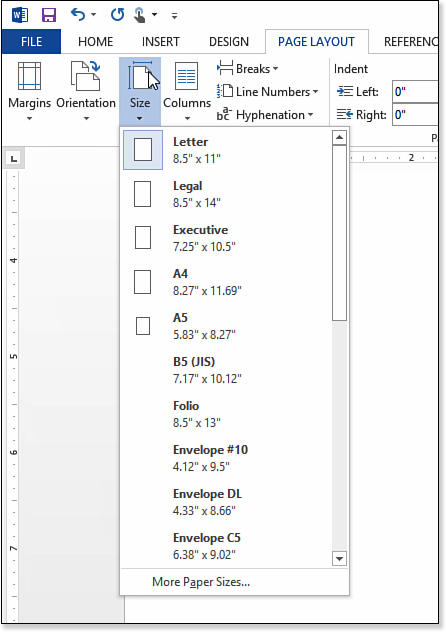
Figure 7.7. Select a paper size.
For more choices, click More Paper Sizes at the bottom of that menu to open the Paper tab of the Page Setup dialog box, shown in Figure 7.8. From here, you can select from a more extensive list of presets or enter exact Width and Height settings for a custom size.
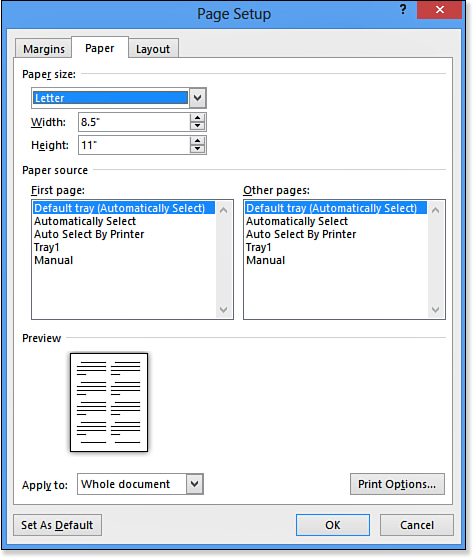
Figure 7.8. More paper size options are available in the Page Setup dialog box.
Setting Vertical Alignment
Every document and section starts out with vertical alignment set to Top by default, which means that if you type less than a full page of text, it is top-aligned. Most of the time that’s good, but if you are trying to perfectly center a business letter vertically, you might prefer a Center vertical orientation.
To change the vertical alignment for a section, follow these steps:
1. On the Page Layout tab, click the dialog box launcher in the Page Setup group. The Page Setup dialog box opens.
![]() Note
Note
There are lots of alternative ways of opening this dialog box. For example, you can click Margins on the Page Layout tab and choose Custom Margins, or click Line Numbers and then choose Line Numbering Options.
3. Open the Vertical Alignment list and select a vertical alignment: Top, Center, Justified, or Bottom.
4. Click OK.
Justified vertical alignment spreads everything out vertically so the first line is at the top margin and the last line is at the bottom, on every page except the last one. (On the last page, Top alignment applies.) This might be useful, for example, if you are using widow/orphan control and a certain page is looking a little “short” because of it. It can cause inconsistencies in line spacing, however, and if you forget justification is turned on, it can turn into a tough-to-troubleshoot puzzle.
![]() To set up widow and orphan control, see “Preventing Paragraphs from Breaking,” p. 210.
To set up widow and orphan control, see “Preventing Paragraphs from Breaking,” p. 210.
Using Line Numbering
Line numbering is a section-wide option that places a small number to the left of each line. People sometimes use it in legal documents or in documents that a committee is reviewing, for ease of referring participants to a specific spot in the document. It’s much easier for people to find “line 20, page 10” than “the second line of the paragraph that begins about halfway down page 10.”
To number the lines, click in the section and then click the Line Numbers button on the Page Layout tab. A menu of line-numbering options appears (see Figure 7.9). Select one of these options.
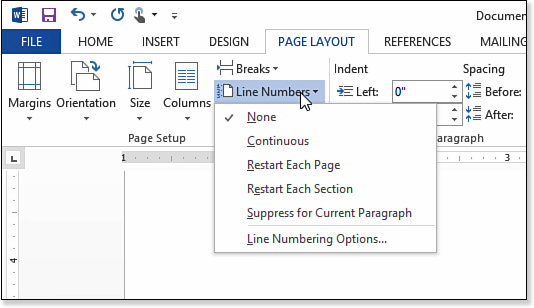
Figure 7.9. Choose a line-numbering method.
To access more line-numbering choices, follow these steps:
1. From the Line Numbers menu shown in Figure 7.9, click Line Numbering Options. The Page Setup dialog box opens with the Layout tab displayed.
2. Click the Line Numbers button. The Line Numbers dialog box opens.
3. Mark the Add Line Numbering check box. Line numbering options become available (see Figure 7.10).
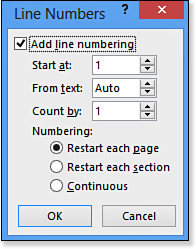
Figure 7.10. Set line numbering options.
4. Set numbering options as needed:
Start At—Specify a starting number, or leave it set to 1.
From Text—Specify a number in inches (the increment buttons increment by 1/10 of an inch with each click), or leave it set to Auto.
Count By—Specify an amount to increment the value for each line (for example, 5 to count 5, 10, 15, 20, and so on), or leave it set to 1.
Numbering—Choose to restart the numbering in each page or each section, or let it run continuously throughout the document.
5. Click OK two times to close both dialog boxes.
Inserting Page Breaks
Soft page breaks occur whenever Word runs out of room at the bottom of a page. You don’t have to create or delete them; they come and go as needed. A soft page break occurs whenever there is no room in the main document area for the next line. Usually that’s at the bottom margin, but it could be earlier than that due to various other factors, such as a page footer, footnotes, or widow/orphan control.
![]() To create page footers, see “Creating Headers and Footers,” p. 262 (ch07).
To create page footers, see “Creating Headers and Footers,” p. 262 (ch07).
![]() To create footnotes, see “Working with Footnotes and Endnotes,” p. 717.
To create footnotes, see “Working with Footnotes and Endnotes,” p. 717.
![]() To set widow/orphan control, see “Preventing Paragraphs from Breaking,” p. 210.
To set widow/orphan control, see “Preventing Paragraphs from Breaking,” p. 210.
To end a page early—that is, before any of the conditions kick in that would trigger a soft page break—create a hard page break by inserting a Page Break code.
To insert a page break, position the insertion point where you want the page break to occur, and do any of the following:
• Press Ctrl+Enter.
• On the Insert tab, click Page Break.
• On the Page Layout tab, click Breaks and then click one of the page break types shown:
• Page—Inserts a hard page break but does not create a new section
• Next Page—Inserts a section break that is also a page break
• Even Page—Inserts a section break that is also a page break, and includes an additional page break if needed so that the new section starts on an even-numbered page
• Odd Page—Same as Even Page except the new section starts on an odd-numbered page
![]() Caution
Caution
Remember from Chapter 1, “Creating and Saving Documents,” that the layout of certain groups changes depending on the window size. For example, when the Word window is fairly narrow, the Cover Page, Blank Page, and Page Break buttons on the Insert tab disappear and are replaced by a generic Pages button representing their entire group. You must click the Pages button to access those other three buttons in a drop-down list.
Creating a page break does not really insert a new page; it just creates a break at the insertion point. For example, if you position the insertion point between two paragraphs and press Ctrl+Enter, the first paragraph appears on the first page and the second paragraph on the second page. You haven’t really inserted anything (well, except for the page break marker). Instead, you’ve just created a split. However, Word does have a feature that actually inserts a new page: the Blank Page button on the Insert tab. It’s the same as if you had created two hard page breaks and then moved the insertion point between them.
Inserting Cover Pages
The Cover Page feature enables you to insert various sample page layouts for document cover pages. It always inserts the new content at the beginning of the document regardless of the insertion point position, and it creates a hard page break between the newly added content and the existing content.
On the Insert tab, click Cover Page and then select the desired cover page style (see Figure 7.11).

Figure 7.11. Insert a cover page.
Switch to Print Layout view, if necessary, to view the cover page layout. The resulting page contains ordinary content, in a mixture of regular paragraphs and text boxes. Some of the text boxes have background colors, but they are not fixed colors; they are placeholders from the theme color set. To change the colors, apply a different theme or theme color set.
![]() Note
Note
After inserting a cover page, you can remove it by reopening the Cover Page menu and choosing Remove Current Cover Page. (That works for cover pages only, not other sample pages.)
![]() To work with themes and color sets, see “Working with Themes,” p. 243.
To work with themes and color sets, see “Working with Themes,” p. 243.
![]() To learn how to manipulate text boxes, see “Creating Text Box Layouts,” p. 303.
To learn how to manipulate text boxes, see “Creating Text Box Layouts,” p. 303.
Saving Content as a New Cover Page
Here’s where the cover page insertion feature becomes really useful: You can save your own formatted content as a new cover page and make it available for insertion in any document.
If this sounds familiar, it should—it’s a continuation of the Building Blocks feature from Chapter 2, “Typing and Editing Text.” In fact, the pages you create are actually stored as building blocks, exactly the same way the text-based blocks you created were stored.
![]() Note
Note
To quickly review: A building block is a formatted snippet of text, graphics, or other objects, with complete formatting, stored as a reusable object within a template. The built-in building blocks in Word are stored in a template called Building Blocks.dotm. You can store your own custom building blocks there too, or you can store them in Normal.dotm (or whatever template is currently in use) if you prefer.
To save content as a new cover page, follow these steps:
1. Create the content you want to save as a cover page.
2. Select everything you want to include on the page.
3. Click the Cover Page button, and select Save Selection to Cover Page Gallery. The Create New Building Block dialog box appears.
![]() Note
Note
Don’t worry if Word doesn’t appear to let you simultaneously select regular text and a text box or graphic. If the anchor for the text box or graphic is included in the text selection, the object travels along with it.
4. Fill in the blanks to describe the new building block:
• Name—Give it a descriptive name of your choice.
• Gallery—Leave this set to Cover Pages.
• Category—Stick with General or create your own category by choosing Create New Category.
• Description—You can use this optional field to hold more information.
• Save In—You can save in the current template (probably Normal.dotm) or in Building Blocks.dotx, the central library for building blocks in Word 2010.
• Options—This setting controls how the insertion interacts with any existing text in the document. To make the inserted text run in with existing text, choose Insert Content Only. The other choices are Insert Content in Its Own Paragraph and Insert Content in Its Own Page (the default, recommended for pages).
5. Click OK to create the new cover page. It now appears at the top of the Cover Page menu, ready for your use.
![]() To learn more about building blocks, see “Working with Building Blocks,” p. 86.
To learn more about building blocks, see “Working with Building Blocks,” p. 86.
Creating Headers and Footers
A header is an area at the top of a page, outside of the document margin, where repeated text is placed, such as a title, page number, or date. A footer is the same thing except at the bottom of the page.
Each section can have its own unique header and footer, or a section can continue the same header/footer from the previous section. It’s up to you which way you want to set it up. In addition, each document or section can have a different first-page header/footer than in the rest of its pages. This enables you to have a different first page (for example, no page numbering on the first page) without having to set up multiple sections.
It is common to place field codes in headers and footers. These codes are placeholders that pull their information from the document or from the system. For example, a Date code inserts the current date, and a Page code inserts the current page number.
What makes Word special in the header/footer department is its ability to use building blocks (yes, the same as in the previous section) to insert and save custom-formatted header and footer layouts.
Understanding the Header and Footer Areas
The header and footer areas themselves are not “inserted.” They are always there; they’re just empty by default so you don’t notice them. To type some text into one of them, follow these steps:
1. On the Insert tab, click Header (or click Footer).
2. On the menu that appears, click Edit Header (or click Edit Footer).
An empty header is shown in Figure 7.12. A dashed divider line separates it from the main document. You can type anything you like into it. Notice that it has two tab stops set on the ruler: a center-aligned tab in the middle and a right-aligned tab at the right margin. These tab stops make it easy to type text that is centered or right-aligned.
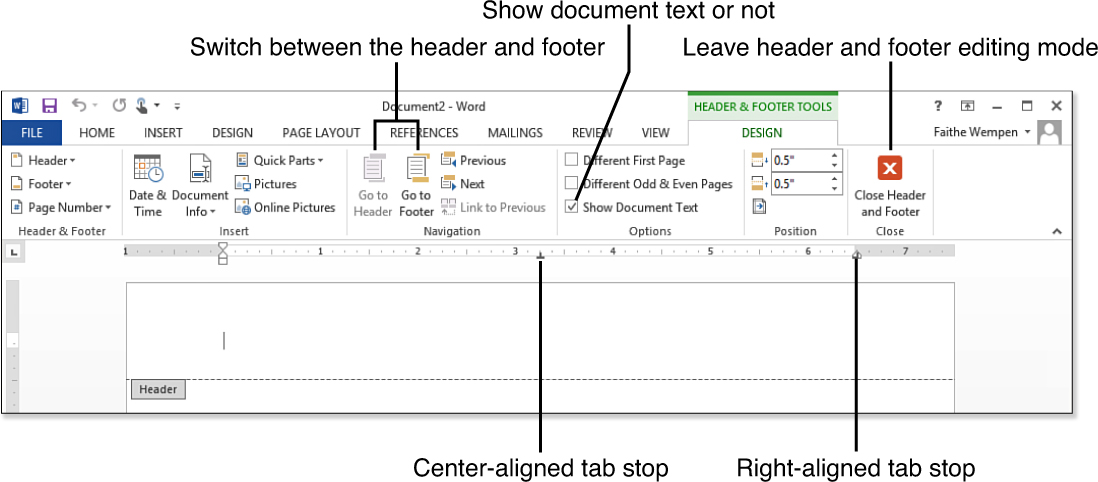
Figure 7.12. The header area on a document.
When the header or footer is active, the Header & Footer Tools Design tab is available. On it, you can switch between the header and footer boxes by clicking the Go To Header and Go To Footer buttons on that tab. (You can also manually scroll the page to access the header and footer areas.)
By default, the text in the document is displayed as you work on headers and footers, but it appears in gray to indicate it is not editable at the moment. It is often useful to see how the text will interact with the header or footer so you can gauge how much space to leave for it. To hide the document text, clear the Show Document Text check box on the Design tab.
When you are finished working with the header and footer, click the Close Header and Footer button on the Header & Footer Tools Design tab to return to normal editing, or double-click the regular text in the document to activate it for editing (and deactivate the header and footer).
Inserting a Header or Footer Building Block
Building blocks are available for headers and footers, offering a variety of formatting and layout ideas. Their use is optional; you are free to manually create your own header/footer designs from scratch if you prefer.
To insert a header or footer building block, follow these steps:
1. From the Insert tab, click Header or click Footer.
2. Click a sample from the menu that appears (see Figure 7.13).
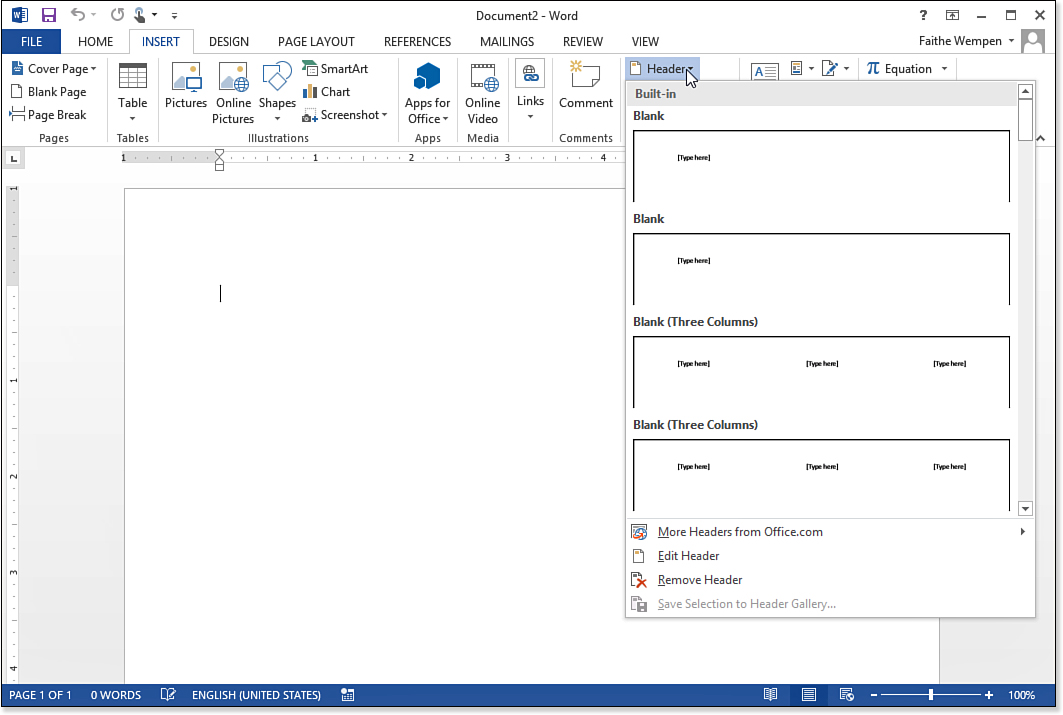
Figure 7.13. Select a header (or footer) building block.
To switch to a different layout, repeat the preceding steps. To remove everything from the header or footer so that it goes back to “empty,” choose Remove Header (or Remove Footer) from the Header or Footer button’s menu. (The Header and Footer buttons appear on the Header & Footer Tools Design tab, in the Header & Footer group, so you don’t have to switch back to the Insert tab to access them.)
Some of the building block headers and footers simply place text and codes in the header or footer area. Others create their own layout using drawing objects (rectangles, lines, and so on) and text boxes.
![]() To learn how to manipulate text boxes, see “Creating Text Box Layouts,” p. 303.
To learn how to manipulate text boxes, see “Creating Text Box Layouts,” p. 303.
![]() To modify drawn lines and shapes, see “Modifying Drawn Objects,” p. 427.
To modify drawn lines and shapes, see “Modifying Drawn Objects,” p. 427.
Understanding Header/Footer Field Codes
Most of the building blocks include field codes for inserting certain information from the document or the system. You can tell a field code because when you click it, its background turns gray.
The text in Figure 7.14 is a mixture of regular text and codes. The words Confidential and Page are regular text; the 1 and the date are field codes.

Figure 7.14. Field codes in a header.
Field codes are easier to see if you toggle their display to show the actual codes rather than the code results. To do so, right-click the field code and choose Toggle Field Codes. (Even though the command says codes, it actually only toggles the one code you clicked.) Field codes are contained in curly braces. Figure 7.15 shows the same header as in Figure 7.14, but with the field codes displayed.
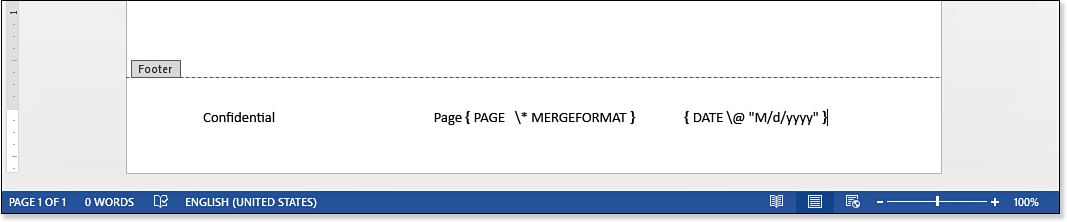
Figure 7.15. Field codes with the codes showing rather than their results.
Deleting a Field Code
To delete a field code, click the icon that appears above it, which selects the entire code block, and press the Delete key on the keyboard. If you don’t see an icon above it, just select the entire field code by dragging across it, and then press Delete.
Adding and Formatting a Page-Numbering Code
To insert a page numbering code, you can use the Page Number button’s menu system either from the Insert tab or the Header & Footer Tools Design tab. The menu contains four location choices, each with its own submenu:
• Top of Page—Choosing from this submenu inserts a sample header of your choice, replacing whatever was previously there.
• Bottom of Page—Choosing from this submenu inserts a sample footer of your choice, replacing whatever was previously there.
![]() Caution
Caution
If you use Top of Page or Bottom of Page, make sure to do it as the first step in constructing a header or footer so that you don’t accidentally wipe out any work on it.
• Page Margins—The choices on this submenu place a floating text box in the header. It is “in” the header in the sense that it is selectable and movable only when the header and footer are active, but it can actually be placed anywhere on the page, such as along the left or right side.
• Current Position—This inserts a page numbering code wherever the insertion point is. If it’s in the header or footer, that’s where the code goes. If it’s in the body of the document, it goes there instead (and appears only on that one page in the document, not repeating itself on each page). The Current Position choice works well in situations when you already have a header or footer you like, and you just want to add a page number to it.
After opening one of the submenus, select the Building Block sample that best represents the positioning and style you want. Figure 7.16 shows some of the choices for Top of Page; the others are similar.
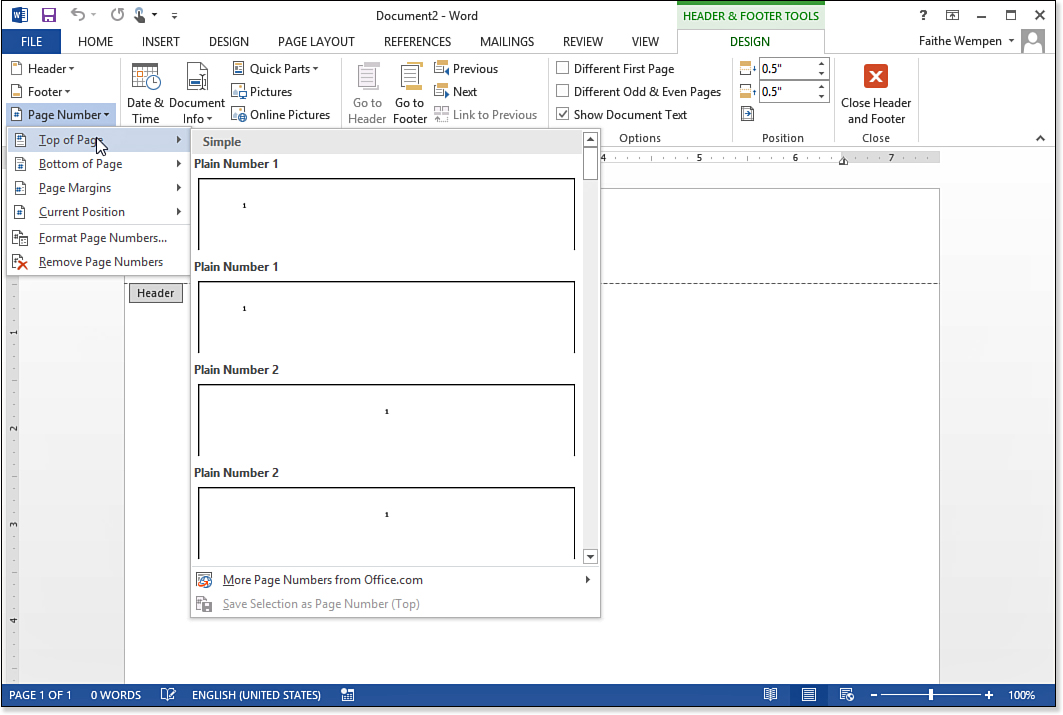
Figure 7.16. Insert a page-numbering code.
Setting the Format for a Page-Numbering Code
When you think about “formatting” a page number, the first thing that might spring to mind is its font, size, color, and so on. You can apply all those formatting attributes to the code as if it were regular text.
When Word talks about formatting a page number, it means something else—it means specifying the numbering style (1, 2, 3 versus I, II, III) and the starting number. To set up those attributes, follow these steps:
1. With the page number code selected, click the Page Number button (Insert or Header & Footer Tools Design tab), and choose Format Page Numbers. The Page Number Format dialog box opens (see Figure 7.17).
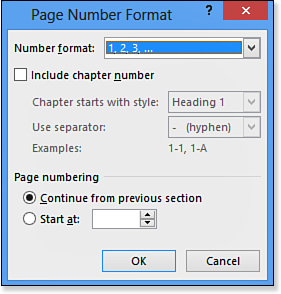
Figure 7.17. Format page number codes.
2. Select a number format from the Number Format list.
3. (Optional) If you want the numbering to restart with each page that includes a certain heading level, follow these steps:
a. Mark the Include Chapter Number check box.
b. Select the style that denotes a numbering restart from the Chapter Starts with Style list.
c. Select a separator character from the Use Separator list.
d. Check the Examples section to make sure the result is as you want it; adjust if needed.
4. To start the page numbering with 1 or continue from the previous section if this is not the first section in the document, leave Continue from Previous Section selected. Otherwise, click Start At and enter a number at which to start.
5. Click OK.
Inserting a Date or Time Code
A date or time code automatically pulls in the date or time from the PC’s real-time clock and displays it in a format of your choice.
Many different formats are available for dates and times, ranging from short dates such as Nov-12 to long, complete date-and-time combinations such as Monday, November 15, 2012 09:30 PM. There are field codes that generate each of these formats, but you don’t have to memorize the syntax because Word inserts it for you.
To insert a date or time code in a header or footer, follow these steps:
1. Place the insertion point where you want the code to appear.
2. On the Header & Footer Tools Design tab, click Date & Time. The Date and Time dialog box opens (see Figure 7.18).
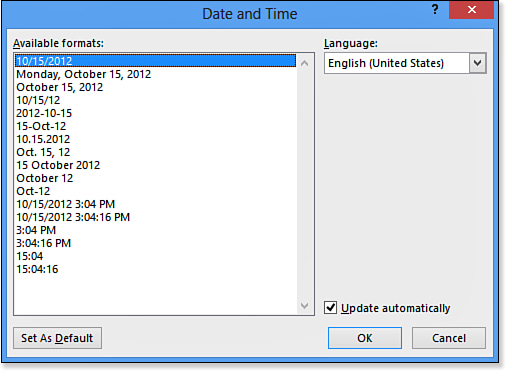
Figure 7.18. Use the Date and Time dialog box to insert a date or time code.
3. Mark the Update Automatically check box (Important! If you don’t do this, you get a static date, not an automatically updated one).
![]() Tip
Tip
To set the chosen format as the default format, click the Set As Default button and then click Yes to confirm.
4. Click the desired format from the Available Formats list.
5. Click OK. The code is inserted. By default, it looks like any other text, showing the current information.
If you are curious about the code syntax that was inserted, toggle the field code on by right-clicking the code and choosing Toggle Field Codes. For example, the syntax for a date such as 3/22/2015 would look like this:
{ DATE @ "M/d/yyyy" }
The codes are case-sensitive, so make sure you use M for the month, rather than m, for example.
The @ portion of the code is called a Date-Time Picture field switch. It tells Word to display the date using the “picture” (that is, the format) that you specify.
That’s good to know because if none of the date/time codes in the Date and Time dialog box are in the format you want, you can manually create your own code syntax. Table 7.1 provides the syntax rules.
Table 7.1. Syntax Rules for Constructing Custom Date/Time Fields
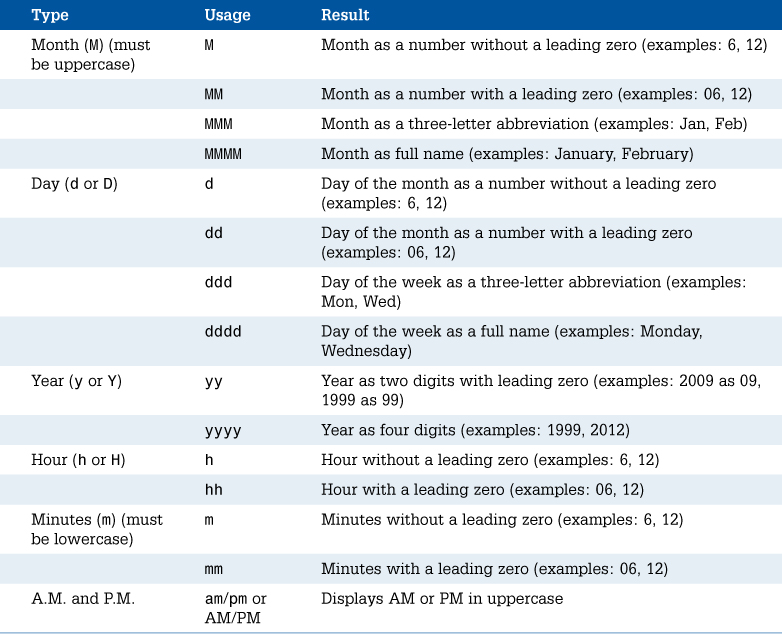
To build your own date format field code, start with the {DATE @} code and then put the desired format after the @. For example, here’s how to produce a date such as 06/15:
{ DATE @ MM/yy }
If there are spaces, punctuation, or text in the syntax, you must enclose the syntax in quotation marks. (It’s good to get into the habit of always using the quotation marks so that you don’t run into problems later if you add any of those elements.) For example, here’s how to produce a date such as June 8:
{ DATE @ "MMMM d" }
To include constant (unchanging) text in the syntax, enclose it in single quotes, making sure to include spaces on both sides of it inside the quotation marks. For example, here’s how to produce a date/time such as June 8 at 9 AM:
{ DATE @ "MMMM d' at 'h AM/PM" }
Word automatically inserts a space after the opening bracket and before the closing one.
Inserting a Document Property
You can also insert codes that represent various properties of the file, such as Author, Category, Comments, Keywords, and so on. To insert one of these, click Quick Parts on the Header & Footer Tools Design tab and then point to Document Property. Then, click the desired property on the menu.
To modify file properties, choose click File, click the Info tab, click the Properties heading to display a menu, and then choose either Show Document Panel or Advanced Properties.
![]() For more information, see “Working with File Properties,” p. 41.
For more information, see “Working with File Properties,” p. 41.
Adjusting Header and Footer Positioning
By default, the top of the header box is 0.5 inches from the edge of the paper, and ditto for the bottom of the footer box. Because the default top and bottom margin settings are 1 inch each, that leaves approximately 0.5 inches of space each for the header and the footer, allowing for a small amount of whitespace buffer between the header/footer and the document.
![]() Note
Note
Some of the building block headers and footers do not use the header and footer boxes; they create their own text boxes. Therefore, these settings do not affect them.
To adjust the header or footer position, use the Position controls on the Header & Footer Tools Design tab. The Header from Top measurement sets the position of the top of the header, and the Footer from Bottom measurement sets the position of the bottom of the footer (see Figure 7.19).
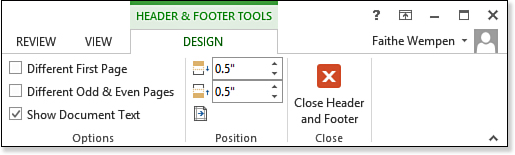
Figure 7.19. Adjust the header or footer position.
The header and footer positioning can affect the document margins, but only indirectly. The header and footer must be of adequate size to hold whatever text you have placed in their boxes, and if you increase their positions to the point where that content starts to encroach on the main document, the main document margins shift inward so there is no overlap. However, as long as the header and footer positions are such that they don’t interfere with the main document, they move independently of it.
The header and footer boxes are flexible in size; they hold whatever you place in them. Therefore, to increase the size of a header or footer area, add more content to it. (Blank paragraphs are fine.) For example, if you think the header is crowding the main document too much, press Enter at the bottom of the Header box to create more space.
Inserting a Picture in a Header or Footer
A small picture such as a company logo or a decorative line in a header or footer can sometimes add to a page’s attractiveness. Don’t go overboard and place huge pictures there, though, because they will crowd out the document text.
To insert a picture from the Header & Footer Tools Design tab, click either the Pictures or the Online Pictures button and then insert the artwork as you normally would.
![]() For more information about inserting pictures from files, see “Inserting a Picture from a File,” p. 383.
For more information about inserting pictures from files, see “Inserting a Picture from a File,” p. 383.
A picture placed in a header or footer is set up as an inline image by default; in other words, it is treated as a character of text (albeit a large character perhaps). That’s fine if you want the picture to be part of a well-defined header or footer area, but you can also break the picture out of the box and position it anywhere on the page.
To make a picture “floatable,” drag it outside the header or footer box. Then on the Format tab, open the Wrap Text button’s menu and select a text wrap type. For example, use Tight to allow the text of the main document to wrap around the picture, or use Behind Text to make the main document’s text run over the top of the picture.
After you’ve set the text wrapping for the graphic to anything other than In Line with Text, you can then drag the picture anywhere on the page, including outside the header and footer areas.
![]() To learn more about repeating items such as pictures on every page of a document, see “Repeating Elements on Every Page,” p. 272.
To learn more about repeating items such as pictures on every page of a document, see “Repeating Elements on Every Page,” p. 272.
Working with Multiple Headers/Footers
By default, a document has only one header and one footer, but there are many ways to get around that.
It is common to want a different header and footer on the first page of the document than on subsequent pages. Header and footer text on a cover page of a report often looks out of place, for example. To arrange this, mark the Different First Page check box on the Design tab. This creates two sets of headers/footers: a First Page set and a regular set.
Similarly, when creating a document destined for multisided printing, you might want different headers and footers on the left (even) and right (odd) pages. To do this, mark the Different Odd & Even Pages check box on the Design tab. This creates two sets of headers/footers, too: an Odd set and an Even set. (If you combine this option with the First Page one, you end up with three sets: First Page, Odd, and Even.)
To move between the boxes for the various header/footer sets in a document, use the Show Next and Show Previous buttons on the Design tab (see Figure 7.20).

Figure 7.20. Move between the various sets of headers and footers in the document.
But, that’s not all. Remember that each section can have its own set of headers and footers. So potentially, you could have different First Page, Odd, and Even footers for every section in your document. If you have three sections, that’s a total of nine separate headers and footers you could have.
Does all that make your head spin? It does mine. With all those different headers and footers, there’s big potential for confusion and inconsistency, but Word helps out by making the headers and footers between sections “Same as Previous.” In other words, by default each section’s headers and footers are linked to those of the section that precedes it. When that feature is turned on, “Same as Previous” appears at the right side of the header and footer boxes when you’re viewing the headers/footers in sections other than the first one.
To turn off this linking, click the Link to Previous button on the Header & Footer Tools Design tab so that you can configure the selected section’s header/footer separately.
Repeating Elements on Every Page
To repeat elements on every page, attach them to the header or footer. Because the header and footer place their content on every page in which they are in effect, you can control which pages an item repeats on by controlling which header/footer set is associated with that page. For example, to make a picture repeat on the first four pages of a document, display the Section 1 header and place the picture on the page (floating, so it can be moved outside the header area), and then on the fifth page, start a new section and do not link its header/footer to the previous ones.
You saw earlier in the chapter how to place a picture in a header and then how to free it up so that it can float outside the header box. You can use a similar technique to insert any type of content. You can insert pictures, clip art, WordArt, text boxes, and more.
Here’s how to associate content with a header or footer but place it outside the header/footer boxes:
1. On the Insert tab, click Footer, Edit Footer (or Header, Edit Header). Word switches to the header/footer editing mode without placing header/footer content.
2. The Design tab is currently displayed; click Insert to display the Insert tab instead.
3. Use the Insert tab to insert content on the page. The details of each type of insertable content are covered in later chapters, but for example, suppose you want to insert a text box:
a. Click Text Box.
b. Click Draw Text Box.
c. Drag the mouse to draw a text box anywhere on the page. It will be associated with the footer (or header), but it does not have to rest anywhere near it.
d. Click in the text box and type some text.
e. Format the text box as needed.
4. Insert other types of content on the page as desired.
5. Double-click the main document area to exit from header/footer editing mode.
![]() Tip
Tip
Why insert a text box when you have a perfectly good place to type text in the Header or Footer box itself? It’s primarily an issue of positioning. The Header and Footer boxes are not manually movable and resizable; a floating text box is. You might have noticed that many of the header and footer building blocks use text boxes, rather than text entered directly into the Header and Footer boxes, for this very reason.
![]() To insert text boxes, see “Creating Text Box Layouts,” p. 303.
To insert text boxes, see “Creating Text Box Layouts,” p. 303.
![]() To insert clip art, see “Working with Clip Art,” p. 458.
To insert clip art, see “Working with Clip Art,” p. 458.
![]() To insert photos or other graphics stored in files on your hard disk, see “Inserting a Picture from a File,” p. 383.
To insert photos or other graphics stored in files on your hard disk, see “Inserting a Picture from a File,” p. 383.
![]() To create WordArt, see “Creating and Modifying WordArt,” p. 453.
To create WordArt, see “Creating and Modifying WordArt,” p. 453.
![]() To draw your own lines or shapes, see “Drawing a Shape,” p. 421.
To draw your own lines or shapes, see “Drawing a Shape,” p. 421.
Applying a Page Watermark
A watermark is text that appears behind the main text of a document, like a faint image. Sometimes, a watermark is stamped into the paper in fine stationery, but more often a watermark is actually printed on the page. For example, a watermark could denote each page of a document as DRAFT or CONFIDENTIAL (see Figure 7.21).
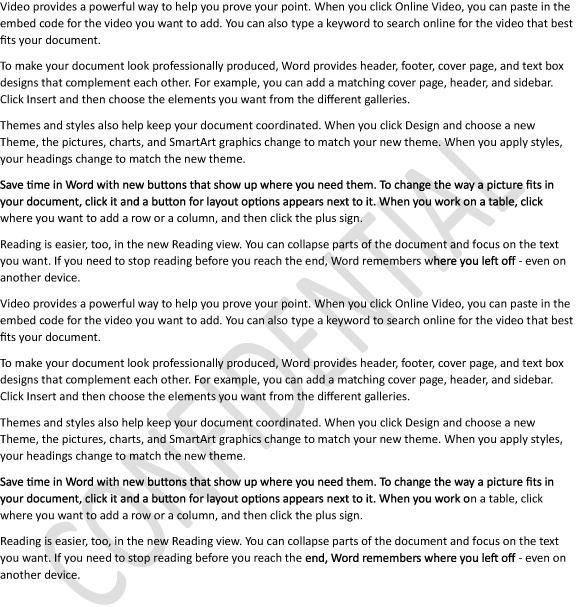
Figure 7.21. A watermark example.
You can create your own watermarks using the technique you learned in the preceding section for associating objects with the header/footer. You can create some WordArt containing the desired text, for example, and color it pale gray so it looks washed out. However, Word offers a Watermark feature that does all that work for you automatically.
Inserting a Built-In Watermark
To use the built-in Watermark feature, open the Watermark menu (from the Design tab) and click one of the samples. To remove a watermark, reopen the Watermark menu and click Remove Watermark.
![]() Caution
Caution
Watermarks are applied only to the current section because they are placed in the header/footer, and each section has its own. If a section is set up to continue the same settings as in the previous section, any watermark from the previous section carries over. This doesn’t apply in reverse, though, so if you are in section 3 when you insert the watermark, sections 1 and 2 will not have it.
If none of the samples is exactly what you want, try one of the custom watermarks, described in the next few sections. (Custom text and custom picture watermarks are covered separately because their procedures are quite different.)
Inserting a Custom Text Watermark
A custom text watermark can contain any text you like. You can format it using any font, size, and color and orient it either diagonally or horizontally. Follow these steps to create a custom text watermark:
1. Make sure the insertion point is in the section where you want to insert the watermark if the document has multiple sections.
2. From the Design tab, click Watermark and then click Custom Watermark. The Printed Watermark dialog box opens.
3. Click Text Watermark. The controls for creating a text watermark become available (see Figure 7.22).
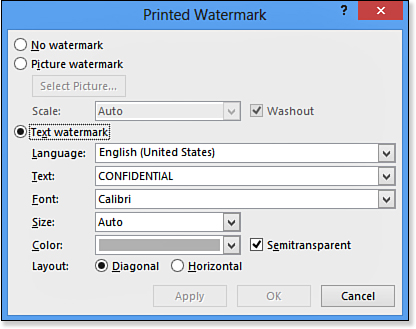
Figure 7.22. Create a custom text watermark.
4. In the Text box, either select a phrase from the drop-down list or type your own custom text.
5. Select Font, Size, and Color settings from these drop-down lists.
6. If you want the watermark to appear faint (recommended) rather than full-strength, make sure the Semitransparent check box is marked.
7. Select Diagonal or Horizontal for the layout.
8. Click OK to place the watermark into the document.
Creating a Picture Watermark
A picture watermark places a picture of your choice behind the main document, in a washed-out form (unless you specify otherwise) so that it does not impede text readability. Follow these steps to create a picture watermark:
1. Make sure that the insertion point is in the section where you want to insert the watermark if the document has multiple sections.
2. From the Design tab, click Watermark and then click Custom Watermark. The Printed Watermark dialog box opens.
3. Click Picture Watermark. The controls for creating a picture watermark become available.
4. Click Select Picture. The Insert Pictures dialog box opens.
This dialog box differs slightly from the version that appears when you click Online Pictures because it contains a From a File option as well as options for inserting from Office.com clip art, Bing, and your SkyDrive (see Figure 7.23).
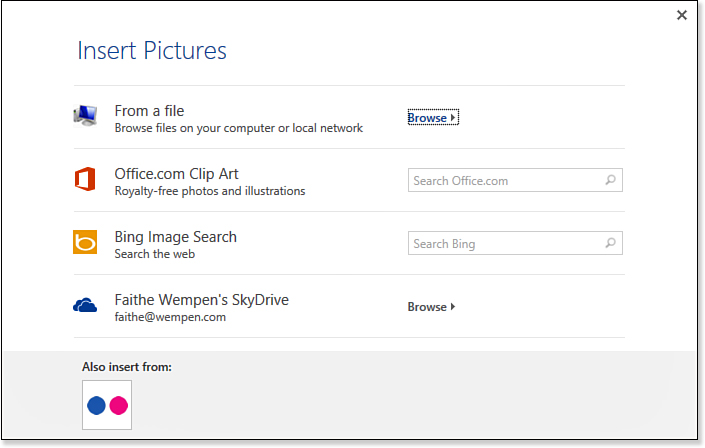
Figure 7.23. Select a source for the image you want to use.
5. Use the dialog box controls to locate and select the desired picture. For example, to use a picture from your hard disk, click the Browse hyperlink next to From a File, or to find and insert some clip art, type a keyword next to Office.com Clip Art and press Enter.
When you have selected a picture, the Printed Watermark dialog box redisplays with the file’s path and name filled in next to the Select Picture button (see Figure 7.24).

Figure 7.24. Set options for the picture watermark.
6. In the Scale list, select a percentage of the original size or click Auto to allow Word to choose the size (recommended).
7. To allow the picture to appear as a washout (recommended), leave the Washout check box marked.
8. Click OK to place the watermark into the document.
Working with Multiple Columns
There are two types of multicolumn layouts: tabular columns and newspaper-style columns. It’s important to choose the right type for the job at hand.
A multicolumn tabular layout is the same thing as a table. Use a tabular layout whenever there are varying amounts of data in each column and you need the data to align horizontally across multiple columns. Tables have their own chapter in this book (Chapter 9, “Creating and Formatting Tables”). Figure 7.25 shows information that is best presented in a tabular layout.
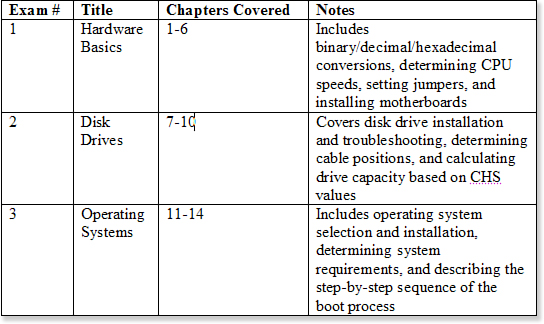
Figure 7.25. A tabular layout keeps items in the various columns aligned with one another.
A newspaper-style column layout is appropriate when you want the text to “snake” from one column to the next, like in a newsletter or magazine. The text in one column does not need to have a relationship to the text in adjacent columns in such a layout. Figure 7.26 shows an example.
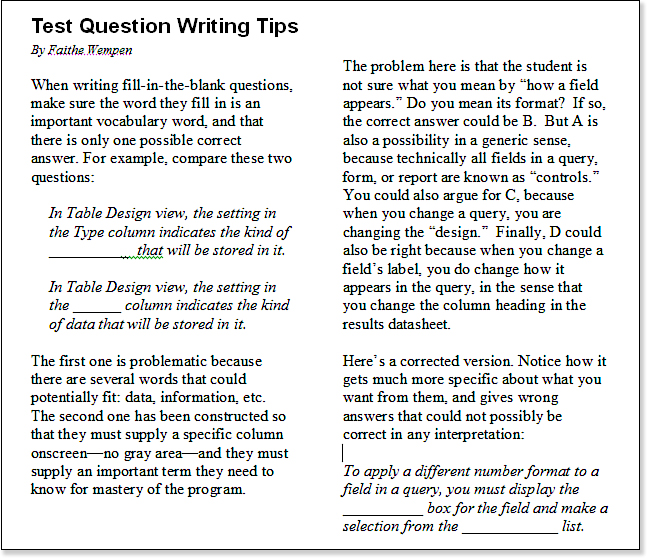
Figure 7.26. A newspaper-column layout runs text from one column to the next without worrying about relationships between columns.
In this section, you find out how to create newspaper-style columns. Tabular column layouts are covered in Chapter 9.
Applying a Column Preset
Columns are set for entire sections (or documents); to set the number of columns, click anywhere within the document or section to affect. Then, open the Columns menu from the Page Layout tab and select a column preset (see Figure 7.27). The presets include One, Two, and Three (all equal column widths), as well as Left and Right (two columns, but a narrower one on the left or right, respectively).
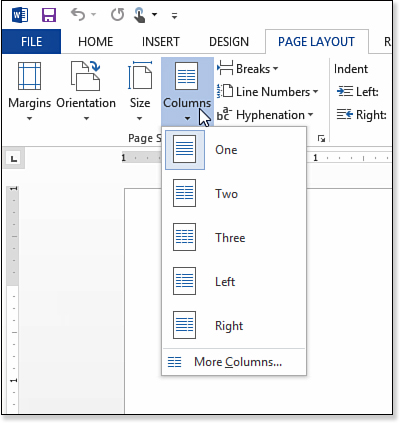
Figure 7.27. Use one of the column presets to select a number of columns for the current section.
To go back to a single-column layout, choose the One preset.
Creating Manual Column Breaks
In a multicolumn layout, the text starts automatically in the next column when it fills up the preceding one. To end a column early, insert a manual column break.
![]() Tip
Tip
If you are trying to balance the text between columns, a manual column break is not the best way to go because it won’t shift automatically if you add or delete text later that unbalances the layout. Instead, insert a continuous section break at the end of the document; this forces the columns on the last page to balance.
To insert a manual column break, on the Page Layout tab, click Breaks. Then, choose Column from the menu that appears.
Applying Custom Column Settings
For more control over column widths, open the Columns menu (from the Page Layout tab) and choose More Columns to open the Columns dialog box.
In the Columns dialog box, all the same presets are available as on the menu, but you can customize the settings (see Figure 7.28).
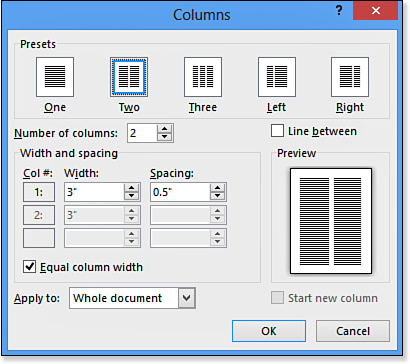
Figure 7.28. Customize column settings in the Columns dialog box.
Here’s what you can do with the custom column settings:
• Number of Columns—Enter a number or use the increment buttons. There’s no fixed limit, but the higher you get, the thinner the columns get until they become not-so-useful.
• Line Between—This places a vertical divider between each column, like in a newspaper. It helps readability.
• Width and Spacing—Specify an exact width for each column as well as an amount of spacing between columns. The Spacing setting refers to the spacing to the right of the column. Set these up individually for each column, or equalize everything by marking Equal Column Width.
• Apply To—By default, column settings apply only to the current section. You can change this to This Point Forward or Whole Document.
Using Different Column Settings for Selected Text
Word has a strict one-column-setting-per-section policy, so you can’t have two different column layouts within a single section. That’s okay, though, because you can use Continuous section breaks to create sections wherever you need them. A section can be as small as a single paragraph.
You can set off a small amount of text in its own section with custom column settings in two ways. One is to manually insert the section breaks above and below the text to be included; then click anywhere within the newly defined section and change the number of columns. An easier way is to select the text and then change the number of columns. Word automatically creates the needed section breaks and changes the column setting within the new section.
Applying a Page Background
A page background appears behind everything on the page (including behind the watermark, if present). It can be a solid color or a fill effect.
Fill effects are covered fully in Chapter 11, “Working with Drawings, WordArt, and Clip Art,” but briefly here are the types to choose from:
• Gradient—Gradual transition from one color to another
• Texture—Repeating tiled graphic that resembles a surface such as wood, marble, or fabric
• Pattern—Repeating two-color repetition of dots, lines, and so on
• Picture—Repeating tiled graphic using any graphics image file you specify
To select a page background, follow these steps:
1. From the Design tab, click Page Color. The Color menu appears (see Figure 7.29).
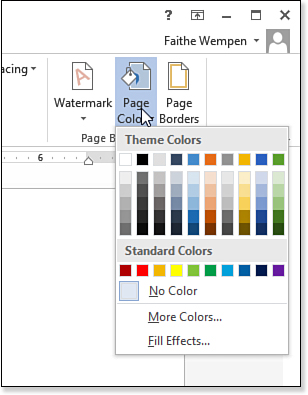
Figure 7.29. Select a page background color or choose Fill Effects to use an effect.
• Click one of the theme colors.
• Click a tint or shade beneath one of the theme colors.
• Click one of the standard colors.
• Click Fill Effects and then select from the Fill Effects dialog box.
![]() Note
Note
The page background appears onscreen only in certain views: Print Layout, Full-Screen Reading, and Web Layout. It’s hidden in Outline and Draft views.
![]() For a full description of how to use each of the fill effects, see “Applying a Picture Fill,” p. 443.
For a full description of how to use each of the fill effects, see “Applying a Picture Fill,” p. 443.
![]() To review the difference between theme colors, tints and shades, and standard colors, see “Changing Font Color,” p. 150.
To review the difference between theme colors, tints and shades, and standard colors, see “Changing Font Color,” p. 150.
![]() To change to a different color set for the theme colors, see “Applying a Color Set,” p. 245.
To change to a different color set for the theme colors, see “Applying a Color Set,” p. 245.
 The Page Background Doesn’t Print at All
1. Choose File, Options, and click Display.
2. Mark the Print Background Colors and Images check box.
3. Click OK.
4. Continue printing normally.
Using Page Borders
Page borders are much like paragraph borders; the main difference is that they apply to entire pages rather than individual paragraphs. A page border can apply to individual sections or to the entire document, as you specify.
To apply a basic page border, follow these steps:
1. On the Design tab, click Page Borders. The Borders and Shading dialog box opens with the Page Border tab displayed (see Figure 7.30).
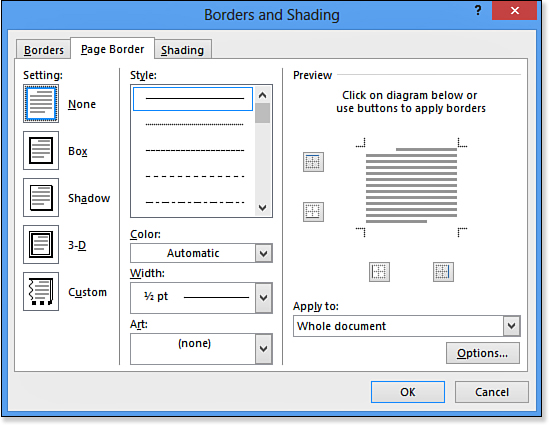
Figure 7.30. Create a page border.
2. Set up a border style, color, and width, as you did with paragraph borders in Chapter 5, “Formatting Paragraphs and Lists.”
![]() To review paragraph border options, see “Applying Paragraph Borders,” p. 203.
To review paragraph border options, see “Applying Paragraph Borders,” p. 203.
3. If you do not want the page border to apply to the entire document, open the Apply To box and select some other range.
The choices here differ only somewhat from other section-wide formatting: This Section, This Section - First Page Only, and This Section - All Except First Page.
4. Click OK.
The one difference between a page border and a paragraph border is that you can specify art for a page border. For example, Figure 7.31 shows part of a page with the Apple border art.

Figure 7.31. An example of page border art.
To use border art, follow these steps:
1. On the Design tab, click Page Borders. The Borders and Shading dialog box opens.
2. Open the Art list and select an art clip.
3. In the Width box, select a width. This determines the height of the artwork in points. (1 point is 1/72 of an inch.)
4. On the Apply To list, select the scope to which the border should be applied (the whole document or just one section).
5. Click OK.