
22. Developing Online-Delivered Content
Word 2013 is a viable choice for the nonprofessional web designer who might be already familiar with Word but reluctant to learn a new application. Using Word, even people with no HTML programming language experience can create basic web pages with ease. However, Word lacks the high-end web design features of an application such as Microsoft Expression Web or Macromedia Dreamweaver, so someone who does web design for a living would likely not choose Word for that work.
In this chapter, you discover Word’s web development capabilities, and find out how to save in different web formats, insert hyperlinks, and even create a tabular page layout. You also see how to use Word’s blogging features and how to send email messages from Word.
Web Page Development: Word’s Strengths and Weaknesses
Word 2013 is a viable choice for the nonprofessional web designer who may be already familiar with Word but reluctant to learn a new application. Using Word, even people with no HTML programming language experience can create basic web pages with ease. However, Word lacks the high-end web design features of an application such as Microsoft Expression Web or Macromedia Dreamweaver, so someone who does web design for a living would likely not choose Word for that work.
Word makes web design easy by shielding the user from the raw coding, instead allowing the user to work in a familiar WYSIWYG (what you see is what you get) environment in which formatting can be applied with toolbar buttons and menu commands. Then, when the document is saved, Word converts all that formatting to Hypertext Markup Language (HTML) coding that web browser applications can understand.
Web Technologies Supported in Word
Word 2013 is similar to earlier Word versions in its web design features. It supports all the basic HTML codes that you would expect for formatting, plus several other technologies, scripting languages, and supplemental HTML code.
Word supports all these types of web content:
• HTML—Hypertext Markup Language is the language of the World Wide Web. Almost every web page is built with this language. HTML, a simple formatting and organizational language, is ideal for the display of text, simple graphics, and hyperlinks. It doesn’t do anything fancy like search a database or display pop-up dialog boxes. The appeal of HTML lies in its ease of use and universal acceptance.
• CSS—Cascading style sheets are used to define the layout of a document precisely. Style sheets are more powerful than the styles found in Word because they can also specify page layout. A style sheet can be a separate document, or it can be embedded in each HTML page. Because browsers have different capabilities in the way they interpret these styles, they interpret what they can and ignore the rest; that is, they cascade down in their interpretation and display what they are able to.
• XML—eXtensible Markup Language is more robust and extensible (hence its name) than HTML. You can define new tags and their uses at any time and in any way by referencing them in an associated text document. The strength of XML is its capability to use these new tags to identify specific information. This technology vastly improves the users’ abilities to find specific-subject web pages and opens up the Internet to even more data mining.
• VML—Vector Markup Language uses text to define geometric shapes, colors, line widths, and so forth. These words are then interpreted and displayed as graphical images in browsers that understand VML (Microsoft Internet Explorer 5 and later). No matter what size circle you want to display, you use the same amount of text to define it. VML reduces the bandwidth required to send a graphical image from a web server to a browser. This improves the browser page load time, improves image quality, and reduces Internet or intranet network congestion.
• JavaScript and VBScript—Both of these script-style programming languages are in common everyday use on the Web right now. These languages handle simple programming tasks without having to load a separate application. The majority of browsers support JavaScript; only Microsoft Internet Explorer browsers support VBScript. These languages enable you to program interactivity into web pages.
You don’t need to know how to use each or any of these technologies to build or edit web pages in Word 2013. However, if you are an experienced web page designer, it’s nice to have these tools supported in Word so that you don’t need to turn to some other editing program simply because you want to use one of them.
Web Page File Formats
When Word saves in Web Page format, it creates a file that contains all the HTML coding needed for display in a web browser, plus all the Word coding needed for full-featured editing and display in Word. Therefore, you can switch freely between Word and a web browser, and the file will look the same in both places. Microsoft calls this interchangeability of file formats round-tripping.
![]() Note
Note
Round-tripping applies only to web pages created in Word. If any other web page is edited in Word, it may or may not look like it originally did after it has been saved in Word.
This beefed-up web page format that Word uses can display most Word features on a web page. These supplementary technologies increase the capability of HTML so that web pages can display Word-specific formatting and features that pure HTML does not support.
However, round-tripping comes at a cost: The file sizes of the HTML files that Word generates are larger than those for regular HTML because they contain all that extra code for Word support. Therefore, Word 2013 also offers an alternative mode called Web Page, Filtered that saves in pure HTML without round-trip support for Word. A filtered HTML file is nearly identical to one you would create in a pure HTML editing application such as Dreamweaver.
Word also offers support for MHTML (MIME HTML), a file format that creates a single file out of a web page that might ordinarily require support files. For example, suppose that you have a Word document that contains a graphic. If you save it in either regular Web Page format or filtered format, Word creates an HTML file (.htm) and a support folder containing a separate picture file. This can be awkward to distribute to others via email. With the Single File Web Page (.mht) format, the web page file contains both the text and the graphics with no need for support folders or files. The only drawback is that some older browsers are not able to display MHTML files.
![]() Note
Note
MIME is an encoding scheme for sending graphics and formatted text via email. It’s been around for a long time, and most email programs support it.
Word Features Lost When Saving in Web Format
Some weaknesses in Word’s capability to translate all its features to web pages still exist, even with the latest improvements. Here are a few Word features that do not transfer when you save in any of the Web Page formats:
• Passwords
• Headers and footers
• Newspaper-style column flow (although the text is unaffected)
The reason for the lack of support for passwords is that typically on a website, the web server controls passwords, rather than individual documents (or pages) doing so.
The lack of support for columns and headers/footers occurs because web browsers simply have no functionality (that is, there is no HTML equivalent) to display these formatted items. When the web page is reloaded into Word, however, columns and headers and footers are restored. Because these “translation” problems are due to shortcomings in HTML or some other web technology, Microsoft cannot create a version of Word that is 100 percent compatible with web pages.
![]() Tip
Tip
If you plan to edit your web pages in an HTML editor application, save them as filtered web pages. Many HTML applications have trouble dealing with Word’s extra formatting codes that it places in a standard web page document.
Why You Might Not Want to Use Word
When you have a choice between an application designed for a certain purpose and one designed for a more generic one, you will usually find that the specific program does its task better and with less effort. That’s true with most of the higher-end full-featured web design applications.
If you are designing a commercial website that will have a lot of pages and some complex linking requirements, you will find the job much easier in an application such as Expression Web, Dreamweaver, or Microsoft Visual Studio. These programs have all kinds of great shortcuts and wizards for creating, formatting, and debugging HTML code and active web content. Although Word can serve as a vessel for many kinds of web objects, such as JavaScript and VBScript, it doesn’t help you generate those items in an automated manner.
Creating and Saving a Web Page in Word
In Word 2013, creating a web page is much the same as creating a Word document. You do not need to open a special environment or think differently about the contents of your page.
To begin building from a blank web page, start a new document and then switch to Web Layout view (from the View tab or the view buttons in the bottom-right corner of the screen).
Then what do you do? Just start creating your document. This is the beauty of Word: A web page is mostly the same thing as a regular document in terms of basic typing, formatting, and layout. You can read more about some specifics that are exceptions later in the chapter.
Previewing a Web Page
As you are building your web page, you can work in Web Layout view as your main editing mode and see the page very nearly as it will appear when displayed on a web page.
If that’s not enough and you need absolute realism, you can use Web Page Preview to examine the page (read-only) in an actual web browser.
![]() Note
Note
Remember that just because your web page looks good in one browser doesn’t mean that it will look good in all browsers. Unless you know that everyone will be accessing your web page with the same browser and version, it is a good idea to test your web pages with the latest versions of Internet Explorer and Firefox, as well as earlier versions if possible. It may also be helpful to try displaying the page in a variety of Mac-platform browsers. Note that if some things do not show up in one browser, you may need to remove those elements or build browser-specific pages.
Web Page Preview is not available as a command on any of the default tabs in Word 2013, but you can add it to the Quick Access toolbar as follows:
1. Choose File, Options. The Word Options dialog box opens.
2. Click Quick Access Toolbar.
3. Open the Choose Commands From list and select Commands Not in the Ribbon.
4. Click Web Page Preview and click Add to place it on the Quick Access toolbar.
5. Click OK.
When the button is on your Quick Access toolbar, you can click it anytime to open the current Word document in your default browser. You do not have to save it as a web page before doing this.
Saving a Web Page
To save a web page, save normally, but set the file type to one of the web formats:
• Use Single File Web Page (.mht) when you are planning to send the web page via email or distribute it as a document that you want people to be able to easily download and work with. Do not use this format if you think your users may be using old web browser software.
• Use the standard Web Page format (.htm) when you are planning to round-trip the page between Word and a web browser, and if you don’t mind that a separate folder for graphics and support files is required for page viewing. Don’t use this format if you are planning to email the page to others or if compatibility with other HTML editing software is important.
• Use the Web Page, Filtered format (.htm) when you need the resulting file to be plain HTML with no special Word tags in it. For example, use it when you are going to integrate the page into a larger website created with Dreamweaver or Expression Web (although Expression Web does do a decent job of accepting Word web content, because it’s also by Microsoft). Don’t use this format if you plan to edit the page in Word in the future.
You can choose any of the formats from the Save as Type drop-down list in the Save As dialog box (File, Save As).
To save a Word document as a web page, follow these steps:
1. Choose File, Save As, and then navigate to the location where you want to save. You can save directly to a web server, or you can save to a local hard disk and then upload to a web server later.
2. Open the Save as Type drop-down list in the Save As dialog box and select the desired format.
3. Click the Change Title button. (This button becomes available after you have selected a web format.)
4. In the Enter Text dialog box (shown in Figure 22.1), type the desired title for the page and click OK.
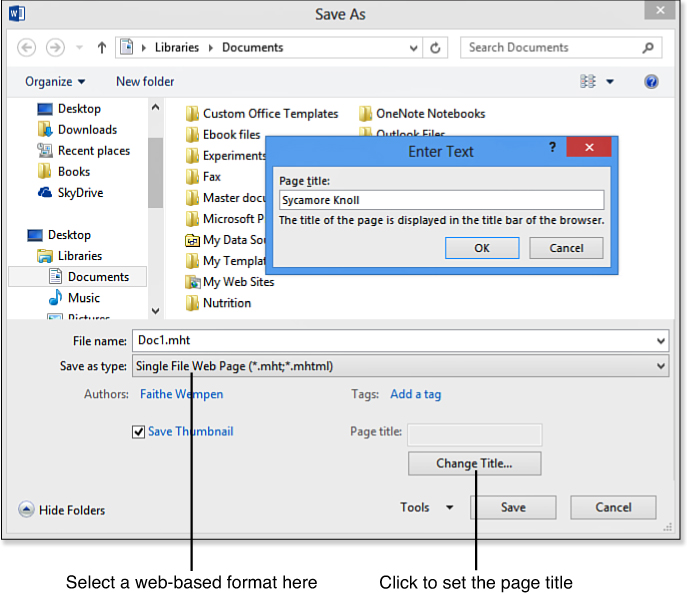
Figure 22.1. Save a file as a web page by selecting a web-based file format.
5. Click Save.
This procedure doesn’t provide much in the way of flexibility, but there are many ways of setting specific options when you save. The following sections address these options.
Options for Web Page Saving
Web options enable you to change the way Word saves web pages. These are more subtle options, not the big ones like filtered/unfiltered or single page/multipage. Most people won’t find it necessary to change them, but you should know about them in case a situation ever arises in which they are useful.
You can open the Web Options dialog box in two ways:
• From the Save As dialog box, click Tools and select Web Options.
• Choose File, Options, click Advanced, scroll down to the General section, and click Web Options.
The following sections look at each of the tabs in this dialog box individually.
Saving for Compatibility with Specific Browsers
On the Browsers tab for Web Options, you can set your target browser (see Figure 22.2). The target browser is based on version number and runs from Internet Explorer 3 and Netscape Navigator 3 up through Internet Explorer 6 and later. Select your default target browser based on the audience viewing your web pages. To reach the widest audience on the Internet, use the lowest version numbers. You might choose Internet Explorer 6 as your target browser on a company intranet where everyone has standardized on Internet Explorer 6 or later and you need these capabilities to support the content in your web pages.
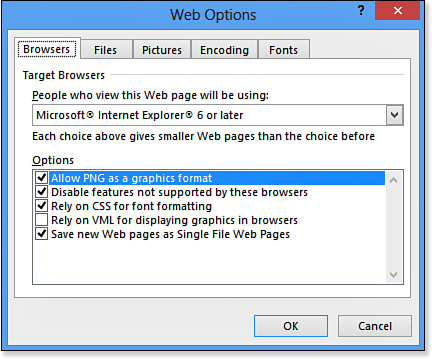
Figure 22.2. Set browser-specific Save options here, balancing compatibility with feature richness.
Each target browser setting enables or disables a set of supported features, including these:
• Allow PNG as a Graphics Format—This newer format is not yet widely supported on the Internet but has advantages over GIF and JPEG files. See the following section for details.
• Disable Features Not Supported by These Browsers—For instance, no VML would be used in web pages designed for Internet Explorer 4 because version 4 browsers do not understand VML. If you clear this box, every web page feature built in to Word is used without regard for whether a browser version can support it.
• Rely on CSS for Font Formatting—Only Internet Explorer version 3 and earlier cannot understand CSS. I recommend leaving this option on for the greatest flexibility in changing web page formatting.
• Rely on VML for Displaying Graphics in Browsers—VML reduces overall web page size, but Internet Explorer versions earlier than 5 do not understand it. See the following section for more on VML.
• Save New Web Pages as Single File Web Pages—This format has the advantage of storing all the files in a single file. You can, of course, override this option each time you save your web page.
More About PNG and VML
The most common graphics file formats used in web pages are GIF (Graphics Interchange Format) and JPG (Joint Photographic Experts Group, also JPEG). Word automatically exports all images to these two formats when you save as a filtered web page.
Word also supports the display of two additional graphics file formats in web pages: VML (Vector Markup Language) and PNG (Portable Network Graphics).
VML Graphics
Vector images are defined by equations. As such, they scale perfectly to any size. This is in contrast to bitmap images, in which each pixel has a defined position and color value. Bitmap images scale poorly because the graphics program must interpolate pixels as the image dimensions are changed. Items created in Word using the Drawing tools are drawn as vector objects. When you save as a web page or a single file web page (.mht) in Word, the VML language defines the graphical object. The primary advantage of using VML is economy of size, especially if you’re using large images. But a significant disadvantage is that only Internet Explorer version 5.0 or later can display vector objects.
PNG Graphics
PNG is basically an improved version of GIF. The idea behind this format is to solve the primary weaknesses of .gif and .jpg files: GIF can support only 256 colors, and JPG gains its small file size using a lossy compression scheme. (That is, as you make your file smaller, you lose photo clarity and resolution because image data is discarded.) Also, GIF supports transparency and animation, but JPG does not.
PNG supports 32-bit color, supports transparency, and uses a file compression scheme that does not reduce the file size at the expense of image clarity. The main reason that this format is not widely used now is that older browsers cannot read the PNG format.
Selecting Web Page File Options
From the Files tab of the Web Options dialog box, shown in Figure 22.3, you can change some filename options and make choices about Word being your default web page editor.
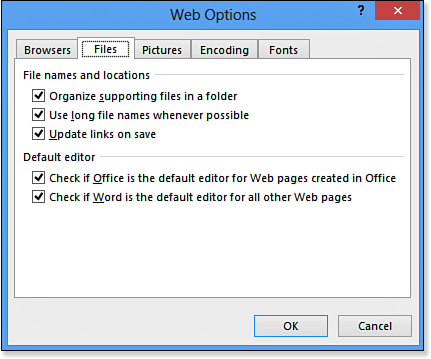
Figure 22.3. Setting filenames, locations, and default editor options using Web Options in Word 2013.
The first check box asks whether you want to organize supporting files in a folder. When Word saves a web page, it sends many (although not all) supporting files—such as graphics—to a separate folder. If you deselect this check box, Word places the supporting files in the same folder as the HTML file.
The Use Long File Names Whenever Possible check box is marked by default. The only operating system that does not support long filenames is DOS (with or without Windows 3.x). Unless you have many people using this operating system (which is unlikely), leave this check box checked.
The final check box in the section, Update Links on Save, updates links to supporting graphics and components in your web page. It does not update or check hyperlinks.
The Default Editor portion of the Files tab in the Web Options dialog box enables you to decide if you want Office to be the default editor for web pages created in Office (checked by default) and Word to be the default editor for all other web pages.
Changing Page Size
The Pictures tab defines the target monitor you want for your web page.
The target monitor refers to the screen resolution you want to optimize your web pages for. This determines the “size” (width) of the page. Screen resolution is expressed in pixels, usually as width × height. A middle-of-the-road screen resolution suitable for most pages is 1024 × 768, and that’s the default setting.
The larger the number, the more pixels (and thus more information) are displayed on the screen. If you choose a target monitor size of 800 × 600 for building your web pages in Word and view the resultant page at 1280 × 1024, much of the screen will be empty space, with most of the information crowded to the left side of the screen. However, if you design your pages at 1280 × 1024 and view the resultant page at 800 × 600, you will have to keep scrolling to the right to see all the information.
You can also change the pixels per inch of your target monitor. Again, the default of 96 is suitable for most uses. Using higher values greatly increases the size of your graphics and increases your web page load time. Using a value of 120 slightly increases the detail in your web page. A value of 72 gives you smaller web graphics, but your web page will have a slightly coarser appearance.
Changing Language Encoding
The Encoding tab in the Web Options dialog box enables you to choose the language code page from those installed on your machine. Choose the appropriate code page for the language you are using to build your web page.
Changing the Default Fonts
You can set the default proportional and fixed-width fonts for your web page from the Fonts tab, as shown in Figure 22.4. First select a character set (a language), and then select the fonts from the drop-down lists.
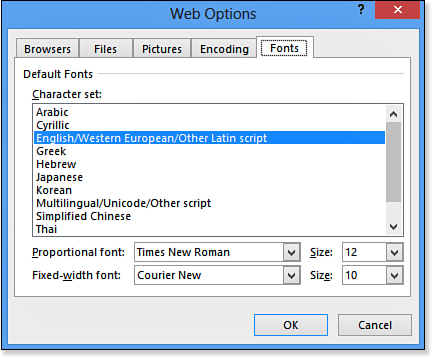
Figure 22.4. Changing the default font for your web page.
![]() Caution
Caution
Use common fonts for your defaults. If you use fonts in your web pages that aren’t installed on your viewers’ PCs, their browsers can’t render your fonts and will substitute their own default fonts.
Working with Web Page Properties
When you build a web page with HTML coding, you place all the text for the web page in a section called <BODY>. There’s also a <HEAD> section at the top of the file that contains some other information about the page, such as keywords that a search engine can use to index the page, and a page title.
The page title is important because it’s what appears in the title bar of the web browser when the page is displayed. When you save a web page in Word, you have the option of changing the default page title by clicking the Change Title button, as you saw in Figure 22.1. But, you can also change the page’s title at any time, not just during the save operation, as well as specify other header information.
To work with the page’s header information, follow these steps:
1. Choose File, Info, Properties, Advanced Properties. (Properties is a drop-down list on the right side of the Info tab.) The Properties dialog box opens for the active file.
2. On the Summary tab, in the Title box, enter a title for the page (see Figure 22.5).
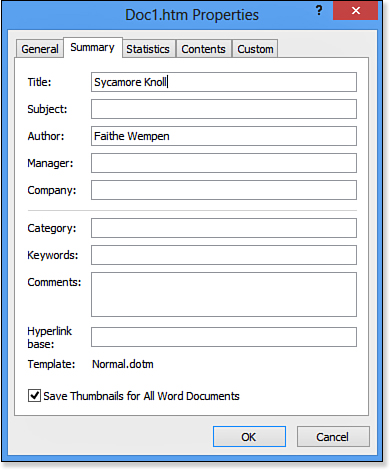
Figure 22.5. The Properties dialog box controls the title and keywords reported to the web browsers that will display the web page.
3. (Optional) Enter keywords that describe the document in the Keywords box.
4. Click OK to close the Properties dialog box.
Creating Hyperlinks
A hyperlink is the combination of some descriptive text or an image and the location (also called the address) of a web page or an object. Any text or image on a web page can hold a hyperlink. Hyperlinks most commonly point to the following:
• Web pages
• Media objects such as sounds, video, or pictures
• Email addresses
The easiest way to create a hyperlink is simply to type it and let Word make it into a live hyperlink automatically. Whenever you type a string of characters that appears to be a web or email address, Word automatically converts it for you. If it doesn’t for some reason, or if you want to specify some options (such as ScreenTips), see the following sections.
Creating a Text Hyperlink
Any text phrase, word, or part of a word can be included in a hyperlink. To build a hyperlink, you need some text in a document and the exact location where you want the hyperlink to lead when someone clicks it:
1. From a document in Word, highlight a text phrase. For instance, highlight Microsoft in the phrase For more information, visit the Microsoft home page.
2. On the Insert tab, click Hyperlink. The Insert Hyperlink dialog box opens, as shown in Figure 22.6.
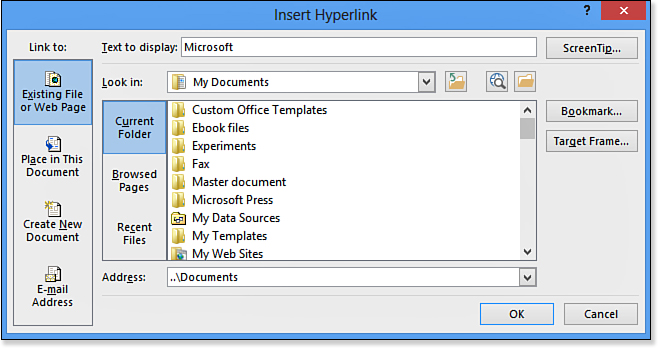
Figure 22.6. Filling in the Insert Hyperlink dialog box.
You can also reach the Insert Hyperlink dialog box by using the keyboard shortcut Ctrl+K or by right-clicking on the selected text and choosing Hyperlink from the shortcut menu.
![]() Note
Note
If the Word window is not wide enough to display all the commands on the Insert tab, the Links group may be collapsed, and you may need to click Links to access the Hyperlink button.
3. In the top box, labeled Text to Display, the text you highlighted is displayed. Change it if desired.
4. In the Address text box, enter the web URL for the site to which you want the text to link.
5. (Optional) To add a ScreenTip to the hyperlink, click the ScreenTip button, type the text, and click OK. A ScreenTip is text that appears in a box when the user points at the hyperlink in a web browser. If you do not specify a ScreenTip, the URL is used as the ScreenTip.
6. Click OK. When you return to your document, the text you highlighted appears blue and underlined, indicating that it is now an active hyperlink.
URL stands for uniform resource locator. It’s the complete address to the web page or other location being referenced. Web page URLs usually begin with http:// and a great many of them (but not all) are then followed by www. Usually, a company places its web pages on a server with the www designation, but some companies with large web presences may have separate servers for support, sales, and so on. For example, to get support from Microsoft, the URL is http://support.microsoft.com.
Adding a Hyperlink to an Image
A graphic can function as a hyperlink, such that when the user clicks on the image, a web page loads. The process for building a clickable or hot image is similar to that for building a text hyperlink:
1. Select any clip art, picture, drawing object, or WordArt within a document.
2. Click Hyperlink on the Insert tab to display the Insert Hyperlink dialog box. (Alternatively, use any of the other previously described methods of opening the Insert Hyperlink dialog box.) The Text to Display line is dimmed because there is no text.
3. Type the address for the link in the Address box at the bottom.
4. (Optional) If you want a ScreenTip, click ScreenTip, type the text, and click OK.
5. Click OK to complete the hyperlink.
The picture will look no different. If you view the web page using Web Page Preview, the default mouse pointer changes to a hand with a pointing finger when it hovers over the image to indicate that it is now clickable, and the ScreenTip appears.
Creating an Email Hyperlink
Besides referencing other pages, hyperlinks can start the user’s email editor and begin a blank email message with the recipient name and subject filled in automatically. This is useful for providing a hyperlink through which someone can email you to comment on your web page.
Follow these steps to create an email hyperlink:
1. Select the text or choose an image for the hyperlink.
2. Click the Hyperlink button on the Insert tab to display the Insert Hyperlink dialog box.
3. In the lower-left corner of the Insert Hyperlink dialog box, click Email Address.
4. Enter the email address, as shown in Figure 22.7.
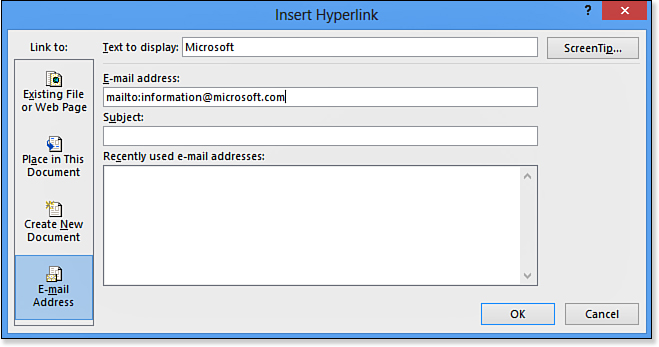
Figure 22.7. Hyperlinking to an email address.
Notice how the phrase mailto: is automatically added to the beginning of your email address.
5. (Optional) Type a subject in the Subject box if you want one to be filled in each time.
6. Click OK to complete the link.
When the link is clicked, a blank, preaddressed email is opened. The email hyperlink is a convenient means for letting visitors to your web page send you feedback or questions.
Building Multicolumn Layouts with Tables
Web pages commonly use tables to create multicolumn layouts. The “traditional” organization of a web page is to place a navigation bar at the left or top and the main content to the right or below. Figure 22.8 shows an example of the left/right layout, and Figure 22.9 shows an example of the top/bottom one.
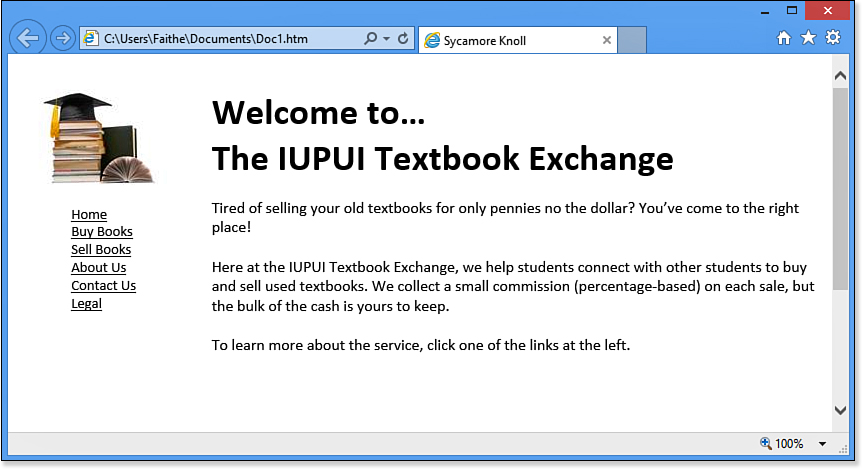
Figure 22.8. A web page that uses a table to create a layout with links to other pages at the left.
Figure 22.9. A web page that uses a table to create a layout with links to other pages at the top.
I won’t go into table creation and usage here because Chapter 9, “Creating and Formatting Tables,” covers the topic thoroughly. I will, however, explain in a big-picture way how to create a page like the one in Figure 22.8:
1. Start a new web page, switch to Web Layout view, and create a table. Size the table rows and columns as appropriate. To make a row taller, click a cell inside it and press Enter a few times.
For example, you might want a large column at the right and a thinner one to the left that will hold navigation hyperlinks.
2. Remove the borders from around all sides of the table. (With the table selected, choose Table Tools Design, Line Style and click No Border.)
3. Type or insert hyperlinks in the cell that you have decided will function as your navigation bar. If you want to hyperlink to other pages you have not created yet, decide what you will name them and then go ahead and create the hyperlinks for them.
In the navigation bar cell, include a hyperlink to the page that you are on. Clicking it will do nothing, so it’s okay to have it. The reason: You will probably copy this page and then edit the copy when you create the other pages in the website, and having the link to this page already in place will prevent your having to create it on each page later.
4. Type or insert the text for the main body of the page in the cell that will function in that capacity. Insert any pictures as desired.
5. Save the page.
6. Save it again under a different name—one of the names you chose for the hyperlinks in the navigation bar.
7. Delete the main body content and enter the content for the new page. The navigation links should be able to remain the same.
8. Repeat until you have created all the pages for your site.
Creating Your Own Web Page Templates
If you will be creating a lot of web pages that share some similar elements, such as a navigation bar or a consistently sized table, creating a template can save you the time of not having to re-create those elements each instance.
A template is a file you use to base new Word documents on. Can you just open a Word document and save it under a new name? Of course. But will you occasionally have a “duh” moment when you forget to save it under a new name and overwrite the original, causing yourself hours of rework? Undoubtedly. The beauty of a template is that it doesn’t allow that kind of mistake to ruin your day.
To build a new web page template, follow these steps:
1. Start a new, blank document (Ctrl+N) and switch to Web Layout view.
2. Create the elements that the template should contain. You might include these:
• A company logo
• One or more tables
• A background texture or color
• Font colors and styles
• A basic text outline
• Standard hyperlinks, such as one to your website home page
3. Save your document as a template by choosing File, Save As, navigating to the location where you want to save, and choosing Word Template (.dotx) as the document type.
Attaching a Cascading Style Sheet
A cascading style sheet (CSS) is a file that defines formatting for a web page. It works much like a set of styles in Word. For example, suppose you define the Paragraph tag <p> in the style sheet as using 12-point font. If you then apply that style sheet to a web page, all the paragraphs on that page that use that tag will appear in 12-point font.
If you would like to use an existing CSS to format your web document, you can attach it by following these steps:
1. Display the Developer tab if it is not already displayed.
![]() To learn how to display or hide the Developer tab, or any other tab, see “Customizing the Ribbon,” p. 888.
To learn how to display or hide the Developer tab, or any other tab, see “Customizing the Ribbon,” p. 888.
2. On the Developer tab, click the Document Template button. The Templates and Add-Ins dialog box opens.
![]() Note
Note
You can create cascading style sheets in any text editor, but the syntax is important and is different from regular HTML. Consult an HTML reference book to develop your own CSS.
3. Click the Linked CSS tab.
4. Click the Add button.
5. Select the CSS file (a file with a .css extension) and click Open to attach it.
6. Click OK to close the Templates and Add-Ins dialog box.
Blogging with Word
A blog is an online journal of sorts, either business or personal, which can be read on the Web or via an RSS (Really Simple Syndication) feed to a feed reader program or email program. Outlook 2013 supports RSS feeds, for example, so you can read blog posts from there as if they were email messages. Blogs are easy and inexpensive to set up, and they enable almost anyone to broadcast their opinions to the world.
![]() Note
Note
What differentiates a blog from a web page? They do have some things in common, and blogs can be read from web interfaces. A blog is a series of dated postings and comments, with the newest listed first, whereas a web page can take any format. A blog is typically hosted on a site that provides all the formatting and layout, so all the blogger has to do is type the text and click Send.
Most blogging services provide web interfaces from which you can create new posts for your blog. Some email programs also enable you to generate new blog postings. So, why use Word? It is primarily a matter of convenience. Word’s spell-checking, research, and other proofing tools can come in handy when you are trying to make a good impression to the world, and Word’s formatting features are more robust than those of most blogging services.
Perhaps you’re wondering about compatibility. But remember, Word 2013 is XML based, and XML is a cousin to HTML, the language of the Web. So, compatibility is not as much an issue as you might think. Word 2013 provides a blog template that you use to start a new document, and the template ensures that the entries you create conform to the strict HTML standards required for most blogging services. You don’t have to worry about the coding or the server; you just focus on the writing!
Understanding the Word Blogging Interface
When you are composing a blog entry, the tabs on the Ribbon change to show only the tools that apply to blog entries. The usual tabs are distilled down to just three: File, Blog Post, and Insert.
On the Blog Post tab, shown in Figure 22.10, are the usual tools for editing and formatting text that you normally find on the Home tab. There are also a few proofreading tools that are normally on the References tab, and a Blog group that’s unique to blogging, used for uploading your post to the blog service.

Figure 22.10. The Blog Post tab for a blog posting.
On the Insert tab, shown in Figure 22.11, are buttons for inserting a variety of types of graphical content, including charts, SmartArt, and equations. These lose their special Word 2013 functionality when you upload, though; they become regular static graphics.

Figure 22.11. The Insert tab for a blog posting.
Registering Your Blog Server in Word
Before you can post to your blog from within Word, you must register your blogging service with your copy of Word 2013 to set up the username and password required for posting.
![]() Caution
Caution
Registering a blog in Word 2013 is not the same as creating a new blog account. This chapter assumes you already have a blog account and just need to set up Word to work with it.
The first time you start a new blog posting, as detailed in the following section, you are prompted to register your service. You can click Register Now to begin the process, or click Register Later to begin creating your blog entry without registering. You can save the blog entry to a Word file, but you cannot post it until you register at least one blogging service.
When you click Register Now, the New Blog Account dialog box opens. Select your blogging service and then follow the prompts to set it up.
![]() Caution
Caution
Not all blog services work with Word’s blogging tool. Word doesn’t support blogging in LiveJournal or Facebook, for example. Contact your blogging provider and find out if any help is available for configuring Word.
After you have one service registered, or if you decline to set up an initial blog service before creating your post, you can register more services by clicking Manage Accounts on the Blog Post tab and then clicking New to set up a new service.
Creating a New Blog Post
After you configure your blog service, creating a new post is almost as easy as creating an ordinary document.
To write a new blog post from scratch, choose File, New and click the Blog Post template, and then click Create. A new blank page opens with a placeholder for the title. If you have already started a regular Word document and then decide you want to publish it as a blog post, choose File, Share, Post to Blog, Post to Blog. This opens a new copy of the document as a new blog post. (The original Word document you started with also remains open, in a separate window, under its original name.)
When you are ready to publish, click the Publish button on the Blog Post tab. Or, if you click the down arrow on the Publish button, you can then choose either of the following:
• Publish—To post your text immediately.
• Publish as Draft—To save your text to your blog server but not post it until you log in to that server via your regular web interface and approve it.
If a username and password prompt appears, enter the info requested and click OK. After the post has been successfully sent, a bar appears across the top of the document showing that it has been posted. It also shows the date and time.
Adding Pictures and Other Graphics to a Blog
You can include almost any type of picture in a blog entry that you can include in a Word document. When you save, however, Word converts every type of graphic into a static image, regardless of its original type (chart, SmartArt, and so on).
Most blogging services cannot accept graphics directly from Word. Instead, you must specify a picture-hosting service at which to store the pictures that will accompany your blog text. When you set up your blogging service, you specify whether pictures are allowed, and if so, what picture service you want to use.
The most straightforward option is simply to use your own server to host your pictures—but you can also use an image provider service. To set up the picture hosting if you have not done so already, follow these steps:
1. Choose Blog Post, Manage Accounts.
2. Click the desired blog service and click Change.
3. In the dialog box for that service, click Picture Options.
4. Open the Picture Provider drop-down list and choose one of the following:
• My Blog Provider—This option is available only if your blogging service permits pictures.
• My Own Server—Use this option if you have server space of your own you want to use.
• Some other service—Depending on your blogging service, there may be other options listed.
![]() Note
Note
If you don’t have an image provider, click I Don’t Have an Image Provider, and follow the steps on the web page that appears.
5. Fill in the URLs for the Upload URL and the Source URL.
6. Click OK.
7. Click OK.
Categorizing Blog Entries
Many blogging systems enable you to categorize your entries. To add a category to an entry in Word, follow these steps:
1. Choose Blog Post, Insert Category. A Category line appears in the document.
2. Open the drop-down list for the Category line that was inserted, and choose a category.
This list comes from your blogging service.
![]() Tip
Tip
If you are editing an entry you started some time ago, you might want to refresh the categories to make sure the desired category is still available. To do this, choose Blog Post, Category and then click Refresh Categories.
3. Continue composing your entry as you normally would.
Managing the Blog List
To add or delete blogs from Word, use the Blog Accounts dialog box. Display it by clicking the Manage Accounts button on the Blog Post tab.
From here, you can follow these steps:
• Click New to set up an additional site.
• Click a blog and click Change to change its settings. For example, you might need to go back and configure a URL for pictures if you did not do that initially.
• Click a blog and click Set as Default to mark the blog that should be used when you start a new blog entry.
• Click a blog and click Remove to stop using it in Word. (It does not do anything to your blogging service account or previous postings.)
Modifying a Blog Post
To modify a blog post, choose Blog Post, Open Existing. A list of posts you’ve made to your default blog appears. From there, select a post and click OK to open it for editing. Then, republish it to save your changes.
Sending Email from Word
If you use Outlook 2013 as your email program, you have probably noticed that its email-composition window has many of the same tools as Word 2013. Even users who don’t have Word installed still have that basic set of Word-like capabilities in Outlook. Therefore, there is not much benefit to composing email messages in Word. You can easily send an email that includes your Word document as an attachment; the body of the email itself can be composed in Outlook.
You can send your document as an attachment in any of several formats, including Word, PDF, XPS, and Internet Fax. To use any of those, follow these steps:
1. Choose File, Share, Email.
2. Click the button that best corresponds to what you want to do (see Figure 22.12). Each of these buttons starts a new email message in your default mail program and attaches the active document in the specified format:
• Send as Attachment—Attaches it in Word format. Anyone who has Word can edit the resulting file.
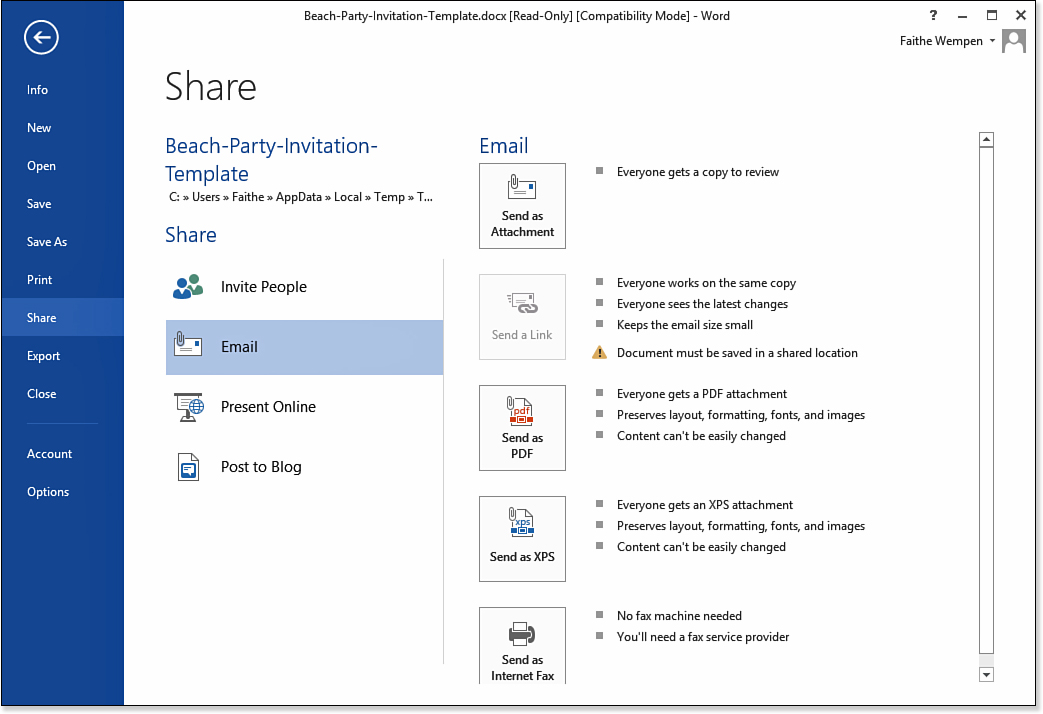
Figure 22.12. Choose to attach the document to an email in whatever format is needed
• Send a Link—Sends a link to the file that others can access from its original location. For this option to be available, the file must be saved in a shared location, such as on your SkyDrive.
• Send as PDF—Saves it as a PDF file and attaches that file. The resulting file cannot be edited in Word, but it retains the formatting well. Recipients need Adobe Reader or some other program that opens PDF files.
• Send as XPS—Saves it as an XPS file and attaches that. The resulting file cannot be edited in Word, but it retains the formatting well. Recipients need an XPS reader, which is included in Windows.
• Send as Internet Fax—Saves it in Internet Fax format and attaches that file. You can then send the resulting file with a third-party Internet Fax service (not included with Word).
3. Complete the email message and send it.