
13. Creating and Using Template Sheets
Unfortunately, this chapter begins with a disclaimer. The template sheets discussed here are only available on Scrivener for the Mac. I encourage Windows users to skim through this chapter, however, as I explain other methods of accomplishing similar goals.
If you are using Scrivener for Mac and based your project on one of the Fiction project templates, you may have noticed a root folder in the Binder labeled Template Sheets. A template sheet is a preformatted document that you use as the basis for creating new documents. The template sheet itself remains unchanged, but the document it creates can be added anywhere in the Binder and edited as you desire.
Think of template sheets as worksheets. They are good for documents that you need to use over and over, such as a character sketch. You may create unique profiles for each character in your novel, all based on the same worksheet. You can also use template sheets to prepopulate certain meta-data fields, such as questions or prompts that you want to include in your document notes for every scene. You can even use a template sheet to create a Notes document that uses a different font and font color in the text, is tagged with a Notes label, has a custom icon applied, and has the Include in Compile option deselected in the Inspector. You can then use that template sheet to add Notes documents in your Draft folder that are easily distinguished from the body of your work.
Using Predesigned Template Sheets
Several preformatted Scrivener project templates contain a root folder called Template Sheets. Inside this folder are sheets that relate to the purpose of the project template. The Novel project template, for example, is prepopulated with two template sheets: Character Sketch and Setting Sketch. If you look at these items in the Binder, as shown in Figure 13.1, you see they have a small T badge on their item icons.
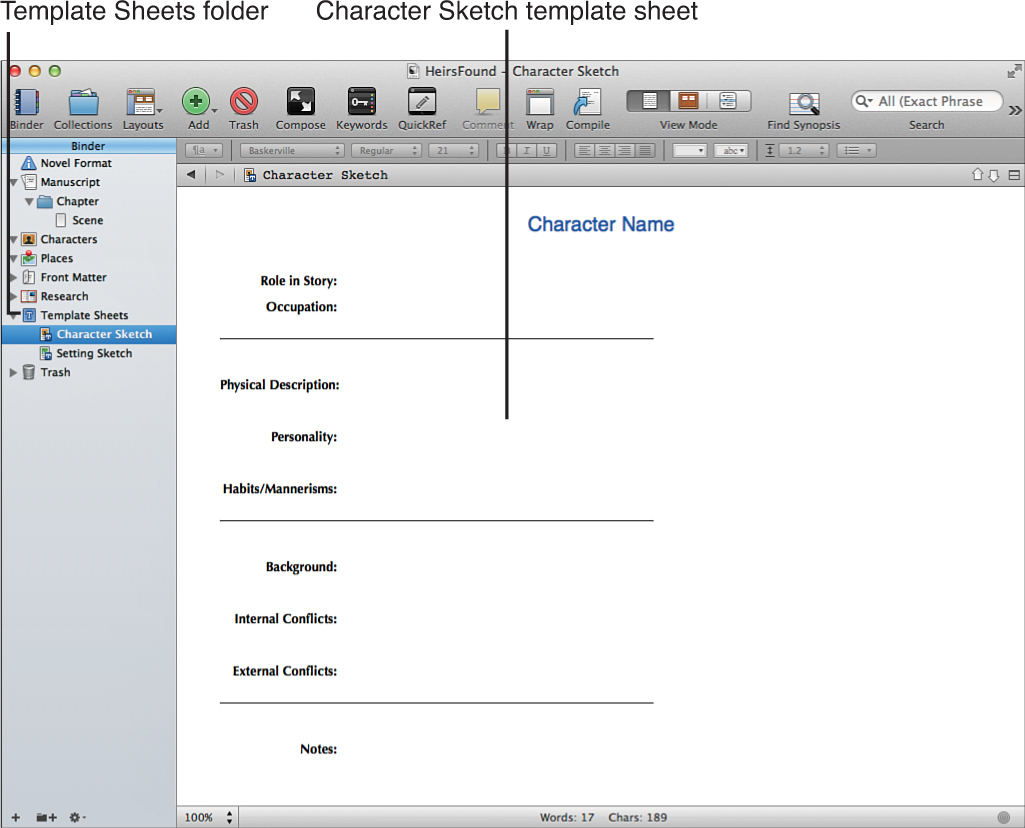
Figure 13.1 The Character Sketch template sheet is a worksheet that can be used to create other new documents.
Changing the Template Folder
Each project can only have one Template Sheets folder. Before you can assign a different folder to serve as the container for template sheets, you must first remove this designation from the existing folder. You can, however, remove this designation and choose a different folder to store your template sheets or designate a folder to store template sheets if your Scrivener project did not assign one.
To remove the template sheets folder designation, choose Projects, Clear Templates Folder from the menu. After you click OK in the warning dialog box, the template folder designation is removed from the folder and all of the documents within it.
![]() Note
Note
Any documents created from these former template sheets remain unscathed. The folder and documents that formerly acted as templates are likewise unscathed. They no longer function as templates, but they can be edited, duplicated, and otherwise treated as any other item.
To designate a new template sheets folder, select the folder and then choose Project, Set Selection as Template Folder. Any documents within that folder automatically assume the template sheet designation, as well.
![]() Tip
Tip
The first item in the Template Sheets folder is automatically assigned a keyboard shortcut to create new documents based on that template. The keyboard shortcut is Shift-Option-Cmd-N. Take advantage of this feature by placing your most-used template sheet at the top of the folder.
Modifying Template Sheets
As the Editor shows, the Character Sketch template sheet contains prompts to enter a name and information about a character. This sketch is a good start, but as every writer has his or her own way of creating a character and determining which traits are important, you are probably already thinking of ways you would change this document. With that in mind, before you actually use the template sheet to create any working documents, you should go ahead and revise the template to meet your needs.
 Caution
Documents do not remain linked to their template sheet. Once you create a document from a template sheet, the document stands alone, so future changes to the template are not reflected on earlier documents. Thus, it is best to modify template sheets to your liking before you ever use them.
To modify an existing template sheet, select the document in the Binder to open in the Editor. Edit the sheet just like any other document, using the Format bar and menu to change the appearance of the sheet and adding or removing prompts for information. Remember, however, that this is merely a template for future working documents. Do not fill in any information that is specific to a particular character, setting, or other story element.
The template sheet consists of more than just the content in the Editor. Any meta-data you add to the item becomes part of the template sheet and is included in the documents you create from it. This means you can add keywords, an initial Label or Status value, reference links, and document notes.
![]() Tip
Tip
You might have noticed that both the Character Sketch and Setting Sketch template sheets use the image view in the Synopsis pane of the Inspector. Because characters and settings are highly visual, it is assumed that you will want to add an image to these items once you create a document from the template sheet. If you do not want to add images to your sketches, switch the Synopsis pane view in the template sheet before creating documents from the template.
Once you have customized the template sheet, such as in Figure 13.2, you are ready to put it to work.
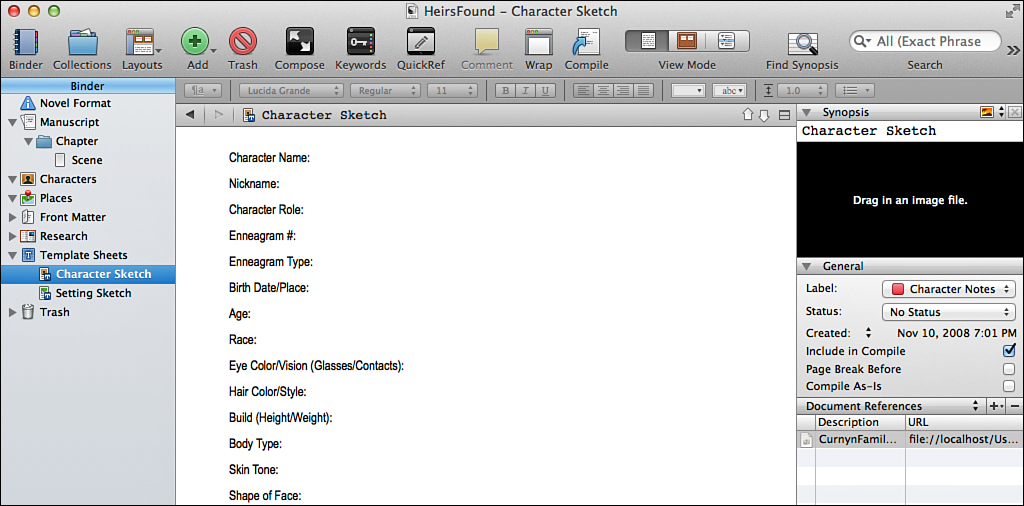
Figure 13.2 After much editing, this Character Sketch template sheet is a bit less stylish, but contains prompts for more detail about a character and a reference link to a family tree created in a third-party genealogy application.
1. Select the folder into which you want to add the new document.
2. Choose from the following options:
• Right-click the folder and choose Add, New from Template, and then select a template sheet from the submenu.
• Click and hold the Add button in the toolbar and then select the template sheet from the drop-down menu.
• Press Option-Shift-Cmd-N to create a new file from the top document in the Template Sheet folder.
• Choose Project, New from Template from the menu and then choose a template sheet from the submenu.
3. Enter a title for the new document.
4. Press Return.
Figure 13.3 shows the new document created from the Character Sketch template. I have titled the document with the name of the character. To populate the sketch with information, simply type. Documents created from templates are the same as any other Scrivener document. To move from prompt to prompt in the worksheet, click the mouse or use the arrow keys.

Figure 13.3 This character sketch has been added to the Characters folder, titled with the character’s name, and is ready to be filled in.
Creating Your Own Template Sheets
Now that you have an idea of how template sheets work, you can create your own from scratch. To create a new template sheet:
1. Select the Templates folder in the Binder. Unless you renamed or created your own, this folder is usually titled Template Sheets.
2. Create a new text file using one of the following methods:
• Press Cmd-N.
• Choose Project, New Text from the menu.
• Right-click on the folder and choose Add, New Text from the context menu.
• Click the Add button in the toolbar.
3. Type a title for the new template sheet.
4. Press Return. The new document appears in the Template Sheets folder with a small T badge.
5. Open the document in the Editor, if necessary.
6. Type and format the worksheet.
7. Add any default meta-data you want to associate with documents created from your new template sheet.
![]() Tip
Tip
You can convert any document in your project into a template sheet by dragging the file into the Template Sheets folder. You can also drag template sheets between projects to copy them into another project.
![]() Note
Note
If you want to use a different font or font color in the text of documents created from the template sheet, you must include some text in the template. For example, if you want to create a Notes template sheet, as I mentioned at the beginning of this chapter, you should type the word Notes in the document text and format it as you want the text in the document to appear. If the document text is blank—such as if you are creating a Scene template with a preset label and document notes—the default font is used.
Template sheets can go beyond individual documents. You can create a template subfolder or file group filled with template sheets. When you choose the New from Template command to create working documents from the template, the entire container and all its subdocuments are copied. As shown in the example in Figure 13.4, you can use this to create an entire character builder series of worksheets.
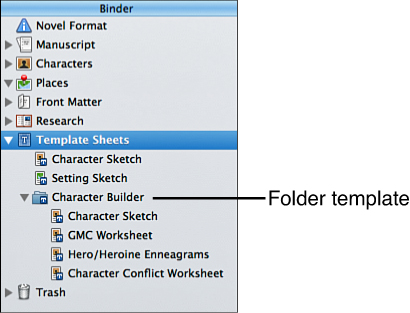
Figure 13.4 The Character Builder template folder contains four template sheets. You can create a new document from a single template sheet within the folder or create a new folder containing all of the documents.
Caution
If you create custom template sheets based on worksheets published in books or disseminated at a workshop, be sure you have permission from the original author before sharing your Scrivener project or document templates with other Scrivener users.
Setting a Default Document Type
If you look at Figure 13.4, you see a Characters folder and a Places folder. If you add a new document to the Characters folder by selecting the folder and pressing Return, by clicking the Add button in the toolbar, clicking the New Document (+) button at the bottom of the Binder, or by using the Cmd-N keyboard shortcut, it automatically creates a new document based on the Character Sketch template sheet. In the Places folder, the same actions automatically create a new document based on the Setting Sketch template sheet.
To designate a default document type for a container:
1. Select the container to which you want to designate a default document type.
2. Choose Documents, Default New Subdocument Type from the menu, and then select the intended template sheet from the submenu.
When you assign a default subdocument type, the New Text command in the Project menu changes to reflect the type of document created when you invoke the command from that folder. For example, when the Characters folder is selected, the command in the Project menu changes to New Character Sketch.
You can still create other types of documents within a folder that has been designated to create a default subdocument type using the Documents, Move, To command in the menu or the Move To command in the context menu. You can also create a document elsewhere in the project and drag it into the folder.