
14. Creating and Using Project Templates
The first step to getting started in Scrivener is choosing a project template. Unfortunately, this is also the step that causes the most anxiety in new Scrivener users because they don’t want to make the wrong choice. Equally unfortunate is that many of these new Scrivener users don’t have anyone standing over their shoulder or reassuring them from the pages of a book that there is no wrong choice.
Project templates are merely a starting point for a project. They provide a few files and folders to get your project started, possibly some template sheets, an initial workspace layout, and so on. An important point, however, is that all of these items and settings can be changed. Even if you choose the Recipe Collection template intending to create a cookbook, if you decide to write a novel about eating your way around Europe instead, you can simply modify your project. Although changing all of the settings in a project isn’t the most efficient way to work, knowing that it’s possible should take some of the stress out of choosing the best project template.
Even if you are writing a screenplay and choose the Screenplay project template, which seems like a perfect match, you might still tweak settings and create supporting documents until you most likely wind up with a project that’s quite different from the basic template. Doing this the first time you create a project is fine, but this is not a process you need to repeat every time you start a new work. Thus, the best project templates are usually the ones you create for yourself.
Creating a Project to Build a Template
Project templates are created from a regular project that is customized and saved in such a way as to be available as the basis of future projects. As you have become more familiar with Scrivener, perhaps you have already begun tweaking the original project file you opened, or at least considered what you would change.
If you want to base your custom template on your current project, before you proceed any further in this chapter, save a duplicate copy of the project. To save a copy of your project, choose File, Save As from the menu and provide a name and storage location for the new file. This new project becomes the starting point for your project template.
 Caution
Do not use the only copy of your current project as the basis for a project template. Creating a template is as much about stripping out unnecessary information as it is about adding and customizing elements. Because Scrivener automatically saves whenever you pause in your work, these changes affect the project upon which your template is based. Always create project templates from a duplicate or “dummy” project file.
If you prefer, you can also create a brand-new project for the purpose of customizing it to create your own template. To create a new project:
1. Click File, New Project from the menu. You can also press Shift-Cmd-N on the Mac or Ctrl+G, N in Windows.
2. In the Project Templates dialog box, shown in Figure 14.1, choose a template as the foundation for your customization efforts. If you want to start truly from scratch, choose the Blank template. Otherwise, choose the project template that provides the best starting point for your customization.
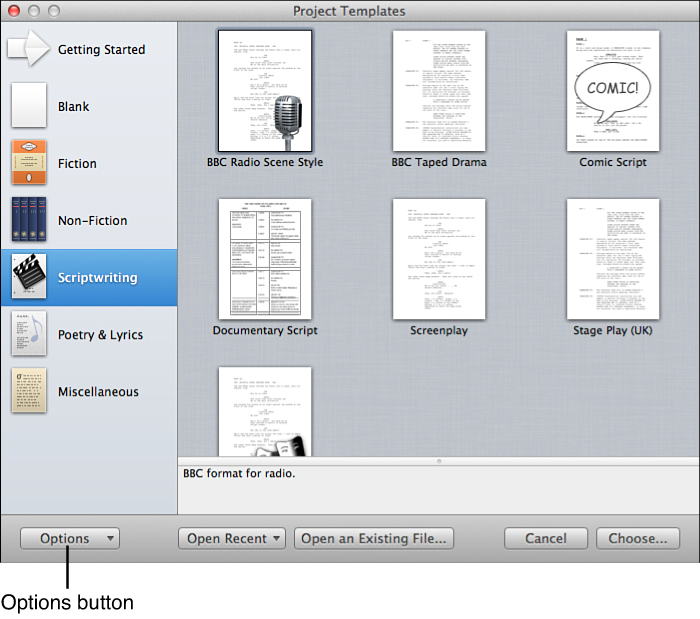
Figure 14.1 Choose a template from the Project Templates dialog box to use as the foundation for your own custom template.
3. Mac users, click Choose and then enter a project name in the Save As dialog box. Windows users, enter a name in the Save As field and select a location to store the project in the Project Templates dialog box.
4. Click Create.
Developing a Good Template
A project template includes every file, folder, and setting that exists in the project upon which it is based. This means that if you want something to appear in projects in the future, add it into your project template so you only need to create it once. It also means if you don’t want something in your projects, be certain it is removed before you save your template. The following sections provide a checklist of items to consider when creating a template, which can be addressed in any order you want.
Create a Workspace Layout
In Chapter 2, “Customizing Your Work Environment,” you learned how to set up workspace layouts. If you want the project to open in a particular layout, select it from the Window, Layouts menu (or the Layouts button on the toolbar) on the Mac toolbar or the View, Layout menu in Windows.
![]() Tip
Tip
If you want new projects created from this template to open in Full Screen mode on the Mac, save the template while in Full Screen mode.
When creating an initial layout for a template, consider how you will use the project. If your workflow necessitates a lot of entering and customization of meta-data, for example, be sure the Inspector is visible in the layout.
Set Up the Draft Folder
Your Draft folder contains the body of your work, so give it proper attention when creating your project template. Remove any files and folders that should not become part of the template. If you have already written material within this project, remove it. You did make a copy of the project before beginning this process, right?
Rename the Draft folder. Although purely cosmetic, referring to your work as something other than a draft may appeal. If you plan to share your project template, changing this folder title makes it appear more professional. The Novel project template that is preinstalled in Scrivener renames the Draft folder to Manuscript, whereas the Screenplay template renames it to Screenplay.
If you are using a preinstalled template as the foundation for your own project template, examine your Draft folder for a title page that may contain identifying information. See the “Using Template Placeholder Tags” section later in this chapter to learn how to strip out this personal information and replace it with placeholder tags on the Mac for future projects. In Windows, replace personal information with generic text, such as Name and Address, that can be replaced by the user.
Create an initial folder and file system upon which you can base the structure of your project. If you are writing a novel, you generally want this to be open ended—perhaps a single folder and file to get things started. If you create more structured works, such as academic papers, you can prepopulate the Draft folder with folders for Introduction, Hypothesis, Research Methods, and so on. If you write three-act screenplays, create a folder for each act.
If you are on a Mac and choose to create a template sheet for your Draft documents, select the Draft folder in the Binder and choose Documents, Default New Subdocument Type from the menu to set the default document used when new items are added to the Draft folder. See Chapter 13, “Creating and Using Template Sheets,” to learn more about template sheets.
In Windows, or if you don’t want to use the template sheet feature on the Mac, you might want to format an initial document file. You can duplicate this document as needed when you create a project from this template.
Add or Modify the Information File
In some templates, you see a file at the top of the Binder that contains instructions on how to use the template. Although you can always veer from how a project is intended to be used, these instructions act as a guideline.
If you base your custom project file on a preinstalled template, modify the instructions file to remind you how to handle new projects created with this project template.
![]() Tip
Tip
Even if you have no intention of sharing your project template with other Scrivener users, this information sheet serves a purpose. If you are a fiction author, you may only create one or two new projects a year, if that, so it’s easy to forget what you were thinking when you changed the Label field title to Ostentation, even if you had a very good reason at the time. Make a note of it and remove all doubt.
If you used the Blank project template to begin your customization, you may want to create an instruction sheet. To do this, create a new file and move it to the top of the Binder. Note any changes to the meta-data settings, how you intend the Draft folder to be structured, additional folders you created for non-Draft elements of the project, template sheets, and the Compile settings.
![]() Tip
Tip
If you create this file as soon as you begin customizing the template, you can add to it as you make noteworthy changes.
Create Non-Draft Folders and Files
As you know, the Draft, Research, and Trash folders cannot be deleted, only renamed, so they remain an integral part of your project template. You might want to create additional folders that will be of use to projects built on this template. To give you an idea of the possibilities, the following is a list of files and folders (shown in Figure 14.2) I use in my novel project template and some of the worksheets or blank files I create within them:
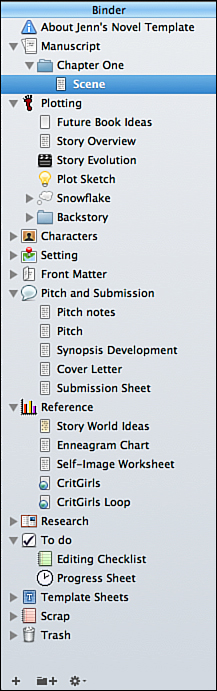
• About Jenn’s Novel Template: This is my information file. It details all of the unique features of my template, both as a reminder to myself and to give insight to others if I decide to share it.
• Manuscript: This is my renamed Draft folder. It contains a title page, an empty Chapter folder, and an empty Scene file created from a Scene template sheet.
• Plotting: This folder contains worksheets titled Story Overview and Story Evolution, a subfolder for the Snowflake Method created by Randy Ingermanson, and a subfolder for Backstory, all of which I use for plotting. If the project is intended for multiple books in a series, I also add a file for Future Book Ideas.
![]() Note
Note
See Chapter 23, “Discovering New Uses for Scrivener,” to learn how to use a single project for multiple works.
• Characters: This folder is intended to store character sketches for each of the main characters created from a series of template sheets. The default document for this folder is the Character Sketch template sheet.
• Setting: This folder is intended to store setting sketches created from a template sheet. The default document for this folder is the Setting Sketch template sheet.
• Front Matter: This folder contains front matter for various types of completed work, including a title page for a manuscript, a file to draft a dedication and acknowledgments, and cover art for an e-book.
• Pitch and Submission: This folder contains files to begin drafting a synopsis and cover letter to submit with a manuscript proposal. It also contains a blank submission worksheet to track where a book has been pitched.
• Reference: This folder contains reference materials pertaining to writing, such as tips on creating a story world and the inherent strengths and weaknesses of various character traits. This folder also contains links to my critique group’s private email list and public blog.
• Research: This is the default Research folder, used to compile story-related research, to which I add subfolders for Time-Period Research and Book-Specific Research.
• To Do: This folder contains an editing checklist to which I refer during revisions and a Progress Sheet, which is a document into which I enter my daily word count and how many hours I’ve worked that day.
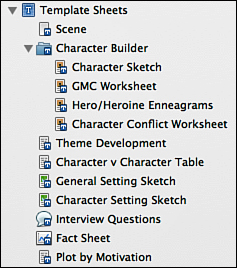
• Template Sheets: This folder contains template sheets for character sketches, setting sketches, conflict worksheets, theme development worksheets, and plotting worksheets. I also have a Scene template sheet, which is the default document for my Manuscript folder.
• Scrap: This is an empty folder intended to put scenes and bits of information that I cut from the project but don’t want to permanently delete.
• Trash: This is the default Trash folder, which I only use to hold files and folders I create by mistake or am otherwise certain I want to permanently delete from the project.
![]() Tip
Tip
If you are a Mac user, you can customize the icons for your files and folders, as shown in Figure 14.2. See Chapter 3, “Organizing the Binder,” to learn how to assign a custom icon and add new icon files to Scrivener.
Set Default Meta-Data
In Chapter 12, “Putting Keywords and Meta-Data to Work,” you learned how to change the Label and Status field titles and values and use the Keywords panel and custom meta-data to tag your documents with meta-data. Although the values of these fields are likely to be project-specific, you will probably use the same Label and Status field titles in multiple projects. For example, if you changed the Label field to be titled Storyline, the subplots will vary by manuscript, but you still want that field to be titled Storyline. If this is the case, remove the values from the Label field, as follows:
1. In the General pane of the Inspector, click the Label drop-down menu and choose Edit.
2. In the Label pane of the Meta-Data Settings dialog box, select the top value on the list, below the No Label entry.
3. Click the Remove button at the bottom of the dialog box.
4. Repeat step 3 until all of the values are removed. You cannot delete the No Label entry.
5. Click OK to close the dialog box.
Alternatively, you can rename the values to be more generic, such as Storyline 1, Storyline 2, etc.
![]() Tip
Tip
If you remove or rename the Label and Status values, make a note in the Information document at the top of the Binder to remind yourself to add or modify values when you create a new project from the project template.
For Keywords, the individual keywords you create may be project-specific, but the parent keywords into which you group them are likely to stay more constant. Thus, you can prepopulate the panel with parent keywords titled Settings, POV Characters, or any other general groups that relate to your type of writing, and then add specific child keywords when you create a project based on your template. You may also prepopulate the panel with keywords that apply to any project, as shown in Figure 14.3.
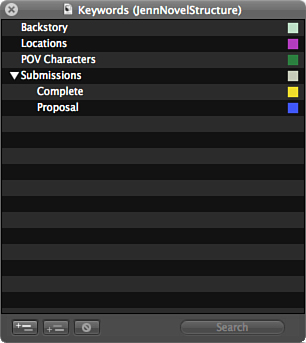
Figure 14.3 Create general keyword categories and keywords that apply to all your projects in the project template.
It is easy to include custom meta-data in your project template (on the Mac). These fields do not store any preset values, so it’s enough to create the fields. If you use custom meta-data, however, don’t forget to go into the Outliner and select those fields from the Columns menu so they are visible when you create a working project.
See Chapter 7, “Plotting in the Outliner,” if you need to review the process of setting up columns in the Outliner.
Set Project Targets
If you write novels or academic papers with an upper word count limit, you may want to set word count goals. You may also want to set project targets if you create a custom project template to use every year for writing challenges such as National Novel Writing Month (NaNoWriMo). Refer to Chapter 15, “Tracking Your Progress,” to learn more about setting project and document targets.
Create Template Sheets
If you’re a Mac user, template sheets can form the core of your project template. Create template sheets for any type of document you use in multiple instances in a project. See Chapter 13, “Creating and Using Template Sheets,” for details on how to create template sheets and configure them as default documents in different folders. Figure 14.4 shows all of the template sheets in the Binder of my custom novel template.
![]() Tip
Tip
Although Windows does not have template sheets, you can create your own folder of base documents and duplicate them in the Binder when you want to use them. See Chapter 13 for more information about this process.
Create Initial Collections
Although collections are project-specific (see Chapter 16, “Searching Your Project,” for details on creating and using collections), you can save the criteria for a collection in your project template. For example, you can create a collection for the first three chapters in your Draft folder and a synopsis and query letter you store in a Pitch and Submissions folder. You can then use that collection to compile a proposal to submit to an editor or agent.
1. Create a keyword in the Project Keywords panel called Proposal.
2. Apply this keyword to the title page in your Draft folder, query/cover letter document, and the synopsis document.
3. In the Search box in the Scrivener toolbar, click the magnifying glass and choose Keywords from the drop-down menu.
4. Enter the word Proposal in the Search box. The documents that have been tagged with the Proposal keyword appear in the Search Results pane.
5. Click the magnifying glass and choose Save Search as Collection (Save Search in Windows).
6. Enter a collection name for the New Saved Search Collection.
![]() Tip
Tip
When you later create a working project from this template, add the Proposal keyword to the files in the first three chapters of your Draft folder and view the collection to update the search results. Once you have created the first three chapters of your manuscript and updated the collection, you can convert the saved search to a standard collection, whereupon you can change the order of the documents.
![]() Note
Note
Similarly, you could create a standard collection to prepare a proposal, but you would need to prepopulate your template with the files and folders for the first three chapters because standard collections are static and do not update based on changing search results.
You can also create collections to automatically gather all of the documents marked with a Needs Research status or keyword so you can make a list of information you need to look up.
Designate Compile Settings
Configuring Compile settings can be rather confusing and time consuming. If you configure them in your project template, those settings appear in any projects created from the template, saving you time and frustration.
Learn more about how to compile your work in Chapter 19, “Compiling Your Completed Work.” If you are using this project template to prepare e-books, see Chapter 20, “Creating E-Books,” for information on how to compile and export in various e-book formats.
Using Template Placeholder Tags (Mac Only)
Many types of writing, such as manuscript submissions and academic papers, require a title page with contact information about the author. If you plan to retain the project template solely for your personal use, you can enter your contact information directly into the project. If you intend to share your project template with other Scrivener users, however, you should remove your personal data from the template.
One way to preserve your privacy but make information available within your project is to use placeholder tags. Instead of entering your name on a Title page, for example, use the placeholder tag <$template_fullName> in your project template, as shown in Figure 14.5. When you create a new project based on that template, the placeholder tag is replaced with data from your card in your Contacts or Address Book app.
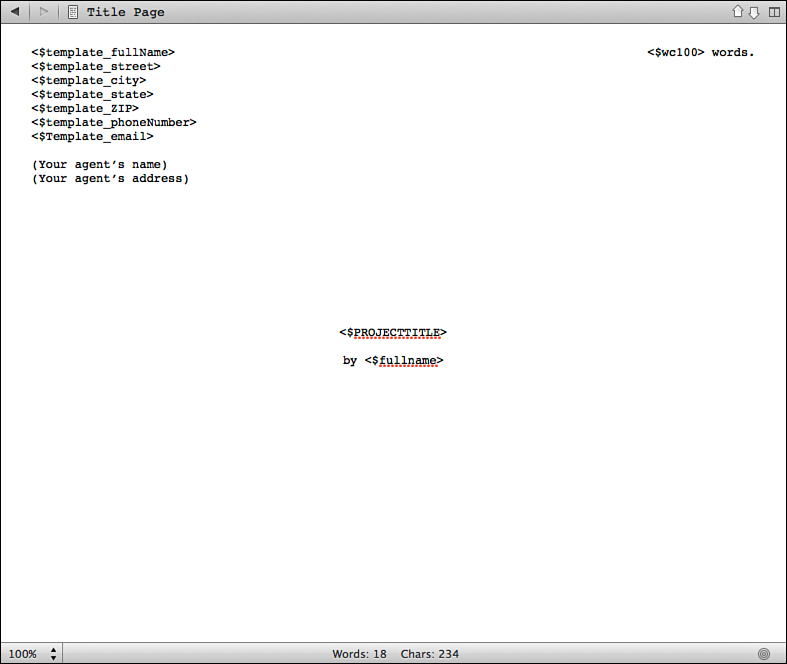
Figure 14.5 Placeholder tags can protect your personal data and automatically provide word count and pagination information when you compile your project.
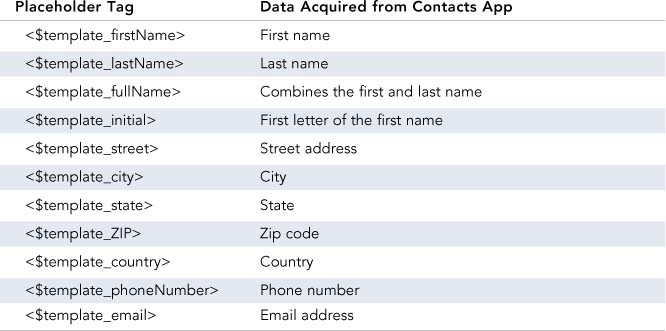
Table 14.1 lists the project template placeholders specific to protecting your contact information.
There is an additional project placeholder tag that gathers data from the name of the project rather than your Contacts app. The tag <$template_projectName> enters the filename of the project when it was created.
Scrivener for Mac also offers additional placeholder tags that can be used on title pages and elsewhere in the project. The Project Properties tab of the Meta-Data Settings dialog box, shown in Figure 14.6, automatically fills in the project title based on the filename of the project and the author’s surname and forename based on the Contacts app. The placeholder tags to access these values appear to the right of each field.
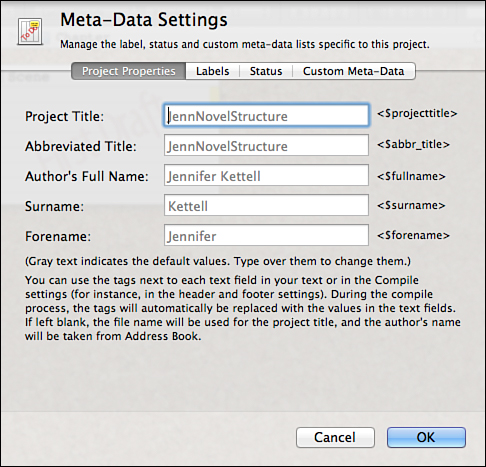
Figure 14.6 The Project Properties tab of the Meta-Data Settings dialog box on the Mac contains placeholders for name and project information, which can be added to documents using placeholder tags.
![]() Tip
Tip
If you write under a pseudonym and want this information saved in your project template, type over the Author’s Full Name, Surname, and Forename fields to replace the automatic entries from the Contacts app.
If you save this information as a contact in your Contacts or Address Book app, type (Scrivener:UseMe) in the Note area of the entry; Scrivener will then use this contact entry for the author information.
Whereas the project template placeholders are only available on the Mac, there are other placeholder tags available for both Mac and Windows. Most of these are used in conjunction with the Compile tool, such as <$p> to add page numbers to the header, for example. Another common placeholder tag for the title page of a document is <$wc100>, which is replaced with the word count of the compiled work rounded to the nearest 100. The complete list of placeholder tags is too extensive to print here.
![]() Note
Note
A complete list of placeholder tags that work on the Mac is available by choosing Help, Placeholder Tags List from the menu. For a list of placeholder tags that work in both Mac and Windows, visit http://scrivener.tenderapp.com/help/kb/windows/placeholder-tags-list.
Saving a Project Template
Rome wasn’t built in a day, and it’s quite likely that your project template won’t be, either. Finally, after getting everything the way you want it, however, you are ready to turn your dummy project file into an actual template. Follow these steps:
1. Choose File, Save as Template from the menu. The Template Information dialog box opens, as shown in Figure 14.7.
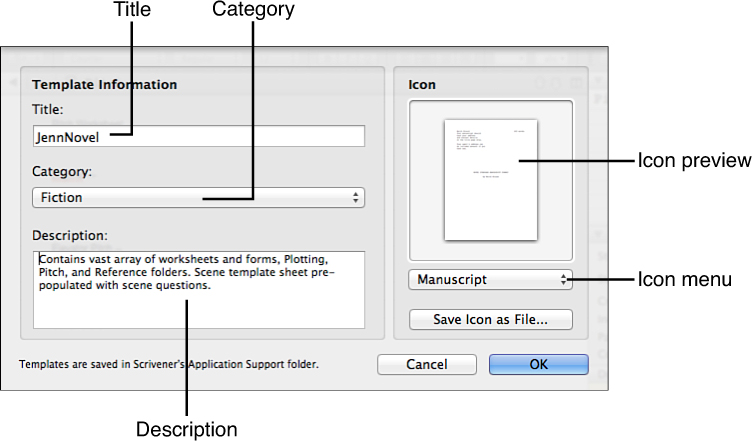
Figure 14.7 The Template Information dialog box prompts you to name your template, add it to a template category, and provide a description and icon to be displayed in the Project Templates dialog box.
2. Enter a name for the template in the Title field.
3. Choose a category from the Category drop-down menu.
4. In the Description field, note what makes this project template unique.
5. Below the icon preview, click and choose an existing template from the drop-down menu to use its icon. Choose Custom from the menu to use a custom image.
6. Click OK to save the template.
Once you have saved your project template, you can close the dummy project upon which it was based. You can even delete the entire project if you want, as you now have a template to create new working projects. To create a project with your new template, open the Project Templates dialog box (File, New Project), click on the category in which you placed your project template, and select the template from the options on the right.
Modifying a Project Template
Even when you think you have settled upon the best combination of settings and features for your project template, you may still come up with a new reference sheet or value for a piece of meta-data. The longer you work in Scrivener, the more features you begin to rely upon. Your writing needs may change, as well, necessitating changes in your project template(s). If you begin using Scrivener for short academic essays, you may need to modify your template—or create a new template based on your current template—as you begin writing longer research papers or a thesis. I have been writing for decades and using Scrivener for over five years, and I still tweak my project templates on a regular basis.
Caution
Templates do not remain linked to the projects created from them. If you modify your template, you need to make the same changes to your existing projects if you want them to contain the same options and settings.
You cannot edit a project template itself. Instead, you need to repeat the process you undertook to create the initial project template. Follow these basic steps:
1. Create a project with the project template you want to edit. The name and location of this project do not matter because you’re using it as a dummy project just to update the template.
2. Make the changes you want to the project. This process should be much more streamlined because you aren’t starting from scratch.
3. Choose File, Save as Template.
4. Enter the same name for the project template as you did previously.
5. Update the description and logo, if you want.
6. Click OK to save the new project template over the old one.
Caution
If you remove files and folders from the project in the course of modifying the template, be sure to empty the Trash folder before you select Save as Template.
Setting a Default Project Template
If you use Scrivener primarily for only one type of project, you can set a project template to be the default. When you designate a default project template, the Project Templates dialog box automatically opens to the category in which that template resides and preselects the template.
To set the default project template:
1. In the Project Templates dialog box, select the template you want to designate as the default.
2. Click the Options button at the bottom of the dialog box, as shown in Figure 14.1.
3. Select Set Selected Template as Default from the drop-down menu.
![]() Note
Note
You can set any project template to be the default, whether you created a custom template or consistently use one of the preinstalled templates.
Deleting a Project Template
As you work with Scrivener, you will likely create several project templates. You may create a couple of variations on the same type of template, give each template a different name, and then work with them to see which approach you like best. Or you may import project templates posted on the Internet by other Scrivener users, hoping to discover a new way of working in Scrivener. You then drag and drop the portions you want to use into your own, ever-evolving project template. All of this experimentation can leave behind a lot of unused project templates. To clear out the dead weight:
1. In the Project Templates dialog box, select the template you want to delete.
2. Click the Options button at the lower left of the dialog box.
3. Select Delete Selected Template from the drop-down menu, shown in Figure 14.8.
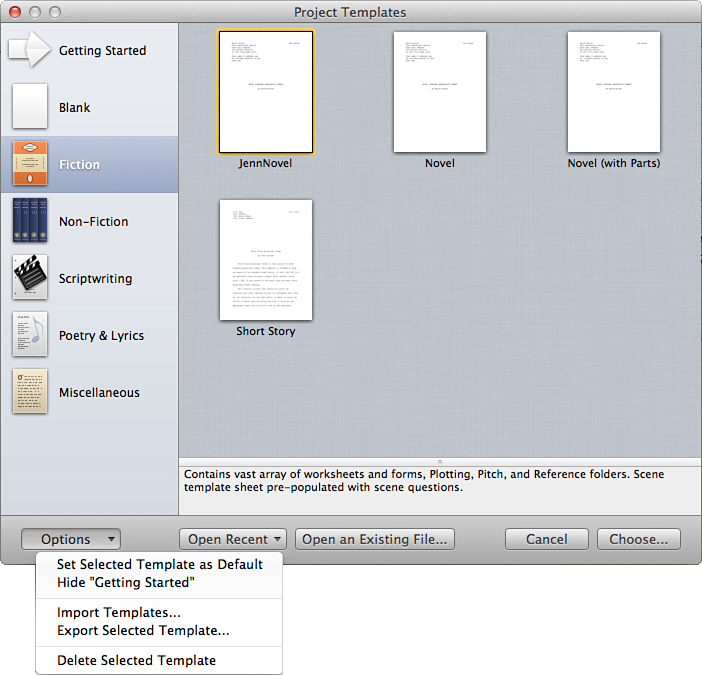
Figure 14.8 The Options button in the Project Templates dialog box provides options to set a default template and delete unwanted templates.
4. Click OK on the Mac or Yes on the PC to confirm the deletion.
![]() Note
Note
You cannot delete the preinstalled templates that came with Scrivener.
Importing and Exporting Project Templates
You now understand how to fend for yourself in the world of project templates. One of the advantages of using project templates, however, is the ability to share them with others. The best way to see how someone else uses Scrivener is to import one of his or her templates and look at how he or she sets up the meta-data, template sheets, and overall file and folder system. And if you have created a project template for a specific type of writing task, consider exporting it to share with the Scrivener user community.
Importing a Project Template
If you download a template from the Internet or simply want to use your own project template on another computer, you can import it.
![]() Note
Note
You can share templates between the Mac and Windows versions of Scrivener, but certain features are not available from Windows. You can view template sheets in Windows, for example, but they do not function in the same manner as on the Mac. To use them, you need to duplicate the template sheet and move it into the folder where you want it to reside. Windows also cannot use custom meta-data.
To import a template:
1. Download or copy the template file onto your computer.
2. Open the Project Templates dialog box.
3. Click the Options button and select Import Templates from the drop-down menu.
4. Navigate to and select the template file you want to import. The template is automatically imported to the category assigned to it by its author.
5. Click Cancel to close the window or select the project template and create a new project.
On the Mac, templates are saved in the Application Support folder in your Mac’s Library folder. In Windows, templates are saved in your local AppData folder. In Windows XP, templates are saved in your Application Data folder. Once you have imported the template, you can delete the copy of the template you saved to your computer in step 1 or retain it as a backup.
![]() Note
Note
Scrivener templates have a .scrivtemplate file extension. Users sometimes share regular project files with a .scriv file extension intended to be used as a template. If you download one of these files, open it as a regular project and then save it as a template to make it available in the New Projects dialog box (Project Templates dialog box in Windows).
Exporting a Project Template
If you want to share your own templates, either with other Scrivener users or to use the template on another computer, export it by doing the following:
1. Open the Project Templates dialog box.
2. Select the template you want to export.
3. Click the Options button and select Export Selected Template from the drop-down menu.
4. In the Export dialog box, navigate to where you want to store the new project template and enter a name for the exported file.
5. Click Export on the Mac or Save in Windows.