8. Explore Fitness Strategies for Bicyclers
In This Chapter
![]() Discover iPhone and Apple Watch apps designed for cyclists
Discover iPhone and Apple Watch apps designed for cyclists
![]() Learn about optional bike computers that can share data with your iPhone
Learn about optional bike computers that can share data with your iPhone
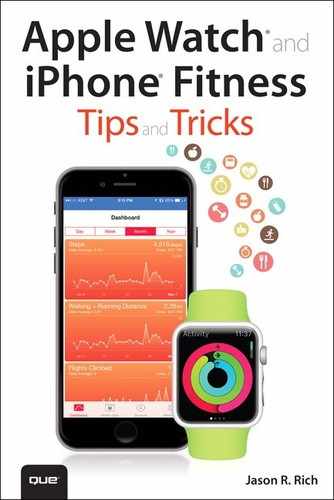
By now you know how the iPhone’s connectivity features, enabled by Wi-Fi, Bluetooth, and AirPlay technology, let it communicate with a broad range of other technology-based devices, including the Apple Watch. This connectivity allows the iPhone to collect and gather data from other sources, plus share data that’s stored in the phone itself. Given that, it’s no surprise that cyclists can also benefit from these features (see Figure 8.1).
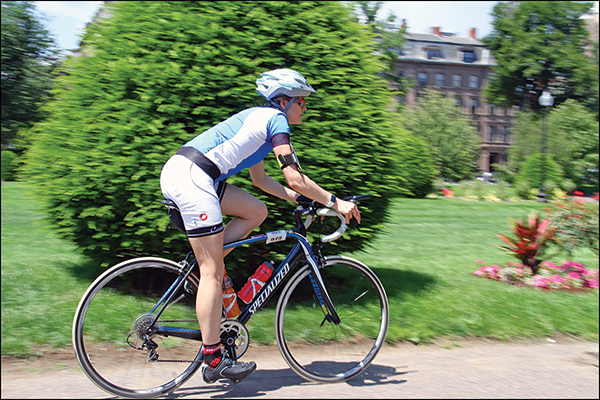
FIGURE 8.1 For cyclists, the iPhone and Apple Watch can be useful tools, especially when used with a dedicated bike computer.
Small computers that connect to a bicycle are nothing new. These devices measure and display useful information in real time, such as speed, distance traveled, heart rate, temperature, lap times, and potentially GPS navigational data. Many of these bike computers are stand-alone devices.
The latest versions of these bike computers can link wirelessly (via Bluetooth) to an iPhone, allowing the information that’s collected to be transferred to the smartphone and imported directly into a wide range of compatible apps. Because cyclists can benefit from having different types of information at their disposal than runners or other fitness enthusiasts, specialized apps have become available specifically for cyclists (see Figure 8.2).
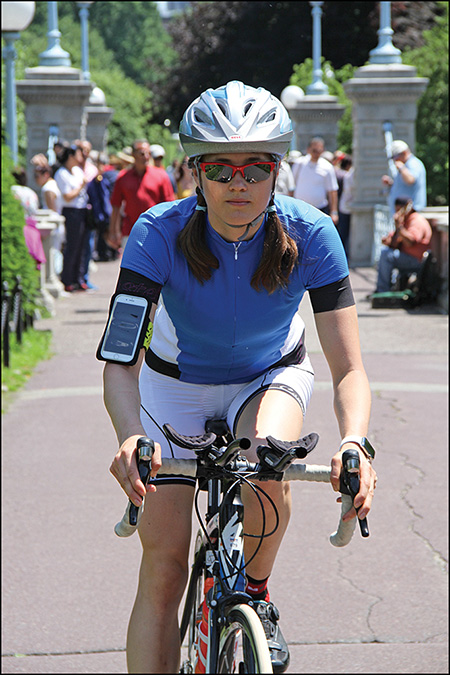
FIGURE 8.2 If you’re already using a compatible bike computer, you can wear your iPhone (shown here), mount it on the bike, or even keep it in a pocket, yet still collect important data in real time.
Biking Apps for Fitness Enthusiasts
As you’re about to discover, cyclists can use the iPhone in several extremely handy ways. For example, you can use it as a full-featured GPS navigational tool to help navigate busy streets more easily (and safely), and find your way along designated bike routes or paths. The iPhone (and in some cases the Apple Watch) can also handle much of the functionality you typically find offered by a dedicated bike computer, or share data with an existing bike computer.
This section focuses on a handful of specialized iPhone (and Apple Watch) apps for cyclists, particularly those who enjoy cycling as a fitness-oriented activity or competitive sport.
![]() Caution
Caution
Many of the specialized apps for cyclists use the iPhone’s GPS capabilities. For this feature to work, the iPhone needs to use a significant amount of cellular data usage via a 3G/4G/LTE data connection. Extended use of the iPhone’s GPS and Location Services functions also depletes the phone’s battery much faster.
Thus, you’ll want to begin each ride with a fully charged iPhone battery, and expect that you’ll probably need to recharge the phone after a long ride.
Cyclemeter GPS
Cyclemeter GPS for the iPhone and Apple Watch is a free app with in-app purchase options that’s designed to be a full-featured bike and fitness computer that does not require a companion online account to function properly. All data is stored on the iPhone (or can be transferred to a computer or iCloud at the user’s discretion). Cyclemeter GPS is also compatible with a variety of popular dedicated bike computers, including the RFLKT+, which you’ll learn about later in this chapter.
![]() Tip
Tip
The Cyclemeter GPS app works best if you mount your iPhone directly onto your bike, so you can easily view it while you ride. Use it instead of or in addition to a dedicated bike computer, depending on what type of data you want to collect.
This app can handle GPS navigation, and is designed from the ground up to cater to the needs of cyclists. For example, not only does the app display information, it can generate 120 different and configurable audible announcements while it’s in use, so without looking at a screen, you can obtain real-time information, such as current speed, average speed, fastest speed, calories burned, distance traveled, elevation, and/or heart rate.
If you mount the iPhone onto a bike for easy viewing, the app’s main dashboard screen, shown in Figure 8.3, displays pertinent information in a color-coded and easy-to-read format that makes it easy to quickly glance at the screen while riding to obtain important information.
Beyond what the main dashboard screen displays, additional information screens are always only one horizontal finger swipe away, and you can configure all the data that appears on each screen to see only the real-time information that you deem relevant.
In addition to displaying information, Cyclemeter GPS gathers and records relevant data you can use for analysis later. (Some of these tools, which include History Dashboards and Historic Key Performance Indicators, Google Maps integration, and Weather Recording, require upgrading to the Elite version of the app.) For navigation, the app offers full integration with Google Maps, so you can view terrain and traffic details on your route (which you can pre-plan).
Another nice feature of this app is that you can display some real-time information, such as speed and heart rate, as colorful graphs. Also, a customizable stopwatch feature automatically detects when the bike starts and stops.
You control the app not only from the iPhone’s touch screen, but you can also display and control many of the functions, including the stopwatch, from the Apple Watch. Use of the Apple Watch with this app requires users to upgrade to the ad-free, Elite version.
![]() Tip
Tip
Thanks to the app’s integration with the Music app, from the Cyclemeter GPS app on the iPhone, you can control the music that’s played and access pre-created playlists, while simultaneously hearing audible announcements the Cyclemeter GPS app generates.
You can access and customize all the app’s features and functions by tapping on one of the five command icons that appear along the bottom of the iPhone app’s screen. These include:
![]() Stopwatch: This default option displays the app’s main dashboard (which is customizable), and allows you to view a map and real-time information, such as Ride Time, Distance, Speed, and Calories Burned. Tap on the Start button to start the stopwatch feature. You’ll then gain access to Lap and Stop buttons. The app automatically records all time-related data.
Stopwatch: This default option displays the app’s main dashboard (which is customizable), and allows you to view a map and real-time information, such as Ride Time, Distance, Speed, and Calories Burned. Tap on the Start button to start the stopwatch feature. You’ll then gain access to Lap and Stop buttons. The app automatically records all time-related data.
![]() Map: View a full-screen version of the navigation map, and then customize it by tapping on the gear-shaped Settings icon in the top-right corner.
Map: View a full-screen version of the navigation map, and then customize it by tapping on the gear-shaped Settings icon in the top-right corner.
![]() Calendar: The app enables you to maintain a schedule of upcoming workouts, events, races, or other information that’s pertinent to your cycling activities and fitness schedule.
Calendar: The app enables you to maintain a schedule of upcoming workouts, events, races, or other information that’s pertinent to your cycling activities and fitness schedule.
![]() History: Choose from a variety of formats to view all data the app has collected. Several formatting buttons appear along the top of the screen. This feature becomes more useful for analytical purposes, for example, as you continue using the app and collect data over time.
History: Choose from a variety of formats to view all data the app has collected. Several formatting buttons appear along the top of the screen. This feature becomes more useful for analytical purposes, for example, as you continue using the app and collect data over time.
![]() More: Tap on this icon to view a detailed menu of options to customize the app, access additional features, and display information from the app in a variety of different formats.
More: Tap on this icon to view a detailed menu of options to customize the app, access additional features, and display information from the app in a variety of different formats.
The first time you use the app, tap on the More icon, and then tap on the Settings option. As prompted, enter details about yourself, such as your gender, birthdate, and weight. If you’ve upgraded to the Elite version of the app, also enter your Bike and Shoe information (to keep track of your gear), and turn on integration with the iPhone’s Health app. You need to turn on or adjust these settings only once, but you can update them at any time from the Settings menu.
The main dashboard screen appears when you tap on the Stopwatch option. However, before you start riding, tap on the Cycle option in the top-right corner of the screen to select the most appropriate mode for your upcoming activity. Options include Cycle (for general bike rides), Cycle for Distance, Cycle for Time, Cycle Intervals, or Mountain Bike.
![]() Tip
Tip
To customize the dashboard and the information it displays, after launching the app, tap on the Stopwatch option. Tap on the up arrow icon (“^”) to the right of the Start button, and then tap on the Pages option.
To personalize the information and Main Overview screen of the dashboard, tap on the Main Overview option, and then tap on the +/Edit option in the top-right corner. Repeat this process for each of the dashboard pages, and if you choose, create additional pages. Then when you’re riding and using the app, you can switch between these page displays by swiping your finger sideways.
Cyclemeter GPS is an advertiser-supported app. Thus, banner ads display on the screen while the app is in use, and periodically, a pop-up window with a short commercial video appears onscreen.
By paying $4.99 per year (via an in-app purchase), you can upgrade to the Elite version of Cyclemeter GPS, which removes the ads and unlocks many additional features, like Apple Watch compatibility, the ability to view terrain maps (via Google Maps), automatically record weather conditions, track biometrics (when you use the appropriate sensors), and log relevant data the iPhone’s Health app collects.
![]() Tip
Tip
You can also use Cyclemeter GPS indoors with a stationary bike, spin bike, bike trainer, treadmill, or other home workout equipment. Just tap on the Stopwatch icon, tap on the up arrow icon (“^”), and then scroll down and turn on the Indoors option. Be sure to turn this feature off again when you go back to riding a regular bike outside.
MapMyRide+ GPS Cycling and Route Tracking
You’ve already learned about the MapMyRun and MapMyWalk apps from Chapter 7, “Explore Fitness Solutions for Walkers, Joggers, and Runners.” The MapMyFitness company (www.maymyfitness.com) developed both the MapMyRide app (free) and the premium MapMyRide+ app ($2.99). All the apps in this family have a similar user interface, but cater to specific activities.
To fully use the MapMyRide app (shown in Figure 8.4), you must set up a free MapMyFitness online account, which also grants you access to the vast online community of fellow MapMyRide users.
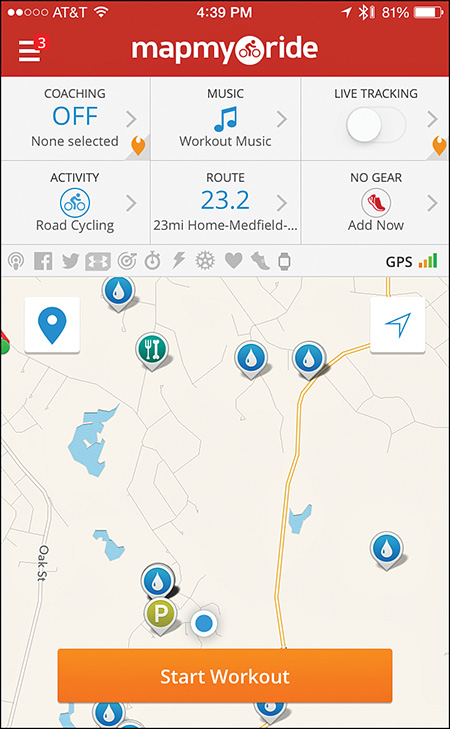
FIGURE 8.4 Use the MapMyRide+ app for navigation, and to collect, track, and analyze fitness-related data of interest to cyclists.
The core functionality of this app is based on planning, tracking, and recording the routes you take while biking. At the same time, the app gathers and tracks a wide range of real-time data, based on what optional equipment (such as an optional bike computer) you have linked to the app.
If you already have a MapMyFitness online account for one of the company’s other apps, you can use that same account information with MapMyRide. Just log in to the app with your existing email address and password.
MapMyRide is compatible with more than 400 bike computers, fitness/activity trackers, and other optional data-gathering equipment, and can pull data from these wirelessly connected devices and incorporate it with the real-time navigation information provided by the app. What data is collected and shared with the iPhone is based on which optional bike computer is linked with the app.
As the MapMyRide app gathers data, it can also share it with the iPhone’s Health app and other compatible apps, although to use many of the analytical features in the MapMyRide app, you need to upgrade to a paid MVP membership.
![]() Tip
Tip
One advantage of paying for an MVP membership for the MapMyRide app is that you can participate in Challenges with or against other people from the online-based MapMyFitness community. An MVP membership costs $5.99 per month, or $29.99 per year, and it unlocks a variety of features that you can use for training and live tracking. Virtual mobile coaching is offered as a premium feature, for example.
While you use the MapMyRide app, the main dashboard screen displays a detailed map that shows your current location and can also highlight your intended route (and provide real-time directions to your destinations), and/or it can display where you’ve been. Details, such as your speed, distance traveled, time, and calories burned, simultaneously appear on the screen.
![]() Tip
Tip
Perhaps the most popular feature of the MapMyRide app is the vast database of more than 70 million pre-planned routes you can access. Using your iPhone’s GPS, the app can detect your current location, and then recommend nearby routes based on your intended goals. You can sort routes by location, length, or level of difficulty, for example.
You can access route information not only from the app, but also from the MapMyRide website (www.mapmyride.com). From either this site or the app, you can also create your own route(s), and/or choose to share them with the online community.
Runtastic Road Bike Pro
Free and paid ($4.99) versions of the Runtastic Road Bike Pro app, shown in Figure 8.5, are available from the App Store. Runtastic developed both app versions as well as the extremely popular Runtastic app for runners (which you learned about in Chapter 7). Designed for cyclists, the Runtastic Road Bike Pro app was created together with road bike experts. It transforms the iPhone into a feature-packed GPS cycling computer.
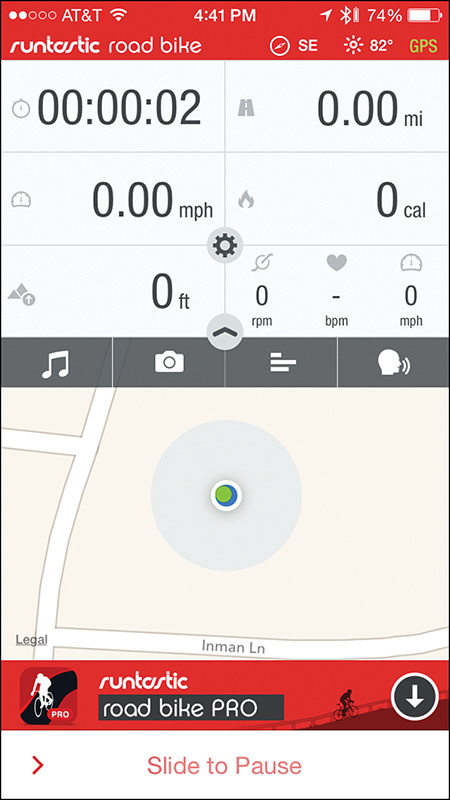
FIGURE 8.5 The Runtastic Road Bike Pro app serves as a bike computer and navigational tool, while also collecting and tracking fitness-related information about the rider.
Using the iPhone’s built-in GPS capabilities, the app can automatically track and record routes traveled, while at the same time collect distance, duration, speed, elevation gain, pace, and calories burned data, and other pertinent real-time information. The app can also gather traffic, weather, wind, and terrain details pertaining to a specified route.
As you would expect, you can custom configure the app’s main dashboard to display only the real-time information you’re interested in, although the app continues to monitor and record other data in the background.
Using optional hardware, such as a fitness/activity tracker or a stand-alone heart rate monitor, you can also monitor and record real-time heart rate data during each bike ride.
As of Summer 2015, the app did not yet support Apple Watch, but it does support the Pebble and Pebble Time smartwatches, and a wide range of other popular fitness/activity trackers.
Real-time data always prominently appears on the screen during a ride, but you can also hear a voice coach reciting this information. At the end of a ride, the app offers detailed post-tour analysis. On this report, you’ll see information including distance traveled (uphill, on flat terrain, and on downhill terrain), duration of the trip, maximum speed, calories burned, average pace, and average speed.
Like the MapMyRide app, Runtastic Road Bike Pro and its related website (www.runtastic.com) offer an ever-growing database of recommended bike routes. To get the most out of this app, mount your iPhone directly on your bike. You can do this using any optional casing and mount, although Runtastic offers its own Runtastic Bike Case for iPhone ($49.99) for this purpose.
Also available from the Runtastic online store (www.runtastic.com/shop/usa) is a selection of optional sensors that work with the Runtastic Road Bike Pro app for collecting, displaying, and recording real-time data beyond what the iPhone can do on its own. For example, the Runtastic Speed & Cadence Sensor ($59.99) transforms the iPhone into a professional cycling computer that can record speed, cadence, GPS position, distance, altitude, and other data.
You attach this optional sensor directly to your bike, and it can also work with the company’s optional Runtastic Heart Rate Combo Monitor (sold separately for $69.99). You wear this Bluetooth-compatible heart rate monitor around your chest, and it shares real-time data with the Runtastic Road Bike Pro app and the iPhone’s Health app.
After you set up the Runtastic Road Bike Pro app and get it operational, the on-screen dashboard displays a lot of real-time information, but unlike other apps, much of this data is not color-coded, so you’ll need to familiarize yourself with the dashboard layout to be able to understand the information at a quick glance. To access the dashboard, tap on the Session icon at the bottom of the screen.
To customize the Voice Feedback you receive during a ride, from the dashboard, tap on the Voice icon (in the top-right corner of the map). Turn on the Enabled option to activate the Voice Feedback feature, and then use the onscreen controls to adjust the volume, to have the music pause during an announcement, and to choose the voice used.
Under the Include in Feedback heading are a handful of options that allow you to determine exactly what information the Voice Feedback feature will share during a ride. Turn on or off each option’s virtual switch to fully customize this feature.
If you’re using the free version of the app, banner ads appear near the bottom of the screen between the dashboard display and the app’s main command icons. Upgrading to the paid version of the app removes these ads.
The first time you launch the app, be sure to tap on the Settings icon that appears at the bottom of the screen, and then from the Settings menu, tap on each feature to adjust the various options and personalize the app to best meet your needs.
Strava Running and Cycling
Offering a somewhat slicker-looking dashboard screen than its competition, the free Strava Running and Cycling app for the iPhone is also compatible with the Apple Watch (see Figure 8.6). This app offers many of the same features and functions as the other cycling apps covered in this chapter, in that it allows you to track your rides in real time using your iPhone’s GPS capabilities, while also collecting useful data about your trip (such as distance, pace, speed, elevation gained, and calories burned) and biometric data (like your heart rate).

FIGURE 8.6 The Strava Running and Cycling app for the iPhone and Apple Watch is another powerful tool designed for cyclists and runners alike.
![]() Tip
Tip
You must use the Strava Running and Cycling app with the Apple Watch, an optional fitness tracker, and/or a dedicated bike computer, for example, to monitor and track your heart rate, power and cadence data, and some other information. You can share all data the app collects (with whatever optional equipment the app is linked with via the iPhone) with the iPhone’s Health app and other compatible health and fitness-related apps.
The Strava Running and Cycling app has a strong focus on social interaction. You can create a profile for yourself, and then share details about your rides with others via the Internet and participate in competitive challenges. Thus, you need to set up a free online account to use this app. The first time you use the app, if you’re a cyclist, be sure to tap on the Cycling option when asked to select your primary sport. This app also offers a comprehensive set of tools for runners.
After the app launches, using it is extremely straightforward. When you’re ready to begin recording a ride, tap on the Record icon at the bottom of the screen, tap on the large Record button that then appears near the bottom center of the screen, and start riding.
When you finish the ride, tap on the checkered-flag Finish icon. You can then either save your ride data by tapping on the Save option, or discard the ride data by tapping on the Trash icon.
At any time, tap on the Profile icon to add information to your personal profile, which you can share with the app’s online community. Sharing your profile is particularly important if you plan to participate in the organized Challenges (which you can do by tapping on the Challenges icon).
Prior to starting a ride, you can access the Strava website (www.strava.com/routes/new) to create a route to follow, or select from a pre-created route in your area. At any time while you’re riding, tap on the Map option (near the top-right corner of the screen) to view a detailed, real-time map.
![]() Note
Note
To unlock some of the app’s more advanced features, you need to upgrade to the Premium version of the app for $5.99 per month or $59.99 per year.
Using the Wahoo Fitness RFLKT+ Bike Computer
Although your iPhone can collect and gather certain types of data on its own, when it comes to cycling, to acquire and track a broader range of data in an accurate way, you’ll probably want to connect a dedicated bike computer to your bike. Be sure to select a bike computer that can communicate and share data wirelessly with your iPhone.
Wahoo Fitness offers two dedicated bike computers, the RFLKT ($99.99) and RFLKT+ ($129.99), both of which are available from the company’s website (www.wahoofitness.com/devices/rflkt.html). Figure 8.7 shows the RFLKT+. As you can see, it features its own display, is waterproof, and can easily mount to any bicycle.
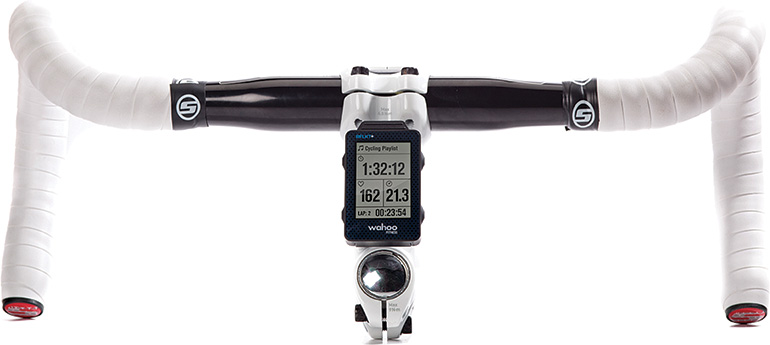
FIGURE 8.7 The RFLKT+ is a dedicated bike computer that can wirelessly share information with the iPhone.
These computers have their own built-in sensors and GPS capabilities that allow users to collect more comprehensive data (including cycling speed, cadence, and distance data) related to their rides, compared to using the iPhone alone for data collection and tracking purposes.
What’s nice about these dedicated bike computers is that they’re fully compatible with many popular cycling apps, including Cyclemeter GPS, MapMyRide, Strava Running and Cycling, and the Wahoo company’s own Wahoo Fitness app.
![]() Note
Note
Wahoo Fitness also offers the optional Blue SC Speed and Cadence Sensor ($59.00) and RPM Cadence Sensor ($49.99), which are sold separately, and that enable you to collect and share cycling speed, cadence, and distance data with the iPhone, without using a dedicated bike computer. You can also use the optional TICKR Heart Rate Monitor ($59.99) or TICKR X Workout Tracker with Memory ($99.99) to monitor and gather real-time heart rate data during a ride.
For anyone who is serious about cycling for fitness or competition, using one of the RFLKT dedicated bike computers with a compatible cycling app on the iPhone offers a comprehensive toolset that can collect, display, analyze, store, and potentially share data.
Just as a fitness/activity tracker enhances the iPhone’s data collection during your run, workout, or other fitness-oriented activity, using the iPhone with a dedicated bike computer allows your iPhone to track data of particular interest to cyclists.
Other companies that offer powerful bike computers include:
![]() Cateye Strada: www.cateye.com
Cateye Strada: www.cateye.com
![]() Garmin: www.garmin.com
Garmin: www.garmin.com
![]() Sigma Sport: http://sigmasport.com/us/produkte/bikecomputer
Sigma Sport: http://sigmasport.com/us/produkte/bikecomputer
![]() Timex: www.timex.com/sport
Timex: www.timex.com/sport
You can purchase these bike computers and others like them online, from bike specialty retail stores, and sporting goods stores (like REI).
![]() Tip
Tip
The RFLKT bike computers are stand-alone devices that can gather and share data, so they have their own display and mount on your bike. However, you can mirror the same displayed information (in full color) on the iPhone’s screen. By having two screens mounted on your bike (one from the RFLKT and one from the iPhone) instead of having the same data displayed on both screens, the computer and iPhone can use the same data, but display different information on each screen as it’s being collected in real time. You can also just keep the iPhone in a jersey pocket or case, and not actually mount it on the bike.
Navigating Safely with the Hammerhead One
Released in May 2015, the Hammerhead One ($85.00) is a navigational tool that connects to any bicycle. As you can see from Figure 8.8, it uses GPS information from the iPhone (via a Bluetooth connection), but shows where to go and what turns to make using simple, color-coded LED lights instead of complex maps.
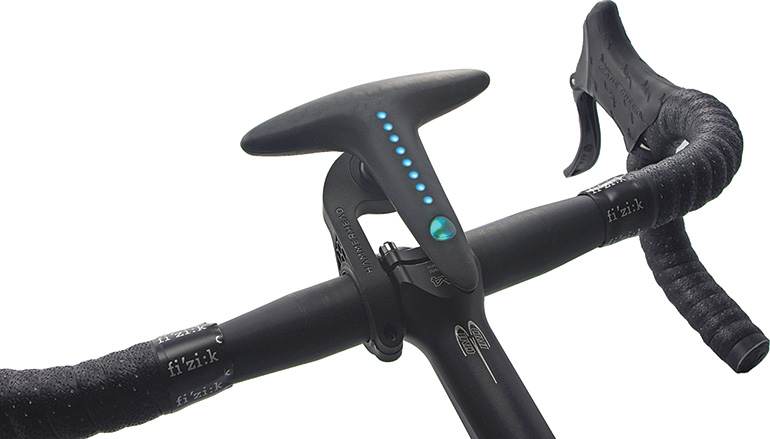
FIGURE 8.8 Instead of displaying complex maps that can distract a cyclist, the Hammerhead One uses colorful LED lights to display navigation information that originates from the iPhone.
Using the proprietary iPhone app exclusively for use with the Hammerhead One device, you can plan a route, and then put your iPhone away in a pocket. The iPhone then communicates with the Hammerhead One wirelessly, and displays navigation information in a simple way that you can use day or night, and in any weather condition. To get to where you’re going, you simply follow the lights as you’re riding.
Thanks to the active online community that supports the Hammerhead One, a growing number of pre-planned bike routes are available, or you can easily plan your own route by choosing a start and finish location, as well as any waypoints in between.
The iPhone app then serves as a traditional GPS system, displaying a detailed map, with your current location, as well as information about your speed, distance to go, and distance traveled. However, while you’re riding, you can place the iPhone in sleep mode and put it in a pocket.
Looking at detailed maps when trying to ride a bike, particularly in a city or on busy roads, can be dangerous. This is where the Hammerhead One is useful. It shows you where to go and warns you of changing terrain and upcoming turns, using colored lights that don’t take your focus away from the road ahead or the traffic you’re alongside.
![]() Note
Note
The Hammerhead One provides comprehensive GPS and navigation functionality to cyclists without compromising their safety. This device does not track fitness-related data. It’s simply a navigational tool that allows you to preplan a route, and then travel toward that destination without having to look at your iPhone’s screen while en route.
Currently, the Hammerhead One is available exclusively from the company’s website (http://hammerhead.io). The product was designed by cycling enthusiasts, and ultimately funded thanks to a crowd-funding campaign supported by more than 4,000 cyclists from around the world.