
8. Shoot, Edit, and Share Photos and Videos
In This Chapter
![]() Tips and tricks for shooting, editing, and sharing photos and videos from your iPhone or iPad
Tips and tricks for shooting, editing, and sharing photos and videos from your iPhone or iPad
![]() Discover the image editing tools built in to the Photos app
Discover the image editing tools built in to the Photos app
![]() Take advantage of the Camera app’s new Selfie and Live Picture features when using an iPhone 6s or iPhone 6s Plus
Take advantage of the Camera app’s new Selfie and Live Picture features when using an iPhone 6s or iPhone 6s Plus
Every day, more than 1.3 billion photos are taken on smartphones and tablets around the world. People love taking photos, and thanks to the two digital cameras built in to all the iPhone and iPad models released within the past few years, plus improvements made to the iOS 9 edition of the Camera and Photos apps, it has never been easier or more fun to shoot, edit, view, print, and share your digital images or video clips.
![]() What’s New
What’s New
The iPhone 6s and iPhone 6s Plus not only offer a 12-megapixel rear-facing camera (with a flash) and a 5-megapixel front-facing camera (with a new feature that allows the smartphone’s screen to serve as a flash), but when used with the iOS 9 edition of the Camera app, it’s possible to use the new Selfie picture taking feature, plus snap what Apple calls “Live Photos,” that can be viewed on any Apple computer or mobile device.
The new Live Photo option enables you to snap a photo but capture it as a two- to three-second mini-movie that can later be viewed as an animated image on any iPhone, iPad, iPod touch, Mac, Apple TV, or Apple Watch that’s using the Photos app or is capable of displaying digital photos in other ways. For example, you can use a Live Photo as your custom watch face on the Apple Watch or as the Lock screen wallpaper on your iPhone or iPad.
A Live Photo can still be treated as a regular digital image file. It can be shared online, emailed, or printed, for example.
Whether you’re using one of these latest iPhone models or an older iPhone (or any iPad model for that matter), it’s possible to take crystal-clear photos and create large and vibrant full-color prints from your digital image files or share those images using options offered by the Photos app’s Share menu.
![]() What’s New
What’s New
When using the iPhone 6s or iPhone 6s Plus and viewing the Home screen, instead of launching the Camera app by tapping on its app icon, place and hold your finger gently on the app icon to reveal a new menu that enables you to access the new Selfie picture taking feature, record a video, record a Slo-mo video, or take a regular photo by tapping on one of the listed options (shown in Figure 8.1).
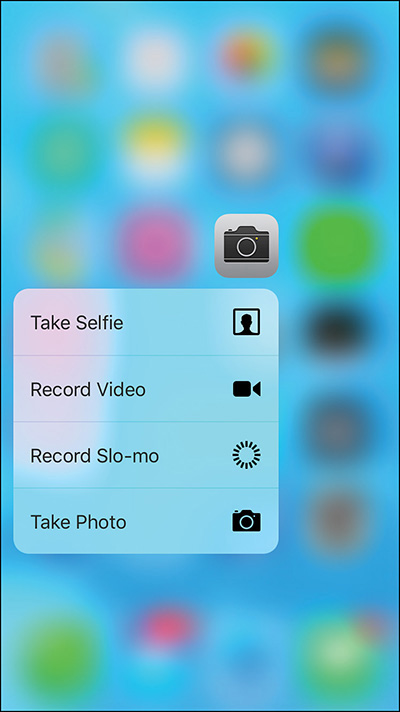
Figure 8.1 Quickly launch a specific feature of the Camera app directly from the Home screen by placing and holding your finger on the Camera app icon for about 2 seconds and utilizing the iPhone 6s or iPhone 6s Plus’s new 3D Touch functionality.
Some Camera App Features Are Available Only on Certain iPhone and iPad Models
The Camera app continues to be one of the core apps that come preinstalled with the iOS 9 operating system. The same version of the Camera app is installed on all iOS mobile devices. However, based on which iPhone or iPad model you’re using, some of the features and functions of the Camera app might not be available to you.
Features such as the new Selfie picture taking mode and the ability to shoot “Live Photos,” for example, work only with the latest iOS mobile devices that offer 3D Touch functionality built in to the device’s touchscreen.
The Camera and Photos Apps Are Chock Full of Features
When it comes to taking, viewing, editing, and sharing pictures using your iPhone or iPad, the Camera and Photos apps each offer a collection of powerful features, like zoom capabilities, a panoramic shooting mode, a timer, a time-lapse shooting mode, plus easy-to-use autofocus sensors that help ensure your photos are blur-free and utilize the available lighting in the best way possible.
Methods for Loading Digital Images into Your iPhone or iPad
Before you can view, edit, print, and share your favorite digital images, you first must either shoot them using the Camera app or transfer the images into your iOS device.
![]() Note
Note
Facebook, Twitter, Instagram, and other third-party apps enable you to access and use your iPhone or iPad’s built-in cameras without using the Camera app. It’s also possible for these apps to access the Photos app’s image folders, such as the All Photos or Favorites folder.
If you activate the iCloud Photo Library feature offered by the Photos app (which enables you to sync all of your digital images between all iOS mobile devices and computers linked to the same iCloud account), your main photos album where all of your photos are stored, including all newly shot photos, is called “All Photos.” However, when iCloud Photo Library is turned off, the main album where you’ll initially find all photos you take using your iPhone or iPad is called “Camera Roll.”
Aside from shooting images using one of your iOS device’s built-in cameras, there are several ways to import photos and then store them in the Photos app:
![]() Use the iTunes sync process with the Photos app running on a Mac or PC. By linking your iPhone or iPad with your computer (via the supplied USB cable), you can transfer photos or entire albums.
Use the iTunes sync process with the Photos app running on a Mac or PC. By linking your iPhone or iPad with your computer (via the supplied USB cable), you can transfer photos or entire albums.
![]() Load photos from your online-based iCloud Photo Library from within the Photos app.
Load photos from your online-based iCloud Photo Library from within the Photos app.
![]() Tip
Tip
If multiple images are attached or embedded within an incoming email, from the Mail app, when you use your finger and hold it on one of the images, a Save [number] Images option is displayed in addition to the Save Image option. Use the Save [number] Images option to save all the photos within the email at once to the All Photos/Camera Roll album in the Photos app.
![]() Receive and save photos sent via text/instant message. Tap on the image you receive using the Messages app, and then tap on the Save command.
Receive and save photos sent via text/instant message. Tap on the image you receive using the Messages app, and then tap on the Save command.
![]() Save images directly from a website as you’re surfing the Web. Hold your finger on the image you’re viewing in a website. If it’s not copy-protected, after a second or two a menu appears, enabling you to save the image or copy it to your device’s virtual clipboard (after which you can paste it into another app). Tap on the Save Image or Copy options, respectively (shown in Figure 8.2).
Save images directly from a website as you’re surfing the Web. Hold your finger on the image you’re viewing in a website. If it’s not copy-protected, after a second or two a menu appears, enabling you to save the image or copy it to your device’s virtual clipboard (after which you can paste it into another app). Tap on the Save Image or Copy options, respectively (shown in Figure 8.2).
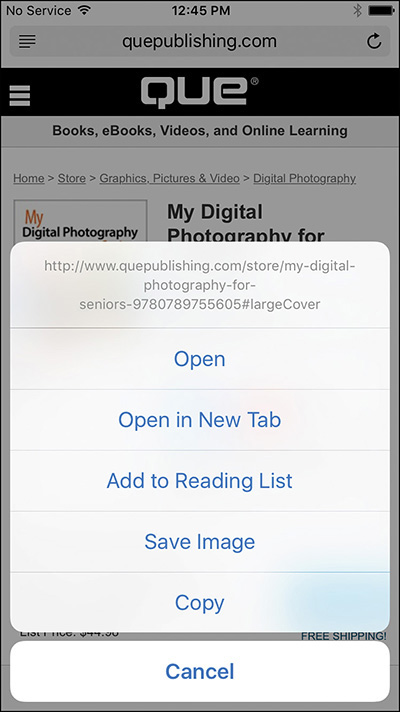
Figure 8.2 Tap on the Save Image option to save an image in your iPhone or iPad that you discover on a web page.
![]() Images can be sent to your iPhone or iPad wirelessly via AirDrop. For this feature to work, AirDrop must be turned on, which can be done from the Control Center. Launch Control Center, tap on the AirDrop option, and then select Contacts Only or Everyone. You can then send images to other AirDrop-compatible computers or mobile devices, or receive images sent to you using this method. Received photos are automatically placed in your All Photos/Camera Roll album.
Images can be sent to your iPhone or iPad wirelessly via AirDrop. For this feature to work, AirDrop must be turned on, which can be done from the Control Center. Launch Control Center, tap on the AirDrop option, and then select Contacts Only or Everyone. You can then send images to other AirDrop-compatible computers or mobile devices, or receive images sent to you using this method. Received photos are automatically placed in your All Photos/Camera Roll album.
![]() Use the optional Camera Connection Kit ($29, available from Apple Stores or Apple.com) to load images from your digital camera or its memory card directly into your iPhone or iPad.
Use the optional Camera Connection Kit ($29, available from Apple Stores or Apple.com) to load images from your digital camera or its memory card directly into your iPhone or iPad.
Use the Camera App to Take Photos or Shoot Video
There are a variety of ways you can launch the Camera app to begin shooting photos or video quickly.
Ways to Launch the Camera App
There are several easy ways to launch the Camera app, including the following:
![]() From the Home screen, tap on the Camera app icon.
From the Home screen, tap on the Camera app icon.
![]() From the Lock screen, place your finger on the camera icon that’s displayed in the bottom-right corner of the screen, and then swipe your finger upward.
From the Lock screen, place your finger on the camera icon that’s displayed in the bottom-right corner of the screen, and then swipe your finger upward.
![]() Tap on the Camera app icon that’s displayed in the Control Center.
Tap on the Camera app icon that’s displayed in the Control Center.
![]() On an iPhone 6s or iPhone 6s Plus, press on the Camera app icon displayed on the Home screen to reveal a pop menu for using specific Camera app features (refer to Figure 8.1).
On an iPhone 6s or iPhone 6s Plus, press on the Camera app icon displayed on the Home screen to reveal a pop menu for using specific Camera app features (refer to Figure 8.1).
![]() Activate Siri and say, “Launch the camera app.” If you’re using one of the newer iPhones or iPads, simply say, “Hey Siri, launch the Camera app,” without having to press and hold down the Home button.
Activate Siri and say, “Launch the camera app.” If you’re using one of the newer iPhones or iPads, simply say, “Hey Siri, launch the Camera app,” without having to press and hold down the Home button.
![]() If the Camera app is already running in the background, access the App Switcher and select the Camera app.
If the Camera app is already running in the background, access the App Switcher and select the Camera app.
How to Shoot Photos or Video with the Camera App
The main camera viewfinder screen appears as soon as you launch the Camera app on an iPhone, iPod touch, or iPad. Figure 8.3 shows the main Camera app viewfinder screen on an iPhone 6, while Figure 8.4 shows the Camera app on the iPhone 6s (which offers the Live Photo feature). Figure 8.5 shows the Camera app’s viewfinder screen on an iPad.
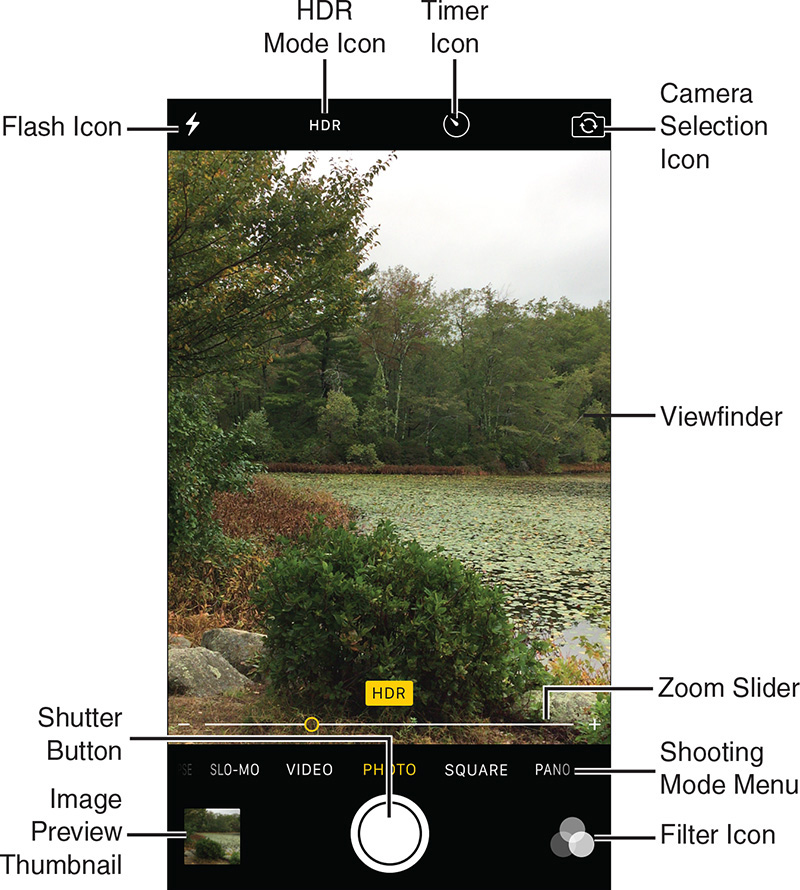
Figure 8.3 From the Camera app’s main screen (shown here on the iPhone 6), you can snap digital photos or shoot video.
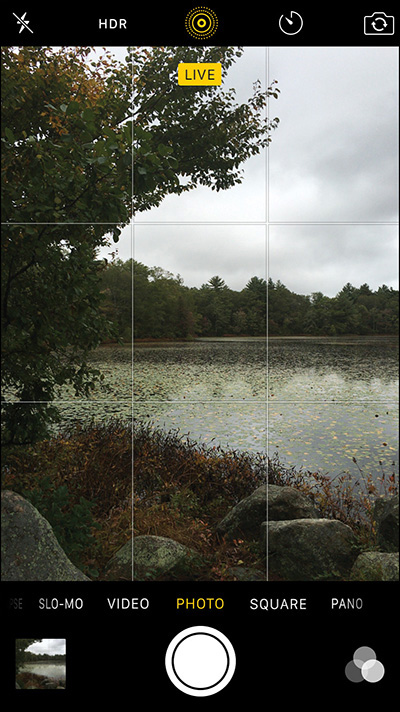
Figure 8.4 The Camera app on the iPhone 6s (or iPhone 6s Plus) offers the new Live Photo icon displayed at the top-center of the screen.
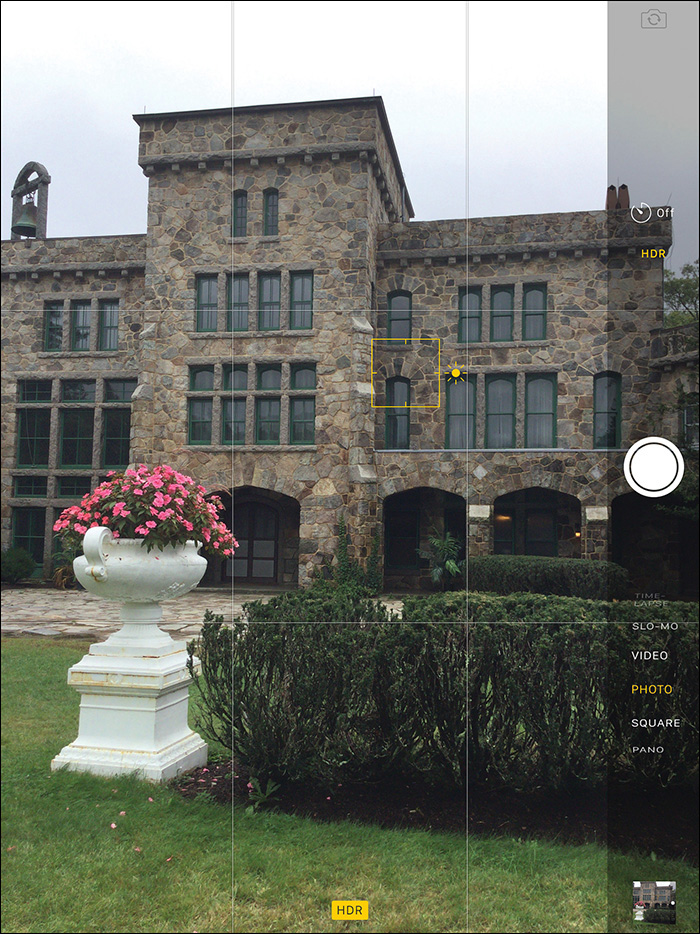
Figure 8.5 The Camera app looks slightly different on an iPad but offers much of the same functionality.
![]() Tip
Tip
To snap a Live Photo (iPhone 6s or iPhone 6s Plus), first tap on the Live Photo icon displayed at the top center of the viewfinder screen to turn on this feature. Then take a photo as you normally would by utilizing any of the Camera app’s other features and functions. Keep in mind that the Live Photo feature works only when the Camera app is set to Photo mode (not Square, Time Lapse, or Pano mode, for example). It does still work, however, with the Timer feature turned on.
When using the Camera app on any iOS mobile device, the main area of the screen serves as your camera’s viewfinder.
On the iPhone, along the bottom of the screen are several command icons and options. When using the Camera app with the iPad, all command icons and options are displayed along the right margin of the screen.
![]() Note
Note
If you’re using an older iPhone or iPad model, such as an iPhone 4s, iPhone 5, or iPad 3, some of the features and functions discussed in this chapter (such as HDR mode, Live Photo, and Burst shooting mode) are not available to you.
To view the last photo you shot (or the last video clip recorded), tap on the Image Preview thumbnail displayed in the bottom-left corner of the viewfinder screen. You can then use the Photo app’s viewing and editing functions on that image.
At the bottom center of the screen on the iPhone is the camera’s round Shutter button. Tap on this to snap a photo or to start and stop the video recording process. In Video mode, the Shutter button icon transforms from a bright red circle into a red square (pause button) when you tap on it to begin shooting a video clip.
![]() Tip
Tip
In Photo mode, if you press and hold down the Shutter button, Burst shooting mode automatically activates on newer iPhone and iPad models. This feature enables you to shoot multiple photos in quick succession (several frames per second) without having to keep pressing the Shutter button.
This feature is ideal for capturing a fast moving subject, for example, and allows you to capture an action or event that happens very quickly. You can always delete the unwanted (extra) photos after choosing your favorite image(s) from the sequence.
Images shot using Burst shooting mode are placed in a separate album in the Photos app called Bursts.
Overview of the Camera App’s Shooting Modes
From the Shooting Mode menu, your options include Time-Lapse, Slow-Mo, Video, Photo, Square, and Pano. This menu is displayed directly above the Shutter button. Use your finger to manually scroll left or right to select your shooting mode. The active shooting mode is highlighted in yellow and displayed directly above the Shutter button.
![]() Note
Note
If you’re using an iPhone 6s or iPhone 6s Plus, the new Selfie shooting mode allows you to snap a photo while using the smartphone’s screen as your flash. This can be accessed from the Home screen using the Camera app’s Pop menu, or from the main Camera app’s viewfinder screen. Make sure the flash option is set to on or auto.
![]() The Time-Lapse feature enables you to set up the Camera app to automatically keep snapping one photo at a time (the time interval is dynamically set by the iOS device) until you manually turn off this function. This feature works best if you mount the iOS mobile device on a tripod, or use it with a stand. It’s great for capturing changes that happen in a single scene over time, such as a sunrise or sunset. The content created when using the Time Lapse feature is stored in the Photos app as a video, not as a series of photos.
The Time-Lapse feature enables you to set up the Camera app to automatically keep snapping one photo at a time (the time interval is dynamically set by the iOS device) until you manually turn off this function. This feature works best if you mount the iOS mobile device on a tripod, or use it with a stand. It’s great for capturing changes that happen in a single scene over time, such as a sunrise or sunset. The content created when using the Time Lapse feature is stored in the Photos app as a video, not as a series of photos.
![]() Note
Note
When shooting with Time Lapse mode, the longer you leave the feature turned on (so the Camera app keeps taking photos automatically over an extended period of time), the longer the interval is between shots. Typically, if you leave this feature turned on long enough, the images are condensed into a 30- to 40-second mini-movie that shows the animated time-lapsed images.
![]() The Slo-Mo option enables you to shoot high-action video but play it back in slow motion. When using the iPhone 6/6s/6 Plus/6s Plus, you can capture slow-motion video at up to 240 frames per second, as opposed to 120 frames per second using the iPhone 5s and some iPad models. This shooting mode is ideal if you’re shooting a fast-moving subject or a high-action activity.
The Slo-Mo option enables you to shoot high-action video but play it back in slow motion. When using the iPhone 6/6s/6 Plus/6s Plus, you can capture slow-motion video at up to 240 frames per second, as opposed to 120 frames per second using the iPhone 5s and some iPad models. This shooting mode is ideal if you’re shooting a fast-moving subject or a high-action activity.
![]() The Video shooting mode is used to shoot 1080p HD-quality video using your iPhone or iPad. Depending on which device you’re using, it’s possible to shoot at 30 or 60 frames per second. Keep in mind that your iPhone or iPad is ideal for shooting relatively short video clips. These HD video files take up a tremendous amount of storage space, so if you want to shoot long home videos, consider using a dedicated video camera.
The Video shooting mode is used to shoot 1080p HD-quality video using your iPhone or iPad. Depending on which device you’re using, it’s possible to shoot at 30 or 60 frames per second. Keep in mind that your iPhone or iPad is ideal for shooting relatively short video clips. These HD video files take up a tremendous amount of storage space, so if you want to shoot long home videos, consider using a dedicated video camera.
![]() Note
Note
From within Settings, you can select the video shooting resolution. The options vary based on the device you’re using. If you’re using an iPhone 6s or iPhone 6s Plus, for example, it’s possible to shoot 4K resolution video at 30 frames per second (or you can choose a lower resolution).
To adjust the default video resolution on any iPhone or iPad, launch Settings, tap on the Photos & Camera option, and then tap on the Record Video option and/or Record Slo-Mo option.
Keep in mind that the higher the resolution you select, the larger your video files will be. Larger files require more internal storage space.
![]() The Photo shooting mode is what you’ll use most of the time when taking pictures. It allows you to snap regular, rectangular-shaped digital images.
The Photo shooting mode is what you’ll use most of the time when taking pictures. It allows you to snap regular, rectangular-shaped digital images.
![]() The Square shooting mode automatically precrops images as you’re shooting to be compatible with services such as Instagram. You wind up with square images.
The Square shooting mode automatically precrops images as you’re shooting to be compatible with services such as Instagram. You wind up with square images.
![]() The Pano shooting mode launches the Camera app’s panoramic mode, which is ideal for shooting vast landscapes, skylines, or large groups of people (shown in Figure 8.6). You wind up with a long, rectangular image.
The Pano shooting mode launches the Camera app’s panoramic mode, which is ideal for shooting vast landscapes, skylines, or large groups of people (shown in Figure 8.6). You wind up with a long, rectangular image.

Figure 8.6 The Pano (panoramic) shooting mode is ideal for shooting images of vast landscapes, large groups of people, or very wide areas.
![]() Tip
Tip
In addition to the Time-Lapse option, the Camera app offers a Timer option. To turn this on, tap on the Timer icon and then set the timer for 3 or 10 seconds. Doing this determines how long the Camera app waits between the time you press the Shutter button and when an image is actually taken and saved. This feature is available on most iPhone and iPad models.
The iPhone and iPad each have two built-in cameras—one in the front and one on the back of the device. The front-facing camera makes it easier to snap photos of yourself (that is, take a “selfie” or participate in video calls via FaceTime or Skype).
The rear-facing camera (which enables you to take much higher-resolution photos or video) enables you to photograph or record whatever is in front of you. Tap on the camera-shaped icon located in the top-right corner of the viewfinder screen to switch between cameras.
![]() Tip
Tip
Unless you’re taking a “selfie,” which is a photo of yourself, use the rear-facing camera whenever possible. This is a much higher-resolution camera. Using it will enable you to shoot more detailed, vibrant, and higher-quality images or video.
Take Advantage of the HDR Shooting Feature
The HDR feature offered by the Camera app stands for High Dynamic Range. It can be used with the rear-facing camera only. When turned on, this feature captures the available light differently, and can help you compensate for a photo that would otherwise be over- or underexposed.
When you take a photo using HDR mode, the iPhone or iPad actually captures several separate images simultaneously and then automatically blends them into a single image in a fraction of a second. By doing this, it’s possible to capture more depth and contrast, plus make better use of available lighting. The result is often a more detailed and vibrant photo.
You can decide whether the original photo and the HDR version of a photo are both saved in the All Photos/Camera Roll album or just the HDR version of the image is saved. To make this adjustment, launch Settings, tap on the Photos & Camera option, and then turn on or off the virtual switch associated with the Keep Normal Photo option.
Depending on which iPhone or iPad model you’re using, you might have access to HDR Auto mode. This allows the camera to decide whether a photo benefits from this feature. Turning on HDR Auto mode takes some of the guesswork out of picture taking, and often results in better-quality images.
The HDR button is displayed near the top center of the Camera app’s viewfinder screen on the iPhone, or just above the Shutter button on the iPad. Tap it to toggle the HDR mode when taking photos.
On the latest iPhones and iPads are three HDR-related options: On, Off, or Auto. If HDR Auto is available (shown in Figure 8.7), it enables you to consistently capture the most vibrant photos in a wide range of lighting situations.

Figure 8.7 On the latest iPhone and iPad models, you can set HDR mode to On, Off, or Auto mode by tapping on the option at the top of the screen. On older iPhone and most iPad models, only the On or Off options are available.
![]() Note
Note
When you turn on the HDR mode, this automatically turns off the flash that’s built in to the iPhone, which could otherwise be used with the smartphone’s rear-facing camera.
How to Utilize the iPhone’s Built-In Flash
On the iPhone, the flash icon is located in the upper-left corner of the Camera’s viewfinder screen. It controls whether the iPhone automatically uses the built-in flash when needed as you’re shooting photos or video with the rear-facing camera. Tap the icon, then tap the On, Off, or Auto option to toggle this feature.
The Auto option is offered only on the newer iPhone models released within the past few years. The Auto option enables the smartphone to analyze the available light for you and automatically determine whether the flash is needed.
Keep in mind that even in low-light situations, you can often achieve better results if you shoot photos using the HDR shooting mode, as opposed to using the flash.
Starting with the iPhone 5 series, the smartphone includes what Apple calls a True Tone flash. This is really two flashes that work together and emit light in different colors. As a result, the Camera app analyzes the available light in each shooting situation and enhances it, while monitoring the natural colors within a photo.
The True Tone flash automatically reduces the red-eye effect when taking pictures of people and can often reduce or eliminate unwanted shadows in photos.
![]() What’s New
What’s New
When using the iPhone 6s or iPhone 6s Plus, if you activate the flash when using the front-facing camera, the screen of your iPhone automatically serves as a simulated flash to brighten up your face when the ambient light isn’t adequate. Make sure the Camera app’s flash option is turned on for this to work.
Take Advantage of the Autofocus and Exposure Control Options
As you’re looking at the Camera app’s viewfinder and framing your shot, be sure to force the app to focus in on your intended subject by tapping on the screen directly over where your subject appears.
When you do this, the Autofocus Sensor box appears in the viewfinder, and the Camera app then focuses in on your intended subject.
If you’re shooting people, however, the Camera app automatically identifies each person’s face in a photo and focuses in on those faces. An Autofocus Sensor box appears around each person’s face.
![]() Tip
Tip
In addition to the Autofocus Sensor, depending on which iOS mobile device you’re using, a manual Exposure Control slider might also be displayed. It looks like a sun-shaped icon that appears to the immediate right of the Autofocus Sensor.
When this Exposure Control slider is displayed (refer to Figure 8.7), place your finger on the sun-shaped icon and slide it upward or downward to manually adjust the exposure before snapping the photo.
How to Snap a Photo
Snapping a single digital photo using the Camera app is simple. Follow these steps:
1. Launch the Camera app.
2. Make sure the shooting mode is set to Photo or Square.
3. Choose which of your device’s two cameras you want to use by tapping on the camera selection icon.
4. Compose your image by holding up your device and pointing it at your intended subject(s).
5. If desired, set the Timer feature.
6. To add a special effect to the image as you’re shooting, tap on the Filter icon and then select one of the eight displayed filters by tapping on its preview image (shown in Figure 8.8). The filter thumbnail serves as the shutter button for snapping a photo when you tap on it.
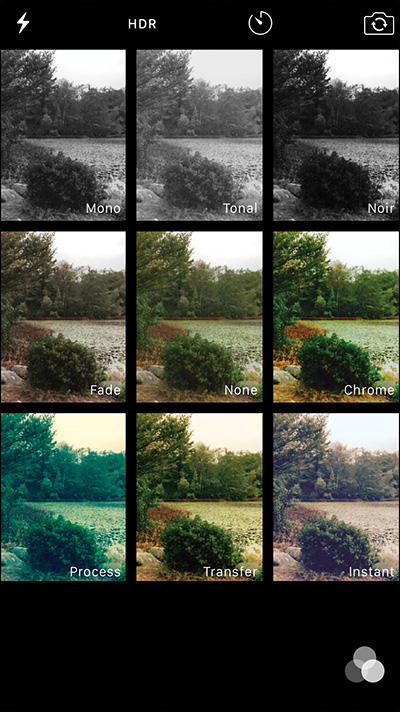
Figure 8.8 As you’re shooting a photo, you can choose one of the eight image filters to add an effect. Choose None (in the center) to shoot without using a filter. You can always add a filter later when editing a photo using the Photos app.
7. Choose the intended subject of your photo, such as a person or an object. Tap your finger on the screen where your subject appears in the viewfinder. An Autofocus Sensor box appears on the screen at the location you tap (refer to Figure 8.7). Where this box is positioned is what the camera focuses on (as opposed to something in the foreground, background, or next to your intended subject).
8. If necessary, use the Exposure Control slider (refer to Figure 8.7) to manually adjust the exposure just before snapping a photo. Keep in mind that using the Photos app, you can later adjust or correct a variety of problematic issues within a photo, including its exposure, contrast, saturation, color, and shadows. These are some of the editing tools built in to the iOS 9 edition of the Photos app.
![]() Tip
Tip
As you’re holding your iPhone or iPad to snap a photo or shoot video, be sure your fingers don’t accidentally block the camera lens that’s being utilized. On the more recent iPhone models, next to the rear-facing camera lens is a tiny flash. Keep your fingers clear of this, as well.
9. If you want to use the Camera app’s zoom feature, use a pinch motion on the screen. A zoom slider (shown in Figure 8.9) appears directly above the Shooting Mode menu and the Shutter button. Use your finger to move the dot on the slider to the right to zoom in, or to the left to zoom out. Alternatively, use a pinch or reverse-pinch finger gesture to manage the zoom level while shooting.
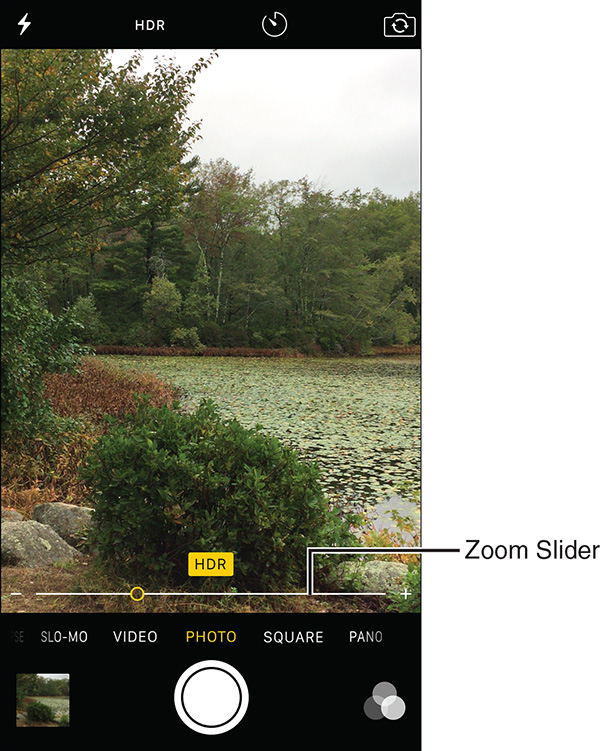
Figure 8.9 As you’re framing an image, zoom in (or out) on your subject using the onscreen zoom slider. Use a pinch finger gesture on the screen to make this slider appear, and then move it to the right or left to increase or decrease the zoom level.
10. Decide whether you want to use HDR mode or the built-in flash (iPhone only) when taking the photo. (You can also choose neither of these options.) Another option, on some more recently released iPhones, is to set both the flash and HDR mode to Auto, and then let the Camera app decide which feature to use. On the iPad, set HDR mode to Auto to allow the Camera app to decide whether this feature is needed. (iPads do not have a rear-facing built-in flash.)
11. When you have your image framed in the viewfinder, tap on the Shutter button to snap the photo. You can also press the Volume Up (+) or Volume Down (-) buttons on the side of your iPhone/iPad, which serve as a Shutter button when using the Camera app.
12. The photo is saved in the All Photos/Camera Roll album of the Photos app. You can now shoot another photo or view the photo using the Photos app.
![]() Note
Note
All regular photos are automatically stored in the All Photos/Camera Roll album as they’re taken. The iOS 9 edition of the Photos app automatically places selfies into a separate Selfies album and sorts your panoramic shots into a Panoramas album.
Videos are placed in a separate Videos folder, and Slo-mo video clips are stored in an album called Slo-mo.
When you use the Burst shooting mode, these groups of images are clustered together and placed in the Bursts album.
All these albums are automatically created for you. In the Photos app, you can move images into the Favorites album or custom-named albums you create manually.
How to Shoot a Panoramic Photo
To take advantage of the panoramic shooting mode to snap a photo of a landscape, city skyline, or a large group of people, follow these steps:
1. Launch the Camera app.
2. Swipe on the Shooting Modes menu and select the Pano shooting mode.
3. Position your iPhone or iPad’s viewfinder to the extreme left of your wide-angle shot. (When using the Pano shooting mode, hold the smartphone or tablet upright in portrait mode, unless you’re shooting a very, very tall object).
![]() Tip
Tip
If you tap on the large arrow icon in the viewfinder, you can switch the panning direction from right to left, instead of left to right as you’re capturing a panoramic shot.
4. Tap the Shutter button, and then slowly and steadily move your iPhone or iPad from left to right (shown in Figure 8.10). If you go too fast, a message appears on the screen telling you to slow down.
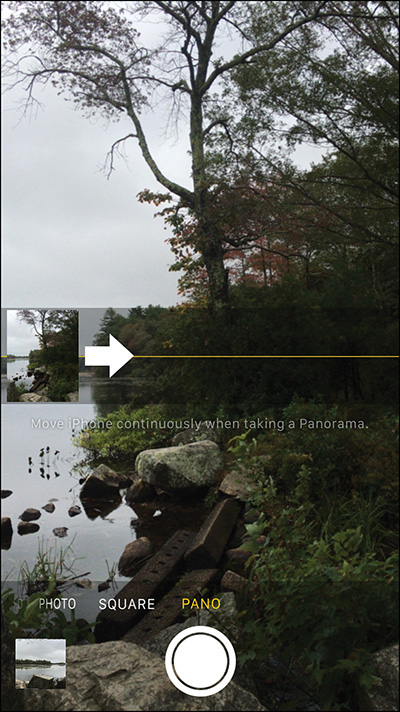
Figure 8.10 When taking panoramic shots, the viewfinder screen looks very different on your iPhone or iPad.
5. The panorama slider moves from left to right as you capture your image. Tap the Shutter button again when you’re finished, or continue moving the iOS device to the right until the entire length of the image has been captured.
6. The panoramic photo is saved in the Panoramas folder of the Photos app. You can then view, edit, or share it from within Photos.
![]() Tip
Tip
When viewing a panoramic photo, hold your iPhone or iPad in landscape mode; however, when shooting a panoramic shot, hold it in portrait mode.
How to Shoot HD Video
From the Camera app, you can easily shoot stunning HD video. Follow these basic steps for shooting video using your iPhone or iPad:
1. Launch the Camera app.
2. Select the Video shooting mode option from the Shooting Mode menu. (If you want to shoot slow-motion video, select the Slo-Mo option, if it’s offered by your iOS mobile device.)
3. Tap the camera selection icon to choose which camera you want to use. You can switch between the front- and the rear-facing camera at any time. On older iPhone/iPad models, the rear-facing camera shoots lower-resolution video, as opposed to 1080p HD resolution video.
![]() What’s New
What’s New
The iPhone 6s and iPhone 6s Plus is capable of shooting 4K resolution video using the rear-facing camera.
On any iPhone, set the video recording resolution by launching Settings, tapping on the Photo and Camera option, and then tapping on the Record Video and/or Record Slo-Mo options. The available options are listed on the Record Video submenu screen, as well the amount of internal storage space needed to record each minute of video.
For example, when the iPhone 6s or iPhone 6s Plus records video in 4K resolution, this requires 375MB of internal storage space per minute.
4. If applicable, tap on the Flash icon that’s displayed near the top-left corner of the screen (iPhone) to turn on the flash and use it as a continuous light source while filming video.
5. Hold your iPhone or iPad up to the subject you want to capture on video. Set up your shot by looking at what’s displayed on the screen.
6. In the viewfinder, tap on your intended subject to make the autofocus sensor appear. If necessary, and if your device supports this feature, you can also manually adjust the Exposure Control using the displayed slider.
7. When you’re ready to start shooting video, tap on the Shutter button. The red dot turns into a red square. This indicates you’re now filming. Your iPhone or iPad captures whatever action you see on the screen, as well as any sound in the area.
8. As you’re filming video, notice a timer displayed on the screen (shown in Figure 8.11). Your only limit to how much video you can shoot is based on the amount of available memory in your iOS device and how long the battery lasts. However, this app is designed more for shooting short video clips, not full-length home movies.
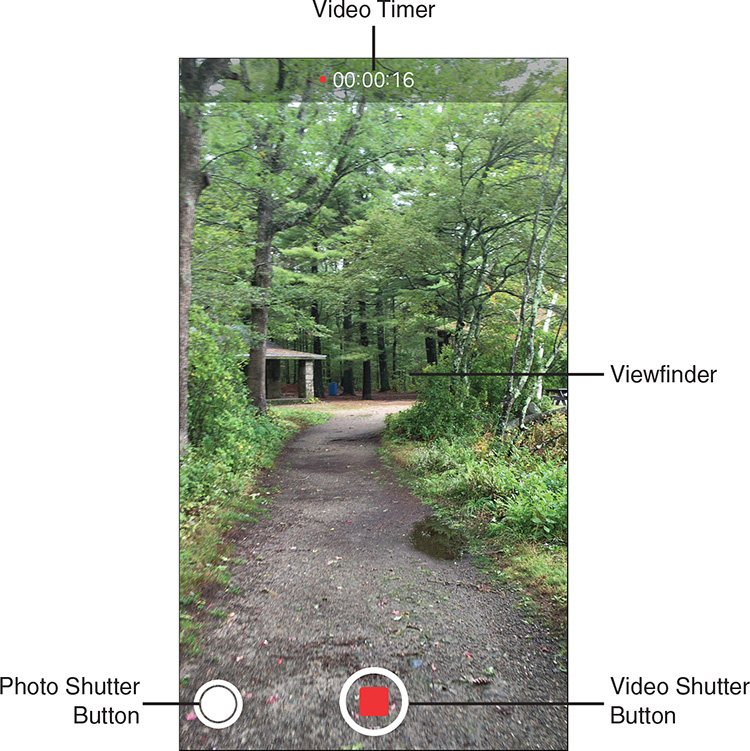
Figure 8.11 When shooting video on your iPhone or iPad, make sure the timer (displayed at the top center of the screen) is counting up. This indicates you’re actually recording.
9. As you’re filming, tap anywhere on the screen to focus in on your subject using the app’s built-in autofocus sensor.
10. To stop filming, tap again on the Shutter button. Your video footage is saved. You can now view, edit, and share it from within the Photos app (or a video app, such as iMovie).
Although the Photos app enables you to trim your video clips as well as view and share the videos, if you want to edit your videos, plus add titles and special effects, use Apple’s feature-packed iMovie app, which is available from the App Store. For more information about iMovie, visit www.apple.com/apps/imovie.
![]() Tip
Tip
Depending on which iPhone or iPad model you’re using, at the same time you’re shooting video, you might discover a second, circular (white) Shutter button displayed to the left of the primary Shutter button (refer to Figure 8.11). When available, this second Shutter button can be used to snap high-resolution digital images at the same time you’re shooting HD video.
Using the Photos App to View, Edit, Enhance, Print, and Share Photos and Videos
Use the Photos app to view images stored on your iOS device or in your iCloud account. The iOS 9 version of the Photos app includes a robust selection of photo editing and image enhancement tools.
![]() Tip
Tip
Images in the Photos app are auto-sorted based on when or where they were shot. Years displays thumbnails of all images shot within a particular year and includes details about where those images were shot.
Collections (shown in Figure 8.12) breaks down a Years grouping to display images based on when and where they were taken. Moments enables you to display thumbnails of images within a Collection that represent one location or date.
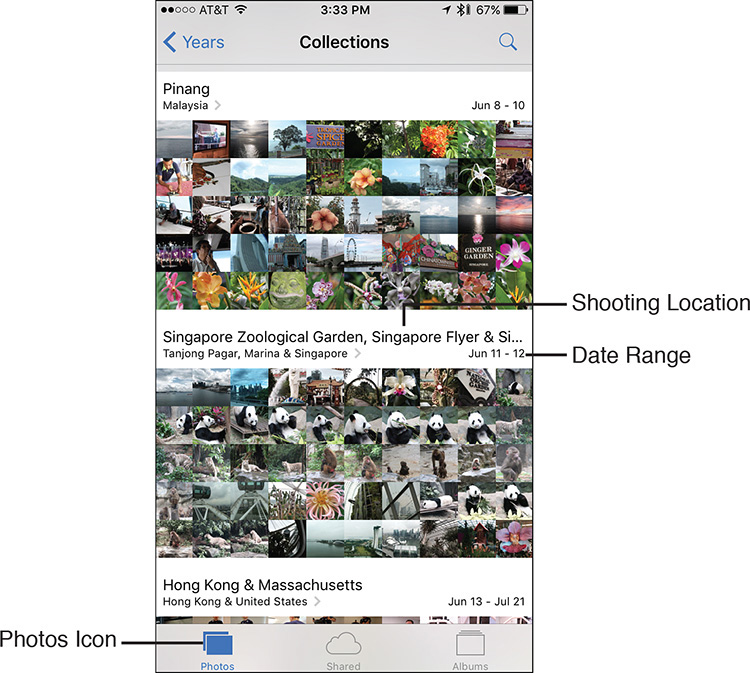
Figure 8.12 The Photos app offers several ways to sort and view image thumbnails. This is an example of the Collections view.
As you’re viewing thumbnails in the Moments view, tap on one of them to view a single image. Or, at the bottom of the screen, tap on Photos, Shared, or Albums to view a different set of images stored on your mobile device.
On the iPhone, the functionality of the Photos app is almost identical to the iPad version; however, the appearance of some of the screens and the position of certain command icons and menus differs due to the size of each device’s screen.
To exit out of the Moments or Collections thumbnail view, use the options displayed at the top-left corner of the screen. From the Years view, tap on a collection (within the main area of the screen) or tap on the Photos, Shared, or Albums icon that’s displayed along the bottom of the screen.
When viewing Moments, each group of photos that are shot at the same place and in the same time frame are automatically grouped together into an event.
As you’re viewing these events, tap on the associated Share button to quickly share all images in that event, or select and share specific images from it via AirDrop, Messages, or iCloud. Tap on the Select option at the top-right corner of the screen to choose one or more events or thumbnails. Once selected, tap either the Share or Trash icon in the top-left corner of the screen to manage those images.
View an Image in Full-Screen Mode
When viewing thumbnails of your images, tap on any single image thumbnail to view a larger version of it. The Edit icon is displayed in the upper-right corner of the screen.
On the iPhone (shown in Figure 8.13), the Share, Favorites, and Trash icons are displayed along the bottom of the screen, while on the iPad, these icons are grouped together near the top-right corner of the screen (with the Edit option).
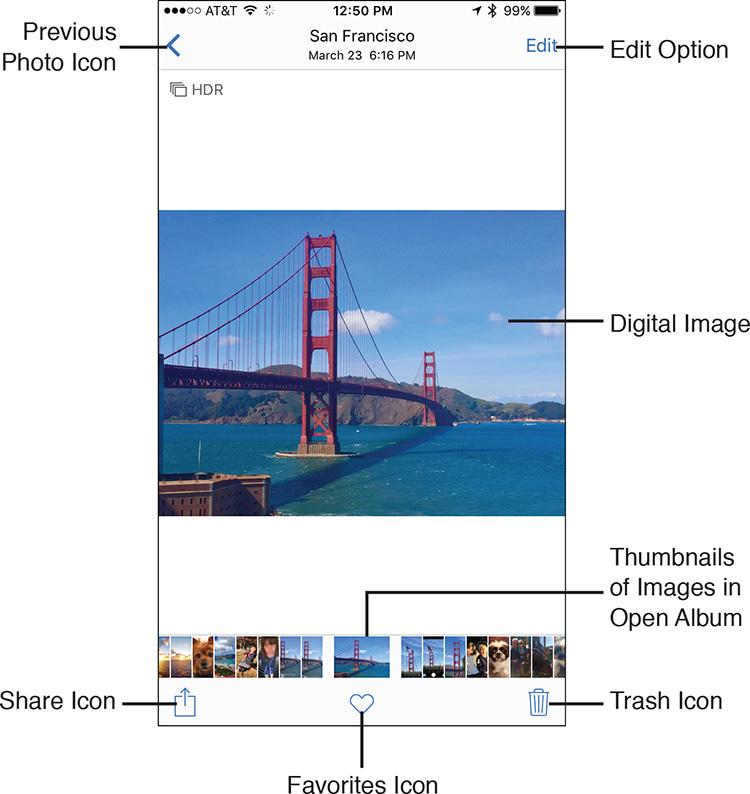
Figure 8.13 The Edit option and the Share, Favorites, and Trash icons are all displayed when viewing a single image on your iPhone or iPad’s screen.
Along the bottom-center of the screen are thumbnails for all the images stored in the album you’re currently accessing.
![]() Tip
Tip
By tapping on the Favorites (heart-shaped) icon associated with each image, you can place that image into a separate Favorites album and then opt to view or share only those images.
As you’re viewing a photo, tap on it to hide or show the Edit option, Share icon, Favorites icon, and Trash icon, which automatically appear and then disappear after a few seconds when you first open a photo. Tap on the Edit icon to reveal the Photo app’s image editing options (shown in Figure 8.14).
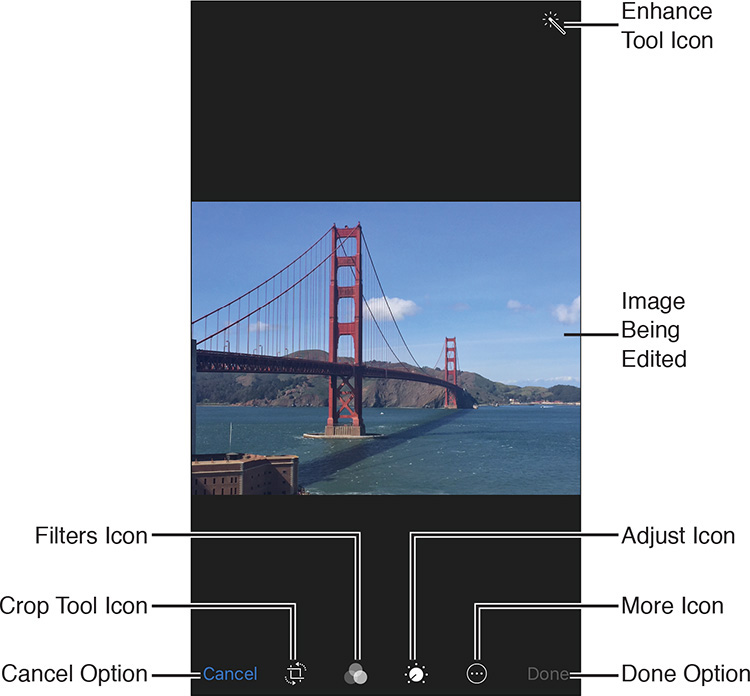
Figure 8.14 After tapping the Edit option, the command icons you use to edit and enhance images are displayed.
To exit the single-image view and return to the multi-image thumbnail view, tap anywhere on the screen to make the command icons appear, then tap on the left-pointing arrow-shaped icon displayed in the upper-left corner of the screen.
Editing Videos
When you tap on the thumbnail for a video clip, you have the option of playing that clip from within the Photos app. The Share, Favorite, and Trash icons are displayed on the screen.
Tap on the Edit option to access the video trimming (editing) feature. Then to trim a video clip, look at the filmstrip display of the clip and move the left and/or right editing tabs accordingly to define the portion of the clip you want to edit and keep.
The box around the filmstrip display (representing the portion of the video you want to keep) turns yellow, and the Done option appears (shown in Figure 8.15). Before tapping on the Done option, tap on the Play icon to preview your newly edited (trimmed) video clip.
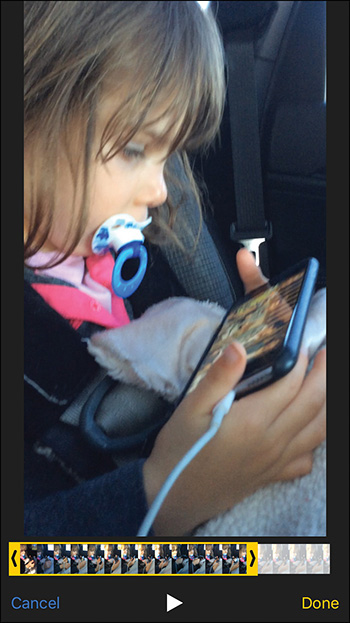
Figure 8.15 Use the Photos app to trim video clips, but use the optional iMovie app to fully edit videos.
If it’s okay, tap on the Done option to save your changes. The Save As New Clip option appears. Tap on it. To gain access to a comprehensive and powerful set of video editing tools, download and install Apple’s iMovie app onto your mobile device.
Tools for Editing Photos
When you tap on the Edit option while viewing a single image, several command icons are displayed on the screen (refer to Figure 8.14). These icons provide the tools for quickly editing and enhancing your image. Your options are explained in the next sections.
Enhance
The Enhance icon looks like a magic wand. When you tap on it, you can utilize a one-touch editing tool that automatically adjusts multiple aspects of a photo at once, including its contrast, exposure, and color, to make the image look better and make colors appear more vibrant. This feature can be turned on or off and is not manually adjustable.
Crop
Use the Crop tool shown in Figure 8.16 to manually adjust the cropping of the image by dragging one of the corners of the white frame horizontally, vertically, or diagonally. The Crop tool also enables you to straighten a photo and readjust its angle by placing your finger on the straightening dial and moving it. Tap on the Image Rotation icon to rotate the image 90 degrees.
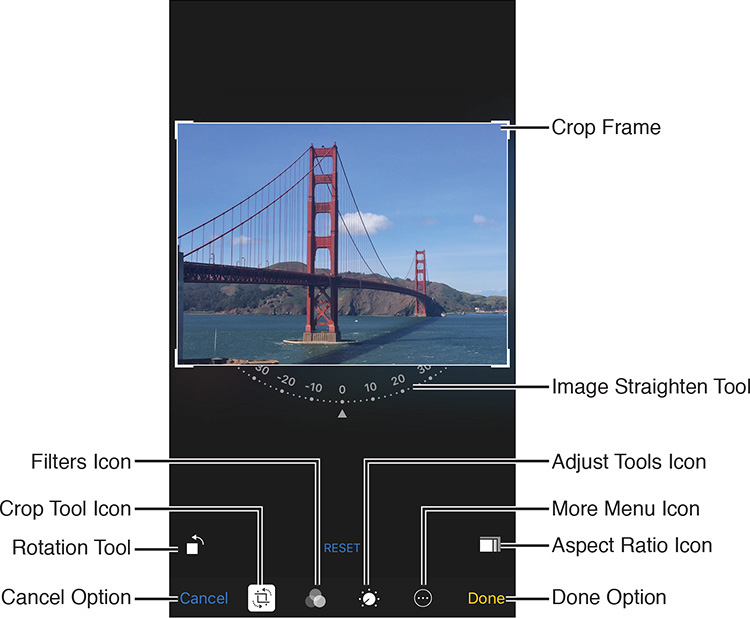
Figure 8.16 Tap on the Crop icon to access tools for cropping, straightening, and/or rotating an image.
![]() Tip
Tip
After using any of the Crop-related tools, be sure to tap the Done option to save your changes. Alternatively, tap Cancel to exit out of this option without saving your changes.
![]() Tip
Tip
As you’re cropping an image, tap on the Aspect Ratio icon to select an aspect ratio, such as Original, Square, 2:3, 3:5, 3:4, 4:5, 5:7, or 9:16. Unless you need the image in a specific size, choose the Original option and then use the Crop tool to adjust your image. Selecting an aspect ratio forces the basic dimensions to stay intact as you crop the image. This enables you to make accurately formatted prints later, without throwing off the image dimensions.
Filters
The Photos app offers a handful of preinstalled special effect filters. After tapping on the Filters icon, select the filter you want to apply to your image with a single on-screen tap. A preview of the altered image is displayed. To save the changes, tap Done. To discard the changes, tap Cancel, or tap on another filter.
![]() Note
Note
In addition to the filters that come preinstalled with the Photos app, third-party developers can now create optional filters you can use with the Photos app.
Adjust
The Photos app enables you to edit or enhance many different aspects of a photo. Begin by tapping on the Adjust icon. Then, from the Adjust submenu, tap on the Light, Color, or B&W option. Each one of these options reveals another submenu that offers a variety of editing tools.
The Light Tools
When you tap on the Light tool, a slider appears that enables you to manually increase or decrease the overall lighting effect within the image being viewed (shown in Figure 8.17).
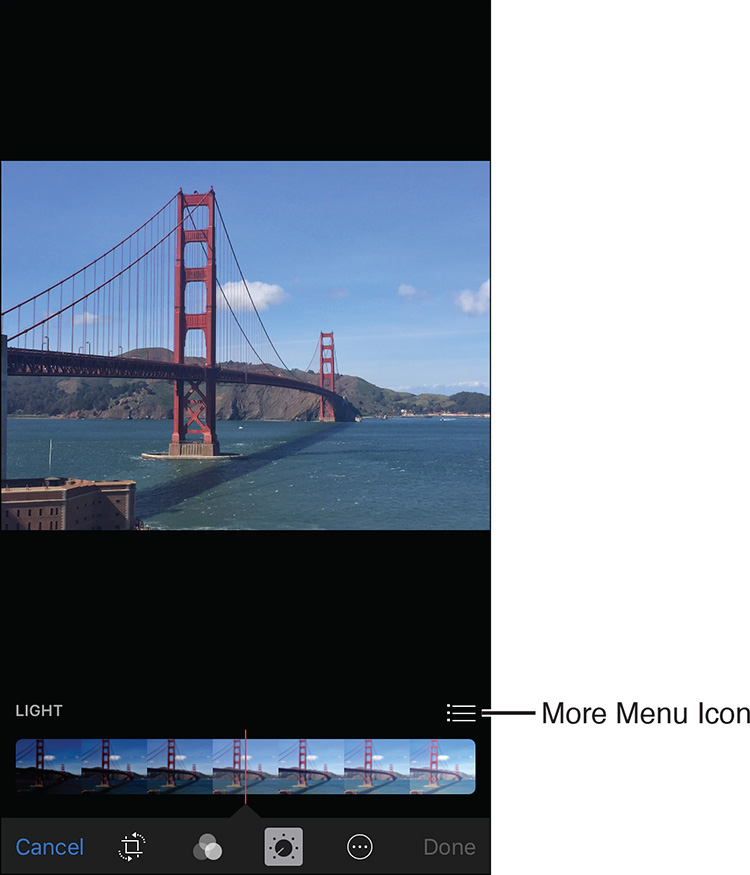
When you tap on the More menu icon (after tapping on the Light option), another submenu with options for Exposure, Highlights, Shadows, Brightness, Contrast, and Black Point is displayed (shown in Figure 8.18).
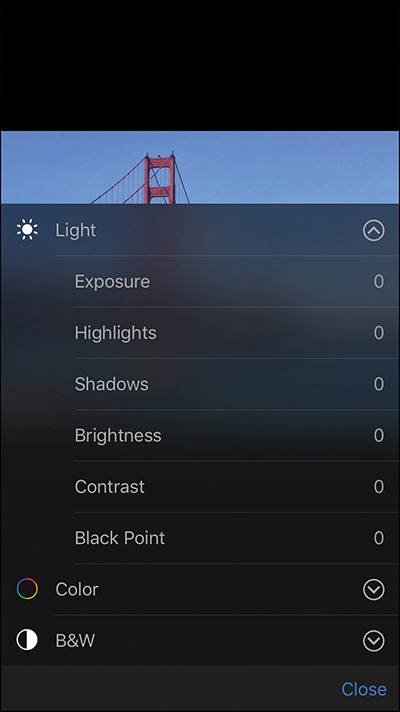
Figure 8.18 Tap on the More menu icon to reveal additional light-related editing and image enhancement tools.
Tap on any of these options to reveal a separate slider you can use to manually adjust that option. Keep in mind that you can mix and match the use of these options to create truly customized visual effects.
The Color Tools
When you tap on the Color icon, a master Color slider is displayed. Use your finger to manually adjust this feature. Tap on the More menu icon to reveal additional Color-related options, including Saturation, Contrast, and Cast.
Each of these tools (shown in Figure 8.19) has its own slider that you can manually adjust. Again, after making a change, be sure to tap on the Done option to save your edits. Alternatively, tap Cancel/Close to exit out of the selected editing tool without making any changes.
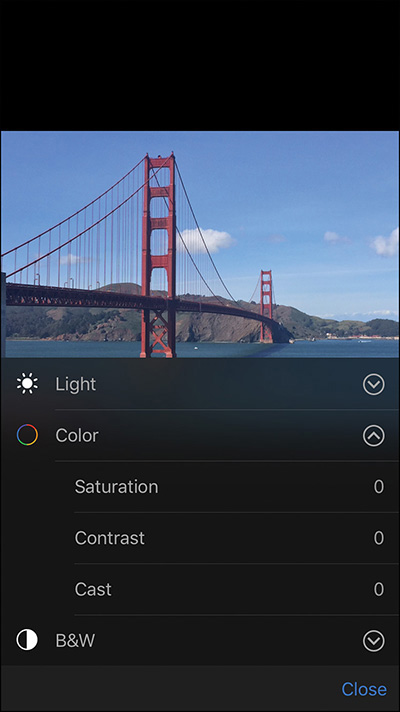
Figure 8.19 After tapping on the Color icon, tap the More menu icon to access tools for adjusting the Saturation, Contrast, and Cast within a photo.
The B&W Tools
Tap on the B&W icon to instantly convert a full-color image into black and white. It’s then possible to manually adjust the black, white, and grayscale colors using the B&W slider that’s displayed.
By tapping on the More menu icon after selecting the B&W editing tool, additional submenu options enable you to manually adjust the image’s Intensity, Neutrals, Tone, and Grain, which all relate directly to the black-and-white effect (shown in Figure 8.20).
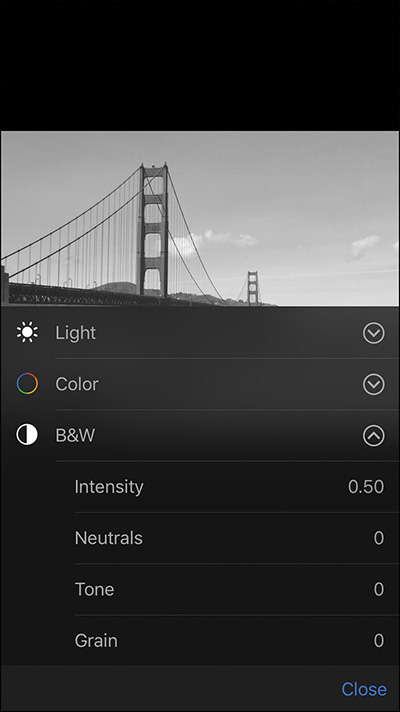
Figure 8.20 Not only can you convert a full-color photo into black and white, but you can then fully customize the black-and-white effect using a series of sliders related to the Intensity, Neutrals, Tone, and Grain settings.
After making a change, tap Done to save your edits or Cancel/Close to exit out of the selected editing tool without making any changes.
Printing Photos
iOS 9 is fully compatible with Apple’s AirPrint feature, so if you have a photo printer set up to work wirelessly with your smartphone or tablet, it’s possible to create prints from your digital images using the Print command in the Photos app. Follow these steps to print an image:
1. Launch the Photos app from the Home screen.
2. From the main View Images screen, tap on any thumbnail to view an image in full-screen mode. You might need to open an album first by tapping on the Album’s thumbnail if you have the Albums viewing option selected.
3. Tap on the full-screen version of the image to make the various command icons appear.
4. Tap on the Share icon.
5. From the Share menu, select the Print option.
6. When the Printer Options submenu appears, select your printer, determine how many copies of the print you’d like to create, choose the size of the desired print(s), and then tap on the Print icon.
![]() More Info
More Info
To print wirelessly from your iOS device using the AirPrint feature, you must have a compatible printer. To learn more about AirPrint, and to configure your printer for wireless printing from your iPhone or iPad, visit https://support.apple.com/en-us/HT201311.
Third-Party Apps for Ordering Prints from Your Images
If you want to order professional quality prints directly from your iPhone or iPad and have them shipped to your door within a few days, you can use one of several apps (such as FreePrints) available from the App Store.
The free KickSend app, for example, determines your current location and tells you which one-hour photo labs are in close proximity. You can then upload your photos to the desired lab directly from your iPhone or iPad, and within 30 to 60 minutes pick up your prints at the selected location. KickSend is easy to use, and works with participating Walgreen’s, CVS Pharmacy, Target, and Wal-Mart locations.
The free Shutterfly app also enables you to order prints directly from your iOS mobile device, plus it gives you the option to create custom photo gifts, such as coffee mugs, mouse pads, iPhone cases, T-shirts, and other products that showcase your images. Enlargements can also be ordered, as can canvas prints and other types of wall art that showcase your favorite photos.
Sharing Photos and Videos
After you have selected one or more images, tap the Share icon to access the Share menu (shown in Figure 8.21).
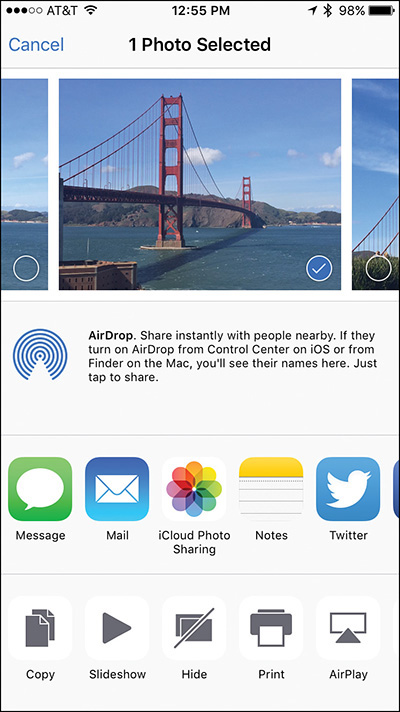
Send Images Wirelessly Via Airdrop
If you’re within close proximity to another Mac, iPhone, or iPad and the other computer or iOS mobile device also has the AirDrop feature turned on, you can wirelessly send images from within the Photos app using the AirDrop feature. This feature becomes active only when others nearby can receive an AirDrop transmission.
Send Images Via Text/Instant Message
Tap this option to send images via the Messages app. When the New Message window appears, fill in the To field with the recipient’s cell phone number or iMessage account username. Tap the plus-sign icon to send the same message to multiple recipients.
You can optionally add text to the photos that are attached to the message. To add more images to the outgoing message, tap on the Camera icon. When you’re ready, tap the Send option to send the photos and message.
Email Up to Five Images at a Time
When looking at thumbnails for images in an album, tap on the Edit button to select between one and five images, and then tap on the Share icon.
Select the Mail option from the Share menu and fill in the To field when prompted. If you want, edit the Subject field, and/or add text to the body of the email, and then tap the Send button.
After you tap the Send button, you are asked to choose an image size. On the iPhone, a pop-up window appears. On the iPad, tap on the Image Size option, displayed to the right of the From field.
The smaller the file size you choose, the faster it sends, but the image’s resolution and file size are reduced. In general, unless you know the recipient can use a smaller and lower resolution image size, choose the Actual Size option.
When viewing a single image, tap on the Share icon, select Mail, fill in the To field, and edit the Subject. If you want, add text to the body of the message, and then tap the Send button.
Tweet a Photo to Your Twitter Followers
To tweet a photo, after tapping the Share icon while viewing a single photo in full-screen mode, select the Tweet option. Compose your tweet message (which will already have the selected image attached), and then tap the Send icon.
It’s also possible to tweet photos from the official Twitter app or from a third-party Twitter-related app such as Twitterific (available from the App Store).
Publish Photos on Facebook
To publish one or more photos to Facebook with an optional text-based status update, tap the Facebook icon displayed in the Share menu. From the Facebook window, tap the Album option to choose an existing Facebook Photos Album to which the image should be added.
Next, tap the Location option to publish the location where the image was shot on Facebook along with the photo. Tap on the Audience option to decide who can view the image(s) on Facebook. Your options include Public, Friends, Friends Except Acquaintances, Only Me, Close Friends, or people within a specific Facebook group you’ve created.
To the left of the photo thumbnail, use the virtual keyboard to enter a caption for the image(s) you’re about to upload, and then tap the Post option (displayed at the top-right corner of the Facebook window) to publish the photos.
![]() Tip
Tip
An alternative to using the Photos app to publish photos to Facebook is to use the official Facebook app. This gives you additional options, such as the ability to tag photos with the names of the people who appear in them. Plus, the Facebook app enables you to add special-effect filters to images before uploading them.
Upload Images to Flickr
Flickr is an online-based photo sharing service and photo lab operated by Yahoo!. To upload selected images to your existing Flickr account, select the images from within the Photos app, tap the Share icon, and then tap the Flickr option. You then can choose an album to which your selected images are uploaded.
It’s also possible to use the official Flickr app to upload and manage your account from your iPhone or iPad.
Share Photos Via Other Compatible Apps
Displayed in the Share menu, when applicable, are app icons for third-party apps you have installed that work with the Photos app to share photos. For example, if you have the Facebook Messenger app installed on your device, you can send photos via instant message using this service.
You’ll also discover options for iCloud Photo Sharing and Notes displayed as part of the Share menu. To place photos online in a particular iCloud album that you want to share with other people, tap on the iCloud Photo Sharing option, and then fill in the prompts offered in the iCloud window that appears.
To export one or more photos from the Photos app and place them into the newly redesigned Notes app, tap on the Notes icon and then choose which existing note you want to place the photos into, or select the New Note option to create a new note in the Notes app from scratch that displays the exported photos.
![]() Note
Note
To control which third-party apps (which are compatible with the Photos app) appear in the Share menu associated with the Photos app, tap on the More option. Then, turn on or off the virtual switch that’s associated with each app. When a switch for a listed app is turned on, that app appears in the Share menu.
![]() Note
Note
Displayed along the bottom of the Share menu are the Copy, Slideshow, AirPlay, Hide, Assign to Contact, Use as Wallpaper, Print, and More icons. Tap on any of these icons to manage the selected photo(s) in the Photos app.
Copy an Image to Another App
From within the Photos app, you can store a photo in your iOS device’s virtual clipboard and then paste that photo into another compatible app. To copy a photo into your device’s virtual clipboard, follow these steps:
1. From within the Photos app, select a single photo and view it in full-screen mode.
2. Tap on the image to make the command icons appear.
3. Tap on the Share icon.
4. Tap on the Copy icon. The photo is now stored in the virtual clipboard.
5. Launch a compatible app and then hold your finger down on the screen to use the Paste option and paste your photo from the clipboard into the active app.
Create a Slideshow
To create and display an animated slideshow featuring selected images, launch Photos and select a group of images. Next, tap the Share icon and choose the Slideshow option.
From the Slideshow Options screen, choose to display the image on the iPhone (or iPad) or via Apple TV. Select your Transition effect from the menu, and decide whether you want music to accompany the presentation. By turning on the virtual switch associated with Play Music, you can choose music that’s stored in the Music app of your iOS mobile device. To begin the Slideshow, tap on the Start Slideshow option.
Show Image on a Television Via Airplay
Instead of viewing an image in full-screen mode on your iPhone or iPad, tap the AirPlay icon and select Apple TV to wirelessly transmit the image to your HD television set. To use this feature with an HD TV, you need the optional Apple TV device. To use the feature with a Mac, be sure AirPlay on your Mac is turned on.
Assign Image to Contact
To link an image stored in the Photos app to a specific contact in the Contacts app, follow these steps:
1. From within the Photos app, select a single photo and view it in full-screen mode.
2. Tap on the image to make the various command icons appear.
3. Tap on the Share icon.
4. Tap on the Assign to Contact option.
5. An All Contacts window is displayed. Scroll through the listing, or use the Search field to find the specific entry with which you want to associate the photo.
6. Tap on that person’s or company’s name from the All Contacts listing.
7. When the Choose Photo window opens, use your finger to move or scale the image. What you see in the box is what will be saved.
8. Tap on the Use icon to save the photo and link it to the selected contact.
9. When you launch Contacts and access that person’s entry, the photo you selected appears in the entry.
Use as Wallpaper
As you’re viewing a photo, you can assign it to be the wallpaper image used on your Home screen or Lock screen by tapping on the Share icon and then choosing the Use As Wallpaper option. When the image is previewed on the screen, tap on the Set button. From the Set Lock Screen, Set Home Screen, or Set Both menu, choose where you want the selected image displayed.
![]() Note
Note
Before tapping on the Set button when previewing a potential wallpaper image that’s one of your photos, it’s possible to use a reverse pinch finger gesture to zoom in on the image, and then hold one finger on the image and drag it around to reposition it.
Deleting Photos Stored on Your iOS Device
To delete one image at a time as you’re viewing them in full-screen mode, simply tap on the Trash icon displayed on the screen.
To select and delete multiple images at once as you’re looking at thumbnails, tap on the Select button. Tap on each thumbnail that represents an image you want to delete. A checkmark icon appears within each image thumbnail indicating that the image has been selected. Tap on the Trash icon to delete the selected images.
Take Advantage of iCloud Photo Library
Turn on the iCloud Photo Library feature from within Settings on all your iOS mobile devices as well as from the iCloud Control Panel on your Mac and/or PC computers, and you’ll be able to sync your entire digital photo library across all your computers, maintain an online backup of your images, and share groups of selected images (or entire albums) with other people.
To turn on iCloud Photo Library on each of your iOS mobile devices, launch Settings, tap on the iCloud option, tap on the Photos option, and then turn on the virtual switch associated with the iCloud Photo Library option. Use the other options in this submenu to customize the iCloud Photo Library feature on the device you’re using.
Keep in mind that, based on how many digital photos are in your entire digital photo library, it might be necessary to upgrade your iCloud account and acquire additional online storage space (for a monthly fee). Refer to Chapter 5, “Use iCloud and the iCloud App from Your iPhone or iPad,” for more information about using iCloud.
The Photos App Supports iCloud’s Family Sharing
One aspect of iCloud’s Family Sharing feature is what Apple refers to as the Family Album. One single Family album becomes accessible by up to six family members, who can then freely add, edit, delete, and share images stored within that Family album. Everyone’s other image albums remain private and separate from the Family album.
When you turn on the Family Sharing feature within iCloud, the Family Album is automatically created. From within the Photos app, you can move images from the All Photos album (or another album) into the Family album, so they become viewable by participating family members.
Move Images Between Albums
To copy selected images from one album to another as you’re viewing thumbnails for images within a specific album, tap on the Select option. Then, one at a time, tap on the images you want to copy into another album. A check mark appears on each image thumbnail you select.
Tap on the Add To option, and then tap on which album from the displayed listing you want to move the selected images to. For example, you can choose the Family album if you have iCloud Family Sharing activated.
To create a new album from scratch, scroll down in the Add To Album screen and tap on the New Album option. When prompted, type a title for the new Album and then tap the Save button.
Create as many separate albums as you need within the Photos app to properly group together and organize your images. As you create a new album, it syncs with iCloud Photo Library if you have this feature turned on.