
16. Working with Fields and Forms
Fields are the often-underappreciated placeholders that work behind the scenes in a document. They help perform the magic involved with many of the most powerful features in Word, such as mail merging, indexing, automatic generation of tables of contents, automatic figure numbering, cross-referencing, page numbering, and more.
There are many different types of fields, each with a specific purpose, but they break down into three main categories. You can use fields to do the following:
![]() Insert text or graphics into the document, such as page numbering, dates and times, text from other documents, graphics from external files, document properties, or calculated values.
Insert text or graphics into the document, such as page numbering, dates and times, text from other documents, graphics from external files, document properties, or calculated values.
![]() Mark a location for later use, such as with a bookmark, table of contents marker, or indexing code.
Mark a location for later use, such as with a bookmark, table of contents marker, or indexing code.
![]() Perform an action, such as running a macro or opening a hyperlink in a web browser.
Perform an action, such as running a macro or opening a hyperlink in a web browser.
Yet another way to use fields is to create user-interactive forms. In this chapter, you see how fields work and how to insert them, and you find out how to use form fields to create forms.
How Word Uses Fields
Many people use fields in Word without even realizing it because so many of Word’s features automatically insert and modify fields. For example, when you insert a date or time and set it to be automatically updated, Word inserts a {Date} or {Time} code. And when you create an OLE link to an object, Word inserts a {Link} code.
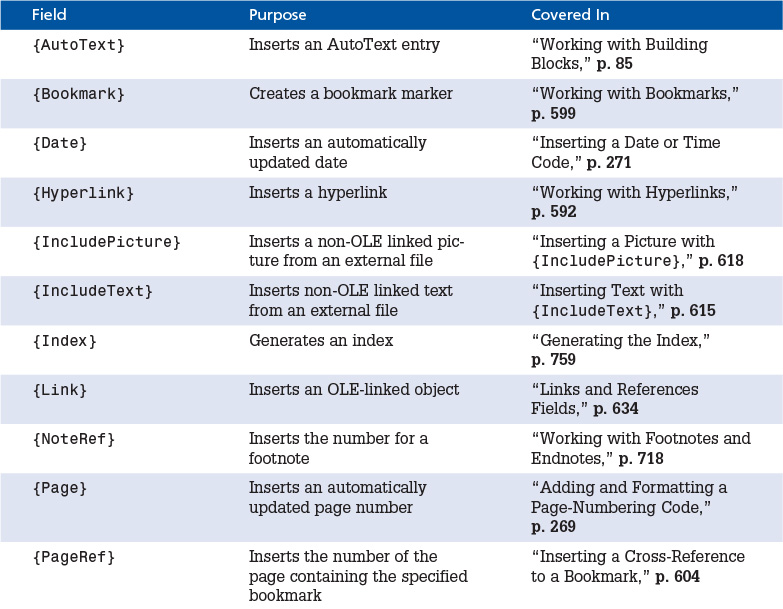
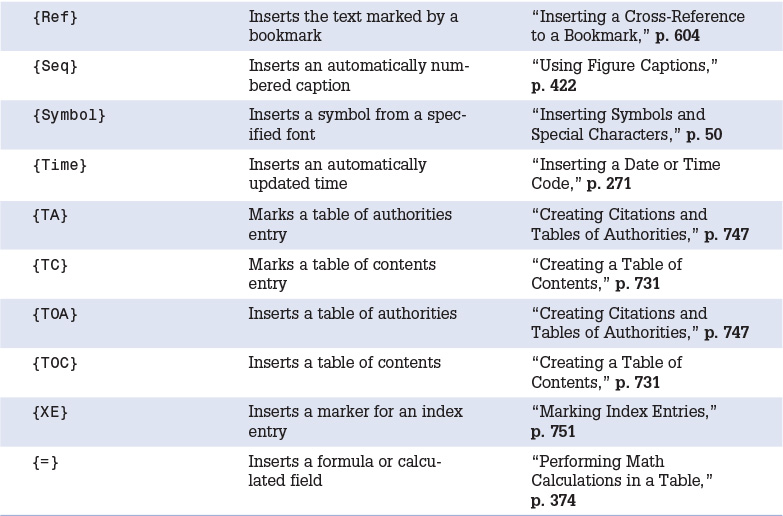
Throughout this book, you’ve learned about fields in an indirect way. Whenever a feature has been discussed that used a field, you’ve learned to insert that field via a button or dialog box, but you haven’t looked too deeply yet at what’s really going on behind the curtain. Table 16.1 lists some of the Word features that employ fields and cross-references them to where those skills are covered in the book.
This chapter delves into the technical nitty-gritty details that govern fields and shows you how you can select, insert, modify, and format fields to accomplish a variety of document-creation and formatting tasks. Even if you don’t end up working manually with fields very often, this is not wasted study! The more you understand about how fields really work, the better you will be able to troubleshoot problems that may occur, or to tweak an individual field’s options to fit an unusual formatting need.
Inserting Fields
You can insert many fields via the regular Word user interface, as listed in Table 16.1. However, you can also insert a field using the Insert Field command, a more direct route that provides access to more of the field’s optional switches and parameters.
To insert a field, follow these steps:
1. Position the insertion point where you want the field to be inserted.
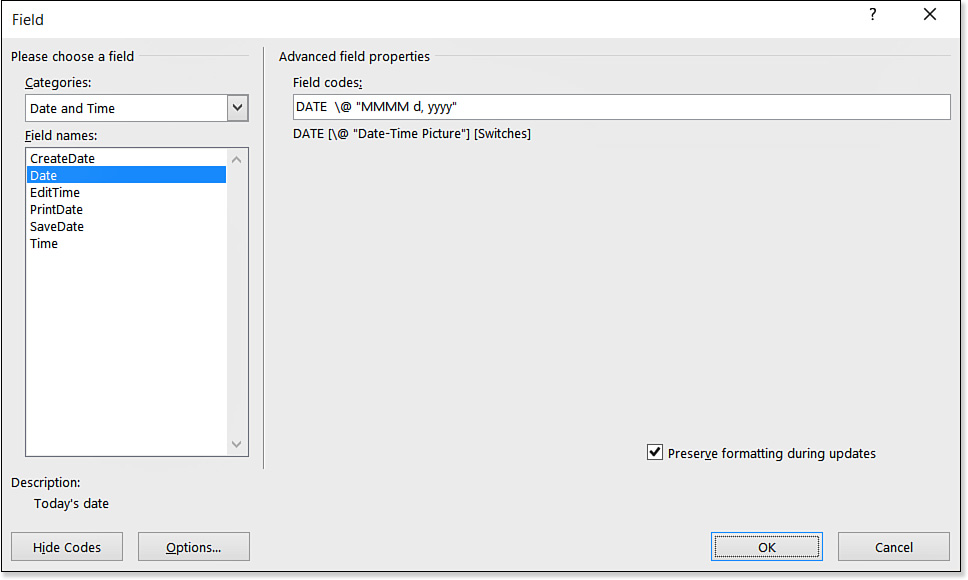
2. On the Insert tab, click Explore Quick Parts and then click Field. The Field dialog box opens.
3. (Optional) On the Categories list, select a category to narrow the list of field names.
4. On the Field Names list, click the desired field name. Lists and check boxes appear for the available options for that field. For example, in Figure 16.1, the options for the Date field are shown.

5. Select any options as needed, and then click OK.
Specifying Field Properties and Options
As you insert a field (as in the preceding section), the Field dialog box prompts you to select the properties and options you want. Field properties are settings from which you must make a selection (or accept the default). For example, in Figure 16.1, the date format is a property. If you do not choose one, Word uses a default property. Field options are optional parameters; to omit them, simply leave their check boxes blank.
If you are interested in the codes behind these user-friendly dialog box controls, click the Field Codes button in the Field dialog box to display the Field Codes text box. It shows the code that Word inserts for the properties and options selected so far (see Figure 16.2).
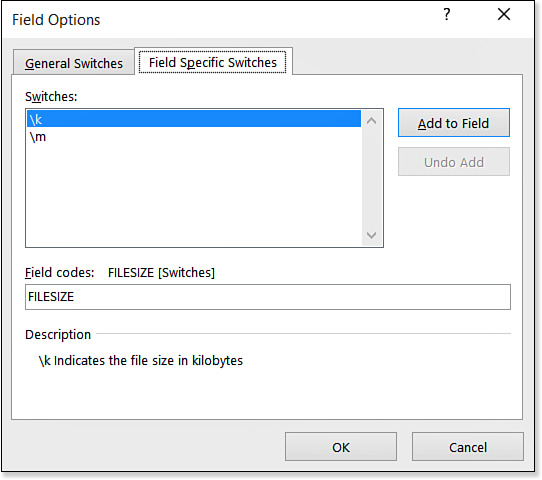
To delve even further into the field’s coding, click the Options button to display the Field Options dialog box. Switches that apply to multiple fields are shown on the General Switches tab (Figure 16.3) and switches specific to the selected field appear on the Field Specific Switches tab (which you will see later in this chapter, in Figure 16.4). To add one of them, select it and click Add to Field.
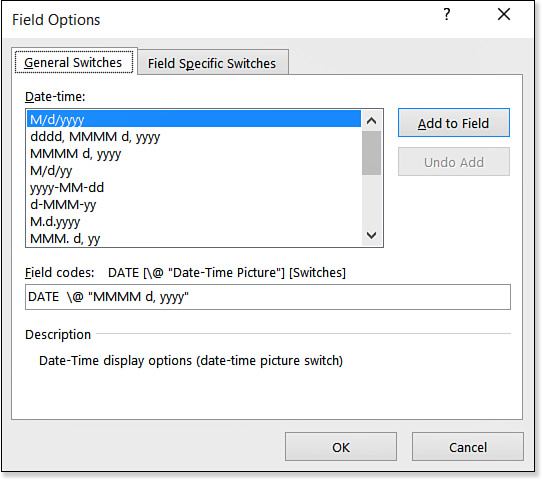
Figure 16.3 Work directly with the field’s optional switches and properties in the Field Options dialog box.
![]() Note
Note
The Field Options dialog box doesn’t do anything that the check boxes and lists in the Field dialog box don’t do, but the description of each option in the Description area of the Field Options dialog box can help you figure out what a particular option does.
Manually Typing Field Codes
If you know exactly what you want in terms of field codes, you might find it easier and quicker to simply type them into your document.
Field codes are bracketed with curly braces, like this: {Date}. However, you can’t manually type the curly braces, because Word won’t recognize the code as a field. Instead, you must press Ctrl+F9 to get the ball rolling.
![]() Tip
Tip
You can add a button to the Quick Access toolbar that starts a new blank set of field braces. Choose File, Options, and click Quick Access Toolbar. Select All Commands from the Choose Commands From list. Then select Insert Field Chars and click Add.
Ctrl+F9 inserts a blank set of curly braces in a shaded field box. From there, you can type the desired field name and any switches or other syntax needed. (If you don’t know the exact syntax you need, it’s better to go with the dialog box method of field insertion.)
Here are some tips for getting the syntax right:
![]() Field names are not case sensitive.
Field names are not case sensitive.
![]() If a property or argument contains spaces, you must enclose it in quotation marks. For example,
If a property or argument contains spaces, you must enclose it in quotation marks. For example, {Username "John Doe"} would be correct. {Username John} would also work because John does not have spaces in it, but { Username John Doe } would be incorrect.
![]() If you need a real quotation mark, use
If you need a real quotation mark, use "".
![]() If you’re specifying a path, use double backslashes rather than single—for example,
If you’re specifying a path, use double backslashes rather than single—for example, { IncludeText C:\Docs\Myfile.doc }. This is necessary because single backslashes indicate switches and special codes.
![]() Leave one space between the field name and each property or switch.
Leave one space between the field name and each property or switch.
![]() Leave one space between the backslash () in the switch and its parameters.
Leave one space between the backslash () in the switch and its parameters.
![]() Leave one blank space to the right of the left bracket and to the left of the right bracket.
Leave one blank space to the right of the left bracket and to the left of the right bracket.
 Common Syntax Errors in Field Codes
![]() Right:
Right: { Date }
![]() Wrong:
Wrong: {Date}
![]() Right:
Right: { Date @ "hh:mm" }
![]() Wrong:
Wrong: { Date@"hh:mm" }
![]() Right:
Right: { Set CompanyName "ACME Corporation" }
![]() Wrong:
Wrong: { Set CompanyName ACME Corporation }
![]() Right:
Right: { If { Date
"MM/dd" } = 12/25 "Merry Christmas!" "Have a nice day!" }
![]() Wrong
Wrong { If { Date
"MM/dd" } = 12/25; "Merry Christmas!"; "Have a nice day!" }
Toggling Between Data and Field Code Views
By default, a field displays its result in the document rather than its code. (Exception: Fields that do not generate results, such as bookmarks and index markers, do not display at all by default.)
To toggle between displaying the field result and the field code, do either of the following:
![]() Select the field and press Shift+F9.
Select the field and press Shift+F9.
![]() Right-click the field and choose Toggle Field Codes.
Right-click the field and choose Toggle Field Codes.
Note that this toggles only the selected field. To toggle more than one field at once, select a contiguous area of the document that includes multiple fields and press Shift+F9. To toggle all the field codes in the entire document at once, press Alt+F9, or select the entire document (Ctrl+A) before pressing Shift+F9.
Field codes in the document appear just like they do in the Field dialog box (refer to Figure 16.2). They appear with a gray background, which helps you remember they are fields, but that gray background does not print and does not appear in Print Preview or Read mode.
![]() Note
Note
One minor difference exists between what appears in the Field dialog box and what appears with codes displayed inline in the document. If the Preserve Formatting During Updates check box was marked in the Field dialog box, the * MERGEFORMAT switch appears inline. It does not appear in the Field dialog box’s version of the code string.
Editing Field Code Strings
When a field code string is displayed in the document (Shift+F9), you can edit it manually just like any other text. The trick is knowing what to type. Many fields have fairly complex code strings with various properties and options.
Most people aren’t able to remember all the syntax rules for each field type, of course, so Word provides an easier way to edit a field code string: Right-click the field code and choose Edit Field. The Field dialog box reappears, as in Figure 16.1, and you can make any changes needed via a friendly dialog box interface.
![]() Tip
Tip
After creating a custom field code string, save it to the Quick Parts gallery for easy reuse. To do so, on the Insert tab, click Explore Quick Parts, and then click Save Selection to Quick Part Gallery. Store it in any gallery you like. (You might want to create a new category called Custom Fields, for example.)
Nesting Fields
When you’re using fields that require input, such as the logical condition ones like {Compare} and {If}, you might want that input to come from other fields. To manage this, you can nest one field inside another.
For example, you might want to test whether today is a certain day of the week. If it is Friday, this message should appear: “Time cards are due today by 5:00 p.m.” Otherwise, this message should appear: “Time cards are due on Fridays by 5:00 p.m.” Here’s the complete syntax for that:
{ If { Date @ "dddd" } = "Friday" "Time cards are due today by 5:00 p.m." "Time
cards are due on Fridays by 5:00 p.m." }
The main thing to remember when nesting fields is that you can’t type the braces for the nested fields; you must insert the braces with Ctrl+F9. Let’s go over the general process.
First, you would start the outer field:
1. Press Ctrl+F9 to insert a new blank set of braces.
2. Type the desired field name and then any portion of the field’s properties or switches that should come before the nested field.
3. Press Ctrl+F9 to insert another new blank set of braces, and in the new set, type the field to be nested.
4. Click to move the insertion point to the right of the closing bracket for the nested field, and continue typing the outer field.
5. Press F9 to update the field and display its result.
Here’s another example. The {Set} field creates a bookmark. It requires two pieces of information: the bookmark name and the text that should be placed within it. So, for example, if you want to create a bookmark called CompanyName and set its value to Microsoft, the field should read as follows:
{ Set CompanyName "Microsoft" }
That’s fine, but what if the company name changes? You can instead use the {FillIn} field to ask the user to specify the company name:
{ Set CompanyName { FillIn "Enter the company name" } }
Now suppose that you want to enter that company’s name in the Title field of the document’s properties. Create another nested set of fields like this:
{ Title { Ref CompanyName } }
Selecting the Right Field
A big part of using fields successfully in Word is knowing which fields are available and which are most applicable to a particular situation. The following sections explain the types of fields available.
Date and Time Fields
In Chapter 7, “Formatting Documents and Sections,” you learned that you can click Date & Time on the Insert tab to insert a date or time code via a dialog box interface. If you mark the Update Automatically check box in this dialog box, Word inserts a {Date} field rather than the actual date or time. If you toggle the field code on an inserted date (Shift+F9), it might look something like this:
{ Date @ "M/d/yyyy" }
The main switch for the {Date} field is @, which is followed by the syntax for the date or time format you want.
The {Date} field has a few other switches, but you’ll probably never use them:
![]()
h is for the Hijri/Lunar calendar.
![]()
l is used to insert the date with the last format chosen using the Date and Time dialog box.
![]()
s is used for the Saka Era calendar.
![]()
u is used for the Um-al-Qura calendar.
![]() Tip
Tip
When you’re inserting a date or time via the Field dialog box, the examples that appear in the Date Formats list show today’s date. If you are more comfortable choosing based on the generic syntax, such as M/d/yyyy, click the Field Codes button and then click the Options button; the list of formats that appears in the Field Options dialog box shows the generic codes.
You might be surprised to find that inserting a time with the Date and Time dialog box does not insert a {Time} field. Instead, it inserts a {Date} field with time-based formatting. For example:
{ Date @ "HH:mm" }
So what’s the {Time} field for? It’s basically the same as {Date}, except with fewer options. You can’t specify a certain alternative calendar via switches, for example. Strictly speaking, the {Time} field is redundant. It doesn’t need to exist, except that people expect it to and might not think to use a {Date} field to express a time.
![]() To learn how to create custom date and time formats, see “Constructing a Custom Date or Time Format,” p. 644.
To learn how to create custom date and time formats, see “Constructing a Custom Date or Time Format,” p. 644.
Besides the {Date} and {Time} fields, there are several other date/time-related fields from which you can choose. All of them pull their information from the file’s properties, not from the PC’s clock/calendar.
![]()
{CreateDate} displays the file creation date. It never changes, because the document’s creation date never changes.
![]()
{PrintDate} displays the date on which the document was last printed. It updates itself automatically when you print the document.
![]()
{SaveDate} displays the date on which the document was last saved. It updates itself automatically when you save the document.
![]()
{EditTime} displays the total amount of time spent editing the document. It does not update automatically.
Document Information Fields
As you learned in “Inserting a Document Property” in Chapter 7, each document has a set of properties. Some of those properties are editable, such as Author; others are automatically calculated by Word, such as FileSize. You can insert these document properties into the document using the document information fields.
Most of these fields have an obvious one-to-one correlation with a certain property. For example, the {Author} field inserts the author’s name, the {Comments} field inserts any comments that have been placed in the document properties, and so on. The field properties vary depending on the nature of the information being inserted. Fields that insert text have properties for setting text case; fields that insert numbers have properties for choosing a number format. Some fields also have additional options. For example, in Figure 16.4, the {FileSize} field’s result can be expressed in either kilobytes or megabytes.
If you do an item-by-item check of fields versus properties, you will find that not every document property has a corresponding field. The {DocProperty} field helps overcome this problem. It is a generic inserter for whatever document property you specify. Its list of available properties includes every property available for the document (except custom properties).
For example, suppose that you want to insert the company name from the Company property. There is no Company field, so you would use {DocProperty} like so:
{ DocProperty Company }
User Information Fields
These three simple fields pull user information from Word. They are somewhat like the document information fields. However, this data is not stored with the document, but with the logged-in user on the PC:
![]()
{UserAddress} inserts the user’s address, if set up in the program. To set up an address, choose File, Options, and click Advanced. In the General section, enter the address into the Mailing Address box.
![]()
{UserInitials} inserts the user’s initials, if set up in the program. To set up initials, choose File, Options, click General, and enter the initials into the Initials box.
![]()
{UserName} enters the user’s name, if set up in the program. To set up the name, choose File, Options, click General, and enter the name into the User Name box.
Numbering Fields
The numbering fields have one thing in common: They help you automatically number various types of items in your document. Each is automatically updated whenever you add more numbering fields or rearrange existing fields. For example, if you switch the positions of two figure captions, they also switch numbering.
Most of the numbering fields are inserted via Word’s user interface in various contexts, but a few are available only via the Field dialog box. The numbering fields are listed here:
![]()
{AutoNum} inserts an automatic number. You can specify the formatting you want for it (Arabic, Roman, letters, and so on). Use this to number anything you like. Each {AutoNum} code in the document shows an incremented value.
![]()
{AutoNumLgl} inserts an automatic number in legal format, with or without a trailing period.
![]()
{AutoNumOut} inserts an automatic number in outline format.
![]()
{BarCode} inserts a delivery point bar code based on the text found in a bookmark. Generally, the bookmark points to a ZIP Code field and changes for each mail merge record with the {Set} field.
![]()
{ListNum} inserts numbering for a list. This is somewhat like {AutoNum}, but rather than there being three separate fields for regular numbers, legal numbers, and outlines, there are field properties that define which type of list to use. The valid values for this property are LegalDefault, NumberDefault, and OutlineDefault. Another difference is that you can set the level in the list, and you can set a start-at value, so you can have some control over the list.
![]() Note
Note
The {AutoNum}, {AutoNumLgl}, and {AutoNumOut} fields are sequenced together, so the same list continues regardless of which of the three field codes you use. There are no switches or properties; the list is completely automatic.
![]()
{Page} inserts the number of the current page. You most commonly use this in headers and footers, but you can use it anywhere in the document.
![]()
{RevNum} counts the number of times the document has been saved. Each time it is saved, the {RevNum} counter is incremented.
![]()
{Section} displays the section number where the field is placed.
![]()
{SectionPages} displays the total pages in the section where the field is placed.
![]()
{Seq} inserts an automatic sequence number. This is the field used for figure captions and other automatically numbered items. A bookmark is created to indicate what type of item is being sequenced. For example, to automatically number figures, each figure has a caption like this: Figure { Seq Figure }. Optional switches can be added for formatting—for example, { Seq Figure ? ARABIC }.
Equations and Formulas Fields
The math-related Equations and Formulas fields are mostly covered elsewhere in Word; you will seldom have reason to insert them manually via the Field dialog box. Here’s a quick round-up of them:
![]()
{=} is a formula field. Do not try to construct its syntax manually; instead, click the Formula button in the Field dialog box and construct the formula via the Formula dialog box.
![]() Caution
Caution
For the {Advance} field, the expected entries for the field options are not obvious in the Field dialog box. For more information, click Field Codes, and then click Options to see a complete list of the switches and get information about each one.
![]()
{Advance} offsets the position of the subsequent text by a specified number of points in a specified direction. You might use this to fine-tune the positioning of text on a page when trying to make printed text line up correctly on a preprinted form, for example.
![]()
{Eq} inserts an equation using the legacy-style Equation Editor (that is, the version from Word 97-2003). Word does not recommend that you construct the syntax manually; click the Equation Editor button in the Field dialog box to open the legacy Equation Editor.
![]()
{Symbol} inserts a symbol, by character number, from a specified font. If no font is specified, the font assigned to the paragraph where the field resides takes precedence. Usually, it is preferable to use the Symbol insertion controls on the Insert tab to insert a symbol because you can browse for the desired symbol more easily (that is, you don’t have to know its number).
Index and Tables Fields
The Index and Tables fields mark entries for tables of contents, indexes, and tables of authorities; then they generate those items. (The Tables in this category’s name refers to tables of contents, tables of authorities, and tables of figures, not to ordinary Word tables.)
These codes are hardly ever inserted manually. You would typically use the Table of Contents, Table of Authorities, or Index feature in Word to insert the markers and generate the listings. However, it is useful to know what the various codes mean, in case you see them in documents and need to decide whether to keep or delete them.
These are the codes for indexes:
![]()
{XE} marks index entries. Various properties and options are available for defining an entry, but these are best created with the Mark Index Entry dialog box (covered in Chapter 19, “Creating Tables of Contents and Indexes”).
![]()
{Index} generates the index.
For tables of contents, these codes apply:
![]()
{TC} marks table of contents entries. Usually, tables of contents are generated automatically based on heading levels, but you can use this field to manually mark some text to be included.
![]()
{TOC} generates the table of contents.
For tables of authorities:
![]()
{TA} marks the table of authorities entries.
![]()
{TOA} generates the table of authorities.
For any of the types of reference tables (table of contents, index, table of authorities):
![]()
{RD} creates an index, table of contents, table of figures, or table of authorities by using multiple documents.
![]() To create an index, see “Marking Index Entries,” p. 751, and “Generating the Index,” p. 759.
To create an index, see “Marking Index Entries,” p. 751, and “Generating the Index,” p. 759.
![]() To create a table of contents, see “Creating a Table of Contents,” p. 731.
To create a table of contents, see “Creating a Table of Contents,” p. 731.
![]() To create a table of authorities, see “Creating Citations and Tables of Authorities,” p. 747.
To create a table of authorities, see “Creating Citations and Tables of Authorities,” p. 747.
Links and References Fields
The Links and References category contains fields that insert linked content from other locations, as well as fields that automatically number pages and footnotes. (Automatic numbering of other items, such as list numbering or figure caption numbering, is handled by fields in the Numbering category, covered previously in this chapter.)
Several of the linking-type fields were covered in Chapter 15, “Copying, Linking, and Embedding Data.” Here’s a quick review of those:
![]()
{Hyperlink} inserts a hyperlink. Hyperlinks are more commonly inserted via the Hyperlink command on the Insert tab.
![]()
{Link} inserts an OLE link to an object. OLE links are more commonly inserted via Paste Special or the Insert Object command.
![]()
{IncludePicture} inserts a non-OLE link to an external picture. Picture links are more commonly inserted via the Insert Picture dialog box by selecting Insert and Link from the Insert button’s drop-down list.
![]()
{IncludeText} inserts a non-OLE link to an external text file. Text links are more commonly inserted via the Insert Text from File command by selecting Insert as Link from the Insert button’s drop-down list.
The following fields insert numbering codes:
![]()
{NoteRef} inserts the number of a footnote or endnote. These numbers are automatically updated as content changes in the document. These are normally placed via footnote and endnote insertion.
![]()
{PageRef} inserts the page number on which the specified bookmark appears. This code is inserted when you create a cross-reference that refers to a page number.
And these fields insert text strings of various types:
![]()
{Quote} inserts a literal text string that you specify. For example, {Quote "Hello world"} displays the text Hello world.
![]()
{Ref} inserts text marked by a bookmark. You learned about this one in Chapter 15, in the section “Inserting a Cross-Reference to a Bookmark.”
![]()
{StyleRef} inserts the text from a paragraph that has the specified style applied. For example, if you have the title of your document set up with a style called DocTitle, the field { StyleRef DocTitle } inserts that title later in the document.
There are also two AutoText-related fields:
![]()
{AutoText} inserts the specified AutoText entry as an updatable link. This is different from inserting AutoText items from the Building Blocks feature, as in “Working with Building Blocks” in Chapter 2, “Typing and Editing Text,” because the latter inserts an unlinked and nonupdatable copy.
![]()
{AutoTextList} creates a shortcut menu based on AutoText entries in the active template. You specify some placeholder text to appear in the field. When the user right-clicks the field, a pop-up list appears with AutoText entries to choose from to fill in that field.
Document Automation Fields
The document automation fields are used to set up code strings that automate processes in the document. Some programmers prefer to use document automation fields rather than VBA for some basic automation tasks such as filling in a form with user information or determining whether one value equals another. Here are a few simple examples.
The {Compare} field compares two values and returns a 1 if the comparison is true or 0 if it is false. It is a programming construct, useful for setting up logical conditions. For example, you might count the number of words in the document with the {NumWords} field and then compare that value to 1000:
{ Compare { NumWords } >= 1000 }
This {Compare} field returns a 1 if the word count is 1000 or above; otherwise, it returns a 0.
The 1 and 0 are all well and good, but it might be nicer to show some meaningful text based on the condition. For that, you need an {If} field. Here’s an {If} field’s syntax:
Expression1 Operator Expression2 TextTrue TextFalse
Suppose, for example, that if {NumWords} is at least 1000, you want to print “OK” in the document; otherwise, you want to print “Need More Words”. Here’s the {If} field to accomplish that:
{ IF { NumWords } >= 1000 "OK" "Need More Words" }
Here are the other available document automation fields:
![]()
{DocVariable} inserts the value of a VBA Word document variable. (This is not the same as the document’s properties, which you can insert with document information fields covered previously in this chapter.)
![]()
{GoToButton} inserts a button that, when clicked, jumps the insertion point to a specified bookmarked location.
![]()
{MacroButton} inserts a button that, when clicked, runs a specified macro.
![]()
{Print} sends a print instruction to the printer; you can use it to automatically print a document, for example. It is usually combined with some other field, such as {If}, rather than standing alone.
Mail Merge Fields
Chapter 14, “Performing Mail and Data Merges,” covers the Mail Merge feature in Word, which is a robust tool for merging the data from one file or database with a document in another file. Most of the fields involved in mail merging are automatically inserted when you work through the mail merge, or you can insert them using the Rules list on the Mailings tab.
![]()
{AddressBlock} inserts data pulled from multiple fields to form a standard postal mailing address.
![]()
{Ask} prompts the user to enter a value to be stored in a bookmark. You can then insert the content of that bookmark anywhere in the document via the {Ref} field.
![]()
{Compare} compares two values and shows a 1 or 0, depending on whether they match. You learned about this field earlier in the chapter in the “Document Automation Fields” section.
![]()
{Database} inserts the results of a database query in a Word table.
![]()
{Fillin} prompts the user to enter a value and then displays it in the field. This is different from {Ask} in that it does not store the value in a bookmark for later reuse.
![]()
{GreetingLine} inserts a greeting line in a mail merge document. You can optionally use the e switch to specify what name to use if the name is blank. For example, you might want something like Dear Valued Customer.
![]()
{If} prescribes two different actions to take based on the outcome of a logical test. This is like {Compare} except you can specify the output in each situation rather than accepting the default 1 and 0 outputs.
![]()
{MergeField} inserts a mail merge field. It requires a field name property, like this: {MergeField FirstName}.
![]()
{MergeRec} numbers each merged record in a mail merge. If a filter excludes any records, they are still numbered, and the numbered records have gaps in the numbering.
![]()
{MergeSeq} also numbers each merged record in a mail merge, but it does not number records excluded by a filter.
![]()
{Next} goes to the next record.
![]()
{NextIf} goes to the next record in a mail merge only if a condition is met.
![]()
{Set} assigns new text to a bookmark.
![]()
{SkipIf} skips the next record in a mail merge only if a condition is met. It is the opposite of {NextIf}.
Updating and Editing Fields
Now that you know about the fields you can insert, let’s look at how you can edit the properties of a field and update its values after insertion.
Updating a Field
Most fields are not automatically updated each time you open or save the document. (In this way, they differ from OLE linked objects, which are automatically updated by default.)
To update a single field, select it (or click anywhere in it) and press F9, or right-click the field and choose Update Field. If you have toggled on the display of the field code string, updating the field toggles it back to displaying the results.
To update multiple fields at once, select them as part of a contiguous selection range and press F9. To update all the fields in the entire document, select the entire document (Ctrl+A) and press F9. If the update takes too long, you can abort it by pressing Esc.
You can’t update all fields. Certain fields are not affected by performing an update because they do not pull information from a source that can be changed. For example, the {Print}, {MacroButton}, {GoToButton}, and {Eq} fields are like that.
In addition, certain fields are not affected by performing a manual update because they automatically update themselves. Examples include {Date}, {Time}, {Page}, and {Seq}. {Date} and {Time} update each time you open or print the document (or open it in Print Preview), and item-numbering fields such as {Page} and {Seq} update whenever there is a change in pagination or item sequencing, respectively.
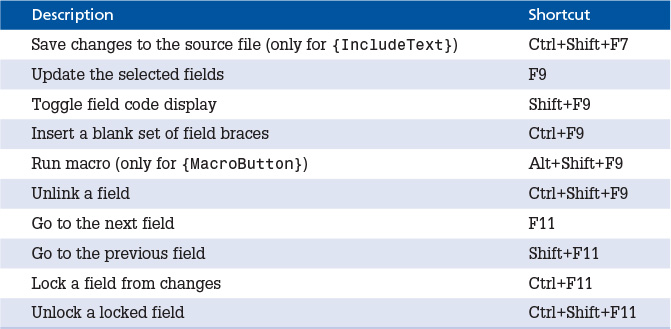
Before we get into specifics, note that a lot of keyboard shortcuts are involved in working with fields, and some of them are the only way to accomplish a particular action. Table 16.2 includes a quick summary of these shortcuts.
Field Doesn’t Update
Locking Fields Against Updates
Some fields can be locked, so they are never updated even when someone issues an Update Field command on them. For example, if you use a field to enter the current date on the day the document was created, you would not want that field to update every time you open the document.
Some fields have a Prevent Fields from Being Updated check box in the Field dialog box. Marking this check box adds a ! switch in the code string for that field. You can type the switch into the code string manually if you find that easier than going back to the Field dialog box.
If the field you want to lock does not have that ! switch as part of its syntax, here’s another way: Click in the field and press Ctrl+F11. To confirm that the field has been locked, right-click it; the Update Field command is unavailable on the menu that appears.
To unlock a field that has been locked this way, click in it and press Ctrl+Shift+F11.
Updating Fields for Printing
By default, Word does not automatically update fields before printing. This behavior is intentional, because it gives you more control over your data. If you would like to change this behavior so that all links are updated before printing, open the Word Options dialog box (File, Options), click Display, and mark the Update Fields Before Printing check box.
![]() Tip
Tip
You do not have to turn on Update Fields Before Printing for dates and times to update; they update automatically when you view the document in Print Preview or when you print.
Finding and Moving Between Fields
Sometimes it can be difficult to know where the fields are actually located in a document, especially when some of the fields do not contain visible content, such as a bookmark or index marker.
There are several ways to surmount this obstacle. One way is to select the entire document and toggle the field codes (Shift+F9). This method doesn’t take you to the codes, but it makes them easy to see.
Another way, which you can actually combine with the preceding one, is to go to the next field code by pressing F11 or to the previous one by pressing Shift+F11. Word jumps to the beginning of the next or previous field. You might not see anything there (if the field is hidden), but after jumping to that spot, right-click the spot and choose Toggle Field Codes or press Shift+F9, and the field appears.
A third way is to use the Go To feature to move from one field to the next. On the Home tab, click the Find arrow, click Go To, and choose Field from the Go to What list and click Next to go to the next field.
![]() To review Go To as a method of finding objects, see “Using Go To,” p. 77.
To review Go To as a method of finding objects, see “Using Go To,” p. 77.
Converting Fields to Plain Text
If you decide at some point that you will never want to update a particular field again, you can convert it to regular text (that is, unlink it). Doing so copies its current value into the document and then deletes the field placeholder.
![]() Note
Note
Unlinking has no effect on a marker type of field, such as a bookmark or index entry.
Before unlinking a field, update it one last time (F9) if needed. Then select it (or select multiple fields to operate on at once) and press Ctrl+Shift+F9. You can reverse an unlink with an Undo operation, but otherwise it’s a one-way route. To restore the field, you need to reinsert it from scratch.
Formatting Fields
When a field inserts data from another source, such as from a bookmark or an external text file, the formatting of the original is inserted, too. For example, suppose that you bookmark the text The New Deal in one section of your document, and you create a bookmark for it called NewDeal. Now when you insert that bookmarked text elsewhere in the document with the { Ref NewDeal } field, the inserted text appears bold and in italic.
That’s the basic default for the formatting, but there are some ways to circumvent that, as described in the next several sections.
Preventing the Formatting from Changing
What happens if you change the formatting of the original and then update the field? That depends on a switch. Ordinarily, the formatting would change, but you can prevent it from changing by using the * MERGEFORMAT switch. For example:
{ Ref NewDeal * MERGEFORMAT }
You can also employ MERGEFORMAT to lock in any manual formatting you have applied to the field.
Specifying Font Formatting for a Field
To apply specific font formatting to the text displayed in a field, toggle on the field code display and then format the first character in the field name the way you want the field result to be. (Font formatting in this context includes font, size, color, and attributes such as bold, italic, and underline.)
For example, with the {Ref} example from the preceding section, suppose that you want to format that field’s result as italic. Select the R in Ref and click the Italic button on the Mini Toolbar that appears. Then add * charformat to the end of the code string. (This part is not required if the field has no arguments.)
{ Ref NewDeal * charformat }
Then update the field (F9) to see the change.
Specifying a Numbering Type
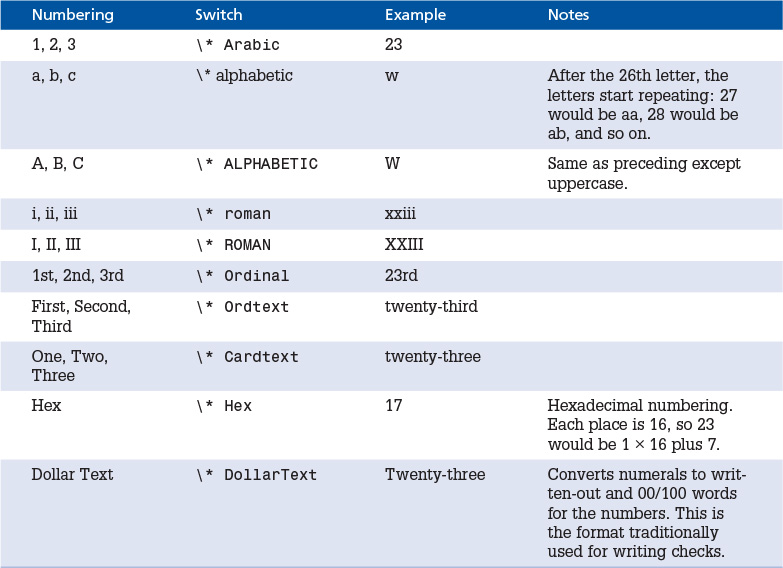
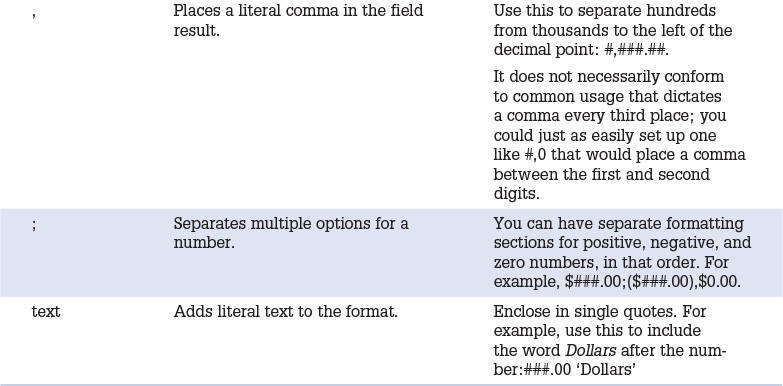
Numeric fields can use any of several types of characters to represent the numbers, such as Arabic (1, 2, 3), Roman (I, II, III), and so on. To specify the type of numbering, use the * switch followed by the appropriate code. The easiest way to set a numbering type is in the Field dialog box; it provides a list of the available types. Alternatively, you can use switches in the field code, as in Table 16.3. (Note that the codes are case sensitive; alphabetic differs from ALPHABETIC, for example.)
Constructing a Custom Numeric Format
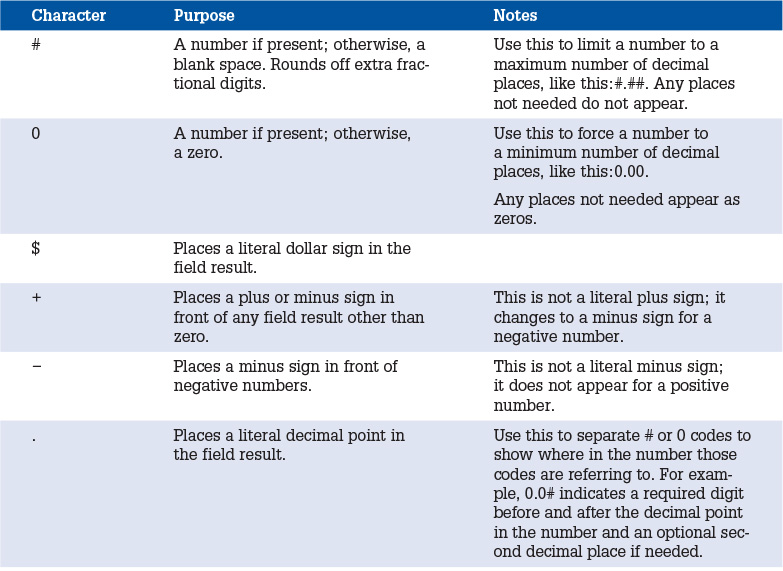
A numeric field’s number format (aka the numeric picture) controls the appearance of the number in cosmetic ways, such as its number of decimal places, its presence of currency symbols or percent signs, and so on.
The easiest way to set the number format is in the Field dialog box; a list of available types is provided. It is much easier to construct the codes this way than to build them manually. Alternatively, you can use the # switch, followed by the numbering format in quotation marks. For example:
{ FileSize # "#,##0" }
If you want to build the numbering format code manually, consult Table 16.4 for the symbols to use.
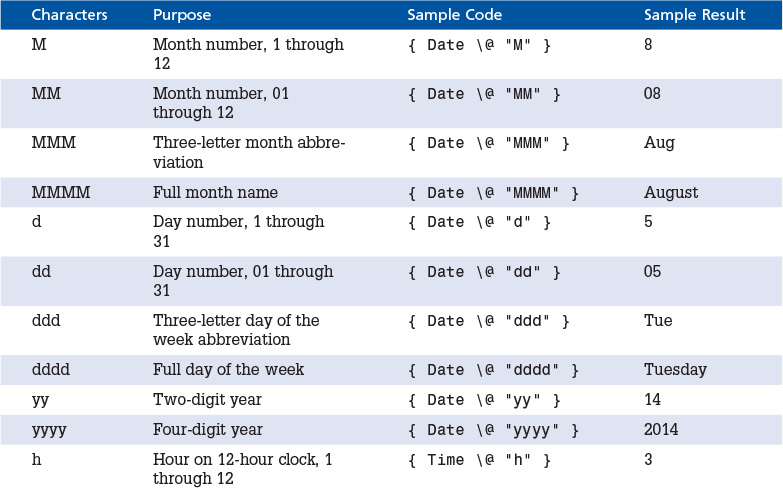
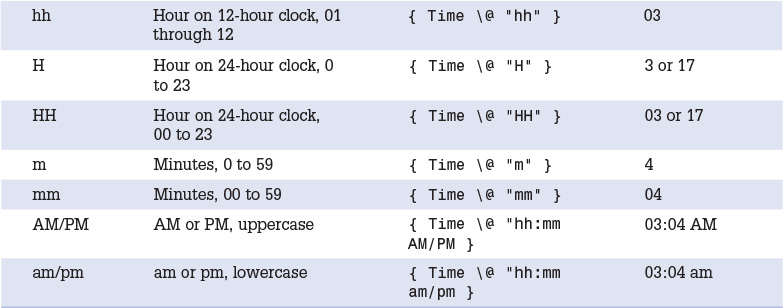
Constructing a Custom Date or Time Format
When you select a date or time from the Date and Time dialog box or from the Field dialog box, a list of sample formats appears. Choosing a format from one of those locations relieves you of the need to manually construct a date/time picture with switches.
However, in some cases, the format you want might not be available on the list. In such situations, you must manually construct the needed code for the switch.
For date and time fields, a @ switch is used, followed by the desired formatting codes in quotation marks. For example:
{ Date @ "MMMM d yyyy" }
{ Time @ "hh:mm AM/PM" }
The code is a combination of placeholders and literal characters. The valid literal characters are colon (:), dash (-), and slash (/). They separate the parts of the date or time. Typically, colons separate hours, minutes, and seconds in times; and dashes or slashes separate months, days, and years in dates.
Table 16.5 shows the valid characters for placeholders.
Understanding Forms
Forms enable you to collect information from people via a fill-in-the-blanks interface. The forms you create in Word can be printed and completed on paper or filled out from within Word. With a little extra programming know-how, you can connect them to an XML data system or an Access database.
Starting in version 2007, Word introduced a whole new class of form fields called content controls, which are used throughout Office applications as a means of interfacing with external data sources. These content controls have some great capabilities that were not present in Word 2003 and earlier, but they also have a few drawbacks. Therefore, Word 2016 also provides access to—and support for—legacy form controls that work in backward-compatible documents. In the following sections, you learn about both.
Designing a Form
The first step in creating a form is to create an ordinary Word document that contains all the “fixed” text used on the form. For example, before creating a Name field that the user fills in, type Name in the document and leave some space after it for the field to come later. To ensure that there is enough space for the fields, you might enter dummy characters where they will go, like this:
Name: &&&&&&&&&&&&&&&&&&&&&&&&
Address: &&&&&&&&&&&&&&&&&&&&&&&
City: &&&&&&&&&&&&&& State: && ZIP: &&&&&-&&&&
If you simply type the text and placeholders into a document, though, the form might not be as tidy as you would like. Notice in the preceding example how the Name and Address text, having different numbers of characters, start the field at different spots. Adding a Tab character after the colon for each label might help with that:

There’s still an alignment issue with the State and ZIP, though. They aren’t aligned with anything in particular; they’re just hanging out there after City. So what if you put the whole thing into a table, like this?

As you can see, a table can be a great help in creating a form on which the fields and labels align in an orderly way. If you define separate cells for each label and entry, you don’t need the placeholders to define where the fields will go. Tables are not appropriate for every form project, but they’re a good addition to your toolbox of techniques.
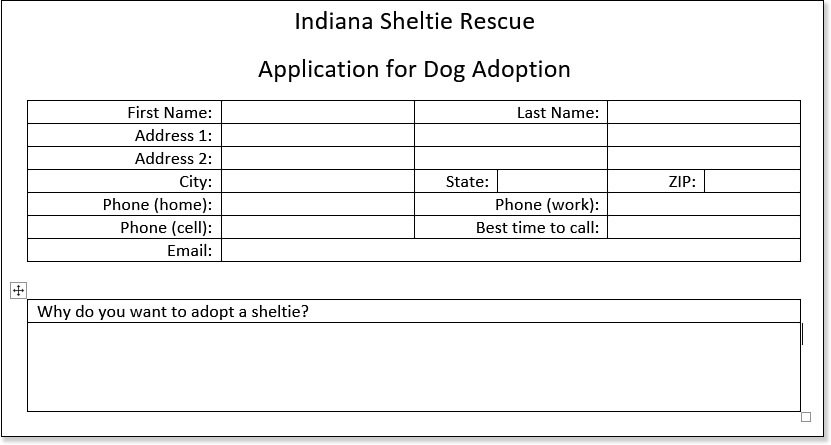
The form does not necessarily have to be in a single table. You could divide it into several tables, or you could use a combination of regular text and tables. Figure 16.5 shows an example. This is pure text and table at the moment; it contains no form fields.
Using whatever layout you find the most expedient for your situation, design the form and lay out all its pieces with placeholders, as in the preceding examples. Here are some tips:
![]() Arrange fields in logical groups—Group the information into sections based on the type of information being gathered. For example, in Figure 16.5, the contact information is in one group, and the essay question being asked of the applicant is in a separate group. Each group is in its own table in this example, but you don’t necessarily have to use tables for yours.
Arrange fields in logical groups—Group the information into sections based on the type of information being gathered. For example, in Figure 16.5, the contact information is in one group, and the essay question being asked of the applicant is in a separate group. Each group is in its own table in this example, but you don’t necessarily have to use tables for yours.
![]() Place fields in the expected order—People expect certain fields to be in a standard order. For example, they expect City to come before State. If you mix them up, users may have problems filling out the form.
Place fields in the expected order—People expect certain fields to be in a standard order. For example, they expect City to come before State. If you mix them up, users may have problems filling out the form.
![]() Plan for different types of fields—When you actually insert the fields, you can use not only text boxes, but drop-down lists, option buttons, and check boxes. If you think any of those will be useful, insert placeholders for them—and leave enough space for them. For example, a set of option buttons takes up more space than a drop-down list.
Plan for different types of fields—When you actually insert the fields, you can use not only text boxes, but drop-down lists, option buttons, and check boxes. If you think any of those will be useful, insert placeholders for them—and leave enough space for them. For example, a set of option buttons takes up more space than a drop-down list.
![]() Leave enough space for user input—Users will be frustrated if their information won’t fit on the form. Leave plenty of space for names, addresses, and so on. Maximilian Theophilus Kreutzcampf will thank you for it.
Leave enough space for user input—Users will be frustrated if their information won’t fit on the form. Leave plenty of space for names, addresses, and so on. Maximilian Theophilus Kreutzcampf will thank you for it.
![]() Be clear with your labels—Make sure it’s obvious what users should put in each field. For example, suppose that you have a City of Birth field, followed by a field labeled Date. Do you want the date of birth there, or the current date? Fifty percent of your users will probably guess wrong.
Be clear with your labels—Make sure it’s obvious what users should put in each field. For example, suppose that you have a City of Birth field, followed by a field labeled Date. Do you want the date of birth there, or the current date? Fifty percent of your users will probably guess wrong.
Saving a Form as a Template
The form isn’t finished yet, of course, but now is a good time to save your work as a template. You’ll want a template file, not a regular document file, because users will be creating new documents based on it.
To save the form as a template, follow these steps:
1. Choose File, Save As, click This PC, and click Browse. The Save As dialog box opens.
2. Open the Save as Type list and choose Word Macro-Enabled Template (.dotm).
![]() Tip
Tip
If you want the template to be easily accessible when starting a new document, store it in the default location for user templates: C:UsersusernameDocumentsCustom Office Templates. This location might appear by default when the dialog box opens in step 1.
If you aren’t planning on storing macros in the template, you could go with Word Template (.dotx) instead.
3. In the File Name box, type the name for the template file.
4. Click Save. The template is saved.
Differentiating Between Content Controls and Legacy Fields
Now you’re ready to start inserting the form fields. There are two kinds, though: content controls and legacy form fields.
Content controls are a natural choice if all the users of your form are using Word 2007 or later. Here are some of the advantages:
![]() There are more types of controls, including rich text, pictures, and a calendar/date picker.
There are more types of controls, including rich text, pictures, and a calendar/date picker.
![]() The document doesn’t have to be protected for forms, so you won’t have trouble with disabled commands such as spell checking that plague protected forms.
The document doesn’t have to be protected for forms, so you won’t have trouble with disabled commands such as spell checking that plague protected forms.
![]() You can set a content control so that it can’t be deleted or so that it unlinks itself immediately after it’s filled in.
You can set a content control so that it can’t be deleted or so that it unlinks itself immediately after it’s filled in.
![]() Their XML format makes form fields ideal for connecting with XML data sources.
Their XML format makes form fields ideal for connecting with XML data sources.
There are a few things you can’t do with content controls that the legacy form fields can, however:
![]() You can’t save the data only in a separate Word document.
You can’t save the data only in a separate Word document.
![]() You can’t easily link a macro to a control.
You can’t easily link a macro to a control.
![]() You can’t automatically format input in a predefined number format (such as currency).
You can’t automatically format input in a predefined number format (such as currency).
![]() You can’t set up a form field that performs a calculation.
You can’t set up a form field that performs a calculation.
![]() You can’t limit the length of an entry.
You can’t limit the length of an entry.
![]() You can’t fill out a Word form containing content controls using Word 2003 or earlier.
You can’t fill out a Word form containing content controls using Word 2003 or earlier.
This chapter focuses mostly on content controls, but it also provides information about the legacy form fields in case you need their capabilities or their backward compatibility.
You can combine the two types of fields in a single form. However, beware when combining the two field types, because they work differently behind the scenes. Here are some reasons to stick to one field type or the other:
![]() Saving data only—If you want to save the data only from the form into a plain-text file (covered later in this chapter), use legacy fields only. This won’t work with content control fields.
Saving data only—If you want to save the data only from the form into a plain-text file (covered later in this chapter), use legacy fields only. This won’t work with content control fields.
![]() Caution
Caution
If you create a form using content controls and then use Save As to save the form in a Word 97-2003 format, a warning appears telling you that the fields will be converted to static text. That’s right—static text, not legacy form fields, as you might expect. You lose all your form fields with that backward-saving, so ensure that you construct the form using legacy fields if you think you will be saving in an older format later.
![]() Supporting Word 97-2003 users—If the form will be filled out by people who use earlier versions of Word, use legacy fields only, and make sure you save the template as a Word 97-2003 template (
Supporting Word 97-2003 users—If the form will be filled out by people who use earlier versions of Word, use legacy fields only, and make sure you save the template as a Word 97-2003 template (.dot), not a Word 2013 .dotx or .dotm file.
![]() Preparing a database front end—If you are creating the form as a user interface for entering data into a database, check with the database developer to find out what type of field you should use—content controls or legacy fields. Stick only with that type. Don’t mix and match, because that makes the programming of the connection difficult or impossible.
Preparing a database front end—If you are creating the form as a user interface for entering data into a database, check with the database developer to find out what type of field you should use—content controls or legacy fields. Stick only with that type. Don’t mix and match, because that makes the programming of the connection difficult or impossible.
On the other hand, if you are creating a form to be printed or to be filled out in Word 2007 or later only and saved in the native Word 2016 document format, you can use both field types freely.
Displaying the Developer Tab
To work with forms, you need to work with the Developer tab. It does not appear by default. Here’s how to display it:
1. Right-click anywhere on the Ribbon and choose Customize the Ribbon.
2. Mark the Developer check box on the list on the right side of the Word Options dialog box.
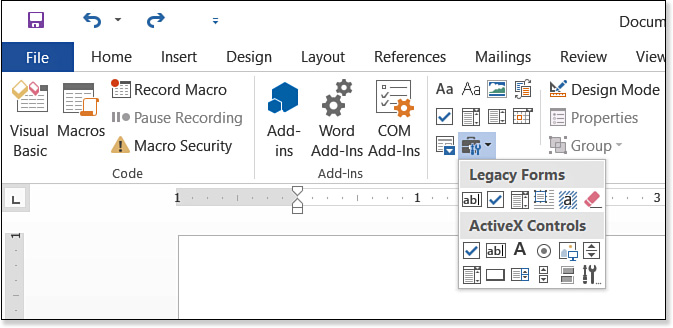
The Developer tab appears just to the right of the View tab. On the Developer tab is a Controls group that contains the buttons you need to build your form.
The Controls group contains eight buttons for content controls, plus one button for repeating section content control and one button for legacy controls. That latter button opens a palette of the legacy controls, as shown in Figure 16.6.
The Design Mode button in the Controls group toggles the form between Design mode (where fields can be added and edited) and regular mode (where fields can be used to collect information).
Creating a Form with Content Controls
As previously explained, content controls work only in Word 2007 and higher documents and templates. They look nice, and they are easy for users to understand and use. You can apply formatting styles to them, and you can prevent them from being edited or deleted.
Inserting a Content Control
To insert a content control, follow these steps:
1. Position the insertion point where you want the new control.
2. On the Developer tab, make sure Design Mode is selected.
3. Click one of the content control buttons on the Controls group to insert it into the document.
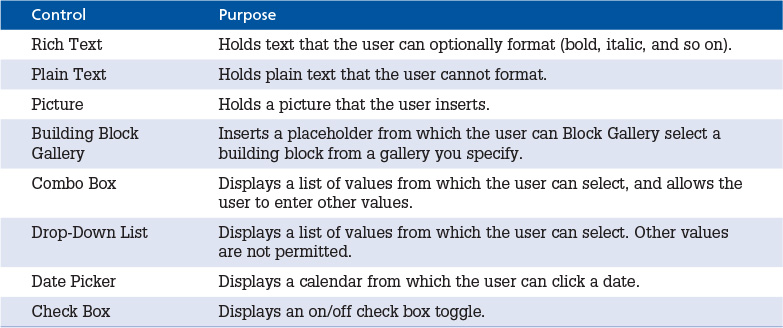
You can insert eight content controls, summarized in Table 16.6. On the Developer tab’s Controls group, point to a button to determine which content type it represents.
Configuring a Control
A content control is generic after insertion; you must provide its context via its Properties box. To view the Properties for a control, select it and then click the Properties button in the Controls group on the Developer tab.
Settings Common to All Control Types
The options available in the Properties dialog box depend on the control type, but all controls have a Title box, in which you specify the text that should appear in the bar across the top of the control. Figure 16.7 shows a photo with a title of January, for example.
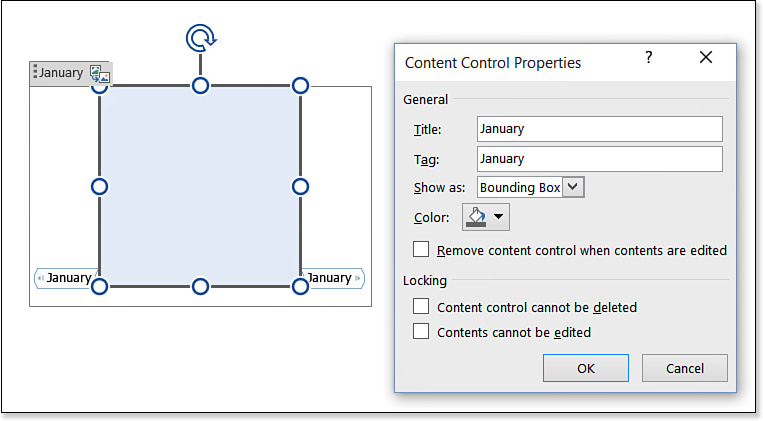
These settings are available, as shown in Figure 16.7, regardless of field type:
![]() Show As—This drop-down list enables you to choose how the field appears in the document. The default is Bounding Box, which is a large box around the control; the alternatives are Start/End Tag, which displays graphical brackets around the field, and None, which makes the field content look like regular text or graphics in the document.
Show As—This drop-down list enables you to choose how the field appears in the document. The default is Bounding Box, which is a large box around the control; the alternatives are Start/End Tag, which displays graphical brackets around the field, and None, which makes the field content look like regular text or graphics in the document.
![]() Remove Content Control When Contents Are Edited—This option deletes the field placeholder after the user enters content into it, leaving only the content as a regular part of the document.
Remove Content Control When Contents Are Edited—This option deletes the field placeholder after the user enters content into it, leaving only the content as a regular part of the document.
![]() Content Control Cannot Be Deleted—This prevents users from deleting the control.
Content Control Cannot Be Deleted—This prevents users from deleting the control.
![]() Contents Cannot Be Edited—This prevents users from changing what they enter in the control after the initial entry.
Contents Cannot Be Edited—This prevents users from changing what they enter in the control after the initial entry.
Style Options
By default, a field takes on the paragraph formatting of whatever paragraph you place it in. For some field types, though, you can override this formatting by applying a different style to the field entry.
For Rich Text, Plain Text, Combo Box, and Drop-Down List, you can mark Use a Style to Format Text Typed into the Empty Control and then select a style from the Style list (see Figure 16.8). You can also click New Style to create a new style on-the-fly for it.

Multiparagraph Text Options
For a plain-text field only, you can choose Allow Carriage Returns (Multiple Paragraphs). This option enables users to press Enter to start a new paragraph within the field. This option is not available for rich-text fields because they always allow this behavior.
List Options
Combo boxes and list boxes enable you to set up the list that appears when the user activates the control. In the Drop-Down List Properties area of the Content Control Properties dialog box, follow these steps:
1. Click Add. The Add Choice dialog box opens.
2. Enter the Display Name. This is the text that appears on the screen.
3. Enter the Value. This is what you enter into the database if you are connected to the form; otherwise, this is just stored with the field (see Figure 16.9).
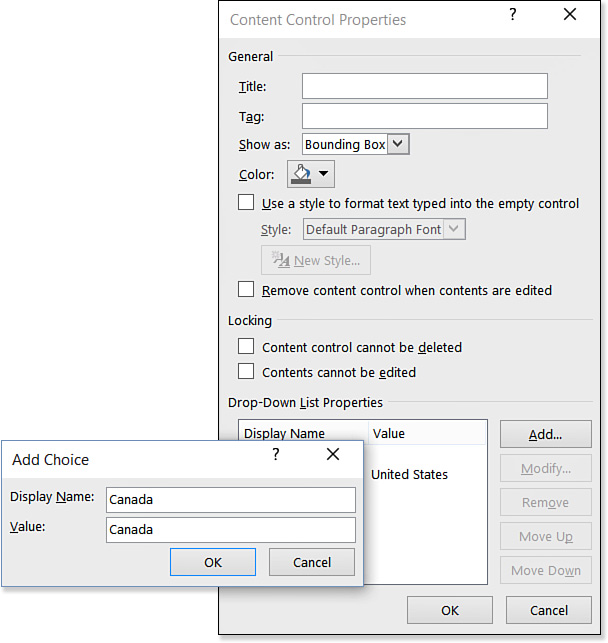
4. Click OK.
5. Repeat steps 1–4 to add more choices to the menu.
6. (Optional) Modify the list by doing any of the following:
![]() To modify an entry, select it, click Modify, make changes, and click OK.
To modify an entry, select it, click Modify, make changes, and click OK.
![]() To delete an entry, select it and click Remove.
To delete an entry, select it and click Remove.
![]() To reorder the list, select an item and click Move Up or Move Down.
To reorder the list, select an item and click Move Up or Move Down.
7. Click OK.
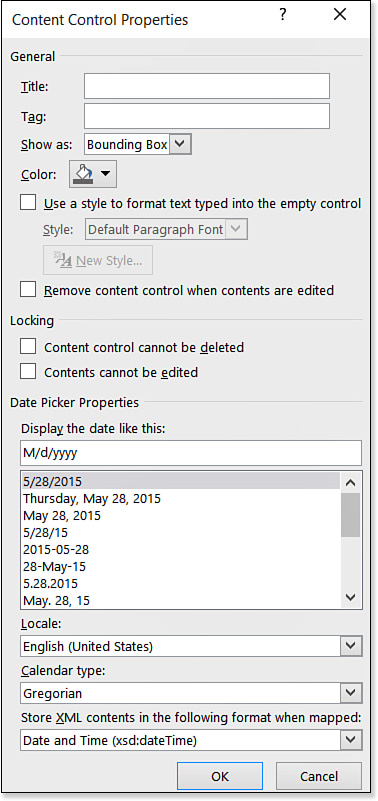
Date Options
For a date field, you can control these four settings, as shown in Figure 16.10:
![]() Display the Date Like This—Select a format from the list provided.
Display the Date Like This—Select a format from the list provided.
![]() Locale—Select a country and language.
Locale—Select a country and language.
![]() Calendar Type—Select a type based on your country. In the United States and most of Europe, the calendar is Western.
Calendar Type—Select a type based on your country. In the United States and most of Europe, the calendar is Western.
![]() Store XML Contents in the Following Format When Mapped—This setting is important only if you will be connecting to an XML data source. Select from the list of formats provided.
Store XML Contents in the Following Format When Mapped—This setting is important only if you will be connecting to an XML data source. Select from the list of formats provided.
Check Box Options
For a check box, you can control how the box appears when it is checked and when it is unchecked.
To control the appearance, from the Properties dialog box for the control, click the Change button next to Checked Symbol or Unchecked Symbol. Then select a new symbol from the Symbol dialog box that appears. You do not have to use square boxes; you can have it appear as any character or symbol you like (see Figure 16.11).

Building Block Options
The same versatile building blocks that you have learned about in other chapters are available for use in forms. For example, you can access any built-in or custom galleries such as Equations, AutoText, and Quick Parts.
The implications of this capability are significant. For example, suppose that you have a set of boilerplate paragraphs that you want to be able to select among when composing letters. You could place a Building Blocks field in your template and then have easy access to those paragraphs by clicking that field whenever you are creating a new letter.
![]() Caution
Caution
Building block insertion works only if the PC on which the form is being completed has the same building blocks available.
The default building block content control doesn’t do anything at first; you have to set it up to be associated with a certain gallery and category. To set that up, choose a gallery and category from the Document Building Block Properties.
![]() To learn more about building blocks, including how to create your own categories, see “Working with Building Blocks,” p. 85.
To learn more about building blocks, including how to create your own categories, see “Working with Building Blocks,” p. 85.
Editing Placeholder Text
The placeholder text for a content control is the text that appears inside the box by default, with instructions such as Click here to enter text. If you like, you can customize the wording of that instruction so that it is different for each field. For example, for a control that holds first names, you could change it to Click here and type your first name.
![]() Note
Note
Most of the changes you make to content control options do not require Design mode to be on; editing the placeholder text is one of the few situations in which you do need it. You can leave it on or off as desired as you work on a form.
To edit a placeholder, follow these steps:
1. On the Developer tab, click the Design Mode button to turn on Design mode if it is not already on.
2. Click inside the control, where the placeholder text is, and edit the placeholder text there.
Creating a Form with Legacy Form Fields
Legacy form fields are the field types that were available in earlier versions of Word. You can continue to use them in Word 2016, and you must use them for forms to be saved in Word 97-2003 format.
Legacy form fields are accessible from the Legacy Tools button’s menu in the Controls group on the Developer tab, as you saw in Figure 16.6. Table 16.7 explains each of them.
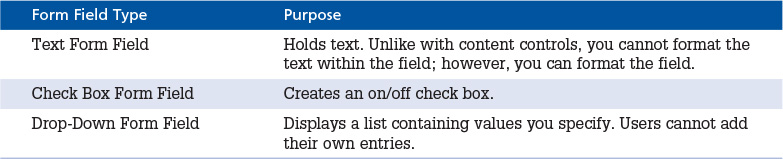
Yes, there are only three types of legacy form fields. The other three buttons in the Legacy Forms section of the Legacy Tools list have other purposes. Table 16.8 describes them.

Inserting a Legacy Field
To insert any legacy field, follow these steps:
1. Position the insertion point where you want the field.
2. On the Developer tab, make sure Design Mode is selected.
3. In the Controls group, click the Legacy Tools button. Its palette of tools appears.
4. Click the desired field type.
The field appears in the document as either a shaded gray box (for drop-down lists and text boxes) or as a check box (for check boxes).
Inserting a field is simple, but you will probably want to configure it after insertion. One advantage of legacy form fields is that they have some different formatting and configuration options available than content controls. Depending on what you want to do with the form, the legacy form fields might have just the option that will make your life easier.
To view the properties for a form field, right-click it and choose Properties, or click the Properties button on the Developer tab. If there is no Properties command, make sure Design Mode is selected in the Controls group and click the Properties button. Figure 16.12 shows the Options dialog box for a legacy text field.
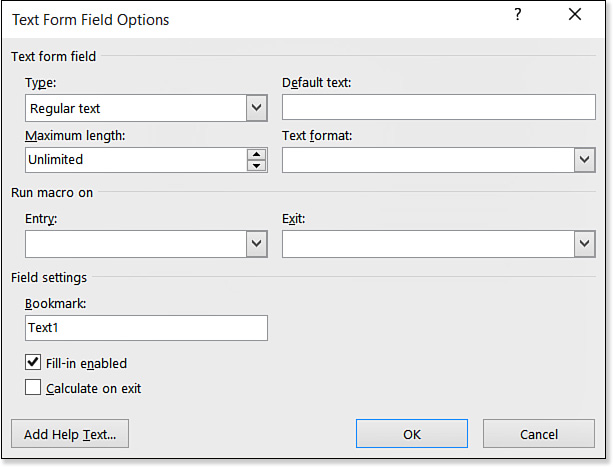
Configuring Legacy Text Field Options
There are three basic field types: Regular Text, Number, and Date. Depending on which of these types you select, different formatting options and length restrictions become available in the Options dialog box. The other three choices on the Type menu are special-purpose types, discussed later in this chapter.
If you choose Regular Text from the Type menu, the following options are available:
![]() Default Text—You can optionally specify default text to appear in the field before the user enters his or her own value.
Default Text—You can optionally specify default text to appear in the field before the user enters his or her own value.
![]() Maximum Length—This is measured in number of text characters. The default is Unlimited.
Maximum Length—This is measured in number of text characters. The default is Unlimited.
![]() Text Format—Choose among Uppercase, Lowercase, First Capital, or Title Case.
Text Format—Choose among Uppercase, Lowercase, First Capital, or Title Case.
![]() To learn about First Capital and Title Case as formatting options, see “Changing Text Case,” p. 159.
To learn about First Capital and Title Case as formatting options, see “Changing Text Case,” p. 159.
If you select Number from the Type menu, you can choose among these options:
![]() Default Number—This is just like Default Text; enter a default if desired.
Default Number—This is just like Default Text; enter a default if desired.
![]() Maximum Length—This is measured in number of digits.
Maximum Length—This is measured in number of digits.
![]() Number Format—This drop-down list lets you specify a numeric format, some of which include currency symbols or percentage signs.
Number Format—This drop-down list lets you specify a numeric format, some of which include currency symbols or percentage signs.
![]() For information about number format codes, see “Constructing a Custom Numeric Format,” p. 642. You cannot construct a custom format here, but that section helps you understand the available choices.
For information about number format codes, see “Constructing a Custom Numeric Format,” p. 642. You cannot construct a custom format here, but that section helps you understand the available choices.
Finally, if you choose Date from the Type menu, you can choose among these options:
![]() Default Date—This is just like Default Text; enter a default if desired.
Default Date—This is just like Default Text; enter a default if desired.
![]() Maximum Length—This is measured in number of digits. It is not typically limited for dates, because dates take up only as much space as they need.
Maximum Length—This is measured in number of digits. It is not typically limited for dates, because dates take up only as much space as they need.
![]() Date Format—This drop-down list lets you specify a date format, including various combinations of month, day, and year.
Date Format—This drop-down list lets you specify a date format, including various combinations of month, day, and year.
![]() For information about date format codes, see “Constructing a Custom Date or Time Format,” p. 644. You cannot construct a custom format here, but that section will help you understand the available choices.
For information about date format codes, see “Constructing a Custom Date or Time Format,” p. 644. You cannot construct a custom format here, but that section will help you understand the available choices.
Inserting the Current Date or Time
If you choose Current Date or Current Time from the Type list in the field’s Options dialog box, the field changes to show the current date or time, as determined by the PC’s clock. The field no longer accepts user input. It does not automatically update, but you can update it manually by selecting it and pressing F9.
Setting Up a Calculation in a Legacy Field
If you choose Calculation as the type for the field, an Expression text box appears in the Field Options dialog box. In it, enter the formula for the calculation (see Figure 16.13). You can then use any of the calculation methods that Word supports.
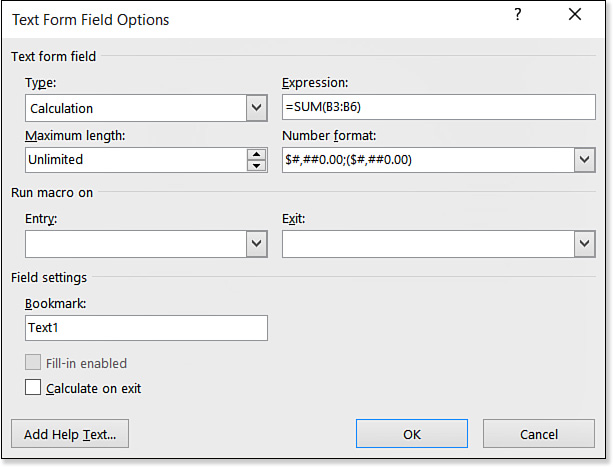
Figure 16.13 Set up a Calculation field within a table, and reference cells by row (number) and column (letter).
![]() Tip
Tip
For best results, set up the data to be calculated in a table, and then place the calculated field in that same table. That way, you can refer to various cells by their row and column designators.
![]() For more information about the calculations that you can perform in Word, see “Performing Math Calculations in a Table,” p. 374.
For more information about the calculations that you can perform in Word, see “Performing Math Calculations in a Table,” p. 374.
Configuring Legacy Check Box Options
Check boxes are useful when you have a list of items and the user can select as many of them as he or she wants.
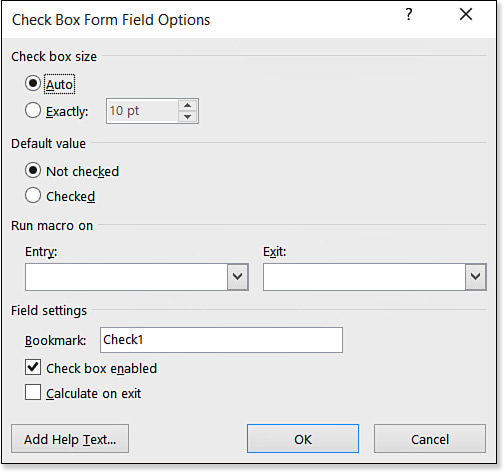
Check boxes have two unique options you can set for them, shown in Figure 16.14:
![]() Check Box Size—The default is Auto, which makes the check box the same size as the text that follows it. If you prefer, you can choose Exactly and enter a size in points.
Check Box Size—The default is Auto, which makes the check box the same size as the text that follows it. If you prefer, you can choose Exactly and enter a size in points.
![]() Default Value—This is set to Not Checked unless you specify otherwise. It determines the check box’s starting state.
Default Value—This is set to Not Checked unless you specify otherwise. It determines the check box’s starting state.
![]() Caution
Caution
If you see a Properties pane instead of the dialog box when you attempt to open the Options dialog box for a legacy text box, check box, or list box, make sure you have chosen a control from the top row of the Legacy Controls list, and not one of the ActiveX controls.
How Can I Program ActiveX Controls?
Configuring Legacy List Options
A legacy list box, also called a Drop-Down Form Field, is like the list box content control. It does not allow the user to input his or her own entries like a combo box does.
The main thing to set up for a list box is the list itself. Follow these steps to create the list:
1. From the Options dialog box for the field, type the first list item in the Drop-Down Item text box.
2. Click the Add button.
3. Repeat steps 1–2 to enter the other values (see Figure 16.15).
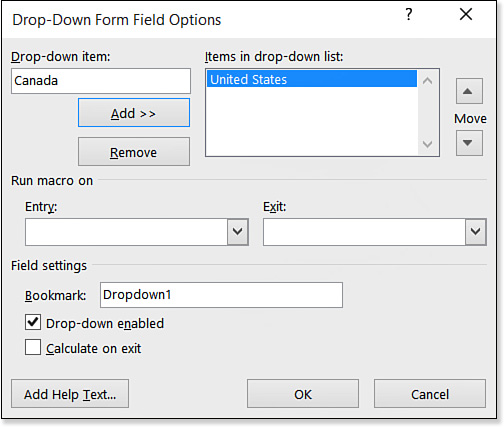
4. (Optional) If you need to remove an item, select it and click Remove.
5. (Optional) To reorder an item, select it and click the Move Up and Down arrows.
6. Click OK.
Setting a Macro to Run on Entry or Exit for a Legacy Field
If you have macros stored in the template or document, you can run one of them when the user enters or exits a particular field. For example, you might want to set up a macro that saves the file and associates it with exiting the final field on your form.
To set a macro to run on entry or exit, select the macro from the Entry or Exit drop-down list in the field’s Options dialog box.
![]() Caution
Caution
Macro-enabled fields are possible only with legacy form fields. They work in legacy documents and templates (.dot or .doc) and in Word 2016 macro-enabled templates and documents (.dotm and .docm), but not in the regular “x” file formats (.dotx and .docx). It’s not that you can’t associate a macro with a field in those file formats, but that macros can’t exist in those files, so there are no macros to be referenced.
Enabling or Disabling a Legacy Field
In some cases you might want to prevent users from changing the content of a field. Some would argue, “Why use a field at all if the user can’t change it?” But there are reasons for that. For example, if you save the form data only to a text file, only what’s in the fields is saved, so you might want some fixed values to travel along with the user-entered data.
To set up a legacy field so that users cannot input anything into it or change its content, open its Options dialog box (right-click and select Properties) and clear the Fill-In Enabled check box.
Assigning a Bookmark to a Legacy Field
Each field has a default bookmark name so you can refer to that field whenever you reference a bookmark. See the section titled “Using a Field to Set Bookmark Text” in Chapter 14, and the section “Working with Bookmarks” in Chapter 15, to learn about the various uses for a bookmark.
To change a field’s default bookmark name, open its Options dialog box (right-click and select Properties) and change the text in the Bookmark text box.
Adding Help Text for a Legacy Field
For legacy form fields, you can create help text that tells the user what to put in the field. With content controls, this isn’t necessary because you can customize the placeholder text in the field, as you saw earlier in the chapter. But the unfriendly gray boxes of the legacy fields need the extra help.
You can set up help to appear in either or both of two ways: in the status bar or in a pop-up window that appears when the user presses F1 while the insertion point is inside the field. (Pressing F1 any other time opens the regular Word Help window.)
To set up help messages, follow these steps:
1. Right-click the field and choose Properties.
2. Click Add Help Text. The Form Field Help Text dialog box opens.
3. To set up F1 help:
a. Click the Help Key (F1) tab.
b. Select the option Type Your Own.
c. Type the text to appear in the help message
4. To set up status bar help:
a. Click the Status Bar tab.
b. Select the option Type Your Own.
c. Type the text to appear in the help message, as shown in Figure 16.16.
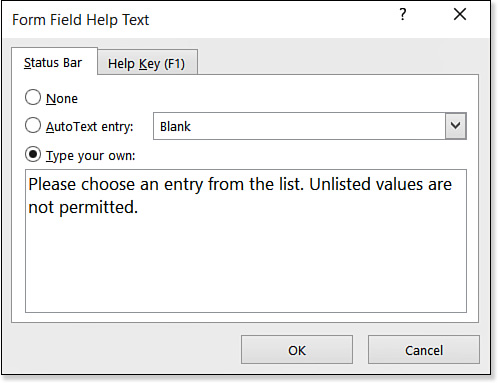
d. Click OK.
5. Click OK.
Protecting a Form
You must protect a legacy form to use its fields. With content controls, protecting the form is optional but recommended.
There are several types of document protection, but the type we’re interested in here makes the document uneditable except in the form fields.
To protect a form, follow these steps:
1. On the Developer tab, click Restrict Editing. The Restrict Editing task pane opens.
2. In the Editing Restrictions section, mark the Allow Only This Type of Editing in the Document check box.
3. Open the drop-down list below the check box and choose Filling In Forms (see Figure 16.17).
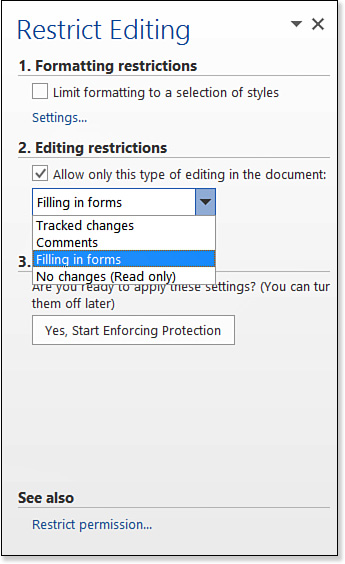
4. Click Yes, Start Enforcing Protection. The Start Enforcing Protection dialog box opens.
If this button is not available, make sure you are not still in Design mode. Click Design Mode on the Developer tab to turn it off if needed.
5. To put a password on the protection (recommended), type the desired password in the Enter New Password (Optional) box, and then retype it in the Reenter Password to Confirm box.
6. Click OK.
The Restrict Editing task pane remains open; close it if desired by clicking the X in its upper-right corner.
To remove the protection so you can further edit the form, follow these steps:
1. If the Restrict Editing task pane is not already displayed, click Restrict Editing on the Developer tab.
2. Click Stop Protection.
3. If you put a password on the protection, a dialog box appears prompting you for the password; enter it and click OK.
Filling Out a Form
You will probably want to test your forms as you build them to make sure they are user friendly. Filling out a form is a little different depending on the field type, so the following sections look at the processes separately.
![]() Caution
Caution
You can test the form in either the template file or in a document file based on the template. If you test the form in the template, though, make sure that you do not save your changes with the fields filled in.
Filling Out a Form with Content Controls
To enter text in a content control, click inside the content control and then type the entry for it.
If the form is protected, the insertion point flashes at the beginning of the document, and clicking anywhere in a protected region fails to move the insertion point; it jumps back to the beginning. The only areas you can successfully move the insertion point into are the content controls. With content controls, however, it is not mandatory that the document be protected to test a field. If the document is not protected, you can click anywhere and edit anything, not just the field entries. That’s by design; this behavior allows you to put content controls into any document.
Depending on the options set up for the content control, the content control might go away after you enter something into it, or it might become locked against further editing after the initial entry. If either of those conditions is unsatisfactory, you can turn off their options in the content control’s Properties.
Preventing Accidental Content Control Deletion
1. Unprotect the form if it is protected, and make sure Design Mode is selected on the Developer tab.
2. Select the content control and click Properties on the Developer tab. The Content Control Properties dialog box opens.
3. Mark the Content Control Cannot Be Deleted check box.
4. Click OK.
Filling Out a Legacy Form
A legacy form doesn’t work properly unless it’s protected. When unprotected, the form treats the fields as foreign objects, and you can’t enter anything into them.
On a protected form, you can click in a field and then type the text into it, or you can press Tab to move from field to field.
If help has been set up for a field, you can press the F1 key to see the help information when the insertion point is within that field. (Pressing F1 any other time opens the general Word 2016 help window, not the specific help for that field.)
Saving and Printing a Form
After filling out the form, you will probably want to either save the form input in a file or send the completed form to the printer. The following sections explain both of those operations.
Saving Only the Form Data
To save only the form data from legacy form fields in a text file, follow these steps:
1. Choose File, Options. The Word Options dialog box opens.
2. Click Advanced.
3. Scroll down to the Preserve Fidelity When Sharing This Document section, and make sure the correct document is selected on the list.
4. Mark the Save Form Data as Delimited Text File check box and click OK.
5. Choose File, Save As. The Save As dialog box opens with Plain Text set as the file type.
6. Type a name for the file and click Save to save the text file.
![]() Caution
Caution
If your form contains only content controls, the check box in step 4 is grayed out. If the form contains a mixture of content controls and legacy form fields, the check box is available, but the resulting save captures only the data from the legacy fields.
In the resulting text file, the data is comma-delimited with quotation marks around text entries. For example, an address block might look like this:
“Sheri Harris”,“10783 Westwood Place”,“Anderson”,“IN”,“46282”
Printing Only the Form Data
Printing form data is similar to saving form data, in that it works only with legacy form fields, not content controls. When you choose to print only the form data, none of the other text from the form prints. However, if the form was constructed within a table, and that table had visible borders or shading, the table will print along with the data. (If you don’t want the table to print, set its borders to None before printing.)
To print only the form data, follow these steps:
1. Choose File, Options. The Word Options dialog box opens.
2. Click Advanced.
3. Scroll down to the When Printing This Document section and ensure that you have selected the correct document on the list.
4. Mark the Print Only the Data from a Form check box.
5. Click OK.
6. Print the document as you normally would. None of the text prints except the text in the form fields.
Tips for Creating Printed Forms
Some forms end up being used for both onscreen and on-paper data entry. That’s fine, but what constitutes an effective online form might not always be the same as what constitutes an effective printed form.
You should think about a few things when moving between printed and electronic formats:
![]() In an onscreen field, users can enter a lot of data in a small field because the text scrolls within the field (at least it does on a legacy form field). When that field is printed, however, there will be a limited amount of space for it. Will your users be able to adequately record their entries in the space provided?
In an onscreen field, users can enter a lot of data in a small field because the text scrolls within the field (at least it does on a legacy form field). When that field is printed, however, there will be a limited amount of space for it. Will your users be able to adequately record their entries in the space provided?
![]() Drop-down fields do not work on a printed form, so you must replace them with check boxes or option buttons. (See the sidebar “Using Option Buttons on a Form,” earlier in this chapter, for details.)
Drop-down fields do not work on a printed form, so you must replace them with check boxes or option buttons. (See the sidebar “Using Option Buttons on a Form,” earlier in this chapter, for details.)
![]() Check boxes might need to be larger on printed forms than on electronic ones. To change the size of a check box, right-click it and choose Properties and make the change in its Options dialog box.
Check boxes might need to be larger on printed forms than on electronic ones. To change the size of a check box, right-click it and choose Properties and make the change in its Options dialog box.
![]() Calculated fields and fields that insert the current date/time do not work on printed forms, so remove them or change them to user-editable fields.
Calculated fields and fields that insert the current date/time do not work on printed forms, so remove them or change them to user-editable fields.
![]() Instead of using a legacy check box field, you might prefer to use a bullet character that looks like a check box. If the form will not be submitted electronically, it doesn’t matter that it’s not a real field. Also, more formatting options are available with a bullet character.
Instead of using a legacy check box field, you might prefer to use a bullet character that looks like a check box. If the form will not be submitted electronically, it doesn’t matter that it’s not a real field. Also, more formatting options are available with a bullet character.