13. Surf the Web More Efficiently using Safari
In this Chapter
![]() How to use new features in the iOS 11 version of Safari
How to use new features in the iOS 11 version of Safari
![]() How to use Safari Reader
How to use Safari Reader
![]() Using your iPhone as a personal Wi-Fi hotspot
Using your iPhone as a personal Wi-Fi hotspot
Chances are, if you know how to use a Mac or PC, you already know how to surf the Web using a browser such as Safari, Microsoft Edge, Firefox, or Google Chrome on your computer.
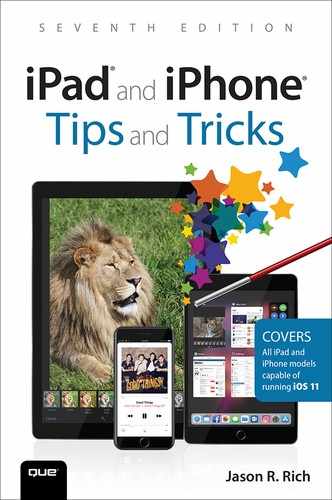
The Safari web browser on your iPhone (see Figure 13.1) or iPad (see Figure 13.2) offers the same basic functionality as the web browser for your desktop or laptop computer, but it’s designed to maximize the iPhone or iPad’s touchscreen and screen size.
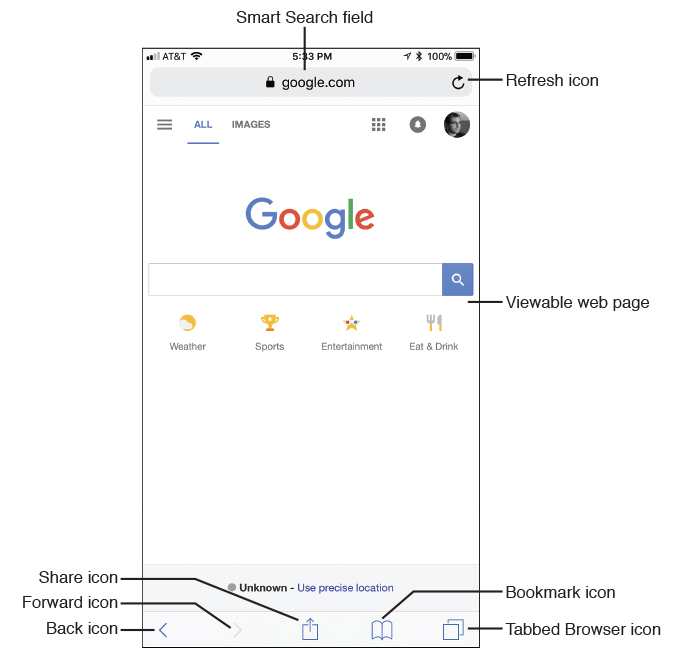
FIGURE 13.1
The main screen of the Safari web browser on the iPhone.
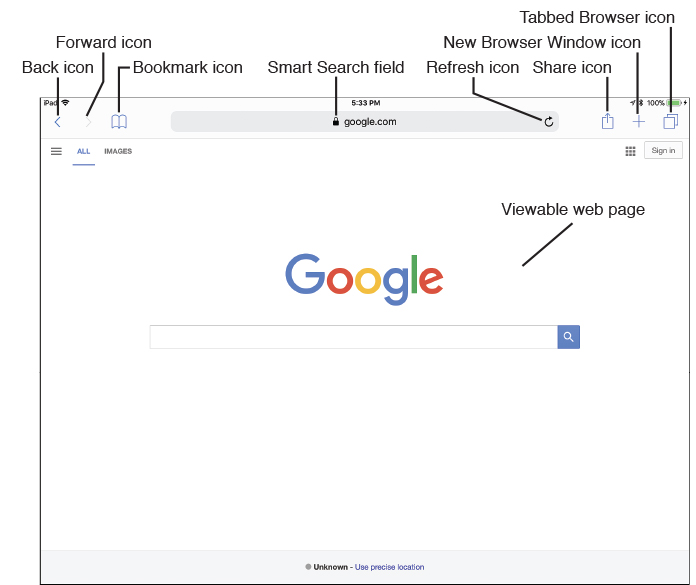
FIGURE 13.2
The main screen of the Safari web browser on the iPad.
![]() Tip
Tip
One the most useful features offered by the iOS 11 version of Safari is the capability to use Split Screen mode and have two independent web browser windows open at the same time on the iPad. It’s also possible to use Multitasking mode, and have two apps (such as Safari and another app of your choosing) running side-by-side on your tablet’s screen.
To use the Split Screen feature, launch Safari on your iPad, and in the Smart Search field, type the first URL you want to visit (or select it from a saved bookmark).
Next, tap the + icon to open a second browser window, and enter the second URL you want to visit. Two browser tabs are now displayed below the Smart Search field (see Figure 13.3).
Place your finger on either browser tab and drag it down and to the left or right side of the screen. Release your finger, and Split Screen mode launches. At this point, the two browser windows are running independently of each other (see Figure 13.4).
To close one of the browser windows, tap the X icon near the top-left corner of the window you want to close.
FIGURE 13.3
When two browser tabs are open, drag one down and toward the right or left edge of the screen.
![]() Tip
Tip
Using the Handoff function, you’re able to begin surfing the Web using Safari on one of your supported Macs or iOS mobile devices, and then pick up exactly where you left off on another, as long as all the equipment is linked to the same iCloud account. (Only iOS mobile devices and Macs released within the past few years offer this capability.)
To turn on the Handoff feature, launch Settings, tap the General option, and then tap the Handoff option. From the Handoff submenu, turn on the virtual switch associated with the Handoff feature. This must be done on each device. Also turn on your device’s Bluetooth feature.
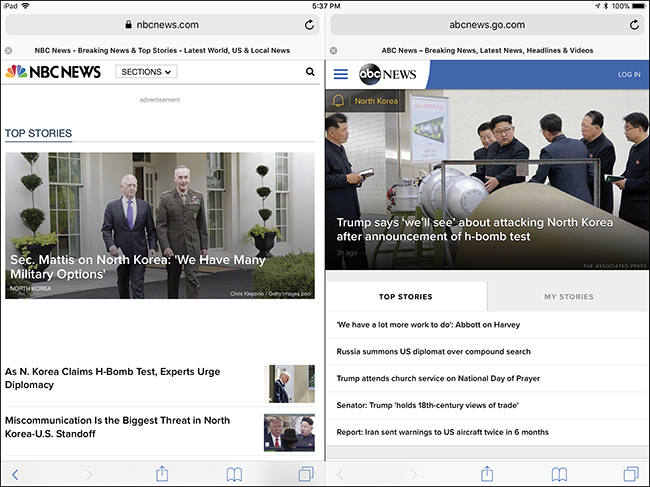
FIGURE 13.4
You can view two web browser tabs side by side with Safari’s Split Screen mode.
![]() Note
Note
Tot surf the Web and use the Safari web browser, your iPhone or iPad requires an active Wi-Fi or cellular data Internet connection unless you’re using Safari’s Read List feature to look at content you’ve saved for offline viewing.
Customizing Your Web-Surfing Experience
As you’d expect from your iPhone or iPad, surfing the Web is a highly customizable experience. For example, you can hold your device in portrait or landscape mode and, on most websites, you can also zoom in on or zoom out of specific areas or content. To do this, use the reverse-pinch finger gesture (to zoom in) or the pinch gesture (to zoom out), or double-tap a specific area of the screen to zoom in or out. Keep in mind that zooming does not work when you’re viewing a mobile-optimized website.
To further customize your web surfing experience, launch Settings and tap the Safari option. The Safari submenu (see Figure 13.5) offers a handful of customizable options. The following sections summarize what each is used for.
The Siri & Search feature gives you the option to allow Siri to access and use content from the Internet to better serve as your virtual assistant. To turn on this feature, launch Settings, tap Siri & Search, and then scroll down and tap Safari. Turn on the virtual switch for Search and Siri Suggestions.
Adjusting Search-Related Settings
The Smart Search field is used to enter specific website addresses (URLs) and to find what you’re looking for on the Web via a search engine, such as Google, Yahoo!, Bing, or DuckDuckGo. The Search Engine option enables you to select your default (favorite) Internet search engine.
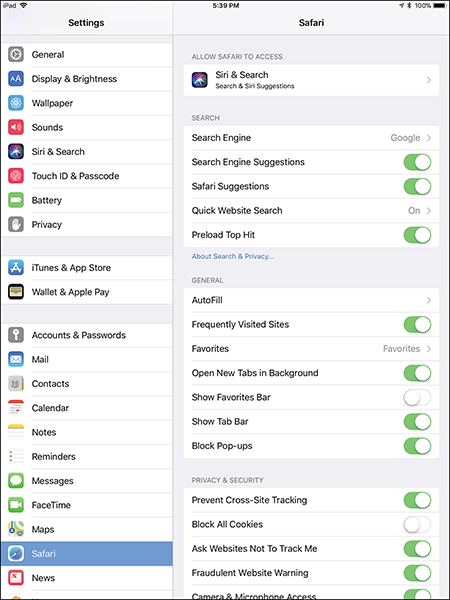
FIGURE 13.5
Customize your web surfing experience when using Safari from within Settings on your iOS device (shown here on an iPad).
DuckDuckGo.com is a search engine that does not track your web surfing behaviors or activities, so it offers a more private experience. However, you can use Safari’s enhanced Privacy features to prevent your web surfing activities from being tracked, regardless of which search engine you’re using.
![]() Tip
Tip
It’s possible to open a private browsing session by tapping the tab browser icon, and then tapping the Private option (see Figure 13.6). Tap Done to continue surfing (now in Private mode). To indicate you’re in Private mode, the Title bar area of the Safari web browser (where the command icons are located) is gray rather than white. When in Private mode, Safari doesn’t keep track of the web pages you visit.
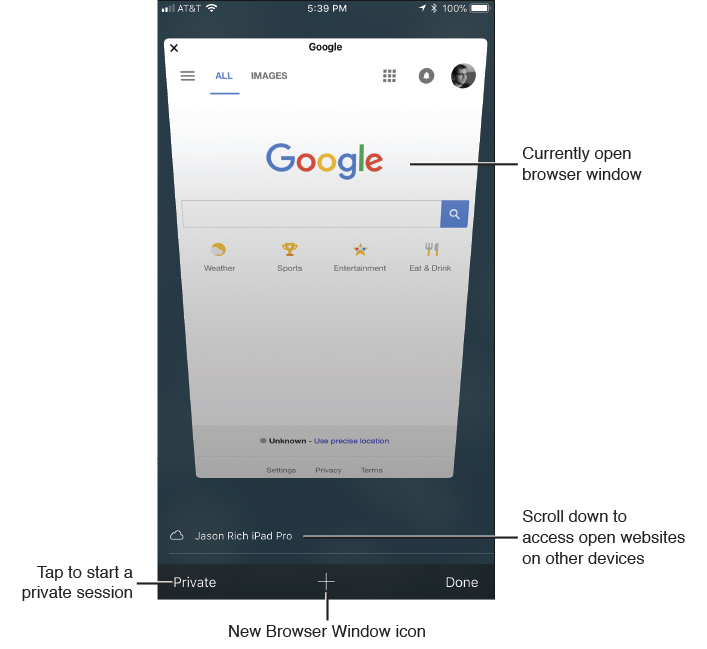
FIGURE 13.6
Manually turn on a private web surfing experience by tapping the Browser Tab icon and then selecting the Private option (shown here on an iPhone).
When viewing the Tabbed Browser Screen on an iPhone (refer to Figure 13.6), tap the New Browser Window (+) icon to open a new browser window.
If you have the Handoff feature turned on, scroll down this screen to view open browser windows on your iPad or Mac(s) that are linked to the same iCloud account and that also have Handoff turned on.
To turn on the Handoff feature (on an iPhone or iPad), launch Settings, tap General, and then tap Handoff. Turn on the virtual switch for the Handoff feature.
Other settings you can configure for Safari include Search Engine Suggestions, Safari Suggestions, Quick Website Search, and Preload Top Hit:
![]() Search Engine Suggestions—Automatically offers additional (related) search term suggestions when you enter a website address or search term in Safari’s Search field.
Search Engine Suggestions—Automatically offers additional (related) search term suggestions when you enter a website address or search term in Safari’s Search field.
![]() Safari Suggestions—Shows related websites when you perform a search using the Search feature in the iOS 11 version of Safari.
Safari Suggestions—Shows related websites when you perform a search using the Search feature in the iOS 11 version of Safari.
![]() Quick Website Search—Can be used to search a specific website for a specific term. For example, enter “Wiki New York” into the Search field to access the Wikipedia website and display information related to New York.
Quick Website Search—Can be used to search a specific website for a specific term. For example, enter “Wiki New York” into the Search field to access the Wikipedia website and display information related to New York.
![]() Preload Top Hit—Displays your favorite and most frequented websites when you do a relevant search.
Preload Top Hit—Displays your favorite and most frequented websites when you do a relevant search.
Customizing General Safari Options
The Safari submenu within Settings displays a heading labeled General. Here you’ll find additional options for customizing your web surfing experience, including the following:
![]() Autofill—When turned on, this feature helps you fill in online-based forms by remembering your responses and automatically inserting your information into the appropriate fields. It also pulls information from your own Contacts app entry. Autofill is particularly useful when shopping online.
Autofill—When turned on, this feature helps you fill in online-based forms by remembering your responses and automatically inserting your information into the appropriate fields. It also pulls information from your own Contacts app entry. Autofill is particularly useful when shopping online.
To customize this option and link your personal contact entry to Safari, tap the AutoFill option, turn on the Use Contact Info option, and then tap My Info to select your own Contacts entry.
You can also set whether Safari remembers usernames and passwords for specific websites you visit, as well as credit card information that you use to make online purchases. Tap the Saved Credit Cards option to add or edit credit card information you have securely stored in Safari for use when making online purchases. This functionality is part of what Apple calls iCloud Keychain.
![]() Note
Note
Some websites allow you to make purchases using Apple Pay from your mobile device. To do this, you first need to set up Apple Pay. Refer to Chapter 16, “iOS 11 and Apple Pay Security and Privacy Strategies,” for more information about setting up and using Apple Pay to make online purchases, and for making purchases from retail stores.
![]() Frequently Visited Websites—Turn on this feature to display websites you frequent the most often when performing a search, as well as before you enter information into Safari’s Search field or into Spotlight Search.
Frequently Visited Websites—Turn on this feature to display websites you frequent the most often when performing a search, as well as before you enter information into Safari’s Search field or into Spotlight Search.
![]() Favorites—This feature serves as a shortcut for accessing websites you frequently visit and that you have favorited. As you begin typing a website address or website name into the Search field, Safari accesses your Favorites list and auto-inserts the appropriate website URL. When you tap the Search field, a screen with icons representing sites in your Favorites list is displayed. Your Favorites list of websites automatically syncs between your Macs, PCs, and iOS mobile devices that are linked to the same iCloud account. This option now enables you to choose a specific folder where your favorite bookmarks are stored in the device you’re using.
Favorites—This feature serves as a shortcut for accessing websites you frequently visit and that you have favorited. As you begin typing a website address or website name into the Search field, Safari accesses your Favorites list and auto-inserts the appropriate website URL. When you tap the Search field, a screen with icons representing sites in your Favorites list is displayed. Your Favorites list of websites automatically syncs between your Macs, PCs, and iOS mobile devices that are linked to the same iCloud account. This option now enables you to choose a specific folder where your favorite bookmarks are stored in the device you’re using.
![]() Tip
Tip
If you’ve created custom Bookmark folders when using Safari on your Mac, you can access and manage them from your iOS mobile device. Plus from the Favorites option within the Safari submenu of Settings, you can make one of these custom folders your default.
![]() Open Links (iPhone only)—Any time a new web page opens as a result of you tapping a link, this feature determines whether the new browser window is opened as the new active browser window or opened in the background as a tabbed browser window.
Open Links (iPhone only)—Any time a new web page opens as a result of you tapping a link, this feature determines whether the new browser window is opened as the new active browser window or opened in the background as a tabbed browser window.
![]() Open New Tabs in Background (iPad only)—Any time a new web page opens as a result of you tapping a link, this feature determines whether the new browser window is opened as the new active browser window or opened in the background as a tabbed browser window. How this option works depends on options you have selected on the Safari submenu of Settings.
Open New Tabs in Background (iPad only)—Any time a new web page opens as a result of you tapping a link, this feature determines whether the new browser window is opened as the new active browser window or opened in the background as a tabbed browser window. How this option works depends on options you have selected on the Safari submenu of Settings.
![]() Show Favorites Bar (iPad)—When you turn on the virtual switch associated with this feature, your Favorites Bar displays across the top of the Safari screen, just below the row of command icons and the Search field. The default setting for this feature is off because it utilizes some of your onscreen real estate.
Show Favorites Bar (iPad)—When you turn on the virtual switch associated with this feature, your Favorites Bar displays across the top of the Safari screen, just below the row of command icons and the Search field. The default setting for this feature is off because it utilizes some of your onscreen real estate.
![]() Show Tab Bar (iPad)—When turned on, if multiple browser windows are open in Safari, tabs for each window are displayed along the top of the screen, just below the row of command icons and the Search field. The default setting for this feature is on. This makes it faster and easier to quickly switch between open browser windows.
Show Tab Bar (iPad)—When turned on, if multiple browser windows are open in Safari, tabs for each window are displayed along the top of the screen, just below the row of command icons and the Search field. The default setting for this feature is on. This makes it faster and easier to quickly switch between open browser windows.
![]() Block Pop-Ups—When turned on, this feature prevents a website you’re visiting from creating and displaying extra windows or opening a bunch of unwanted browser tabs. The default for this option is turned on because this makes for a more enjoyable web-surfing experience.
Block Pop-Ups—When turned on, this feature prevents a website you’re visiting from creating and displaying extra windows or opening a bunch of unwanted browser tabs. The default for this option is turned on because this makes for a more enjoyable web-surfing experience.
Adjusting Safari’s Privacy & Security Options
From the Safari submenu in Settings, scroll down to the Privacy & Security heading, and then turn on or off the virtual switches associated with the various options.
![]() Tip
Tip
Using a Virtual Private Network (VPN) enhances your security when surfing the Web and handling online tasks (such as online banking or online shopping) from your mobile device. Setting up a VPN is discussed in Chapter 16.
The adjustable Privacy and Security options include the following:
![]() Prevent Cross-Site Tracking—Cross-site tracking is a technology (called “remarketing”) that’s used by online advertisers. When you look up or discuss a product or service via a search engine or website or when you’re active on social media, what you look up or discuss is remembered. As you continue your web surfing activities, advertisements for what you looked up or discussed continuously appear on other advertising-supported websites. For example, if you look up something do to with new tires for your car, for the next few days (sometimes longer), you see ads related to tires on many different websites and social media services that display advertising. Turning on the Prevent Cross-Site Tracking feature makes it harder for advertisers to customize and target the online ads you see based on your past surfing habits and searches.
Prevent Cross-Site Tracking—Cross-site tracking is a technology (called “remarketing”) that’s used by online advertisers. When you look up or discuss a product or service via a search engine or website or when you’re active on social media, what you look up or discuss is remembered. As you continue your web surfing activities, advertisements for what you looked up or discussed continuously appear on other advertising-supported websites. For example, if you look up something do to with new tires for your car, for the next few days (sometimes longer), you see ads related to tires on many different websites and social media services that display advertising. Turning on the Prevent Cross-Site Tracking feature makes it harder for advertisers to customize and target the online ads you see based on your past surfing habits and searches.
In addition to turning on the Prevent Cross-Site Tracking, turn on the virtual switch associated with the Ask Websites Not to Track Me feature. This prevents a website’s operator from tracking what you see and do on each website you visit.
![]() Block All Cookies—Some websites automatically remember things about your visit, such as your personal preferences, so when you return to that website, the same information doesn’t need to be collected from you again. This data is stored within Safari as a “cookie.” To prevent websites from creating cookies and having Safari store them, turn on the virtual switch associated with this feature. When you have this feature turned on, your web surfing experience will be more convenient because websites you frequently visit will remember information about your activities and preferences.
Block All Cookies—Some websites automatically remember things about your visit, such as your personal preferences, so when you return to that website, the same information doesn’t need to be collected from you again. This data is stored within Safari as a “cookie.” To prevent websites from creating cookies and having Safari store them, turn on the virtual switch associated with this feature. When you have this feature turned on, your web surfing experience will be more convenient because websites you frequently visit will remember information about your activities and preferences.
![]() Tip
Tip
The Fraudulent Website Warning feature helps prevent you from getting tricked into visiting a fraudulent website that’s designed to replicate a legitimate website.
For example, imagine you receive an email staying there is a problem with your credit card account, and you must click on a specific link immediately to rectify the situation. The email is not from your credit card issuer, however. It’s from someone trying to perpetuate online fraud. When you click the provided link, you’re sent to a fake website designed to look exactly like the actual website from your credit card company. However, the website’s purpose is to collect personal information from you; that information could be used for identity theft, credit card fraud, or to steal your money. Similar scams appear to come from banks and financial institutions, eBay, major airlines, and email service providers.
Turning on this feature does not offer total protection from fraudulent websites or what are called phishing schemes, but it does help to protect you.
![]() Camera & Microphone Access—Some websites use the microphone and camera built into your iPhone or iPad to help you communicate via video calls or voice-over-IP (Internet-based) voice calls. These apps won’t be able to access and turn on your iOS device’s camera or microphone unless you turn on the virtual switch associated with this feature. Turning off this feature helps to prevent hackers and online-based criminals from potentially virtually spying on you while you’re surfing the Web.
Camera & Microphone Access—Some websites use the microphone and camera built into your iPhone or iPad to help you communicate via video calls or voice-over-IP (Internet-based) voice calls. These apps won’t be able to access and turn on your iOS device’s camera or microphone unless you turn on the virtual switch associated with this feature. Turning off this feature helps to prevent hackers and online-based criminals from potentially virtually spying on you while you’re surfing the Web.
![]() Check for Apple Pay—If a website you’re visiting supports the Apple Pay feature, you’ll be notified that you can use Apple Pay for purchases.
Check for Apple Pay—If a website you’re visiting supports the Apple Pay feature, you’ll be notified that you can use Apple Pay for purchases.
Examining Additional Safari-Related Options
After accessing Settings and tapping on the Safari option, as you scroll down within the Safari submenu, you’ll discover the following three additional options:
![]() Clear History and Website Data—Use this feature to delete the contents of Safari’s History folder, in which details about all the websites you have visited are stored. Cookies are also deleted.
Clear History and Website Data—Use this feature to delete the contents of Safari’s History folder, in which details about all the websites you have visited are stored. Cookies are also deleted.
![]() Automatically Save Offline—Use this feature to download all articles and web pages you save in Safari’s Reading list. Items added to the Reading List are stored within your iCloud account, so you can access them from Safari running on any of your computers or mobile devices that are linked to the same iCloud account, so you can read and refer to them anytime later, even when your iPhone or iPad is not connected to the Internet. Keep in mind that this feature does not store audio or video that’s associated with an article or web page you save within your Reading List. See the “Creating and Managing Reading Lists” section later in this chapter for more information.
Automatically Save Offline—Use this feature to download all articles and web pages you save in Safari’s Reading list. Items added to the Reading List are stored within your iCloud account, so you can access them from Safari running on any of your computers or mobile devices that are linked to the same iCloud account, so you can read and refer to them anytime later, even when your iPhone or iPad is not connected to the Internet. Keep in mind that this feature does not store audio or video that’s associated with an article or web page you save within your Reading List. See the “Creating and Managing Reading Lists” section later in this chapter for more information.
![]() Advanced—View details about website-specific data that Safari has collected. You can manually delete this information. You also can enable or disable the JavaScript feature.
Advanced—View details about website-specific data that Safari has collected. You can manually delete this information. You also can enable or disable the JavaScript feature.
Using Tabbed Browsing with Safari
Safari’s main screen contains the various command icons used to navigate the Web. On the iPhone, these icons are displayed along the bottom of the Safari screen, while the smart Search field is displayed along the top of the screen.
If you’re using Safari on an iPad, the Title bar displays all of Safari’s command icons along the top of the screen, unless you’re using Split Screen mode, in which case the icons are displayed along the bottom of the screen.
![]() Note
Note
The command icons offered by Safari include Back, Forward, Bookmarks, Reader (when applicable), Webpage Refresh, Share, Open New Browser Window (+), and the Tab Browser icon.
Immediately below the Title bar, if you have the option turned on, your personalized Favorites Bar is displayed. Below the Favorites Bar, the Tabs bar becomes visible if you have more than one web page loaded in Safari at any given time (and you have this featured turned on).
Switching Between Web Pages on an iPhone
The iPhone version of tabbed browsing involves Safari opening separate browser windows for each active web page. Tap the Tabbed Browser icon located in the bottom-right corner of the Safari screen to quickly switch between open browser windows (see Figure 13.7), because only one at a time can be viewed.
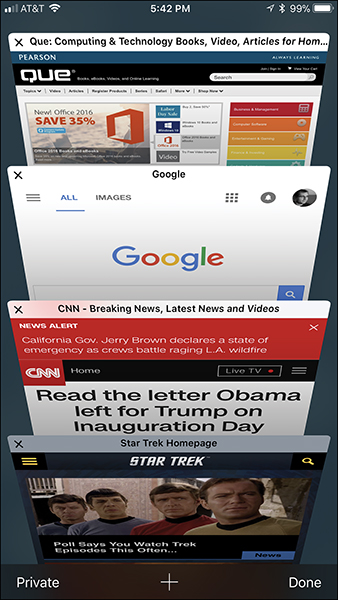
FIGURE 13.7
Safari’s Tab view is shown here on the iPhone.
![]() Tip
Tip
When looking at the Tab View screen, if you press the + option for a second or two, a Recently Closed Tabs menu screen appears. You can easily reopen a previously visited but closed browser window by tapping an item listed (which is based on your personal web surfing history).
When you’re viewing the Tab View screen, tap the New Browser Window (+) icon to create a new (empty) browser window, and then manually surf to a new website by typing a URL or search term into the Smart Search field, selecting a favorite icon, or selecting a bookmark.
![]() Tip
Tip
When viewing the Tab View screen in Safari, tap the Private option to turn on the Private web surfing mode only for the newly open browser windows. This prevents Safari from storing details about the websites you visit and syncing this information with your iCloud account.
To switch between active (viewable) browser windows that are open, simply tap one of the web page thumbnails displayed. Swipe up and down to scroll through the browser window thumbnails. To close a window (tab), tap its X icon.
![]() Tip
Tip
To access browser windows open on your other computers or iOS mobile devices, scroll down to the bottom of the Tab View screen (on the iPhone) to see listings for open browser windows on your Mac(s) or other iOS mobile devices linked to the same iCloud account. Tap any of these listings to pick up exactly where you left off on that other device.
Tap Done to exit the Tab View screen and return to the main Safari web browser screen. Alternatively, tap any web page thumbnail displayed in the Tab View screen to open that browser window and continue your web surfing experience at the selected web page.
Using Tabbed Browsing on Any iPad
When you tap a link in a web page that causes a new web page to automatically open, a new tab in Safari is created and displayed. Six tabs are shown in Figure 13.8, and each represents a separate open browser window. The right-most tab is the active tab. The Tab bar can display multiple tabs at once. To instantly switch between web pages, tap the desired tab. The website name (or web page title) is displayed in the tab for easy reference.
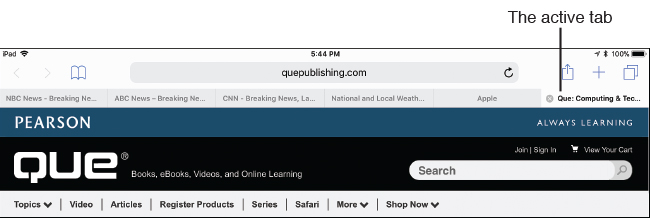
FIGURE 13.8
On the iPad, open browser window tabs are displayed along the top of the screen. Six tabs are shown here.
![]() Note
Note
On the iPad, tabs are not displayed if the Show Tab Bar option is turned off from the Safari submenu of Settings. Turning off Show Tab Bar and Show Favorites Bar enables you to save onscreen real estate that can then be used to display more of the web pages you’re visiting. Having these features turned on, however, makes switching between browser windows and reloading frequently visited websites faster and more convenient.
As you’re viewing a web page, to open another web page, tap the New Browser Window (+) icon near the top-right corner of the Safari screen (between the Share and Tab Browser icons). When you do this, a new tab is created for an empty browser window. This enables you to visit a different web page without closing the web page(s) you’re currently viewing.
To close a tab, tap the small x that appears on the left side of an open tab (refer to Figure 13.8).
![]() Tip
Tip
As you’re surfing the Web using your iPad, tap the Tab Browser icon in the top-right corner of the screen to display all the open browser windows on each of your other Macs or iOS mobile devices linked to the same iCloud account. Tap any of these preview windows or listings to open that browser window on your iPad and pick up exactly where you left off when using the other computer or device.
Cleaning Up Screen Clutter with Safari’s Reader Option
Safari Reader enables you to select a compatible website page (or an article displayed on a website); strip out graphic icons, ads, and other unwanted elements that cause onscreen clutter; and then read just the text (and view related photos) from that web page.
The Safari Reader works only with compatible websites. If the feature is available while you’re viewing a web page, the Reader icon (as shown in Figures 13.9 and 13.10) is displayed before that web page’s URL on the extreme left side of the Smart Search field.

FIGURE 13.9
An article from AARP.org, without the Reader feature active (shown on an iPad).

FIGURE 13.10
The same article from AARP.org but with the Reader feature active.
![]() Tip
Tip
When using the Reader feature, tap the AA icon on the right side of the Smart Search field in Safari to access a menu that enables you to change the font used to display the text, as well as decrease or increase the size of the text.
Tap the Reader icon a second time to return the web page to its normal appearance.
Creating and Managing Reading Lists
As you’re surfing the Web, you might come across specific web pages, articles, or other information that you want to refer to later. In Safari, it’s possible to create a bookmark for that website URL and have it displayed as part of your Bookmarks list or as part of your Favorites Bar. Another option, however, is to add a web page to your Safari Reading List. In addition to just storing the web page’s URL, Reading List stores the actual content of that page for later viewing (including offline viewing).
![]() Note
Note
The Reading List feature downloads entire web pages for offline viewing, as opposed to simply storing website addresses that you can refer to later. Although this feature downloads text and photos associated with a web page, it does not download animated graphics, video, or audio content associated with that page.
To add a website or web-based article to your personalized Reading List for later review, tap the Share icon, and then tap the Add to Reading List icon in Safari’s Share menu.
To later access your Reading List to view any of the stored web pages or articles, tap the Bookmarks icon, and then tap the Reading List tab. Figure 13.11 shows an example of a Reading List. The Reading List tab looks like eyeglasses.
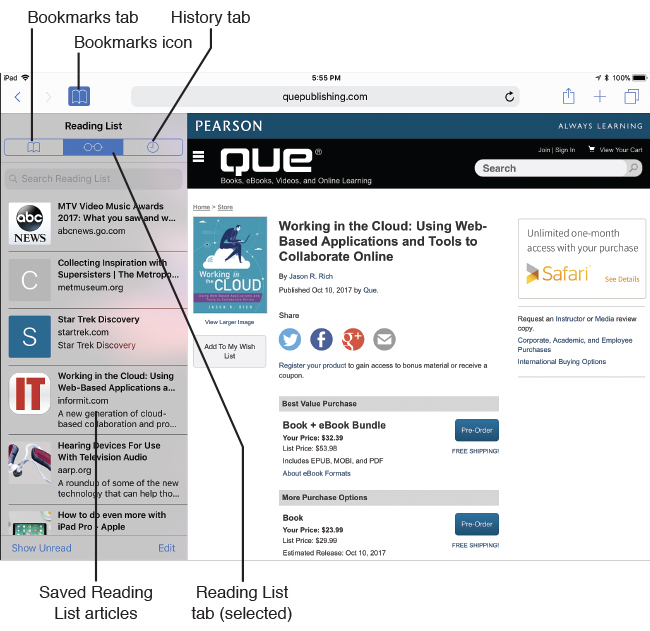
FIGURE 13.11
Create a Reading List to store links that you want to easily be able to find again and access later.
Like your Bookmarks list and Favorites Bar, the items stored in your Reading List automatically sync with your iCloud account and are almost instantly made available on any other computer or iOS device linked to your iCloud account.
Working with Bookmarks
When you tap the Bookmarks icon on an iPad, the Bookmarks menu appears along the left side of the screen. It remains visible until you tap the Bookmarks icon again. On the iPhone, when you tap the Bookmarks icon, the Bookmarks menu is displayed on a new screen in the Safari app.
At the top of the Bookmarks menu are three tabs. The leftmost tab (shaped like a book) is the Bookmarks tab. When you tap it, your saved list of website bookmarks is displayed. The center tab is the Reading List tab. Tap it to reveal your reading list (refer to Figure 13.11).
![]() What’s New
What’s New
The History tab (represented by the clock icon) enables you to see a listing of websites you’ve previously visited. Tap any History listing to quickly revisit that web page without manually typing its URL. The most recently visited websites are listed first. As you scroll down, headings for earlier that day and previous days are displayed.
One way to clear (erase) your web surfing history is to launch Safari, tap the Bookmarks icon, and then tap the History tab. Next, tap the Clear tab in the lower-right corner of the History list.
Sharing Web Content in Safari
The iOS 11 version of Safari makes sharing web links and managing web page content extremely easy, thanks to a handful of available options offered by the Share menu. The Share menu (see Figure 13.12), which you access by tapping the Share icon, offers a variety of features for sharing, printing, and managing web page content.
The options available to you from the Share menu vary depending on several factors, including the content you’re viewing as well as whether you have Facebook, Twitter, and other third-party apps installed and set up to work with Safari and iOS 11.
![]() Tip
Tip
If you have the AirDrop feature turned on, when you access the Share menu, the AirDrop option is available. This enables you to wirelessly share content with nearby (compatible) Mac, iPhone, iPad, or iPod touch users. Some older Mac and iOS mobile device models don’t support AirDrop.
Refer to Chapter 6, “Sync, Share, and Print Files Using AirDrop, AirPlay, AirPrint, and Handoff,” for more information on how to use the AirDrop feature.
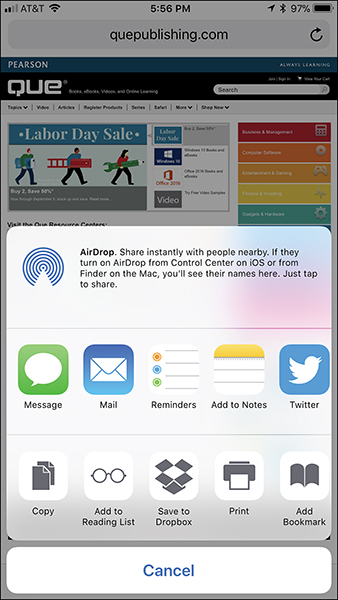
FIGURE 13.12
Safari’s Share menu offers a handful of ways to store, manage, print, and share web page content.
Also displayed on Safari’s Share menu are command icons that allow you to manage the content you’re viewing. The following are some of the more commonly used options:
![]() Copy—Use this command to copy the URL for the web page you’re looking at to the virtual clipboard. You can then paste that information into another app.
Copy—Use this command to copy the URL for the web page you’re looking at to the virtual clipboard. You can then paste that information into another app.
![]() Print—Wirelessly print a website’s contents to any AirPrint-compatible printer that’s set up to work with your iOS mobile device. To print a web page, tap the Print icon. From the Printer Options screen, select the printer you want to use, and then choose the number of copies you want printed. Tap the Print icon at the bottom of the Print Options window to send the web page document to your printer.
Print—Wirelessly print a website’s contents to any AirPrint-compatible printer that’s set up to work with your iOS mobile device. To print a web page, tap the Print icon. From the Printer Options screen, select the printer you want to use, and then choose the number of copies you want printed. Tap the Print icon at the bottom of the Print Options window to send the web page document to your printer.
![]() Add to Reading List—Instead of adding a web page URL to your Bookmarks list or Favorites Bar, you can save it in your Reading List for later reference.
Add to Reading List—Instead of adding a web page URL to your Bookmarks list or Favorites Bar, you can save it in your Reading List for later reference.
![]() Add Bookmark—Tap this option to add a bookmark to your personal Bookmarks list. When you opt to save a bookmark, an Add Bookmark window appears. Here, you can enter a title for the bookmark and decide whether you want to save it as part of your Bookmarks menu or in your Favorites Bar. You can also create separate subfolders in your Bookmarks menu to organize your saved bookmarks.
Add Bookmark—Tap this option to add a bookmark to your personal Bookmarks list. When you opt to save a bookmark, an Add Bookmark window appears. Here, you can enter a title for the bookmark and decide whether you want to save it as part of your Bookmarks menu or in your Favorites Bar. You can also create separate subfolders in your Bookmarks menu to organize your saved bookmarks.
![]() Add To Favorites—Add a listing for the website you’re currently viewing to your Safari Favorites list. This list syncs with iCloud and will be updated on all the Macs, PCs, and iOS mobile devices that you have linked to the same iCloud account.
Add To Favorites—Add a listing for the website you’re currently viewing to your Safari Favorites list. This list syncs with iCloud and will be updated on all the Macs, PCs, and iOS mobile devices that you have linked to the same iCloud account.
![]() Note
Note
When using Safari on the iPhone, you can maintain a Favorites list; however, to conserve onscreen space, a Favorites Bar is not displayed across the top of the Safari screen like it is on an iPad. Instead, on an iPhone, the Favorites list is displayed as an additional Bookmark folder when you tap the Bookmarks icon.
When using an iPad, turn off the Show Favorites Bar option (found on the Safari submenu within Settings) to hide the Favorites Bar.
![]() Add to Home Screen—See the section, “Launching Your Favorite Websites via Home Screen Icons,” later in this chapter, for more information on this feature.
Add to Home Screen—See the section, “Launching Your Favorite Websites via Home Screen Icons,” later in this chapter, for more information on this feature.
![]() Open in News—Transfer the web content you’re viewing in Safari to the News app, where it will be formatted and become viewable like any news article that’s accessible from the For You screen.
Open in News—Transfer the web content you’re viewing in Safari to the News app, where it will be formatted and become viewable like any news article that’s accessible from the For You screen.
![]() Request Desktop Site—Anytime you visit a website using the iOS 11 edition of Safari, if a mobile version of the website is offered, that’s the version that automatically loads. A mobile website has been custom formatted to accommodate the smaller iPhone or iPad screen size (compared to a full-sized computer monitor). However, if you’d prefer to switch to viewing the Desktop version of the website, tap the Request Desktop Site icon, and if available, this version of the website loads. You can then use the zoom in and zoom out finger gestures, as well as swipe finger gestures to navigate around the web page.
Request Desktop Site—Anytime you visit a website using the iOS 11 edition of Safari, if a mobile version of the website is offered, that’s the version that automatically loads. A mobile website has been custom formatted to accommodate the smaller iPhone or iPad screen size (compared to a full-sized computer monitor). However, if you’d prefer to switch to viewing the Desktop version of the website, tap the Request Desktop Site icon, and if available, this version of the website loads. You can then use the zoom in and zoom out finger gestures, as well as swipe finger gestures to navigate around the web page.
![]() What’s New
What’s New
It’s now possible to create a PDF from the contents of any web page you’re looking at, and then annotate, store, share, or manage that file just as you would any other PDF. To do this, as you’re viewing a web page you want to convert into a PDF, tap the Share button, and then tap Create PDF.
You see a preview screen that shows what will become the PDF. Tap the Markup/Annotate icon to write or draw on the PDF. (This feature works particularly well if you’re using an Apple Pencil in conjunction with an iPad Pro.) Tap the Share icon to determine what you want to do with the PDF.
For example, you can copy it and then paste it into another compatible app, share it with other people (via text message, AirDrop, email, or social media), or save the file within a cloud-based file storage account, such as iCloud Drive (via the Files app) or Dropbox. Tap the Print button to print the file to an AirPrint-compatible printer that’s wirelessly linked to your mobile device.
To save the PDF, tap Done, tap Save File To, and then choose where you want to save it. You can choose a specific folder or subfolder within iCloud Drive, or you can choose the On My iPhone/iPad option to save it locally within the internal storage of the device you’re using.
Creating, Managing, and Syncing Bookmarks and User Information
Your iOS device automatically syncs your Bookmarks and related Safari data with your other iOS mobile devices, as well as the compatible web browsers on your primary computer(s).
To activate iCloud sync functionality as it relates to Safari, launch Settings, tap your profile photo/username, and then tap the iCloud option. Turn on the virtual switch associated with the Safari option. This must be done on each of your iOS mobile devices just once.
Once this feature is turned on, your Bookmarks list, Favorites Bar, open browser windows (tabs), Safari Reading List, and iCloud Keychain data are automatically and continuously synced with your iCloud account. Thus, when you add a new bookmark while surfing the Web on your iPad, for example, within seconds that same bookmark appears in your Bookmarks list on your iPhone and on Safari that’s running on your Mac.
![]() Tip
Tip
For Windows PC users, if you download the optional iCloud for Windows software (www.apple.com/icloud/setup/pc.html), your Bookmarks and related web browser data on your PC sync with your iOS mobile device(s) and Mac(s), and vice versa. Simply add a check mark to the Bookmarks option displayed in the iCloud Control Panel.
This feature is compatible with the Microsoft Edge, Firefox, and Chrome web browsers. When prompted, simply select which web browser you want to sync your Safari bookmarks and data with.
When the iCloud Keychain feature is turned on (on each of your iOS mobile devices and Macs), any time you enter a username and password for a website you visit, Safari stores that information and syncs it with your personal iCloud account. Then, any time you revisit that website on any of your Macs or iOS mobile devices that are linked to the same iCloud account, your username and password for that website are remembered and you’re automatically logged in.
![]() Note
Note
iCloud Keychain also remembers credit card information you use when making online purchases from a website. All usernames, passwords, and credit card details are stored using 256-bit AES encryption to maintain security.
![]() Tip
Tip
Safari supports Apple Pay and enables you to make online purchases when you visit participating websites. Instead of manually entering your credit card details when making an online purchase, select the Apple Pay option, and then place your finger on the Touch ID sensor to confirm the purchase (see Figure 13.13).
To set up this feature, launch Settings, tap the Wallet & Apple Pay option, and then tap the Add Credit or Debit Card option to link one or more of your credit or debit cards to your Apple Pay account.
Be sure to select your default shipping address, email address, and phone number to make the checkout process faster when shopping online.
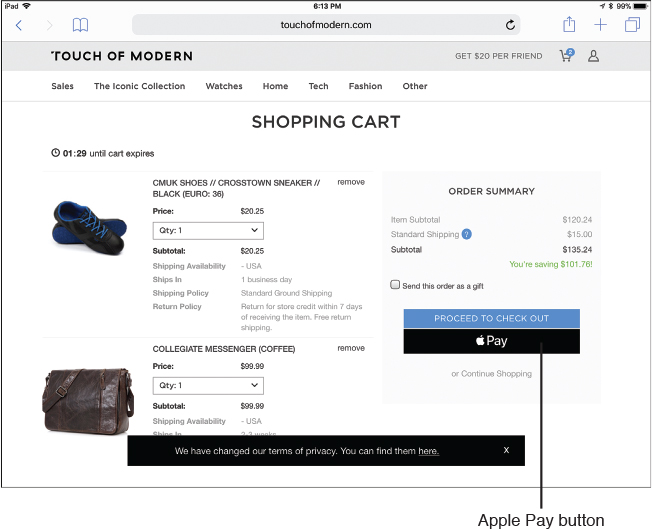
FIGURE 13.13
Look for the Apple Pay button on the checkout screen when shopping online.
To turn on and begin using iCloud Keychain, launch Settings, tap your profile photo/username, and then tap the iCloud option. From the iCloud Control Panel, tap the Keychain option. Turn on the virtual switch for this feature. Follow the onscreen prompts that walk you through the feature’s built-in security precautions.
Next, return to the main Settings menu and tap the Safari option. Tap the AutoFill option, and turn on the virtual switches associated with Use Contact Info, Names and Password, and/or Credit Cards. Also, tap the My Info option and select your own entry from your Contacts app database.
![]() Note
Note
For your security, online banking, credit card, and financial websites do not support iCloud Keychain. When you visit these websites, Safari might remember your username but you must manually enter your password each time.
When using this feature, it’s a good strategy to also activate the Passcode Lock feature of your iOS mobile device to prevent unauthorized people from accessing personal information when using your iPhone or iPad to surf the Web.
Using iCloud Keychain, you no longer need to remember the unique usernames and passwords that you associate with each of the websites you frequently visit. Plus, to make your web surfing experience even more secure, you can use the built-in Password Generator feature to create highly secure passwords for you (which the web browser then remembers).
Launching Your Favorite Websites via Home Screen Icons
A time-saving alternative to creating bookmarks for your most frequented websites is to create a Home screen shortcut icon for each of these websites. When you do this, an icon for that website is displayed on your device’s Home screen. When you tap it, Safari launches and the selected website automatically loads.
To create a Home screen icon, surf to one of your favorite websites. After it loads, tap the Share icon, and then tap the Add to Home Screen button.
The Add to Home window appears. It displays a thumbnail image of the website you’re visiting and enables you to enter the title for the website (which is displayed below the icon on your device’s Home screen). Next, tap the Add option in the upper-right corner of the window.
After you create a Home screen icon for a web page, it can be treated like any other app icon. You can move the icon around on the Home screen, add it to a folder, or delete it from the Home screen.
![]() Tip
Tip
Without manually launching Safari, it’s possible to look up and access web content using the Spotlight Search feature built in to iOS 11. Plus, Siri is also fully compatible with Safari. Activate Siri and use verbal commands like, “Launch Safari,” “Search the web for [topic],” or “Google [topic].” It’s also possible to ask a question and have Siri search the Web for the answer.
Transforming Your iPhone into a Personal Wi-Fi Hotspot
Your iPhone can use a 4G (LTE) cellular data connection to communicate with the Internet. If you have other devices, such as a Wi-Fi Only iPad or another device that uses only Wi-Fi to access the Internet, you can transform your iPhone into a personal (password-protected) Wi-Fi hotspot when public Wi-Fi is not available. When you do this, your iPhone uses its cellular data connection to access the Internet and creates a Wi-Fi hotspot that your other Wi-Fi-only devices can connect to.
Not all cellular service providers offer this feature. With some providers that do offer the feature, you need to pay extra to have this feature added to your service plan.
If your cellular data provider supports allowing your iPhone to serve as a personal Wi-Fi hotspot, turn on this feature on your iPhone by launching Settings and tapping Personal Hotspot. Turn on the virtual switch associated with Personal Hotspot, and then tap the Wi-Fi Password option to create a custom password you’ll use from your other Wi-Fi-only devices to access the Wi-Fi hotspot.
When the hotspot feature is active, access one or more of your Wi-Fi only devices, turn on the Wi-Fi-feature, and select your iPhone’s Wi-Fi network (see Figure 13.14). When prompted, enter the Wi-Fi password you created on your iPhone.
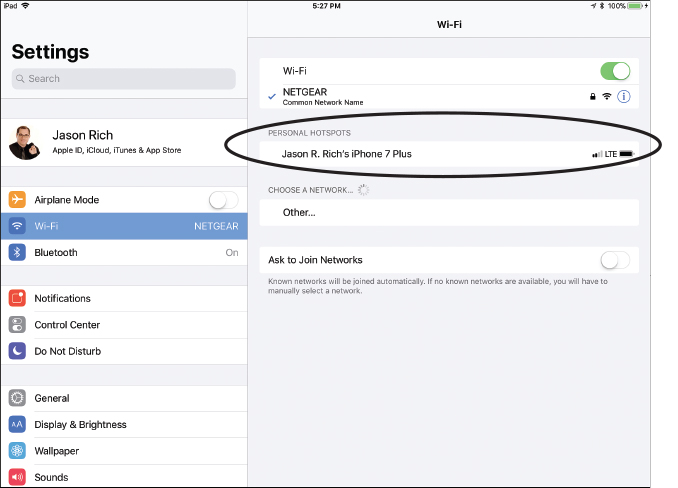
FIGURE 13.14
This Wi-Fi Only iPad Pro can connect to the Wi-Fi network being created by the iPhone called Jason R. Rich’s iPhone 7 Plus.
The personal Wi-Fi hotspot network name that’s used will be the name given to your iPhone. To change the iPhone’s name, launch Settings, tap General, tap About, and then tap Name. Enter a name for your iPhone, such as “Jason R. Rich’s iPhone 7 Plus.”
There are three ways to connect a Wi-Fi-only device to your iPhone to use the personal hotspot feature. You can wirelessly link both devices via Wi-Fi, connect a computer with your iPhone wirelessly via Bluetooth, or use the USB cable that came with your iPhone. Plug the USB port end of the cable into the USB port of your computer, and plug the Lightning port end of the cable to the bottom of your iPhone.
![]() Caution
Caution
Using the Personal Hotspot feature of your iPhone quickly depletes the smartphone’s battery, so if possible, use this feature when your iPhone is connected to an external power source.
If you have a monthly cellular data usage associated with your data plan from your cellular service provider, using the Personal Hotspot feature consumes some of this allocation. In some cases, even if you have an unlimited cellular data plan, the cellular service provider caps how much data can be used by a personal hotspot, or the provider might limit the number of devices that can link to the personal hotspot simultaneously.
![]() Caution
Caution
Do not use the Personal Hotspot feature while traveling overseas, unless you have an unlimited international cellular data plan. Otherwise, you’ll be charged outrageously high international roaming fees.
To avoid these charges, you can purchase and install a local (pre-paid) SIM chip that works in the country you’re visiting, or you can use a standalone personal Wi-Fi hotspot device that supports multiple devices, including your iPhone, iPad, or computer. Of course, you can also rely exclusively on public Wi-Fi hotspots to acquire Internet access.
An example of a standalone personal hotspot device that is designed specifically for international travelers is available from SkyRoam (www.skyroam.com). Once you purchase the device (for less than $100), you prepay a flat fee of $8.00 or $9.00 per day for unlimited Internet access in more than 100 countries.