
Levels
Levels - optimized quality starts here
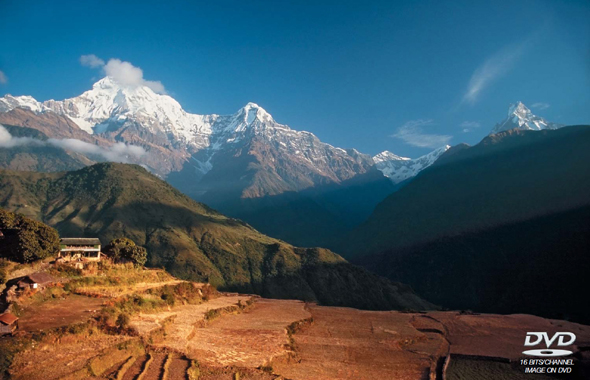
This project will guide the user safely through the tricky mountain passes of the primary and essential technique to achieving quality digital images. The adjustment feature is called ‘Levels’, but when you are presented with the virtual mountain range on opening the Levels dialog box, you begin to wonder what the clever people at Adobe were thinking of when they gave this indispensable adjustment feature its wonderful name (I think it’s called irony).

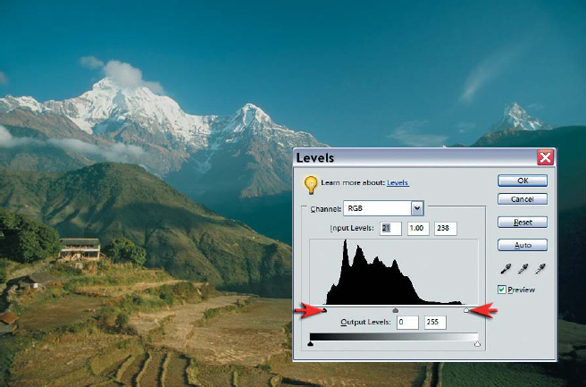
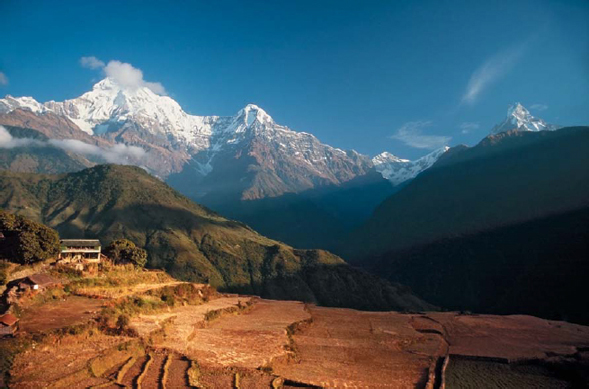
1. In the illustration above one might be forgiven for thinking that the black peaks in the dialog box are an indication of how high the mountains are in the image, but no, it is really an indicator of how many pixels of each tone are present in the image. If the image is dark then the mountains will be higher on the left side. If the image is very light, the mountains will be taller on the right side. The first step in nearly all image-editing tasks is the need to optimize the tonality or ‘dynamic range’ of the image by adjusting the ‘Levels’.
Finding your levels >In Elements go to the Enhance menu and select ‘Levels’ from the Adjust Lighting submenu.
If you are a newcomer to this dialog box you may simply want to click on the Auto button and then click OK. This simple procedure ensures the tonality of the digital image starts with a deep black and finishes with a bright white for optimum contrast and visual impact. If you want to perform the task manually click on the black slider underneath the mountain range (the triangle on the left) and drag it to where the mountains start. If you are now looking for the little triangle at the foot of the photographic mountains instead of the virtual ones, then I suggest go and lie down for a moment and come back refreshed. Do the same with the white slider on the right and you are almost finished. Click and drag the gray slider in the middle to make the image brighter or darker (depending on which way you drag the slider). If you want to start impressing the neighbors then you may like to start calling the gray triangle the ‘gamma slider’.
Warning > You should avoid using the destructive Brightness/Contrast adjustment from the same submenu as the image will often look far from enhanced if used.
2. If you drag the sliders too far you will lose or ‘clip’ information from the image file. Shadows will become black and highlights will become white. Your detail will have sunk without a trace into the black holes of our virtual valleys (called level 0) or have been pushed off the top of the virtual peaks (called level 255). If you fear the numbers 0 and 255 (which every self-respecting photographer should) you could try the following top tip. Hold down the Alt key and drag the shadow or highlight slider towards the mountains (your image will disappear momentarily but fear not). Colors will start to appear in your main image window when information is being lost. Move the sliders back until these colors disappear. If colors are still appearing in the image window with the sliders all the way back to the edge of the histogram then your image was either underexposed or overexposed in your camera. If you are really unlucky you will have lost detail both in the shadows and in the highlights as result of the photographers worst enemy - excessive contrast. Not even the magic called Photoshop Elements can dig you out of this hole, my friend, if you failed to ‘bracket’ your exposures.
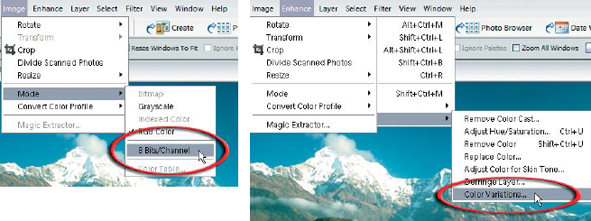
3. Users who have acquired images at a higher bit depth using camera RAW or a scanner set to 48-bit scanning should now drop their images to 8 Bits/Channel (Image >Mode >8 Bits/Channel). The secret to intelligent color adjustment is that the grass may ‘really’ be greener on the other side. Until you have seen the other side how will you know? With this in mind Adobe has given us ‘Color Variations’. It is a simple case of ‘if you see something else you like - you can have it’.
16-bit editing is now a reality for Adobe Elements 3 and 4 users. If you have acquired your image from the Camera RAW dialog box or a 48-bit scanner then you will need to drop the bit depth to 8 bits to complete the following steps because although Elements 3 and 4 support 16-bit editing they do not support the use of adjustment layers with which to edit the bit-rich pictures. Adjusting the levels of your image in 16 bits per channel and then dropping to the more time-efficient 8 bits per channel mode keeps you on the path to maximum quality.
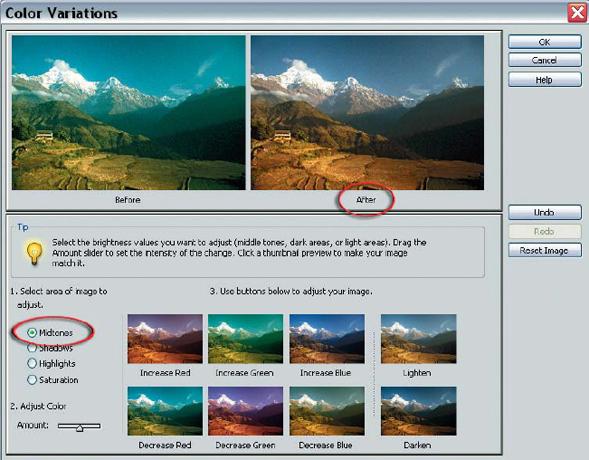
4. From the Enhance menu choose ‘Variations’ from the Adjust Color menu. Yes I know it’s a big box. It needs to be this size so they can get all of the lovely colors in. Just follow the numbers in the box. Start by selecting the ‘Midtones’ radio button and then adjust the intensity until you can see the flavoured thumbnails look about right (not too loud please), and then click on the one you like (color blind males may need a woman’s touch just about now). Then click OK. For those that have found bliss you can stop this project now - or for those who still want to take another look at that grass - press on to step 5.
Warning > Clicking on anything other than ‘Midtones’ in this dialog box may be harmful to the health of your pixels that you so lovingly looked after in the Levels dialog box.
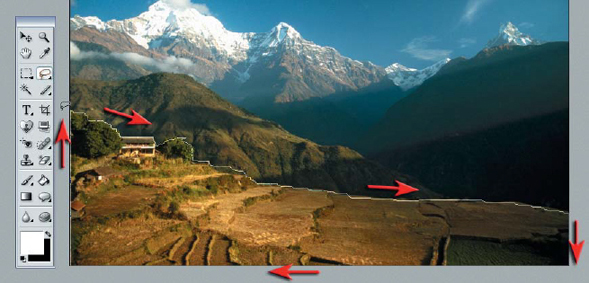
5. We have just completed our global adjustments (all of the pixels in the image have changed in brightness and color). We will now set about changing just a select few. To isolate pixels for a ‘localized adjustment’ we have to select them with (yes - you guessed it) a ‘selection tool’. We will start with the very wobbly Lasso Tool (there are three in the stack so make sure you get the right one - click, and hold your clicker down, on the little black arrow in the corner of the Lasso Tool to see your options). Now draw (yes I know drawing isn’t everybody’s strong point) along the terraced fields in the foreground of the image (don’t let go of the mouse clicker - not even when you get to the end of the field) and then circle (what else would you expect to do with a lasso) beneath the image and around until you get back to the point where you started - now let go. Those things that have appeared are called ‘marching ants’. Don’t worry about how wobbly your drawing is at this stage.
Note >If you did happen to let go (even though I told you not to) before you had finished the selection, go to the Select menu, choose ‘Deselect’, and then start again (this time paying closer attention to not letting go of your clicker).
Now if your drawing (like mine) leaves a lot to be desired, we can fix it up by painting it better in the next step (my painting isn’t much better than my drawing either, but at least with the brush we can let go of the clicker without unleashing the mad ants and take a breather for a while).
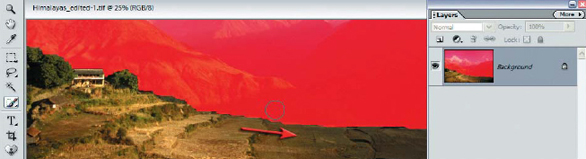
Elements users do not have a Quick Mask Mode that is found in the full version of Photoshop. They must use the Selection Brush Tool to fix up the very disturbing attempts with the lasso or the not-so-magic ‘Magic Wand Tool’. The Selection Brush Tool icon in the Tools palette has a circle of ants emanating from the tip of the brush (wow - a brush that paints ants - how wonderful). Now painting ants is too weird for me so I usually choose ‘Mask’ from the Mode menu in the Options Bar (positioned above the image window) to replicate the Quick Mask Mode found in the full version of Photoshop.
6. Choose the ‘Selection Brush Tool’ and the ‘Mask’ option in the Options bar. Set the brush hardness to 100% and start painting your mask better. If your paint has strayed over the line, you will need to hold down the Alt key and paint to remove the paint (strange but true). Take your time - no rush - zoom in if you can’t see what you are doing and paint on the bigger picture.

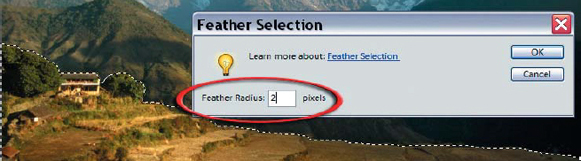
7. Just trust me on the next step OK. I want you to ‘feather your selection’. Choose ‘Feather’ from the Select menu and then enter a Value of 2 in the ‘Feather Radius’ field.
When you click OK watch the edge of your brushwork - it goes sort of soft. If you missed it go to the Edit menu and choose ‘Undo’ and then ‘Redo’. Zoom in if you still didn’t see it change. I need you to see it change so you don’t think I am messing with your head on this one. So why is soft better than hard you ask? Soft is good (in this instance) because it is hard to pick a soft transition between pixels that have been adjusted and those that missed the boat, i.e. no one will be able to pick that you have been ‘tweaking’ (aka enhancing) your image. At the moment however you have not tweaked anything, merely isolated it for tweaking.
Note >If the terminology ‘Feather Selection’, when you are in fact looking at a mask, is troubling you then you have my permission to select ‘Selection’ in the Options bar instead of ‘Mask’ before feathering. The advantage to feathering or blurring the selection, when it is being viewed as a mask, is that you can see whether the amount of feather is appropriate, and adjust the pixel radius according to the softness of the edge that looks right for your image. Bigger images (more megapixels) require more feathering as a rule.

Warning > Too much feathering is as bad as none at all, i.e. now the color corrections will bleed into the adjacent image and make it look like your colors are running.
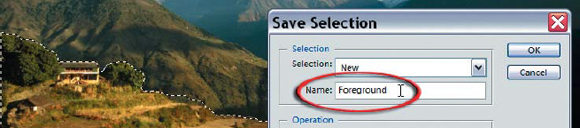
8. Because making a selection can be the most time-consuming part of the process, and because computers crash (no really they do), Adobe allows you to save your artwork (the selection). Go to the Select menu and choose ‘Save Selection’ - give it a name, choose OK and then save your image file by going to the File menu and choosing ‘Save As’. This will allow you to choose a different name and save it as a different file to the one you originally opened. In this way you will have one original and one enhanced/stuffed file just for good measure. You can now lie down for five minutes to rest the gray matter and then return to your enhanced/stuffed file - go to the Select menu and choose ‘Load Selection’.
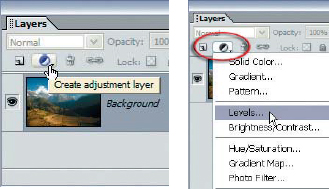
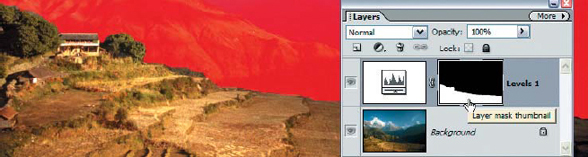
9. With the marching ants running rampant all around your selected pixels I now want you to find the Layers palette. If it is hiding then you can summon it up from the depths of oblivion by going to the Window menu and selecting - yes you guessed it again -‘Layers’. Click on the little round icon that is half black and half white. Click on the icon and choose ‘Levels’ from this submenu.
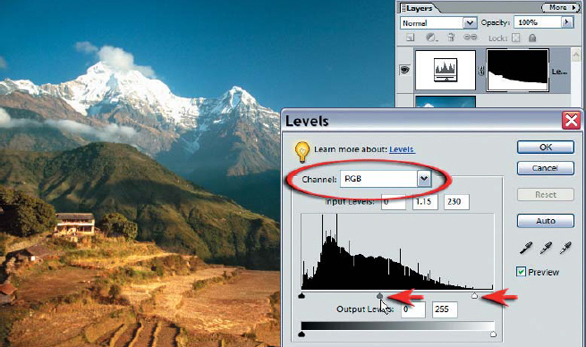
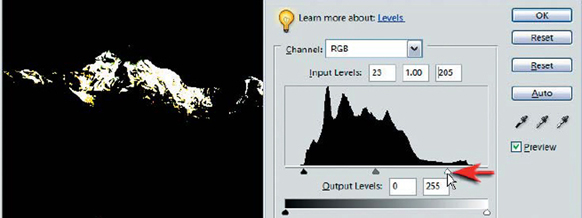
10. Now a couple of really interesting things have happened (well mildly interesting for a computer geek anyway). First, and not surprisingly, the virtual mountains have reappeared - but this time they represent only the selected pixels and not the pixels of the entire image (hence the different shape). Second - the ants have mysteriously disappeared, only to be replaced by a new layer in the Layers palette. This layer is called an ‘adjustment layer’ and it will play host to the adjustments we are about to make in this Levels dialog box. Third - the mask has reappeared in a little thumbnail image to the right of the adjustment icon in the Layers palette. This is called a layer mask and it will hide any adjustments we make in the unselected portion of the image (the distant mountains and sky).
Move the highlight slider (the white triangle on the right) in towards the slopes of the histogram and move the central gray triangle (the gamma slider) to the left to brighten the selected pixels.
Note > The adjustment layer icon changes with the preferences set for this palette - so don’t worry if yours doesn’t look the same as mine.
Now we could have picked up the ‘Levels’ command from the Enhance menu, as in step 1 of this very exciting project. The difference is that adjustments made using an adjustment layer are infinitely editable. Infinite editing is great for people who are indecisive about color, want to make frequent changes and don’t want to degrade the quality of their image by doing so. The changes you make when you use an adjustment layer are not actually applied to the pixels at this point. The adjustment layer acts like a filter showing us a view of how the pixels will look when the adjustments are applied. If you make frequent changes to the actual pixels themselves you will eventually degrade the image quality. Using adjustment layers you can make changes till the cows come home and never degrade the quality of the image. Your adjustments are only applied once - when your editing is complete and your image is either saved for screen viewing or printed.
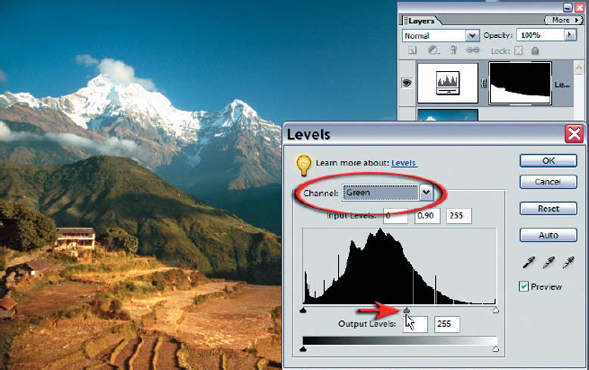
11. Because the grass is sometimes too green on the other side we can go to the ‘Green’ channel in the Channel menu, positioned near the top of the Levels dialog box, and move the gray triangle to the right. This will make the grass less green. These adjustments will have the effect of making the foreground look sunnier (brighter, more contrasty and warmer usually does the trick). Select OK and sit back and admire a job well done. Zoom in to look for bleeding color or areas that should have been in the selection that were left out.
12. If you have found any errors they can usually be attributed to the mask. To work on the mask you can click on its thumbnail in the Layers palette and paint with either white or black. This time you will need to select the real paintbrush and not the one that paints ants. Pressing the letter D on the keyboard will make sure the colors in the Tools palette are set to their default settings of white and black. Black will remove the adjustments and white will allow the adjustments to affect the pixels below. Use a slightly soft brush to match the softening you have done to your mask. If you want to see the mask during this operation you will need to hold down the Alt and the Shift keys at the same time whilst clicking on the layer mask thumbnail. Repeat this action to return to the normal view.
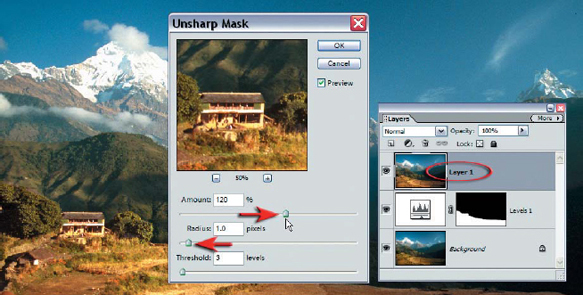
13. Don’t forget the final step of any editing procedure is the Unsharp Mask. I always prefer to create a separate layer for the sharpening process - especially if I am intending to make a print. My procedure is to choose ‘Select All’ from the Select menu, ‘Copy Merged’ and then ‘Paste’ both from the Edit menu. Set the view to ‘Actual Pixels’ from the View menu before going to the Filter menu to choose the ‘Unsharp Mask’ option from the Sharpen submenu. Standard settings are around 100% for the amount, 1.5 for the Radius when sharpening a 5 or 6 megapixel image with a threshold of around 3. Slightly more if your image is slightly noisy or has already been sharpened in-camera.
A print has a habit of looking less sharp than the screen image so a little bit of oversharpening is usually required to get things looking perfect. If you can’t see any sharpening then you need to check that you do not have the adjustment layer selected. You cannot sharpen invisible pixels, i.e. there are no pixels on an adjustment layer to be sharpened. Project 5 will look at advanced skills for sharpening localized areas of the image.
PERFORMANCE TIP
If this sharpening layer is beneath the adjustment layer, the adjustments will be applied twice, and then your image will look like it has had a tussle with the ugly stick. If this happens you should drag the new layer to the top of the layers stack. Remember that when you choose ‘Paste’ from the Edit menu the pixels are always pasted into a new layer above the active layer.