
Creative Montage
Forget cutting and pasting - learn the craft of professional montage using advanced masking techniques
Masks are used to control which pixels are concealed or revealed on any image layer except the background layer. If the mask layer that has been used to conceal pixels is then discarded the original pixels reappear. This approach to montage work is termed ‘non-destructive’. In the full version of Photoshop the mask is applied to the image layer whilst in Elements the mask is applied to a separate layer or the layer mask from an adjustment layer.
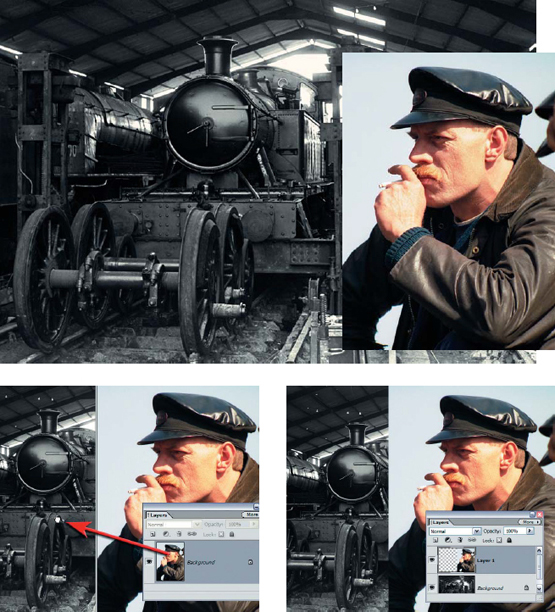
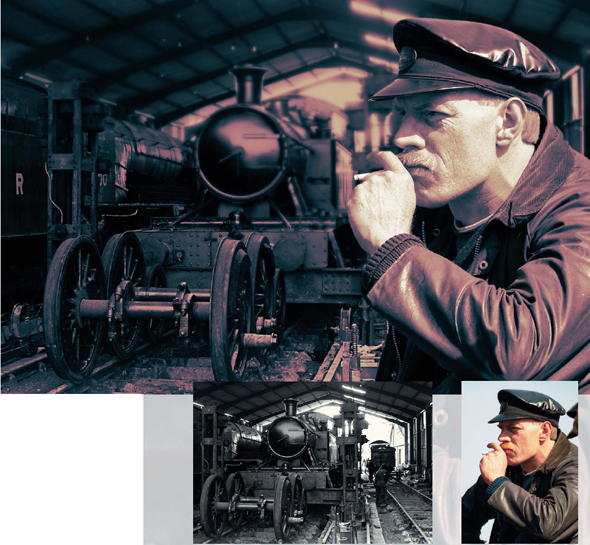
1. Open the resource images and drag the layer thumbnail of the train driver image into the trains image window to create a file with two layers. Use the Move Tool to position the second layer. Select ‘Free Transform’ to make minor changes in size of any new item being included in the montage.
2. Select the majority of the sky on Layer 1 by using a combination of the Magic Wand and Lasso tools. Keep the Shift key depressed to build on, or add to, each successive selection or use the ‘Add to selection’ and ‘Subtract from selection’ icons in the Options bar.

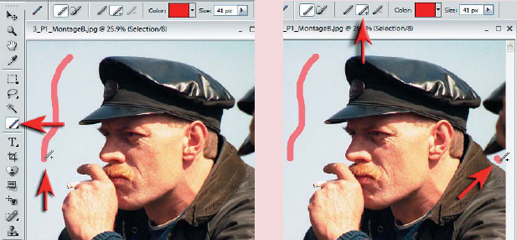
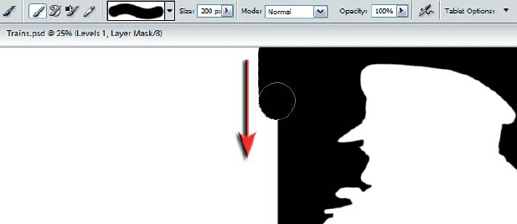
3. Use the Selection Brush tool in ‘Mask’ mode to fine-tune the selection work. Pressing the Alt key when painting with the selection brush tool will remove rather than add to the selection or mask. Keep the feather set to 0 and the hardness of the Selection Brush Tool set to maximum to match the quality of the Magic Wand. Switch the Mode in the Options bar back to Selection and from the Select menu choose Inverse.
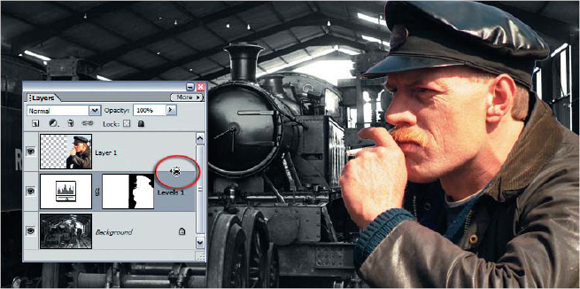
4. Select the background layer in the Layers palette and create a levels adjustment layer. Select OK without making any adjustment. The selection has now become a mask that can be used to conceal the background pixels of the train driver. Click on Layer 1 at the top of the layers stack to select it and then choose ‘Group with Previous’ (Ctrl+G) from the Layer menu or hold down the Alt key as you move your mouse cursor over the dividing line between the train driver layer and the levels adjustment layer and then click your mouse. The pixels are concealed rather than being deleted and can be retrieved if required to create the perfect edge.
PERFORMANCE TIP
This would be an ideal time to test drive the new Magic Selection Brush (a more sophisticated version of the Magic Wand Tool). Start by painting on the background, even though Adobe encourages you to select the foreground (it is always quicker to select the area with fewer colors). An initial selection will then be made. Then proceed to add to your selection by clicking on the ‘Indicate Foreground’ icon in the Options bar (even though you are selecting the background in this exercise) and then paint in any additional areas required for the selection.
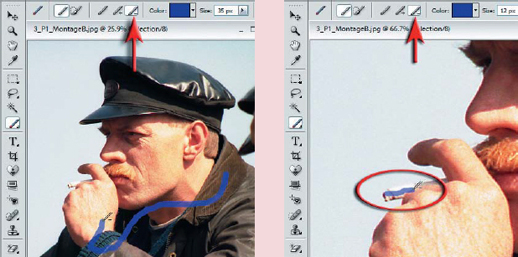
If the selection invades any areas that you don’t want, click on the ‘Indicate Background’ icon and paint over these areas to perfect the selection. In this project the new tool does a fine job of working around the cigarette. Then choose ‘Inverse’ from the Select menu.
PERFORMANCE TIP
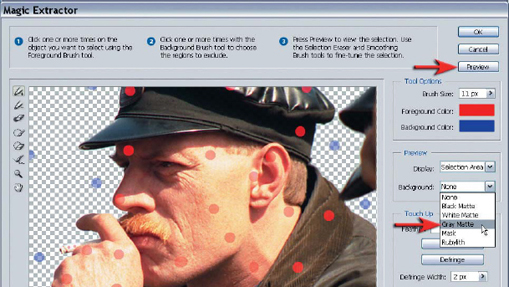
The fact of life is that some extractions can be as painful as pulling teeth! With this in mind Adobe offers you even more magic - the Magic Extactor (Image >Magic Extractor). This is yet another alternative for getting rid of problematic backgrounds. This tool takes a little more time than the Magic Selection Brush and is destructive in nature (it deletes the pixels you select with the Background Brush tool) so I would advise duplicating this layer before proceeding. As with the Magic Selection Tool you make little marks or squiggles to advise Photoshop which pixels you would like to keep and which pixels you would like to delete. Then click on the ‘Preview’ button. From the Preview menu choose a matte color to view your extracted subject (choose a different tone to the original background or one that is similar to the new background).
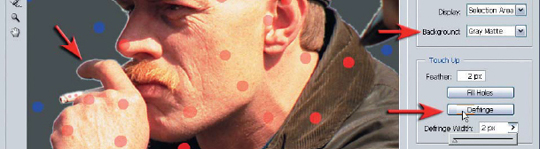
In the ‘Touch Up’ section of the dialog box select a feather value (usually 1 or 2 pixels for sharp images) and then choose a ‘Defringe Width’ to remove any of the remaining background. Not a bad job - if you don’t mind losing the background pixels. If you do, then return to the main project to guide you through the basic techniques for professional, and ‘non-automated’, montage.
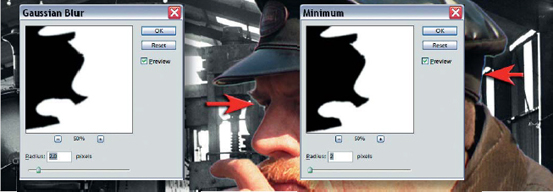
5. The mask will require some modifications before the edge is subtle and believable. Click on the layer mask thumbnail to select it. From the Filters menu select ‘Blur >Gaussian Blur’. Select a pixel ‘Radius’ that softens the edge of the subject by an appropriate amount (one or two pixels is usually sufficient). If the subject has one edge that is softer than the rest, first make a selection to isolate that edge for individual attention. To remove the small halo or fringe pixels of the old background from around the subject go to the Filter menu and select ‘Other >Maximum’. Select a pixel radius amount that is just enough to shrink the mask so that the fringe of old background pixels disappears.
Note > Any small traces of old background (especially in corners or areas of fine detail) can be removed with the Paintbrush Tool. Paint at a reduced opacity (approximately 50%) and erase some of the mask in the localized area that is causing the problem.
PERFORMANCE TIP
Using Gaussian Blur and Minimum/Maximum filters to work the quality and position of an edge often leads to a visible edge to the layer. This should be removed by extending the mask in this area by either filling a selection or painting with black.
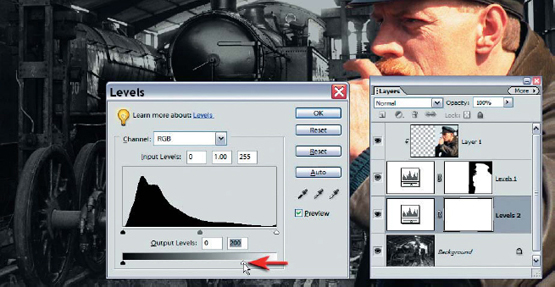
6. Select the background layer and create a levels adjustment layer. Drag the Output Levels slider to a value of 200 to reduce the brightness of the distracting highlights in the background.
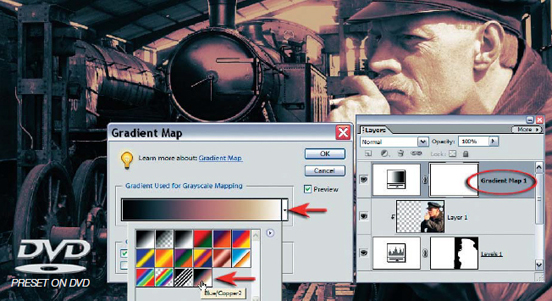
7. Select the train driver layer at the top of the Layers palette and then select ‘Gradient Map’ by clicking on the Create Adjustment Layer icon. Choose theBlue/Copper’ gradient preset that can be loaded from the supporting DVD or click on the gradient to edit an existing gradient map. See ‘Part 2 - Toning’ for more information on this technique.

8. Duplicate the background layer, and from the Filters menu choose ‘Blur >Gaussian Blur’. Select a pixel ‘Radius’ that reduces the focus sufficiently to separate the portrait from the background layer.
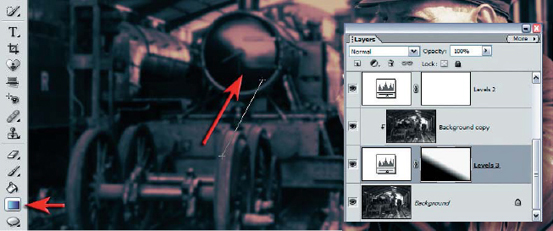
9. Create a levels adjustment layer above the background layer and group the background copy with it as you did previously with the driver and the driver mask. Select the Gradient Tool with the ‘Foreground (black) to Transparent’ and ‘Linear’ options. Select the layer mask thumbnail and drag the Gradient Tool in the main image window to follow the perspective line of the train. This gradient mask will conceal the front of the blurred train layer to create a simple depth of field effect.
Note > More elaborate ‘depth masks’ can be created using the selection tools. See the ‘Depth of Field’ project in Part 2.

10. Use the Clone Stamp set to 50% opacity to ‘tone down’ the distracting highlights on the background copy and/or background layer (top-left side of the image). This action makes way for the insertion of the wheels image in the top left-hand corner. Select the ‘Circular Marquee Tool’ and draw a feathered circle around the wheel. With the active selection create a new adjustment layer.

11. Use the Type Tool to create a line of text and click on the Create warped text icon in the Options bar and then select the ‘Arc’ option in the drop-down menu. Use a negative value to match the arc of the wheel. Select OK. The beauty of this montage technique is that any aspect is editable if the montage requires fine-tuning at a later date.