
Glamor Portrait

Photograph by Jennifer Stephens
Cheaper (and more fun) than plastic surgery we explore how pixel surgery can be used to craft perfect portraits that are bound to flatter the sitter every time.
The glamor portrait offers an excellent opportunity to test the effectiveness of a variety of image-editing skills. The portrait is an unforgiving canvas that will show any heavy-handed or poor technique that may be applied. We will start with a color portrait that has been captured using a soft diffused light source.
This project will aim to perfect various features and not to make such changes that the character of the sitter is lost to the technique. The techniques used do not excessively smooth or obliterate the skin texture that would, in turn, lead to an artificial or plastic appearance. The techniques used smooth imperfections without totally eliminating them.

The 15-minute (after practice) makeover - techniques designed to flatter your model

PERFORMANCE TIP
Use window light or diffused flash to obtain a soft low-contrast light source to flatter the subject. Avoid direct flash unless it is diffused with a white umbrella. Stand back from your sitter and zoom in with your lens rather than coming in close and distorting the features of the face (the closer you stand - the bigger the nose of the sitter appears). A perfect white background is difficult to create if you don’t have a studio backdrop and multiple lights but, with a little practice, it is possible to get a near white background by capturing the sitter in front of a white translucent curtain against a brightly illuminated window and with a single introduced light source.

1. If you can capture using the RAW format then you will have the opportunity of perfecting the histogram and color balance in 16 Bits/Channel mode prior to starting the project. Drag the Shadow and Highlight sliders in to meet the histogram or simply click the ‘Auto’ button. Drop the bit depth once this has been done to 8-bit mode (Image >Mode >8 Bits/Channel).
2. Select the ‘Dodge Tool’ in the Tools palette and in the Options bar choose ‘Highlights’ and an exposure setting of a round 20 to 30%. If you are a little nervous about using this tool on the Background layer duplicate the Background layer by dragging it to the New Layer icon in the Layers palette. Stroke the background with a large soft brush until any detail or tone present is rendered white. As the Dodge Tool in ‘Highlight’ mode only lightens the brightest tones on the layer, care only needs to be taken if the skin tones or hair next to the white background are also very bright.
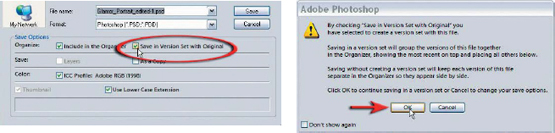
3. As you move through this project it is worth saving consecutive versions. The Organizer in Elements can keep track of these versions and help name them if you click on the ‘Save in Version Set with Original’ option when you first use the Save As command from the File menu.
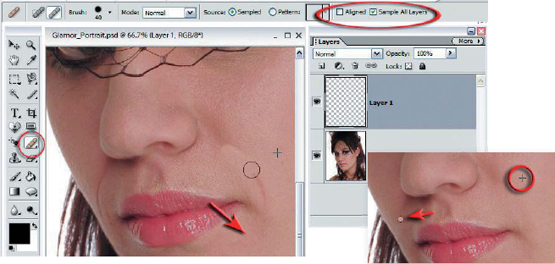
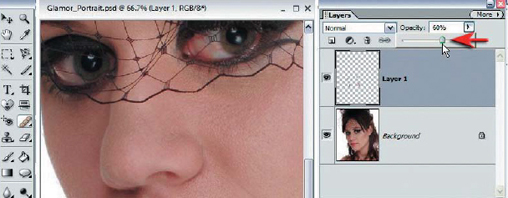
4. A timesaving technique when working with the Healing Brush Tool is to either duplicate the Background layer or create a new empty layer before starting the healing process. You can simply fade all of your work at the end of the process by dropping the opacity of the healing layer. If you choose to heal to an empty layer make sure that this is the layer that is selected in the Layers palette and the ‘Sample All Layers’ option is selected in the Options bar.
PERFORMANCE TIP
Care must be taken when selecting the size and hardness of the brush. If an overly large soft edged brush is used near the eyes, lips or hair it can draw in color values that can contaminate the skin tones (a selection can be made prior to using the Healing Brush to isolate the healing area from different colors or tones). If the brush is too hard the edges of the healing area will be visible. Sometimes it is better to use a smaller brush and make several passes rather than trying to complete the section with a single pass. The Healing Brush Tool, with its protection of surface texture, is a superior alternative to using the Rubber Stamp Tool at a reduced opacity.
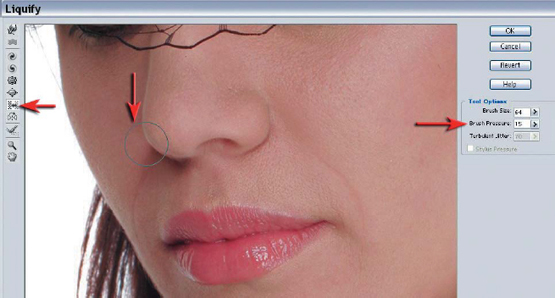
5. The Liquify filter is another tool that works directly on your pixels so you may like to duplicate the Background layer if you are feeling nervous about the pixel surgery that follows. The various tools in the Liquify filter dialog box can be used to modify the shape or size of the sitter’s features. The Pucker Tool and Bloat Tool can be used to contract or expand various features, e.g grow eyes or lips and shrink noses. Perhaps the most useful of the Liquify tools however is the Shift Pixels Tool. This tool can be used to move pixels to the left when stroking down and to the right when stroking up. This tool is ideal for trimming off unsightly fat or reshaping features. In this project the brush pressure is dropped to 15% and an appropriate brush size is selected so that the side of the face is not moved along with the nose. If things start to get ugly - just remember the keyboard shortcut Ctrl+Z (undo)!
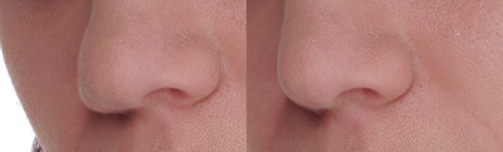
Note > It is important to exercise great restraint when using the Liquify filter, as the face can quickly become a cartoon caricature of itself when taken too far. The filter also softens detail that becomes obvious when overdone.
PERFORMANCE TIP
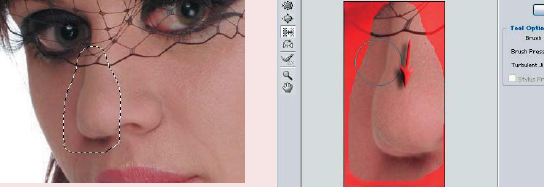
It is possible to ‘freeze’ pixels to protect them from the actions of the Liquify filter. There is a freeze brush in the Liquify filter of the full version of Photoshop - but not so in Elements. To activate the freeze in Elements simply make a feathered selection prior to selecting the Liquify filter. Select the area to be modified, being careful to leave out sections of the face that should be protected from the pixel surgery. With the selection active open the Liquify dialog box. The areas outside of the selection are now frozen.
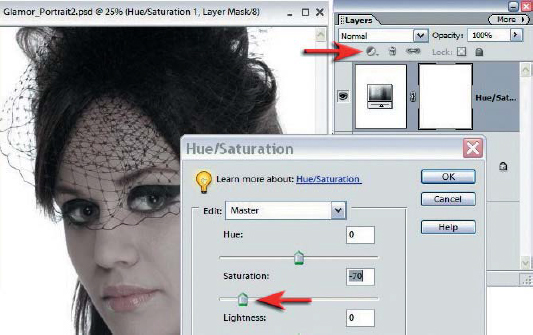
6. Create a Hue/Saturation adjustment layer. Focus your attention on the whites of the eyes and lower the saturation until any discoloring in the eyes is removed. Disregard the effects to the rest of the face for the time being. Select OK and then fill the layer mask with black to conceal the adjustment (Alt+Backspace if Black is in the foreground color swatch or Ctrl+Backspace if Black is in the background color swatch).
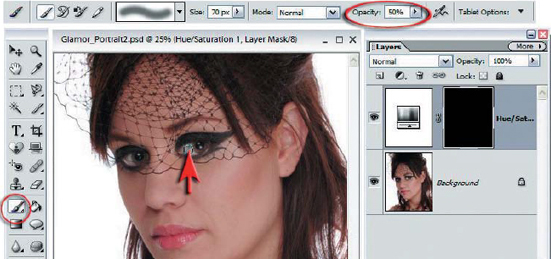
Select the ‘Paintbrush Tool’ from the Tools palette. Choose a soft edged brush just a little smaller than the eye in the Options bar and lower the opacity to 50%. Choose white as the foreground color in the Tools palette. Stroke the eyes with the brush until the whites are appropriately drained of color.
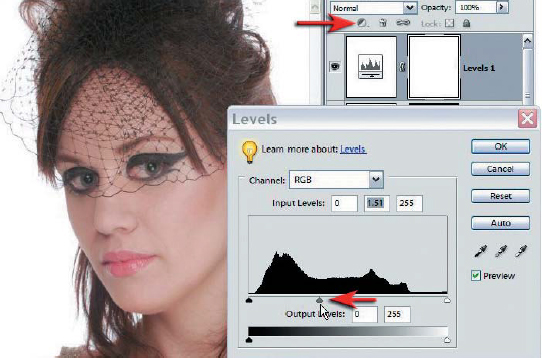
7. Create a Levels adjustment layer and move the Gamma slider to the left to brighten the whites of the eyes. As before select OK and then fill the layer mask with black to conceal the adjustment once again.
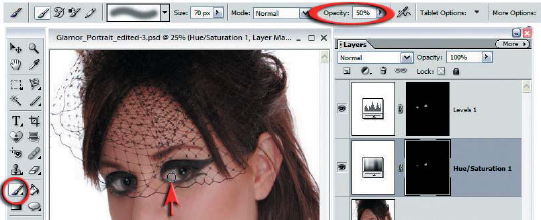
This time brighten the eyes by painting with white at 50% opacity. If you overdo it you can switch colors and paint with black or simply lower the opacity of the adjustment layer.

8. This technique is fast and effective. The first step is to merge all of the visible elements of this image into a new layer on top of the layers stack (referred to as ‘stamp visible’). Hold down all of the modifier keys (the Ctrl, Shift and Alt keys) and then type in the letter E (on Version 3 you will need to type in the letter N followed by the letter E). Make sure the resulting layer is on top of the layers stack and set the blend mode of this layer to ‘Multiply’. Go to the Filter menu and choose ‘Gaussian Blur’ from the Blur submenu. Apply a 20 pixel Gaussian Blur.
Visual warning > Now it is going to look like someone turned out some of the lights until we carry out the next stage of the process, but if you use your imagination you can probably already see that the skin tones are now smooth and radiant - if just a tad dark.
The precise pixel radius of the Gaussian Blur filter will vary depending on the resolution of your image. The idea is to bleed the tones, but not so much as to lose the features of the face. Reduce the size of the preview in the filter dialog box to gain an idea of the extent of the blur on this layer. Back off before you start losing features of the face.
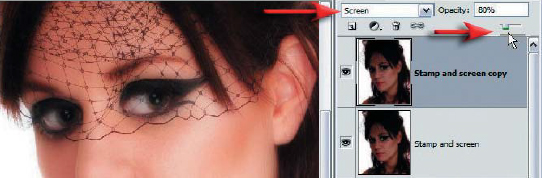
9. Use the same monster keyboard shortcut as in step 8 to ‘stamp’ the visible elements to a new layer. Set the blend mode of this layer to ‘Screen’ mode to lighten the image. If the image is still not light enough you will need to drag this layer to the New Layer icon to duplicate it. The blend mode of this duplicate layer will also be in ‘Screen’ mode. If this lightens the image too much simply lower the opacity of this layer until you strike the correct balance.
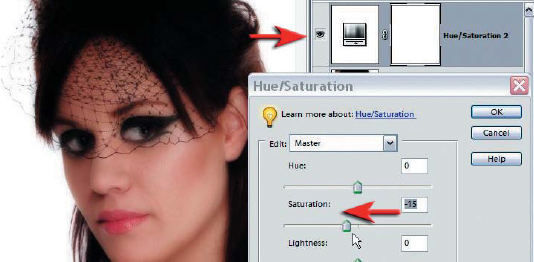
10. Create a Hue/Saturation layer above these screened layers and lower the saturation a little. The side effect to smoothing the skin tones using this technique is that saturation increases. Another problem that will need to be resolved is that the deepest shadow tones may be pushed too dark to print. These important shadow tones will need to be rescued in order to produce a professional result.
Fine-tuning the tonality
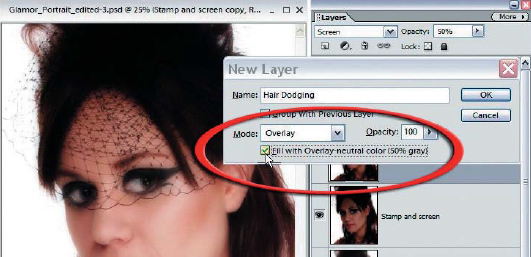
11. There are a number of different ways we can rescue the shadow tones of this image. The first technique uses the non-destructive dodge layer technique. Hold down the Alt key whilst you click on the New Layer icon in the Layers palette. Switch the ‘Mode’ to ‘Overlay’ and check the ‘Fill with Overlay-neutral color (50% gray)’ box. Select OK. This 50% gray layer is invisible in ‘Overlay’ mode but can be used to lighten or darken the underlying image.
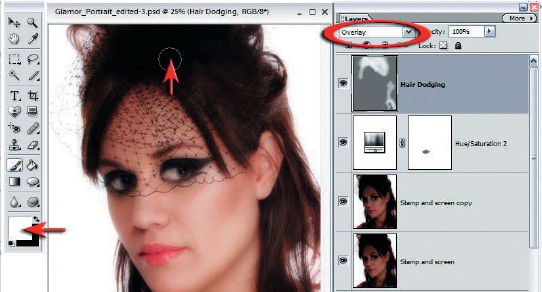
Select white as the foreground color and use a soft edged brush at 50% opacity to paint the darkest areas of the hair lighter. Several passes at a reduce opacity rather than a single pass at 100% opacity will render the dodging a subtle affair.
PERFORMANCE TIP
If you require more ‘oomph’ to your dodging, or less saturation with your burning, try switching the blend mode of your dodge and burn layer to ‘Soft Light’ mode instead of ‘Overlay’.

12. The Shadows/Highlights adjustment feature from the Enhance >Adjust Lighting submenu can also be used to target and rescue the darker tones of your image. Stamp visible to a new layer before implementing the adjustment. When using a layer mask with the Shadows/Highlights adjustment command it is possible to pump up the level of lightening and midtone contrast without affecting the midtones or highlights in the image.

PERFORMANCE TIP
The Shadows/Highlights is a very powerful adjustment feature. Use a layer mask to further limit or restrict the effects of the Shadows/Highlights adjustment. Create a levels adjustment layer without making any adjustment (simply click OK). Copy the image to the clipboard (Edit >Copy Merged) and paste it into the layer mask of this adjustment layer. In order to paste the image into the layer mask you must first Alt+Click the layer mask. When you Alt+Click an empty layer mask the image window will appear completely white. From the ‘Edit’ menu choose ‘Paste’. If this action is not taken the copied pixels will be pasted to a new layer. To restrict the adjustment to just the darkest tones of the image you must first invert the image in the layer mask (Ctrl+I) and then perform a ‘Levels’ adjustment (Ctrl+L) to this layer mask. Move the shadow slider to the right to restrict the lightening process to just the darkest shadows. Move the Highlight slider to the left to increase the effect of the shadows adjustment.
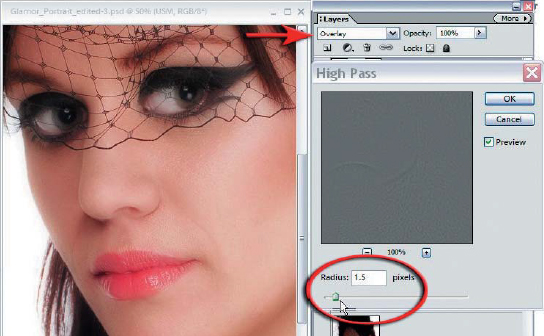
13. Smooth skin tones can be unduly sensitive to the application of the Unsharp Mask. It is usual to raise the Threshold slider sufficiently so that areas of smooth tonal gradation are left unaffected. Film grain, image sensor noise and minor skin defects all come in for the sharpening treatment if the threshold is left too low. If the sharpening process is proving problematic using the Unsharp Mask a selective sharpening technique should be considered. Stamp visible to a new layer, set the blend mode to ‘Overlay’ and apply the High Pass filter (Filter >Other >High Pass). At this stage the sharpening is global but it can be restricted by using a layer mask borrowed from an adjustment layer or by painting directly into this High Pass layer using 50% gray to eliminate sharpening.
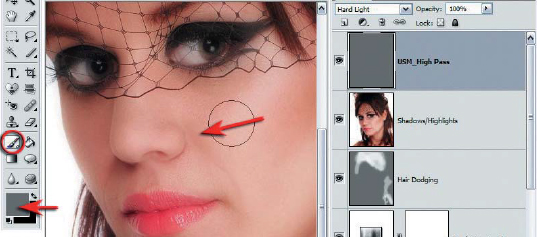
Click on a 50% gray swatch in the Swatches palette or click on the foreground color swatch in the Tools palette and set the HSB values to 0, 0 and 50. With 50% gray as your foreground color you can now proceed to paint the smoother areas of skin to ensure they escape the sharpening process.
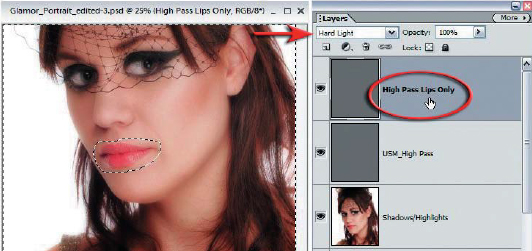
14. You can add a little lip-gloss (or extra sparkle to the eyes) by duplicating the High Pass layer and filling the rest of the image with 50% gray. Make selections of the lips and/or eyes and then invert the selection. Then choose ‘Fill Selection’ from the Edit menu and choose 50% gray. Switching the mode of the layer to ‘Hard Light’ will pump up the effect to maximum.
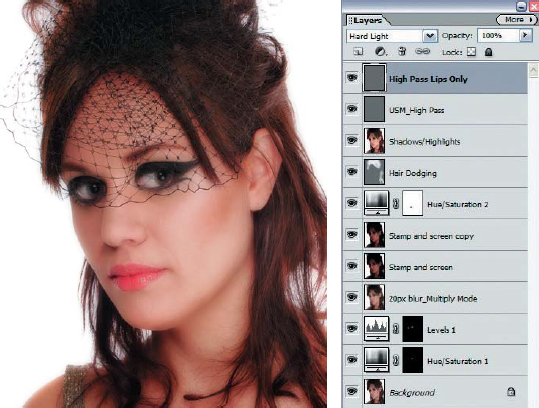
It might seem like a long road to the final result but this technique can be surprisingly quick when you get into the swing of things. It avoids excessive selections and fiddly work and a lot of minor blemishes are nuked via the blurred layer set to ‘Multiply’ mode. Of course the real reward will be the admiration of your photographic skills by the sitter - who will be eternally grateful.
PERFORMANCE TIP
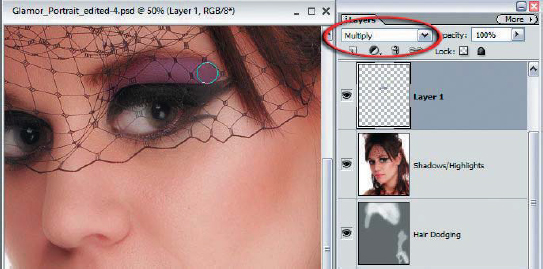
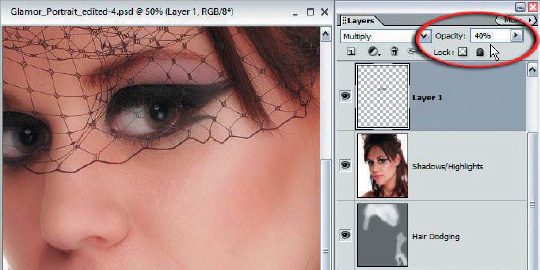
If you can’t leave well enough alone, or would just like to explore different approaches to the makeup the model is using, then you can add your own makeup in post-production instead of pre-production. Add a new empty layer set to ‘Multiply’ mode. Using a soft paint brush set to 50% opacity build up some eye shadow, rouge or lipstick and then lower the opacity of the layer until you create the right effect.
Try grouping a Hue/Saturation slider with the makeup layer and move the Hue and Saturation slider to explore alternative shades quickly and easily. If only getting ready to go out for the evening was this simple!

Create this image using techniques from Project 1 in this section of the book - image by Dorothy Connop