Depth of Field
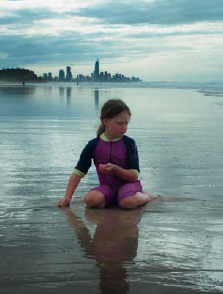
The Gaussian Blur filter can be used creatively to blur distracting backgrounds. Most digital cameras achieve greater depth of field (more in focus) at the same aperture when compared to their 35mm film cousins due to their comparatively small sensor size. This is great in some instances but introduces unwelcome detail and distractions when the attention needs to be firmly fixed on the subject.
There is often a lot to think about during the capture of an image and the time required to consider the appropriate aperture and shutter speed combination for the desired visual outcome often gets the elbow. Elements can however come to the rescue and drop a distracting background into a murky sea of out-of-focus oblivion. Problems arise when the resulting image, all too often, looks manipulated rather than realistic. A straight application of the Gaussian Blur filter will have a tendency to ‘bleed’ strong tonal differences and saturated colors into the background fog, making the background in the image look more like a watercolor painting rather than a photograph. The Gaussian Blur filter will usually require some additional work if the post-production technique is not to become too obvious.
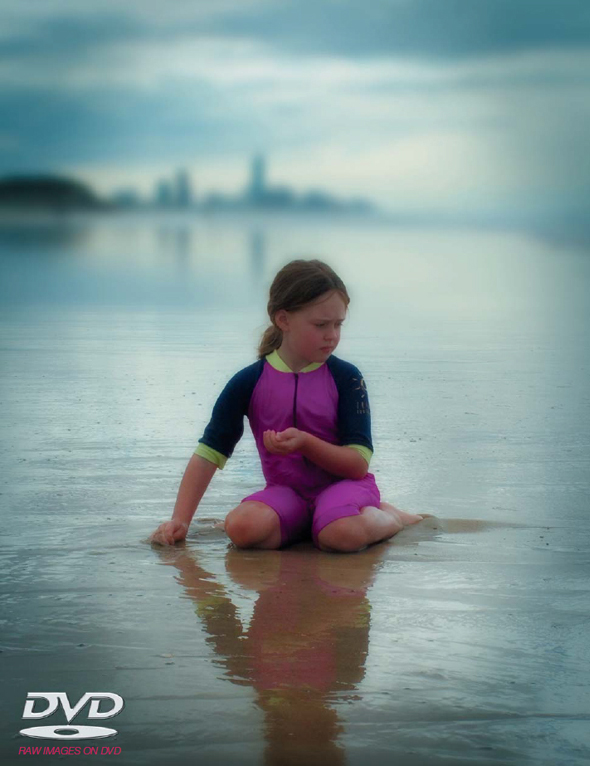
Decrease the depth of field to emphasize your subject
1. Not all subjects lend themselves to automated extraction processes. Professionals using the full version of Photoshop often make use of ‘Channels’ to start the process of creating a mask where there is not sufficient contrast between the subject and its background. As channels are off limits for Photoshop Elements users (Photoshop Elements uses them but you are not allowed to see them) we need to use a workaround. We can borrow or hijack a layer mask from an adjustment layer for our purposes in this project.
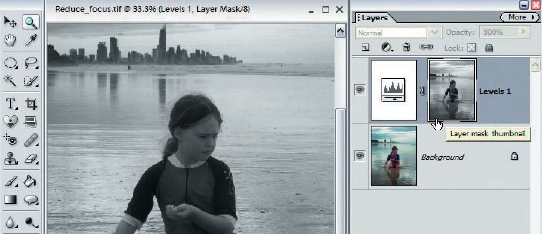
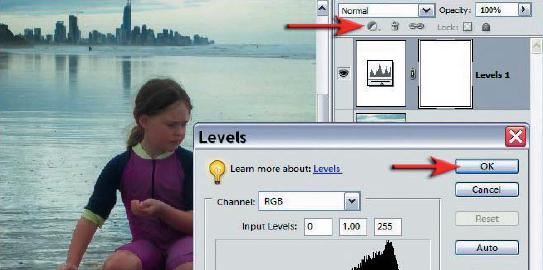
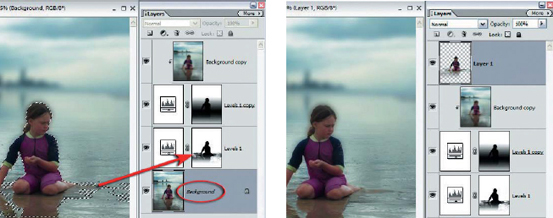
Create a levels adjustment layer. Click OK without making any adjustments (we need the mask rather than the adjustment that this layer offers). From the Select menu choose ‘All’ (Ctrl+A). Choose ‘Copy Merged’ from the Edit menu (this copies everything that is visible rather than everything that is on the current layer - very useful, as there are no pixels on the adjustment layer!) Now if we select ‘Paste’ from the Edit menu the pixels are not pasted into the layer mask (even though it has been selected), they are pasted into a new layer. To paste them into the layer mask we need to hold down the Alt key and then click on the layer mask. This is the keyboard shortcut for viewing the contents of the layer mask. Only in this state will Photoshop allow us to paste the pixels from the clipboard into the layer mask.
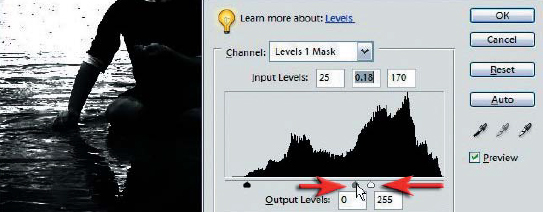
2. It is possible to modify, manipulate and massage the contents of the layer mask into something that will prove effective for separating the background from the subject (the essential ingredient if we are going to tamper with the depth of field in this image). To increase the contrast of this mask we will apply a levels adjustment to this mask to start the ball rolling (go to the Enhance >Adjust Lighting submenu or use the keyboard shortcut Ctrl+L). Your objective is to render the background white (out of focus) and the subject black (in focus). The Highlight slider can be dragged to the left to clip all highlight tones to white. The Shadow slider can be dragged to the right to render all shadow tones black. Drag the Gamma slider whichever way gives the best outline to the main subject.
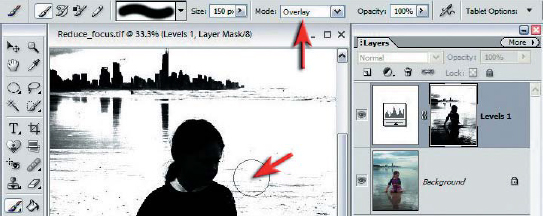
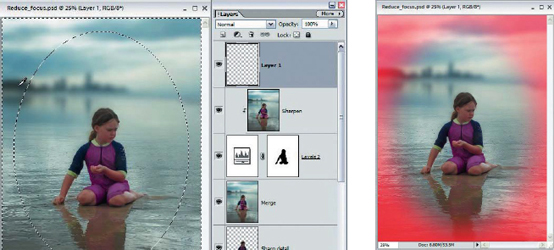
3. Painting in Photoshop is not everybody’s flavor of the month. There is however a ‘magic paintbrush’ technique when masking that makes it a far less painful procedure. Switch the blend mode of the Paintbrush Tool to ‘Overlay’ in the Options bar and set the foreground and background colors to their default setting in the Tools palette. It’s that simple! When you now paint in the layer mask all the gray tones are progressively rendered lighter or darker tones depending whether you are painting with white or black. The magic lies in the fact that black has no effect on the lightest tones and white has no effect on the darkest tones in Overlay mode. Try it! Paint with black in the white areas: result - no effect. Switching between black and white (press x on the keyboard) and repeating the work in some areas result in a vastly improved mask with very little effort. Now switch back to ‘Normal’ mode (the magic has its limits) and with steady hands touch up all of the areas in the distance that refuse to respond to the magic. You can leave all of the areas in the immediate foreground and around the base of the girl black.
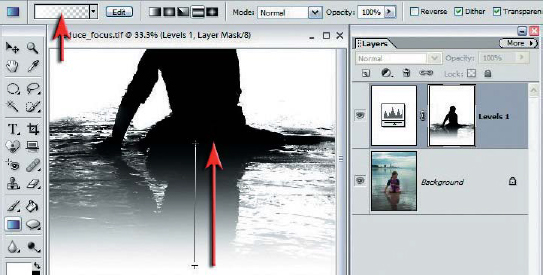
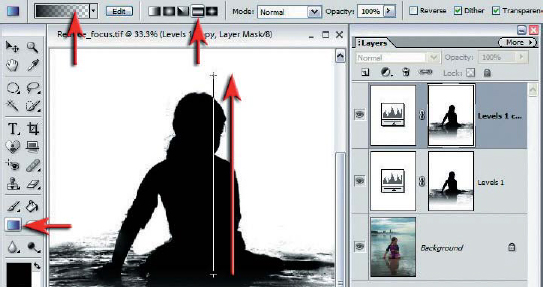
4. Focus is not a brick wall, i.e. it does not start and end suddenly - it gradually fades in and out. Think Gradient tool when you are think of fading between masked and unmasked. Choose the ‘Gradient Tool’ in the Tools palette with white as the foreground color. Choose the ‘Foreground to Background’ and ‘Linear’ options in the Options bar. Drag a gradient from the base of the image to the point where the girl is in contact with the sand.
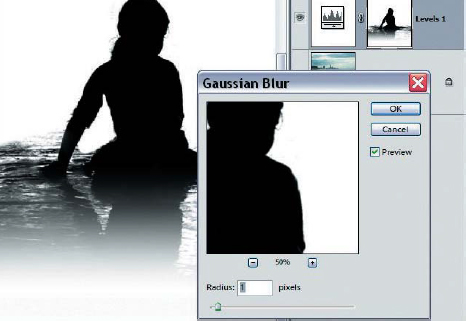
5. To further ensure we don’t end up with an unnatural shift in focus it is important to soften the edge of the subject a little. Apply a 1 or 2 pixel Gaussian Blur (Filter >Blur >Gaussian Blur) before proceeding with the gradients in this mask.
|
Note > The TIFF file for this project has a saved selection (Selection > Load Selection >DOF). Creating a layer mask with this active selection will automatically create the layer mask in step 5. |

6. Duplicate the adjustment layer that you are working on by dragging it to the new layer icon in the Layers palette (multiple masks will give us a few options later on). Alt+Click the layer mask of the duplicate levels adjustment layer to view the contents of the new mask. With the Gradient Tool still selected choose black as the foreground color and the ‘Foreground/Transparent’ and ‘Reflected Gradient’ options in the Options bar. Drag a gradient from the base of the girl to somewhere around the horizon line in the distance (holding down the Shift key as you drag will constrain the gradient so that it is not crooked). The gradient will extend both sides of the girl. This will become our plane of focus. Alt+Click on the layer mask to exit the layer mask view.
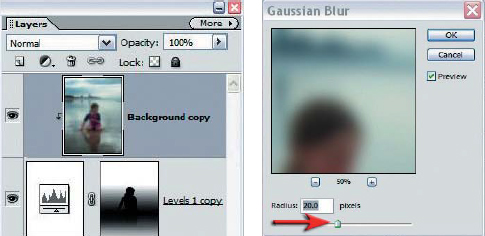
7. Drag the background layer to the new layer icon and then drag it to the top of the layers stack (shortcuts - Ctrl+J to duplicate background layer, then Ctrl+Shift+] to move this duplicate layer to the top of the layers stack). Now apply the Gaussian Blur filter to this layer. How much you drop the focus is pretty much a subjective step. Very shallow depth of field is achieved with larger apertures, close vantage point and larger format cameras. If you are generous with the pixel radius in the Gaussian Blur filter the image will appear as though it was created with a large format film camera - something that is impossible to achieve with a digital compact unless you are shooting an insect or flower in macro mode. At this stage the entire image will be subjected to the effects of the blur.
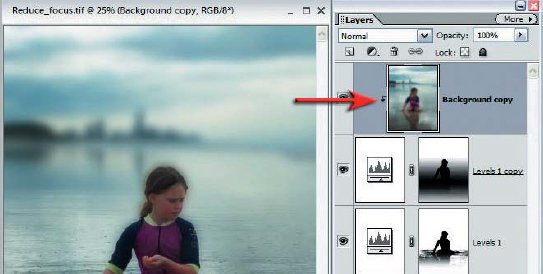
8. Group this blurred layer with the adjustment layer below (Layer > Group or Ctrl+G). If the level of blur required was difficult to assess in the last step it is possible to group this layer prior to applying the Gaussian Blur filter. The power of this effect is to remove distracting background clutter from the image, isolate the subject and keep the focus entirely on the focal point of the image. Unfortunately the effect at this stage has a few shortcomings. The effect of blurring the background has bled some of the darker and more saturated tones into the lighter more desaturated background. A tell-tale halo is forming that indicates this effect has been achieved in post-production rather than in-camera.
9. Wherever there is a problem there is usually a ‘fixit’ waiting to be found. Photoshop CS2 users have a beautiful lens blur filter that renders this effect without the halo. Elements users can fix the problem in a couple of additional steps. The first involves Ctrl+Clicking the first adjustment layer mask (the one without the reflected gradient) to load the mask as a selection. Then select the background layer and copy these pixels to the clipboard. Select the top layer and then select ‘Paste’ from the Edit menu (Ctrl+V). This will reduce but not eliminate the bleeding problem.
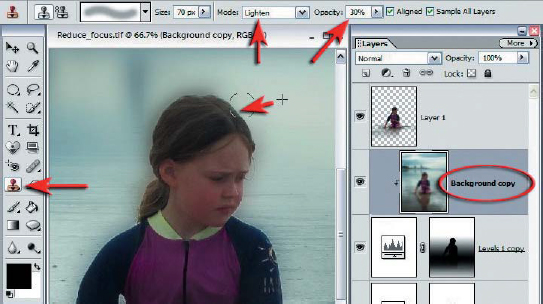
10. The problem is finally resolved by careful application of the Clone Stamp Tool. Select the blur layer, the Clone Stamp Tool, the ‘Lighten’ and ‘Aligned’ options in the Options bar. Reduce the opacity of the tool and hold down the Alt key as you select some pixels further away from the edge where the bleed has not extended to and paint these pixels back into the affected border regions. Switch from lighten to darken modes if you encounter brighter tones bleeding into a darker background.
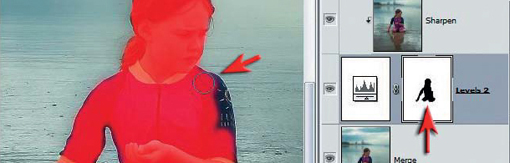
11. Final adjustment to the tone and sharpness is made by stamping the visible elements to a new layer on top of the layers stack (‘Select >Select All’ then Edit >Copy Merged then Edit >Paste or Ctrl+Alt+Shift and then type the letter E).
PERFORMANCE TIP
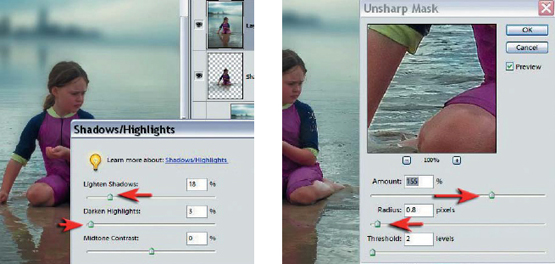
Adjustment layer masks can also be hijacked and used to mask either sharpening effects or the effects of a Shadows/Highlights adjustment (not available as a layer adjustment). If you need to see the mask at the same time as the image hold down the Shift key at the same time as holding down the Alt key when you click on the layer mask thumbnail. This allows you to paint the mask accurately to your subject. Hold down the Shift and Alt keys as you click on the layer mask thumbnail to return the view to normal. In this example the Unsharp Mask is removed from the girl but is left to sharpen the ripples of water surrounding her.
12. The viewer’s attention can be further restricted to the central subject by adding a subtle vignette so that the image progressively gets brighter towards the center (we are visually drawn to the light). Create a new layer and then use the Elliptical Marquee Tool and feather the resulting selection by 100 pixels.
Note > View the selection as a mask (Selection Brush Tool with the ‘Mask’ option selected) as you choose a feather radius to gain a visual idea of an appropriate amount of feather.
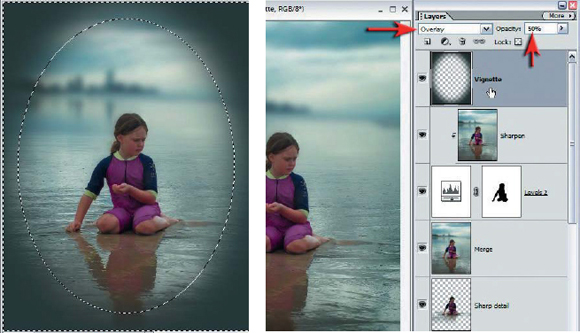
13. Invert the selection (Select >Inverse), select a dark color from the image using the Eyedropper Tool and then choose ‘Edit > Fill Selection > Foreground Color’ (Alt+Backspace). Set the blend mode of the layer to Overlay or Multiply and reduce the opacity so the vignette sits on the edge of your perception for the most subtle effect.
FUTURE DEVELOPMENTS SHIFTING FOCUS
If digital cameras are eventually able to record distance information at the time of capture this could be used in the creation of an automatic depth map (the CS2 Lens Blur filter can already use channels or layer masks to create automated depth of field effects but the channel must still be created manually using the techniques outlined in this project). Choosing the most appropriate depth of field could be relegated to post-production image editing in a similar way to how the white balance is set in camera RAW.