
Displacement
Liquid pixels - a displacement, masking and layer style ‘combo’
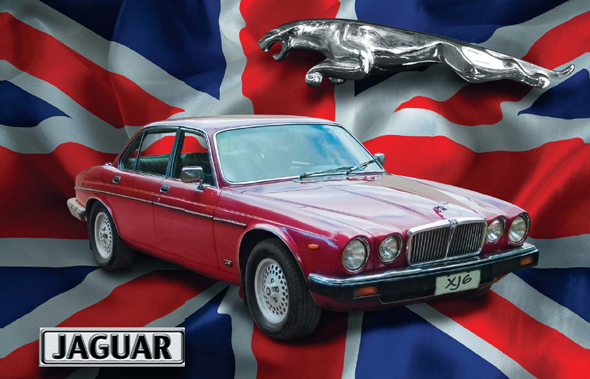
Create a showpiece montage by elevating an old Jag into a classic motor with a little spit and polish and some delectable digital deeds. Wickedly good stuff! The car’s paintwork was enhanced before starting the project by increasing the overall saturation of the image and the scratches were removed using the Healing Brush. The tires were made to look like new by using the Burn Tool set to 20%. If only it was this easy in real life!
Part A - Creating a backdrop using the displacement filter
The layer blend modes are an effective way of merging or blending a pattern or graphic with a three-dimensional form. By using the blend modes the flag in this project can be modified to respect the color and tonality of the undulating silk beneath it. The highlights and shadows that give the silk its shape can however be further utilized to wrap or bend the flag so that it obeys the material’s shape and sense of volume. This can be achieved by using the Displace filter in conjunction with a ‘displacement map’. The ‘map’ defines the contours to which the flag must conform. The final effect can be likened to ‘shrink-wrapping’ the flag to the 3-D form of the undulating silk.
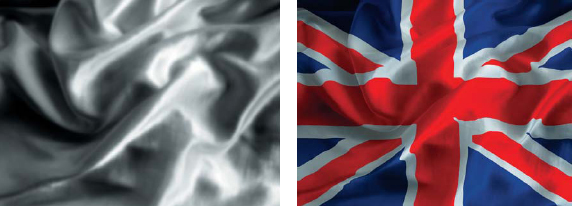
How it works: The brightness level of each pixel in the map directs the filter to shift the corresponding pixel of the selected layer in a horizontal or vertical plane. The principle on which this technique works is that of ‘mountains and valleys’. Dark pixels in the map shift the graphic pixels down into the shaded valleys of the 3-D form whilst the light pixels of the map raise the graphic pixels onto the illuminated peaks of the 3-D form.
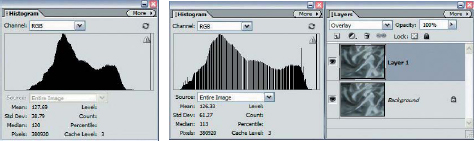
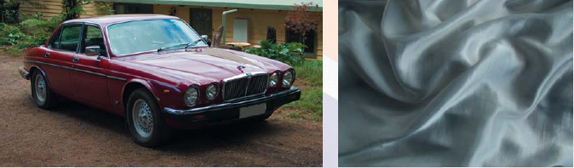
1. A silk dressing gown was photographed using the available light. For this image to act as an effective displacement map the contrast must however be expanded. An effective way of expanding contrast in Photoshop Elements is to duplicate the layer and set the top layer to ‘Overlay’ blend mode. Note the changes to the histogram by viewing the histogram in the Histogram palette.
Note > Duplicate the silk image resource file to ensure the original file is retained as a master and not lost by this manipulation. Either copy the image file before you start the project or go to File >Duplicate before you proceed to step 2.
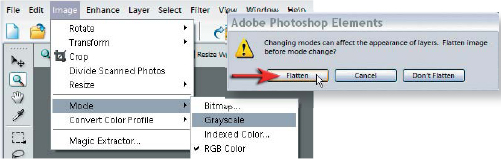
2. Go to the Image menu and from the Mode submenu select ‘Grayscale’. Choose the option ‘Flatten’ when the warning dialog box appears.
Note > The displacement map must be in Grayscale otherwise the color channels will upset the appropriate displacement effect.
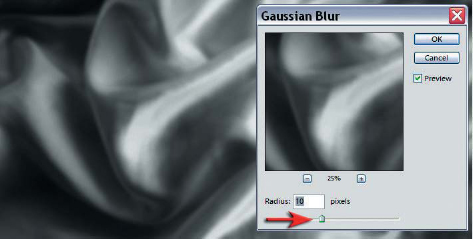
3. To further improve the effectiveness of the displacement map we must blur the image slightly. This effect of blurring the map will smooth out the lines of the flag as it wraps around the contours of the silk. Too much blur and the undulations will be lost, too little and the lines of the flag will appear jagged as it is upset by any minor differences in tone. Go to Filter >Blur > Gaussian Blur and start by selecting a radius of around 10 pixels. Increase or decrease this radius when working with images of a different resolution.
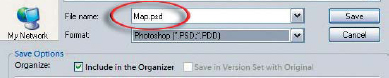
4. Save the image (displacement map) as a Photoshop (PSD) file. Close the blurred Grayscale file as the map is now complete. You will need to choose this file when the Displacement filter asks for the location of your map, so make a note of where it has been saved to on your computer.
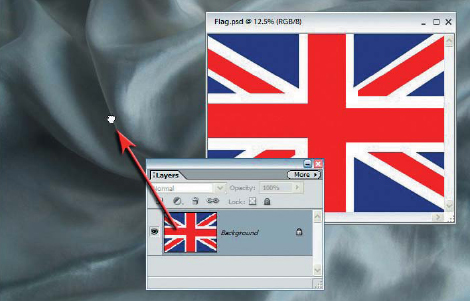
5. Open or select the RGB silk file that has not been blurred. Also open the flag image. With the flag image as the active window, choose ‘All’ from the Select menu and then choose ‘Copy’ from the File menu. Now make the Silk image the active window and choose ‘Paste’ from the File menu. Alternatively you can just drag the thumbnail of the flag image in the Layers palette into the image window of the silk image if you can see both image windows on your desktop.
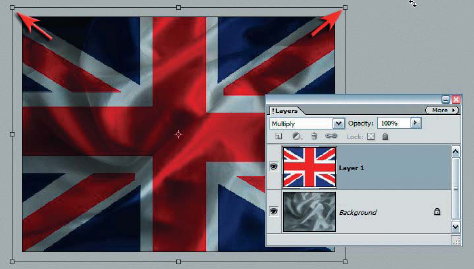
Set the blend mode of the flag layer to ‘Multiply’. If you are intending to displace a graphic or a texture it is worth ensuring that you have some elbow room (when we displace the flag it will come away from, and reveal, the edges of the background layer if they are the same size). Use the ‘Free Transform’ command to enlarge the flag layer so that it is a little larger than the background layer.
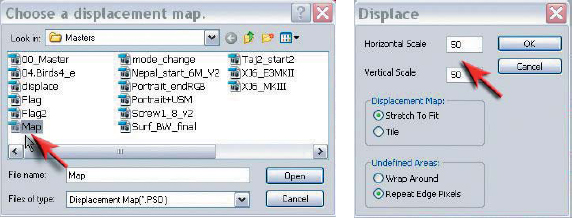
6. Go to Filter > Distort > Displace. Enter in the amount of displacement in the Horizontal and Vertical fields of the Displace dialog box. The size of the displacement is dependent on the resolution of the image you are working on. Choose amounts of 40 for both fields for the Flag. jpg used in this project. Increasing the amount greater than 60 for either the Horizontal or Vertical scale will increase the amount of distortion in this project image but will also start to break off islands of color from the design of the flag indicating that the limit of the effect has been exceeded. Choose the displacement map you created earlier to complete this step. Your flag should now miraculously conform to the contours of the silk. If you are not entirely happy with the results go to the Edit menu and choose ‘Undo’. Repeat the process choosing smaller or greater amounts in the Displace dialog box.
Note > It helps if the graphic or pattern image file you are displacing is slightly larger than the image file you created the map for. This will ensure that no gaps appear between the distorted graphic and the edge of the image window.

7. Add an adjustment layer and drag the highlight slider to the start of the histogram to extend the dynamic range and make the highlights and midtones appear brighter. Your dramatic and colorful background is now complete.
Part B - Creating a montage using masks
The following montage techniques are used for professional looking results. The techniques covered allow precise control over the alignment and quality of the edge (soft/hard) to ensure that no halos from the old background are visible (even when using crude selection tools such as the Magic Wand).
Note > Download the completed flag file from the supporting DVD if you would like to start the project at this point.
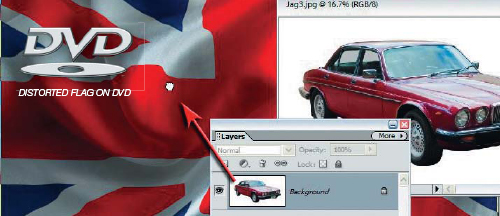
8. Open the image of the Jaguar car and add this as a layer above the adjustment layer and flag in the master project file (see step 5 for a guide on combining two images). I have made the background behind the car white in order to make it easier for you to remove it from view in this project. You can use one of two different methods in order to hide the white background from view.
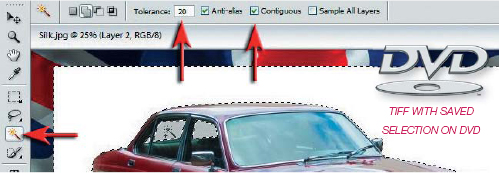
Method 1 > Select the ‘Magic Wand Tool’ in the Tools palette. Select the ‘Add to’ icon in the options bar and set the tolerance in the Options bar to 20. Click on the white background surrounding the car and then click on the rear window behind the back seat to add these sections to the selection. You do not need to delete the white background in order to conceal it (deleting pixels is considered destructive editing and can restrict the control over the edge quality later).
Note > The TIFF image on the supporting DVD has a saved selection of the car.
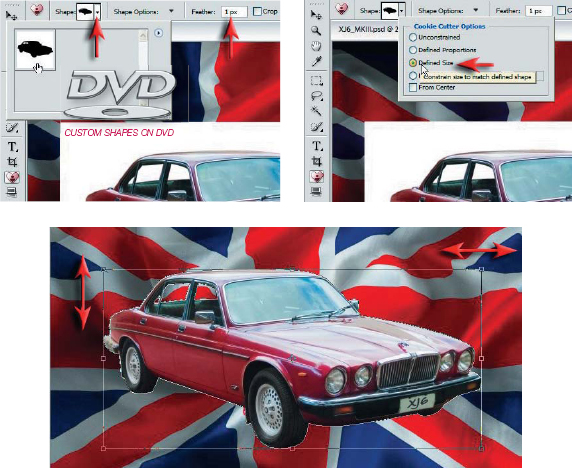
Method 2 > Elements 4 does not have a Pen Tool for the creation of paths but you can use them in the form of Custom Shapes if they are available to load into the shapes folder. I have saved a custom shape for both the car and the leaping Jaguar used in the final montage. Locate the Application folder for Photoshop Elements 4 and then drag the shapes files for this project into the Custom Shapes folder (located in the Presets folder). Restart Elements, click on the cookie cutter tool in the Tools palette, choose XJ6 from the cookie menu and from the shape options choose ‘Defined Size’ and a 1 pixel feather. Click in the image window and drag the cookie shape over the car until it aligns. Let go of the mouse clicker to see the results of the cutting action and perfect the cutting action by nudging the shape into alignment using the arrow keys on the keyboard. Commit the cutting action by clicking on the tick in the Options bar. To proceed to the next step you will need to load the car as a selection. Hold down the Ctrl key and click on the layer. A selection of the car will appear.
Note > The cookie cutter technique deletes rather than hides the white background pixels, but as the cookie cutter outline is smoother and more accurate than can probably be achieved using the selection tools the warning about deleting rather than hiding pixels in Method 1 can largely be ignored.

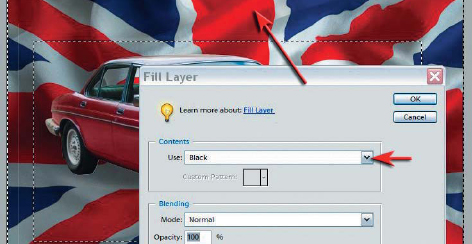
9. If you selected the background using the Magic Wand Tool then you will need to go to the Select menu and choose ‘Inverse Selection’. If you have used the cookie cutter technique hold the Ctrl key down and click on the layer thumbnail to load the car as a selection. Then proceed to select an adjustment layer from the Layers palette. It does not matter which adjustment layer you choose as we will only be borrowing its layer mask and not using it to make any adjustments to the layers beneath. Just select OK without making any adjustment. Click on the car layer above the adjustment layer and choose ‘Group’ from the Layer menu.
Note > The background has already been removed using the cookie cutter but the edge still requires masking to improve its appearance.
PERFORMANCE TIP
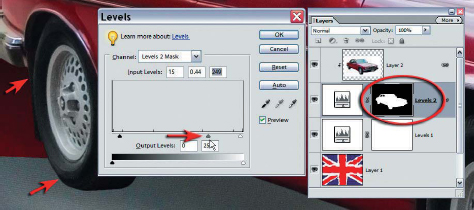
The resulting mask is likely to have a 1 pixel white line visible around the edge of the old background. To remove this thin white line paint with black directly into the layer mask of the adjustment layer. Alternatively a quicker option (if you know your short-cuts) is to make a rectangular selection around the car using the Marquee Tool (M), invert the selection (Ctrl+Shift+I) and fill this selection with black (Alt+Backspace if black is in the foreground swatch).
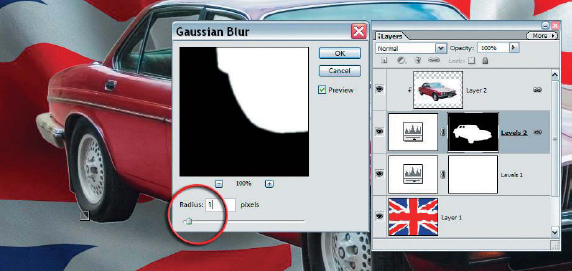
10. Zoom in to 100 or 200% and take a good close look at the edge. The edge needs to be softened and moved to conceal the remnants of the old white background. From the Filter menu choose ‘Blur > Gaussian Blur’. Use a Radius value of 1 or 2 pixels to soften the edge of the outline of the car (if you used the Cookie Cutter Tool the outline will already have been softened by 1 pixel). Larger values are required in montage work when dealing with very high-resolution images or masking objects that were not photographed in sharp focus.
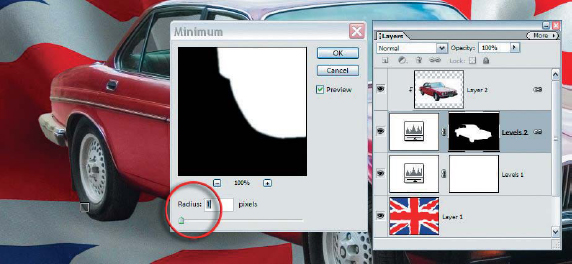
11. Go to Filter > Other > Minimum and choose a 1 or 2 pixel radius to eliminate the remnants of the white background. The filter acts to expand the mask and limit the visibility of the pixels on the layer above.
PERFORMANCE TIP
The mask can be fine-tuned by applying a levels adjustment to this layer mask (yes - you really can apply a levels adjustment to a levels adjustment layer mask). Moving the central Gamma slider in the Levels dialog box moves the edge of the mask if it has been first softened as in step 10. Levels offers a little more control that the Maximum and Minimum filters in that you can also move the Shadow and Highlight sliders to control both the trailing edge and leading edge independently. Pretty cool stuff!
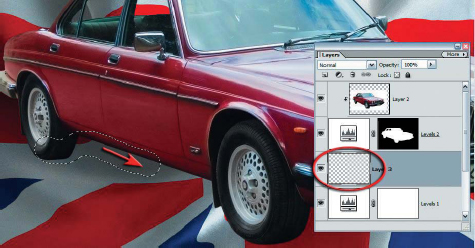
12. Select the layer below the mask layer and then click on the ‘New Layer’ icon in the Layers palette. Select the ‘Selection Brush Tool’ in the Tools palette and then paint a selection that extends just in front of the tires and underneath the car. Extend some way over the edge of the car as this will be needed later (blurring the shadow will reduce its opacity at the edges). From the Edit menu choose the ‘Fill’ command and select black as the color and click OK.
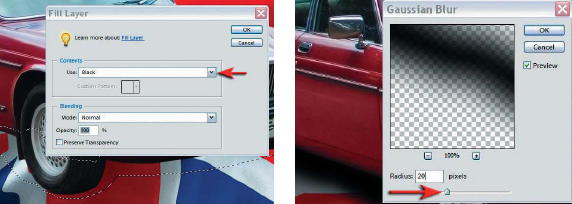
13. Apply a Gaussian Blur filter to this layer and then refine the shadow by setting the blend mode to ‘Multiply’ and lowering the opacity to around 70%.
Note > A second shadow layer could be added to create some smaller shadows just underneath the wheels and further underneath the car. This refinement will help create the illusion that the car is in contact with the flag.

14. The image just needs a few finishing touches to complete the project. Add the leaping Jaguar. This time delete the white background pixels instead of masking them. A custom shape and saved selection are available for this leaping Jaguar on the supporting DVD. Ctrl+Click the layer to load the Jaguar as a selection. Create a new layer underneath the leaping Jaguar and fill the selection with black (Edit >Fill Selection). Group these two layers (Layer > Group with Previous). The base layer now acts as a mask and should be modified by applying the Gaussian Blur filter (to soften the edge) and Maximum filter (Filter > Other > Maximum) to remove any white fringe pixels.

15. As the Jaguar does not need to appear to be in contact with the flag we can simply add a drop shadow to this layer rather than create a shadow by hand. Click on a drop shadow style in the Styles palette. This can be modified or perfected by going to the Layers menu and choosing ‘Style Settings’. The angle and distance of the shadow from the object can be controlled from this dialog box or the user can simply click inside the image window and drag the shadow to a different position to obtain the best effect.
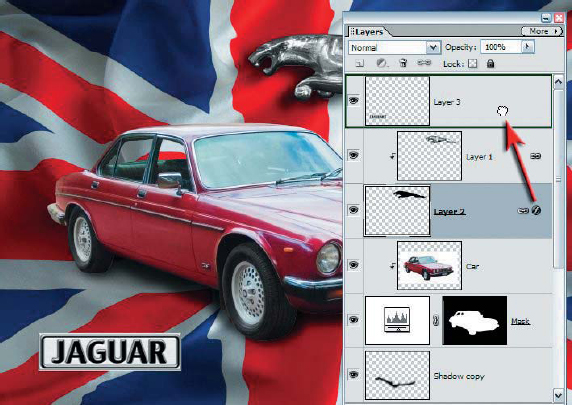
16. Complete the image by adding the image of the badge in the lower left-hand corner. Add a drop shadow to this layer and the project is complete. Download the Australian flag to turn a homegrown tired old car from yesteryear into a classic motor fit for the photo frame.

Akane Utsunomiya
Use the masking techniques in Projects 1and 5 of this section to create seamless and convincing montages