9: Publishing Your Photos
lesson overview
Lightroom 3 offers several easy-to-use options for sharing your photos. The new Publish Services feature enables you to share images directly from the Library module. You can create Publish Collections to help you manage the files you’ve handed off to a client, to sync photos to your iPhone, or to upload images directly to a photo sharing website. The Web module provides a range of customizable gallery layout templates and all the tools you need to build a striking website, preview it in a browser, and upload it to your web server.
In this lesson, you’ll learn the techniques and skills you need to publish photos from the Library and to create your own web gallery:
• Publishing images to a photo sharing website
• Using Publish Collections and re-publishing updated images
• Distinguishing between HTML and Flash gallery templates
• Choosing and customizing a gallery layout template
• Rearranging the order of the images in your gallery
• Specifying the output settings and adding a watermark
• Previewing your web gallery
• Saving your customized templates and presets
• Uploading your gallery to a web server
![]() You’ll probably need between one and two hours to complete this lesson.
You’ll probably need between one and two hours to complete this lesson.
Use the Publish Services feature to share your photos directly from the Lightroom Library module, or choose from HTML and Flash templates in the Web module to quickly generate sophisticated interactive web galleries. Post images to a photo sharing site, sync photos to your iPhone, or upload an interactive gallery directly to a web server—all without leaving the Lightroom workspace.
Getting started
This lesson assumes that you are already familiar with the Lightroom workspace and with moving between the different modules. If you find that you need more background information as you go, refer to Lightroom Help, or review the previous lessons in this book.
Before you begin, make sure that you have correctly copied the Lessons folder from the CD in the back of this book onto your computer’s hard disk and created the LR3CIB Library Catalog file as detailed in “Copying the Classroom in a Book files” on page 2 and “Creating a catalog file for working with this book” on page 3.
1 Start Lightroom.
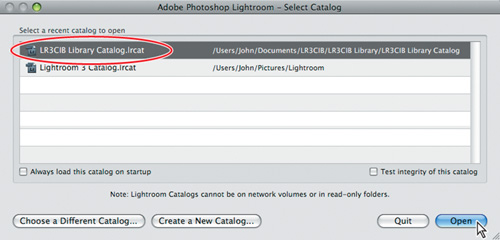
2 In the Adobe Photoshop Lightroom - Select Catalog dialog box, make sure the file LR3CIB Library Catalog.lrcat is selected under Select A Recent Catalog To Open, and then click Open.
3 Lightroom will open in the screen mode and workspace module that were active when you last quit. If necessary, click Library in the Module Picker to switch to the Library module.
![]()
Importing images into the library
The first step is to import the images for this lesson into the Lightroom library.
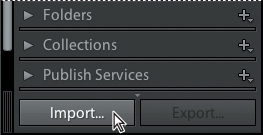
1 In the Library module, click the Import button below the left panel group.
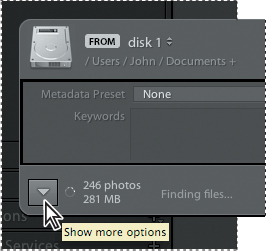
2 If the Import dialog box appears in compact mode, click the Show More Options button at the lower left of the dialog box to see all the options in the expanded Import dialog box.
3 Under Source at the left of the expanded Import dialog box, make sure that the option Include Subfolders is activated, and then navigate to the Lessons folder that you copied into the LR3CIB folder on your hard disk. Select the Lesson 9 folder. Ensure that all the images in the Lesson 9 folder are checked for import.
4 In the import options above the thumbnail previews, click Add to add the imported photos to your catalog without moving or copying them.
5 Under File Handling at the right of the expanded Import dialog box, choose Minimal from the Render Previews menu and ensure that the Don’t Import Selected Duplicates option is activated.
6 Under Apply During Import, choose None from both the Develop Settings menu and the Metadata menu and type Lesson 9 in the Keywords text box. Make sure your settings are exactly as shown in the illustration below, and then click Import.
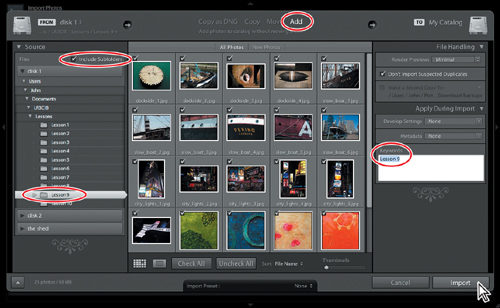
The images are imported from the Lesson 9 folder and now appear in both the Grid view of the Library module and in the Filmstrip across the bottom of the Lightroom workspace.
Publishing photos from the Library
We live in a connected world where, for many of us, sharing our images with family and friends, posting to photo sharing websites, or handing off photos online to a client are almost daily occurrences.
The new Publish Services panel enables you to publish your images directly from the Library module by creating Publish Collections that help you manage your shared images by keeping track of whether or not they have been updated to the most current versions. A Publish Collection can be used to manage the images you have handed off to a particular client, to publish images to your iPhone sync folder, or to upload images directly to a photo sharing website.
Lightroom 3 ships with a direct connection from the Publish Services panel to the Flickr photo sharing site so that adding images to your Flickr Photostream is as simple as drag and drop. Adobe is working to support developers creating plug-ins that will enable direct access from the Publish Services panel to other popular photo sharing websites.
Setting up a Flickr account
In this exercise, you’ll set up a Flickr account and publish a selection of photos.
1 In the left panel group, expand the Publish Services panel, if necessary, by clicking the triangle at the left of the panel name, and then click Set Up at the right of the Flickr header.
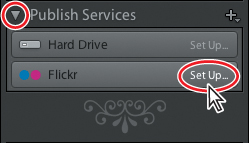
The Lightroom Publishing Manager dialog box appears.
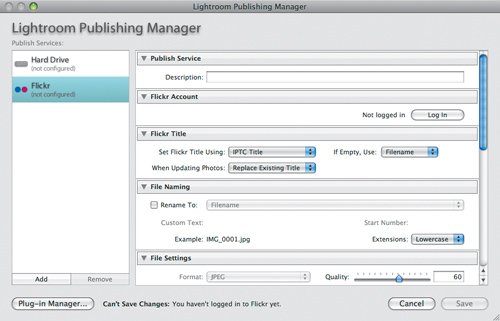
2 Under Publish Service, type your name in the Description text box.
3 Under Flickr Account, click Log In. A dialog box appears, asking you to give Lightroom permission to upload images to Flickr. Click Authorize.
Your default web browser opens. You will be asked to sign in to Yahoo, and then your browser will open the Flickr sign-in page.
4 Type a screen name for your Flickr account and click Create A New Account.
5 Flicker asks you to confirm the request from Lightroom to link to your Flickr account. As you arrived at this page from Lightroom, click Next as shown in the illustration below.
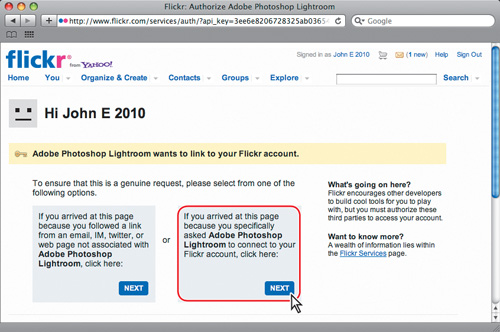
6 On the next screen, click “OK, I’ll Authorize It” to authorize Lightroom to access all content in your Flickr account, to upload, edit, replace, and delete photos in your account, and to interact with other Flickr members.
7 Close the browser page, and then click Done to return to the Lightroom Publishing Manager dialog box.
8 Set up the options in the Lightroom Publishing Manager dialog box as follows:
• Under Flickr Title, choose Filename from the Set Flickr Title Using menu.
• Under File Settings, drag the Quality slider to set a value of 75.
• Scroll down, if necessary, to see the Output Sharpening options. Click the check box to enable sharpening, and then choose Screen from the Sharpen For menu,. Choose Standard from the Amount menu.
• Under Watermarking, disable the Simple Copyright Watermark option.
• Under Privacy and Safety, make sure the Public option is activated.
9 Leave the options for renaming, resizing, and metadata unchanged and click Save to close the Lightroom Publishing Manager dialog box.
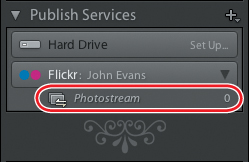
In the Publish Services panel, the activated Flickr service displays the name you assigned in step 2. The service now contains a single Photostream. An image count of 0 at the right shows that the new Photostream does not yet contain any photos.
Publishing photos to Flickr
In this exercise you’ll add a selection of images to your Flickr Photostream.
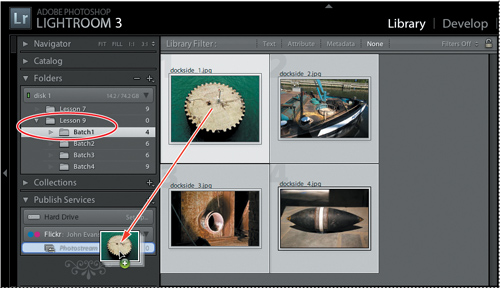
1 In the left panel group, expand the Folders panel. Collapse other panels, if necessary, so that you can see both the expanded Folders and Publish Services panels, as shown in the illustration below.
2 In the Folders panel, expand the Lesson 9 folder and click to select the subfolder named Batch1.
3 Choose Edit > Select All or Ctrl-click / Command-click to select all four images, and then drag the selected photos to your newly created Photostream under Flickr in the Publish Services panel.
4 Click the new Photostream entry under Flickr in the Publish Services panel.
The work area displays the four images in this Publish Collection under the header New Photos To Publish.
5 Click the Publish button at the bottom of the left panel group.
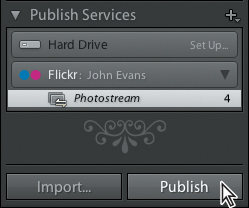
A progress bar appears in the upper left of the workspace as the images are uploaded to Flickr. The work area becomes a split screen, showing which images have been published and which are yet to be published.
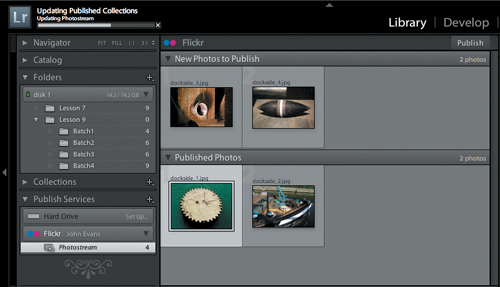
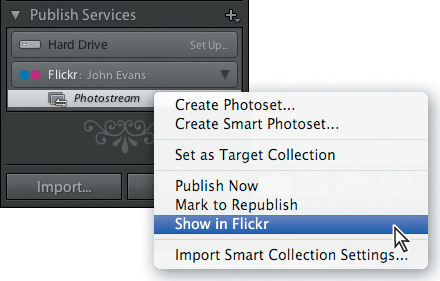
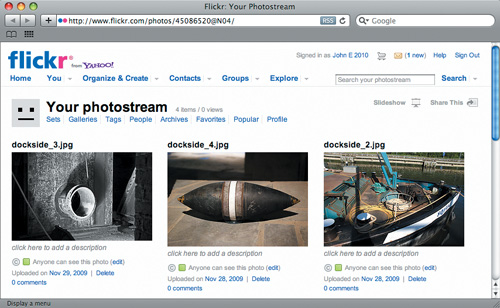
6 Wait until all four images have been published to Flickr, and then right-click / Control-click the entry for your Photostream in the Publish Services panel and choose Show In Flickr from the menu.
Publishing photo comments
Your Publish Services connection allows for two-way interaction with Flickr.
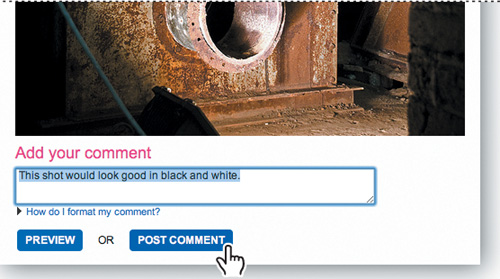
1 On your Flickr web page, click the photo dockside_3.jpg to see the image enlarged. Type a comment in the text box below the enlarged image and click Post Comment.
2 Switch back to Lightroom and click the Refresh Comments button (![]() ) at the left of the header of the Comments panel in the right panel group. Watch the progress bar at the top left of the workspace as Lightroom connects to Flickr and updates your Publish Collection.
) at the left of the header of the Comments panel in the right panel group. Watch the progress bar at the top left of the workspace as Lightroom connects to Flickr and updates your Publish Collection.
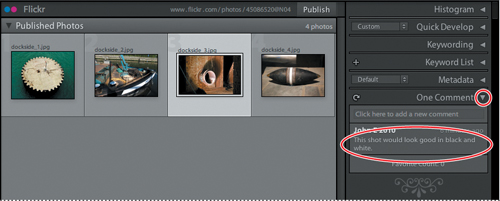
3 When the process is complete, click to select the image dockside_3.jpg under the Published Photos header in the work area.
4 In the right panel group, expand the Comments panel. The comment you posted on your Flickr page has been downloaded to Lightroom.
![]() Tip: Remember that your Publish Services connection allows for two-way interaction with Flickr. To post a comment to an image in your Photostream from Lightroom, select a published image, type a comment in the Comments panel, and then click the Publish button at the bottom of the right panel group.
Tip: Remember that your Publish Services connection allows for two-way interaction with Flickr. To post a comment to an image in your Photostream from Lightroom, select a published image, type a comment in the Comments panel, and then click the Publish button at the bottom of the right panel group.
Re-publishing a photo
Publish Services helps you keep track of images that have been modified since they were published, so you can easily make sure that you are sharing the latest versions.
1 With your Flickr Photostream selected in the Publish Services panel, and the image dockside_3.jpg selected in the work area, expand the Quick Develop panel in the right panel group.
2 In the Quick Develop panel, choose General - Grayscale from the Saved Preset menu. In the work area, the edited image is now displayed under the header Modified Photos To Re-Publish.
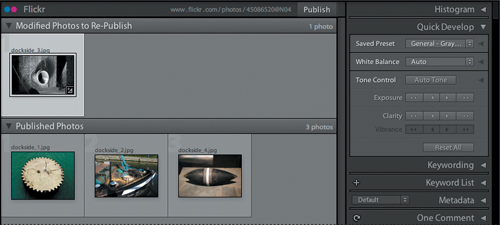
3 Click the Publish button to re-publish the modified photo. A dialog box appears asking you if you wish to replace the photo on Flickr, and informing you that with your free Flickr account, any comments or ratings attached to the image will be deleted when the image is replaced. Click Replace.

![]() Tip: With a Flickr Pro account, any comments and ratings attached to your photos on Flickr will be preserved when you re-publish images. For more detail on the advantages of a Flickr Pro account, click Help on the Flickr web page.
Tip: With a Flickr Pro account, any comments and ratings attached to your photos on Flickr will be preserved when you re-publish images. For more detail on the advantages of a Flickr Pro account, click Help on the Flickr web page.
4 Right-click / Control-click your Photostream under Flickr in the Publish Services panel and choose Show In Flickr from the menu.
Your Flickr page has been updated to show the re-published black and white version of the image dockside_3.jpg.
![]() Tip: You may need to wait a few moments while your photostream is updated. If you don’t see your re-published photo, try reloading the page in your browser.
Tip: You may need to wait a few moments while your photostream is updated. If you don’t see your re-published photo, try reloading the page in your browser.
Creating a new Photoset on Flickr
The Publish Services panel offers several options for working with your Flickr account from within Lightroom.
1 In the Folders panel in the left panel group, expand the Lesson 9 folder and click to select the subfolder named Batch2.
2 Choose Edit > Select All or Ctrl-click / Command-click to select all six images in the Batch2 folder.
3 Right-click / Control-click your Photostream in the Publish Services panel and choose Create Photoset from the menu.
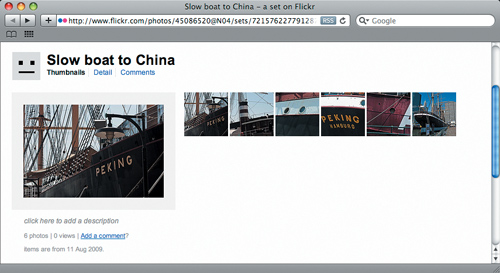
4 In the Create Photoset dialog box, type Slow boat to China as the name for the new set. Ensure that the Include Selected Photos option is activated and the Make New Virtual Copies option is disabled, and then click Create.
Your new Photoset appears under the Flickr service in the Publish Services panel and the work are displays the six slow_boat images under the header New Photos To Publish.
5 Click the Publish button, and then wait while the new set of images is uploaded to Flickr.
6 To view the newly published set of images online, right-click / Control-click the entry for your new Photoset in the Publish Services panel and choose Show In Flickr from the menu. Return to Lightroom when you’re done.
Publishing photos to your hard disk
The Publish services panel also enables you to create publish collections on your hard disk—Lightroom will keep track of which images have been updated since the collection was published, just as it does for a collection published online. You can create a new publish collection for each client to whom you hand off photos, making it easy to check whether they have the most current versions, or set up a publish collection that will enable you to publish images to your iPhone sync folder with drag and drop convenience.
1 In the Publish Services panel, click Set Up at the right of the Hard Drive header.

2 In the Lightroom Publishing Manager dialog box, type Sync to iPhone in the Description text box under Publish Service.
3 Under Export Location, choose My Pictures Folder / Pictures Folder from the Export To menu. Activate the Put In Subfolder option and type iPhone as the name for the new subfolder. Under File Settings, set a Quality value of 50. Review the other options in the Lightroom Publishing Manager dialog box, leaving the settings unchanged for the moment, and then click Save.
A listing for your new iPhone publish service appears under the Hard Drive header in the Publish Services panel.
4 In the Folders panel in the left panel group, expand the Lesson 9 folder and click to select the subfolder named Batch3.
5 Choose Edit > Select All or Ctrl-click / Command-click to select all six images in the Batch3 folder, and then drag the selected photos to your newly created iPhone entry in the Publish Services panel.
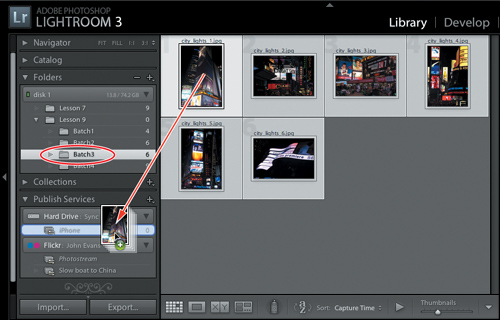
6 Click the iPhone entry in the Publish Services panel. The six cty_lights photos in the new publish collection displayed in the work area under the header New Photos To Publish. Click the Publish button at the bottom of the left panel group and wait while Lightroom processes the images. 7 Right-click / Control-click iPhone collection in the Publish Services panel and choose Go To Published Folder from the context menu.
An Explorer / Finder window opens showing the six published images in the new iPhone folder.
8 Close the Explorer / Finder window and return to Lightroom.
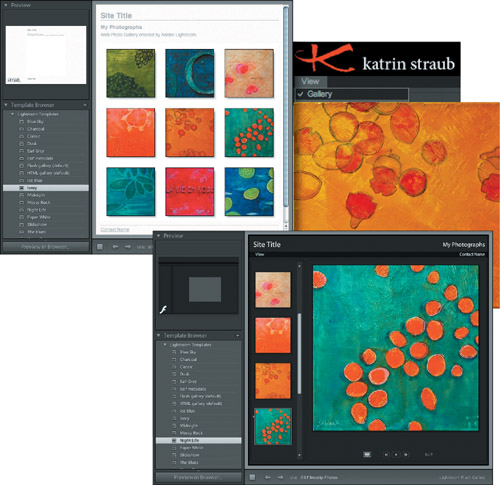
The Lightroom Web module
Another great way to share and showcase your photos is to use the Lightroom Web module to design, preview, and upload your own web gallery.
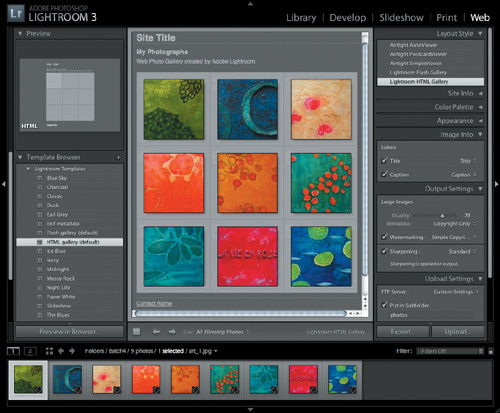
In the Web module, you’ll use the Template Browser in the left panel group to preview the wide range of gallery layout templates. When you choose a template in the Template Browser, the Gallery Editor view in the central work area shows how your images look in the new gallery layout.
In the Gallery Editor view, your gallery is fully interactive, performing exactly as it will on the web.
You’ll use the panels in the right group to customize the gallery template. You can change the layout, the color scheme, or the background, and add text, borders, or effects. With a single click, you can preview your gallery in a web browser or upload it to your web server without leaving Lightroom.
![]() Note: For the purposes of the illustration below, the Lightroom Templates menu has been abridged; you’ll actually find many more varied and versatile gallery designs there.
Note: For the purposes of the illustration below, the Lightroom Templates menu has been abridged; you’ll actually find many more varied and versatile gallery designs there.
Creating a basic web gallery
In the following exercises you’ll create a web portfolio based on one of the Lightroom Flash templates to showcase some photographs of paintings.
Creating a new collection
It’s a good idea to group the images for your web gallery as a collection, so that you can easily retrieve the same selection of images should you wish to re-work or extend your presentation. Creating a collection has other advantages: you can make consistent adjustments across all the images, rearrange their display order, and easily add or remove images. You can use the temporary Quick Collection in the Catalog panel, or create a new collection that will appear in the Collections panel.
![]() Note: A Collection is a groupings of photos in the library catalog. A Collection not only preserves the display order of the images it contains but also any settings applied in the Slideshow, Print, and Web modules.
Note: A Collection is a groupings of photos in the library catalog. A Collection not only preserves the display order of the images it contains but also any settings applied in the Slideshow, Print, and Web modules.
1 If necessary, switch to the Library module. In the Folders panel in the left panel group, expand the Lesson 9 folder and select the subfolder named Batch4.
2 Choose Edit > Select All or Ctrl-click / Command-click to select all nine images in the Batch4 folder.
3 Click the New Collection button (+) in the header of the Collections panel, and choose Create Collection from the menu.
![]() Tip: To delete a collection, right-click / Control-click its name in the Collections panel, and choose Delete from the context menu.
Tip: To delete a collection, right-click / Control-click its name in the Collections panel, and choose Delete from the context menu.
4 In the Create Collection dialog box, type Web Portfolio in the Name text box and choose None from the Set menu. Under Collection Options, activate the Include Selected Photos option and disable Make New Virtual Copies, then click Create.
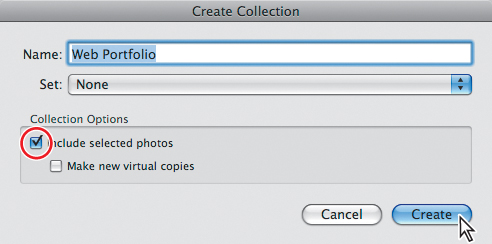
A listing for your new collection, containing the nine images from the Batch4 folder, appears in the Collections panel in the left panel group.

Choosing a template in the Web module
1 In the left panel group, expand the Collections panel if necessary, and then click to select your Web Portfolio collection.
2 Switch to the Web module by clicking Web in the Module Picker. From the Use menu in the Toolbar below the Gallery Editor view, choose All Filmstrip Photos.
3 In the right panel group, expand the Layout Style panel. If it’s not already selected, choose Lightroom HTML Gallery from the list in the Layout Style panel. The Gallery Editor view shows how your images will look displayed in the default HTML layout.
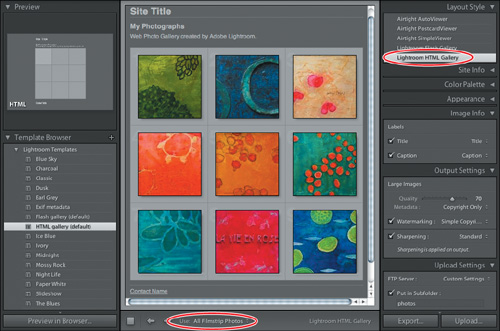
![]() Note: For the purposes of the illustrations on this page and the next, the Lightroom Templates menu has been abridged; you’ll actually find many more varied and versatile gallery designs in the list; you may need to scroll down to see the HTML Gallery (Default).
Note: For the purposes of the illustrations on this page and the next, the Lightroom Templates menu has been abridged; you’ll actually find many more varied and versatile gallery designs in the list; you may need to scroll down to see the HTML Gallery (Default).
4 Hide the Filmstrip, if necessary, so that you can see both the Preview panel and the list of templates in the Template Browser. Move the pointer down the list to preview the different template designs in the Lightroom Templates folder. Note the HTML or Flash icon in the lower left corner of the layout preview indicating the gallery type for each template.
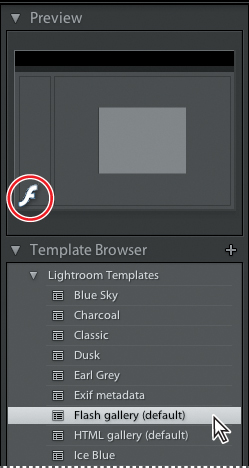
5 When you’ve finished previewing the gallery templates in the Template Browser, click to select the template Flash Gallery (Default).
The Gallery Editor view in the work area shows your images displayed in the new template layout.
Distinguishing between HTML and Flash templates
In the Template Browser you’ll find both HTML and Flash templates. As you move the pointer down the list of gallery templates, you’ll see a preview of each template layout in the Preview panel.
An icon in the lower left corner of the layout preview indicates the gallery type. Once you click to select a template in the Template Browser, the gallery type is also shown in the Layout Style panel in the right panel group and at the right of the Toolbar below the Gallery Editor view.

Templates of either type can be customized to show your work in its best light. You can add text and effects to your layout and change the color scheme, the background, and the image size.
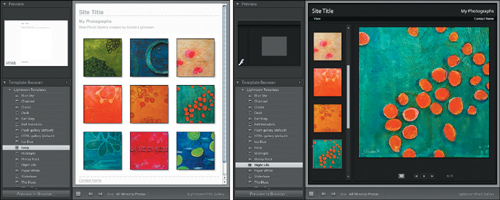
The HTML gallery templates enable you to produce simple web sites that are compatible with most browsers. The HTML pages generated can be customized further in an HTML editor.
Flash templates can produce more sophisticated web galleries, including animations, slideshows with smooth transitions, and other special effects. However, Flash galleries require that the viewer has the appropriate Adobe Flash Player plug-in installed. Should security settings be in place to block scripts and ActiveX controls, your audience may have to click through warning messages in the web browser before being able to see the gallery.
6 In the Gallery Editor view you’ll notice that the default Lightroom Flash gallery has its own navigation controls below the large image. Click the Play button to view the gallery slideshow.
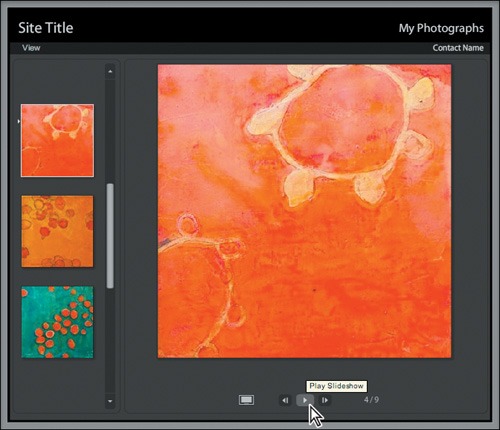
7 To stop the slideshow, press the spacebar or click the Pause button.
Rearranging the Order of your images
After seeing your slideshow in action, you may wish to change the order in which the images appear in the web gallery. In this exercise, you’ll move two of the images so that the slideshow alternates between cool and warm colors.
![]() Note: The order of the images in the Grid view and the Filmstrip determines their display order in a Web gallery.
Note: The order of the images in the Grid view and the Filmstrip determines their display order in a Web gallery.
1 Click the Library Grid button (![]() ) at the top left of the Filmstrip, or press G on your keyboard, to return to the Grid view in the Library module.
) at the top left of the Filmstrip, or press G on your keyboard, to return to the Grid view in the Library module.

2 Make sure that your Web Portfolio collection is still selected in the Collections panel, and then choose Edit > Select None.
3 In the Grid view, drag the image art_6.jpg one position to the left. Release the mouse button when the vertical black line appears to indicate an insertion point between the images art_4.jpg and art_5.jpg.
![]() Note: Dragging an image that is part of a multiple selection will move all the selected images. If all images in a collection are selected you will not be able to rearrange their order.
Note: Dragging an image that is part of a multiple selection will move all the selected images. If all images in a collection are selected you will not be able to rearrange their order.

4 In the Filmstrip, drag the third image, art_3.jpg, one position to the left. Release the mouse button when a vertical black line appears to indicate an insertion point between the first two images art_1.jpg and art_2.jpg.

![]() Note: You can rearrange the order of images in the Filmstrip or the Grid View only if the images have been grouped as a collection.
Note: You can rearrange the order of images in the Filmstrip or the Grid View only if the images have been grouped as a collection.
5 Click Web in the Module Picker and review the slideshow again in the Gallery Editor view. Notice that with the new image order the images now alternate between cool and warm colors. Press the spacebar to stop the slideshow.
6 (Optional) In the Web module, create a new image order by dragging one or more thumbnails to new positions in the Filmstrip. If the Gallery Editor view in the work area is not updated automatically, choose Web > Reload. Switch to the Library module to confirm that the images in the Grid view are displayed in the same order as in the Filmstrip. Switch back to the Web module.
Customizing your web gallery
You can save time creating your web gallery by starting with the layout template closest to the design you have in mind. Once you’ve made your choice, you can use the Site Info, Color Palette, Appearance, Image Info, and Output Settings panels in the right panel group to customize the template. You can add text, choose backgrounds and color schemes, and tweak the layout to change the look and feel of your gallery. In the following exercises, you’ll customize the text in your gallery template, adjust the layout, place a logo, and add a watermark to the images.
Replacing text
In the Site Info panel you can add a website title, a collection description, contact information, and web or e-mail links. The information you enter in the Site Info panel will appear on your website.
1 If the Site Info panel is currently collapsed in the right panel group, expand it by clicking the triangle beside its name.

2 Click the default Site Title text in the Site Info panel and type a title for your site. Press Enter on your keyboard to update the title displayed in your layout in the Gallery Editor view. In a web browser, the site title will also appear in the title bar of the browser window.

3 Click the triangle beside Site Title and note the entries in the Site Title menu. Lightroom keeps track of your entries for each of the text boxes in the Site Info panel. Instead of retyping information each time you create a new web gallery, you can choose previously entered details from this list.
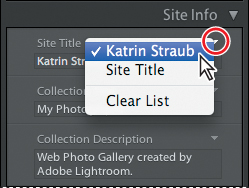
4 As an alternative to working with the Site Info panel, you can edit the text in your gallery directly in the Gallery Editor view in the work area. Click the Collection Title (My Photographs) in the top right corner of the Gallery Editor view and type a new title. Press Enter and both the gallery preview and the corresponding entry in the Site Info panel will be updated.

5 In the Site Info panel, delete the default text under Collection Description. Additional information about the images in your web gallery can be entered here. In this particular template, the viewer can access those details by clicking View below the site title and choosing About These Photos from the menu.
The last two items in the Site Info panel are Contact Info and Web Or Mail Link. Your web or email address will become an active link on your website, so the viewer’s browser will either jump to the specified web page or launch their default e-mail application.
Enter an e-mail address like this: mailto:[email protected], or a web address in the following format: http://www.domain.com.
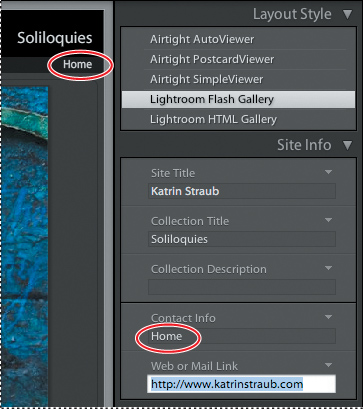
![]() Tip: As illustrated here, you could create a link to a Home page where you can offer the viewer links to the other galleries that you’ve created in Lightroom.
Tip: As illustrated here, you could create a link to a Home page where you can offer the viewer links to the other galleries that you’ve created in Lightroom.
Changing colors
The controls in the Color Palette panel enable you to change the color scheme for your website. You can set the color for every element in your layout: background, borders, header, menu bar, and text.
![]() Tip: When choosing colors, particularly for base elements such as the background, borders, and headers, remember that neutral colors will compete less with your images. If you want to get serious about designing color schemes, kuler from the Adobe labs can be an invaluable tool (http://labs.adobe.com/technologies/kuler/).
Tip: When choosing colors, particularly for base elements such as the background, borders, and headers, remember that neutral colors will compete less with your images. If you want to get serious about designing color schemes, kuler from the Adobe labs can be an invaluable tool (http://labs.adobe.com/technologies/kuler/).
Choosing colors that work well together and look good on any system may seem a major challenge, but a few simple rules might help you to stay within a safe color palette:
• Use dark text on light backgrounds.
• Use light text on dark backgrounds.
• Don’t rely on differences in color to convey essential information.
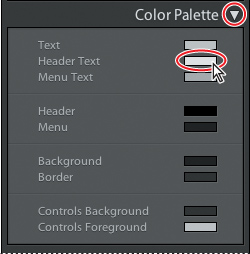
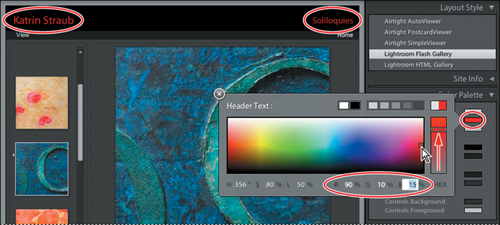
In this exercise you’ll change the color of the text for the site and collection titles, but the same technique applies to any of the color settings. 1 Expand the Color Palette panel by clicking the triangle next to its name. If necessary, you can collapse other panels to make more space. 2 In the Color Palette, click the Header Text color swatch to open the Lightroom Color Picker.
![]() Tip: To simplify working with the side panel groups, right-click/Control-click any panel header, and activate Solo Mode in the context menu. In Solo Mode, you can open only one panel in the group at a time.
Tip: To simplify working with the side panel groups, right-click/Control-click any panel header, and activate Solo Mode in the context menu. In Solo Mode, you can open only one panel in the group at a time.
3 In the Color Picker, drag the slider at the right almost to the top, and then click a bright red in the large color field on the left. We chose a color with RGB values of R: 90%, G: 10%, B: 15%. You can enter these RGB values directly by clicking the number and typing a new value. The new color appears in the Header Text color swatch in the Color Palette panel and is applied to both the site and collection titles in the Gallery Editor view.
![]() Tip: If you see a hexadecimal value displayed in the lower right corner of the Color Picker rather than the RGB values shown in the illustration at the right, click RGB below the vertical color slider.
Tip: If you see a hexadecimal value displayed in the lower right corner of the Color Picker rather than the RGB values shown in the illustration at the right, click RGB below the vertical color slider.
4 Close the Color Picker and collapse the Color Palette panel.
Tweaking the layout of a web gallery
You can adjust your gallery layout using the Appearance panel. The options available in the Appearance panel differ for Flash and HTML galleries.
For an HTML gallery, the Appearance panel offers the options shown in the illustration to the right. You can add borders or drop shadows to your images and display an index number in the background of each image cell. Change the number of rows and columns used on the index page with the Grid Pages controls, which will indirectly determine the size of the thumbnail images in the grid. The minimum grid is three by three—if your gallery contains more than nine images additional index pages will be generated. You can also set the size of the page and the width of a photo border for the enlarged view of an image.
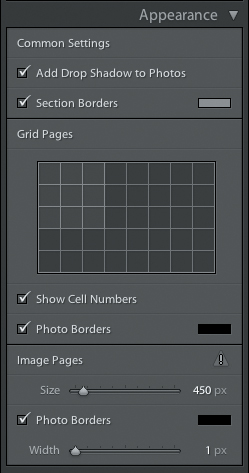
These options give you great flexibility in customizing the look and feel of your HTML gallery. For a Flash gallery the options in the Appearance panel are more restricted.
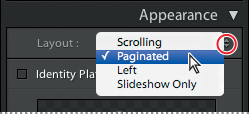
1 In the right panel group, expand the Appearance panel; then click the double triangle beside Layout, and choose the Scrolling layout option from the menu.
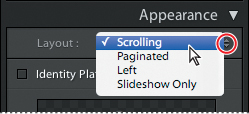
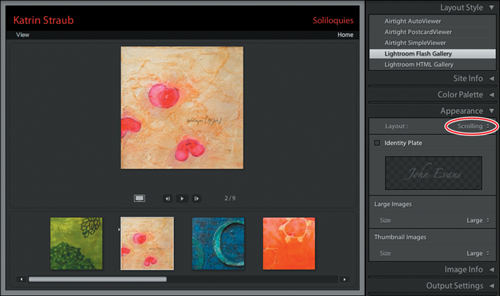
The Scrolling layout displays a scrollable row of index thumbnails beneath an enlarged image view.
2 In the Appearance panel, click the double triangle beside Layout, and choose the Paginated layout option from the menu.
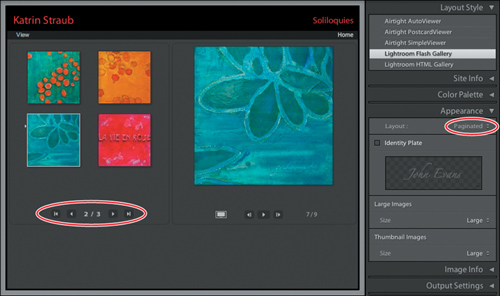
The Paginated layout displays thumbnails organized as an index beside an enlarged image view. Navigation controls below the thumbnails provide easy access to additional index pages.
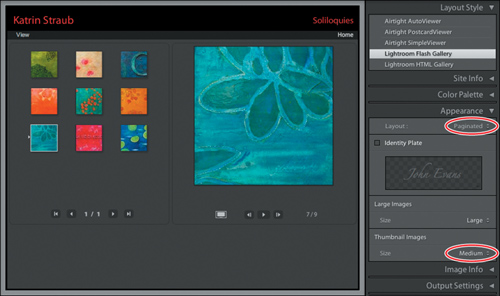
3 Under Thumbnail Images in the Appearance panel, click the double triangle beside Size and choose Medium from the menu.
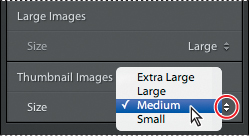
The gallery preview is updated in the Gallery Editor view. Depending on the number of images in your collection and the size of your Lightroom workspace window, the new thumbnail size may affect the number of index pages for your gallery.
4 In the Appearance panel, click the double triangle beside Layout, and choose the Slideshow Only layout option from the menu.
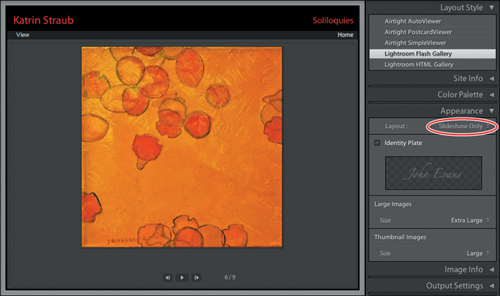
The Slideshow Only layout, displays only the enlarged image view, with controls for navigating through the collection and playing a gallery slideshow.
5 In the Appearance panel, click the double triangle beside Layout, and choose the Left layout option from the menu to return to the default layout for this gallery template, with a scrolling column of thumbnails to the left of the enlarged image view.
6 Click the View Slideshow button (![]() ) below the enlarged image view to hide the index thumbnails and view a slideshow that will display only the enlarged images.
) below the enlarged image view to hide the index thumbnails and view a slideshow that will display only the enlarged images.
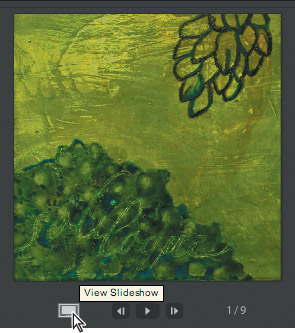
The View Slideshow button switches the gallery temporarily to Slideshow Only mode—it is available in all of the Flash gallery layout options except the Slideshow Only layout. When the View Slideshow button is clicked, it changes to the View Gallery button (![]() ).
).
7 Click the View Gallery button (![]() ) to return to the selected gallery layout, complete with index thumbnails.
) to return to the selected gallery layout, complete with index thumbnails.

Personalizing your web gallery
Next, you’ll personalize your web gallery by placing a logo in the header area.
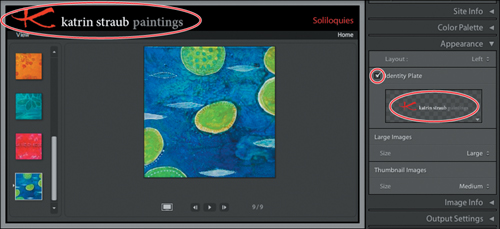
1 In the Appearance panel, activate the Identity Plate option; then click the white triangle at the lower right of the Identity Plate preview pane and choose Edit from the menu.
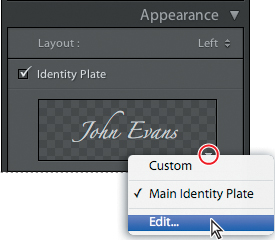
2 In the Identity Plate Editor dialog box, activate the option Use A Graphical Identity Plate, and then click the Locate File button.
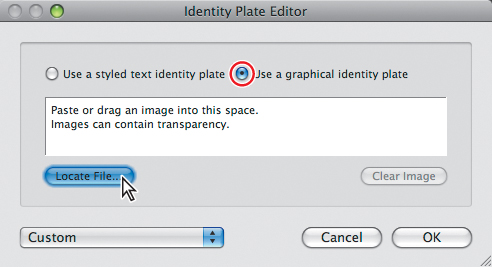
3 In the Locate File dialog box, navigate to the Lesson 9 folder and select the file Web_Identityplate.png. Click Choose, and then click OK.
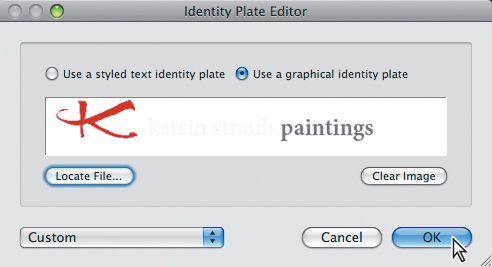
![]() Tip: For best results use an image that is no more than 60 pixels high so that it will not need to be scaled to fit your layout template. In this case we used an image with a height of 46 pixels.
Tip: For best results use an image that is no more than 60 pixels high so that it will not need to be scaled to fit your layout template. In this case we used an image with a height of 46 pixels.
The new identity plate appears in the gallery preview and in the Identity Plate preview in the Appearance panel. The identity plate will replace the site title on your web page, but when the gallery is viewed in a web browser, the text you entered as the Site Title will still be displayed in the title bar of the browser window.
Working with identity plates
You can personalize your slideshows, Web presentations, and print layouts—and the Lightroom workspace itself—by adding your own identity plate.
A Styled Text Identity Plate will display the text you enter in the Identity Plate Editor dialog box. You can choose from the menus below the text box to specify the font characteristics.
A Graphical Identity Plate uses a graphic that is no more than 60 pixels high, in any of the following file formats: PDF, JPG, GIF, PNG, TIFF, or PSD (Windows) and JPG, GIF, PNG, TIFF, or PSD (Macintosh). The resolution of graphical identity plates may be too low for printed output. Choose Save As from the Enable Identity Plate menu, and give your identity plate a name.
To display your identity plate in the Lightroom workspace, choose Edit > Identity Plate Setup / Lightroom > Identity Plate Setup. In the Identity Plate Editor dialog box, activate the Enable Identity Plate option and choose one of your saved identity plates from the menu to the right.
Choose from the pop-up menus on the right side of the dialog box to change the font style, size and color for the Module Picker. The first color swatch sets the text color for the active module; the second swatch sets the text color for the others.
—From Lightroom Help
Providing more information
You can display information about the images in your web gallery by choosing from a range of options in the Title and Caption menus in the Image Info panel. Show specific details retrieved from the metadata of each image, apply the same text to all the images at once, or display your images without any text information at all.
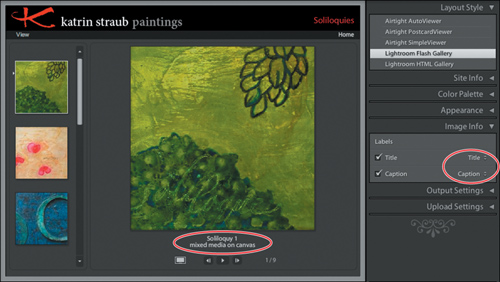
![]() Note: The title text will be displayed immediately below the enlarged image view. The caption appears below the title in a smaller font size.
Note: The title text will be displayed immediately below the enlarged image view. The caption appears below the title in a smaller font size.
You can also set up a text template that will combine information drawn from different sources to compose titles and captions for your images automatically. In this exercise, you’ll add a title and caption to the first image in the collection.
1 Expand the Image Info panel in the right panel group. Make sure that both the Title and Caption options are activated.

![]() Tip: Choose the Custom Text option to add “boilerplate” text that will be displayed with every image.
Tip: Choose the Custom Text option to add “boilerplate” text that will be displayed with every image.
2 Click on the double triangle beside Title to see the list of options. The same choices are available in the Caption menu. Most of the options display information retrieved from an image’s metadata.
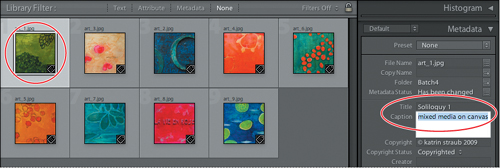
3 From the Title menu, choose Title. From the Caption menu, choose Caption.
Next, you’ll need to edit the image metadata from which the Title and Caption information will be drawn. You can do this in the Library module.
4 Press G to switch to the Grid view in the Library module.
5 In the Grid view, select the first image. If you’ve arranged the images differently than shown in the illustration below, that’s fine. Expand the Metadata panel in the right panel group. In the Title text box, type Soliloquy I and for the Caption type mixed media on canvas; then press Enter / Return.
6 (Optional) Enter titles and captions for the other images.
7 Switch back to the Web module by pressing Ctrl+Alt+5 / Command+Option+5. The new details are now displayed under the enlarged view of the first painting.
Specifying output settings
In the Output Settings panel you can control the image quality and the sharpness of the JPEG images generated for your web gallery. You can also choose to add a watermark to your images—a minimal protection when making your work available to the public.
1 In the right panel group, collapse the Image Info panel and expand the Output Settings panel. Drag the Quality slider to set the image quality to 70%, or alternatively, click the value to the right, type 70 and press Enter. In most cases, an image quality setting of 70% to 80% strikes a good balance between file size and image quality.
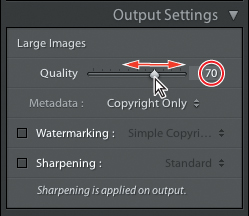
![]() Tip: It’s always worth experimenting with the image quality settings; for some images a lower setting might be sufficient, resulting in a website that loads faster.
Tip: It’s always worth experimenting with the image quality settings; for some images a lower setting might be sufficient, resulting in a website that loads faster.
2 Activate the Sharpening option at the bottom of the Output Settings panel. Click the double arrow to open the Sharpening menu and choose Standard.
You won’t see the changes to these settings reflected in the images in the gallery preview; both the image quality and sharpening settings will not be applied until Lightroom exports the image files for your website.
Watermarking images
With the new Watermark Editor interface, Lightroom 3 makes it easier than ever to watermark your images for export, printing, publishing, or for a web gallery.
You have the choice of applying a simple text watermark—ideal for a copyright message or your business name—or importing an image file such as your company logo to be applied as a graphic watermark.
For a text watermark you can specify a font and the text color, and for both water-mark styles you can adjust the opacity and either use precise scaling and positioning controls or work directly with your watermark in the watermarking preview.
1 In the Filmstrip, select all the images in your web gallery. In the Output Settings panel, activate the Watermarking option. Click the double arrow to open the Watermarking menu and choose Edit Watermarks to open the Watermark Editor dialog box.
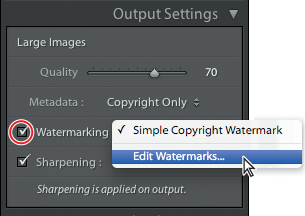
The default watermark style is a simple text copyright watermark. In the Watermark Editor dialog box you have the opportunity to enter your own message and specify the font, style, alignment, and color of your text. On Mac OS, you also have the option to set up a drop-shadow effect for your watermark text.
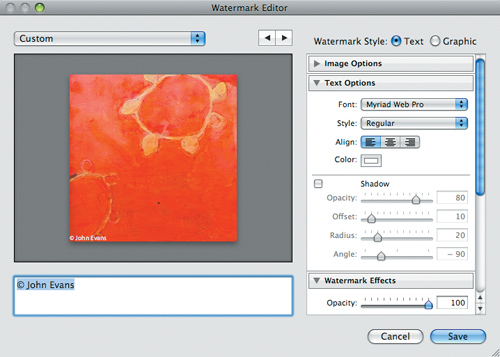
![]() Tip: For both water-mark styles you can use the Watermark Effects controls at the right of the Watermark Editor dialog box, where you can adjust the opacity of your watermark as well as its size and placement. Alternatively, you can move or resize your watermark directly in the watermarking preview; a bounding box and handles will appear around the watermark when you move the pointer over the preview. Use the left and right arrows at the top of the dialog box to change the image in the preview pane.
Tip: For both water-mark styles you can use the Watermark Effects controls at the right of the Watermark Editor dialog box, where you can adjust the opacity of your watermark as well as its size and placement. Alternatively, you can move or resize your watermark directly in the watermarking preview; a bounding box and handles will appear around the watermark when you move the pointer over the preview. Use the left and right arrows at the top of the dialog box to change the image in the preview pane.
2 Under Image Options at the top right of the Watermarks Editor dialog box, click Choose to select an image file to be used as a graphic watermark.
3 In the Open / Choose A File dialog box, navigate to and open the Lesson 9 folder. Select the file watermark_K.png, and then click Choose.
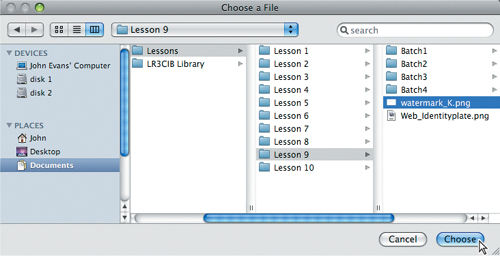
4 At the right of the Watermarks Editor dialog box, scroll down if necessary and expand the Watermark Effects controls. Use the sliders or type new values to set up the Watermark Effects controls as shown in the illustration below. Set the opacity value to 40, proportional sizing value to 25, and both the horizontal and vertical inset values to 3. Leave the Anchor setting at the default so that the wateremark appears in the lower left corner of the image. For our purposes, you won’t need to use the Rotate buttons to reorientate the watermark image.
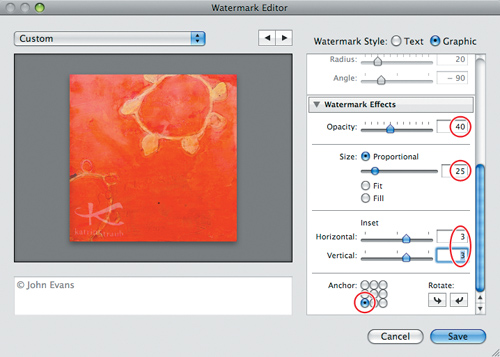
5 Use the left and right arrow buttons at the top of the Watermarks Editor dialog box to cycle the image in the watermarking preview and decide whether the settings are effective for all the images in the collection. Make any adjustments you wish to make.
6 Choose Save Current Settings As New Preset from the Custom menu above the watermarking preview.
7 In the New Preset dialog box, type web portfolio as the name for your new preset, and then click Create.
You will now be able to use the watermarking presets menu to apply the same watermark settings to another collection of images quickly and easily.
8 Click Done to close the Watermark Editor dialog box. The watermark appears on the images in the gallery preview and the web portfolio preset is indicated beside Watermarking in the Output Settings panel.
This concludes the section on customizing the look and feel of your web gallery. You’ve changed the site title text, added a link to your Home page, learned how to adjust the color scheme and modify the layout, personalized your web page by placing a graphic identity plate, and finally added titles, captions and a watermark to the images. It’s time to save all these modifications as a custom template that you can use as a starting point the next time you create a web gallery, but first let’s preview your gallery in your web browser.
Previewing the gallery
To enable you to preview your gallery as it will appear on the Web, Lightroom generates the web pages and all the necessary image files in a temporary folder on your hard disk, and then opens the main page of the gallery in your default web browser.
1 To preview the gallery in your default web browser, click the Preview In Browser button below the left panel group, or choose Web > Preview In Browser.
While Lightroom generates the necessary files, a progress bar appears in the upper left corner of the Lightroom workspace. You can cancel the Preview In Browser command at any time by clicking the small cross icon (x) at the right end of the progress indicator—but for this exercise, let the process run its course.
2 Once Lightroom has finished generating the necessary files, your web gallery opens in your default browser.
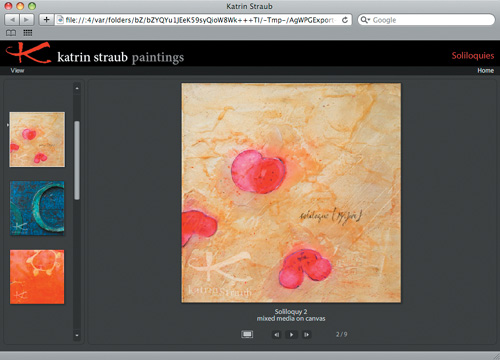
![]() Tip: You should always preview your gallery in this way before uploading it to your website. Check that the navigation controls work as expected, examine the image quality, and confirm that your photos appear in the correct order. Finally, you should resize the browser window to see how well the gallery layout adapts to different display sizes.
Tip: You should always preview your gallery in this way before uploading it to your website. Check that the navigation controls work as expected, examine the image quality, and confirm that your photos appear in the correct order. Finally, you should resize the browser window to see how well the gallery layout adapts to different display sizes.
3 To check how your web gallery performs in the browser, run these simple tests:
• Click the Play button in the group of navigation controls below the large image to start the gallery slideshow.
• Click the Pause button or press the spacebar to stop playback.
• Use the scrollbar to scroll down the list of small thumbnail images on the left. Click a thumbnail to view the enlarged image on the right.
• Click the word View just below the identity plate at the upper left of the gallery layout, and then choose Slideshow from the menu.
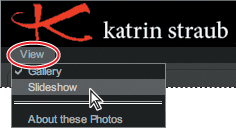
• Use the arrow keys on your keyboard to move from one image to the next.
• Click the View Gallery button at the left of the navigation controls below the large image to leave the slideshow mode and return to the gallery layout with the column of thumbnail images on the left.
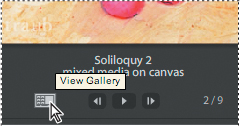
• Resize your browser window to see how the gallery works at different sizes.
• Examine the image quality.
• Make sure the titles, captions, and watermarks are displayed correctly.
• Click the Home button to see if it links correctly to your home page. (You’ll need an active Internet connection to test this.)
4 When you’re done, close the browser window and return to Lightroom.
Saving your custom template
Having spent time and effort modifying the gallery layout, changing the color scheme and text style, adding titles, captions, an identity plate, and watermarks, you should save your design as a custom web gallery template. The new template will be listed under User Templates in the Template Browser panel, where you can access it easily in case you need to rework or extend your gallery, or should you wish to use your customized template as a starting point for creating a new layout. You can create additional folders in the Template Browser to help you manage your custom templates.
1 With your customized web gallery still open in the Web module, click the Create New Preset button (+) in the header of the Template Browser panel in the left panel group. Alternatively, choose Web > New Template.
2 In the New Template dialog box, type My Flash Web Portfolio. Leave the default User Templates folder selected in the Folder menu and click Create.
Your customized web gallery template is now listed under User Templates in the Template Browser panel.
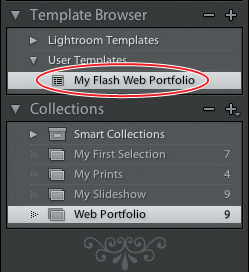
![]() Tip: To delete a custom template, select the template and click the Delete Selected Preset button (-) in the header of the Template Browser. You cannot delete the Lightroom templates.
Tip: To delete a custom template, select the template and click the Delete Selected Preset button (-) in the header of the Template Browser. You cannot delete the Lightroom templates.
3 In the Template Browser panel right-click / Control-click the User Templates folder and choose New Folder from the context menu.
![]() Tip: In order to delete a folder from the Template Browser panel, first delete all the templates inside it—or drag them into another folder; then right-click / Control-click the empty folder and choose Delete Folder from the context menu. You cannot delete either the Lightroom Templates folder or the default User Templates folder.
Tip: In order to delete a folder from the Template Browser panel, first delete all the templates inside it—or drag them into another folder; then right-click / Control-click the empty folder and choose Delete Folder from the context menu. You cannot delete either the Lightroom Templates folder or the default User Templates folder.
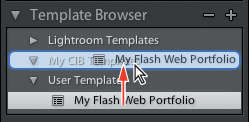
4 In the New Folder dialog box, type My CIB Templates as the name for the new folder; then click Create.
The new folder is listed in alphabetical order in the Template Browser panel.
5 In the Template Browser panel, drag the My Flash Web Portfolio template from the User Templates folder into your new My CIB Templates folder.
Exporting your gallery
![]() Tip: Before burning your web gallery to a CD-ROM for a client, create an alias of the index.html file, place it beside the folder containing the files for the website, and rename it Start here. This will make it easy for your client to launch your presentation.
Tip: Before burning your web gallery to a CD-ROM for a client, create an alias of the index.html file, place it beside the folder containing the files for the website, and rename it Start here. This will make it easy for your client to launch your presentation.
Now that you’re happy with your gallery and you’ve saved the template, you can export the website to your hard disk. You can run the exported website from your laptop if you need to present your work where there is no Internet connection, or burn the exported files to a CD-ROM as a working backup or to send to a client.
1 Select My Flash Web Portfolio from the My CIB Templates folder in the Template Browser panel and click the Export button below the right panel group, or choose Web > Export Web Photo Gallery.
![]() Tip: Before burning your web gallery to a CD-ROM for a client, create an alias of the index.html file, place it beside the folder containing the files for the website, and rename it Start here. This will make it easy for your client to launch your presentation.
Tip: Before burning your web gallery to a CD-ROM for a client, create an alias of the index.html file, place it beside the folder containing the files for the website, and rename it Start here. This will make it easy for your client to launch your presentation.
2 In the Save Web Gallery dialog box, navigate to your Lesson 9 folder. Type My Web Gallery in the File Name / Save As text box, and then click Save.
Lightroom will create a folder named My Web Gallery inside the Lesson 9 folder and generate all the necessary image files, web pages, subfolders and support files within that folder. If you have many images in your gallery, this operation might take a while—a progress bar at the upper left of the Lightroom workspace provides feedback as Lightroom completes the process.
3 When the export is complete, double-click the file index.html in the folder My Web Gallery inside your Lesson 9 folder. Your gallery opens in your default web browser. When you’re finished reviewing the exported gallery, close the web browser window and return to Lightroom.
Uploading your gallery to a web server
In the last exercise of this lesson you’ll learn how to upload your web gallery to a server from within Lightroom. To do this, you’ll need to know your FTP server access information. You can get these details from your Internet service provider.
1 In the Web module, expand the Upload Settings panel in the right panel group.
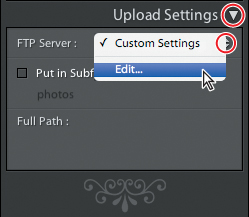
2 From the FTP Server menu in the Upload Settings panel, choose Edit.
3 In the Configure FTP File Transfer dialog box, enter the server address, your username and password, and the server path.
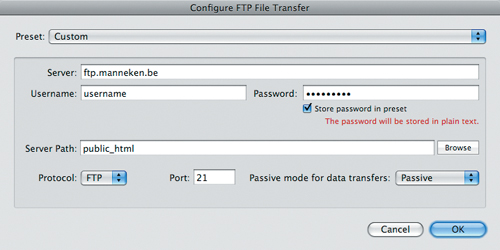
![]() Tip: For security reasons, don’t activate the Store Password In Preset option unless you are the only person with access to the computer you’re using.
Tip: For security reasons, don’t activate the Store Password In Preset option unless you are the only person with access to the computer you’re using.
4 From the Preset menu, choose Save Current Settings As New Preset.

5 In the New Preset dialog box, enter a name for your FTP server preset, and then click Create.
6 Click OK to close the Configure FTP File Transfer dialog box. You’ll notice that the name of your new FTP server preset now appears in the Upload Settings panel, where you can access it at any time from the FTP Server Presets menu.
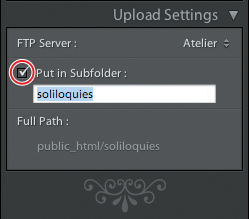
7 To place the gallery inside a subfolder on your FTP server, activate the option Put In Subfolder and type a name for the subfolder that’s relevant to the content of the gallery. This subfolder name will become part of the URL of your web gallery. For example, we used soliloquies as subfolder name, so the complete URL might look like this: http://www.katrinstraub.com/soliloquies.
![]() Tip: To avoid possible compatibility issues with your web server, you should use only lowercase letters, the minus sign (-), and the underscore character (_) in the subfolder name. Avoid using spaces in the folder name.
Tip: To avoid possible compatibility issues with your web server, you should use only lowercase letters, the minus sign (-), and the underscore character (_) in the subfolder name. Avoid using spaces in the folder name.
8 Click the Upload button below the right panel group. If you didn’t save your FTP server password in the Configure FTP File Transfer dialog box, you’ll need to enter it now in the Enter Password dialog box, and then click Upload.
Uploading your web gallery to an FTP server generally takes much longer than exporting it to your local hard disk. You can watch the upload status in the progress bar at the upper left of the Lightroom workspace.
Once the upload is complete, you can enter the URL of your gallery in your web browser and admire your site live on the Internet. Don’t send the URL to a client or friends before you’ve confirmed that everything works as expected!
Congratulations—you’ve completed this lesson on publishing images. You’ve learned how to use the new Publish Services feature to publish images to a photo sharing website or to your hard disk. You’ve built your own web gallery, saved a custom gallery template and created new watermarking and FTP upload presets. Finally, you learned how to export your web gallery or upload it to a web server. Before you move on to the next lesson, take a moment or two to review some of your new skills by reading through the questions and answers on the facing page.
Review questions
1 Why would you use Publish Services to publish images to your hard disk?
2 Why is it useful to create a collection to group the images that you intend to use for a web gallery?
3 What is the difference between HTML and Flash galleries?
4 Which panels would you use to customize the Lightroom web templates?
5 How do you add a graphic watermark to the images in your web gallery?
Review answers
1 You can create a new publish collection on your hard disk for each client to whom you hand off photos, making it easy to check whether they have the most current versions, as Lightroom will keep track of which images have been updated since the collection was published. You can also set up a publish collection that will enable you to publish images to your iPhone sync folder with drag and drop convenience.
2 Grouping your images as a collection not only keeps them all in one place for easy reference—it will also make the process of updating and adjusting your web gallery much more efficient. Once a selection of images has been saved as a collection it is possible to rearrange the order in which they will appear in the gallery.
3 HTML gallery templates produce simple web sites that are compatible with most browsers. Flash templates can produce more sophisticated web galleries, including animations, slideshows with smooth transitions, and other special effects. However, Flash galleries require that the viewer has the appropriate Adobe Flash Player plug-in. Viewers may need to click through security messages in the web browser before being able to see the gallery.
4 The panels in the right panel group—the Site Info, Color Palette, Appearance, Image Info, Output Settings, and Upload Settings panels—contain controls for modifying the gallery layout templates available in the Template Browser.
5 In the Web module, activate the Watermarking option in the Output Settings panel. Click the double arrow to open the Watermarking menu and choose Edit Watermarks to open the Watermark Editor dialog box. Under Image Options in the Watermarks Editor dialog box, click Choose to select an image file to be used as a watermark.

