
6. Color and Painting
This lesson takes approximately an hour and a half to complete. If needed, remove the previous lesson folder from your hard disk and copy the Lesson06 folder onto it.
![]()
Spice up your illustration with colors by taking advantage of color controls in Adobe® Illustrator® CS5. In this information-packed lesson, you’ll discover how to create and paint fills and strokes, use the Color Guide panel for inspiration, work with color groups, recolor artwork, create patterns, and more.
Getting started
In this lesson, you will learn about the fundamentals of color and create and edit colors using the Color panel, Swatches panel, and more.
1. To ensure that the tools and panels function as described in this lesson, delete or deactivate (by renaming) the Adobe Illustrator CS5 preferences file. See “Restoring default preferences” on page 3.
2. Start Adobe Illustrator CS5.
Note
If you have not already done so, copy the resource files for this lesson onto your hard disk from the Lesson06 folder on the Adobe Illustrator CS5 Classroom in a Book CD. See “Copying the Classroom in a Book files” on page 2.
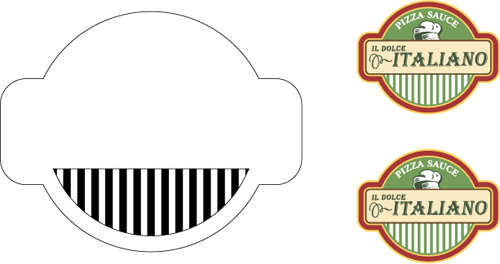
3. Choose File > Open and open the L6end_1.ai file in the Lesson06 folder to view a final version of the label you will paint. Leave it open for reference.

4. Choose File > Open. In the Open dialog box, navigate to the Lesson06 folder in the Lessons folder. Open the L6start_1.ai file.
This file has some components already in it. You will create and apply color as necessary to complete the label.
5. Choose File > Save As. In the Save As dialog box, navigate to the Lesson06 folder and name it label.ai. Leave the Save As Type option set to Adobe Illustrator (*.AI) (Windows) or the Format option set to Adobe Illustrator (ai) (Mac OS), and click Save. In the Illustrator Options dialog box, leave the options at their default settings, and then click OK.
Understanding color
When working with color in Illustrator, you first need to understand color modes (also called color models). When you apply color to artwork, keep in mind the final medium in which the artwork will be published (print or web, for instance), so that you can use the correct color model and color definitions. First, you will learn about color modes, and then you will learn the basic color controls.
Color modes
Before starting a new illustration, you must first decide which color mode the artwork should use, CMYK or RGB.
• CMYK—Cyan, magenta, yellow, and black are the colors used in four-color process printing. These four colors are combined and overlapped in a screen pattern to create a multitude of other colors. Select this mode for printing.
• RGB—Red, green, and blue light are added together in various ways to create an array of colors. Select this mode if you are using images for onscreen presentations or the Internet.
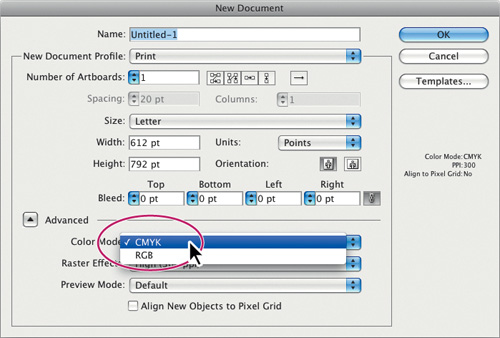
When creating a new document, you select a color mode by choosing File > New and picking the appropriate document profile, such as Print, which uses CMYK for the color mode. You can change the color mode by clicking the arrow to the left of Advanced and selecting a Color Mode.
When a color mode is selected, the applicable panels open displaying colors in either the CMYK or RGB mode. You can change the color mode of a document after a file is created by choosing File > Document Color Mode, and then selecting either CMYK or RGB in the menu.
Understanding the color controls
In this lesson, you will learn about the traditional methods of coloring objects in Illustrator. This includes painting objects with colors and patterns using a combination of panels and tools, including the Control panel, Color panel, Swatches panel, Gradient panel, Stroke panel, Color Guide panel, Color Picker, and the paint buttons in the Tools panel. You’ll begin by looking at finished artwork to which color has already been applied.
1. Click the L6end_1.ai document tab at the top of the Document window.
2. Choose 1 from the Artboard Navigation menu in the lower-left corner of the Document window to fit the first artboard in the Document window.
3. Select the Selection tool (![]() ), and then click the green shape behind the text “Pizza Sauce.”
), and then click the green shape behind the text “Pizza Sauce.”
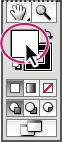
Objects in Illustrator can have a fill, a stroke, or both. In the Tools panel, notice that the Fill box appears in the foreground, indicating that it is selected. This is the default setting. The Fill box is green for this object. Behind the Fill box, the Stroke box has a yellow outline.
Note
Depending on your screen resolution, your Tools panel may be displayed in a single-column rather than a double-column.
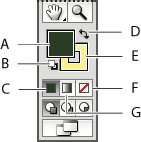
A. Fill box
B. Default Fill And Stroke button
C. Color button
D. Swap Fill And Stroke button
E. Stroke box
F. None button
G. Gradient button
4. Click the Appearance panel icon (![]() ) on the right side of the workspace.
) on the right side of the workspace.
The Fill and Stroke attributes of the selected object also appear in the Appearance panel. You can edit, delete or save appearance attributes as graphic styles, which you can apply to other objects, layers, and groups. You’ll use this panel later in this lesson.
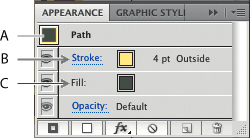
A. Object selected
B. Stroke color
C. Fill color
5. Click the Color panel icon (![]() ) on the right side of the workspace. The Color panel displays the current color of the fill and stroke. The CMYK sliders in the Color panel show the percentages of cyan, magenta, yellow, and black. The color spectrum bar is at the bottom of the Color panel.
) on the right side of the workspace. The Color panel displays the current color of the fill and stroke. The CMYK sliders in the Color panel show the percentages of cyan, magenta, yellow, and black. The color spectrum bar is at the bottom of the Color panel.
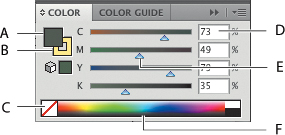
A. Fill box
B. Stroke box
C. None box
D. Color value
E. Color slider
F. Color spectrum bar
Tip
Shift-click the color spectrum bar at the bottom of the Color panel to rotate through different color modes like CMYK and RGB.
The color spectrum bar lets you quickly and visually select a fill or stroke color from a spectrum of colors. You can also choose white or black by clicking the appropriate color box at the right end of the bar.
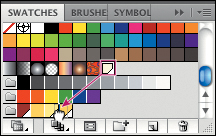
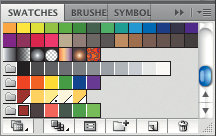
6. Click the Swatches panel icon (![]() ) on the right side of the workspace. You can name and save document colors, gradients, and patterns in the Swatches panel, for instant access. When an object has a fill or stroke that contains a color, gradient, pattern, or tint applied in the Swatches panel, the applied swatch is highlighted in the panel.
) on the right side of the workspace. You can name and save document colors, gradients, and patterns in the Swatches panel, for instant access. When an object has a fill or stroke that contains a color, gradient, pattern, or tint applied in the Swatches panel, the applied swatch is highlighted in the panel.
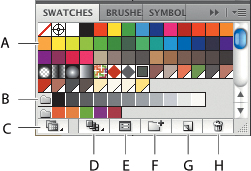
A. Swatch
B. Color group
C. Swatch Libraries menu
D. Show Swatch Kinds menu
E. Swatch Options
F. New Color Group
G. New Swatch
H. Delete Swatch
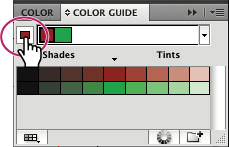
7. Click the Color Guide panel icon (![]() ) on the right side of the workspace. Click the green swatch in the upper-left corner of the panel to set the base color as the color of the selected object (labeled A in the figure below). Click the Harmony Rules menu, and choose Complementary 2.
) on the right side of the workspace. Click the green swatch in the upper-left corner of the panel to set the base color as the color of the selected object (labeled A in the figure below). Click the Harmony Rules menu, and choose Complementary 2.
The Color Guide can provide color inspiration while you create your artwork. It helps you pick color tints, analogous colors, and much more. In this panel, you can also access the Edit or Apply Color feature, which lets you edit and create colors.
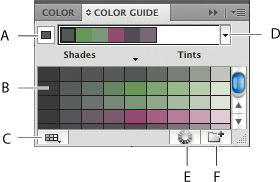
A. Set base color to the current color
B. Color variations
C. Limits the color group to colors in a swatch library
D. Harmony Rules menu and active color group
E. Edit Or Apply Colors
F. Save color group to Swatch panel
8. Click the Color panel icon (![]() ). Using the Selection tool (
). Using the Selection tool (![]() ), click various shapes in the L6end_1.ai file to see how their paint attributes are reflected in the panel.
), click various shapes in the L6end_1.ai file to see how their paint attributes are reflected in the panel.
9. Leave the L6end_1.ai file open for reference or choose File > Close to close it, without saving.
10. Click the label.ai document tab at the top of the Document window if you did not close the L6end_1.ai document.
Creating color
You are working on artwork in the CMYK color mode, which means that you can create your own color from any combination of cyan, magenta, yellow, and black. You can create color in a variety of ways, depending on the artwork. If you want to create a color that is specific to your company, for instance, you can use a swatch library. If you are trying to match color in artwork, you can use the Eyedropper tool to sample color, or the Color Picker to enter exact values. Next, you will create color using different methods and then apply that color to objects.
Building and saving a custom color
First you will create a color using the Color panel, and then save the color as a swatch in the Swatches panel.
1. Choose Select > Deselect to ensure that nothing is selected.
2. Choose 1 from the Artboard Navigation menu in the lower-left corner of the Document window to fit the first artboard in the Document window.
Note
If an object is selected when you create a color, the color is typically applied to the selected object.
3. If the Color panel is not visible, click the Color panel icon (![]() ). If the CMYK sliders are not visible, choose CMYK from the Color panel menu (
). If the CMYK sliders are not visible, choose CMYK from the Color panel menu (![]() ).
).
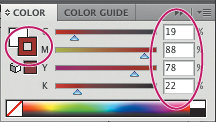
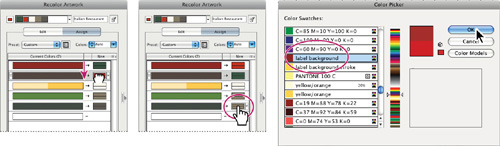
Click the Stroke box and type these values in the CMYK text fields: C=19., M=88., Y=78., K=22..
Tip
These values are each a percentage of 100.
4. Click the Swatches panel icon (![]() ), and choose New Swatch from the Swatches panel menu (
), and choose New Swatch from the Swatches panel menu (![]() ).
).
Tip
To save a color you made in the Color panel, you can also click the New Swatch button in the Swatches panel to open the New Swatch dialog box.
5. In the New Swatch dialog box, name the color label background and, leaving the rest of the options as is, click OK. Notice that the swatch is highlighted in the Swatches panel.
New colors added to the Swatches panel are saved with the current file only. Opening a new file displays the default set of swatches that comes with Adobe Illustrator CS5.

Tip
If you want to load swatches from one saved document into another, click the Swatch Libraries Menu button (![]() ) at the bottom of the Swatches panel and choose Other Library. Then locate the document with the swatches that you want to import.
) at the bottom of the Swatches panel and choose Other Library. Then locate the document with the swatches that you want to import.
6. With the Selection tool (![]() ), click the white-filled background shape to select it. Click the Fill box at the bottom of the Tools panel. Click the Swatches panel icon (
), click the white-filled background shape to select it. Click the Fill box at the bottom of the Tools panel. Click the Swatches panel icon (![]() ) if the panel is not showing, and select the label background swatch. Choose Select > Deselect.
) if the panel is not showing, and select the label background swatch. Choose Select > Deselect.

Note
The Swatches panel that appears when you click Fill color in the Control panel is the same as the Swatches panel on the right side of the workspace.
Next, you will create another swatch using a similar, yet different, method.
7. In the Swatches panel, click the New Swatch (![]() ) button at the bottom of the panel. This creates a copy of the selected swatch and opens the New Swatch dialog box.
) button at the bottom of the panel. This creates a copy of the selected swatch and opens the New Swatch dialog box.
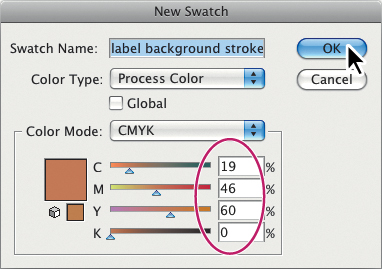
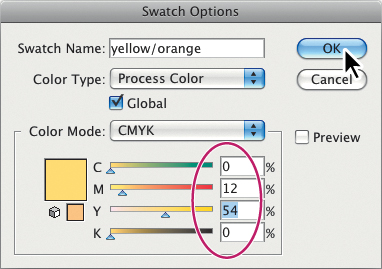
8. In the New Swatch dialog box, change the name to label background stroke and change the values to C=19., M=46., Y=60., K=0.. Click OK.
Note
If the shape had still been selected, it would be filled with the new color.
9. With the Selection tool (![]() ), click the shape again to select it. Click the Stroke color in the Control panel. When the Swatches panel appears, select the label background stroke swatch.
), click the shape again to select it. Click the Stroke color in the Control panel. When the Swatches panel appears, select the label background stroke swatch.
10. Change the Stroke Weight in the Control panel to 7. pt. Leave the Swatches panel showing.
Editing a swatch
After a color is created and saved in the Swatches panel, you can edit that color.
Next, you will edit the label background swatch that you just saved.
1. Select the Stroke box in the Tools panel. This expands the Color panel. Click the Swatches panel icon (![]() ) on the right side of the workspace.
) on the right side of the workspace.
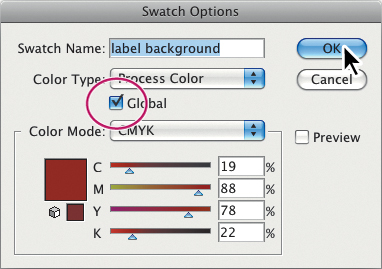
2. With the shape still selected, double-click the label background stroke swatch in the Swatches panel. In the Swatch Options dialog box, change the values to C=2., M=15., Y=71., K=20.. Select Preview to see the changes to the logo shape. Change the K value to 0., and then click OK.
Tip
You can position the pointer over a color swatch in the Swatches panel to see a tooltip indicating the name of the swatch.
When you create a swatch and then edit it, the objects that already have that swatch color applied need to be selected to apply the change.
Next, you will change the logo background swatch to a global color. When you edit it, a global color automatically updates throughout the artwork, regardless of whether the objects that use that global color are selected.
3. With the shape still selected, click the Fill box in the Tools panel.
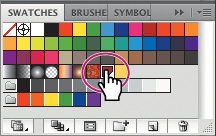
4. Double-click the label background swatch in the Swatches panel to open the Swatch Options dialog box. Select Global, and then click OK.
5. Choose Select > Deselect.
6. Double-click the label background swatch in the Swatches panel again to open the Swatch Options dialog box. Change the K value (black) to 70.. Select Preview to see the changes. Notice how the shape fill changes, even though the shape is not selected. Click Cancel so the color change is not saved.
Note
The white triangle in the lower-right corner of a swatch icon (![]() ) in the Swatches panel indicates a global color.
) in the Swatches panel indicates a global color.
7. Choose File > Save.
Using Illustrator swatch libraries
Swatch libraries are collections of preset colors such as PANTONE®, TOYO, and thematic libraries like Earthtone and Ice Cream. The libraries appear as separate panels and cannot be edited. When you apply color from a library to artwork, the color in the library becomes a swatch that is saved in the Swatches panel for that document. Libraries are a great starting point for creating colors.
Note
Most, but not all, of the libraries that come with Illustrator are CMYK colors.
Next, you will create a yellow spot color using the PANTONE solid coated library for another shape in the label. When this color is defined, it could be a warm, dark, or light yellow. This is why most printers and designers rely on a color matching system, like the PANTONE system, to help maintain color consistency and to give a wider range of colors in some cases.
Creating a spot color
In this section, you will see how to load a color library, such as the PANTONE color system, and to add a PANTONE (PMS) color to the Swatches panel.
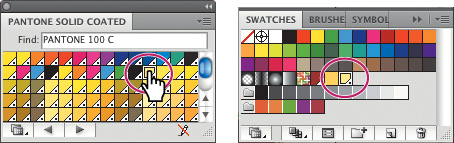
1. In the Swatches panel, click the Swatch Libraries Menu button (![]() ). Choose Color Books > PANTONE Solid Coated. The PANTONE solid coated library appears in its own panel.
). Choose Color Books > PANTONE Solid Coated. The PANTONE solid coated library appears in its own panel.
Note
When you exit Illustrator and then relaunch it, the PANTONE library panel does not reopen. To automatically open the panel whenever Illustrator opens, choose Persistent from the PANTONE Solid Coated panel menu.
2. Choose Show Find Field from the PANTONE Solid Coated panel menu (![]() ). Type 100. in the Find field. PANTONE 100 C is highlighted. Click the highlighted swatch to add it to the Swatches panel. Close the PANTONE Solid Coated panel. The PANTONE color appears in the Swatches panel.
). Type 100. in the Find field. PANTONE 100 C is highlighted. Click the highlighted swatch to add it to the Swatches panel. Close the PANTONE Solid Coated panel. The PANTONE color appears in the Swatches panel.
3. Position the pointer on the artboard and, holding down the Spacebar, drag to the right so that you can see both the white-filled shape off the left edge and the content on the first artboard.
4. With the Selection tool (![]() ), click the white-filled shape off the left edge of artboard 1 to select it. From the Fill color in the Control panel, choose the PANTONE 100 C color to fill the shape. Change the Stroke color to None (
), click the white-filled shape off the left edge of artboard 1 to select it. From the Fill color in the Control panel, choose the PANTONE 100 C color to fill the shape. Change the Stroke color to None (![]() ).
).
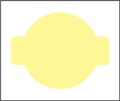
5. With the shape still selected, Shift-click to select the original red label background shape on the first artboard. Release the Shift key.
6. Choose View > Fit Artboard In Window.
7. With the Selection tool, click the red shape once more to make it the key object.
Note
To learn more about what key objects are and how to work with them, see Lesson 2, “Selecting and Aligning.”
8. In the Control panel, click the Horizontal Align Center button (![]() ) and Vertical Align Center button (
) and Vertical Align Center button (![]() ) to align the yellow shape to the red label shape.
) to align the yellow shape to the red label shape.

Note
If you don’t see the Align options, click the word Align in the Control panel to reveal the Align panel.
9. Choose Select > Deselect.
10. Choose File > Save. Keep the file open.
Why does my PANTONE swatch look different from the other swatches in the Swatches panel?
In the Swatches panel, the color type is identified by the icon that appears next to the name of the color. You can identify spot-color swatches by the spot-color icon (![]() ) when the panel is in list view or by the dot in the lower corner (
) when the panel is in list view or by the dot in the lower corner (![]() ) when the panel is in thumbnail view. Process colors do not have a spot-color icon or a dot.
) when the panel is in thumbnail view. Process colors do not have a spot-color icon or a dot.
By default, the PANTONE solid coated swatch is defined as a spot color. A spot color is not created from a combination of CMYK inks but is its own solid ink color. A press operator uses a premixed PMS (PANTONE Matching System) color in the press, offering more consistent color.
A triangle indicates that the color is global. If a global color is edited, all color references used in the illustration are updated. Any color can be global, not only PANTONE colors. To learn more about spot colors, choose Help > Illustrator Help and search for “spot colors.”
Using the Color Picker
The Color Picker lets you select color in a color field and in a spectrum by either defining colors numerically or by clicking a swatch.
Next, you will create a color using the Color Picker, and then save the color as a swatch in the Swatches panel.
1. With the Selection tool (![]() ), click one of the white bars in the lower part of the label shape to select the underlying white shape in the lower half of artboard 1.
), click one of the white bars in the lower part of the label shape to select the underlying white shape in the lower half of artboard 1.
2. Double-click the Fill box in the Tools panel to open the Color Picker.
Tip
You can double-click the Fill box or Stroke box in the Tools panel or Color panel to access the Color Picker.
3. In the Color Picker dialog box, type these values into the CMYK text fields: C=0., M=11., Y=54., and K=0..
Notice that the slider in the color spectrum bar and the circle in the color field move as you enter the CMYK values. The color spectrum shows the hue, and the color field shows saturation (horizontally) and brightness (vertically).
Tip
If you work in Adobe Photoshop, the Color Picker is probably familiar, because Photoshop also has a Color Picker feature.
4. Select S (saturation) to change the color spectrum displayed in the Color Picker. The color spectrum bar becomes the saturation of the orange color. Drag the color spectrum slider up until the S value is 60%, and then click OK.
The white shape is filled with the yellow/orange color you just made in the Color Picker.
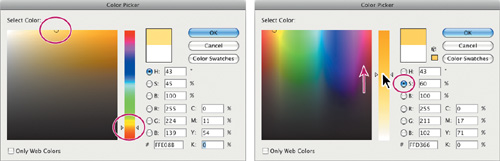
Note
The Color Swatches button in the Color Picker shows you the swatches in the Swatches panel and lets you select one. Then you can return to the color models view you started with by clicking the Color Models button and editing the swatch color values.
5. Change the stroke color in the Control panel to None (![]() ).
).
Next, you will save the color in the Swatches panel.

6. Select the Fill box at the bottom of the Tools panel. This ensures that when you create a new swatch, it is created using the fill of the selected shape.
7. Expand the Swatches panel by clicking its panel icon (![]() ).
).
8. Click the New Swatch button (![]() ) at the bottom of the Swatches panel and name the color yellow/orange in the New Swatch dialog box. Select Global, and then click OK to see the color appear as a swatch in the Swatches panel.
) at the bottom of the Swatches panel and name the color yellow/orange in the New Swatch dialog box. Select Global, and then click OK to see the color appear as a swatch in the Swatches panel.
9. Choose Select > Deselect, and then File > Save.
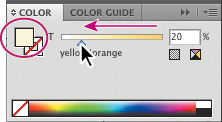
Creating and saving a tint of a color
A tint is a lighter version of a color. You can create a tint from a global process color like CMYK or from a spot color.
Next, you will create a tint of the yellow/orange swatch.
1. With the Selection tool, click one of the black bars in the lower half of the artboard. Change the fill color in the Control panel to the yellow/orange color you just made.
2. Click the Color panel icon (![]() ) to expand the Color panel.
) to expand the Color panel.
3. Make sure that the Fill box is selected in the Color panel, and then drag the tint slider to the left to change the tint value to 20%.
4. Click the Swatches panel icon (![]() ) on the right side of the workspace. Click the New Swatch button (
) on the right side of the workspace. Click the New Swatch button (![]() ) at the bottom of the panel to save the tint. Notice the tint swatch in the Swatches panel. Position the pointer over the swatch icon to see its name, yellow/orange 20%.
) at the bottom of the panel to save the tint. Notice the tint swatch in the Swatches panel. Position the pointer over the swatch icon to see its name, yellow/orange 20%.
5. Choose File > Save.
Copying attributes
1. Using the Selection tool (![]() ), select one of the black bars that has not yet been colored, and then choose Select > Same > Fill Color to select the remaining black rectangles.
), select one of the black bars that has not yet been colored, and then choose Select > Same > Fill Color to select the remaining black rectangles.
2. Using the Eyedropper tool (![]() ), click the painted bar. All the bars that are unpainted pick up the attributes from the painted bar.
), click the painted bar. All the bars that are unpainted pick up the attributes from the painted bar.

3. With the Selection tool, Shift-click to select the original bar.
4. Choose Object > Group.
5. Choose Select > Deselect, and then File > Save.
Creating color groups
In Illustrator, you can save colors in color groups, which consist of related color swatches in the Swatches panel. Organizing colors by their use, such as grouping all the logo colors, is helpful. Only spot, process, and global colors can be in a group.
Next, you will create a color group using the label colors you’ve created.
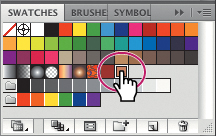
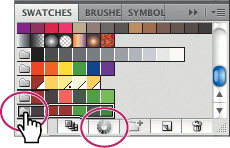
1. In the Swatches panel, click a blank area of the panel to deselect the color swatches. Click the label background swatch (red) and, holding down the Shift key, click the yellow/orange swatch to the right to select four color swatches.
Tip
To select multiple colors that are not next to each other in the Swatches panel, Ctrl-click (Windows) or Cmd-click (Mac OS) the swatches you want to select.
2. Click the New Color Group button (![]() ) at the bottom of the Swatches panel to open the New Color Group dialog box. Change the Name to label base and click OK to save the group.
) at the bottom of the Swatches panel to open the New Color Group dialog box. Change the Name to label base and click OK to save the group.

Note
If objects are selected when you click the New Color Group button, an expanded New Color Group dialog box appears. In this dialog box, you can create a color group from the colors in the artwork and convert the colors to global colors.
Next, you’ll edit a color in the group and then add a color to the group.
3. With the Selection tool (![]() ), click a blank area of the Swatches panel to deselect the color group you just created.
), click a blank area of the Swatches panel to deselect the color group you just created.
4. In the Swatches panel, double-click the yellow/orange swatch in the label base color group to open the Swatch Options dialog box. Change the values to C=0., M=12., Y=54., and K=0.. Click OK.
5. Click the yellow/orange 20% swatch and drag it between the PANTONE 100 C swatch and the yellow/orange swatch in the label base color group.
You can still reorder the swatches in the group by dragging them. Try dragging the PANTONE 100 C swatch to the right of the yellow/orange 20% swatch.
Note
If you drag the PANTONE 100 C swatch too far to the right, you may pull it out of the group. If that happens, you can always drag it back into the group.
6. Choose File > Save.
The colors in the label have now been saved with this document as a color group. You will learn how to edit a color group later in the lesson.
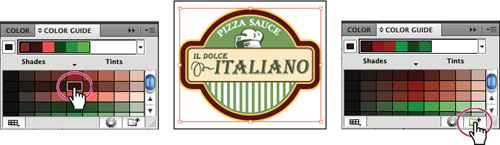
Working with the Color Guide panel
The Color Guide panel can provide you with color inspiration as you create your artwork. Use it to pick harmony rules such as color tints, analogous colors, and much more. In this panel, you can also access the Edit Color/Recolor Artwork feature, which allows you to edit and create colors.
Next, you will use the Color Guide panel to select different colors for a second label, and then you’ll save those colors as a color group in the Swatches panel.
1. Choose 2 from the Artboard Navigation menu in the lower-left corner of the Document window.
2. With the Selection tool (![]() ), click the red background shape of the label. Make sure that the Fill box is selected in the Tools panel.
), click the red background shape of the label. Make sure that the Fill box is selected in the Tools panel.
3. Click the Color Guide panel icon (![]() ) on the right side of the workspace to open the panel. Click the Set Base Color To The Current Color button (
) on the right side of the workspace to open the panel. Click the Set Base Color To The Current Color button (![]() ).
).
Note
The colors you see in the Color Guide panel may be different from what you see in the figure. That is okay.
This allows the Color Guide panel to suggest colors based on the color showing in the Set Base Color To The Current Color button.
Next, you’ll experiment with the colors in the label.
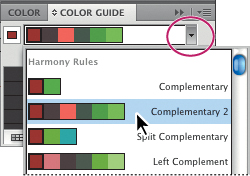
4. Choose Complementary 2 from the Harmony Rules menu to the right of the Set Base Color To The Current Color button in the Color Guide panel.
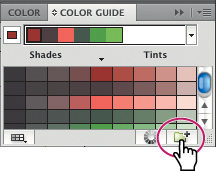
5. Click the Save Color Group To Swatch Panel button (![]() ) to save the colors in the Right Complement harmony rule in the Swatches panel.
) to save the colors in the Right Complement harmony rule in the Swatches panel.
6. Click the Swatches panel icon (![]() ). Scroll down to see the new group added. You can apply these colors to the artwork and you can edit them.
). Scroll down to see the new group added. You can apply these colors to the artwork and you can edit them.
7. Click the Color Guide icon (![]() ) to open the Color Guide panel.
) to open the Color Guide panel.
Next, you’ll experiment with the colors.
8. In the color variations in the Color Guide panel, select the fifth color from the left, in the second row. Notice that the logo changes color. Click the Set Base Color To The Current Color button (![]() ) to try a new group of colors using the Complementary 2 harmony rule. Click the Save Group To Swatch Panel button (
) to try a new group of colors using the Complementary 2 harmony rule. Click the Save Group To Swatch Panel button (![]() ) to save the colors in the Swatches panel.
) to save the colors in the Swatches panel.
Note
If you choose a different color variation than the one suggested, your color will differ from those in the rest of this section.
9. Choose File > Save.
Editing a color group
Illustrator has many tools for working with color. When you create color groups, either in the Swatches panel or in the Color Guide panel, you can edit them individually or as a group in the Edit Colors dialog box. You can also rename the color group, reorder the colors in the group, add or remove colors, and more. In this section, you will learn how to edit colors of a saved color group using the Edit Color dialog box.
1. Choose Select > Deselect and then click the Swatches panel icon (![]() ).
).
2. Click the folder icon to the left of the last color group, to select the group (you may need to scroll down in the Swatches panel). Notice that the Swatch Options button (![]() ) changes to the Edit Color Group button (
) changes to the Edit Color Group button (![]() ) when the group (folder) is selected.
) when the group (folder) is selected.
The Swatch Options button (![]() ) at the bottom of the panel lets you edit a single, selected color.
) at the bottom of the panel lets you edit a single, selected color.
Tip
To edit a color group, you can also double-click the folder icon to the left of the color group in the Swatches panel.
Note
If artwork is selected when you click the Edit Color Group button in the Swatches panel, the color group applies to the selected object(s). The Recolor Artwork dialog box appears, allowing you to edit colors for and apply colors to the selected object(s).
3. Click the Edit Color Group button (![]() ) at the bottom of the Swatches panel to open the Edit Color dialog box.
) at the bottom of the Swatches panel to open the Edit Color dialog box.
On the right side of the Edit Color dialog box, under Color Groups, all of the existing color groups in the Swatches panel are listed. On the left side of the dialog box, you can edit the colors of each color group, either individually or as a group.
Next, you will edit the colors for the color group.
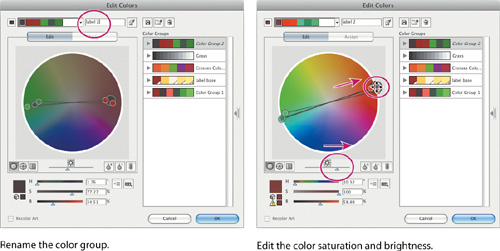
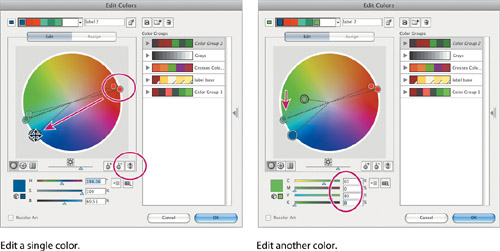
4. In the Edit Colors dialog box, the group of colors you are about to edit is shown in the upper-left corner. Select the name Color Group 2 in the field above the Assign button, and rename the group label 2. This will be the name of a new color group you save later in the lesson.
5. In the color wheel, you see markers (circles) that represent each color in the group. Drag the large red marker on the right side of the color wheel up and to the right edge of the color wheel.
6. Change the Brightness (![]() ) by dragging the Adjust Brightness slider to the right, to brighten all the colors at once. Leave the Edit Colors dialog box open.
) by dragging the Adjust Brightness slider to the right, to brighten all the colors at once. Leave the Edit Colors dialog box open.
The Recolor Art selection at the bottom of the Edit Colors dialog box is dimmed because no artwork is selected. If artwork is selected when you open this dialog box, the dialog box is called the Recolor Artwork dialog box, and any edits you make change the artwork as well.
Note
The larger marker in the color wheel with the double circle is the base color of the color group.
Next, you will edit the colors in the group independently, and then save the colors as a new named group.
7. Click the Unlink Harmony Colors button (![]() ) in the Edit Colors dialog box to edit the colors independently. The button will turn into the Link Harmony Colors button (
) in the Edit Colors dialog box to edit the colors independently. The button will turn into the Link Harmony Colors button (![]() ).
).
The lines between the color markers (circles) and the center of the color wheel become dotted, indicating that the colors can be edited independently.
8. Drag the larger red marker down and to the left, to the edge of the color wheel below the green color markers, to change the red color into a blue.
By moving the color markers away from the center, you increase saturation. By moving the color markers toward the center of the color wheel, you decrease saturation. When a color marker is selected, you can edit the color using the HSB (hue, saturation, and brightness) sliders below the color wheel.
9. Click the Color Mode button (![]() ), and choose CMYK from the menu, if the CMYK sliders are not already visible. Click to select one of the green markers in the color wheel, as shown in the figure below, on the right. Change the CMYK values to C=65., M=0., Y=80., and K=0.. Notice the light green color marker move in the color wheel.
), and choose CMYK from the menu, if the CMYK sliders are not already visible. Click to select one of the green markers in the color wheel, as shown in the figure below, on the right. Change the CMYK values to C=65., M=0., Y=80., and K=0.. Notice the light green color marker move in the color wheel.
Note
It’s okay if the color markers in your Edit Colors dialog box are different from the figure above.
10. Click the Color Mode button (![]() ) and choose HSB from the menu, so that next time you edit colors you will be using the HSB sliders.
) and choose HSB from the menu, so that next time you edit colors you will be using the HSB sliders.
11. Click the New Color Group button (![]() ) at the top of the Edit Colors panel, to save the colors you’ve edited as a new color group named label 2. The color groups that are available in the document appear on the right side of the Edit Colors dialog box.
) at the top of the Edit Colors panel, to save the colors you’ve edited as a new color group named label 2. The color groups that are available in the document appear on the right side of the Edit Colors dialog box.
12. Click OK to close the Edit Colors dialog box and save the label 2 color group in the Swatches panel. If a dialog box appears, click Yes to save the changes to the color group in the Swatches panel.
13. Choose File > Save.
Tip
To edit a color group and save the changes without creating a new color group, click the Save Changes To Color Group button (![]() ).
).
Editing color options
You can use the options in the lower portion of the Edit Colors dialog box to edit color, as described in the figure below.
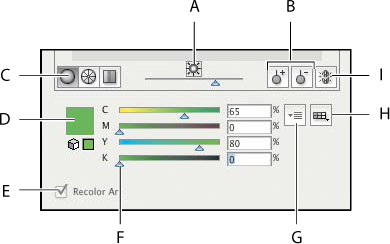
A Show saturation and hue on color wheel.
B Add and subtract color marker tools.
C Color display options (smooth color wheel, segmented color wheel, color bars)
D Color of the selected color marker or color bar
E Selected artwork is recolored when selected (the check box is dimmed when artwork is not selected).
F Color sliders
G Color mode button
H Limit the color group to colors in a swatch library.
I Unlink harmony colors.
Editing colors in artwork
You can also edit the colors in selected artwork, using the Recolor Artwork command. Next, you will edit the colors in the second label, and save the edited colors as a color group.
1. Choose Select > All On Active Artboard.
2. Choose Edit > Edit Colors > Recolor Artwork to open the Recolor Artwork dialog box.
You use the Recolor Artwork dialog box to reassign or reduce the colors in your artwork and to create and edit color groups. All the color groups that you create for a document appear in the Color Groups storage area of the Recolor Artwork dialog box and in the Swatches panel. You can select and use these color groups at any time.
Tip
You can also access the Recolor Artwork dialog box by selecting the artwork, and then clicking the Recolor Artwork button (![]() ) in the Control panel.
) in the Control panel.
3. In the Recolor Artwork dialog box, click the Hide Color Group Storage icon (![]() ) on the right side of the dialog box.
) on the right side of the dialog box.
4. Click the Edit tab to edit the colors in the artwork and using a color wheel.
5. Click the Link Harmony Colors icon (![]() ) to edit all the colors at the same time. The icon should now look like this
) to edit all the colors at the same time. The icon should now look like this ![]() .
.
6. Press the Shift key and drag the larger red color circle down into the purple area of the color wheel. Release the mouse button and then the Shift key. Dragging with the Shift key allows you to adjust the color in the color wheel only, not the saturation.
Tip
If you want to return to the original logo colors, click the Get Colors From Selected Art button (![]() ).
).
Tip
You can save the edited colors as a color group by clicking the Show Color Group Storage icon (![]() ) on the right side of the dialog box and then clicking the New Color Group button (
) on the right side of the dialog box and then clicking the New Color Group button (![]() ).
).
7. Drag the Adjust Brightness slider to the left to make the colors darker overall.
The edit options in the Recolor Artwork dialog box are the same as the options in the Edit Color dialog box. Instead of editing color and creating color groups to apply later, you are dynamically editing colors in the selected artwork. Notice the Recolor Art selection in the lower-left corner of the dialog box. When artwork is selected, you are editing the artwork.
8. Click OK.
9. Choose File > Save.
Next, you will get a color group from a community of users, using the Kuler panel.
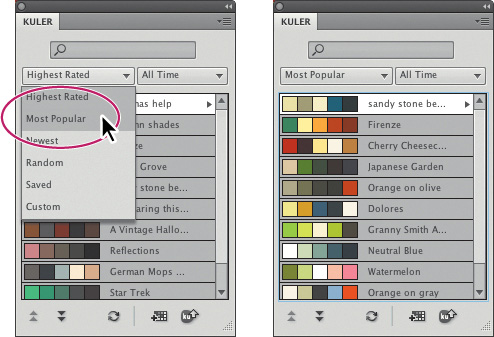
Working with the Kuler panel
The Kuler panel is a portal to themed color groups, such as ice cream, created by an online community of designers. You can browse lots of the groups and download themes to edit or use. You can also create themed color groups to share with others.
Next, you will download a themed color group for a soda can and apply color to it.
1. Choose Select > Deselect.
2. Choose 3 Artboard 3 from the Artboard Navigation menu in the lower-left corner of the Document window.
3. Choose Window > Extensions > Kuler.
Note
You need an Internet connection to access the Kuler themes.
4. In the Kuler panel, click the Highest Rated menu and choose Most Popular. The Kuler panel shows you the newest themes, highest rated themes, and more.
Note
Because the themes are constantly updated and are brought into the Kuler panel via the Internet, your Kuler panel may show different themes from those in the figures shown.
5. To search for themes, type Italian restaurant in the Search field at the top of the panel and press Enter or Return. This brings in the themes related to the words Italian restaurant.
6. Click the first Italian restaurant theme in the Browse panel (below the search field). If the Italian restaurant theme does not appear, select another. Click the Add Selected Theme To Swatches button (![]() ) to add it to the Swatches panel for the open document.
) to add it to the Swatches panel for the open document.
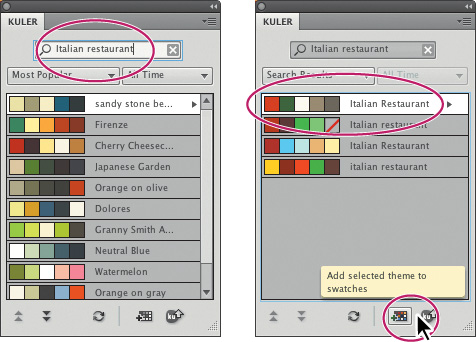
7. Close the Kuler panel.
8. Click the Swatches panel icon (![]() ) to open the panel if it isn’t already open. Notice that the new color group, Italian restaurant, appears in the panel list of swatches (scroll down, if necessary).
) to open the panel if it isn’t already open. Notice that the new color group, Italian restaurant, appears in the panel list of swatches (scroll down, if necessary).
9. Choose File > Save.
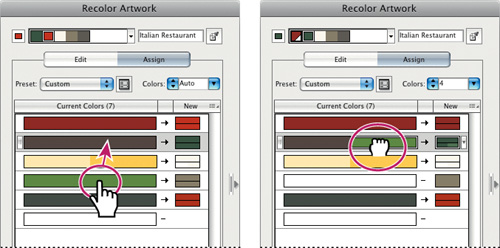
Assigning colors to your artwork
The Assign tab of the Recolor Artwork dialog box lets you assign colors from a color group to your artwork. You can assign colors in several ways, including using a new color group chosen from the Harmony Rules menu. Next, you will assign new colors to a third version of the label.
1. Choose Select > All On Active Artboard.
2. Choose Edit > Edit Colors > Recolor Artwork.
3. Click the Show Color Group Storage icon (![]() ) on the right side of the dialog box to show the color groups, if they aren’t already showing. Make sure that, in the top left of the dialog box, the Assign button is selected.
) on the right side of the dialog box to show the color groups, if they aren’t already showing. Make sure that, in the top left of the dialog box, the Assign button is selected.
In the Recolor Artwork dialog box, notice that the colors of the label are listed in the Current Colors column in what is called “Hue-Forward” sorting. That means they are arranged, from top to bottom, in the ordering of the color wheel: red, orange, yellow, green, blue, indigo, and violet.
Note
If the colors in the Kuler group you selected earlier were different than what we selected, the colors in this section will also look a little different and that is okay.
4. Under Color Groups in the Recolor Artwork panel, select the Italian restaurant color group you saved from the Kuler panel.
In the Recolor Artwork dialog box, notice that the colors of the Italian Restaurant color group are assigned to the colors in the label. The Current Color column shows what the color was in the label, and the New column shows what the color has become (or been “reassigned to”). Also, notice that the two yellow colors in the original label are now next to each other and are mapped to a single color. This is because there are only five colors in the Italian Restaurant group and six in the label.

Note
If the colors of the label do not change, make sure that Recolor Art is selected at the bottom of the Recolor Artwork dialog box.
5. Click the Hide Color Group Storage icon (![]() ) to hide the color groups.
) to hide the color groups.
6. In the New column of the Recolor Artwork dialog box, drag the red color on top of the green color below it. This swaps the green and red colors in the artwork order.
7. Drag the colors back to their original order.
The colors in the New column show what you see in the artwork. If you click one of the colors, notice that the HSB sliders at the bottom of the dialog box let you edit that one color.
8. Double-click the darker brown color at the bottom of the New column.
9. In the Color Picker dialog box, click the Color Swatches button to see the document swatches. Select label background in the Color Swatches list. Click OK to return to the Recolor Artwork dialog box.
10. Drag the Recolor Artwork dialog box out of the way to see the artwork, if necessary.
Next, you will make a few more changes to the colors in the label, and then save the color edits to the Italian Restaurant color group.

11. Click the arrow between the lighter green color in the Current Color column and the light brown color in the New column. In the artwork, the color on the label changes slightly.

By clicking the arrow between a current color and a new color, you prevent the current color in the row (the light green) from being reassigned to the new color (light brown).
12. Drag the light green bar up on top of the dark brown bar in the current color list. Notice the color change in the artwork.
Note
If you want to apply a single color to the selected artwork, you can choose 1 from the Colors menu, above the New column in the Recolor Artwork dialog box. Be sure to finish the steps in this lesson before experimenting with this.
When you drag a color in the current color column onto another row in the same column, you are telling Illustrator to apply the same new color (the green in this case) to both colors. The green color in the New column is split into three sections (![]() ). The darkest color in the row (the dark brown gray) is replaced with the green. The lighter green color is replaced with a proportionally lighter tint of the green.
). The darkest color in the row (the dark brown gray) is replaced with the green. The lighter green color is replaced with a proportionally lighter tint of the green.
13. Click the Show Color Group Storage icon (![]() ) to show the color groups on the right side of the dialog box. Click the Save Changes To Color Group button (
) to show the color groups on the right side of the dialog box. Click the Save Changes To Color Group button (![]() ) to save the changes to the color group without closing the dialog box.
) to save the changes to the color group without closing the dialog box.
14. Click OK. The color changes that you made to the color group are saved in the Swatches panel.
15. Choose Select > Deselect, and then File > Save.
Note
Many kinds of color edits can be made to selected artwork in the Recolor Artwork dialog box. To learn more, search for “working with color groups” in Illustrator Help.
Adjusting colors
Next, you will change the original label on artboard 1 to use CMYK colors only. You’ll need to convert the yellow color PANTONE 100 C to CMYK.
1. Choose 1 from the Artboard Navigation menu in the lower-left corner of the Document window.
2. Choose Select > All On Active Artboard.
3. Choose Edit > Edit Colors > Convert To CMYK. The colors in the selected label, including the yellow PANTONE 100 C, are now CMYK.
There are many options in the Edit > Edit Colors menu for converting color, including Recolor With Preset. This command lets you change the color of selected artwork using a chosen number of colors, a color library, and a specific color harmony (such as complementary colors). To learn more about adjusting colors this way, search for “reduce colors in your artwork” in Illustrator Help.

Note
Using this method for converting to CMYK does not affect the color swatches in the Swatches panel. It simply converts the selected artwork colors to CMYK.
4. Choose Select > Deselect, and then File > Save.
Painting with patterns and gradients
In addition to process and spot colors, the Swatches panel can also contain pattern and gradient swatches. Illustrator provides sample swatches of each type in the default Swatches panel and lets you create your own patterns and gradients.
Note
To learn more about working with gradients, see Lesson 10, “Blending Colors and Shapes.”
Applying existing patterns
A pattern is artwork saved in the Swatches panel that can be applied to the stroke or fill of an object. You can customize existing patterns and design patterns from scratch with any of the Illustrator tools. All patterns start with a single tile that is tiled (repeated) within a shape, starting at the ruler origin and continuing to the right. Next, you will apply an existing pattern to a shape.
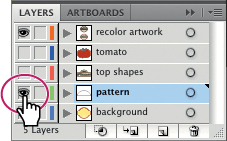
1. Choose Window > Workspace > Essentials.
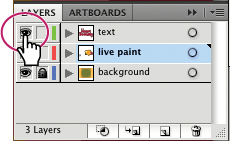
2. Click the Layers panel icon (![]() ) to expand the Layers panel.
) to expand the Layers panel.
3. In the Layers panel, click to select the Visibility column to the left of the layer named pattern.
4. Click the Swatches panel icon (![]() ). In the Swatches panel, click the Swatch Libraries menu button (
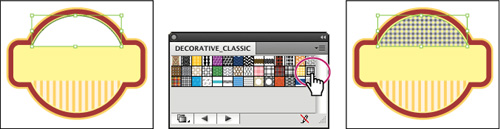
). In the Swatches panel, click the Swatch Libraries menu button (![]() ) at the bottom of the panel and choose Patterns > Decorative > Decorative_Classic to open the pattern library.
) at the bottom of the panel and choose Patterns > Decorative > Decorative_Classic to open the pattern library.
5. Using the Selection tool (![]() ), select the white shape towards the top of the artboard.
), select the white shape towards the top of the artboard.
6. In the Control panel, change the Stroke color to None (![]() ).
).
7. Make sure that the Fill box is selected in the Tools panel.
Note
This last step is important. When you apply a pattern swatch, it applies to the stroke or the fill that is selected.
8. Select the Plaid 3 pattern swatch in the Decorative_Classic panel to fill the group of objects with the pattern.
Tip
Because some supplied patterns have a clear background, you can create a second fill for the object using the Appearance panel. For more information, see Lesson 13, “Applying Appearance Attributes and Graphic Styles.”
9. Close the Decorative_Classic panel.
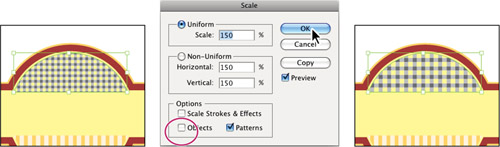
10. With the shape still selected, double-click the Scale tool (![]() ) in the Tools panel to make the pattern larger without affecting the shape. In the Scale dialog box, deselect Scale Strokes & Effects, if necessary. Deselect Objects, which selects Patterns. Change the uniform scale to 150., and select Preview to see the change. Click OK. This scales the pattern only.
) in the Tools panel to make the pattern larger without affecting the shape. In the Scale dialog box, deselect Scale Strokes & Effects, if necessary. Deselect Objects, which selects Patterns. Change the uniform scale to 150., and select Preview to see the change. Click OK. This scales the pattern only.
11. Click the Swatches panel icon to collapse the panel.
12. Choose Select > Deselect, then File > Save.
Creating your own pattern
In this section of the lesson, you will create your own custom pattern and add it to the Swatches panel.
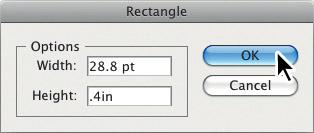
1. Select the Rectangle tool (![]() ) in the Tools panel. Click once in a blank area of the artboard to open the Rectangle dialog box. Change the Width to .4 in and the Height to .4 in, and then click OK.
) in the Tools panel. Click once in a blank area of the artboard to open the Rectangle dialog box. Change the Width to .4 in and the Height to .4 in, and then click OK.
Notice that the newly rectangle has the same pattern fill as the shape in the previous steps.
2. With the rectangle selected, press the letter D to set the default stroke (black) and fill (white) on the selected shape.
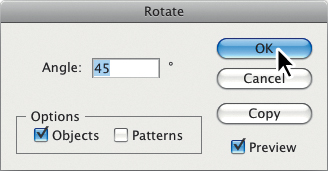
3. With the shape still selected, double-click the Rotate tool (![]() ) in the Tools panel. In the Rotate dialog box, change the Angle value to 45., and make sure that the Objects option is selected and that Patterns is deselected. Click OK.
) in the Tools panel. In the Rotate dialog box, change the Angle value to 45., and make sure that the Objects option is selected and that Patterns is deselected. Click OK.
4. Select the Selection tool (![]() ), and make sure that the new shape is still selected.
), and make sure that the new shape is still selected.
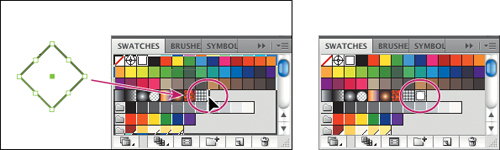
5. Click the Swatches panel icon (![]() ) to reveal the Swatches panel and make sure you can see the top of the swatch list. With the Selection tool, drag the selected shape into the Swatches panel. You have created a new pattern.
) to reveal the Swatches panel and make sure you can see the top of the swatch list. With the Selection tool, drag the selected shape into the Swatches panel. You have created a new pattern.
Note
A pattern swatch can be composed of more than one shape. For instance, to create a flannel pattern for a shirt, you can create three overlapping rectangles or lines, each with varying colors. Then select all three shapes and drag them as one into the Swatches panel.
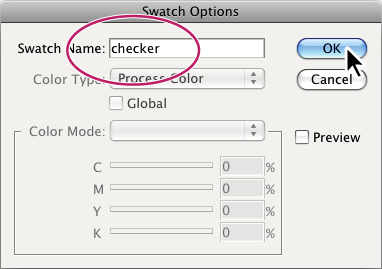
6. Double-click the pattern swatch you added and assign the name checker. Click OK.
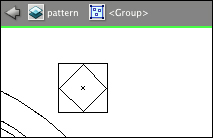
7. With the Selection tool, click to select the diamond shape on the artboard that you used to make the pattern swatch, and then delete it.
8. Choose File > Save.
Applying a pattern
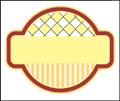
You can assign a pattern using a number of different methods. In this lesson, you will use the Swatches panel to apply the pattern. You can also apply the pattern using the Fill color in the Control panel.
1. With the Selection tool (![]() ), click the shape filled with the pattern you’ve just created, near the top of the artboard.
), click the shape filled with the pattern you’ve just created, near the top of the artboard.
2. Select the checker pattern swatch from the Fill color in the Control panel.
Notice that the pattern is transparent between the diamond shapes.
Tip
As you add more custom swatches, you may want to view the Swatches panel by the swatch names. To change the view, choose List View from the Swatches panel menu.
3. Choose Select > Deselect, and then File > Save.
Editing a pattern
To edit a pattern swatch, you need the artwork used to create the swatch. If you’ve deleted it, you can get it back by dragging the pattern swatch onto the artboard.
Next, you will edit the saved pattern and then update all instances in your artwork.
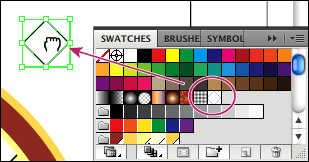
1. Using the Selection tool (![]() ), drag the checker swatch from the Swatches panel to an empty location on the right side of the artboard.
), drag the checker swatch from the Swatches panel to an empty location on the right side of the artboard.
This places the shape you used to make the pattern onto the artboard or canvas.
2. With the shape selected, notice the word Group, at the left end of the Control panel. Double-click the diamond shape to enter isolation mode and then choose View > Outline.
Note
You may need to zoom in or hold down the Spacebar and drag the artboard down, so that you can see the group better.
When you create an irregular (non-rectangular) shape, Illustrator displays a rectangle shape behind it to create a rectangular tile.
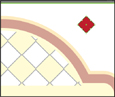
3. Click to select the square shape and choose white from the Fill color in the Control panel. This eliminates the transparency between the diamond shapes in the pattern.
4. Choose View > Preview.
5. With the Selection tool, click to select the diamond shape. In the Control panel, change the fill color to the red swatch (C=15, M=100, Y=90, K=10). Change the Stroke color to None in the Control panel. Press Escape to hide the Swatches panel.
6. Press Escape to exit isolation mode.
Next, you will update the pattern swatch.
7. Choose Select > Deselect, then click the diamond shape with the Selection tool to select the group.
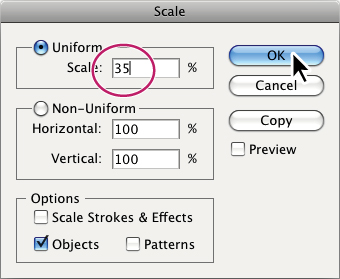
8. Double-click the Scale tool (![]() ) in the Tools panel. Change Uniform Scale to 35.%, make sure that Objects is the only option selected, and then click OK.
) in the Tools panel. Change Uniform Scale to 35.%, make sure that Objects is the only option selected, and then click OK.
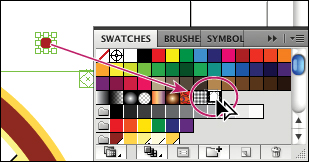
9. Using the Selection tool, select the diamond shape group and press the Alt (Windows) or Option (Mac OS) key and drag it back on top of the existing pattern swatch, called checker, in the Swatches panel. The swatch is updated and the artwork that is filled with the pattern swatch is updated as well.
10. On the artboard, select and delete the diamond shape group that you edited to create the updated pattern.
11. Open the Layers panel and make all layers visible by selecting the Visibility column to the left of the “tomato” and “top shapes” layers.

12. Choose Select > Deselect, and then File > Save. Choose File > Close.
Working with Live Paint
Live Paint lets you paint vector graphics intuitively, by automatically detecting and correcting gaps that otherwise would have affected how fills and strokes were applied. Paths divide the drawing surface into areas, any of which can be colored, regardless of whether the area is bounded by a single path or by segments of multiple paths. Painting objects is like filling in a coloring book or using watercolors to paint a pencil sketch.
Live Paint is different from using the Shape Builder tool because Live Paint is “live.” This means that the Shape Builder tool edits the underlying shapes, whereas Live Paint does not. To learn more about the Shape Builder tool, see Lesson 3, “Creating and Editing Shapes.”
Creating a Live Paint group
Next, you will open a file and paint objects using the Live Paint Bucket tool.
1. Choose File > Open and open the L6start_2.ai file in the Lesson06 folder.
2. Choose File > Save As. In the Save As dialog box, name the file greetingcard.ai and navigate to the Lesson06 folder. Leave the Save As Type option set to Adobe Illustrator (*.AI) (Windows) or the Format option set to Adobe Illustrator (ai) (Mac OS), and click Save. In the Illustrator Options dialog box, leave the Illustrator options at their default settings, and then click OK.

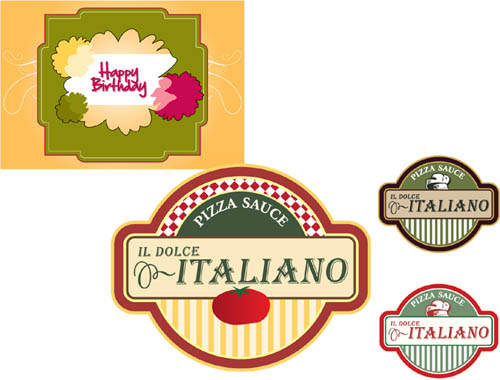
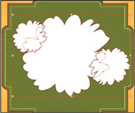
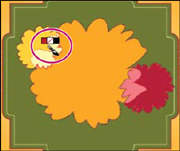
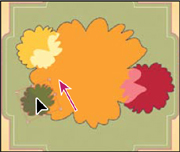
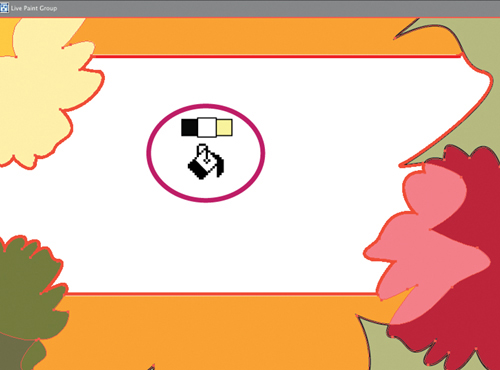
3. Use the Selection tool (![]() ) to drag a selection across the three white flower shapes on the artboard.
) to drag a selection across the three white flower shapes on the artboard.
4. Choose Object > Live Paint > Make. This creates a Live Paint group that you can now paint using the Live Paint Bucket tool (![]() ).
).
Once a Live Paint group is created, each path remains fully editable. When you move or adjust a path’s shape, the colors are automatically reapplied to the new regions that are formed by the edited paths.
Tip
You can tell it’s a Live Paint group because of the special bounding box around all three shapes.
5. Select the Live Paint Bucket tool (![]() ) in the Tools panel, which is in the same group as the Shape Builder tool (
) in the Tools panel, which is in the same group as the Shape Builder tool (![]() ). Before painting, click the Fill color in the Control panel and select the yellow/orange swatch in the Swatches panel.
). Before painting, click the Fill color in the Control panel and select the yellow/orange swatch in the Swatches panel.
Note
You may need to press the Escape key to hide the Swatches panel.
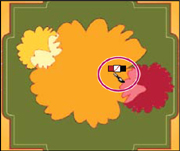
6. Position the pointer over the center of the Live Paint group. As you move over Live Paint objects, they are highlighted and three color swatches appear above the pointer. The swatches represent the three adjacent swatches in the Swatches panel. The center swatch is the last selected color. Click when the center flower shape is highlighted.
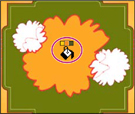
Tip
You can also drag across multiple shapes to apply color to them at once.
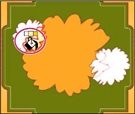
7. Move the pointer to the left, to the overlapping shape. Click the left arrow key twice to highlight the light yellow color in the three swatches above the pointer. Click to apply the color to the flower.
You will repeat the previous step to paint the rest of the flower shapes.
Note
You can also switch to a color other than the one selected in the group by clicking a color in the Swatches panel.
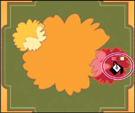
8. Paint the remaining three flower shapes using the colors you see in the figure at right (yellow, pink, and dark pink). Before clicking to apply a color, press the left and right arrow keys to cycle through the colors in the Swatches panel.
Painting strokes with the Live Paint Bucket tool is just as easy as painting fills. First, you need to enable the option to paint strokes.
9. Double-click the Live Paint Bucket tool in the Tools panel. This opens the Live Paint Bucket Options dialog box.

Select the Paint Strokes option and then click OK.
Note
To learn more about the options in the Live Paint Bucket Options dialog box, such as the Cursor Swatch Preview (the three swatches that appear above the Live Paint Bucket cursor), and the Highlight options like changing color and width, search for “paint with the Live Paint Bucket tool” in Illustrator Help.
Next you’ll remove the inner black strokes from the shapes and retain the outer black strokes.
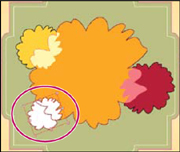
10. Position the pointer directly over the stroke between the center shape and the light yellow filled shape, as shown in the figure. When the Stroke cursor (![]() ) appears, click the left arrow to select None, and then click the stroke to remove the stroke color.
) appears, click the left arrow to select None, and then click the stroke to remove the stroke color.
11. Position the pointer directly over the stroke between the center shape and the light pink filled shape, as shown in the figure. When the Stroke cursor appears, click the left arrow to select None, and then click the stroke to remove the stroke color.
12. Choose Select > Deselect to see how the strokes are now painted. Then choose File > Save.
Editing Live Paint regions
When you make a Live Paint group, each path remains editable. When you move or adjust a path, the colors that were previously applied don’t just stay where they were, like they do in natural media paintings or image editing software. Instead, the colors are automatically reapplied to the new regions that are formed by the edited paths.
Next, you will edit the paths, and add another shape.
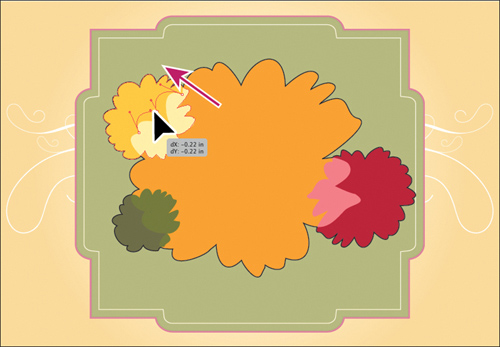
1. Select the Selection tool (![]() ) in the Tools panel, then hold down the Spacebar and drag the artboard to the right to reveal the flower shape off the left edge of the artboard.
) in the Tools panel, then hold down the Spacebar and drag the artboard to the right to reveal the flower shape off the left edge of the artboard.
2. Select the flower shape and choose Edit > Copy.
3. Double-click the Hand tool to fit the artboard in the Document window.
4. With the Selection tool, double-click the Live Paint group. This places the document in isolation mode and allows you to edit each shape independently.
5. Choose Edit > Paste. Drag the pasted flower shape down to the lower left, so that it overlaps the center flower, as shown in the figure.
6. Select the Live Paint Bucket tool (![]() ) in the Tools panel and paint the shapes with the dark green (outside half) and light green (inside half) swatches.
) in the Tools panel and paint the shapes with the dark green (outside half) and light green (inside half) swatches.
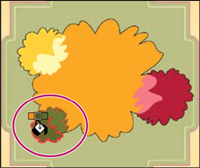
7. Position the pointer directly over the strokes between the center orange shape and the green-filled shape. When the Stroke cursor appears, click the left arrow to highlight None, and then click the stroke to remove the stroke color. Do this for any strokes inside the green-filled shape.
Note
When you move or edit shapes that are part of a Live Paint group, unexpected things can happen. For instance, a stroke may appear where there was none before. Be sure to double-check the shapes to make sure that they look like they should.
8. Select the Selection tool and drag the green-filled flower shape a little up and to the left, to reposition it. Notice how the color fill changes.
9. Select the Direct Selection tool (![]() ) in the Tools panel, and position the pointer over the small yellow flower in the upper-left corner. Click one of the anchor points on the edge of the center flower (located in the middle of the small yellow flower) and drag to reposition it.
) in the Tools panel, and position the pointer over the small yellow flower in the upper-left corner. Click one of the anchor points on the edge of the center flower (located in the middle of the small yellow flower) and drag to reposition it.
Notice how the paths are still completely editable and the colors are automatically reapplied to the new regions that are formed by the edited paths.
Note
The Selection tool selects an entire Live Paint group. The Direct Selection tool selects the individual paths inside a Live Paint group. For instance, clicking with the Selection tool once selects the entire Live Paint group, and clicking once with the Direct Selection tool or the Group Selection tool selects individual paths that make up the Live Paint group.
Next, that will add a white color to the center of the larger flower so that you can add text and make it readable.
10. Press Ctrl++ (Windows) or Cmd++ (Mac OS) twice to zoom in.
11. Press Escape to exit isolation mode, and then choose Select > Deselect.
12. Expand the Layers panel by clicking the Layers panel icon (![]() ) on the right side of the workspace. Click the Visibility column for the layer named text (just above the eye icon for the layer named live paint).
) on the right side of the workspace. Click the Visibility column for the layer named text (just above the eye icon for the layer named live paint).
13. Select the Selection tool and double-click the flower shapes to enter isolation mode.
14. Select the Line Segment tool (![]() ) in the Tools panel. Change the Stroke color to white in the Control panel.
) in the Tools panel. Change the Stroke color to white in the Control panel.
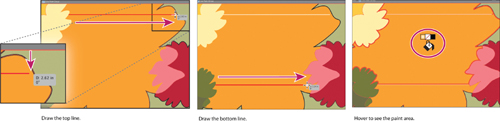
15. Press the Shift key and click the right edge of the small yellow flower. Drag towards the right edge of the large center flower to draw a line. When you’re close to the edge (not at the edge) release the mouse button, then the Shift key, as shown in the figure below, to leave a small gap on the right end of the line.
16. Draw another line below that by pressing the Shift key and clicking the right edge of the green flower, and dragging to the right, to the point where the line snaps to the left edge of the light pink shape. The smart guides help you snap the line to the shapes.
17. Select the Live Paint Bucket tool in the Tools panel and position the cursor over the center of the large orange flower, between the lines. Note where the red outline shows, and that the bottom line “closes” the bottom of the flower shape. The top line, which is not touching the edge of the flower, may not close the top of the path. This gap is a problem that you will fix next.
Note
If the red outline stops at the top line, try making the top line shorter using the Direct Selection tool.
Working with Gap Options
Next, you will work with the Gap Options dialog box.
1. Choose Select > All.
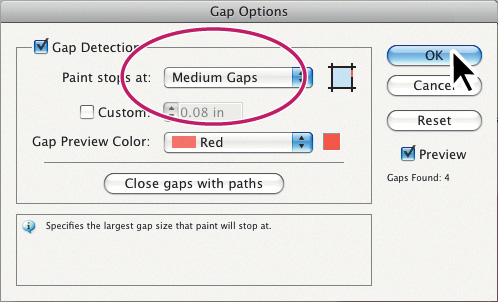
2. Choose Object > Live Paint > Gap Options. In the Gap Options dialog box, select Gap Detection, if it is not already selected. The Gap Preview Color is set to highlight any gaps it detects in red.
3. Choose Medium Gaps from the Paint Stops At menu. This stops paint from leaking through some of the gaps as you paint. Look at the artwork to see any gaps highlighted in red. The gap between the top line and the right edge of the flower shape is closed. Click OK.
Note
If you can’t get this to work, in the Gap Options dialog box, try changing the Paint Stops At option to Small or Large Gaps, or try resizing the top line so that it snaps to the right edge of the flower.
4. Select the Live Paint Bucket tool (![]() ), and cross over the space between the two lines you drew. Make sure that white is showing in the swatches above the pointer, and then click to color the space.
), and cross over the space between the two lines you drew. Make sure that white is showing in the swatches above the pointer, and then click to color the space.
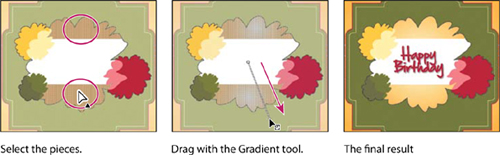
5. Select the Live Paint Selection tool (![]() ) in the Tools panel, beneath the Live Paint Bucket tool. Click the top yellow shape and Shift-click the bottom yellow shape, as shown in the figure. Choose the background gradient from the Fill color in the Control panel.
) in the Tools panel, beneath the Live Paint Bucket tool. Click the top yellow shape and Shift-click the bottom yellow shape, as shown in the figure. Choose the background gradient from the Fill color in the Control panel.
Tip
Within a Live Paint group, you can also select content by dragging across artwork with the Live Paint Selection tool.
6. Select the Gradient tool (![]() ) in the Tools panel. Drag from the center of the large flower shape down and to the right, to create a uniform gradient across both shapes.
) in the Tools panel. Drag from the center of the large flower shape down and to the right, to create a uniform gradient across both shapes.
7. Select the Selection tool, and press Escape to exit isolation mode and see the “Happy Birthday” text on the artboard. Choose View > Fit Artboard In Window.
8. Choose File > Save, then File > Close.
Exploring on your own
1. Choose File > Open. In the Open dialog box, navigate to the Lesson06 folder in the Lessons folder. Open the file named color.ai.
2. Using the Selection tool, select the letters in the center of the poster.
3. Fill the letters with a color from the Fill color in the Control panel, and then save the color as a swatch in the Swatches panel by Ctrl-clicking (Windows) or Command-clicking (Mac OS) the New Swatch button. Name the color text.
4. With the swatch applied to the text fill, create a tint of the text color, and then save it in the Swatches panel.
5. Apply a 3 pt stroke to the text and paint the stroke with the saved tint, making sure that the fill of the text is just the text color, not the tint.
6. Select the Ellipse tool in the Tools panel and create a circle on the artboard. Select a swatch from the Fill color in the Control panel. Create a pattern out of the circle you drew.
7. Apply the pattern to the star shape behind the text.
8. Edit the pattern and resize the pattern fill in the star shapes by double-clicking the Scale tool.
9. Choose File > Close without saving.
Review questions
1 Describe at least three ways to fill an object with color.
2 How can you save a color?
3 How do you name a color?
4 How do you assign a transparent color to an object?
5 How can you choose color harmonies for colors?
6 Name two things that the Edit Colors/Recolor Artwork dialog box allows you to do.
7 How do you add pattern swatches to the Swatches panel?
8 Explain what Live Paint allows you to do.
Review answers
1. To fill an object with color, select the object and the Fill box in the Tools panel. Then do one of the following:
• Double-click the Fill or Stroke box in the Control panel to access the Color Picker.
• Drag the color sliders, or type values in the text boxes in the Color panel.
• Click a color swatch in the Swatches panel.
• Select the Eyedropper tool, and then click a color in the artwork.
• Choose Window > Swatch Libraries to open another color library, and then click a color swatch in the Color Library panel.
2. You can save a color for painting other objects in your artwork by adding it to the Swatches panel. Select the color, and do one of the following:
• Drag it from the Fill box and drop it over the Swatches panel.
• Click the New Swatch button at the bottom of the Swatches panel.
• Choose New Swatch from the Swatches panel menu.
You can also add colors from other color libraries by selecting them in the Color Library panel and choosing Add To Swatches from the panel menu.
3. To name a color, double-click the color swatch in the Swatches panel, or select it and choose Swatch Options from the panel menu. Type the name for the color in the Swatch Options dialog box.
4. To paint a shape with a semitransparent color, select the shape and fill it with any color. Then adjust the opacity percentage in the Transparency panel or Control panel to less than 100%.
5. The Color Guide panel is a tool you can use for inspiration while you create your artwork. The panel suggests color harmonies based on the current color in the Tools panel.
6. You use the Edit Colors/Recolor Artwork dialog box to create and edit color groups, to reassign or reduce the colors in your artwork, and more.
7. Create a pattern (patterns cannot contain patterns themselves), and drag it into the Swatches panel.
8. Live Paint lets you paint vector graphics intuitively by automatically detecting and correcting gaps that otherwise would have affected how fills and strokes were applied. Paths divide the drawing surface up into areas, any of which can be colored, regardless of whether the area is bounded by a single path or by segments of multiple paths. Painting objects with Live Paint is like filling in a coloring book or using watercolors to paint a pencil sketch.