
12. Applying Effects
This lesson will take approximately an hour to complete. If needed, remove the previous lesson folder from your hard disk and copy the Lesson12 folder onto it.
![]()

Effects change the look of an object. Effects are live, which means you can apply an effect to an object and then modify or remove it at any time using the Appearance panel. Using effects, it’s easy to apply drop shadows, turn two-dimensional artwork into three-dimensional shapes, and much more.
Getting started
In this lesson, you’ll create objects using various effects. Before you begin, you’ll need to restore the default preferences for Adobe® Illustrator®. Then you’ll open a file containing the finished artwork to see what you’ll create.
1. To ensure that the tools and panels function exactly as described in this lesson, delete or rename the Adobe Illustrator CS5 preferences file. See “Restoring default preferences” on page 3.
2. Start Adobe Illustrator CS5.
Note
If you have not already done so, copy the resource files for this lesson onto your hard disk from the Lesson12 folder on the Adobe Illustrator CS5 Classroom in a Book CD. See “Copying the Classroom in a Book files” on page 2.
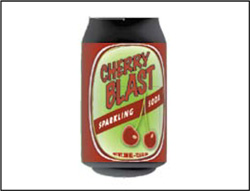
3. Choose File > Open, and open the L12end_1.ai file in the Lesson12 folder, located in the Lessons folder on your hard disk.
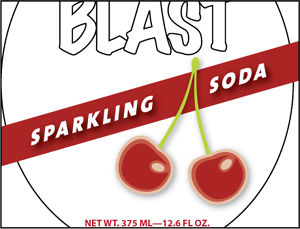
This file displays a completed illustration of a soda can.
4. Choose View > Zoom Out to make the finished artwork smaller. Adjust the window size, and leave it on your screen as you work. (Use the Hand tool (![]() ) to move the artwork where you want it in the window.) If you don’t want to leave the image open, choose File > Close.
) to move the artwork where you want it in the window.) If you don’t want to leave the image open, choose File > Close.
To begin working, you’ll open an existing art file.
5. Choose File > Open, and open the L12start_1.ai file in the Lesson12 folder, located in the Lessons folder on your hard disk.
6. Choose File > Save As, name the file sodacan.ai, and select the Lesson12 folder in the Save In menu. Leave the Save As Type option set to Adobe Illustrator (*.AI) (Windows) or the Format option set to Adobe Illustrator (ai) (Mac OS), and click Save. In the Illustrator Options dialog box, leave the Illustrator options at their default settings, and then click OK.
Using live effects
The Effect menu commands alter the appearance of an object without changing the base object. Applying an effect automatically adds the effect to the object’s appearance attribute. You can apply more than one effect to an object. You can edit, move, delete, or duplicate an effect at any time in the Appearance panel. To edit the points that the effect creates, you must first expand the object.
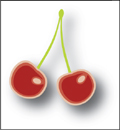
Object with a drop shadow effect applied.
Note
When you apply a raster effect, the original vector data is rasterized using the document’s raster effects settings, which determine the resolution of the resulting image. To learn about document raster effects settings, search for “Document raster effects settings” In Illustrator Help.
There are two types of effects in Illustrator: vector effects and raster effects. In Illustrator, click the Effect menu item.
• Illustrator (vector) effects: The top half of the Effects menu contains vector effects. You can apply these effects only to vector objects or to the fill or stroke of a bitmap object in the Appearance panel. The following vector effects can be applied to both vector and bitmap objects: 3D effects, SVG filters, Warp effects, Transform effects, Drop Shadow, Feather, Inner Glow, and Outer Glow.
• Photoshop (raster) effects: The bottom half of the Effects menu contains raster effects. You can apply them to either vector or bitmap objects.
Applying an effect
Effects are applied using the Effect menu or the Appearance panel and can be applied to objects or groups. In this part of the lesson, you are first going to learn how to apply an effect to a soda can label, then you will apply an effect using the Appearance panel.
1. Choose Essentials from the workspace switcher in the Application bar to reset the workspace.
2. Choose View > Smart Guides to deselect them.
3. With the Selection tool (![]() ), click the text shapes Sparkling Soda on the artboard.
), click the text shapes Sparkling Soda on the artboard.
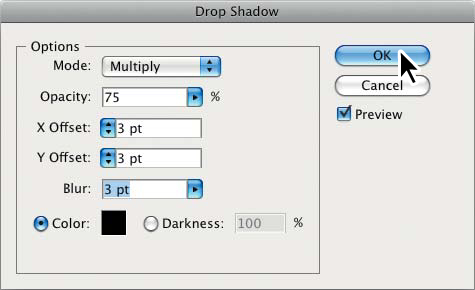
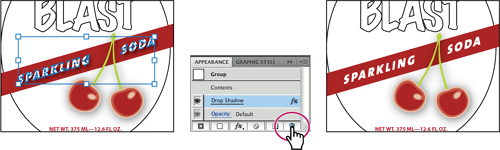
4. With the group selected, choose Effect > Stylize > Drop Shadow.
5. In the Drop Shadow dialog box, change the X Offset, Y Offset, and Blur to 3. pt. Select Preview to see the drop shadow applied to the text shapes. Click OK.
6. With the Selection tool, click the cherries to select the group.
7. With the group selected, click the Appearance panel icon (![]() ) on the right side of the workspace to expand the Appearance panel.
) on the right side of the workspace to expand the Appearance panel.
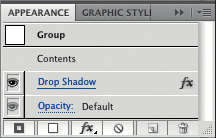
In the Appearance panel, you will see the word Group at the top of the panel, indicating that a group is selected. Effects can be applied to grouped objects.
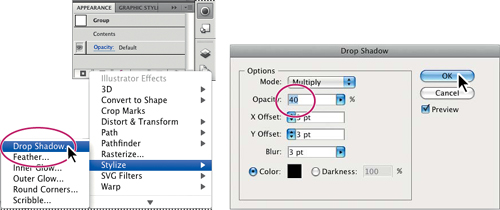
8. Click the Add New Effect button (![]() ) at the bottom of the Appearance panel. You’ll see the same options as in the Effect menu.
) at the bottom of the Appearance panel. You’ll see the same options as in the Effect menu.
9. Choose Stylize > Drop Shadow from the Illustrator Effects section of the menu that appears.
10. In the Drop Shadow dialog box, change the Opacity to 40. and leave the X Offset, Y Offset, and Blur set at 3 pt. Select Preview to see the drop shadow applied to the text shapes. Click OK.
In the Appearance panel, notice that Drop Shadow is now listed below Group.
11. Choose Select > Deselect.
12. Choose File > Save.
Next, you will edit the two drop shadow effects.
Editing an effect
Effects are live, so they can be edited after they are applied to an object. You can edit the effect in the Appearance panel by selecting the object with the effect applied, then either clicking the name of the effect or double-clicking the attribute row in the Appearance panel. This displays the dialog box for that effect. Changes you make to the effect update in the artwork. In this section, you will edit the drop shadow effect applied to the cherries.
1. With the Selection tool (![]() ), click the grouped cherry shapes and make sure that the Appearance panel is showing. If it isn’t, choose Window > Appearance or click its panel icon (
), click the grouped cherry shapes and make sure that the Appearance panel is showing. If it isn’t, choose Window > Appearance or click its panel icon (![]() ).
).
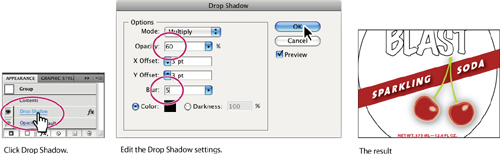
Notice the drop shadow effect listed in the Appearance panel.
2. Click the blue underlined Drop Shadow in the Appearance panel. In the Drop Shadow dialog box, change Opacity to 60.% and select Preview to see the change. Try different settings to see their effects (we set the Blur at 5), and then click OK.
Next, you will remove an effect from the “Sparkling Soda” text shapes.
3. With the Selection tool, click the Sparkling Soda text shapes.
4. In the Appearance panel, click to the right or left of the blue, underlined name Drop Shadow to highlight the attribute row for the Drop Shadow effect, if it’s not already highlighted. After highlighting the attribute row, click the Delete Selected Item button (![]() ) at the bottom of the panel.
) at the bottom of the panel.
Note
Be careful not to click the blue, underlined name Drop Shadow, which will open the Drop Shadow dialog box.
5. With the Selection tool, click to select the cherries group again.
6. Choose Object > Ungroup.
Notice that the drop shadow effect is gone from the cherries. When an effect is applied to a group, it affects the group as a whole. If the objects are no longer grouped together, then the effect no longer applies.
7. Choose Edit > Undo Ungroup and the drop shadow reappears.
8. Choose Select > Deselect, then File > Save.
Note
When you ungroup the cherries, you will still see the word Group at the top of the Appearance panel. That’s because each cherry is its own group.
Styling text with effects
You can make a warp from objects in your artwork, or you can use a preset warp shape or mesh object as an envelope. Next, you will use a warp effect to warp the text at the bottom of the label.
1. Select the Selection tool (![]() ) in the Tools panel, and then select the “NET WT...” type at the bottom of the label.
) in the Tools panel, and then select the “NET WT...” type at the bottom of the label.
2. Choose Effect > Warp > Arc Lower.
3. In the Warp Options dialog box, to create an arcing effect, set Bend to 35.%. Select Preview to preview the changes. Try choosing other styles from the Style menu, and then return to Arc Lower. Try adjusting the Horizontal and Vertical Distortion sliders to see the effect. Make sure that the Distortion values are returned to 0., and then click OK.
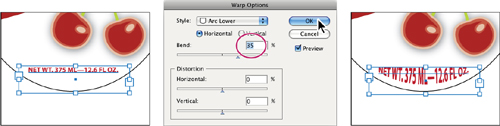
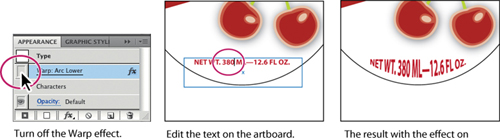
4. With the warped text still selected, click the visibility icon (![]() ) to the left of the Warp: Arc Lower row in the Appearance panel to turn off visibility for the effect. Notice how the text is no longer warped on the artboard.
) to the left of the Warp: Arc Lower row in the Appearance panel to turn off visibility for the effect. Notice how the text is no longer warped on the artboard.
Note
To learn more about the Appearance panel, see Lesson 13, “Applying Appearance Attributes and Graphic Styles.”
5. Select the Type tool (![]() ) in the Tools panel, and select and change the “375” text on the page to 380..
) in the Tools panel, and select and change the “375” text on the page to 380..
6. Select the Selection tool, then click the visibility icon (![]() ) to the left of the Warp: Arc Lower row in the Appearance panel, to turn on visibility for the effect. Notice how the text is once again warped.
) to the left of the Warp: Arc Lower row in the Appearance panel, to turn on visibility for the effect. Notice how the text is once again warped.
Note
You selected the Selection tool again in this step because you originally applied the effect to the text object with the Selection tool.
Tip
It is not necessary to turn the visibility off for the Warp effect before editing the text on the artboard, but doing so makes it easier.
Next, you will apply effects to the text shapes “CHERRY BLAST” at the top of the soda label.
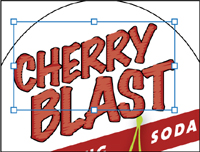
8. With the Selection tool (![]() ), click the CHERRY BLAST type shapes to select the group.
), click the CHERRY BLAST type shapes to select the group.
9. Choose Effect > Warp > Rise.
10. In the Warp Options dialog box, leave the Horizontal option selected and change the Bend to 20.%. Click OK.

Notice how the selected text shapes (in blue) still look like the original shapes, but are actually warped. This shows how a live effect allows you to print the text shapes with the Rise effect applied, but does not change the underlying object.
11. If the Appearance panel is not visible, choose Window > Appearance.
Notice that the Appearance panel lists the Warp: Rise effect that has been applied to the text shapes.
Next, you will hide the selection anchor points so that you can focus on the outcome.
12. With the CHERRY BLAST text shapes still selected, choose View > Hide Edges.
13. In the Control panel, change the Fill to the banner color and leave the stroke at black, 1 pt.

14. Choose Edit > Copy.
15. With the text shapes still selected, choose Object > Hide > Selection.
16. Choose Edit > Paste In Front.
17. With the copy selected, change the fill to the scribble swatch and the stroke color to None in the Control panel.
Next, you will apply the Scribble effect to the text shapes.
18. With the text shapes selected, choose Effect > Stylize > Scribble.
19. In the Scribble dialog box, choose Tight from the Settings menu. Select Preview to see the change. Change the Angle to 10., the Path Overlap to −3 pt, and leave the remainder of the settings at default. Click OK.

20. Choose Object > Show All.
21. Choose Select > Deselect, then File > Save.
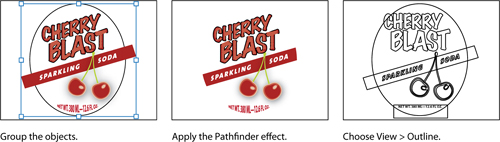
Editing shapes with a Pathfinder effect
Pathfinder effects are similar to working with Pathfinder commands in the Pathfinder panel, except they are applied as effects and do not change the underlying content.
Next, you will apply a Pathfinder effect to several shapes.
1. With the Selection tool (![]() ), Shift-click to select both the red banner shape beneath the SPARKLING SODA text shapes and the oval in the background.
), Shift-click to select both the red banner shape beneath the SPARKLING SODA text shapes and the oval in the background.
2. Choose Object > Group.
You grouped the objects together because Pathfinder effects may only be applied to groups, layers, or type objects.
3. Choose Effect > Pathfinder > Intersect to create a shape that shows where the two shapes intersect.
Note
If you see a warning dialog box when you choose Effect > Pathfinder > Intersect, it’s because you didn’t group the objects first.
4. In the Appearance panel notice that the Intersect effect appears in the Appearance panel. Clicking Intersect allows you to change the Pathfinder effect and edit the Intersect effect.
Note
You’ll learn more about the Appearance panel in Lesson 13, “Applying Appearance Attributes and Graphic Styles.”
Note
To remove the Intersect effect from a group that you just applied, click the Intersect effect in the Appearance panel, and then click the Delete Selected Item button (![]() ) at the bottom of the panel.
) at the bottom of the panel.
5. With the group still selected, choose View > Outline.
The two shapes are still there and completely editable since this is a live effect being applied.
Note
To intersect shapes, you can also use the Pathfinder panel, which will expand the shapes immediately, by default. Using the Effect menu lets you edit shapes independently.
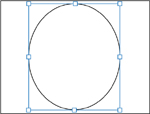
Next, you will copy the oval shape from the group of shapes with the Pathfinder effect applied.
6. With the Selection tool, double-click the edge of the oval shape to enter isolation mode. This allows you to edit just the two shapes that are part of the group.
Note
You are double-clicking the edge because shapes in isolation mode have no fill, so they can’t be selected by clicking in the center.
7. Click the edge of the oval shape to select it. Choose Edit > Copy.
8. Press Escape to exit isolation mode. Choose Select > Deselect.
9. Choose Edit > Paste In Front to paste a copy on top of the other objects.
10. Choose View > Preview and leave the oval shape selected.
11. Choose File > Save.
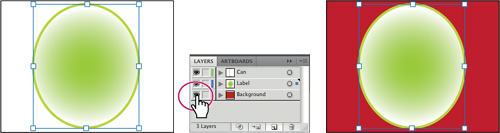
Offsetting paths
Next, you will edit the oval shape by adding multiple strokes to it. You will then edit the multiple strokes by offsetting them against the oval shape. This process allows you to create the appearance of multiple stacked shapes.
1. With the oval shape selected, change the stroke color to green, the fill color to the green gradient labeled center, and the stroke weight to 5. pt in the Control panel.
2. Click the Layers panel icon (![]() ) on the right side of the workspace to expand the Layers panel. Click the visibility column to the left of the Background layer to reveal the background shape.
) on the right side of the workspace to expand the Layers panel. Click the visibility column to the left of the Background layer to reveal the background shape.
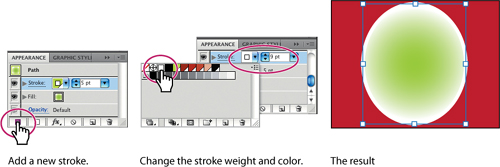
Next, you will add another stroke to the shape, then edit the gradient fill.
3. Click the Appearance panel icon (![]() ) to expand the panel. With the green shape still selected and the stroke row selected in the Appearance panel, click the Add New Stroke button (
) to expand the panel. With the green shape still selected and the stroke row selected in the Appearance panel, click the Add New Stroke button (![]() ) at the bottom of the Appearance panel. A new stroke appears in the panel, but the shape looks the same.
) at the bottom of the Appearance panel. A new stroke appears in the panel, but the shape looks the same.
The shape now has two strokes that are the same color and same weight directly on top of each other.
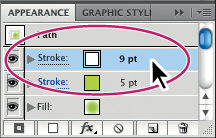
4. In the Appearance panel, change the stroke weight for the selected (highlighted) Stroke to 9. pt.
5. Click the Stroke Color in the Appearance panel and select the white swatch in the Swatches panel. Press Enter or Return to close the Swatches panel and return to the Appearance panel.
You can add multiple strokes to an object and apply different effects to each one, giving you the opportunity to create unique and interesting artwork.
Note
You’ll learn more about the Appearance panel in Lesson 13, “Applying Appearance Attributes and Graphic Styles.”
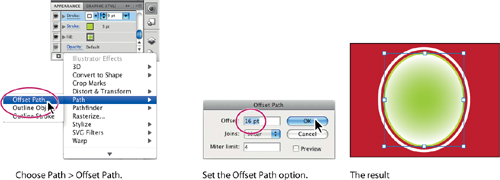
6. With the white Stroke selected in the Appearance panel, click the Add New Effect (![]() ) button at the bottom of the Appearance panel. Choose Path > Offset Path.
) button at the bottom of the Appearance panel. Choose Path > Offset Path.
7. In the Offset Path dialog box, change the Offset to 16. pt, and click OK.
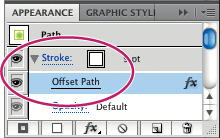
8. In the Appearance panel, click the arrow to the left of the word Stroke (9 pt) to toggle it open. Notice that Offset Path is subset underneath Stroke. This indicates that the Offset Path is applied to only that Stroke.
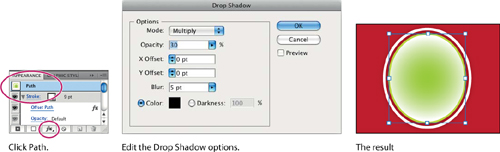
9. Click the word Path at the top of the Appearance panel. This will allow the drop shadow you add in the next step to apply to the entire shape rather than just the offset stroke.
Note
You may need to scroll up in the Appearance panel or resize the panel for easier viewing.
10. Click the Add New Effect (![]() ) button at the bottom of the Appearance panel and choose Stylize > Drop Shadow.
) button at the bottom of the Appearance panel and choose Stylize > Drop Shadow.
11. In the Drop Shadow dialog box change Opacity to 30.%, X Offset to 0. pt, Y Offset to 0. pt, and Blur to 5. pt. Click OK.
Tip
Notice the Color square in the Drop Shadow dialog box. Clicking this square will open the Color Picker and allow you to edit the drop shadow color or choose a color from the Swatches panel or other color book.
12. Choose Select > Deselect, then File > Save.
Applying a Photoshop effect
As described earlier in the chapter, the effects in the bottom half of the Effects menu are Photoshop effects (raster effects). You can apply them to either vector or embedded bitmap objects. Raster effects are effects that generate pixels rather than vector data. Raster effects include SVG Filters, all of the effects in the bottom section of the Effect menu, and the Drop Shadow, Inner Glow, Outer Glow, and Feather commands in the Effect > Stylize submenu.
Next, you will apply a Photoshop effect to the background of the label.
1. With Selection tool (![]() ), click to select the oval shape with the white stroke applied. In the Appearance panel, click the white Stroke row to select it. Be careful not to click the word Stroke.
), click to select the oval shape with the white stroke applied. In the Appearance panel, click the white Stroke row to select it. Be careful not to click the word Stroke.
You are going to apply a Photoshop effect to the white stroke.
Note
After you apply the raster effect, the background shape is composed of pixels rather than vector data.
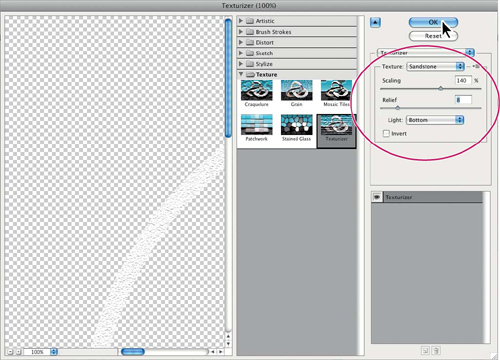
2. Choose Effect > Texture > Texturizer to open the Effect Gallery. In the Texturizer settings on the right, change the Texture to Sandstone, the Scaling to 140., the Relief to 8., and, from the Light menu, choose Bottom.
In the Effect Gallery, you can apply a single raster effect or multiple raster effects to an object. The raster effects are in the middle panel, organized in folders that correlate to the menu item in the Effect menu. You can try more effects and adjust their settings if you like. Click OK to set the Texturizer options.
Now that the artwork is complete, you will scale it, and then save it as a symbol in the Symbols panel. Then you’ll apply it to a 3D soda can that you’ll create.
3. With the Selection tool selected, hold down the Shift key and click the red rectangle in the background to select both shapes. Choose Object > Arrange > Send To Back.
4. Choose Select > All On Active Artboard. Choose Object > Group.
5. With the Group selected, double-click the Scale tool (![]() ) in the Tools panel.
) in the Tools panel.
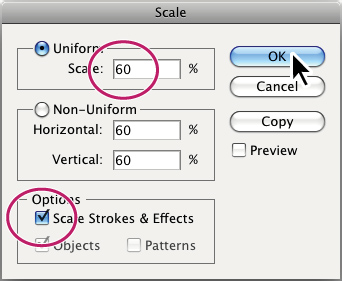
6. In the Scale dialog box, change the Uniform Scale value to 60. and select Scale Strokes & Effects. Click OK.
Note
If you scale content and do not select Scale Strokes & Effects, the stroke weights and effects will stay the same when you scale the content.
Tip
To learn more about symbols, see Lesson 14, “Working with Symbols.”
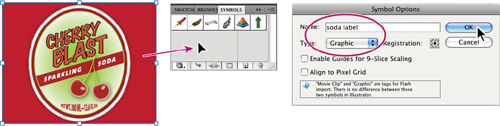
7. Click the Symbols panel icon (![]() ), or choose Window > Symbols to expand the Symbols panel. Select the Selection tool, and drag the selected content onto the Symbols panel to create a symbol. In the Symbol Options dialog box, name the symbol soda label, and select Graphic as the symbol type. Click OK.
), or choose Window > Symbols to expand the Symbols panel. Select the Selection tool, and drag the selected content onto the Symbols panel to create a symbol. In the Symbol Options dialog box, name the symbol soda label, and select Graphic as the symbol type. Click OK.
8. Choose Select > Deselect, and then File > Save. Keep the file open.
Document Raster Effects Settings
Whenever you apply a raster effect, Illustrator uses the document’s raster effects settings to determine the resolution of the resulting image. It’s important to check the document raster effects settings before you start working with effects.
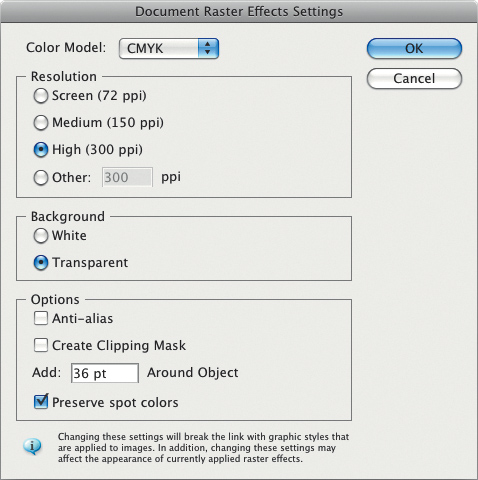
You set rasterization options for a document when creating a new document or by choosing Effect > Document Raster Effects Settings. In the Document Raster Effects Settings dialog box, for all raster effects in a document or when you rasterize a vector object, you can set the Color Model, Resolution, Background, Anti-alias, Create Clipping Mask, and Add Around Object. To learn more about Document Raster Effects Settings, search for “About raster effects” in Help.
—From Illustrator Help
Working with a 3D effect
Using the 3D effect, you can control the appearance of 3D objects with lighting, shading, rotation, and other attributes. In this part of the lesson, you’ll use two-dimensional shapes as the foundation for creating three-dimensional objects.
There are three types of 3D effects you can apply:
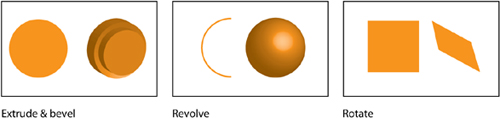
• Extrude & Bevel: Extends a 2D object along the object’s z axis to add depth to the object. For example, if you extrude a 2D ellipse, it becomes a cylinder.
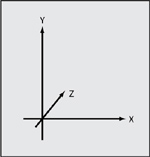
The 3D effect takes advantage of the x, y, and z axes.
• Revolve: Sweeps a path or profile in a circular direction around the global y axis (revolve axis) to create a 3D object.
• Rotate: Uses the z axis to rotate 2D artwork in 3D space and change the artwork’s perspective.
Creating a revolved object
In this part of the lesson, you will explore one of the 3D effects called Revolve. You will create a soda can from an existing path on the second artboard, using the Revolve effect.
1. Choose Window > Workspace > Essentials.
2. Click the Artboards panel icon (![]() ) to expand the Artboards panel.
) to expand the Artboards panel.
3. Double-click Artboard 2 in the panel to fit the artboard in the Document window. Click the Artboards panel icon to collapse the panel.

4. Choose Select > All On Active Artboard.
This path is half of the shape of a soda can. When you apply the revolve effect to it, it will be revolved around the right or left edge to create a 360 degree shape.
5. Click the Stroke color in the Control panel and choose None (![]() ).
).
Note
The stroke color overrides the fill color of the object when revolved.
6. Click the Fill color in the Control panel and select White.
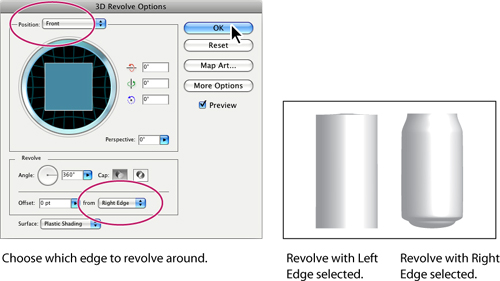
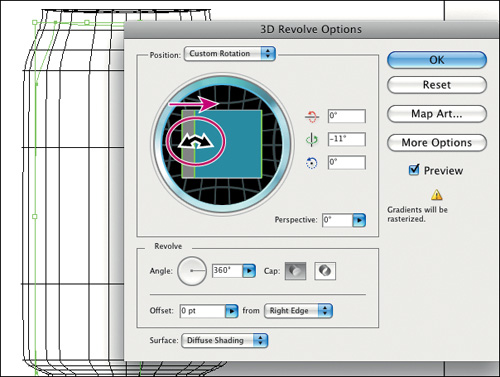
7. Choose Effect > 3D > Revolve. In the 3D Revolve Options dialog box, choose Front from the Position menu. Select Preview to see the changes. You may need to reposition the 3D Revolve Options dialog box to see the artwork.
Note
Depending on the complexity of the shape being revolved and the speed of the machine you are working on, making changes in the 3D Revolve Options dialog box can take some time. It may be helpful to deselect Preview, make some changes, then select Preview again. That way the shape does not have to “redraw” on the artboard every time a change is made in the dialog box.
8. For the Offset From option, choose Right Edge. This is the edge that your arc revolves around. The result varies dramatically depending on the side that you choose and whether you have a stroke or fill applied to the original object. Click OK.
Tip
The Angle determines the degree of revolution. To create a “cut-away” look, you can change the degree to less than 360.
9. Choose File > Save, and keep the file open.
Changing the lighting of a 3D object
The Revolve effect allows you to add one or more lights, vary the light intensity, change the object’s shading color, and move lights around the object.
In this section, you will change the strength and direction of the light source.
1. With the soda can shape selected, click 3D Revolve in the Appearance panel. If the Appearance panel is not visible, choose Window > Appearance. You may also need to scroll in the Appearance panel, or resize it for easier viewing.
2. Select Preview in the 3D Revolve Options dialog box, and click More Options.
You can create custom lighting effects on your 3D object. Use the preview window in the lower left of the 3D Revolve Options dialog box to reposition the lighting and change the shade color.
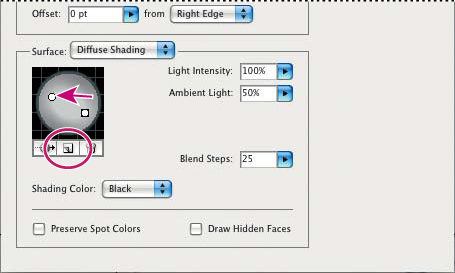
3. Choose Diffuse Shading from the Surface menu.
4. In the preview window (the shaded sphere), drag the white square that represents the light source to the left. This changes the direction of the lighting. Click the New Light button (![]() ) to add another light source to the soda can. Drag the second light source down and to the right.
) to add another light source to the soda can. Drag the second light source down and to the right.
Try positioning them in different arrangements, and move the dialog box out of the way to see the artwork.
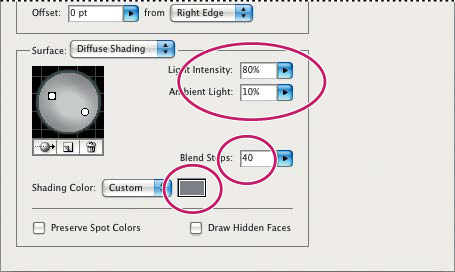
5. Choose Custom from the Shading Color menu. Click the colored square to the right of Custom to open the Color Picker. In the Color Picker, change the color to a medium gray (C=0, M=0, Y=0, K=50). Click OK to close the Color Picker and return to the 3D Revolve Options dialog box.
6. In the 3D Revolve Options dialog box, change Light Intensity to 80.% and the Ambient Light to 10.%. Leave the dialog box open.
Note
Depending on the speed of the machine you are working on, it may take some time to process changes made in the 3D Revolve Options dialog box.
Ambient light controls the brightness on the surface of the 3D object uniformly.
7. Change the Blend Steps to 40. and click OK when it is done processing.
8. Choose File > Save.
Mapping a symbol to the 3D artwork
You can map artwork from Illustrator and also import artwork from other applications, such as Photoshop. The artwork you map needs to be 2D artwork that’s stored in the Symbols panel. Symbols can be any Illustrator art object, including paths, compound paths, text, raster images, mesh objects, and groups of objects. In this part of the lesson, you will map the soda label that you previously saved as a symbol to the soda can.
1. With the soda can still selected, click 3D Revolve in the Appearance panel. Drag the 3D Revolve Options dialog box off to the side so that you can see the soda can artwork. Make sure that Preview is also selected.
2. Click the Map Art button in the 3D Revolve Options dialog box.
When you map art to a 3D object, you first need to choose which surface to map the art to. Every 3D object is composed of multiple surfaces. For example, an extruded square becomes a cube that is made of six surfaces: the front and back faces, and the four side faces. Next, you will choose which surface to map the artwork to.
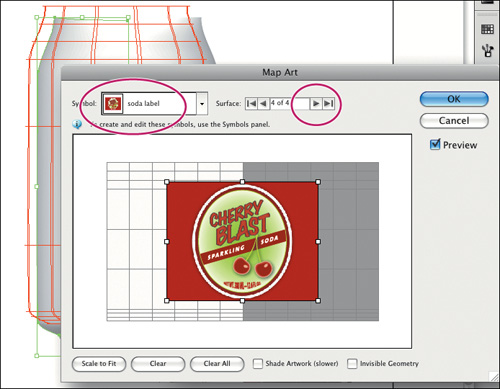
3. Drag the Map Art dialog box off to the side. Click the Next Surface button (![]() ) until “4 of 4” appears in the surface field. In the artwork, notice that Illustrator is highlighting the wireframe and the selected surface in red.
) until “4 of 4” appears in the surface field. In the artwork, notice that Illustrator is highlighting the wireframe and the selected surface in red.
4. Choose soda label from the Symbol menu. Select Preview, if not already selected.
Note
If you select the wrong surface, choose Clear and map to another surface.
5. Deselect Preview in the Map Art dialog box to speed up the next few steps.
6. Drag the symbol into the light area of the map in the Map Art dialog box.
A light gray color marks surfaces that are currently visible. A dark gray color marks surfaces that are hidden by the object’s current position.
Tip
If you don’t like the position or size of the symbol artwork, you can click the Clear button at the bottom of the dialog box to clear the symbol artwork from the current surface.
7. Select Shade Artwork (Slower). Select Preview to see the artwork with the symbol mapped to it. You may want to reposition or resize the artwork. Then click OK to close the Map Art dialog box.
8. In the 3D Revolve Options dialog box, click the Fewer Options button, and then click the left edge of the blue square and drag to the right to spin the 3D object along the y-axis. With Preview selected, when you release the mouse button the object on the artboard will update. Click OK.
Tip
You can interact with the symbol in the Map Art dialog box using the normal bounding box controls to move, scale, or rotate the object.
The texture now wraps around the soda can. Next, you will edit the soda can path and the color.
9. With the Selection tool selected, and the 3D object selected, change the Fill color to Black in the Control panel.
Notice that the entire shape changes color, except where the symbol artwork is mapped to the surface. At this point, if necessary, you can edit the shape that you started with. If you need to rotate the 3D object, in this situation it is best done in the 3D Revolve Options dialog box.
Tip
If you need to edit the shape, it is recommended that you deselect the visibility column of the 3D Revolve (Mapped) effect in the Appearance panel first. Then, when you are finished editing the shape, click the visibility column to show the 3D Revolve (Mapped) effect again.
10. Choose View > Show Edges to show the edges for later lessons.
11. Choose File > Save. Keep the file open for the Exploring on Your Own section, or choose File > Close.
Exploring on your own
Next, you will work with another effect to add a nice touch to the sodacan.ai file you still have open.
1. Choose 1 from the Artboard Navigation menu in the lower-left corner of the Document window.
2. With the Selection tool, click to select the symbol instance on the artboard. Click the Break Link button in the Control panel to edit the shapes.
3. Choose Select > Deselect.
4. Click the oval shape with the white stroke to select it.
5. Choose Effect > Convert To Shape > Rounded Rectangle.
6. In the Shape Options dialog box, select the Relative option, and then change Extra Width and Extra Height to 0.. Select Preview, and then adjust the corner radius to the desired corner radius. Click OK.
7. Choose File > Save, and then File > Close.
Create an additional item for the artwork in this lesson.
1. Choose File > Open, and locate the L12start_2.ai file in the Lesson12 folder.
2. Select the Selection tool (![]() ), and then Select > All.
), and then Select > All.
3. Drag the artwork into the Symbols panel.
4. In the Symbol Options dialog box, change the name to Soap, and choose Graphic from the Type menu. Click OK.
5. With the artwork still selected, choose Edit > Clear, or press the Delete key.
6. Select the Rectangle tool (![]() ), and click the artboard once. Type 325 pt for the width and 220 pt for the height. Click OK.
), and click the artboard once. Type 325 pt for the width and 220 pt for the height. Click OK.
7. Choose Effect > 3D > Extrude & Bevel, and experiment with different positions and settings.
Note
Changing the Bevel option can greatly increase the complexity of the 3D object and the number of surfaces to map artwork to.
8. Click Map Art, and map the Soap symbol that you created to one surface of the box.
9. Close both dialog boxes when you are finished.
Take the illustration further by creating your own symbols and applying them to the other faces of the box.
10. Choose File > Close and don’t save the file.
Review questions
1 Name two ways to apply an effect to an object.
2 Where can the effects applied to an object be edited, once they are applied?
3 What are the three types of 3D effects that are available? Give an example of why you would use each one.
4 How can you control lighting on a 3D object? Does the lighting of one 3D object affect other 3D objects?
5 What are the steps to map artwork to an object?
Review answers
1. You can apply an effect to an object by selecting the object, and then choosing the effect from the Effect menu. You can also apply an effect by selecting the object, then clicking the Add New Effect button(![]() ) in the Appearance panel, and then choosing the effect from the menu that appears.
) in the Appearance panel, and then choosing the effect from the menu that appears.
2. You can edit effects in the Appearance panel.
3. The types of 3D effects are Extrude & Bevel, Revolve, and Rotate.
• Extrude & Bevel: Uses the z axis to give a 2D object depth by extruding the object. For example, a circle becomes a cylinder.
• Revolve: Uses the y axis to revolve an object around an axis. For example, an arc becomes a circle.
• Rotate: Uses the z axis to rotate 2D artwork in 3D space and change the artwork’s perspective.
4. By clicking the More Options button in any of the 3D dialog boxes, you can change the light, the direction of the light, and the shade color. Settings for the light of one 3D object do not affect the settings for other 3D objects.
5. Map artwork to an object by following these steps:
a Select the artwork to be used as a symbol and Alt-click (Windows) or Option-click (Mac OS) the New Symbol button in the Symbols panel.
b Select the object and choose Effect > 3D > Extrude & Bevel or Effect > 3D > Revolve.
c Click Map Art.
d Navigate to the surface by clicking the Next Surface or Previous Surface buttons. Select the symbol from the Symbol menu. Close both dialog boxes.