In This Chapter
Understanding Leads, Contacts, and Accounts
Creating an Accounts record
Creating a Contacts record
Creating a Leads record
Converting a lead to a contact
Updating contact information
Removing records from Sugar
Dealing with duplicate records
Exporting data
A database is only as good as the records it contains. In SugarCRM, adding, deleting, and editing the records in your database is easy. In this chapter, I show you how to do all three of these tasks to maintain an organized, working database. Because your business—and your database—expands, I show you how to link Contact records to Account records, as well as promote Leads to Contacts. For the overly zealous members in the audience, I show you how to get rid of any duplicates—just in case you manage to get the same record in there twice. And, if you change your mind about how records are added, I show you how to update all the information with the click of a button.
In this chapter, I show you how to add Accounts, Contacts, and Leads records. Before you can add any of these new records, you need to know the differences among them.
An Accounts record is basically a company. Generally, your business does business with other businesses — unless of course you mind your business and don't do business with anyone else!
A Contacts record is a person. You'll probably find that most of your Contacts work at a company, so you might want to associate a Contacts record with an Accounts record. Sound confusing? You'll know how to navigate this maze after you read this chapter.
A Leads record is a person with whom you are hoping to do business. Like the Contacts record, you can associate Leads with Accounts, or you can convert a Leads record to a Contacts record.
There's a lot of uniformity among Sugar modules, which means that when you master one module, you're well on the way to becoming a master chef in all modules. You create, view, and edit all records the same way. Rather than repeating myself — and probably putting you to sleep in the process — I take you through the areas that are similar for all three record types, pointing out any differences along the way.
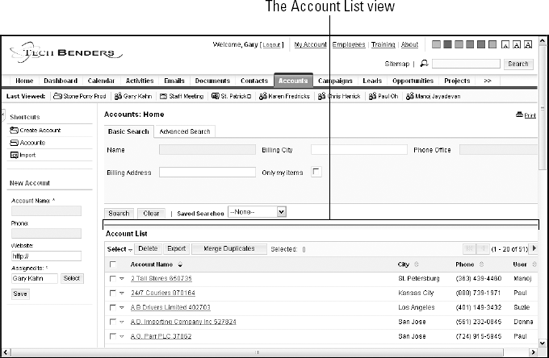
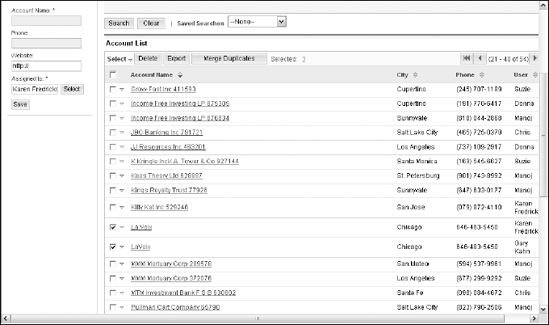
The List view is the view you land in when you click on the Accounts, Contacts, or Leads tab. The List view displays all the records in a table format. Each record is represented by a line in the table; you click a name to drill down to the Detail view. The Account List view is shown in Figure 4-1.
All List views contain the following elements:
An indicator on the top-right corner of the List view lets you know how many records you have. Only 20 display at a time. To view the next 20 records, click the right-pointing arrow.
You can sort the List view by clicking the appropriate column heading.
The List view contains both a Basic and Advanced Search tab. Chapter 9 explains these tabs in more detail.
You can select records by selecting the check box to the left of a record. Alternatively, you can click the Select drop-down button and choose This Page, to select only those records that you are currently viewing, or All Records, to select all of your records.
There's an old adage that asks which comes first — the account or the contact? Okay, maybe that's not exactly the way the saying goes, but you might wonder which type of records you should add to your database first. You might want to start by adding in your Accounts records; you'll be able to associate any new Contacts or Leads records to them as you enter them.
Adding an Accounts record is simple if you follow these steps:
If you aren't already in the Account List view, go there by clicking the Accounts tab on the Module Tab bar.
Don't know about the Module Tab bar? Check out Chapter 3, where you find out all you need to know about accessing a module and then some.
Click Create Account from the Shortcuts menu to add a new account to your database.
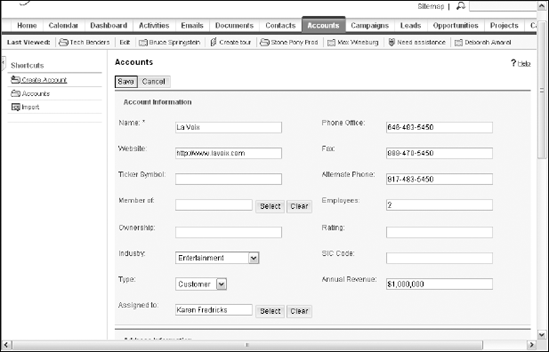
The Accounts window (shown in Figure 4-2) opens.
Add the company's name in the Name field.
This is the only required field — the rest of the fields are optional but important never the less.
Alternatively, you can fill in the account's name, who it's assigned to, and (optionally) a phone number and Web site in the Quick Form fields. However, it's well worth the effort to fill in as much information as possible.
Click the next field you want to add information to and start typing.
You can also use the Tab key to advance to the next field. As I mention in Chapter 2, SugarCRM comes with the typical preprogrammed fields that are needed by most users. Many of the fields are fairly self-explanatory (and reflect the type of information that you probably expect to garner for any company): Ticker Symbol, Industry, Annual Revenue, and so forth.
Warning
Not seeing the field you want? Chapter 15 takes you on a tour of the Sugar Studio where you can add fields to your heart's content!
You can always go back to a record and delete, add, or change any information in any field, so don't worry if you leave a field blank.
Scroll down.
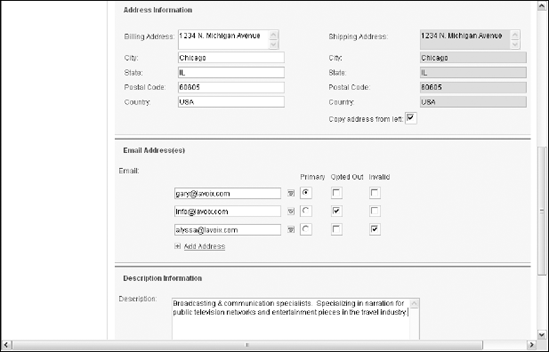
Seek and ye shall find a few more fields to fill in, such as the ones shown in Figure 4-3.
A few features are particularly noteworthy:
Select the Copy Address From Left check box to copy the Billing Address information into the Shipping Address if the two addresses are the same.
The Email Address(es) area allows you to enter multiple e-mail addresses so you can keep track of old addresses that you might want to mark as Opted Out or Invalid.
Click the Save button at the bottom of the screen and, like magic, your new Account will be saved for posterity.
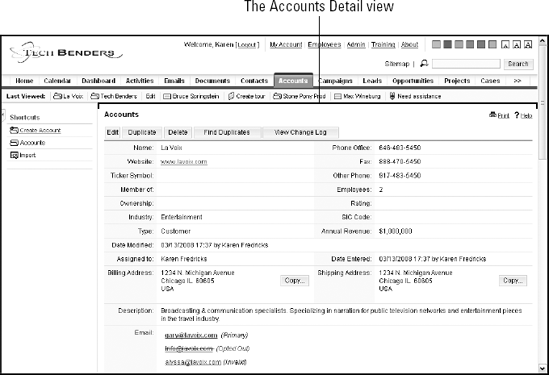
After you enter an Accounts record, you'll want to view the fruit of your labor. Chapter 9 shows you several search options, but for now, you can simply click an account name from the Account List view; the Accounts record will come to life in all of its glorious detail, as shown in Figure 4-4.
You'll notice five buttons running across the top of the Accounts Detail view (refer to Figure 4-4):
Edit: Give this baby a click and you're able to make any necessary changes.
Duplicate: This will start you on your way to adding a new Accounts record; however, certain key pieces of information (including the Accounts record's name, phone numbers, and Web site) will already be filled in. Tweak the Accounts record's name and voilà! — you have another division at the same company.
Delete: This is the button you click to delete the record. Fortunately, you'll receive a warning notice before Sugar bids adieu to the record permanently.
Find Duplicates: You find out how to merge duplicates from the List view later in this chapter in the "Checking for Duplicate Records" section; click this button if you prefer to merge your duplicates from the Details view.
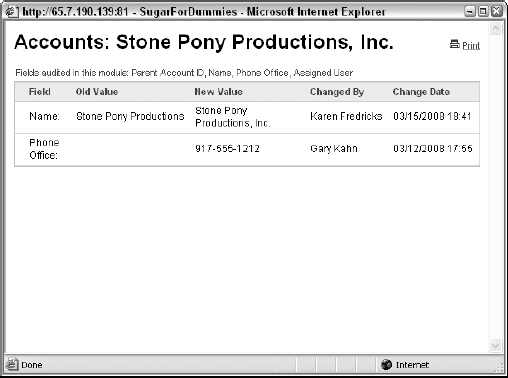
View Change Log: If you work in a large company, you're probably used to playing "Point the Finger." For those of you who aren't familiar with the game, this is where information changes — and everyone places the blame on someone else. Figure 4-5 shows you the Change Log, which tracks every time a user changes information in any of the fields for which the Administrator has turned on the auditing property in the Sugar Studio.
By definition, CRM software helps you track all of your interactions with your customers. By scrolling down an Accounts record, you're able to view subpanels with all the associated records linked to the current Accounts record. Talk about one-stop shopping.
Knowing the subpanels
The subpanels offer a wealth of information related to the Accounts record, including:
Activities: See all the Tasks, Meetings, and Calls for an Accounts record.
History: View the notes, documents, and e-mail attached to the Accounts record.
Contacts: Here's where you can see a list of all the Contacts records that are associated with the Accounts record.
Opportunities: This subpanel shows you the money — or at least all the deals that will (you hope) close and lead to big bucks.
Leads: Gaze at your list of leads, cross your fingers, and hope that these people will soon become Contacts and/or Accounts records.
Cases: Shows you a list of all the customer service issues that have been opened on the account's behalf — along with their status.
Member Organizations: This is a fancy moniker for Division. You can link Accounts records to each other so that you can see the various departments from within the Accounts record.
Bugs: If you're a manufacturer, you might want to cross-reference any product defects to the Accounts record that was being bugged by the bug.
Projects: If you're in the service industry, you'll find this panel particularly effective; here's where you can view all the projects assigned to an Accounts record — and check their status.
Tip
Feeling a bit overwhelmed by the various subpanels? Like a good fast food restaurant, Sugar lets you have things your way. Notice the tabs running across the top of Figure 4-6; you can break the subpanels into bite-sized pieces by clicking the appropriate tab so that only the corresponding subpanels display.

Tip
Want to get rid of a panel entirely? You can click the double up arrows at the top of each subpanel to close the panel. Need to get the panel back? Click the double down arrows to open the panel again.
More subpanel fun and games
Sugar's subpanels are more than just pretty faces. In addition to viewing account-related information, they also let you create new information and edit existing information. Talk about a time saver!
Warning
Any changes that you make are forever preserved in the Change Log, so be careful what you change — others will be able to see a record of those changes!
As you saw in Figure 4-6, the subpanels offer lots of functionality:
Create: You can create a new record directly from the corresponding subpanel. Need to add another Contacts record? Want to create a note? Clicking the Create button at the top of a subpanel takes you to the corresponding new record view.
Select: You might find yourself in a situation where you've added a record but forgot to associate it with the main Accounts record. For example, you might have added Max Wineburg as a contact but failed to mention that he worked at Stone Pony Productions. By clicking the Select button, you can navigate to Max's Contacts record and link him to the Accounts record for Stone Pony Productions.
Edit: Sugar aims to make your life easy as pie and here's a great example. If you notice an error while you peruse the subpanels, feel free to click the Edit link to correct the entry on the fly.
Rem: Short for remove, this link allows you to unlink a record from the master Accounts record if you feel it's linked in error.
On the very simplest level, the main purpose of SugarCRM is to serve as a place to store all your contacts. You can add and edit your contacts from the Contacts Detail view — it contains all the information that pertains to one particular record and allows you to see all your contact's fields.
You probably have lots of contacts that you're dying to enter into your database, so what are you waiting for? Jump right in and follow these steps:
If you aren't already in the Contact List view, click the Contacts tab on the Module Tab bar.
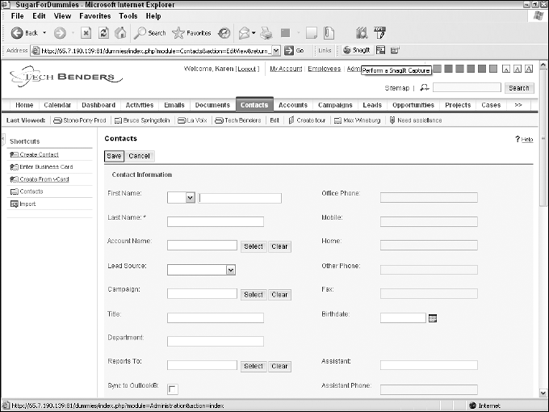
Click Create Contact from the Shortcuts menu to add a new contact to your database.
A blank contact record screen opens like the one you see in Figure 4-7; you're now ready to enter the new contact's information.
Alternatively, you can fill in the contact's first and last name, office phone number, and e-mail address in the Quick Form fields. However, it's well worth the effort to fill in as much information as possible.
Tip
A very nice Sugar feature is the ability to import vCards (virtual/electronic business cards). Should a potential contact send you one, you can import it by clicking the Create From vCard option in the Contacts Detail Shortcuts menu.
Click the Last Name field and enter the Contact's last name.
This is the only required field.
Click the next field you want to add information to and start typing.
Every time you add a new contact, SugarCRM automatically fills in information to the Assigned To and Date Created fields. When you add a new contact, Sugar inserts your name into the Assigned To field and your name and the current date into the Date Created field. The Date Created field serves as a permanent record; you can't change it. However, you can override the contents of the Assigned to field if you desire.
Continue filling in fields.
Most of these are conveniently located in the top half of the Contacts Detail view. A few of the fields are a little less obvious:
Account Name: This is where you can associate a contact with an Accounts record. If you type in the first few letters of an Accounts record name, Sugar will suggest an existing Accounts record name. Alternatively, you can click the Select button and search for an Accounts record name.
Tip
You can associate as many Contacts records as you like with the same Accounts record.
Lead Source: If you're paying for advertising in two newspapers or putting a lot of time and effort into your Web site optimization, it's nice to know whether your efforts result in any new business. Here's where you enter just such information.
Campaign: Chapter 13 shows you how to create a marketing campaign, but I give you a bit of a sneak preview here. A campaign targets a large group of individuals or organizations. Here's where you can associate a specific Contacts record with a marketing campaign to help you measure the success rate of those campaigns.
Reports To: Corporate food chains are alive and kicking. Because it's not always easy to identify the key players without a scorecard, you can associate this contact with his direct superior from the same company.
Assigned To: By default, your name appears in the Assigned To field. However, feel free to place the name of one of your co-workers here instead if she is responsible for this contact.
Scroll down and continue adding new contact information.
Many cool contact fields are just waiting for data, and you don't want to miss any of them.
Add your data as uniformly as possible.
One sure-fire way to sabotage your database is to develop new and creative ways to say the same thing. In Florida, users often vacillate between Fort, Ft, and Ft. Lauderdale, resulting in a bad sunburn and the inability to find all their contacts correctly. Notice that several of the SugarCRM fields contain drop-down lists. In these fields, you can choose an item in the list or you can type the first few letters of an item; the field then automatically fills with the item that matches what you typed or clicked. Chapter 15 shows you how to add — and modify — drop-down lists.
Click the Save button to save the new contact information.
As I mention earlier, there's a lot of similarity among Accounts, Contacts, and Leads records. When you click on a Contacts record from the Contact List view, you end up in the Contacts Detail view that you see in Figure 4-8.
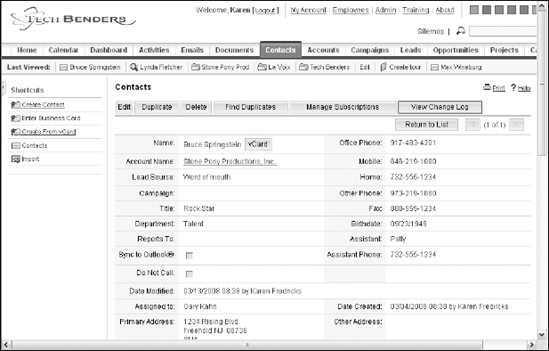
From here, you can edit, duplicate, delete, find duplicates, and view the Change Log exactly as you do for an Accounts record. Not wanting to bore you, you can read the earlier section, "Accessing an existing Accounts record," substituting contacts for accounts.
One difference you'll notice between a Contacts and Accounts record is the ability to manage subscriptions directly from the Contacts Detail view. In Sugar, a subscription refers to a newsletter that you are producing. Chapter 13 shows you how to create marketing campaigns — including newsletters — but for now, here's how to make sure your contact is set to receive your literary work.
Click the Manage Subscriptions button on the Contacts Detail view.
The Manage Subscriptions window (shown in Figure 4-9) springs to life.
The Newsletters Subscribed To box gives you a list of the newsletters that the contact is receiving; the Available Newsletters box shows you other newsletters that are available to the Contacts record.
Drag a newsletter from the Available Newsletters box to the Newsletters Subscribed To box.
Alternatively, if you want to remove someone from your mailing list, you can drag in the reverse direction.
Click Save to save your changes.

The Contacts record becomes a part of the Target List that Sugar associates with a marketing campaign.
Tip
It would seem logical that after hitting the Save button to associate a Contacts record with a newsletter you'd return to the Contacts Detail view where you started. Wrong. However, you'll notice that the Contacts record's name now appears on the Last Viewed bar; click the name and you'll end up right where you started.
Sugar makes a distinction between a Leads and a Contacts record. In Sugar-speak, a lead is someone that has icicles hanging from his forehead — or at least hasn't started speaking with you in a warm and fuzzy manner about purchasing your products or services. A contact, on the other hand, is someone you feel you have a great shot at closing — or maybe they're someone you've already had some dealings with. In any case, you can always promote a lead to a contact when the ice starts to melt from his checkbook.
If you've already noted the similarities between Accounts and Contacts records, you're going to feel a very strong sense of déjà vu when it comes to working with Leads records. I'll try not to bore you with any ABC (already been covered) information, but I want to point out a few of the subtle differences between the record types:
Click the Leads tab on the Module Tab bar.
One interesting thing to note is that the Lead List view alphabetizes by first name rather than by last name.
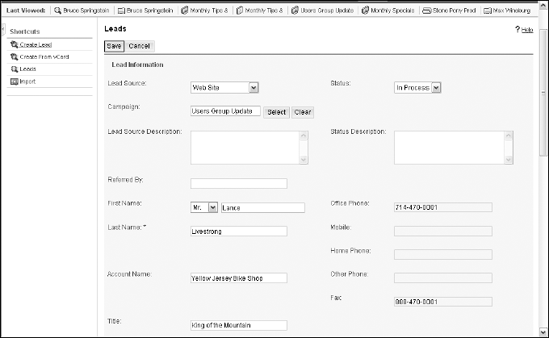
Click Create Lead from the Shortcuts menu to add a new lead to your database.
On cue, a blank Leads record opens and you can commence entering your new lead into the window that you see in Figure 4-10.
You probably already know the drill by now, but you can also use the Quick Form and fill in the lead's last name to add a bare-bones Leads record.
Warning
Sugar will not warn you if you're adding a new Leads record that's identical to an existing Contacts record. Nor can you merge the two records together when you see the error of your way. You have to either delete the Leads record or promote her to a Contacts record and then merge the two Contacts records together.
Click the Lead Source drop-down field and indicate the source of the new lead.
Click the next field you want to add information to and start typing.
Just like a Contacts record, the only Leads record field that is required is the Last Name field. And, just like a Contacts record, every time you add a new contact, SugarCRM automatically fills your name into the Assigned To field and the date into the Date Created field. Feel free to change the contents of the Assigned To field.
Continue filling in fields.
One difference you might notice is that the Account Name field is not linked to the Accounts module, as it is when you enter a new Contacts record. The theory here is that if the Leads record is ice-cold, it's not worth adding his company permanently to the Accounts list.
Scroll down and continue adding new contact information.
Warning
Your mantra is consistency!
Click the Save button to save the new Leads record information.
By now, you might be tired of hearing about all the timesaving features that are incorporated into SugarCRM. Personally, I don't think you can ever get too much of a good thing.
Converting a Leads record to a Contacts record is ridiculously easy — and saves you having to enter all that information a second time. Here's all you need to do:
Click the name of the lead from the Lead List view.
The Leads record opens in the Leads Detail view.
Warning
Having trouble finding the lead you're looking for? Chapter 9 shows you a couple of ways to find just the record you need.
Click the Convert Lead button.
The Leads Detail window changes slightly. The top half of the screen allows you to edit or add basic contact information including name, address, and phone numbers.
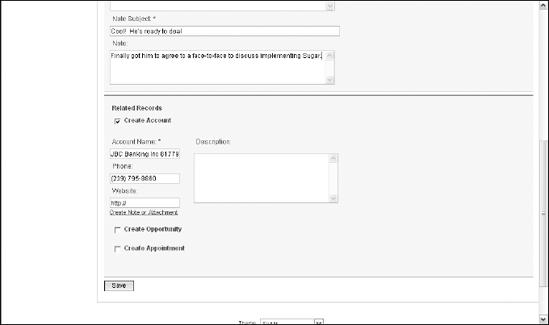
(Optional) Click the Create Note or Attachment link to add a note or attachment to the new Contacts record.
Figure 4-11 shows you the expanded window, which allows you to include fields to add a note subject and body, and attach an attachment if you so desire.
(Optional) Scroll down further to the Related Records area of the window, select the Create Account, Create Opportunity, and/or the Create Appointment check boxes and fill in the appropriate information.
Here's your chance to add an Account, Opportunity, or Appointment — and have it automatically link to the record that you're promoting. If you're adding a new account, the one you previously added for the Leads record will automatically appear. The account phone number will also appear based on the Leads record's office phone number.
Click Save to complete the transformation from Lead to Contact.
Good software helps you manage the more mundane aspects of your life. SugarCRM is a great piece of software because it helps make mincemeat of your work.
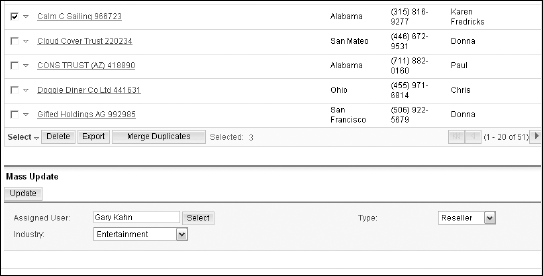
If you scroll to the bottom of the List view, you'll see the Mass Update portion of the screen. Here's where you can update all the selected records in a click of a button:
Select the records in the List view that you want to update.
Fill in the field information that you want to change.
Figure 4-12 shows you the fields that you can update for your Accounts records. Updating Leads or Contacts records information gives you slightly different choices. Regardless of the record type, you can change the Assigned User field. This list draws from the user list of your Sugar database. You can type a user name, or click the Select button and choose the name of a user.
Click the Update button.
A prompt appears, asking you if you really want to update the records.
Click OK to update the records.
The field information will update on the records that you selected, and the Account List will show only those records.
What do you do if you find that you're no longer doing business with one of your accounts? Or that one of your contacts is MIA — or no longer works for a company? For whatever reason you decide that a record no longer needs to be a part of your database, you can just delete that record.
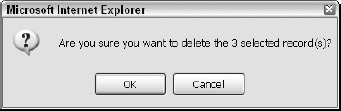
SugarCRM allows you to delete a single record from the Detail view, or selected records from the List view. In either view, clicking the Delete button brings up the warning shown in Figure 4-13. Click OK and your records will disappear. Forever.
Although the procedure is rather simple, you might want to rethink deleting records. When you delete a record, you also delete all the associated notes and histories tied to that record. For example, suppose that State College uses SugarCRM to keep track of all the prospective students it has contacted — or has been contacted by. State College admissions personnel receive thousands of inquiries per month and fear that the database will become too large to manage — and subsequently think that deleting all prospects that they haven't had contact with in over a year is the best course of action. However, some of those prospects might be attending different schools that they aren't happy with and might want to enter State College as transfer students. Other prospects might transfer after completing two years at a community college, and still others might consider attending State College as graduate students.
What to do in such a situation? You have a few options. Consider moving the contacts that you no longer need into another archival database. That way, should the need ever arise, you can still find all the original information on a contact without having to start again from scratch. How nice to be able to rekindle a relationship by asking, "So tell me, how did you find the accounting department at Podunk University?" Another option is to change the contact's status to inactive.
Losing contacts in your database is a very scary thought. You undoubtedly rely very heavily on your SugarCRM database; therefore, losing that data can be potentially devastating to your business. Worst of all, when you realize that you just accidentally removed several — or even hundreds — of records from the database, panic can set in!
Avert this panic by following these tips before you attempt to delete any of your records:
Read the warning and make note of the number of contacts that you're about to delete. Don't be afraid to click Cancel.
Remember the three rules of computing: back up, back up, back up! Chapter 16 provides you with instructions on how to create a backup. A good backup provides the easiest method to restore all your information after you accidentally delete it.
It's a good practice to make sure that a record doesn't already exist in your database before you set about adding it a second time. However, if you realize that a record exists multiple times in your database, you can easily merge them from either the List or Detail view.
You'll probably run across duplicate records while perusing the List view. Here's how you can fix the problem:
Indicate the duplicated records by selecting the appropriate check boxes.
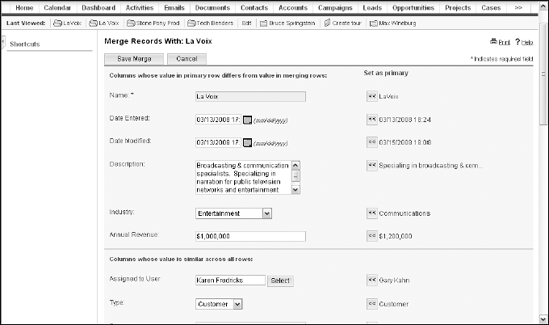
If necessary, you can merge more than two records together, as shown in Figure 4-14.
Click the Merge Duplicates button.
The Merge Records With window opens. The left column shows you the data to be kept when the records are merged; the column on the right shows what data — if any — will be lost.
Click the double left arrows next to any data you want to save.
In the example in Figure 4-15, you see that the Industry information is different for the two records. If you'd like to retain Communications as the industry, click those arrows and the data will copy over to the first record's information.
Click the Save Merge button when you're finished.
A prompt appears, warning you that your record(s) will disappear after the merge.
Click OK to continue.
Say sayonara to the old record(s) and howdy to the newly merged record. You might even hear a faint Ta-Dum in the background.
You might want to export a list of your records for a number of reasons. You might need to give a list of your Accounts records to a mailing house in order for them to send out those slick new brochures they've created for you. Or, maybe you want to share a list of the Contacts records belonging to a trade association with a non-Sugar user. Whatever the reason, it's quite simple to export that list by following these steps:
Select the records you wish to export from any List view.
Click the Export button.
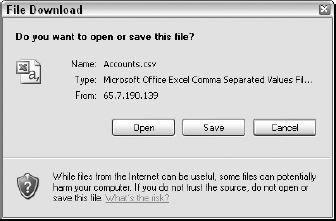
The window in Figure 4-16 magically appears, making this a foolproof operation.
Click Save.
The Save As window opens.
Navigate to the folder where you want to save the file and give it a name.
Click Save.
Sugar creates a
.csv(comma-separated values) file containing all your selected records.