In This Chapter
Using document workspaces to work collaboratively on documents
Adding new document workspaces to your SharePoint site
Setting version settings for your document workspace
A document workspace is a subsite of your SharePoint site that uses the special Document Workspace site template. This site template provides Web Part elements that make it easy to edit a particular document collaboratively or to work together on a project that involves a series of related documents (such as preparing an annual report or a special budget proposal).
As with other subsites that you create for your SharePoint site (see Chapter 2), when you set up a new document workspace, SharePoint imbues it with the typical Announcements, Links, and Calendar lists you'd expect as well as a Team Discussion board. In addition, the Document Workspace template also adds a distinctive Shared Documents and Tasks list.
You can then use all these standard document workspace elements to outline the document-related project to your team members, provide them with the documents they need, assign particular project tasks to them, and provide them with the deadlines and milestones they need to reach in accomplishing these tasks.
SharePoint provides three main methods for adding a new document workspace to your SharePoint site:
From scratch following the same general steps you would take if you were adding a new standard subsite to SharePoint
From a document in a SharePoint document library that your teams need to edit in the course of the collaborative project
From an Office 2003 or 2007 document (created with an application such as Microsoft Word or Excel) that your teams need to edit in the course of the collaborative project
To create a document workspace from scratch, follow the same basic steps you use when creating a new subsite:
Open the home page of the parent site to which you want to add your document workspace.
If you want to add the document workspace as a subsite to the top-level site, open the home page of the entire SharePoint site.
Choose Create from the Site Actions drop-down menu.
SharePoint opens the site's Create page.
Click the Sites and Workspaces link in the Web Pages column.
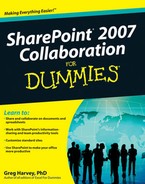
SharePoint opens a New SharePoint Site page similar to the one shown in Figure 9-1.
Type the name of the new document workspace in the Title text box and then press Tab.
SharePoint advances the cursor to the Description text box.
Type a description of the purpose of the new document workspace in the Description text box and then press Tab.
SharePoint advances the cursor to the URL Name text box.
Type the name you want to use as the last part of the URL address of the new document workspace in the URL Name text box.
Now, you need to select the Document Workspace template for the new subsite.
Click the Document Workspace option on the Collaboration tab in the Select a Template list box.
(Optional) Make any changes necessary to the Permissions, Navigation, and Navigation Inheritance options of the new document workspace.
If you don't modify any of these default settings, your team members have the same permissions in the new document workspace as they do in its parent site, and a tab for the new document workspace appears in the Top Link bar as well as under the Sites heading in the parent site's Quick Launch.
Click the Create button.
SharePoint creates the new document workspace and then displays its Web page in your browser. This new document workspace page contains all the lists shown in Figure 9-2, which you can then customize (see Chapter 2). You can also add your own content to it (see Chapter 4 for details).
If you have a document already uploaded to an existing document library and you determine that your teams need to edit that document collaboratively, you can create the document workspace and copy the document to that workspace as part of a single procedure:
Open the document library containing the document you want to copy to the new document workspace and then click the document's name and highlight the Send To option on the drop-down menu that appears.
SharePoint displays the Send To option's submenu, as shown in Figure 9-3.
Choose Create Document Workspace from the Send To submenu.
SharePoint opens a Create Document Workspace page that tells you that a new document workspace is going to be created and a copy of the selected document is going to be stored there. This page also informs you that you can publish the (edited) document from the new workspace back to its original location in the document library if desired.
Click the OK button on the Create Document Workspace page.
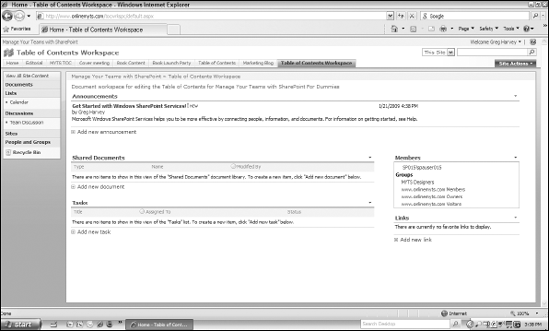
SharePoint creates the new document workspace and displays its page, similar to the one shown in Figure 9-4. This new document workspace page carries the name of the selected document as its page name, already contains a welcome message in its Announcements list, and shows that a copy of the document has been put into its Shared Documents list.
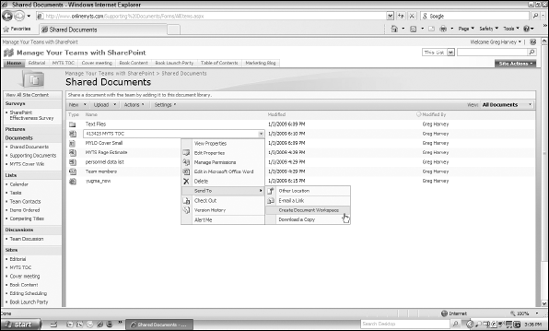
Figure 9.3. I need to create a new document workspace with the 413425 MYTS TOC document in my Shared Documents library.
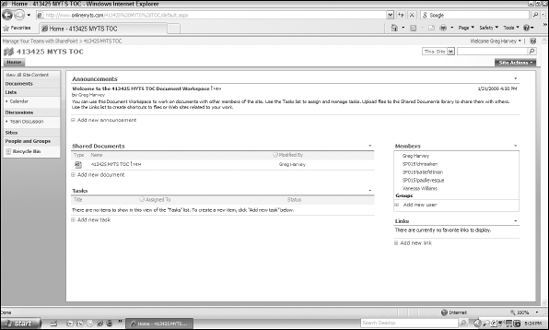
Figure 9.4. I created this document workspace created from the document in my Shared Documents library.
The Members and Groups list that appears in a Web Part on the right side of this new document workspace may list your name as the sole member of the document workspace. When this is the case, you need to add the other team members who need access to this document workspace (or their user groups) as members, as spelled out in the next step.
Click the Add a New User link under the Members and Groups list.
SharePoint displays the Add Users page for the document workspace.
Use the Add Users, Give Permission, and Send E-Mail options on the Add Users page to add individual team members or their groups to the document workspace and then click OK.
Use the options on the Add Users page (see Chapter 3 for details) to add individual users or their groups to the workspace.
After you click OK, SharePoint adds the users and groups you selected and displays the Permissions page for the document with a list showing the level of permissions you assigned.
In the Content Navigation Breadcrumb at the top of the Permissions page, click the link to the document workspace (which is identical to the name of the document used to create the workspace).
SharePoint once again displays the document workspace page, which now displays the names of the individual team members or their groups that you just added to the site.
Note
When you create a document workspace from a document in an existing document library, SharePoint doesn't automatically add a link to the new document workspace to the parent site's Quick Launch. This means that either you must manually add a Quick Launch link or your team members need to access the document workspace from the Sites and Workspaces section of the site's All Site Content page. See the following section for details on creating this link.
To add a link for a document workspace to the parent site's Quick Launch when you create the workspace from an existing document, follow these steps:
Click the Sites link in the parent site's Quick Launch in SharePoint.
SharePoint opens the All Site Content page for that site, using the Sites and Workspaces filter.
Click the link to the document workspace you want to add to the Quick Launch.
SharePoint opens the document workspace.
Right-click the document workspace's URL address in your Web browser's address bar and then choose the Copy option from the shortcut menu.
SharePoint copies the workspace's URL to the Windows Clipboard.
Click the link to the parent site in the Content Navigation Breadcrumb at the top of the document workspace page.
SharePoint opens the parent site's home page.
Choose Site Settings from the Site Actions drop-down menu to open the Site Settings page, and once you're there, click the Quick Launch link in the Look and Feel column.
SharePoint opens the Quick Launch page for the site.
Click the New Link button at the top of the Quick Launch page.
SharePoint opens the New Link page.
Select http:// in the Type the Web Address text box, press Ctrl+V, and then press Tab.
Windows pastes the document workspace's URL into the Type the Web Address text box and then advances the cursor to the Type the Description text box.
Type a brief description of the document workspace's Quick Launch link into this text box.
Select Sites from the Heading drop-down list and then click OK.
SharePoint returns you to the Quick Launch page, where the link to the document workspace appears in the Sites section.
Click the parent site's link in the Content Navigation Breadcrumb at the top of the Quick Launch page.
SharePoint displays the parent site's home page, where the new link to your document workspace appears at the bottom of the Sites section of its Quick Launch.
The last method for creating a document workspace on your SharePoint site is to create it locally (that is, on your computer rather than on the SharePoint server) using the very Office application (such as Word 2007 or Excel 2007) used to create the document you want your teams to edit collaboratively in that new workspace.
To create a document workspace from an Office document, follow these steps:
Open the document you want uploaded to a new document workspace in its native Office 2007 application.
Note
Note that you do not have to open the SharePoint site where you want to create the new document workspace at the time you take this step. You can create a new document workspace from an Office 2007 application even when you're not currently logged in to your SharePoint site.
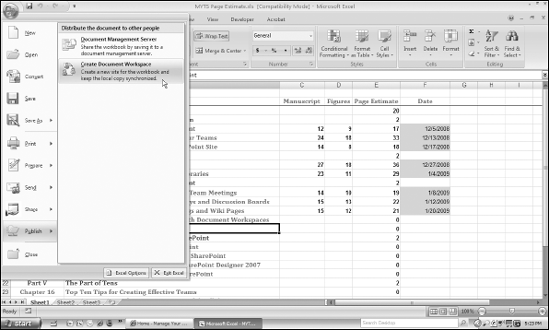
Click the Office button in the upper-left corner of the Office program and then highlight the Publish option.
The Office program opens a Distribute the Document to Other People submenu similar to the one shown in Figure 9-5.
Choose Create Document Workspace from the bottom of the Distribute the Document to Other People submenu.
The Document Workspace pane opens in the Office application on the right side of the window. This pane displays general information about document workspaces and contains two boxes: Document Workspace Name text box (with the name of the document opened in your Office application) and a Location for New Workspace combo box.
(Optional) Edit or replace the current document name automatically entered in the Document Workspace Name text box if you want the workspace to have another name.
Next, you need to specify the URL address of your SharePoint site.
Enter the URL address of your SharePoint site in the Location for New Workspace combo box (or select this URL if you've previously connected a document to this site in this Office application) and then click the Create button.
Warning
Your Office application may display an alert dialog box warning you that your SharePoint site is not among its trusted sites, if it's not already listed as one. If you receive this alert, click OK and then open your Web browser and use its Internet Options to add your SharePoint site to its trusted sites list. (In some corporate environments, you will choose your local intranet instead.) If you're using Internet Explorer 7 or 8, you do this by pressing the Alt key to display the pull-down menus. Then, choose Tools

If your SharePoint site is hosted by a third-party vendor, you'll probably receive a Connect To dialog box asking for your user ID and password. Provide this information and then click OK.
After you get through all this necessary but unpleasant security stuff, Office then goes ahead and creates the document workspace on your SharePoint site, while at the same time saving the current Office document to it.
Note
When you create a document workspace from a document open in an Office application, SharePoint does not automatically add a link to the new document workspace to the parent site's Quick Launch. This means that either you must manually add a Quick Launch link or your team members need to access the document workspace from the Sites and Workspaces section of the site's All Site Content page. See the section "Adding a document workspace to the parent site's Quick Launch," earlier in this chapter, for details on adding this link.
After your Office application finishes creating the new document workspace on your SharePoint site, the Document Workspace pane in its program window is replaced by a Document Management pane, similar to the one shown in Figure 9-6.
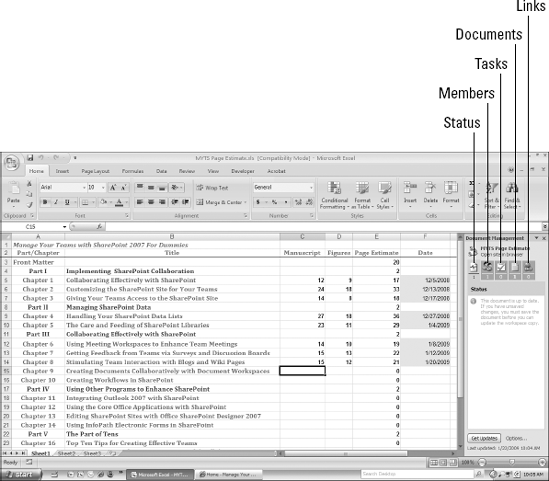
Figure 9.6. The Document Management pane appears in the Office application after you create a document workspace on your SharePoint site.
As you see in this figure, the Document Management pane indicates the current status of the document on the workspace (which is up-to-date when you first create the workspace). This pane also contains a series of very useful buttons for managing your new workspace from the document in your Office application:
Status: This button is selected by default and shows you whether or not the document saved on the SharePoint site is currently up-to-date (which it is when you first create the document workspace).
Members: Click this button to display the names of the members who currently have access to the document workspace. When you first create a document workspace, you are the only member. You can, however, use the Add New Members link and the Send E-mail to All Members link that appear when the Members button is selected to add members and then invite them to visit the workspace, respectively.
Tasks: Click this button to display all the tasks assigned to team members and to use its Add New Task, Alert Me About Tasks, and View Workflow Tasks links to assign new tasks, send out alerts, and display any workflow settings you've set up for the document (see Chapter 10 for details), respectively.
Documents: Click this button to display all the documents added to your new workspace. (Only the document currently open in the Office application is listed in the pane when you first create the workspace.) You can use the Add New Document, Add New Folder, and Alert Me About Documents links that appear when the Documents button is selected to add other documents to the workspace, create new subfolders, and send out alerts about changes to the documents in the workspace, respectively.
Links: Click this button to display the links that are added to the workspace. You can use the Add New Link and Alert Me About Links hyperlinks that appear when the Links button is selected to add new links and send out alerts about changes to the links list in the workspace, respectively.
When you or other team members save editing changes locally to a copy of the workspace document on your computer, you still have to synchronize those changes with the copy of the document saved on the SharePoint workspace. The Document Management pane in the your Office program tells you when the copies need to be synchronized by displaying an alert in the Status area telling you that your local changes have not been updated in the copy of the document stored on your SharePoint document workspace.
To synchronize your changes by updating this copy on the SharePoint site, you need to click the Update Workspace Copy link that appears beneath this message in the Manage Document pane. Office then updates the copy on your SharePoint site, and the status of the document reported in the Document Management pane becomes up-to-date once again.
To check for and get updates on the latest changes made to the Members, Tasks, Documents, and Links lists on the workspace, click the Get Updates button that appears at the bottom of the Document Management pane.
You can use the Options link to the immediate right of the Get Updates button to open the Service Options dialog box (shown in Figure 9-7), where you modify the settings that control when the Document Management pane appears in the document saved on the workspace and how and when workspace updates are made.
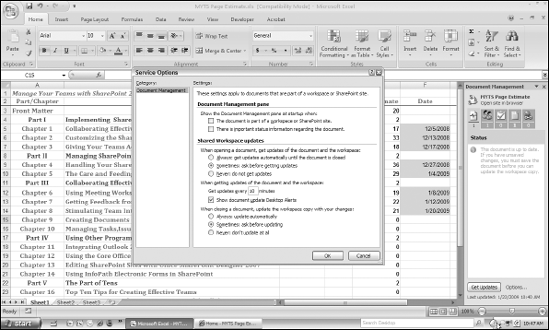
Figure 9.7. You can modify the update settings for the document used to create a document workspace in the Service Options dialog box.
Tip
For the Document Management Pane settings, it's generally a good idea to select the There Is Important Status Information Regarding the Document check box under the Show the Document Management Pane at Startup heading so that your Office application automatically opens this pane whenever the program detects new updates to the workspace's Members, Tasks, Documents, or Links lists.
Before you and your team begin collaboratively editing a document that you've placed in the default Shared Documents library on a new document workspace, you may want to modify its versioning settings. Versioning is an umbrella term that covers three distinct areas of document security: Document Version History, Content Approval, and Require Check Out.
When you activate the Document Version History settings, SharePoint creates a version of the document each time it is edited by someone on the team. To turn on these settings, you choose between having SharePoint save major and minor versions of the document. When you select major versions, SharePoint creates a version only when you or a team member saves and closes the document. When you select minor versions, SharePoint creates a minor version each time you or a team member saves editing changes (without closing the document).
Warning
Keep in mind when selecting minor versions of the document that this results in many more versions of the document. This can be a great thing when you have lots of team members editing collaboratively and want to track document changes closely. However, it also can result in lots of copies of the same document to keep track of — copies which, when added together, can start to take up quite a bit of valuable storage space on the server.
At the time you activate the Document Version History settings for a workspace, you may also activate Content Approval. When you do this, you as the administrator of the document workspace must approve each version of the document. Until you make this approval, the edited document resides in a special draft items section of the workspace that only the team members designated by the Draft Item Security settings can access.
The final version setting is the Require Check Out setting. You activate this setting to prevent multiple team members from being able to edit the same document saved in the workspace at the same time, thus preventing your team members from making conflicting edits to the document.
When Require Check Out is turned on, a document in the workspace is automatically checked out to you when you create a new document in that workspace or save a new document to that workspace. Any team member to whom the document is checked out must check it back in before the other members of your team can see the document when they access the workspace.
When you or a team member opens a document that's saved in the workspace for editing, SharePoint automatically checks the document out to you or to that team member. While the file is checked out, no one else on the team can open it for editing. (SharePoint indicates that the file is checked out with a special icon in the library list; it also indicates the person to whom the document is checked out when you position the mouse pointer over the document name.)
When the person to whom the document is checked out checks it back in, he's prompted to record comments indicating the types of editing changes he may have made. If the Document Version History settings are also activated, his comments are saved as part of the version history. Should a team member ever forget to check a document back into a workspace, you as the workspace administrator can check the document back in and make it available to others on the document workspace.
Note
Keep in mind that you activate these same versioning settings for regular document libraries and not just for the libraries you add to your document workspaces.
To modify the versioning settings for the document(s) you upload to the Shared Documents library in a new document workspace, follow these steps:
Open the document workspace in SharePoint and then click the Shared Documents link for the default document library containing the document(s) whose version settings you want to modify.
SharePoint opens the Shared Documents page for that library.
Choose Document Library Settings from the Settings drop-down menu.
SharePoint opens the Customized Shared Documents page.
Click the Versioning Settings link in the General Settings column.
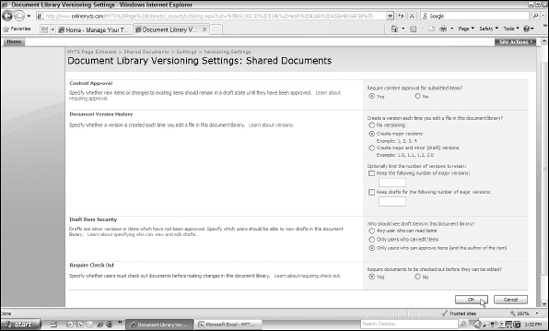
SharePoint opens the Document Library Versioning Settings page for the Shared Documents library, similar to the one shown in Figure 9-8.
(Optional) If you want to approve a team member's changes before the modified document is available in the document library, select the Yes radio button in the Content Approval section of the page.
When you select this option, edited versions of the document remain in the Draft Items area until you approve them.
Once this Yes radio button is selected, the radio button options in the Draft Items Security section of the Document Library Versioning Settings page become active. You can use these options to determine who gets to see the documents placed in the Draft Items area: Any User Who Can Read Items, Only Users Who Can Edit Items, or Only Users Who Can Approve Items (and the Author of the Item), which is the default Draft Items Security setting.
(Optional) If you want SharePoint to create numbered versions each time the document is edited, select the Create Major Versions or the Create Major and Minor Versions radio button in the Document Version History section of the page.
When you select either of these radio buttons, the Optionally Limit the Number of Versions to Retain check box and text box settings in the Document Version History section of the Document Library Versioning Settings page become active. You can then use these options to limit the total number of major versions SharePoint should keep as well as the total number of drafts of the major versions to store.
(Optional) If you want to require your team members to check out the document before they can edit it, select the Yes radio button in the Required Check Out section.
When you select the Yes radio button, each team member must formally check the document out before making any edits to it.
After making all the changes you want to the versioning settings, click OK.
SharePoint makes the changes to the Shared Documents library versioning settings and then returns you to the Customize Shared Documents page. You can then return to the document workspace page by clicking its link in the Content Navigation Breadcrumb at the top of this page.