
Creating a data-driven web application without writing any code using Dynamic Data's scaffolding functionality
Customizing the data model and presentation layer of a Dynamic Data application
Adding Dynamic Data features to an existing web application
Most developers spend an inordinately large amount of their time writing code that deals with data. In fact, this is so fundamental to what many of us do on a daily basis that an acronym has appeared to describe this type of code — CRUD. CRUD stands for Create, Read, Update, Delete, which are the four basic functions that can be performed on data.
For example, consider a simple application to maintain a Tasks or To Do list. At the very least the application must provide the following functionality:
Create: Create a new task and save it in the database.
Read: Retrieve a list of tasks from the database and display them to the user. Retrieve and display all the properties of an individual task.
Update: Modify the properties of an existing task and save the changes to the database.
Delete: Delete a task from the database that is no longer required.
ASP.NET Dynamic Data is a framework that takes away the need to write much of this low-level CRUD code. Dynamic Data can discover the data model and automatically generate a fully functioning, data-driven web site at run time. This allows developers to focus instead on writing rock-solid business logic, enhancing the user experience, or performing some other high-value programming task.
This chapter demonstrates how to use Dynamic Data scaffolding to create a data-driven web application with little or no code. You also learn how flexible Dynamic Data is by customizing the data model and web pages.
Although Dynamic Data is somewhat synonymous with scaffolding and building a data-driven web application from scratch, at the end of this chapter you will see that you can get a number of benefits by adding Dynamic Data functionality to your existing web application.
Before you can create and run a Dynamic Data web application you will need a database. The examples in this chapter use the SQL Server 2008 AdventureWorksLT database, which you can download from the CodePlex web site at http://msftdbprodsamples.codeplex.com/.
Once you've downloaded your database, open Visual Studio and select File
Note
If you prefer working with Web Site projects instead of Web Application projects you can still use Dynamic Data. Under the New Web Site dialog you will find two equivalent templates for creating a new LINQ to SQL or Entities Dynamic Data Web Site project.
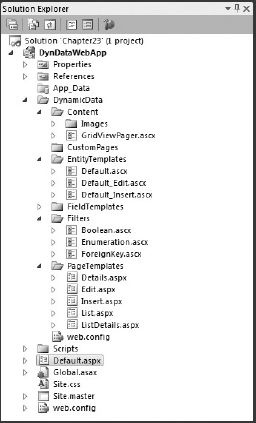
Select the Dynamic Data Linq to SQL Web Application project and click OK. When the new project is created it will generate a large number of files and folders, as shown in Figure 23-1. Most of these files are templates that can be modified to customize the user interface. These are located under the DynamicData root folder and are discussed later in this chapter.
The project template will also create a standard web form, Default.aspx, as the start page for the web application. As with the standard ASP.NET Web Application project, the application encourages best practices by making use of the master page feature and an external CSS file, and includes the JQuery JavaScript library. See Chapter 20 for further information on any of these features.
Once you have created your new project you will need to specify the database and create a new data model. Right-click the App_Data folder and select Add Existing Item, then browse to the AdventureWorksLT2008_Data.mdf file you downloaded earlier and click Add.
The next step is to create the data model. Right-click the project in the Solution Explorer and select Add
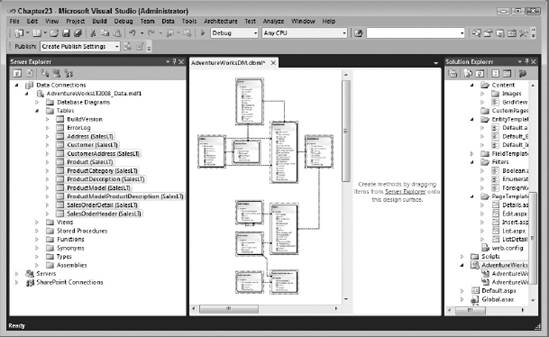
After you click Add, the new item will open in the Object Relational Designer. Double-click the AdventureWorksLT database file you added earlier to open it in the Server Explorer and then expand the Tables node. Select all tables, except the first two, and drag them onto the Designer. This populates the LINQ to SQL data model as shown in Figure 23-2.
Finally, you'll need to register your data model with Dynamic Data and enable scaffolding. Open the Global.asax.cs (or Global.asax.vb if you are using Visual Basic) and locate the following line of code. Uncomment this line and change the YourDataContextType to AdventureWorksDMDataContext. Lastly, change the ScaffoldAllTables property to true.
- C#
DefaultModel.RegisterContext(typeof(AdventureWorksDMDataContext),
                             new ContextConfiguration()
                             { ScaffoldAllTables = true });
- VB
DefaultModel.RegisterContext(GetType(AdventureWorksDMDataContext), _
                             New ContextConfiguration() _
                             With {.ScaffoldAllTables = True})
That is all you need to do to get a data-driven web application with full CRUD support up and running.
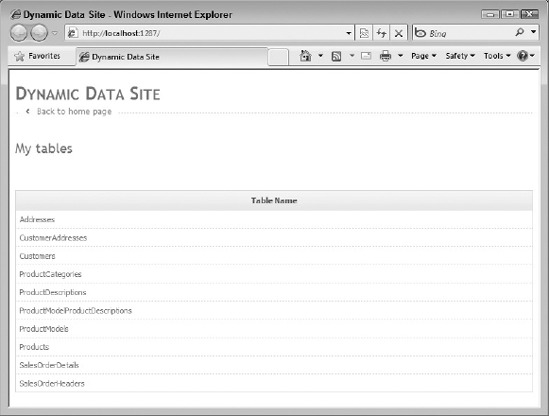
When you run the application, it opens with the home page, Default.aspx, which displays a list of hyperlinks for all the tables you added to the data model (see Figure 23-3). Note that the names listed on this page are pluralized versions of the table name.
When you click one of these links, you are taken to the List.aspx page, shown in Figure 23-4, for the selected table. This page, along with the Details.aspx page for an individual record, represents the "Read" function of your CRUD application and includes support for paging and filtering of the records by foreign key. This page also displays links to view details, edit, or delete a record. Any foreign keys are displayed as links to a details page for that foreign key record.
Note
You may notice that some database fields are missing from the web page, such as ProductID and ThumbNailPhoto. By default, Dynamic Data will not scaffold Identity columns, binary columns, or computed columns. This can be overridden, as you will find out later in this chapter.

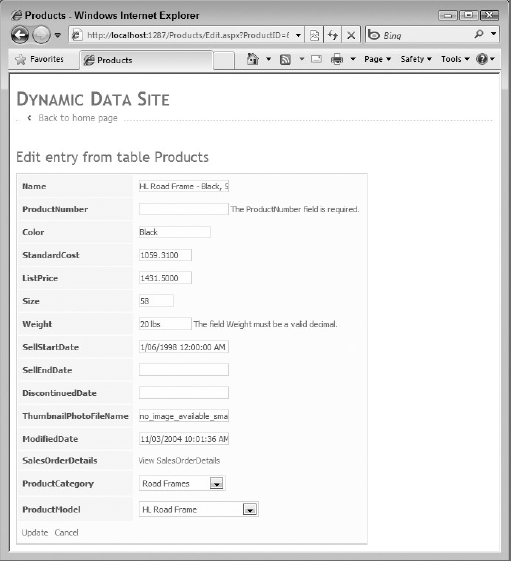
The "Update" CRUD function is accessed by clicking the Edit link against a record. This displays the Edit.aspx page, as shown in Figure 23-5. You will notice that the textboxes are different widths — this is determined based on the length of the database field. This page also includes a number of ASP.NET validation controls, based on database field information. For example, the ProductNumber field has a RequiredFieldValidator because the underlying database field is not nullable. Likewise, the Weight field uses a CompareValidator to ensure that the value entered is a decimal.
Foreign keys are also handled by drop-down selectors. For example, in Figure 23-5 the ProductCategory and ProductModel fields are foreign keys. Tables that use the selected table as a foreign key are displayed as hyperlinks. This can be seen in the SalesOrderDetails field in Figure 23-5.
While scaffolding an entire database makes for an impressive demo, it is unlikely that you would actually want to expose every table and field in your database to end users. Fortunately, Dynamic Data has been designed to handle this scenario, and many others, by customizing the data model.
Before you begin customizing the data model you should disable automatic scaffolding of all tables. Open the Global.asax.cs file and change the ScaffoldAllTables property to false.
The next step is to selectively enable scaffolding for individual tables. Begin by adding a new class file to the project called Product.cs. This class must be a partial class, because Product is already defined in the LINQ to SQL data model. To enable scaffolding for the Product table, decorate the class with the ScaffoldTable attribute. Once completed, the class should look similar to the following code:
- C#
using System.ComponentModel.DataAnnotations;

namespace DynDataWebApp
{
    [ScaffoldTable(true)]
    public partial class Product
    {
    }
}
- VB
Imports System.ComponentModel.DataAnnotations

<ScaffoldTable(True)> _
Partial Public Class Product
End Class

If you run the application now only the Product table will be listed and editable.
Note
You can achieve the same result by leaving the ScaffoldAllTables property to true and selectively hiding tables by decorating their corresponding classes with the ScaffoldTable attribute set to false.
In many cases you will want certain fields in a table to be either read only or hidden. This is particularly useful if the table contains sensitive data such as credit card information.
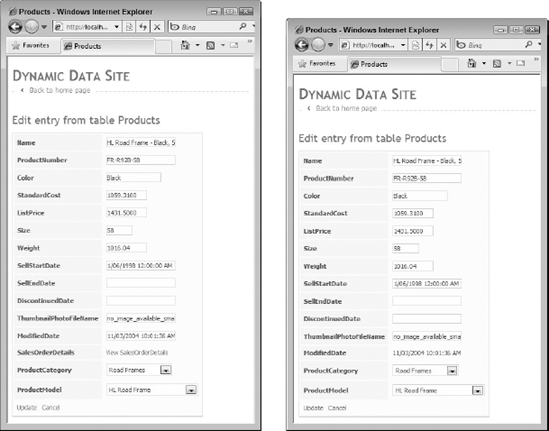
For example, when you edit a record in the Products table, it displays a link to the SalesOrderDetails table. This link is disabled because the SalesOrderDetails table has not been enabled for scaffolding. Therefore displaying this field provides the user with no useful information. Also the ModifiedDate field, while useful for end users to know, is not something that you would typically want them to edit directly. Therefore it would be better to display this field as read only and allow the database to modify it with an Update trigger.
These requirements are supported by Dynamic Data by adding a metadata class to your data model class. In the Product.cs file add a new class to the bottom of the file called ProductMetadata. This class can be associated by applying the MetadataType attribute to the Product class.
In the ProductMetadata class, create public fields with the same name as each data field that you want to customize. Because Dynamic Data will read the type of this field from the data model class rather than the metadata class, you can use object as the type for these fields.
Add the ScaffoldColumn attribute to the SalesOrderDetails field and set it to false to hide the field. To make the ModifiedDate field read only, decorate it with an Editable attribute that is set to false.
The following code shows these changes:
- C#
namespace DynDataWebApp { [ScaffoldTable(true)] [MetadataType(typeof(ProductMetadata))] public partial class Product { }public class ProductMetadata{[ScaffoldColumn(false)]public object SalesOrderDetails;[Editable(false)]public object ModifiedDate;}}
- VB
<ScaffoldTable(True)> _ <MetadataType(GetType(ProductMetadata))> _ Partial Public Class Product End Class
Public Class ProductMetadata<ScaffoldColumn(False)> _Public SalesOrderDetails As Object<Editable(False)> _Public ModifiedDate As ObjectEnd Class
Figure 23-6 shows the results of these changes in action. On the left is the original edit screen for the Product table. On the right is the new edit screen after the data model has been customized.
As mentioned earlier in this chapter, Dynamic Data includes some built-in support for validation rules that are inferred from the underlying database schema. For example, if a field in a database table is marked as not nullable, a RequiredFieldValidator will be added to the Update page.
However, in some cases there are business rules about the format of data that isn't supported by the built-in validation rules. For example, in the Product table, the values saved in the ProductNumber field all follow a specific format that begins with two uppercase letters followed by a hyphen. This format can be enforced by decorating the ProductNumber field with a RegularExpression attribute, as shown in the following code:
- C#
[ScaffoldTable(true)] [MetadataType(typeof(ProductMetadata))] public partial class Product { } public class ProductMetadata{[RegularExpression("^[A-Z]{2}-[A-Z0-9]{4}(-[A-Z0-9]{1,2})?$",ErrorMessage="Product Number must be a valid format")]public object ProductNumber;}
- VB
<ScaffoldTable(True)> _ <MetadataType(GetType(ProductMetadata))> _ Partial Public Class Product End Class Public Class ProductMetadata<RegularExpression("^[A-Z]{2}-[A-Z0-9]{4}(-[A-Z0-9]{1,2})?$", _ErrorMessage:="Product Number must be a valid format")> _Public ProductNumber As ObjectEnd Class
There is also a Range attribute, which is useful for specifying the minimum and maximum allowed values for a numeric field. Finally, you can apply the Required or StringLength attributes if you want to enforce these constraints on a field in the data model without specifying them in the underlying database.
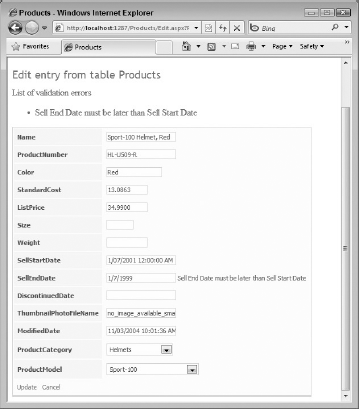
Although useful, the attribute-based validations don't support all scenarios. For example, a user could attempt to enter a date for the Product SellEndDate that is earlier than the SellStartDate value. Due to a database constraint on this field, this would result in a runtime exception rather than a validation error, which is presented to the user.
For each field that is in the data model, LINQ to SQL defines two methods that are called during an edit — the OnFieldNameChanging method, which is called just before the field is changed, and the OnFieldNameChanged method, which is called just after. To handle complex validation rules, you can complete the appropriate partial method declaration in the data model.
The following code shows a validation rule that ensures a value entered for the Product SellEndDate field is not earlier than the SellStartDate:
- C#
[ScaffoldTable(true)] [MetadataType(typeof(ProductMetadata))] public partial class Product {partial void OnSellEndDateChanging(DateTime? value){if (value.HasValue && value.Value < this._SellStartDate){throw new ValidationException("Sell End Date must be later than Sell Start Date");}}}
- VB
<ScaffoldTable(True)> _ <MetadataType(GetType(ProductMetadata))> _ Partial Public Class ProductPrivate Sub OnSellEndDateChanging(ByVal value As Nullable(Of DateTime))If value.HasValue AndAlso value.Value < Me._SellStartDate ThenThrow New ValidationException( _"Sell End Date must be later than Sell Start Date")End IfEnd SubEnd Class
Figure 23-7 shows how this custom validation rule is enforced by Dynamic Data.
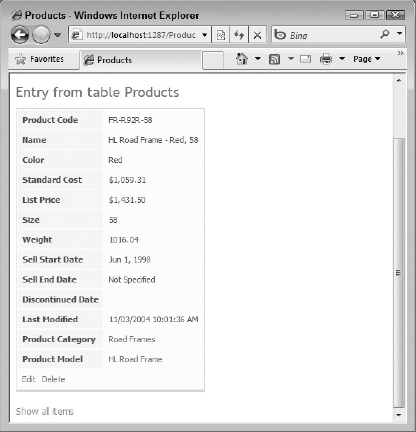
The default way that some of the data types are formatted is less than ideal. For example, the Product StandardCost and ListPrice fields, which use the SQL money data type, are displayed as numbers to four decimal places. Also, the Product SellStartDate and SellEndDate fields, which have a SQL datetime data type, are formatted showing both the date and time, even though the time portion is not really useful information.
The display format of these fields can be customized in two ways: globally for a specific data type by customizing the field template; or on an individual field basis by customizing the data model. Field template customization is discussed later in this chapter.
First, to specify how the fields will be formatted in the user interface, decorate the corresponding property in the data model with the DisplayFormat attribute. This attribute has a DataFormatString property that accepts a .NET format string. The attribute also includes a number of additional parameters to control rendering including the HtmlEncode parameter, which indicates whether the field should be HTML encoded, and the NullDisplayText attribute, which sets the text to be displayed when the field's value is null. The following code shows how the DisplayFormat attribute can be applied:
- C#
[DisplayFormat(DataFormatString="{0:C}")]
public object ListPrice;

[DisplayFormat(DataFormatString="{0:MMM d, yyyy}",
               NullDisplayText="Not Specified")]
public object SellEndDate;
- VB
<Display(Name:="List Price")> _
<DisplayFormat(DataFormatString:="{0:C}")> _
Public ListPrice As Object

<Display(Name:="Sell End Date")> _
<DisplayFormat(DataFormatString:="{0:MMM d, yyyy}",
               NullDisplayText:="Not Specified")> _
Public SellEndDate As Object
Note
By efault, the display format will only be applied to the Read view. To apply this formatting to the Edit view set the ApplyFormatInEditMode property to true on the DisplayFormat attribute.
Second, it's unlikely that you'll want to use the database field names in the user interface. It would be much better to provide descriptive names for all of your fields. You can use the Display attribute to control how the field labels are rendered. This attribute accepts a number of parameters, including Name, to specify the actual label and Order to control the order in which fields should be listed. In the following code, the ProductNumber field has been given a display name of "Product Code" and an order value of 1 to ensure it is always displayed as the first field:
- C#
[Display(Name="Product Code", Order=1)]
public object ProductNumber;

- VB
<Display(Name:="Product Code", Order:=1)> _
Public ProductNumber As Object

Figure 23-8 shows how these display formatting changes are rendered by Dynamic Data.
Chances are the way that Dynamic Data renders a web site by default will not be exactly what you require. The previous section demonstrated how many aspects of the data model could be customized to control how the database tables and fields are rendered. However, limitations exist as to what can be achieved simply by customizing the data model. Fortunately, Dynamic Data uses a rich template system that is fully customizable and allows you complete control over the UI.
The Dynamic Data template files are stored under a number of subfolders in the DynamicData folder, which is in the root of the web application. Following the Convention over Configuration principle, these template files do not need to be manually registered with Dynamic Data. Instead, each different type of template should be stored in a specific folder and the framework will use the location, as well as the template filename, to determine when to load it at run time.
Page templates are used to provide the default rendering of a database table. The master page templates are stored in the DynamicDataPageTemplates folder. Dynamic Data ships with the following five page templates for viewing and editing data:
Details.aspx: Renders a read-only view of an existing entry from a table.
Edit.aspx: Displays an editable view of an existing entry from a table.
Insert.aspx: Displays a view that allows users to add a new entry to a table.
List.aspx: Renders an entire table using a grid view with support for paging and sorting.
ListDetails.aspx: Used when Dynamic Data is configured with the combined-page mode, where the Detail, Edit, Insert, and List tasks are performed by the same page. This mode can be enabled by following the comment instructions in the
Global.asaxfile.
You can edit any of these default page templates if there are changes that you would like to affect all tables by default. You can also override the default page templates by creating a set of custom templates for a table. Custom pages templates are stored under the DynamicDataCustomPages folder.
In the AdventureWorksLT database, the SalesOrderHeader table is a good candidate for a custom page template. Before creating the template, you will need to enable scaffolding for this table. Create a new data model partial class for the SalesOrderHeader table and enable scaffolding as shown in the following listing:
- C#
using System.ComponentModel.DataAnnotations;

namespace DynDataWebApp
{
    [ScaffoldTable(true)]
    public partial class SalesOrderHeader
    {
    }
}
- VB
Imports System.ComponentModel.DataAnnotations

<ScaffoldTable(True)> _
Partial Public Class SalesOrderHeader
End Class

Next, create a subfolder called SalesOrderHeaders under the DynamicDataCustomPages folder. This folder will contain the custom templates for the SalesOrderHeader table. Copy the existing List.aspx template from the DynamicDataPageTemplates folder to the DynamicDataCustomPagesSalesOrderHeaders folder.
Note
The folder name for custom page templates should generally be named with the plural form of the table name. The exception to this is if the data model is using the ADO.NET Entity Framework version 3.5, or if the default option Pluralize or Singularize Generated Object Names has been changed. In this case the folder name should have the same name as the table.
Because the template was copied, and therefore a duplicate class was created, your application will no longer compile. The easiest way to fix this is to change the namespace to any unique value in both the markup and code-behind files of the new template, as shown in the following code:
- C#
<%@ Page Language="C#" MasterPageFile="~/Site.master" CodeBehind="List.aspx.cs"
    Inherits="DynDataWebApp._SalesOrderHeaders.List" %>
namespace DynDataWebApp._SalesOrderHeaders
{
    public partial class List : System.Web.UI.Page
    {
        // Code snipped
    }
}
- VB
<%@ Page Language="VB" MasterPageFile="~/Site.master" CodeBehind="List.aspx.vb" Inherits="DynDataWebApp._SalesOrderHeader.List" %>Namespace _SalesOrderHeader Class List Inherits Page ' Code Snipped End Class End Namespace

You can now customize the template in whatever manner you wish. For example, you may want to reduce the number of columns that appear in the List view, while still ensuring that all data fields appear in the Insert and Edit views. This degree of customization is only possible by creating a table-specific page template.
Make this change by locating the GridView control in List.aspx. Disable the automatic rendering of all data fields by adding the property AutoGenerateColumns="False". Then, manually specify the fields that you want to display by adding a set of DynamicField controls as shown in the following code:
<asp:GridView ID="GridView1" runat="server" DataSourceID="GridDataSource"
EnablePersistedSelection="True" AllowPaging="True"
AllowSorting="True" CssClass="DDGridView"
AutoGenerateColumns="False" RowStyle-CssClass="td"
HeaderStyle-CssClass="th" CellPadding="6">
<Columns>
<asp:TemplateField>
<ItemTemplate>
<asp:DynamicHyperLink runat="server" Text="Details" />
</ItemTemplate>
</asp:TemplateField>
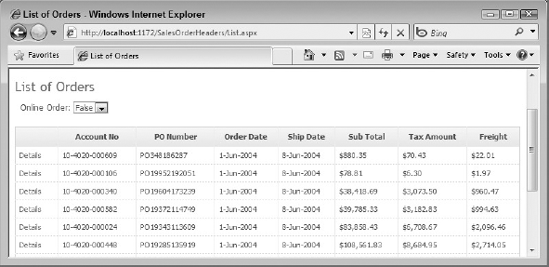
<asp:DynamicField DataField="AccountNumber" HeaderText="Account No" />
<asp:DynamicField DataField="PurchaseOrderNumber" HeaderText="PO Number" />
<asp:DynamicField DataField="OrderDate" DataFormatString="{0:d-MMM-yyyy}"
HeaderText="Order Date" />
<asp:DynamicField DataField="ShipDate" DataFormatString="{0:d-MMM-yyyy}"
HeaderText="Ship Date" />
<asp:DynamicField DataField="SubTotal" DataFormatString="{0:c}"
HeaderText="Sub Total" />
<asp:DynamicField DataField="TaxAmt" DataFormatString="{0:c}"
HeaderText="Tax Amount" />
<asp:DynamicField DataField="Freight" DataFormatString="{0:c}"
HeaderText="Freight" />
</Columns>
<HeaderStyle CssClass="th" />
<PagerStyle CssClass="DDFooter"/>
<PagerTemplate>
<asp:GridViewPager runat="server" />
</PagerTemplate>
<EmptyDataTemplate>
There are currently no items in this table.
</EmptyDataTemplate>
<RowStyle CssClass="td" />
</asp:GridView>

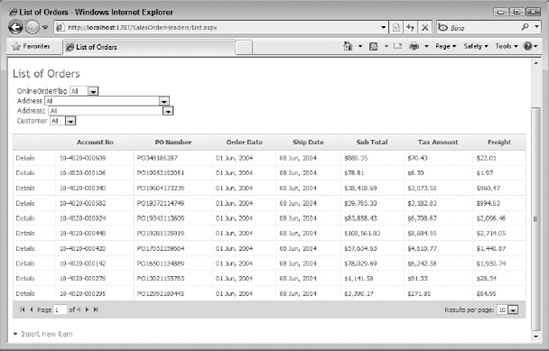
Figure 23-9 shows the customized List view of the SalesOrderHeader table with this reduced set of columns.
Field templates are used to render the user interface for individual data fields. There are both view and edit field templates. The field templates are named according to the name of the data type, with the suffix _Edit for the edit view. For example, the view template for a Text field is called Text.ascx, and renders the field using an ASP.NET Literal control. The corresponding edit template is called Text_Edit.ascx, and it renders the field using an ASP.NET TextBox control. The edit template also contains several validation controls, which are enabled as required and handle any validation exceptions thrown by the data model.
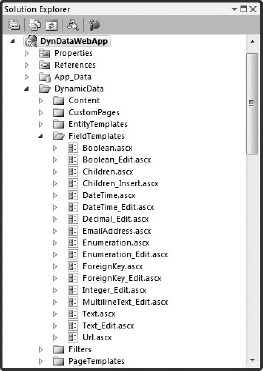
Dynamic Data ships with a large number of field templates, as shown in Figure 23-10. As with page templates, you can customize the default field templates or create new ones. All field templates, including any new templates that you create, are stored in the DynamicDataFieldTemplates folder.
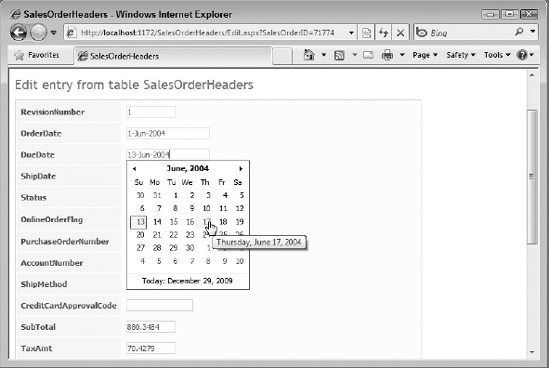
Several date fields in the SalesOrderHeader table of the AdventureWorksLT database are rendered with both the date and time, even though the time portion is not relevant.
The DateTime field template in Dynamic Data displays a simple TextBox control for its Edit view. If the data field only requires the date to be entered, and not the time, it would be nice to display a Calendar control instead of a TextBox.
Begin by creating a copy of the DateTime.ascx template and renaming it to DateCalendar.ascx. Then open both the markup file and the code-behind file for DateCalendar.ascx and rename the class from DateTimeField to DateCalendarField as shown in the following code:
- C#
<%@ Control Language="C#" CodeBehind="DateCalendar.ascx.cs" Inherits="DynDataWebApp.DateCalendarField" %>namespace DynDataWebApp { public partial class DateCalendarField : FieldTemplateUserControl { // Code snipped } }

- VB
<%@ Control Language="VB" CodeBehind="DateCalendar.ascx.vb" Inherits="DynDataWebApp.DateCalendarField" %>Class DateCalendarField Inherits FieldTemplateUserControl ' Code Snipped End Class

Next, create a copy of the DateTime_Edit.ascx template and rename it to DateCalendar_Edit.ascx. As before, open both the markup file and the code-behind file for DateCalendar_Edit.ascx and rename the class from DateTime_EditField to DateCalendar_EditField. The following code shows how it should look once renamed:
- C#
<%@ Control Language="C#" CodeBehind="DateCalendar_Edit.ascx.cs" Inherits="DynDataWebApp.DateCalendar_EditField" %>namespace DynDataWebApp { public partial class DateCalendar_EditField : FieldTemplateUserControl
{
        // Code snipped
    }
}
- VB
<%@ Control Language="VB" CodeBehind="DateCalendar_Edit.ascx.vb" Inherits="DynDataWebApp.DateCalendar_EditField" %>Class DateCalendar_EditField Inherits FieldTemplateUserControl ' Code Snipped End Class

At this point you could replace the TextBox control in the DateCalendar_Edit.ascx file with a standard Calendar web server control. However, this would require a number of changes in the code-behind file to get it working with this new type of control. A far easier solution is to use the Calendar control from the AJAX Control Toolkit. This is a Control Extender, which means it attaches to an existing TextBox on a web page and provides new client-side functionality. You can find more information about Control Extenders and the AJAX Control Toolkit in Chapter 20.
You can download the AJAX Control Toolkit from http://ajaxcontroltoolkit.codeplex.com/. Follow the instructions in Chapter 20 to add the controls in the AJAX Control Toolkit to the Visual Studio Toolbox. Once this has been done, add a CalendarExtender control onto the DateCalendar_Edit.ascx template. Then set the TargetControlID property and Format property as shown in the following code:
<cc1:CalendarExtender ID="CalendarExtender1" TargetControlID="TextBox1"
       Format="d-MMM-yyyy" runat="server">
</cc1:CalendarExtender>

The final step is to associate some fields in the data model with the new field templates. In this example, the OrderDate, ShipDate, and DueDate fields from the SalesOrderHeader table should be associated. Modify the SalesOrderHeader partial class and create a metadata class, as described earlier in the chapter. The UIHint attribute is used to associate the specified fields with the custom field template, as shown in the following code:
- C#
namespace DynDataWebApp { [ScaffoldTable(true)] [MetadataType(typeof(SalesOrderHeaderMetadata))] public partial class SalesOrderHeader { }public class SalesOrderHeaderMetadata{[DisplayFormat(DataFormatString = "{0:dd-MMM-yyyy}",ApplyFormatInEditMode = true)][UIHint("DateCalendar")]public object OrderDate;[DisplayFormat(DataFormatString = "{0:dd-MMM-yyyy}",ApplyFormatInEditMode = true)][UIHint("DateCalendar")] public object DueDate; [DisplayFormat(DataFormatString = "{0:dd-MMM-yyyy}", ApplyFormatInEditMode = true)] [UIHint("DateCalendar")] public object ShipDate; } }
- VB
<ScaffoldTable(True)> _ <MetadataType(GetType(SalesOrderHeaderMetadata))> _ Partial Public Class SalesOrderHeader End Class
Public Class SalesOrderHeaderMetadata<DisplayFormat(DataFormatString:="{0:dd-MMM-yyyy}", ApplyFormatInEditMode:=True)> _ <UIHint("DateCalendar")> _ Public OrderDate As Object <DisplayFormat(DataFormatString:="{0:dd-MMM-yyyy}", ApplyFormatInEditMode:=True)> _ <UIHint("DateCalendar")> _ Public DueDate As Object <DisplayFormat(DataFormatString:="{0:dd-MMM-yyyy}", ApplyFormatInEditMode:=True)> _ <UIHint("DateCalendar")> _ Public ShipDate As Object End Class
Figure 23-11 shows the custom field template in the Edit view of an entry in the SalesOrderHeader table.
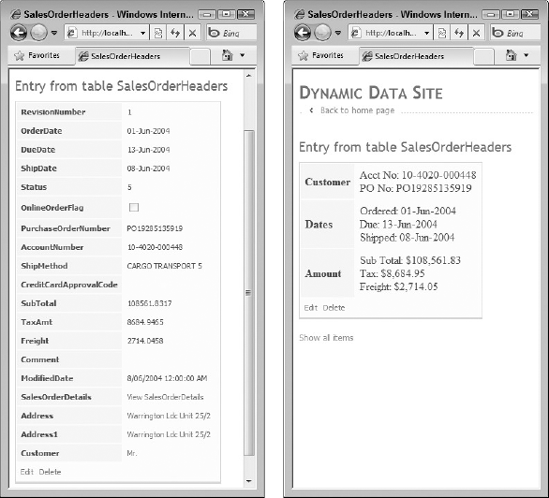
Entity templates are used to render the user interface for an individual entry from a table. The default entity templates are stored in the DynamicDataEntityTemplates folder, and include templates to create, edit, and display a record. These templates work with the default page templates, and render the UI using a two-column HTML table; label in the left column, data field in the right.
Customizing the existing entity templates affects all tables. You can also create a new custom entity template for a specific table. This allows you to provide a completely different layout when editing an entry from a database table compared to when the entry is simply viewed.
To create a new entity template, right-click the DynamicDataEntityTemplate folder and select Add
The default templates use an EntityTemplate control, which is more or less equivalent to a Repeater web server control. This control dynamically generates all of the fields for this table from the data model. In this case, instead of using an EntityTemplate control, you can manually specify the fields to be displayed. The following code lists a custom markup for the entity template that displays a subset of the data:
<tr>
   <td class="DDLightHeader">
      <asp:Label ID="Label1" runat="server" Text="Customer" />
   </td>
<td>
Acct No:
<asp:DynamicControl ID="DynamicControl1" runat="server"
DataField="AccountNumber" />
<br/>
PO No:
<asp:DynamicControl ID="DynamicControl2" runat="server"
DataField="PurchaseOrderNumber" />
</td>
</tr>
<tr>
<td class="DDLightHeader">
<asp:Label ID="Label2" runat="server" Text="Dates" />
</td>
<td>
Ordered:
<asp:DynamicControl ID="DynamicControl3" runat="server"
DataField="OrderDate" />
<br/>
Due:
<asp:DynamicControl ID="DynamicControl4" runat="server"
DataField="DueDate" />
<br/>
Shipped:
<asp:DynamicControl ID="DynamicControl5" runat="server"
DataField="ShipDate" />
</td>
</tr>
<tr>
<td class="DDLightHeader">
<asp:Label ID="Label3" runat="server" Text="Amount" />
</td>
<td>
Sub Total:
<asp:DynamicControl ID="DynamicControl6" runat="server"
DataField="SubTotal" DataFormatString="{0:c}" />
<br/>
Tax:
<asp:DynamicControl ID="DynamicControl7" runat="server"
DataField="TaxAmt" DataFormatString="{0:c}" />
<br/>
Freight:
<asp:DynamicControl ID="DynamicControl8" runat="server"
DataField="Freight" DataFormatString="{0:c}" />
</td>
</tr>

Finally, change the web user control to inherit from System.Web.DynamicData.EntityTemplateUserControl instead of System.Web.UI.UserControl:
- C#
public partial class SalesOrderHeaders :
         System.Web.DynamicData.EntityTemplateUserControl
- VB
Public Class SalesOrderHeaders
    Inherits System.Web.DynamicData.EntityTemplateUserControl
You can now build and run the project to test the new entity template. Figure 23-12 shows the default entity template (left) and the new customized template (right) for the SalesOrderHeader table. The Edit and Insert views are unchanged, because the read-only Details template was the only template that was customized.
Filter templates are used to display a control that filters the rows that are displayed for a table. Dynamic Data ships with three filter templates, stored in the DynamicDataFilters folder. These filters have self-explanatory names — the Boolean filter is used for Boolean data types, the Enumeration filter is used when the data type is mapped to an enum, and the ForeignKey filter is used for foreign key relationships.
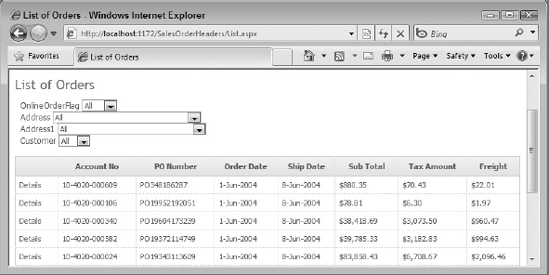
Figure 23-13 shows the four filter templates that are rendered by default for the SalesOrderHeader table. The first filter, OnlineOrderFlag, is a Boolean filter and only contains three options — All, True, and False. The remaining three filters are generated from foreign keys, and each has a large number of entries.
Note
You may have noticed that the values displayed in the Customer drop-down list are simply the customer's title (Mr, Mrs, and so on), which are next to useless. To select the field that is displayed for foreign keys, Dynamic Data finds the first field on the table with a string type. This can be overridden to any other field on the table by decorating the data model class with a DisplayColumn attribute. However, in the case of the Customer table what you really want is to display a string containing a number of fields (FirstName, LastName). To do this, simply override the ToString method of the Customer data model class.
Unfortunately, drop-down lists are only useful if they contain fewer than a couple of hundred entries. Anything more than this and the rendering of the web page will slow down and the list will be difficult to navigate. As the number of customers in the database grows to thousands, or more, the use of a drop-down list for the Address, Address1, and Customer foreign keys will render this page unusable.
If you wanted to keep these filters, you could do something advanced such as customize the default ForeignKey filter with a search control that performed a server callback and displayed a list of valid entries that matched the search, all within an AJAX request of course! However, such an exercise is well beyond the scope of this book, so instead you can learn how to control which fields are rendered as filters.
Note
The remainder of this section assumes you have created a custom page template for the SalesOrderDetail table, as described earlier in this chapter.
Open the custom List.aspx template for the SalesOrderHeader table from DynamicDataCustomPagesSalesOrderHeaders. Locate the QueryableFilterRepeater control on this page. This control is used to dynamically generate the list of filters. Delete this control, and in its place add a DynamicFilter control as shown in the following code. The DataField property must be set to the correct data field for the filter, and the FilterUIHint property should be set to the correct filter template.
Online Order:
<asp:DynamicFilter ID="OnlineOrderFilter" runat="server"
           DataField="OnlineOrderFlag" FilterUIHint="Boolean"
           OnFilterChanged="DynamicFilter_FilterChanged">
</asp:DynamicFilter>

Next, locate the QueryExtender control toward the bottom of the page. This control is used to "wire up" the DynamicFilter control to the data source, so that the correct query will be used when the filter changes. Modify the ControlID property to match the name of the DynamicFilter control you just added, as shown in the following code:
<asp:QueryExtender TargetControlID="GridDataSource" ID="GridQueryExtender"
                   runat="server">
   <asp:DynamicFilterExpression ControlID="OnlineOrderFilter" />
</asp:QueryExtender>

Finally, you will need to remove some code that was only required by the QueryableFilterRepeater control. Open the code-behind file (List.aspx.cs or List.aspx.vb) and remove the Label_PreRender method. When you save the changes and run the project, you will see only a single filter displayed for the SalesOrderHeader table, as shown in Figure 23-14.
Dynamic Data is undoubtedly a very powerful way to create a new data-driven web application from scratch. However, with the version of Dynamic Data that ships with Visual Studio 2010, you can use some of the features of Dynamic Data in an existing Web Application or Web Site project.
The EnableDynamicData extension method has been introduced to enable this functionality. This method can be called on any class that implements the System.Web.UI.INamingContainer interface. This includes the Repeater, DataGrid, DataList, CheckBoxList, ChangePassword, LoginView, Menu, SiteMapNodeItem, and RadioButtonList controls.
Adding this functionality to an existing web control does not require the application to be using LINQ to SQL or the Entity Framework. In fact, the application could be using any data access option including plain old ADO.NET. This is because the Dynamic Data functionality that is enabled in this way does not include any of the scaffolding functionality. Instead, it enables both field templates and the validation and display attributes that were described earlier in this chapter.
For example, to enable Dynamic Data on a GridView control, call the EnableDynamicData extension method as shown in the following code:
- C#
GridView1.EnableDynamicData(typeof(Product));
- VB
GridView1.EnableDynamicData(GetType(Product))
You can now create a Product class with public properties that match the data displayed in GridView1. Each of these properties can be decorated with attributes from the System.ComponentModel.DataAnnotations namespace, such as Required, StringLength, RegularExpression, or DisplayFormat. ASP.NET will interpret these attributes at run time and automatically apply the relevant validations and formatting.
This allows any application to leverage Dynamic Data without making any significant changes to the application.
In this chapter you learned how to use ASP.NET Dynamic Data to create a data-driven web application with little or no code. More importantly, you also learned how flexible Dynamic Data is by customizing the data model and web pages.
By freeing developers from needing to write reams of low-level data access code, Dynamic Data allows for faster development time, and lets your developers build features that add more value to end users.