
Topics and tasks in this chapter
Finding compatible video slots and ports
Understanding video card features
Installing your new video card
When engineers sat down at their poker table many years ago to design computers, they decided on a quick and easy way to upgrade their many parts.
Upgrades would come on cards, they decreed. To upgrade the computer, owners would simply slide the card into one of several standard-sized slots built into every computer. Simple.
And today, that's still how you upgrade your computer's video: You slide a video card into your computer's video slot. This chapter covers that specific task in minute detail by covering these things:
Discovering what type of video card works with your computer's video slot.
Choosing a more powerful video card that both fits into that slot and matches the video ports on your monitor.
Installing the new video card and plugging a cable between the card and your monitor.
Note
Dig in — unless you own a laptop and netbook, unfortunately. Only desktop computers can upgrade their video.
Video cards require two things to be compatible with your computer:
The card must physically fit into your computer's video slot.
The card's ports — its connectors — must match the ones on your monitor.
Let's tackle the slot issue, first.
Also known as buses, slots sit together in a long row on your motherboard, like rake marks left in dirt. When you plug in a card, the card's flat silver end rests against the back of your PC, allowing its ports to protrude from the back of the PC's case. Different types of slots support different types of computer gadgets.
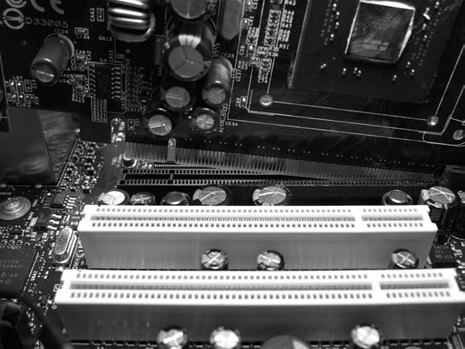
Your computer most likely comes with one of two types of video slot: PCI-Express or AGP. In fact, your PC probably comes with a PCI-Express 16x slot, because that slot has been built-into most computers for the past five years.
PCI-Express (Peripheral Component Interconnect-Express): Found on nearly every PC sold since 2005, PCI-Express slots dominate the video card world. PCI-Express slots come in several sizes; most video cards require the largest size, shown in Figure 9-1, which is called 16x. Conveniently, most newer computers come with a 16x slot.
PCI-Express cards and slots come in several version numbers, but they're backward compatible. That means that a PCI-Express "version 2.1" card will work fine in a "version 2.0" slot.
Tip
PCI Express slots are longer than the PCI slot that lives next to it.
AGP (Accelerated Graphics Port): Venerable PCs hailing from the late 1990s through 2005 often came with an AGP slot, shown in Figure 9-2. An AGP slot is usually chocolate brown. Although the slot's been through several revisions, most AGP slots accept either 4X or 8X AGP cards. You can still find a few AGP cards sold online at NewEgg and Amazon.

Tip
Still not sure what type of video slot you have? Look closely at the motherboard's lettering near the slots. In tiny letters, you'll usually see either the words "AGP" or "PCI-Express."
Tip
Don't want to open your PC's case just yet? Then download CPU-Z (available at www.cpuid.com), a popular free utility that reveals lots of boring information about your computer's innards. Run CPU-Z, click the program's Mainboard tab, and you'll see your type of video slot listed in the Graphic Interface section's Version area.
After you know what video slot lives inside your computer, your mission is nearly complete. Your new goal is to buy a video card with at least one port that matches a port on your monitor. (Most video cards come with two or more ports.)
Examine the connectors on your monitor, and you'll find any combination of these four.
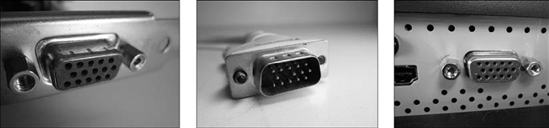
VGA (Video Graphics Array) or D-SUB: Created in the late 1980s, this early video connector simply won't die. It's still found on nearly every computer, laptop, netbook, monitor, and flat screen TV. A VGA port, shown in Figure 9-3, works fine as a last resort to stay compatible, but the next three ports provide better-quality video.
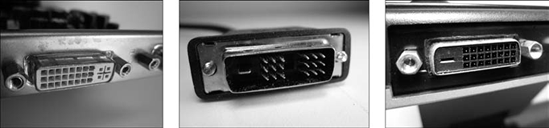
DVI (Digital Visual Interface): Born around 2000, this port, shown in Figure 9-4, sends numbers to a flat-panel monitor, which converts those digits into pictures. For extra compatibility, many flat panel monitors include both a VGA and a DVI port, letting you plug your monitor into one. When given a choice, always use the DVI port for a better picture.
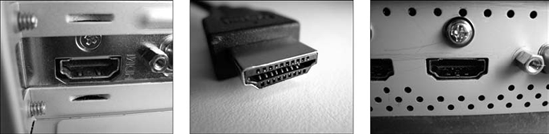
HDMI (High-Definition Multimedia Interface): Heralded in mid-2000 as a "single cable" solution for the unsightly dangling cords plaguing home theaters, HDMI cables carry both video and surround sound. As computers began turning into mini-home theaters, they began carrying those ports, as well. An HDMI port, shown in Figure 9-5, is handy if you plan on watching your computer on a High Definition TV set.
DisplayPort: Newly emerging at the time of this book's printing, DisplayPort, shown in Figure 9-6, will soon be replacing the VGA, Digital, and HDMI ports on computers, leaving HDMI to its original market: home theaters. When shopping, look for a card and monitor with a DisplayPort adapter to keep them compatible with as many new products as possible. (Adapters let you convert DisplayPort to HDMI or DVI, if necessary.)
Tip
If you find yourself staring at a pair of video ports that don't match on your monitor and computer, there's a convenient solution: Computer stores sell adapters that convert nearly any connector to the one you need.

After you've decided what graphics card fits inside your PC and works with your monitor, your last choice is price. Video cards come with oodles of options. Here's a rundown on the things that drive a video card's price up or down:
Video memory: Only your video card can touch its own "onboard" video memory; none of your programs can borrow any of it. More memory means more detailed images, leading to a higher price tag. Windows 7 runs best on video cards with at least 256MB of video memory; more memory is better.
Cheaper cards come with very little of their own memory. Instead, the card robs some of your computer's memory, slowing down your computer in the process.
Brand: Two companies battle it out for the graphic market: NVIDIA and AMD (ATI). However, those two companies license their chips to lots of other companies. Don't be surprised to see a wide variety of brands selling what appears to be the same type of card. Off-brand cards can save money, but sometimes ship with incomprehensible manuals, little documentation, and no technical support.
Graphics chip: NVIDIA and AMD constantly introduce newer, more powerful chips. Because the latest chips carry a premium price, buy a slightly older model to save some money. For up-to-date tips, visit Tom's Hardware (
www.tomshardware.com) and read their "Best Graphics Cards for the Money" article, updated monthly.Ports: As described in the previous section, make sure one of the card's ports matches the port on your monitor. If they don't match, you'll need an adapter or adapter cable, which can add anywhere from $5 to $50 to your purchase.
Dual-monitor support: Most video cards now sport two ports, meaning you can plug two monitors into them. A few even offer three ports, making them compatible with the most monitors possible. Although additional ports rarely add more than a few dollars, they're a nice option for future compatibility.
DirectX: Programmers use this special software to create advanced visual tricks. Many games use DirectX to display three-dimensional fire-breathing dragons and other spectacular effects. For the best experience, Windows 7 requires video that can handle DirectX version 11.
Noise: Video cards generate a lot of heat, so most of them include built-in fans. Cheap cards often come with noisy fans, known as "leaf-blowers." Quieter cards cost more.
Resolution: The higher the resolution, the more information you can pack onto your monitor at once. And, of course, the higher the price. To save money, check your monitor's manual (or do a Google search for its make and model) to see its highest resolution. Then buy a card that meets that resolution, because any higher resolution would be wasted.
Power: If you're planning on playing lots of computer games or doing video-editing work, buy a powerful, more expensive card costing more than $100. If you're just word processing or crunching numbers, you can get away with a decent card for less than $50.
Cards are particularly susceptible to static electricity. Tap your computer's case to ground yourself before touching the card. If you live in a particularly dry, static-prone area, wear latex gloves — the kind that doctors and dentists often wear.
Cards are also delicate, so don't bend them. Handle them only by their edges. Finally, those little silver dots on one side of the card can be sharp; don't scratch yourself.
To install a card, follow these steps:
Turn off your PC, unplug it, and remove your computer's case, as described in this book's Cheat Sheet, downloadable from
www.dummies.com/cheatsheet/upgradingandfixingcomputersdiy.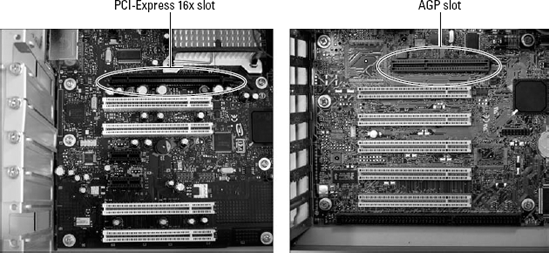
Locate the right slot for your card, either PCI-Express 16x or AGP, as I describe earlier in this chapter. The card won't fit into the wrong slot, so you can't go wrong. Don't confuse your computer's thin memory slots for its video card slot.
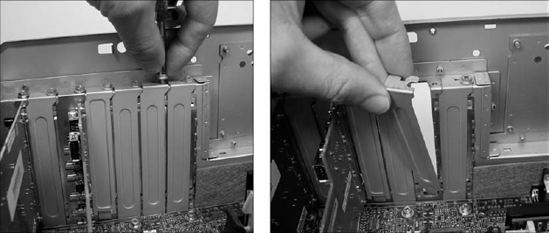
With a small screwdriver, remove the screw holding in the old card or the metal cover. Don't lose that screw! You need it to secure the new card in place. If you're replacing an old card, pull it up and out of the slot. If you're not replacing an old card, remove the metal cover from the back of your computer. (Unused slots have a little cover next to them to keep dust from flying in through the back of your computer.)
When you've identified the card's appropriate slot, hold the card by its edges and position it over the correct slot. The edge with the shiny metal bracket should face toward the back of your computer. (That shiny bracket replaces the cover you removed in Step 3.) Line up the tabs and notches on the card's bottom with the notches in the slot. Push the card slowly into the slot. You may need to rock the card back and forth gently. When the card pops in, you can feel it come to rest. Don't force it!
Tip
Dropped the screw inside your computer's case? Keep poking at it with a screwdriver or chopstick until you get it out. If you lose the screw inside the computer, your computer could electrocute itself. If the screw's still lost inside your PC, pick up your computer and shake it until the screw falls out.
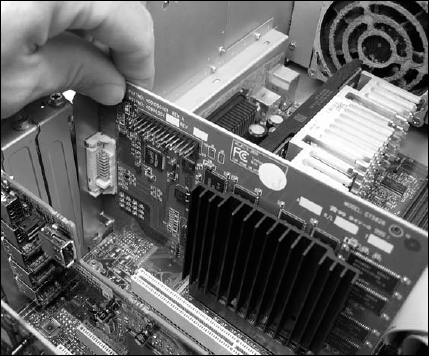
Most video slots have a flexible plastic retaining clip that fits over a tab on the end of the video card. Bend out the clip slightly when inserting the card; when the card fits into the slot, release the clip, letting it hold the card in place.
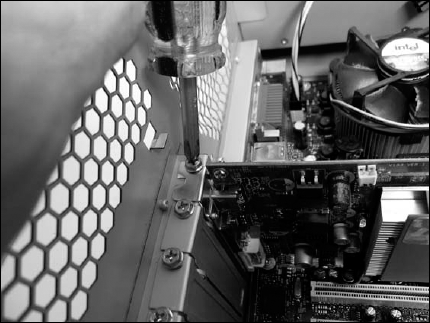
Secure the card in the slot with the screw you removed in Step 3. Then, plug the computer back in, turn it on, and see whether Windows recognizes and installs the card. Windows usually recognizes newly installed cards and sets them up to work correctly. If something goes wrong, turn off your computer, unplug it, and make sure you've seated the card correctly. If everything's working, however, put your PC's cover back on.
Some monitors come with built-in speakers. If you're connecting the monitor through an HDMI cable and want the HDMI cable to carry the video and the sound, you need to connect a small jumper cable between two pins on your sound card or motherboard and your newly inserted video card. I explain this bit of microsurgery in a task in Chapter 8.
Tip
Whenever you install a new video card or any other card, be sure to visit the manufacturer's Web site to download and install the latest drivers, a chore I describe in Chapter 17. Card manufacturers, especially video card manufacturers, constantly update their drivers to fix bugs.