
Chapter 3. Relationships: Your Key to Data Integrity
IN THIS CHAPTER
- Why This Chapter Is Important
- Introduction to Relational Database Design
- Establishing Relationships in Access
- Establishing Referential Integrity
- Looking at the Benefits of Relationships
- Examining Indexes and Relationships
- Practical Examples: Establishing the Relationships Between the Tables Included in the Time and Billing Database
Why This Chapter Is Important
A relationship exists between two tables when one or more key fields from one table are matched to one or more key fields in another table. The fields in both tables usually have the same name, data type, and size. Relationships are a necessary by-product of the data normalization process. Data normalization, which was introduced in Chapter 1, “Access as a Development Tool,” and is covered in additional detail in this chapter, is the process of eliminating duplicate information from your system by splitting information into several tables, each containing a unique value (primary key). Although data normalization brings many benefits, you need to relate your application’s tables to each other so that your users can view the data in the system as a single entity. After you define relationships between tables, you can build queries, forms, and reports that combine information from multiple tables. In this way, you can reap all the benefits of data normalization while ensuring that your system provides users with all the information they need.
Introduction to Relational Database Design
Many people believe Access is such a simple product to use that database design is something they don’t need to worry about. I couldn’t disagree more! Just as a house without a foundation will fall over, a database with poorly designed tables and relationships will fail to meet the needs of its users.
The History of Relational Database Design
Dr. E. F. Codd first introduced formal relational database design in 1969 while he was at IBM. Relational theory, which is based on set theory, applies to both databases and database applications. Codd developed 12 rules that determine how well an application and its data adhere to the relational model. Since Codd first conceived these 12 rules, the number of rules has expanded into the hundreds. (Don’t worry; you need to learn only a few of them!)
You should be happy to learn that, although not perfect as an application development environment, Microsoft Access measures up quite well as a relational database system.
Goals of Relational Database Design
The number one goal of relational database design is to, as closely as possible, develop a database that models some real-world system. This involves breaking the real-world system into tables and fields and determining how the tables relate to each other. Although on the surface this task might appear to be trivial, it can be an extremely cumbersome process to translate a real-world system into tables and fields.
A properly designed database has many benefits. The processes of adding, editing, deleting, and retrieving table data are greatly facilitated by a properly designed database. In addition, reports are easier to build. Most importantly, the database becomes easy to modify and maintain.
Rules of Relational Database Design
To adhere to the relational model, tables must follow certain rules. These rules determine what is stored in tables and how the tables are related.
The Rules of Tables
Each table in a system must store data about a single entity. An entity usually represents a real-life object or event. Examples of objects are customers, employees, and inventory items. Examples of events include orders, appointments, and doctor visits.
The Rules of Uniqueness and Keys
Tables are composed of rows and columns. To adhere to the relational model, each table must contain a unique identifier. Without a unique identifier, it becomes programmatically impossible to uniquely address a row. You guarantee uniqueness in a table by designating a primary key, which is a single column or a set of columns that uniquely identifies a row in a table.
Each column or set of columns in a table that contains unique values is considered a candidate key. One candidate key becomes the primary key. The remaining candidate keys become alternate keys. A primary key made up of one column is considered a simple key. A primary key comprising multiple columns is considered a composite key.
It is generally a good idea to pick a primary key that is
- Minimal (has as few columns as possible)
- Stable (rarely changes)
- Simple (is familiar to the user)
Following these rules greatly improves the performance and maintainability of your database application, particularly if you are dealing with large volumes of data.
Consider the example of an employee table. An employee table is generally composed of employee-related fields such as Social Security number, first name, last name, hire date, salary, and so on. The combination of the first name and the last name fields could be considered a primary key. This choice might work, until the company hires two employees with the same name. Although the first and last names could be combined with additional fields to constitute uniqueness (for example, hire date), this would violate the rule of keeping the primary key minimal. Furthermore, an employee might get married and change her last name. This violates the rule of keeping a primary key stable.
Using a name as the primary key violates the principle of stability. The Social Security number might be a valid choice, but a foreign employee might not have a Social Security number. This is a case in which a derived, rather than a natural, primary key is appropriate. A derived key is an artificial key that you create. A natural key is one that is already part of the database.
In examples such as this, I suggest adding EmployeeID as an AutoNumber field. Although the field would violate the rule of simplicity (because an employee number is meaningless to the user), it is both small and stable. Because it is numeric, it is also efficient to process. In fact, I use AutoNumber fields (an Identity field in SQL Server) as primary keys for most of the tables that I build.
The Rules of Foreign Keys and Domains
A foreign key in one table is the field that relates to the primary key in a second table. For example, the CustomerID is the primary key in the Customers table. It is the foreign key in the Orders table.
A domain is a pool of values from which columns are drawn. A simple example of a domain is the specific data range of employee hire dates. In the case of the Orders table, the domain of the CustomerID column is the range of values for the CustomerID in the Customers table.
Normalization and Normal Forms
Some of the most difficult decisions that you face as a developer are what tables to create and what fields to place in each table, as well as how to relate the tables that you create. Normalization is the process of applying a series of rules to ensure that your database achieves optimal structure. Normal forms are a progression of these rules. Each successive normal form achieves a better database design than the previous form did. Although there are several levels of normal forms, it is generally sufficient to apply only the first three levels of normal forms. The following sections describe the first three levels of normal forms.
First Normal Form
To achieve first normal form, all columns in a table must be atomic. This means, for example, that you cannot store first names and last names in the same field. The reason for this rule is that data becomes very difficult to manipulate and retrieve if multiple groups are stored in a single field. Using the full name as an example, it would become impossible to sort by first name or last name independently if both groups were stored in the same field. Furthermore, you or the user must perform extra work to extract just the first name or the last name from the field.
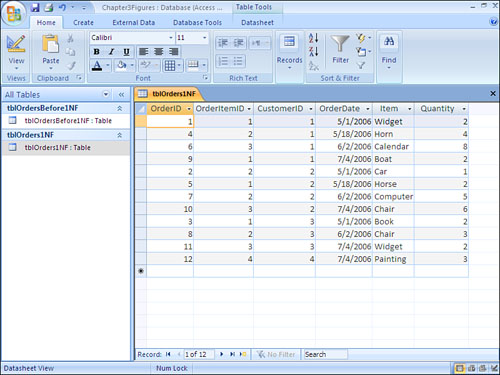
Another requirement for first normal form is that the table must not contain repeating values. An example of repeating values is a scenario in which the Item1, Quantity1, Item2, Quantity2, Item3, and Quantity3 fields are all found within the Orders table (see Figure 3.1). This design introduces several problems. What if the user wants to add a fourth item to the order? Furthermore, finding the total ordered for a product requires searching several columns. In fact, all numeric and statistical calculations on the table become extremely cumbersome. The alternative, shown in Figure 3.2, achieves first normal form. Notice that each item ordered is located in a separate row.
Figure 3.1. This table contains repeating groups. Repeating groups make it difficult to summarize and manipulate table data.
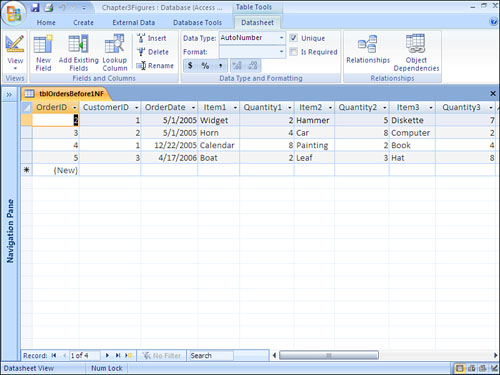
Figure 3.2. This table achieves first normal form. Notice that all fields are atomic and that the table contains no repeating groups.
Second Normal Form
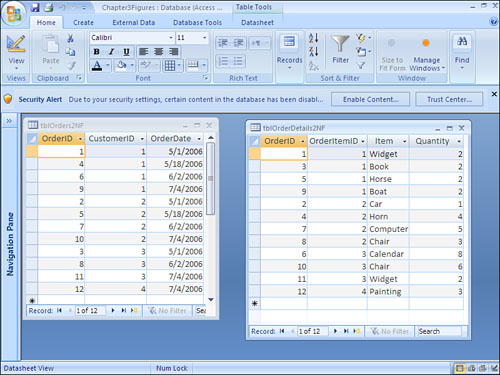
To achieve second normal form, all non-key columns must be fully dependent on the primary key. In other words, each table must store data about only one subject. Notice the table shown in Figure 3.2. It includes information about the order (OrderID, CustomerID, and OrderDate) and information about the items the customer is ordering (Item and Quantity). To achieve second normal form, you must break this data into two tables: an order table and an order detail table. The process of breaking the data into two tables is called decomposition. It is considered to be non-loss decomposition because no data is lost during the decomposition process. After you separate the data into two tables, you can easily bring the data back together by joining the two tables in a query. Figure 3.3 shows the data separated into two tables. These two tables achieve second normal form.
Figure 3.3. These tables achieve second normal form. The fields in each table pertain to the primary key of the table.
Third Normal Form
To attain third normal form, a table must meet all the requirements for first and second normal form, and all non-key columns must be mutually independent. This means that you must eliminate any calculations, and you must break out data into lookup tables.
An example of a calculation stored in a table is the product of price multiplied by quantity. Instead of storing the result of this calculation in the table, you would generate the calculation in a query, or in the control source of a control on a form or a report.
The example in Figure 3.3 does not achieve third normal form because the description of the inventory items is stored in the order details table. If the description changes, all rows with that inventory item need to be modified. The order detail table, shown in Figure 3.4, shows the item descriptions broken into an inventory table. This design achieves third normal form. All fields are mutually independent. You can modify the description of an inventory item in one place.
Figure 3.4. The table on the right achieves third normal form. The description of the inventory items has been moved to an inventory table, and the ItemID is stored in the order details table.

Denormalization—Purposely Violating the Rules
Although the developer’s goal is normalization, often it makes sense to deviate from normal forms. We refer to this process as denormalization. The primary reason for applying denormalization is to enhance performance.
An example of when denormalization might be the preferred tactic could involve an open invoices table and a summarized accounting table. It might be impractical to calculate summarized accounting information for a customer when we need it. Instead, you can maintain the summary calculations in a summarized accounting table so that you can easily retrieve them as needed. Although the upside of this scenario is improved performance, the downside is that you must update the summary table whenever you make changes to the open invoices. This imposes a definite trade-off between performance and maintainability. You must decide whether the trade-off is worthwhile.
If you decide to denormalize, document your decision. Make sure that you make the necessary application adjustments to ensure that you properly maintain the denormalized fields. Finally, test to ensure that the denormalization process actually improves performance.
Integrity Rules
Although integrity rules are not part of normal forms, they are definitely part of the database design process. Integrity rules are broken into two categories. They include overall integrity rules and database-specific integrity rules.
Overall Rules
The two types of overall integrity rules are referential integrity rules and entity integrity rules. Referential integrity rules dictate that a database does not contain orphan foreign key values. This means that
- Child rows cannot be added for parent rows that do not exist. In other words, an order cannot be added for a nonexistent customer.
- A primary key value cannot be modified if the value is used as a foreign key in a child table. This means that a
CustomerIDin the customers table cannot be changed if the orders table contains rows with thatCustomerID. - A parent row cannot be deleted if child rows are found with that foreign key value. For example, a customer cannot be deleted if the customer has orders in the order table.
Entity integrity dictates that the primary key value cannot be Null. This rule applies not only to single-column primary keys, but also to multi-column primary keys. In fact, in a multi-column primary key, no field in the primary key can be Null. This makes sense because, if any part of the primary key can be Null, the primary key can no longer act as a unique identifier for the row. Fortunately, the Access Database Engine (Access 2007’s new version of the JET database engine, available with the new ACCDB file format) does not allow a field in a primary key to be Null.
Database-Specific Rules
The other set of rules applied to a database are not applicable to all databases but are, instead, dictated by business rules that apply to a specific application. Database-specific rules are as important as overall integrity rules. They ensure that only valid data is entered into a database. An example of a database-specific integrity rule is that the delivery date for an order must fall after the order date.
Examining the Types of Relationships
Three types of relationships can exist between tables in a database: one-to-many, one-to-one, and many-to-many. Setting up the proper type of relationship between two tables in your database is imperative. The right type of relationship between two tables ensures
- Data integrity
- Optimal performance
- Ease of use in designing system objects
The reasons behind these benefits are covered throughout this chapter. Before you can understand the benefits of relationships, though, you must understand the types of relationships available.
One-to-Many
A one-to-many relationship is by far the most common type of relationship. In a one-to-many relationship, a record in one table can have many related records in another table. A common example is a relationship set up between a Customers table and an Orders table. For each customer in the Customers table, you want to have more than one order in the Orders table. On the other hand, each order in the Orders table can belong to only one customer. The Customers table is on the one side of the relationship, and the Orders table is on the many side. For you to implement this relationship, the field joining the two tables on the one side of the relationship must be unique.
In the Customers and Orders tables example, the CustomerID field that joins the two tables must be unique within the Customers table. If more than one customer in the Customers table has the same customer ID, it is not clear which customer belongs to an order in the Orders table. For this reason, the field that joins the two tables on the one side of the one-to-many relationship must be a primary key or have a unique index. In almost all cases, the field relating the two tables is the primary key of the table on the one side of the relationship. The field relating the two tables on the many side of the relationship is the foreign key.
One-to-One
In a one-to-one relationship, each record in the table on the one side of the relationship can have only one matching record in the table on the many side of the relationship. This relationship is not common and is used only in special circumstances. Usually, if you have set up a one-to-one relationship, you should have combined the fields from both tables into one table. The following are the most common reasons why you should create a one-to-one relationship:
- The number of fields required for a table exceeds the number of fields allowed in an Access table.
- Several fields in a table are required for only a subset of records in the table.
The maximum number of fields allowed in an Access table is 255. There are very few reasons why a table should ever have more than 255 fields. In fact, before you even get close to 255 fields, you should take a close look at the design of your system. On the rare occasion when having more than 255 fields is appropriate, you can simulate a single table by moving some of the fields to a second table and creating a one-to-one relationship between the two tables.
The other situation in which you would want to define one-to-one relationships is when you will use certain fields in a table for only a relatively small subset of records. An example is an Employee table and a Vesting table. Certain fields are required only for employees who are vested. If only a small percentage of a company’s employees are vested, it is not efficient, in terms of performance or disk space, to place all the fields containing information about vesting in the Employee table. This is especially true if the vesting information requires a large volume of fields. By breaking the information into two tables and creating a one-to-one relationship between them, you can reduce disk-space requirements and improve performance. This improvement is particularly pronounced if the Employee table is large.
Many-to-Many
In a many-to-many relationship, records in both tables have matching records in the other table. You cannot directly define a many-to-many relationship in Access; you must develop this type of relationship by adding a table called a junction table. You relate the junction table to each of the two tables in one-to-many relationships. An example is an Orders table and a Products table. Each order probably will contain multiple products, and each product is found on many different orders. The solution is to create a third table called OrderDetails. You relate the OrderDetails table to the Orders table in a one-to-many relationship based on the OrderID field. You relate it to the Products table in a one-to-many relationship based on the ProductID field.
Establishing Relationships in Access
You use the Relationships window to establish relationships between Access tables, as shown in Figure 3.5. To open the Relationships window, click to select the Database Tools tab on the ribbon, and then select the Relationships tool in the Show/Hide group. If you have not established any relationships, the Show Table dialog box appears. The Show Table dialog box allows you to add tables to the Relationships window.
Figure 3.5. The Relationships window enables you to view, add, modify, and remove relationships between tables.
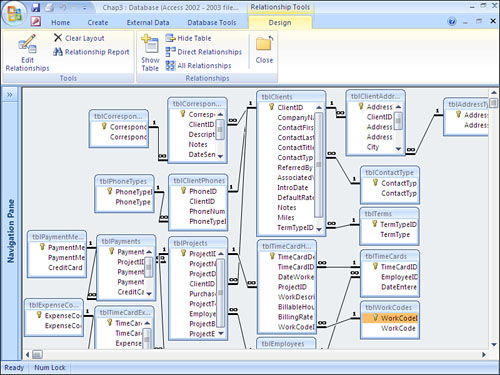
Looking at the Relationships window, you can see the types of relationships that exist for each table. All the one-to-many and one-to-one relationships defined in a database are represented with a join line. If you enforce referential integrity between the tables involved in a one-to-many relationship, the join line between the tables appears with the number 1 on the one side of the relationship and with an infinity symbol (∞) on the many side of the relationship. One-to-one relationships appear with a 1 on both ends of the join lines.
Establishing a Relationship Between Two Tables
To establish a relationship between two tables, follow these six steps:
- Open the Relationships window.
- If you’re opening the Relationships window of a particular database for the first time, the Show Table dialog box appears (see Figure 3.6). Select each table you want to relate and click Add.
Figure 3.6. The Show Table dialog box enables you to select the tables you want to relate.
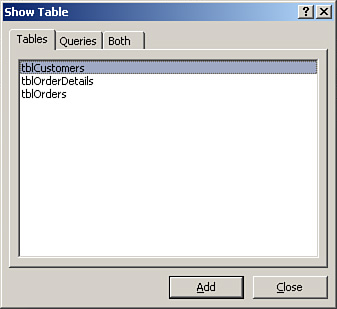
- If you have already established relationships in the current database, the Relationships window appears. If the tables you want to include in the relationship do not appear, click the Show Table button in the Relationships group on the ribbon. To add the desired tables to the Relationships window, select a table and then click Add. Repeat this process for each table you want to add. To select multiple tables at once, press Shift while clicking to select contiguous tables or press Ctrl while clicking to select noncontiguous tables; then click Add. Click Close when you are finished.
- Click and drag the field from one table to the matching field in the other table. The Edit Relationships dialog box appears, as shown in Figure 3.7.
Figure 3.7. The Edit Relationships dialog box enables you to view and modify the relationships between the tables in a database.
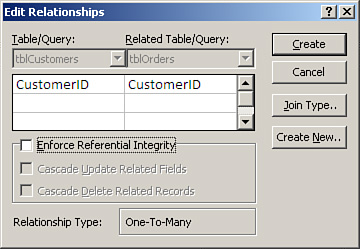
- Determine whether you want to establish referential integrity and whether you want to cascade update related fields or cascade delete related records by enabling the appropriate check boxes. The section later in this chapter titled “Establishing Referential Integrity” covers these topics.
- Click Create.
Looking at Guidelines for Establishing Relationships
You must remember a few important points when establishing relationships. If you are not aware of these important gotchas, you could find yourself in some pretty hairy situations:
- It is important to understand the correlation between the Relationships window and the actual relationships you have established within the database. The Relationships window lets you view and modify the existing relationships. When you establish relationships, Access creates the relationships the moment you click Create. You can delete the tables from the Relationships window (by selecting them and pressing Delete), but the relationships still exist. (The “Modifying an Existing Relationship” section, which appears later in this chapter, covers the process of permanently removing relationships.) The Relationships window provides a visual blueprint of the relationships that you have established. If you modify the layout of the window by moving tables around, or by adding tables to or removing them from the window, Access prompts you to save the layout after you close the Relationships window. Access is not asking whether you want to save the relationships you have established; it is simply asking whether you want to save the visual layout of the window.
- When you are adding tables to the Relationships window using the Show Tables dialog box, it is easy to accidentally add the same table to the window many times. The reason is that the tables you are adding can hide behind the Show Tables dialog box, or they can appear below the portion of the Relationships window that you are viewing. If this occurs, you’ll see multiple occurrences of the same table when you close the Show Tables dialog box. Access gives each occurrence of the table a different alias. You must remove the extra occurrences.
- You also can add queries to the Relationships window by using the Show Tables dialog box. Although rarely used, this approach might be useful if you regularly include the same queries within other queries and want to permanently establish a relationship between them.
- If you remove tables from the Relationships window (this does not delete the relationships) and you want to once again show all relationships that exist in the database, click All Relationships in the Relationships group on the Design tab. These processes show all existing relationships.
- To delete a relationship, select the join line and click Delete.
Create a new database and add a table called tblCustomers, another called tblOrders, and a third called tblOrderDetails. The tables should have the following fields:
tblCustomers: CustomerID, CompanyName, Address, City, State, ZipCode
tblOrders: OrderID, CustomerID, OrderDate, ShipVIA
tblOrderDetails: OrderID, LineNumber, ItemID, Quantity, Price
- In the
tblCustomerstable, make theCustomerIDfield aTextfield. Designate theCustomerIDfield as the primary key. Set the size of the field to5. Make all other fieldsTextfields with their default properties. - In the
tblOrderstable, setOrderIDto theAutoNumberfield type. Make theOrderIDthe primary key field. Make theCustomerIDfield aTextfield with a field size of5. Set the field type of theOrderDatefield toDate/Time, and the field type of theShipVIAfield toNumberwith a size ofLong Integer. - In the
tblOrderDetailstable, set the field type of theOrderIDfield toNumberand make sure that the size isLong Integer. Set the field type of theLineNumberfield toNumberwith a size ofLong Integer. You should base the primary key of the table on the combination of theOrderIDandLineNumberfields. TheItemIDandQuantityfields should be theNumbertype with a size ofLong Integer. ThePricefield should be theCurrencytype. - To open the Relationships window, click the Relationships button in the Show/Hide group of the Database Tools tab. With the
tblCustomerstable in the Show Table dialog box selected, hold down your Shift key and click to select thetblOrderstable. Click Add. All three tables should appear in the Relationships window. Click Close. Click and drag from theCustomerIDfield in thetblCustomerstable to theCustomerIDfield in thetblOrderstable. After the Edit Relationships dialog box appears, click Create. Repeat the process, clicking and dragging theOrderIDfield from thetblOrderstable to theOrderIDfield in thetblOrderDetailstable.
Note
You can find this example, and all examples included in this chapter, in the Chap3TryIt.ACCDB file included with the sample code on the website.
Modifying an Existing Relationship
Modifying an existing relationship is easy. Access gives you the capability to delete an existing relationship or to simply modify the nature of the relationship. To permanently remove a relationship between two tables, follow these three steps:
- Click to select the Database Tools tab and then click to select the Relationships tool in the Show/Hide group on the ribbon.
- Click the line joining the two tables whose relationship you want to delete.
- Press Delete. Access prompts you to verify your actions. Click Yes.
You often will want to modify the nature of a relationship rather than remove it. To modify a relationship, follow these four steps:
- Click to select the Database Tools tab, and then click to select the Relationships tool in the Show/Hide group on the ribbon.
- Double-click the line joining the two tables whose relationship you want to modify.
- Make the required changes.
- Click OK. All the normal rules regarding the establishment of relationships will apply.
Establishing Referential Integrity
As you can see, establishing a relationship is quite easy. Establishing the right kind of relationship is a little more difficult. When you attempt to establish a relationship between two tables, Access makes some decisions based on a few predefined factors:
- Access establishes a one-to-many relationship if one of the related fields is a primary key or has a unique index.
- Access establishes a one-to-one relationship if both the related fields are primary keys or have unique indexes.
- Access creates an indeterminate relationship if neither of the related fields is a primary key and neither has a unique index. You cannot establish referential integrity in this case.
As covered earlier in the chapter, referential integrity consists of a series of rules that the Access Database Engine applies to ensure that it properly maintains the relationships between tables. At the most basic level, referential integrity rules prevent the creation of orphan records in the table on the many side of the one-to-many relationship. After a relationship is established between a Customers table and an Orders table, for example, all orders in the Orders table must be related to a particular customer in the Customers table. Before you can establish referential integrity between two tables, the following conditions must be met:
- The matching field on the one side of the relationship must be a Primary Key field or must have a unique index.
- The matching fields must have the same data types (for linking purposes,
AutoNumberfields matchLong Integerfields). With the exception ofTextfields, they also must have the same size.Numberfields on both sides of the relationship must have the same size (Long Integer, for example). - Both tables must be part of the same Access database.
- Both tables must be stored in the proprietary Access file (
.ACCDB) format. (They cannot be external tables from other sources.) - The database containing the two tables must be open.
- Existing data within the two tables cannot violate referential integrity rules. All orders in the
Orderstable must relate to existing customers in theCustomerstable, for example.
Caution
Although Text fields involved in a relationship do not have to be the same size, it is prudent to make them the same size. Otherwise, you will degrade performance as well as risk the chance of unpredictable results when creating queries based on the two tables.
After you establish referential integrity between two tables, the Access Database Engine applies the following rules:
- You cannot enter a value in the foreign key of the related table that does not exist in the primary key of the primary table. For example, you cannot enter a value in the
CustomerIDfield of theOrderstable that does not exist in theCustomerIDfield of theCustomerstable. - You cannot delete a record from the primary table if corresponding records exist in the related table. For example, you cannot delete a customer from the
Customerstable if related records exist in theOrderstable (records with the same value in theCustomerIDfield). - You cannot change the value of a primary key on the one side of a relationship if corresponding records exist in the related table. For example, you cannot change the value in the
CustomerIDfield of theCustomerstable if corresponding orders exist in theOrderstable.
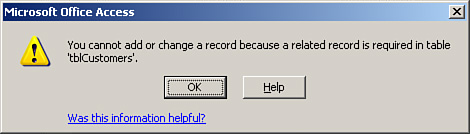
If you attempt to violate any of the preceding three rules and you have enforced referential integrity between the tables, Access displays an appropriate error message, as shown in Figure 3.8.
Figure 3.8. An error message when attempting to add an order for a customer who doesn’t exist.
The Access Database Engine’s default behavior is to prohibit the deletion of parent records that have associated child records and to prohibit the change of a primary key value of a parent record when that parent has associated child records. You can override these restrictions by using the three check boxes available in the Edit Relationships dialog box when you establish or modify a relationship.
The following example enforces referential integrity between the tblCustomers table and the tblOrders table. It illustrates how this affects the process of adding and deleting records:
- To open the Relationships window, click to select the Database Tools tab and then click the Relationships tool in the Show/Hide group. Double-click the join line between
tblCustomersandtblOrders. Enable the Enforce Referential Integrity check box. Click OK. Repeat the process for the relationship betweentblOrdersandtblOrderDetails. - Go into
tblCustomersand add a couple of records. Take note of the customer IDs. Go intotblOrders. Add a couple of records, taking care to assign customer IDs of customers who exist in thetblCustomerstable. Now try to add an order for a customer whose customer ID does not exist intblCustomers. You should get an error message. - Attempt to delete a customer from
tblCustomerswho does not have any orders. You should get a warning message, but Access should allow you to complete the process. Now try to delete a customer who does have orders. The Access Database Engine should prohibit you from deleting the customer. Attempt to change the customer ID of a customer who has orders. You should not be able to do this.
Cascade Update Related Fields
The Cascade Update Related Fields option is available only if you have established referential integrity between the tables. With this option selected, the user can change the primary key value of the record on the one side of the relationship. When the user tries to modify the field joining the two tables on the one side of the relationship, the Access Database Engine cascades the change down to the foreign key field on the many side of the relationship. This technique is useful if the primary key field is modifiable. For example, a purchase number on a purchase order master record might be updatable.
If the user modifies the purchase order number of the parent record, you would want to cascade the change to the associated detail records in the purchase order detail table.
Note
You do not need to select the Cascade Update Related Fields option when the related field on the one side of the relationship is an AutoNumber field. You can never modify an AutoNumber field. The Cascade Update Related Fields option has no effect on AutoNumber fields.
Caution
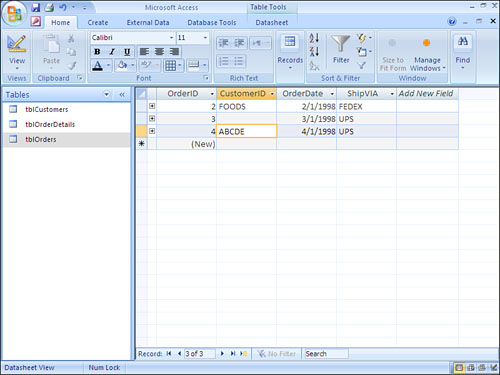
You can easily introduce a loophole into your system accidentally. If you create a one-to-many relationship between two tables but forget to set the Required property of the foreign key field to Yes, you allow the addition of orphan records. Figure 3.9 illustrates this point. I added an order to tblOrders without entering a customer ID. This record is an orphan record because no records in tblCustomers have a customer ID of Null. To eliminate the problem, set the Required property of the foreign key field to Yes.
Figure 3.9. An orphan record with Null in the foreign key field.
Cascade Delete Related Records
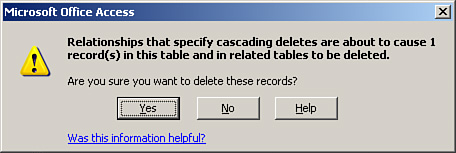
The Cascade Delete Related Records option is available only if you have established referential integrity between the tables. With this option selected, the user can delete a record on the one side of a one-to-many relationship, even if related records exist in the table on the many side of the relationship. A user can delete a customer even if the customer has existing orders, for example. The Access Database Engine maintains referential integrity between the tables because it automatically deletes all related records in the child table.
If you attempt to delete a record from the table on the one side of a one-to-many relationship and no related records exist in the table on the many side of the relationship, you get the usual warning message, as shown in Figure 3.10. On the other hand, if you attempt to delete a record from the table on the one side of a one-to-many relationship and related records exist in the child table, Access warns you that you are about to delete the record from the parent table, as well as any related records in the child table (see Figure 3.11).
Figure 3.10. A message that appears after the user attempts to delete a parent record without related child records.
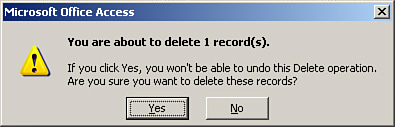
Figure 3.11. A message that appears after the user attempts to delete a parent record with related child records.
Tip
The Cascade Delete Related Records option is not always appropriate. It is an excellent feature, but you should use it prudently. Although it is usually appropriate to cascade delete from a tblOrders table to a tblOrderDetails table, for example, it generally is not appropriate to cascade delete from a tblCustomers table to a tblOrders table. The reason is that you generally do not want to delete all your order history from the tblOrders table if for some reason you want to delete a customer. Deleting the order history causes important information, such as your profit and loss history, to change. Therefore, it is appropriate to prohibit this type of deletion and handle the customer in some other way, such as marking him as inactive or archiving his data. On the other hand, if you delete an order because the customer canceled it, you probably want to remove the corresponding order detail information as well. In this case, the Cascade Delete Related Records option is appropriate. You need to make the most prudent decision in each situation, based on business needs. The important point is to carefully consider the implications of each option before making your decision.
With the Cascade Update feature enabled, you are able to update the primary key value of a record that has associated child records. With the Cascade Delete feature enabled, you can delete a parent record that has associated child records. This exercise illustrates the use of Cascade Update and Cascade Delete:
- Modify the relationship between
tblCustomersandtblOrders. Enable the Cascade Update Related Fields check box. Modify the relationship betweentblOrdersandtblOrderDetails. Enable the Cascade Delete Related Records check box. You do not need to enable Cascade Update Related Fields because theOrderIDfield intblOrdersis anAutoNumberfield. - Attempt to delete a customer who has orders. The Access Database Engine should still prohibit you from doing deleting because you did not enable Cascade Delete Related Records. Change the customer ID in
tblCustomersof a customer who has orders. The Access Database Engine should allow this change. Take a look at thetblOrderstable. The Access Database Engine should have updated the customer ID of all corresponding records in the table to reflect the change in the parent record. - Add some order details to the
tblOrderDetailstable. Try to delete any order that has details within thetblOrderDetailstable. You should receive a warning, but the Access Database Engine should allow you to complete the process.
Looking at the Benefits of Relationships
The primary benefit of relationships is the data integrity they provide. Without the establishment of relationships, users are free to add records to child tables without regard to entering required parent information. After referential integrity is established, you can enable Cascade Update Related Fields or Cascade Delete Related Records, as appropriate, which will save you quite a bit of code in maintaining the integrity of the data in your system. Most relational database management systems require that you write the code to delete related records when the user deletes a parent record or to update the foreign key in related records when the user modifies the primary key of the parent. By enabling the Cascade Update and Cascade Delete check boxes, you are sheltered from having to write a single line of code to perform these tasks when they are appropriate.
Note
SQL Server 2000 and SQL Server 2005 offer Cascade Update and Cascade Delete features similar to those found in Microsoft Access. This means that you no longer need to write your own T-SQL statements when it is appropriate to implement Cascade Update and Delete functionality.
Access automatically carries relationships into your queries. This means that each time you build a new query, Access automatically establishes the relationships between the tables within the query, based on the relationships you have set up in the Relationships window. Furthermore, each time you build a form or report, Access uses relationships between the tables included on the form or report to assist with the design process. Whether you delete or update data using a datasheet or a form, all referential integrity rules automatically apply, even if you establish the relationship after you build the form.
Examining Indexes and Relationships
The field that joins two tables on the one side of a one-to-many relationship must be a primary key field or must have a unique index so that the Access Database Engine can maintain referential integrity. If the index on the one side of the relationship is not unique, there is no way to determine to which parent a child record belongs.
In Access 2007, you do not need to create an index for the field on the many side of the relationship. Access 2007 will create an internal index for you. If you do create an index on the many side of the relationship, make sure that you set the index to Yes (Duplicates OK); otherwise, you will have a one-to-one, rather than a one-to-many, relationship.
Practical Examples: Establishing the Relationships Between the Tables Included in the Time and Billing Database
In this example, you’ll establish some of the relationships you need to set up for the tables included in a hypothetical time and billing database. If you would like to build the relationships yourself, open the database that you created in Chapter 2, “What Every Developer Needs to Know About Databases and Tables.”
tblClientstotblProjects—You need to relatetblClientsandtblProjectsin a one-to-many relationship based on theClientIDfield. You must enforce referential integrity to ensure that the user cannot add projects for nonexistent clients. There is no need to set Cascade Update Related Fields because the client ID that relates the two tables is anAutoNumberfield intblClients. You do not want to enable Cascade Delete Related Records because you do not want billing information to change if the user deletes a client. Instead, you want to prohibit the deletion of clients who have projects by establishing referential integrity between the two tables.tblProjectstotblPayments—You need to relatetblProjectsandtblPaymentsin a one-to-many relationship based on theProjectIDfield. You must enforce referential integrity to ensure that the user cannot add payments for nonexistent projects. There is no need to set Cascade Update Related Fields because theProjectIDthat relates the two tables is anAutoNumberfield intblProjects. You do not want to enable Cascade Delete Related Records because you do not want payment information to change if the user deletes a client. Prohibit the deletion of clients who have payments by establishing referential integrity between the two tables.tblProjectstotblTimeCardHours—You need to relatetblProjectsandtblTimeCardHoursin a one-to-many relationship based on theProjectIDfield. You must enforce referential integrity to ensure that the user cannot add hours for nonexistent projects. There is no need to set Cascade Update Related Fields because theProjectIDthat relates the two tables is anAutoNumberfield intblProjects. Enable Cascade Delete Related Records so that the Access Database Engine deletes the associated hours if the user deletes a project.tblProjectstotblTimeCardExpenses—You need to relatetblProjectsandtblTimeCardExpensesin a one-to-many relationship based on theProjectIDfield. You must enforce referential integrity to ensure that the user cannot add expenses for nonexistent projects. There is no need to set Cascade Update Related Fields because theProjectIDthat relates the two tables is anAutoNumberfield intblProjects. Enable Cascade Delete Related Records so that the Access Database Engine deletes expenses if the user deletes a project.tblEmployeestotblTimeCards—You need to relatetblEmployeesandtblTimeCardsin a one-to-many relationship based on theEmployeeIDfield. You must enforce referential integrity to ensure that the user cannot add time cards for nonexistent employees. There is no need to set Cascade Update Related Fields because theEmployeeIDthat relates the two tables is anAutoNumberfield intblEmployees. You do not want to enable Cascade Delete Related Records because, if the user deletes an employee, you do not want the Access Database Engine to delete all the employee’s time cards.tblEmployeestotblProjects—You need to relatetblEmployeesandtblProjectsin a one-to-many relationship based on theEmployeeIDfield. You must enforce referential integrity to ensure that the user cannot assign projects to nonexistent employees. There is no need to set Cascade Update Related Fields because the employee ID that relates the two tables is anAutoNumberfield intblEmployees. You do not want to enable Cascade Delete Related Records because, if the user deletes an employee, you do not want the Access Database Engine to delete all the employee’s projects, which is generally not desirable.tblTimeCardstotblTimeCardHours—You need to relatetblTimeCardsandtblTimeCardHoursin a one-to-many relationship based on theTimeCardIDfield. You must enforce referential integrity to ensure that the user cannot add time card hours for nonexistent time cards. There is no need to set Cascade Update Related Fields because the time card ID that relates the two tables is anAutoNumberfield intblTimeCards. You do want to enable Cascade Delete Related Records because, if the user deletes a time card, you want the Access Database Engine to delete the corresponding hours.tblTimeCardstotblTimeCardExpenses—You need to relatetblTimeCardsandtblTimeCardExpensesin a one-to-many relationship based on theTimeCardIDfield. You must enforce referential integrity to ensure that the user cannot add time card expenses for nonexistent time cards. There is no need to set Cascade Update Related Fields because the time card ID that relates the two tables is anAutoNumberfield intblTimeCards. You do want to enable Cascade Delete Related Records because, if the user deletes a time card, you want the Access Database Engine to delete the corresponding expenses.tblExpenseCodestotblTimeCardExpenses—You need to relatetblExpenseCodesandtblTimeCardExpensesin a one-to-many relationship based on theExpenseCodeIDfield. You must enforce referential integrity to ensure that the user cannot add time card expenses with nonexistent expense codes. There is no need to set Cascade Update Related Fields because the expense code ID that relates the two tables is anAutoNumberfield intblExpenseCodes. You do not want to enable Cascade Delete Related Records because, if the user deletes an expense code, you do not want the Access Database Engine to delete the corresponding expenses.tblWorkCodestotblTimeCardHours—You need to relatetblWorkCodesandtblTimeCardHoursin a one-to-many relationship based on theWorkCodeIDfield. You must enforce referential integrity to ensure that the user cannot add time card hours with invalid work codes. There is no need to set Cascade Update Related Fields because the work code ID that relates the two tables is anAutoNumberfield intblWorkCodes. You do not want to enable Cascade Delete Related Records because, if the user deletes a work code, you do not want the Access Database Engine to delete the corresponding hours.tblPaymentMethodstotblPayments—You need to relatetblPaymentMethodsandtblPaymentsin a one-to-many relationship based on thePaymentMethodIDfield. You must enforce referential integrity to ensure that the user cannot add payments with an invalid payment method. There is no need to set Cascade Update Related Fields because thePaymentMethodIDthat relates the two tables is anAutoNumberfield intblPaymentMethods. You do not want to enable Cascade Delete Related Records because, if the user deletes a payment method, you do not want the Access Database Engine to delete the corresponding payments.
Summary
Relationships enable you to normalize your database. Using relationships, you can divide your data into separate tables, once again combining the data at runtime. This chapter began by explaining relational database design principles. It described the types of relationships that you can define. It then covered the details of establishing and modifying relationships between tables and described all the important aspects of establishing relationships.
The capability to easily establish and maintain referential integrity between tables is an important strength of Microsoft Access. This chapter described the referential integrity options and highlighted when each option is appropriate. Finally, this chapter summarized the benefits of relationships.