
Chapter 12. Arrays and Collections
After completing this chapter, you will be able to:
Implement arrays in C++.
Create single-dimensional and multidimensional arrays.
Create and use managed arrays.
Understand what generic types are.
Use the features of the System::Array class.
Use the collection classes provided by the .NET Framework.
Describe what the STL/CLR library is.
This chapter concerns itself with data structures. You’ll learn about arrays and other collection classes, and you’ll learn how to use them in your applications. In the first part of the chapter, you’re going to learn about two sorts of arrays: the native arrays provided by the C++ language, and the Microsoft .NET managed arrays, which use functionality inherited from the .NET Framework.
The second part of the chapter looks more widely at the range of collection classes provided by the .NET Framework, discussing their characteristics and showing you how and when to use them. The chapter concludes with a brief introduction to the STL/CLR library.
Native C++ arrays
Native arrays are those provided as part of the C++ language, and they are based on the arrays that C++ inherited from C. Although native arrays are designed to be fast and efficient, there are drawbacks associated with using them, as you’ll see shortly.
This first exercise introduces you to C++ native arrays by showing you how to create an array of value types and how to use the array.
Start Microsoft Visual Studio 2012 and create a new CLR Console Application project named TradArray.
Open the source file Trad.cpp and edit the main function to match the following:
const size_t SIZE = 10;

int main(array<System::String ^> ^args)
{
    Console::WriteLine("Traditional Arrays");

    // Create an array
    int arr[SIZE];
    Console::WriteLine("Size in main: {0}", sizeof(arr));

    // Fill the array
    for(size_t i=0; i<SIZE; i++)
        arr[i] = i*2;

    return 0;
}
The first line declares a constant that represents the size of the array. Using symbolic constants in this fashion is preferable to using the integer literal “10” in the code. Not only does it make explicit just what the 10 represents, but should you want to change the size of the array, you only have to change the value in one place.
The type size_t is a typedef for unsigned int. This is used where you want to denote sizes, dimensions, or quantities. It is good practice to use size_t rather than int. Also note the widespread convention of using capitalized names for constants.
The array is created by specifying a type, a name, and a size enclosed in square brackets ([]). Here, the array is named arr, and it holds ten int values. All arrays are created by using the same syntax, as shown here:
// Create an array of six doubles
double arr[6];
// Create an array of two char*'s
char* arr[2];
Here’s the first important point about native arrays: after you’ve created an array, you can’t resize it, so you need to know how many elements you require before you start. If you don’t know how many elements you’re going to need, you might be better off using a .NET collection, which is discussed later in this chapter.
Note
The array size has to be known at compile time, so, for example, you can’t ask the user for a value and then use that value to specify an array dimension at run time. However, it’s common to create constants, either by using preprocessor #define declarations or by declaring const variables, and using them to specify array dimensions.
As you can see from the loop in the preceding code, array elements are accessed by using square brackets that contain the index. Here’s the second important point about native arrays: indexing starts at zero rather than one, so the valid range of indices for an array is from zero to one less than the size of the array. In other words, for a 10-element array, valid indices are [0] to [9].
Add a second loop to print out the array’s contents after filling it.
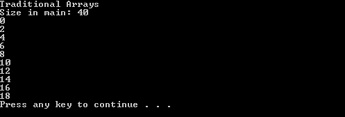
// Print its contents
for(size_t j=0; j<10; j++)
    Console::WriteLine(arr[j]);
Build and run the application.
The values print, one to a line, as shown in the following screen shot, and you also see that the size of the array is 40, representing 10 ints of 4 bytes each:
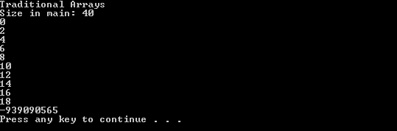
What happens if you change the range of the second loop so that it tries to print the element at [10]?
Alter the code in the second loop to look like the following:
// Print its contents
for(size_t j=0; j<=10; j++)
    Console::WriteLine(arr[j]);
Notice the less-than-or-equal-to (<=) condition. The effect of this condition is to try to print 11 elements rather than 10. Compile and run the program, and you should see output similar to the following:
Notice the random value that’s been printed at the end of the list. Here’s the third important point about native arrays: bounds aren’t checked. Native arrays in C++ aren’t objects, and therefore they have no knowledge of how many elements they contain. It’s up to you to keep within the bounds of the array; if you don’t, you risk corrupting data or crashing your application.
Passing arrays to functions
Passing arrays to functions introduces a complication because the function has no knowledge about the size of the array it has been passed. As you’ll see shortly, when you pass an array to a function, you pass only the starting address, which means that you have to figure out some way of passing the size information along with the array when you call the function. Normally this is accomplished in one of two ways:
Pass the size as an explicit parameter to the function call.
Ensure that the array is always terminated by a unique marker value so that the function can determine when the end of the data has been reached.
Let’s investigate passing an array to a function.
Continue with the project from the previous exercise.
Add the following function definition immediately after the using namespace System; line:
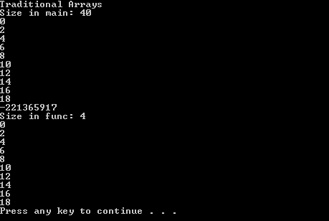
void func(int arr[], size_t size)
{
    Console::WriteLine("Size in func: {0}", sizeof(arr));
    for(size_t i=0; i<size; i++)
        Console::WriteLine(arr[i]);
}
The first argument to the function alerts the compiler that the address of an array is going to be passed, which is equivalent to passing a pointer. It’s very common to see int* used, instead. The second argument passes the size of the array—in effect, the amount of memory pointed to by the first argument. The function prints out the array by using the size, just as before.
Call the function from the main routine, as shown here:
func(arr, 10);
What if the array size needs to be changed at some point? You can make your code more robust by calculating the number of elements in the array automatically by using the sizeof operator, like this:
func(arr, sizeof(arr)/sizeof(arr[0]));
The sizeof operator returns the size of its argument in bytes, where the argument can be a variable name or a type name. Using sizeof on an array returns the total size of the array in bytes, in this case, 40 bytes. When divided by the size of one element—4 bytes—you’re left with the number of elements in the array.
Build and run the application.
The right values print out as well as the fact that the array is of size 4 bytes. This reflects the fact that it is passed to the function as a pointer.
Initializing arrays
It’s possible to initialize arrays at the point of declaration, as shown in the following syntax fragment:
int arr[4] = { 1, 2, 3, 4 };The values to be used for initialization are provided as a comma-separated list in braces ({}) on the right side of an assignment; these values are known as an aggregate initializer. The compiler is clever enough to figure out how many values are in the list, and it will dimension the array to fit if you don’t provide a value.
// Dimension the array automatically
int arr[] = { 1, 2, 3, 4 };
If you give a dimension and then provide too many values, you’ll get a compiler error. If you don’t provide enough values, the initial values you give will be used to initialize the array starting from element zero, and the remaining elements will be set to zero.
Multidimensional arrays
Multidimensional arrays in C++ are an extension of the single-dimensional variety. The following short exercise shows how to create and use a two-dimensional array.
Create a new CLR Console Application project named MultiD.
Open the source file MultiD.cpp and add the following code to the main function:
int main(array<System::String ^> ^args)
{
    Console::WriteLine("Multidimensional Arrays");

    // Create a 2D array
    int arr[2][3];

    // Fill the array
    for(int i=0; i<2; i++)
        for(int j=0; j<3; j++)
            arr[i][j] = (i+1)*(j+1);

    return 0;
}
Observe that a two-dimensional array is declared by using two sets of square brackets. You don’t put the two values inside one set of brackets, as you do in many other languages, and for higher-order arrays, you simply add more sets of square brackets. As with single-dimensional arrays, you have to provide the size at compile time, and the indices of each dimension vary from zero to one less than the declared size. Array elements are also accessed by using two sets of square brackets.
Print out the array by using an extension of the method for printing out the elements of the single-dimensional array, as follows:
// Print the array content
for(int i=0; i<2; i++)
{
    for(int j=0; j<3; j++)
        Console::Write("{0} ", arr[i][j]);

    Console::WriteLine();
}
Notice that one row of the array is printed on one line. The inner loop prints a single row by using repeated calls to Console::Write. After each row has been output, a call to Console::WriteLine outputs a new line.
To pass a multidimensional array to a function, use two empty sets of square brackets (for example, int arr[][]) and specify the dimension information, as before.
Dynamic allocation and arrays
So far, all arrays in this chapter have had a fixed size allocated at compile time. It is possible—and very common—to create arrays dynamically at run time by using the new operator. The array you create still has a fixed size, but this size can be specified at run time when you know how many elements you need. The following exercise shows how to create an array dynamically and then use it.
Open the source file Dynamic.cpp and edit the main function as shown:
const size_t SIZE = 10;

int main(array<System::String ^> ^args)
{
    Console::WriteLine("Dynamic Arrays");

    // Create an array dynamically
    int *pa = new int[SIZE];

    // Fill the array
    for(size_t i=0; i<SIZE; i++)
        pa[i] = i*2;

    // Print the array content
    for(size_t j=0; j<SIZE; j++)
        Console::WriteLine(pa[j]);

    // Get rid of the array once we're finished with it
    delete [] pa;

    return 0;
}
You’ve previously used the gcnew operator to create .NET reference types; the new operator is used in traditional C++ code in a similar way to allocate memory dynamically at run time. The syntax is new, followed by the type of the array and then the dimension enclosed in square brackets. After the array has been created, you’re returned a pointer to the start of the array. Pointers work in a similar way to handles, but they use an asterisk (*) instead of a caret.
You can see that dynamic arrays are accessed in exactly the same way as statically allocated arrays, using the square-bracket notation. This use of a pointer with array notation underlines the relationship between pointers and arrays, as explained in the sidebar How do native arrays work? earlier in this chapter.
Notice the call to delete just before the program exits. Allocating an array dynamically in traditional C++ doesn’t create a managed object, so there is no garbage collection associated with this array. Therefore, to use memory efficiently, you must remember to deallocate memory as soon as you’ve finished with the array. There are two versions of delete: one to delete single objects (delete), and one for arrays (delete []).
When deleting an array, you need to use the delete [] version. If you forget the square brackets, your application might well still run, but according to the standard, the result of calling single-element delete on an array is undefined.
Strictly speaking, the call is unnecessary here because all allocated memory is freed up when the application exits. However, in any real-world application, you need to manage your memory carefully to ensure that all memory is freed up at an appropriate point.
Generic types
Before we talk about the .NET array and collection classes, we need to introduce the concept of generic types. This is a complex topic, and we cannot cover it in great depth, but this section provides enough detail for you to understand why generic types are useful and how they work. You will also find that you use generic types far more often than you create them, so I will focus on how to use the generic types you will encounter in .NET.
Perhaps the easiest way to introduce generic types is through an example. Suppose that you want to create a class that will hold a list of object handles. When you begin designing the class, you will soon realize that it doesn’t matter what type the objects in the list are, as long as they are ref types and you can get a handle to them. A list of String^ will work in exactly the same way as a list of Person^ or a list of Vehicle^. In fact, you can say that your list class will work with T^, where T is any reference type.
This is what generic types give you the flexibility to do. You can write a class in terms of T^, and only decide what T is going to be when you use it. Here is what a (very) partial definition of such a generic list class might look like:
generic <typename T>
ref class MyList
{
public:
    void Add(T obj);
    T GetAtIndex(int idx);
    ...
};
The class definition begins with the generic keyword, which alerts the compiler that you’re starting a generic type. The <typename T> then informs the compiler that T is a type parameter, a placeholder that will be filled in later and which must be the name of a type. You can then implement the class in terms of T, using it in member declarations, and for function parameter and return types.
Note
It is possible (and quite common) for a generic type to have more than one type parameter. For example, a dictionary of key/value pairs will have one parameter for the key type and a second for the value type, which would be denoted by <typename K, typename V>.
To use this type in code, you need to specify to the compiler what T will be by providing as a type name in angle brackets:
MyList<String^> ^listOfString = gcnew MyList<String^>();
This line informs the compiler that we want a list of String^, and the compiler will ensure that the object will only work with String^. Any attempt to add another type results in a compile-time error. The types created from a generic type by specifying a type parameter are called constructed types.
Note
When this code is compiled, a generic version of the class is added to the assembly, and constructed types are created at run time, as needed. This is important because it means that it is not necessary to know when compiling the original MyList<T> code what types it will be used with at run time.
Managed arrays
The .NET Framework library contains an array class that provides a managed equivalent of a standard C++ array but without the disadvantages. A managed array is an object that is allocated on the managed heap and subject to the normal garbage-collection rules.
Creating a managed array is quite different from creating a standard C++ array. You declare a managed array by using the array keyword, as in the following examples:
array<int> ^arr1;
array<double, 2> ^arr2;
array<Person^> ^arr3;
Observe that all of these are declared as handles. This is because an array is a managed object, and you always interact with arrays through handles. So, arr1 is a handle to a 1D array of integers; arr2 is a handle to a 2D array of doubles; and arr3 is a handle to an array of Person handles.
Note
The <> syntax indicates that the array is a generic type. The array class is written so that it can represent an array of any type of object, and you specify the type it is to contain in angle brackets at the time of declaration.
The general syntax for declaration is
array<type, rank> handle_name;
where rank is the number of dimensions (although for a 1D array, you can omit the rank). So, we could declare some arrays as follows:
array<int> ^intArray = gcnew array<int>(5);
array<String^> ^stringArray = gcnew array<String^>(10);
The first line declares an array of 5 ints, whereas the second declares an array of 10 String handles. You might recognize this second type from the main function that you’ve seen in all the examples.
This exercise shows you how to create and iterate over an array of ints.
Create a new CLR Console Application project named IntArray.
Add the following code to main to create an array of ints and then fill it with some squares:
array<int> ^intArray = gcnew array<int>(5);
for (int i=0; i<intArray->Length; i++)
    intArray[i] = i*i;
Notice how you access the array elements by using the square-bracket notation, with the index starting at zero, just as in traditional arrays. There is no reason why indexing must start from zero, but it is traditional for languages in the C family.
Add another loop to print out the values.
for (int i=0; i<intArray->Length; i++)
    Console::WriteLine("Element {0} is {1}", i, intArray[i]);
Build and run the application, and verify that the values are printed.
Modify the loop so that it tries to read off the end of the array.
for (int i=0; i<intArray->Length+1; i++)
Build and run the application again.
This time you should get an exception because the array object knows how many elements it has, and it won’t let you try to access an element that doesn’t exist.
This is an important difference between traditional and managed arrays. The managed array is holding a set of values for you, knows exactly how many it has, and isn’t going to let you access an element that doesn’t exist.
Initialization
Initialization
You saw earlier how a traditional C++ array can be initialized by using an aggregate initializer. You can do the same with managed arrays, so we can write the following:
array<int> ^intArray = gcnew array<int>(3) { 1, 2, 3 };
As you might expect, the compiler is clever enough to work out the size of the array from the initializer, so you can omit the dimension, as demonstrated in the following:
array<int> ^intArray = gcnew array<int>() { 1, 2, 3 };And, just like traditional arrays, you can omit the entire gcnew expression because the compiler knows from the left side of the statement that you want an array<int>, as illustrated here:
array<int> ^intArray = { 1, 2, 3 };Arrays and reference types
Arrays of reference types are slightly different to arrays of value types. Remember that reference types are always accessed through a handle. This means that an array of reference types is actually going to be an array of handles.
You can see this by examining the main function of any application you’ve written so far. If you look at the definition of main, the first line should look like this:
int main(array<System::String ^> ^args)
The args argument is a handle to an array of String handles, and you will become very accustomed to seeing this “double caret” pattern as you work with managed arrays.
The following exercise shows you how to create and use an array of reference types. In this example, you will use the System::String class, but you can easily substitute a reference type of your own.
Create a new CLR Console Application named RefArray.
Edit the main function to match the following:
const size_t SIZE = 5;

int main(array<System::String ^> ^args)
{
    Console::WriteLine("Arrays of Reference Types");

    // Create an array of String references
    array<String ^> ^arr = gcnew array<String ^>(SIZE);

    // Explicitly assign a string to element zero
    arr[0] = gcnew String("abc");

    // Implicitly assign a string to element one
    arr[1] = "def";

    // Print the content
    for (size_t i=0; i<SIZE; i++)
        if (arr[i] == nullptr)
            Console::WriteLine("null");
        else
            Console::WriteLine(arr[i]);
    }
Compile and run the application, ensuring that the values are printed as you expected.
You should see two strings printed first, followed by three nulls. This is because the array object sets the String handles to null when it is created, and you have only assigned to two of them.
You can also use an aggregate initializer with reference types, so you could have initialized the array like this:
array<String ^> ^arr = gcnew array<String^>(SIZE) {
        gcnew String("abc"),
        gcnew String("def") };
Using the for each loop with arrays
In .NET code, there is a better way to iterate over arrays than using a counted for loop: the for each loop. With for each, you can iterate over a collection without having to maintain a counter. Here’s what a for each loop looks like:
for each (String ^s in arr)
{
    // use s
}
Each time around the loop, an element from the array is assigned to the String s, so that you can use it within the body of the loop. You do not have to know how big the array is, and don’t have to initialize and maintain a counter. Not having to do this means that there is less chance to get an off-by-one error in your code.
There is another advantage to using the for each loop that might not be immediately apparent. This loop doesn’t only work with arrays; it works with any collection that implements the IEnumerator interface. This means that you can use the same programming construct to iterate over very different kinds of collection.
This short exercise shows you how to use a for each loop:
Continue with the project from the previous exercise.
Modify the code that prints out the contents of the array to use a for each loop:
for each (String ^s in arr) {
    if (s == nullptr)
        Console::WriteLine("null");
    else
        Console::WriteLine(s);
}
Build and run the application to ensure that you see the same output.
Multidimensional arrays
Just as in standard C++, you can create multidimensional arrays in C++/CLI. Unlike standard C++, however, you don’t provide extra pairs of square brackets, but instead specify the dimension inside the angle brackets. For example, here is how you would declare a two-dimensional array of ints:
array<int,2> ^array2D = gcnew array<int,2>(3, 3);
Because you have two dimensions, you need to specify two values in the constructor to set the values for each dimension.
You also obviously need to give two values when specifying an element in a 2D array, but in C++/CLI, you place both inside a single pair of square brackets:
array2d[1,1] = 7;
As you would expect, indexes start from zero in all dimensions, and you can generalize the creation and use of these arrays to any number of dimensions you like.
You can use aggregate initializers with multidimensional arrays, and you use nested curly brackets to show which values belong to which row of the array:
array<int, 2> ^array3d = {
    { 1, 2, 3 },
    { 4, 5, 6 },
    { 7, 8, 9 }
};
The .NET array class
Managed arrays in the .NET Framework all inherit from System::Array, which means that every managed array has a number of useful properties and methods. These properties and methods are summarized in the following two tables.
Property | Description |
Returns true if the array has a fixed size. Always returns true, unless overridden by a derived class. | |
Returns true if the array is read-only. Always returns false, unless overridden by a derived class. | |
Returns true if the array is thread-safe (synchronized). Always returns false, unless overridden by a derived class. | |
Returns the total number of elements in all dimensions of the array as a 32-bit integer. | |
Returns the total number of elements in all dimensions of the array as a 64 bit integer. | |
Returns the number of dimensions in the array. | |
Returns a pointer to an object that can be used to synchronize access to the array. |
Method | Description |
Returns a read-only wrapper for an array. | |
Static method that searches a single-dimensional array for a value by using a binary search algorithm. | |
Static method that sets all or part of an array to zero or a null reference. | |
Copy | Static method that copies all or part of one array to another array, performing type downcasting as required. |
Method that copies all or part of one single-dimensional array to another. | |
Determines whether the array contains elements that match a condition. | |
Return the first element of the array that matches a condition. | |
Return all the elements of the array that match a condition. | |
Return the last element of the array that matches a condition. | |
Performs an action on each element of the array. | |
Returns an enumerator for the array. See the section Using enumerators later in this chapter for details. | |
Returns the number of elements in a specified dimension as an integer. | |
Returns the lower bound of a specified dimension as an integer. | |
Returns the upper bound of a specified dimension as an integer. | |
Returns the value at a specified position in a single-dimensional or multidimensional array. | |
Static method that returns the index of the first occurrence of an element in an array or a part of an array. | |
Initializes an array of value types by calling the default constructor of the value type. This method must not be used on arrays of reference types. | |
Static method that returns the index of the last occurrence of an element in an array or a part of an array. | |
Resize the array to the specified number of elements. | |
Static method that reverses the order of the elements in all or part of a single-dimensional array. | |
Sets an array element to a specified value. | |
Static method that sorts the elements in a single-dimensional array. | |
Determines whether every element of the array matches a condition. |
Basic operations on arrays
Unlike traditional C++ arrays, managed arrays are objects, and they “know” how many dimensions they have and how many elements they contain. The following exercise introduces you to some of the basic functionality in the System::Array class.
Create a new CLR Console Application project named SysArray.
At the top of the main function, add declarations for some loop counters and a two-dimensional array of 32-bit integers, as demonstrated in the following:
// Declare loop counters
int i,j,k;

// Create a multidimensional array of ints
array<int, 2> ^arr = gcnew array<int, 2>(3,2);
This is the array that you’ll use for exploring the features of the System::Array class in the rest of this section.
Because this is a managed array, it inherits directly from System::Array, so you can use the Rank and Length properties of the Array class to find out the rank (number of dimensions) and total length of the array. Add the following code to the main function:
Console::WriteLine("Rank is {0}", arr->Rank);
Console::WriteLine("Length is {0}", arr->Length);
When you run this code, you should find that the rank is two and the total length is six, which matches the declaration.
The GetLength method—not to be confused with the Length property—returns the size of any one dimension of the array, so you can print out the sizes of each dimension, as presented here:
// Print out the array dimension information
for (i=0; i<arr->Rank; i++)
    Console::WriteLine("Dimension {0} is of size {1}", i, arr->GetLength(i));
Now that you have an array and can find out how large each dimension is, you need to know how to get and set elements in the array.
Add the following nested loops to the end of your code:
// Fill the array with values
for (j=0; j<arr->GetLength(0); j++)
    for (k=0; k<arr->GetLength(1); k++)
        arr[j,k] = (j+1)*(k+1);
The outer loop iterates over the rows, whereas the inner loop iterates over the columns, and the [x,y] notation is used to reference the array elements. The Array class also has the SetValue method, which provides an alternative way of setting values for those languages that don’t support the array notation style of C++.
// Put '10' in array element [1,1]
arr->SetValue(10, 1, 1);
Print out the values in the array by using a similar pair of nested loops.
// Print out the array data
for (j=arr->GetLowerBound(0); j<=arr->GetUpperBound(0); j++)
    for (k=arr->GetLowerBound(1); k<=arr->GetUpperBound(1); k++)
        Console::WriteLine("pn[{0},{1}] = {2}", j, k, arr[j,k]);
Again, the outer loop iterates over the rows, and the inner loop iterates over the columns. In this case, the GetLowerBound and GetUpperBound methods return the indices of the lower and upper bounds. The argument to GetUpperBound and GetLowerBound is the dimension of the array whose bound you want to find. In C++, the lower bound is invariably 0 and the upper bound can be obtained by using the GetLength method, so these are mainly useful in other languages for which it might be common to have arrays with arbitrary lower and upper bounds.
Build and run the application. Check that the results are what you expect.
More advanced array operations
You can now create arrays, find out how many dimensions they have and how large they are, and get and set values. This section introduces some of the more advanced operations supported by the Array class, such as copying, searching, and sorting.
Copying array elements
The following exercise shows you how to use the Copy method to copy part of one array to another.
Continue with the project from the previous exercise.
At the end of the main function, create a second two-dimensional array the same size and type as the original.
// Create another multidimensional array of ints
array<int, 2> ^arr2 = gcnew array<int, 2>(3,2);
Add some code to fill the new array with a constant value.
// Fill the array with a constant value
for (j=0; j<arr2->GetLength(0); j++)
    for (k=0; k<arr2->GetLength(1); k++)
        arr2[j,k] = 47;
To copy some values over from the first array to the second, use the static Copy method.
// Copy two values from arr to arr2
System::Array::Copy(arr,0, arr2,2, 2);
Using this method, you can copy all or part of one array into another. The first two arguments are the source array and the index from which to start copying. The second two are the destination array and the starting index at which elements are to be replaced. The final argument is the number of elements to be copied. In this case, you’ve copied two elements from arr into the middle of arr2, which you’ll be able to see if you add code to print the contents of arr2, such as in the following example:
for(j=arr2->GetLowerbound(0); j<=arr2->GetUpperBound(0); j++)
    for(k=arr2->GetLowerbound(1); k<=arr2->GetUpperBound(1); k++)
        Console::WriteLine("pn[{0},{1}] = {2}", j, k, arr2[j,k]);
Build and run the application.
Searching
It’s common to want to search an array to see whether it contains a specific entry, and you can do so by using the IndexOf and LastIndexOf methods.
Create a new CLR Console Application project named Strings.
Open the Strings.cpp source file and add the following code to the top of the main function to create an array of strings:
// Create an array of strings
array<String ^> ^sa = { "Dog", "Cat", "Elephant", "Gerbil", "Dog",
    "Horse", "Pig", "Cat" };

// Check the length
Console::WriteLine("sa has length {0}", sa->Length);
The IndexOf and LastIndexOf functions both let you search to determine whether a particular object occurs in the array. Add the following code to the main function:
// Search for a value
String ^s = "Dog";

int pos = Array::IndexOf(sa, s);
Console::WriteLine("Index of s in sa is {0}", pos);

// Search for the next occurrence
pos = Array::IndexOf(sa, s, pos+1);
Console::WriteLine("Next index of s in sa is {0}", pos);
The call to IndexOf finds the first occurrence of the string “Dog” in the array and returns its index, which in this case is 0. The second call, to an overload of IndexOf, searches for an occurrence beginning at a given offset. Because the search is starting just past the first occurrence, the index returned is that of the second occurrence, which is 4. A third overload lets you search within a portion of the array.
Note
If the value isn’t found, the index returned will be one less than the lower bound of the array, which in C++ will usually mean a value of –1.
LastIndexOf works in the same way as IndexOf, but it starts searching from the other end of the array.
Build and run the application.
Sorting
The static Array::Sort method and its overloads give you a way to sort an array or a part of an array, whereas Array::Reverse lets you reverse the order of elements. Try adding the following code to the main routine:
Array::Sort(sa);
Array::Reverse(sa);
for each (String ^s in sa)
    Console::WriteLine(s);
When you run the application, you should see the elements of the array printed in reverse order, from Pig back to Cat.
One valuable overload to Sort makes it possible for you to provide two arrays, one of which contains keys used to define the sort order. Here’s an exercise to show you how this works.
Continue with the project from the previous exercise.
The sa array currently contains the following entries:
Pig
Horse
Gerbil
Elephant
Dog
Dog
Cat
Cat
After the calls to Sort and Reverse, add a new array.
array<int> ^keys = { 6, 4, 3, 5, 2, 2, 1, 1 };This array contains the keys that you’re going to use to sort the array of animal names. They reflect my preferences—cats are number one, while pigs come in at number six—so feel free to change them as you like.
Add another call to Sort, specifying both arrays.
Array::Sort(keys, sa);
Console::WriteLine("---Sorting with keys---");
for each(String ^s in sa)
{
    Console::WriteLine(s);
}
The keys array is sorted, and the elements in sa are sorted into exactly the same order. When you run the code and print out the array, the elements will have been sorted from Cat to Pig.
Using enumerators
You have already seen how you can use enumerators to iterate over any collection, and that they are what makes for each loops work with collections. The GetEnumerator method on a collection returns an enumerator that you can use to iterate over the elements of the collection.
In this next exercise, you’ll use an enumerator to list the elements in the String array.
Continue by using the Strings project; add the following using declaration after the using namespace System; line:
using namespace System::Collections;
The IEnumerator interface is defined in the System::Collection namespace, so it’s easier to use enumerators if you add a using declaration for the namespace.
Add the following code to the end of the main function:
Console::WriteLine("---Using Enumerator---");
IEnumerator ^ie = sa->GetEnumerator();
while (ie->MoveNext())
    Console::WriteLine(ie->Current);
Build and run the application.
You’ll notice several things about this code. To begin with, the enumerator starts off positioned before the first element, so you need to call MoveNext once to get to the first element. When there are no more elements to retrieve, calls to MoveNext return false. The property Current retrieves the current object but doesn’t move the pointer, so you’ll get the same value back until you call MoveNext again. The Current property also returns a general Object handle, so you’ll often need to cast this to the actual type of the object by using the C++ dynamic_cast or the .NET equivalent keyword, safe_cast. (See Chapter 11, for details on how to use safe_cast.)
What isn’t obvious from the preceding code is that the enumerator gets a snapshot of the underlying collection. Enumerators are designed for read-only access to collections, and you can have several independent enumerators active on the same collection at one time. If any changes are made to the underlying collection, the snapshot will fall out of synchronization, which causes the IEnumerator to throw an InvalidOperationException, alerting you that it no longer reflects the underlying data.
Other .NET collection classes
The System::Collections::Generic namespace contains several very useful collection classes that you can use in C++ programs. Some of the most commonly used are listed in the following table. A couple of them will be examined later in more detail to give you an idea of how they work.
The List<T> class
The List<T> class, defined in the System::Collections::Generic namespace, is a dynamically expandable (and shrinkable) array. By default, instances of this class are resizable and writable, but the class provides two static methods with which you can create read-only and fixed-size Lists.
Note
The non-generic version of the List is System::Collections::ArrayList. This class was introduced before generics were added to .NET, and although it provides the same functionality, use of generic collections is preferred whenever possible because they are type-safe.
The following exercise shows you how to create a List and manipulate it.
Create a new CLR Console Application project named MyList.
Open the MyList.cpp source file and add the following line immediately after the using namespace System; line:
using namespace System::Collections::Generic;
The List class is defined in the System::Collections::Generic namespace. By inserting a using directive, you can use the name without having to fully qualify it every time.
Add the following code to the main function:
int main(array<String ^> ^args)
{
    Console::WriteLine("List Demo");

    // Create an empty List
    List<int> ^lst = gcnew List<int>();

    // Look at the count and capacity
    Console::WriteLine("Capacity={0}", lst->Capacity);
    Console::WriteLine("Count={0}", lst->Count);

    // Adjust the capacity
    lst->Capacity = 10;
    Console::WriteLine("Capacity={0}", lst->Capacity);

    // Add some elements
    lst->Add(0);
    lst->Add(2);
    lst->Add(3);
    lst->Insert(1, 1);
    Console::WriteLine("Count is now {0}", lst->Count);

    return 0;
}
The default List constructor creates an empty List. Because this is a generic type, you need to specify the type that the List is to contain, in this case int.
The next two lines use the Capacity and Count properties to print the current capacity of the List and a count of how many objects it currently contains. If you run this code, you’ll find that the count is 0—not surprising because you haven’t added anything yet—and that the capacity is also 0. Using the following alternative constructor, you can specify a different initial capacity:
    // Create a List with a capacity of ten elements
    List<int> ^pal = gcnew List<int>(10);
If you exceed the capacity when adding elements, it will automatically be doubled. If your array is too large, you can reduce its capacity to match the actual number of elements stored by calling TrimToSize. You can also reset the capacity of the List at any time by using its Capacity property.
The List doesn’t contain any elements until you add some by using the Add or Insert functions. Add appends a new item to the end of the list, whereas Insert takes a zero-based index and inserts a new item at that position.
Because List implements IEnumerator, you can print out the contents of the List by using a for each loop.
for each (int i in lst)
    Console::WriteLine(i);
The syntax for removing items from a List is similar to that used for retrieving them.
// Remove item at index 2
lst->RemoveAt(2);
Console::WriteLine("---Item removed---");
for each(int i in lst)
{
    Console::WriteLine(i);
}
If you want to remove more than one element, the RemoveRange function takes a starting index and a number of elements to remove. In addition, if you have stored a handle to an object in the collection, you can use the Remove function, which will search the List and remove the first occurrence.
Build and run the application.
Other list operations
The List<T> class implements the same interfaces as the System::Array class discussed earlier in the chapter, which means that it provides much of the same functionality.
The IList interface provides the Add, Clear, Contains, IndexOf, Insert, Remove, and RemoveAt methods, plus the Item, IsFixedSize, and IsReadOnly properties.
The ICollection interface provides the CopyTo method, plus the Count, IsSynchronized, and SyncRoot properties.
The IEnumerable interface provides the GetEnumerator method.
You use these interfaces to specify common functionality for the collection classes. After you know how the interface methods work, it becomes easier to use other collection classes.
The SortedList<K,V> class
The SortedList<K,V> class, also defined in the System::Collections::Generic namespace, represents a collection of keys and values. A SortedList is very similar to a Dictionary, which also maintains key/value pairs, but the SortedList maintains its data in sorted-key order and allows you to access items by index as well as by key.
SortedList sorts its entries two ways:
The objects stored in the SortedList can implement the IComparable interface with its CompareTo method. All the value types, such as number and string classes, implement this interface, and you should implement it on any other user-defined types whose values can be ordered.
An external comparer object can be provided, which implements the IComparer interface with its Compare method.
The following exercise shows you how to create a SortedList and manipulate it. As an example, suppose you wanted to maintain a list of employees’ names together with their phone extensions. A SortedList would work well in this case, using the name as the key and the extension as the value.
Create a new CLR Console Application project named SortedList.
Open the SortedList.cpp source file and add the following line immediately after the using namespace System; line:
using namespace System::Collections::Generic;
The SortedList class is defined in the System::Collections::Generic namespace, and by inserting a using directive, you can use the name without having to fully qualify it every time.
Add the following code to the main function to create a SortedList and add some data to it:
SortedList<String^, int> ^sl = gcnew SortedList<String^, int>();

sl->Add("Dilbert", 1044);
sl->Add("Wally", 2213);
sl->Add("Ted", 1110);
sl->Add("Alice", 3375);
When you create a SortedList, you must specify the types for the key and the value within the angle brackets. In this case, we are using a String^ for the key, and an int for the value.
As with the List discussed in the previous section, a SortedList has a default capacity and will automatically increase its capacity as necessary. Using alternative constructors, you can create SortedList classes with particular initial capacities, and you can trim excess by using the Trim ToSize function.
The Add method takes key/value pairs and adds them to the SortedList. If the key already exists in the collection, the method throws an ArgumentException.
Add some code to print out the contents of the SortedList by using a for each loop.
for each (KeyValuePair<String^, int> kp in sl)
    Console::WriteLine("Key={0}, value={1}", kp.Key, kp.Value);
Each element of the SortedList is returned as a KeyValuePair object, and you can use its Key and Value properties to retrieve the key and value.
In addition to retrieving values by index, you can retrieve them by key, as demonstrated here:
Console::WriteLine("Value for key 'Alice' is {0}", sl["Alice"]);The indexer uses the key to return its associated value if a match is found; if no match is found, the indexer throws an exception.
As an alternative to handling an exception, you can use TryGetValue, which returns a bool to let you know whether it found a value.
int value = 0;
if (sl->TryGetValue("Fred", value))
    Console::WriteLine("Value is {0}", value);
else
    Console::WriteLine("Key not found");
In this code, value is passed through to TryGetValue by reference so that the function can update it.
You can also modify entries in the list by using the indexer, like this:
// Change the value associated with key 'Alice'
sl["Alice"] = 5555;
Console::WriteLine("Value for 'Alice' is {0}", sl["Alice"]);
If the key already exists, its associated value is overwritten; if it doesn’t exist, a new key/value pair is created.
Build and run the application.
Other SortedList operations
You can use the IndexOfKey and IndexOfValue methods to return the index of a given key or value, and both of them will return –1 if the key or value you specify doesn’t exist in the collection. Likewise, the ContainsKey and ContainsValue functions will return true if the collection contains a given value or key.
If you want to delete items from the collection, you can use Remove to get rid of an item by key. RemoveByIndex does the same thing by index, and Clear can be used to remove all entries.
Generics and templates
If you are familiar with standard C++, you might be wondering how .NET generics relate to C++ templates, because they look so similar (on the surface, at least) and seem in many cases to be doing the same job.
Note
If you are new to C++ or have not encountered templates before, you might want to skip this section on first reading.
Although generics and templates do have some features in common, they are very different in the way in which they work, and neither of them can act completely as a substitute for the other. For this reason, they are both supported in C++/CLI. Because the use of templates in C++/CLI is an advanced topic, this section only gives a brief summary of the similarities and differences between the two mechanisms.
Templates are compile-time, generics are run-time: this means that a generic type is still generic at run time, whereas a template has been instantiated at compile time.
Templates support features such as specialization, non-type template parameters, and template template parameters. Generics don’t support these and are rather simpler.
Generic types cannot inherit from a type parameter, as is the case with templates.
There is no metaprogramming support for generics.
Generic types support constraints on type parameters, which templates do not.
The STL/CLR library
One reason why templates are supported in C++/CLI is to permit the use of the STL/CLR library. The Standard Template Library (STL) is part of standard C++. It is best known for providing a set of high-performance, extensible collection classes. This section can only give the briefest overview of what the STL is and how it works.
The STL containers are standard in unmanaged C++ code, and a version that works with managed types has been provided in the STL/CLR library. This has been done for two reasons. First, many C++ developers are familiar with (and like using) the STL containers, and this enables them to continue to be productive. Second, the STL is a lot more extensible and configurable than the .NET collection classes, and its features might appeal to developers looking for more performance and extensibility.
Note
If you want more details of the STL/CLR library, consult the reference documentation, which, as of this writing, you can find at http://msdn.microsoft.com/en-us/library/bb385954.aspx.
Here is a simple example to give you a feel for what STL/CLR code looks like:
#include "stdafx.h"

#include <cliextvector>

using namespace System;
using namespace cliext;

int main(array<System::String ^> ^args)
{
    // Create a vector of int
    vector<double> v1;

    // Append values
    for(int i=0; i<10; i++)
        v1.push_back(i*2.0);

    // Use an iterator to print all the values in order
    vector<double>::iterator it = v1.begin();
    for(; it != v1.end(); it++)
        Console::WriteLine(*it);

    return 0;
}
A vector is the equivalent of an ArrayList: a dynamically resizable array. The push_back function adds an element to the end of a sequence, and if you were using a linked list, you could also use push_front to add values to the beginning. As you might expect, the pop_back function removes an element from the end. Iterators are classes, always called iterator, that are defined within a container, so an iterator to a vector<int> is a vector<int>::iterator. You obtain an iterator by calling the begin function, which returns an iterator that points to the start of the sequence. The end function returns an iterator pointing to the end of the sequence, and you use this to check when you get to the end.
You use iterators like pointers: you can use ++ and –– to move them along the sequence, and * to dereference them in order to get to the value at that position. The == and != operators are overloaded to compare position: if == for two iterators returns true, they are pointing at the same position.
The three concepts behind STL
The STL is based on three concepts, which have far-reaching consequences for how containers are written and used.
The first concept is that of the container. In STL, the main job of a container is to hold its elements. Although this might seem obvious, many container types in other libraries do a lot more besides, which limits their adaptability. For example, although STL containers will allocate memory for their members, you can provide your own memory allocator if you want. And, if you want to sort the contents in some particular way, you can do this by providing your own custom external function rather than having to rely on the sort function that’s built in to the container.
Be aware also that STL containers own their contents, which circumvents a lot of ownership problems. This is achieved by containers taking copies of what you add.
The following table shows the most commonly used STL/CLR container types:
The second concept is the iterator. An iterator is an object that knows how to iterate over the elements in a container, visiting each element in turn. Using an iterator means that you do not have to know how to traverse the data inside the container: simply ask the iterator for the next item. The implementation of STL iterators is very clever and makes it possible for them to interoperate with C++ pointers.
The final concept is the algorithm. Most non-STL container types are properly object oriented, in that the container completely encapsulates its data and all the functionality needed to operate on it. Want to sort the data in a list? Ask the list. Want to reverse the order? Again, ask the list. Although this fits well with object-oriented practice, it can be awkward: what if we want to provide another sorting algorithm? Object-oriented best practice states that the collection should hide its implementation, so it would be difficult to write another sort function that is at all efficient because we cannot get at the data.
STL encourages the use of external functions, called algorithms, to implement operations on containers. Algorithms work with containers by using iterators, so you will see code like this:
vector<int> vec;
...
sort(vec.begin(), vec.end());
Here, vec.begin is an iterator that points to the beginning of the sequence, and vec.end marks the end. The code inside the sort function can simply call ++ on the first iterator to advance it to the next item. When the begin and end iterators are pointing at the same location, the traversal is complete. In this way, sort doesn’t need to know any details of the container that it is traversing.
In case you think that this does not sound very efficient, the way that the STL has been written, making heavy use of inline code and templates, means that very efficient code is generated at run time.