6. Work with My Site and OneDrive for Business
In this chapter
![]() Converse and monitor by using the Newsfeed page
Converse and monitor by using the Newsfeed page
![]() Work with OneDrive for Business
Work with OneDrive for Business
Practice files
For this chapter, use the practice file from the SP2016SBSCh06 folder. For practice file download instructions, see the introduction.
My Site is a personal site that provides a central location to manage and store content, including personal information, that other people in your organization can use to find out about your skills and interests. It incorporates the Newsfeed, which includes functions like those you might have seen on Twitter and Facebook, such as the ability to write short messages. It also contains a library that you can sync across all devices where you have installed the OneDrive for Business sync client or app.
This chapter guides you through procedures related to using your My Site to engage in conversations and to monitor what you are following and who is following you; and using OneDrive for Business to store, sync, and share your work files.
![]() Important
Important
Not all personal and social features are enabled by default; therefore, your organization might have customized or not enabled the features described, so you might not be able to complete all the procedures described in this chapter.
Understand your My Site
Your My Site website is an integral component of social networking and document management in SharePoint Server 2016 and Microsoft Office 365. The My Site website is the top-level site of your personal site collection and contains the following pages:
![]() About Me This is also known as your profile page. It includes personal information such as your name, job title, work address, and phone number. The content on your profile page is used to display information about you so other users can read about your skills, the projects you have worked on, ways to contact you, and what you are doing within SharePoint. You can view other users’ profile pages; for example, as a result of a people search or by selecting a person’s name in the Created By column of a list or library.
About Me This is also known as your profile page. It includes personal information such as your name, job title, work address, and phone number. The content on your profile page is used to display information about you so other users can read about your skills, the projects you have worked on, ways to contact you, and what you are doing within SharePoint. You can view other users’ profile pages; for example, as a result of a people search or by selecting a person’s name in the Created By column of a list or library.
![]() Tip
Tip
To get the best results from a people search, you should add as much information as you can to your user profile.
![]() Newsfeed This is where you can converse with other users and monitor content you are following.
Newsfeed This is where you can converse with other users and monitor content you are following.
![]() Important
Important
Your organization might have replaced the SharePoint newsfeed with Yammer or some other social-computing program. This book does not cover Yammer.
![]() Sites In Office 365, this page is labeled SharePoint. It displays a list of sites categorized as promoted sites, sites you are following, and suggested sites. Promoted sites are displayed as tiles and are configured by your SharePoint server administrator. You will not be able to modify which site tiles you see; however, you can pin sites so that they appear first in the list of sites you are following.
Sites In Office 365, this page is labeled SharePoint. It displays a list of sites categorized as promoted sites, sites you are following, and suggested sites. Promoted sites are displayed as tiles and are configured by your SharePoint server administrator. You will not be able to modify which site tiles you see; however, you can pin sites so that they appear first in the list of sites you are following.
![]() OneDrive This page displays the contents of the Documents library, where you can store and share personal work files. You can view, and in some cases also sync, the contents of this library on your computers, tablets, and smartphones, by using a program or app named OneDrive for Business; therefore, on SharePoint, the Documents library is also known as your OneDrive for Business library, or just OneDrive for Business.
OneDrive This page displays the contents of the Documents library, where you can store and share personal work files. You can view, and in some cases also sync, the contents of this library on your computers, tablets, and smartphones, by using a program or app named OneDrive for Business; therefore, on SharePoint, the Documents library is also known as your OneDrive for Business library, or just OneDrive for Business.
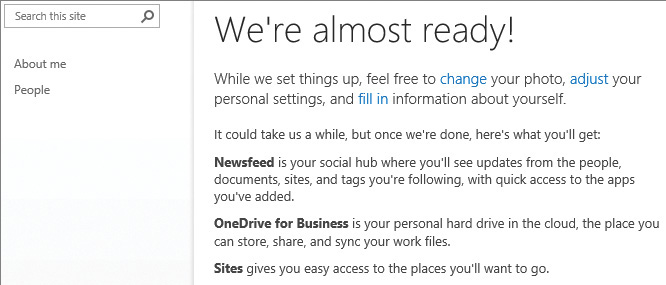
Your My Site can be pre-created by your IT department or, if self-site creation is enabled, your My Site will be created when you first select About Me, Newsfeed, Sites, or OneDrive, in which case the We’re Almost Ready page is displayed and you will have to wait for your My Site to be created before the page you selected is displayed.
![]() Tip
Tip
You can find links to the Newsfeed, OneDrive for Business, and Sites on the app launcher as described in the “Navigate home pages and SharePoint Sites” topic in Chapter 2, “Navigate SharePoint sites.”
When you select the Settings menu from the OneDrive or Sites pages, you will be directed to the Site Settings page of the top-level site of your My Site site collection; you are not only the site owner of the site, you are also the site collection administrator of the site collection. You can configure your site and site collection just as you can other sites and site collections. For example, you can turn on auditing by going to the Site Collection Audit Settings page from the Site Settings page.
On the Quick Launch of either the Newsfeed or About Me page, you can select Blog, which uses the Blog site template to create your personal blog site as a subsite.
1. Do one of the following:
• Select your name in the navigation bar, and then select About me.
• In the app launcher, select Newsfeed, and then on the Quick Launch, select About Me, or if the Newsfeed page displays any of your activities, select your name in one of those activities.
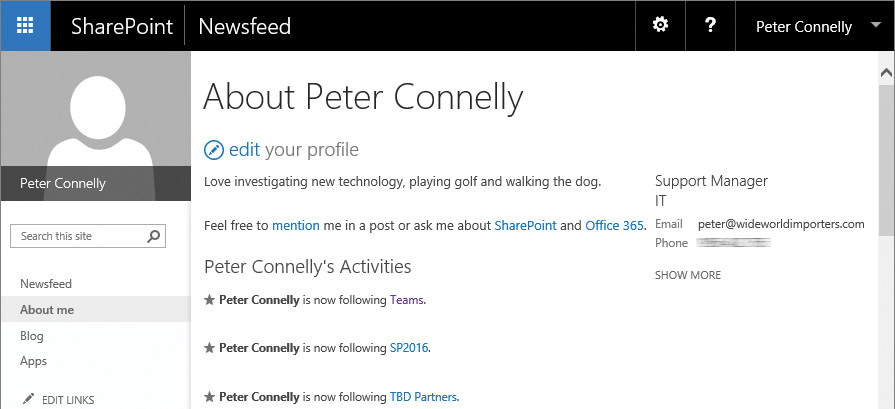
To modify your user profile properties
1. Go to your About Me page.
2. Select edit to the left of the your profile text to display the Edit Details page, make your changes, and then select Save all and close.
![]() See Also
See Also
For more information about modifying your user profile, see the “To add information to your user profile” procedure in the “Search for people” topic in Chapter 5, “Search for information and people.”
To hide or delete an activity on your profile page
1. Go to your About Me page.
2. Point to the activity so that an x appears to the right of the activity, and then select the x.
3. Depending on the activity and whether you created it, you will then be able to either delete the activity or hide the activity from everyone.
To see sites you are following
1. Do one of the following to display the Sites page:
• In the app launcher, select Sites.
• In the app launcher, select Newsfeed, and then in the I’m following web part, select the number above sites.
1. Do one of the following:
• Go to your Sites page, select the ellipsis to the right of the site you want to stop following, and then select Stop Following.
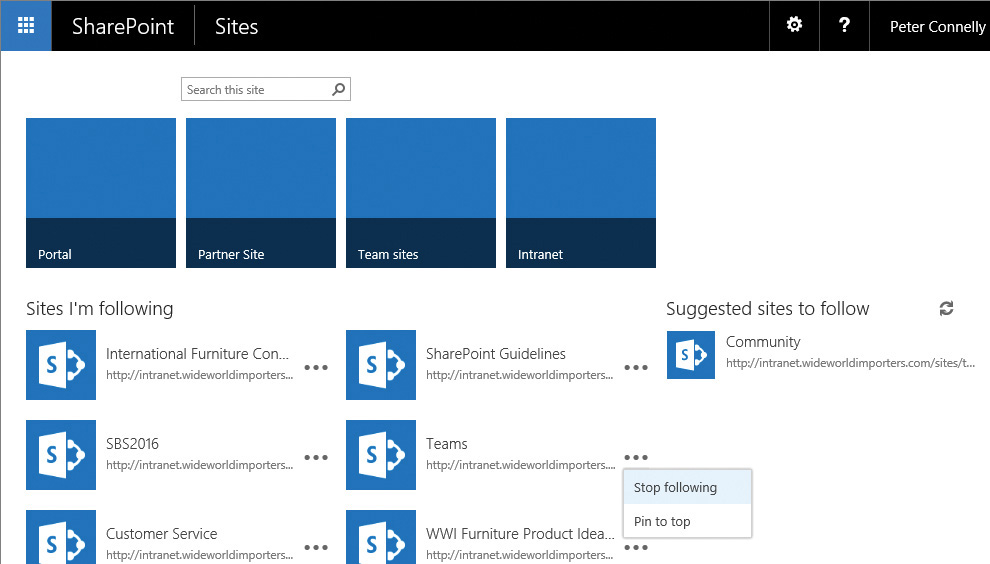
The Sites page displays tiles of promoted sites, sites you are following, and suggested sites to follow
• If you have created a microblog for a site you are following, go to your Newsfeed page and then on any microblog for that site, select the ellipsis, and then select Stop following this site.
![]() See Also
See Also
For information about displaying your Newsfeed page, see “The Newsfeed page” in the following topic, “Converse and monitor by using the Newsfeed.”
To pin or unpin sites on your Sites page
1. Go to your Sites page, select the ellipsis to the right of the site you want to pin or unpin, and then select Pin to top or Unpin.
To go to the site contents page on your My Site
1. Do one of the following:
• On your About Me or Newsfeed page, in the Quick Launch, select Apps.
• On your About Me, Newsfeed, or Sites page or on your OneDrive, from the Settings menu, select Site Contents.
Hybrid OneDrive and hybrid sites
Hybrid OneDrive
See Also
For information about planning for hybrid OneDrive, go to https://support.office.com/en-gb/article/Plan-hybrid-OneDrive-for-Business-b140bc4c-f54d-4b5a-9409-a3bece4a9cf9.
Tip
Some features are currently only available in classic mode. If your OneDrive library is using the modern experience and you want to temporarily switch to classic mode, see the “Compare SharePoint products” topic in Chapter 1, “Introduction to SharePoint 2016.”
See Also
For information about the new experience in Office 365 libraries, go to https://support.office.com/en-US/article/What-is-a-document-library-3b5976dd-65cf-4c9e-bf5a-713c10ca2872.
Hybrid sites features
![]() Hybrid site following In the app launcher, when you select Sites from SharePoint 2016 or SharePoint from Office 365, you are redirected to the Office 365 sites list, where you will see both SharePoint 2016 sites you are following and Office 365 sites you are following.
Hybrid site following In the app launcher, when you select Sites from SharePoint 2016 or SharePoint from Office 365, you are redirected to the Office 365 sites list, where you will see both SharePoint 2016 sites you are following and Office 365 sites you are following.
![]() Hybrid extensible app launcher In SharePoint 2016, only three tiles are displayed on the app launcher, whereas in Office 365 a larger number of tiles are displayed, depending on your Office 365 subscription, your access permissions, and the services that are enabled. In a hybrid extensible app launcher, Office 365 services such as the Delve and Video apps are displayed, along with any custom apps you have pinned to the Office 365 app launcher.
Hybrid extensible app launcher In SharePoint 2016, only three tiles are displayed on the app launcher, whereas in Office 365 a larger number of tiles are displayed, depending on your Office 365 subscription, your access permissions, and the services that are enabled. In a hybrid extensible app launcher, Office 365 services such as the Delve and Video apps are displayed, along with any custom apps you have pinned to the Office 365 app launcher.
Converse and monitor by using the Newsfeed page
In Chapter 2, “Navigate SharePoint sites,” you were introduced to the Newsfeed page, which is the primary landing page for social activities; thus, it is also referred to as the social hub.
The Newsfeed page
The Newsfeed page is hosted in your My Site and provides quick access to the lists of people, documents, sites, and tags that you are following. It is also where users can create posts or start “conversations” with you by using the microblog feature.
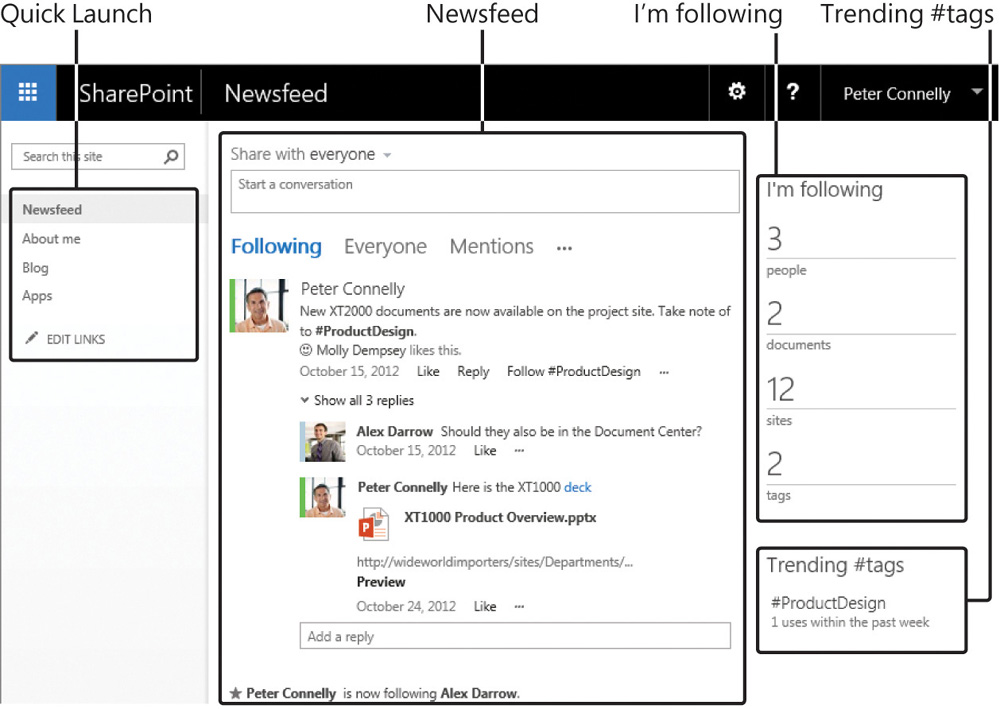
Use the Newsfeed page to quickly find what you are following and posts you have created
The Quick Launch contains the following links:
![]() About Me This displays your profile.
About Me This displays your profile.
![]() Blog site This displays your personal blog site, which will be created the first time you select Blog in the Quick Launch. For more information about blog sites, see Chapter 9, “Work with wikis, blogs, and community sites.”
Blog site This displays your personal blog site, which will be created the first time you select Blog in the Quick Launch. For more information about blog sites, see Chapter 9, “Work with wikis, blogs, and community sites.”
![]() Apps This displays the Site Contents page, where you can add apps or subsites to your My Site. The Site Contents page of your My Site also contains links to the MicroFeed list and the Social List, which contain the two views used on the Sites page and OneDrive for Business.
Apps This displays the Site Contents page, where you can add apps or subsites to your My Site. The Site Contents page of your My Site also contains links to the MicroFeed list and the Social List, which contain the two views used on the Sites page and OneDrive for Business.
For information about adding apps to a site, see Chapter 3, “Work with content in lists and libraries.”
The Newsfeed page is a web part page that contains four web part zones and the following web parts:
![]() Newsfeed This MicroFeed web part consists of the microblogging text box labeled Share With Everyone and a consolidated view of microblogs organized in conversations and displayed in modified time sort order, so that the most recent content is displayed at the top of the list.
Newsfeed This MicroFeed web part consists of the microblogging text box labeled Share With Everyone and a consolidated view of microblogs organized in conversations and displayed in modified time sort order, so that the most recent content is displayed at the top of the list.
Each microblog displays the microblog author’s name and a thumbnail image, if that user added one to his or her profile. When you select the name or thumbnail of the user, that user’s profile page is displayed.
The following filters can be used to organize the microblogs conversations:
• Following Displays activities you are following
• Everyone Displays conversations available to everyone in your organization
• Mentions Displays conversations where you are mentioned
• Activities Displays social activities you have completed, such as sites or people you are following, documents you have rated or tagged, and any microblogs you have created or replies you have made to other users’ microblogs
• Likes Displays conversations you have liked
![]() Tip
Tip
You might not see the last two filters; you might need to select the ellipsis to the right of Mentions to display them.
![]() I’m following This web part displays the number of people, files, sites, and tags you are following. By selecting one of the numbers, you can see details of the content you are following. You will automatically follow sites you create and users who are part of your organization’s structure.
I’m following This web part displays the number of people, files, sites, and tags you are following. By selecting one of the numbers, you can see details of the content you are following. You will automatically follow sites you create and users who are part of your organization’s structure.
![]() Tip
Tip
Before you can follow documents or sites, the Following Content site feature must be activated.
![]() Trending #tags This web part displays #tags (hashtags) that are currently popular. A tag is a keyword or topic preceded by a hash character (#). For example, if you want to find microblogs about marketing news and resources, you might follow #marketing. You can follow #tags and, if your newsfeed privacy settings allow it, people who follow you will get notifications in their newsfeed when you start following a tag.
Trending #tags This web part displays #tags (hashtags) that are currently popular. A tag is a keyword or topic preceded by a hash character (#). For example, if you want to find microblogs about marketing news and resources, you might follow #marketing. You can follow #tags and, if your newsfeed privacy settings allow it, people who follow you will get notifications in their newsfeed when you start following a tag.
You can modify the newsfeed settings. For example, you can decide whether to receive emails notifying you of events, such as when you have started following another user; you can determine whether others can see the list of people you are following or your list of followers; and you can choose which activities you want to share with other users. You can also configure whether you (Only Me) or other users (Everyone) can see the hashtags that you follow.
1. In the app launcher, select Newsfeed.
To modify the newsfeed settings
1. Go to your About Me page, and then select edit to the left of your profile to display the Edit Details page.
2. Select the ellipsis to the right of Details, and then select Newsfeed Settings.
3. Select or clear the check boxes as needed, and then at the bottom of the Edit Details page, select Save all and close.
4. In the Profile Changes dialog box warning you that the user profile information might not be available right away, select OK.
To see people you are following
1. Go to your newsfeed, and then in the I’m following web part, select the number above people to display the People I’m Following page.
![]() Tip
Tip
The People I’m Following page lists the people you are following, people who are following you and, under Suggest People, people you might want to follow.
1. Display the People I’m following page.
2. Select the ellipsis to the right of the person, and select Stop Following in the callout.
To see documents you are following
1. Do one of the following to display the Docs I’m Following page:
• Go to your newsfeed, and then in the I’m following web part, select the number above documents.
• Go to OneDrive, and in the Quick Launch, select Followed.
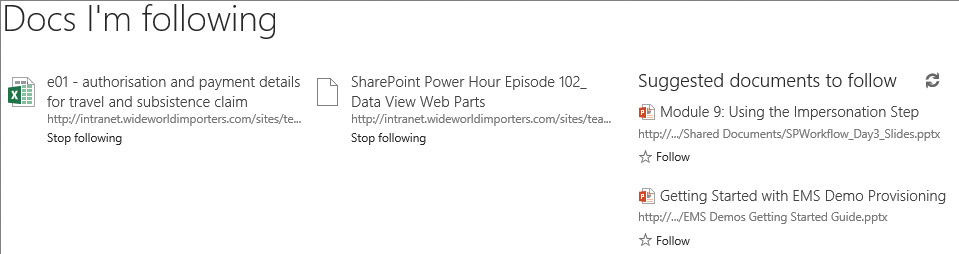
Use this page to unfollow or follow suggested documents
1. Display the Docs I’m following page.
2. Select Stop following below the document you want to stop following.
To see #tags you are following
1. Go to your newsfeed, and then in the I’m following web part, select the number above tags to display the #tags I’m Following page.
1. In any conversation, or in the Trending #tags section of the Newsfeed page or the #tags I’m following page, select the #tag to display the About #tag page.
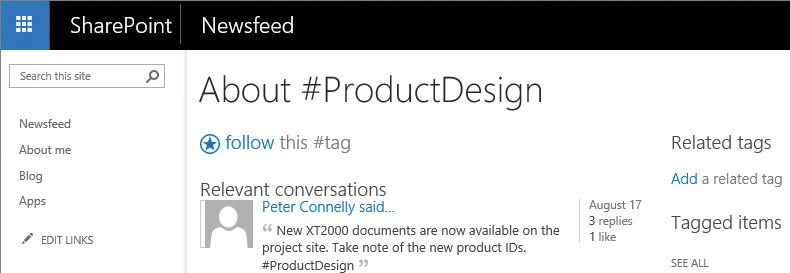
Use the About #<tag> page to follow the tag, view a list of conversations and other items, and view a list of related tags that you can add to
1. Do one of the following, where tag is the #tag you want to follow:
• Below any microblog or reply that includes the #tag, select Follow #tag; or if you do not see this option, select the ellipsis and then select Follow #tag.
Use the links below a conversation to follow tags and people; tags and people you are already following will not be listed
• Go to the About #tag page, and select Follow.
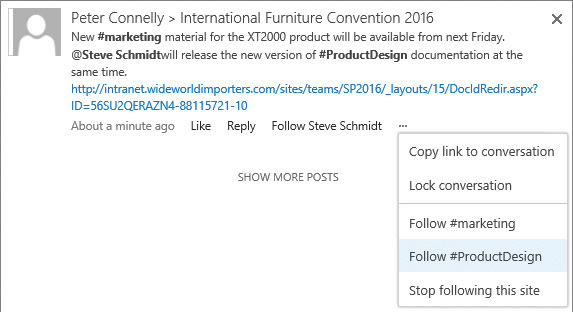
1. Do one of the following, where tag is the #tag you are following:
• Go to the #tags I’m following page, and then below the #tag you want to stop following, select Stop following.
• On any conversation that includes the #tag you are following, select the ellipsis, and then select Stop following #tag.
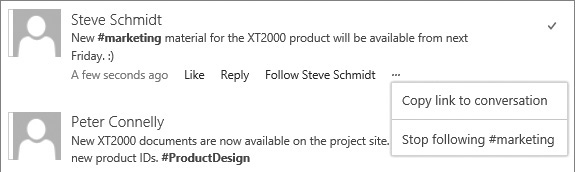
Select the ellipsis to display the More Options menu, from which you can stop following a #tag or copy a link to the conversation
• Go to the About #tag page, and then select Stop following this #tag.
Microblogging
You will find the MicroFeed web part on your Newsfeed page and on team sites. You use this web part to post messages; this is known as microblogging. Twitter is an example of a microblogging system.
If you are new to microblogging, you could first review other microblogs, and find and follow people who are microblogging about topics that interest you and notice the tags they use. If they have not locked their microblogs, you could supplement the conversation or ask questions by using the reply link.
When you want to draw specific people’s attention to your microblog, you can mention them by prefixing their name with an @ sign. If they have enabled email notifications in their newsfeed settings, they will receive an email letting them know you have mentioned them. They will also see it on their Newsfeed page, when they select the Mentions filter.
You will soon distinguish posts you like most and identify users who provide, significant content, notable ideas, good links, and new information. You can show your appreciation by liking a microblog, which allows you to find them again.
![]() Tip
Tip
You can monitor the people and tags you follow on your Newsfeed page, as described earlier in this chapter. For more information about searching for people, see Chapter 5, “Search for information and people.”
The microblogs are stored in the MicroFeed list that is automatically created on team sites and on your My Site. On team sites, the MicroFeed list inherits its permissions from the site, and therefore any user who is a contributor to the site can start a conversation. When you invite people to your site and want them to be able to add to conversations, select the Contribute permission level.
![]() Tip
Tip
You can disable the site newsfeed on team sites by deactivating the Site Feed site feature.
On the Newsfeed page, you have the option of sharing your microblog with everyone in your organization or only those people who can access the sites you are following, where the Site Feed site feature is activated. When you share a microblog with a site, the microblog is displayed on the Newsfeed for that site and on the Newsfeed page. On the Newsfeed page, the site name is displayed to the right of your name.
You can activate the Site Feed site feature on sites, if it is not already activated. To microblog, you next need to add the MicroFeed web part on a page in the site. The MicroFeed web part is available in the Web Part pane only when the Site Feed site feature is activated in the top-level site of the site collection.
![]() See Also
See Also
For information about activating site features, see Chapter 8, “Create and manage sites.” For information about how to add web parts to a page, see Chapter 7, “Work with webpages.”
1. In the MicroFeed web part on a SharePoint site or in the Start a conversation box on your Newsfeed page, enter or insert content.
2. If you want to limit the people who can see your microblog, above the Start a conversation box, select the Share with everyone arrow, and select a site you are following.
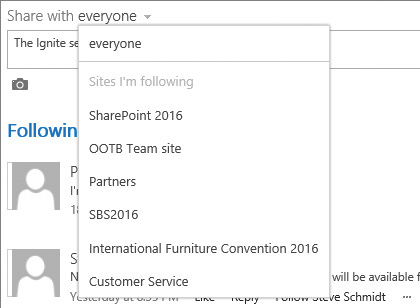
Use the Share With Everyone menu to post to a newsfeed on a team site you are following (if the site allows newsfeeds)
![]() Tip
Tip
When the Site Feed site feature is activated on a site you’re already following, it does not immediately appear in the drop-down menu on your Newsfeed page. Stop following the site, and then follow it again to make the site appear in the menu.
3. Select Post or press Enter.
1. Below the microblog, select Reply to open a text box.
2. Enter or insert content.
3. Select Post or press Enter.
1. Below the microblog or reply, select Like.
To include links in a microblog or reply
![]() Tip
Tip
You can include a link to a website, webpage, list, library, list item, document or another conversation, or to a video.
1. In a separate browser window or tab, copy the web address of the web component you want to include—for example, by doing one of the following:
• Right-click the component and select Copy shortcut or Copy link address or something similar (the exact wording depends on your browser).
• Copy the web address from the browser address box.
• On a microblog, select the ellipsis, and then select Copy a link to a conversation.
![]() Tip
Tip
If you want to include a link to a document, you could copy the document’s durable link, as described in Chapter 2, “Navigate SharePoint sites,” or its Document ID, as described in Chapter 14, “Manage and monitor content.”
2. Return to your microblog, position the cursor where you want to add the link, and paste the copied web address.
3. Optionally, select the web address, and in the window that opens, under Display as, enter the text you want displayed, and then select the check mark.
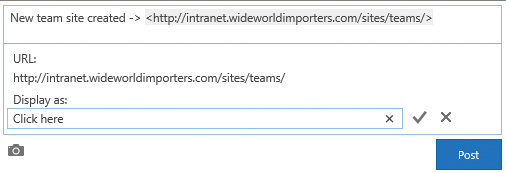
In the microblog, select the web address to open a window that allows you to modify the URL and displayed text
4. In the microblog, select any text to close the window.
To mention a person in a microblog or reply
1. Position the cursor where you want to mention the person, and enter @ followed by at least the first two characters of the person’s name to display the autocomplete box.

Enter sufficient characters to suggest the name of the person you want to mention
2. Select the name of the person and press Enter.
![]() Tip
Tip
At first, the names of people you are following are displayed in the autocomplete box. If the name of a person you want does not appear, enter more characters of the person’s name; the search then extends to everyone in your organization.
To include a tag in a microblog or reply
1. Position the cursor where you want to include a tag.
2. Enter # and then at least one character of the tag.
3. Do either of the following:
• If the tag has been previously used, in the autocomplete box that appears, select the tag.

Use a #tag when the microblog is not targeted to a specific person, but is about a specific topic
• If the tag you want to use is new, finish entering the name of the tag.
![]() Tip
Tip
When you create a new tag, it is automatically added to the Managed Metadata Service (MMS) metadata term store, under the System, Hashtags hierarchy. For information about MMS, see Chapter 5, “Search for information and people.” When you want the hashtag to include more than one word, concatenate the words, as in #MobileReports.
To include a picture in a microblog or reply
1. Select the camera icon to open the Choose A Picture dialog.
2. Select Browse to open the Open dialog box.
3. Go to the image file you want to add, and then select Open to close the Open dialog box.
4. Select Upload to close the Choose A Picture dialog and insert the image.
![]() Tip
Tip
Pictures are always displayed at the bottom of a microblog or reply.
![]() Important
Important
You can only delete microblogs you have created. When you delete a microblog, the whole conversation is deleted; that is, the initial microblog and all replies. The deleted conversation is not moved to the Recycle Bin; therefore, you cannot restore a deleted conversation.
1. Point to the microblog you want to delete, and then select the x that appears in the upper-right corner.
2. In the Get rid of this conversation dialog, select Delete it.
To lock or unlock a conversation
![]() Important
Important
You can only lock or unlock conversations you have created.
1. Go to the microblog you want to lock or unlock, select the ellipsis, and then select Lock conversation or Unlock conversation.
Work with OneDrive for Business
The OneDrive link on the app launcher takes you to the Documents library on your My Site, also known as your OneDrive for Business library. It is an integral part of both SharePoint Server and Office 365.
You can access your files from your My Site Documents library on your devices by using the OneDrive for Business program, also known as the sync client, for your Windows-based computers, OneDrive for Mac, and OneDrive mobile apps for tablets and smartphones.
![]() Tip
Tip
OneDrive for Business is different from OneDrive, also known as OneDrive personal or OneDrive consumer, which provides a place in the cloud for personal files, separate from the OneDrive for Business Documents library. The cloud storage, OneDrive – personal, is often included if you have a hotmail.com, outlook.com, or live.com email account and is similar to Dropbox, iCloud, Google Drive, and other cloud storage products.
The OneDrive for Business library
The OneDrive for Business library provides a place where you can store your files and documents that is private to you so only you can see them. By default, the library contains a folder named Shared With Everyone that is configured so that everyone in your organization can edit the contents of that folder. You can edit the permissions of this folder, delete it, create a new folder, and choose to share it with your coworkers. Deleting the Shared With Everyone folder reduces the risk of accidentally sharing files with your whole organization.
Most organizations stipulate that you should not use your OneDrive for Business library for group or team files or data that is to be preserved for the long term. Other SharePoint libraries and sites are best suited for that content. This is particularly important in an Office 365 or hybrid OneDrive environment, because when the Office 365 license is removed from you—for example, when you leave your organization—your My Site is deleted, together with all the files and folders in your OneDrive for Business library. In SharePoint 2016, when you leave, your organization can choose to disable your user ID but allow others access to your My Site to move business-critical files that you might have stored in your OneDrive for Business library.
The ribbon is not available in your OneDrive for Business library; however, as in other document libraries, you can do the following:
![]() Select the commands immediately below the Documents library title to:
Select the commands immediately below the Documents library title to:
• Create files or folders and upload files.
• Synchronize the library on your computer.
• Share a file or folder, which also includes finding out who you have shared a file or folder with.
• You might have to use the More command to open the shortcut menu to complete other activities with selected files and folders, such as opening or downloading a file; renaming, deleting, checking out, or viewing the version history of a file or folder; initiating a workflow; or connecting a folder to Outlook.
![]() Tip
Tip
A OneDrive for Business library is configured for major versions and is limited to 500 versions of each file.
![]() Select the ellipsis to the right of the file or folder name to display the callout where you can:
Select the ellipsis to the right of the file or folder name to display the callout where you can:
• Preview the file.
• Edit and follow the file.
• Select the ellipsis on the callout to open the shortcut menu.
![]() Drag the files to the library in the browser window, to where it says Drag Files Here To Upload.
Drag the files to the library in the browser window, to where it says Drag Files Here To Upload.
![]() Select the Recycle Bin link on the Quick Launch to go to the Recycle Bin to restore deleted files and folders.
Select the Recycle Bin link on the Quick Launch to go to the Recycle Bin to restore deleted files and folders.
![]() See Also
See Also
For information about working with content in libraries, see Chapter 3, “Work with content in lists and libraries.”
In SharePoint 2016, the storage limit for your files in your OneDrive library is set by your IT department. If you are using OneDrive in Office 365, including hybrid OneDrive, the storage limit is set by Microsoft; depending on your organization’s Office 365 plan, this could be 1 terabyte (TB) or more. Free OneDrive accounts—that is, personal OneDrive—come with 5 gigabytes (GB), although you can purchase more storage.
![]() See Also
See Also
For information about OneDrive for Business storage limits across Office 365 plans, go to https://technet.microsoft.com/en-gb/library/onedrive-for-business-service-description.aspx.
The Quick Launch for the OneDrive for Business library is different from the Quick Launch you might see on team sites and contains the following:
![]() Search A box where you can enter keywords to find content.
Search A box where you can enter keywords to find content.
![]() Documents A link to the default view of your OneDrive for Business library. In Office 365, this link is labeled Files.
Documents A link to the default view of your OneDrive for Business library. In Office 365, this link is labeled Files.
![]() Recent Displays up to 30 lists and folders that you have accessed recently.
Recent Displays up to 30 lists and folders that you have accessed recently.
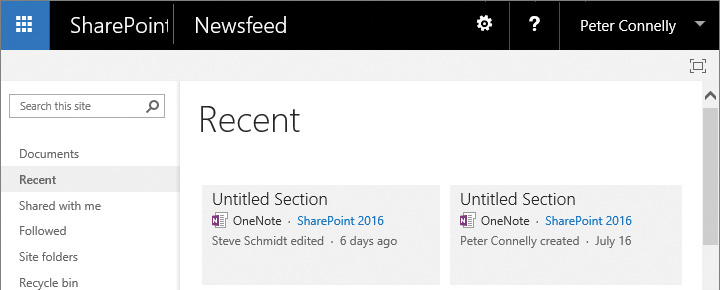
Select Recent on the Quick Launch to view lists and libraries you have recently accessed
![]() Shared with me Displays lists and folders that have been directly shared with you.
Shared with me Displays lists and folders that have been directly shared with you.
![]() Followed Displays the Docs I’m Following page, which lists files you have chosen to follow and suggested documents to follow.
Followed Displays the Docs I’m Following page, which lists files you have chosen to follow and suggested documents to follow.
![]() Site Folders Displays a list of sites you have followed and groups you are a member of. When you select a followed site, a list of libraries in that site is displayed; you can then use any of those library links to open the default view of the library. This provides a convenient way to quickly go to a library you are working with. This feature is not currently available in Office 365.
Site Folders Displays a list of sites you have followed and groups you are a member of. When you select a followed site, a list of libraries in that site is displayed; you can then use any of those library links to open the default view of the library. This provides a convenient way to quickly go to a library you are working with. This feature is not currently available in Office 365.
![]() Recycle Bin Opens the Recycle Bin.
Recycle Bin Opens the Recycle Bin.
![]() Important
Important
At the Ignite conference in September 2016, Microsoft announced new updates to OneDrive for both Office 365 and SharePoint 2016. For more information about the announcement, go to https://blogs.office.com/2016/09/26/sharepoint-online-sync-preview-headlines-ignite-announcements-for-onedrive/. The new updates will be rolled out to Office 365 before the end of 2016. The new OneDrive for Business experience for SharePoint 2016 is to be released as part of Feature Pack 1, which will be available in November 2016. If your organization has installed Feature Pack 1, the user experience you see could differ from the one shown in the screenshots in this chapter.
To go to your OneDrive for Business library
1. Do one of the following:
• In the app launcher, select OneDrive.
• Go to the Site Contents page on your My Site, and then select Documents.
To sync your OneDrive for Business library to your computer
1. Go to your OneDrive for Business library.
2. Above the list of documents, select Sync, and then in the Sync this library to your device for easy access dialog box, select Sync now.
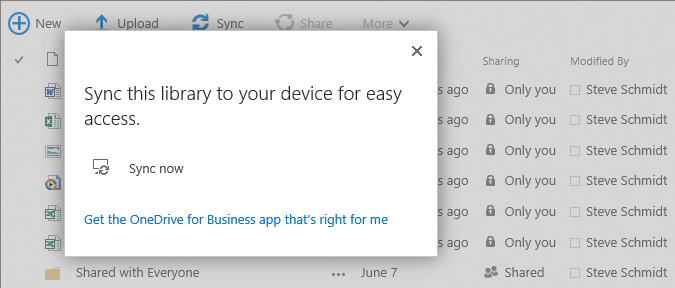
Select Get The OneDrive For Business App That’s Right For Me in the Sync dialog box if you do not have the sync client or you need to update your sync client
3. When your browser asks for your permission to open OneDrive or asks whether you mean to switch programs, select Allow or Yes, whichever option the browser provides.
4. In the Your files are syncing as we speak dialog, select Show my files if you want to open File Explorer to show the synced library.
![]() Tip
Tip
This procedure is very similar to the “To sync a library to your device” procedure in the “Work offline” topic in Chapter 3, “Work with content in lists and libraries.” For information about how the sync client and File Explorer work together, see the next section in this topic, “Use the OneDrive for Business sync client.”
To access your OneDrive for Business library settings page
1. Go to your OneDrive library, your About Me page, or the Newsfeed page.
2. On the Settings menu, select Site Content.
3. Select the ellipsis to the right of Documents, and then select Settings.
Use the OneDrive for Business sync client
At the time of this writing, there are two OneDrive for Business sync clients:
![]() OneDrive for Business Next Generation sync client This has improved upload limits; however, this new program can currently only be used to synchronize your OneDrive for Business library in SharePoint Online and OneDrive consumer. The Next Generation sync client is already installed if you are using Windows 10 with at least the November 2015 system updates. If you don’t have it and want to install it, go to https://OneDrive.com/download.
OneDrive for Business Next Generation sync client This has improved upload limits; however, this new program can currently only be used to synchronize your OneDrive for Business library in SharePoint Online and OneDrive consumer. The Next Generation sync client is already installed if you are using Windows 10 with at least the November 2015 system updates. If you don’t have it and want to install it, go to https://OneDrive.com/download.
![]() The old OneDrive for Business sync client Use this to synchronize document libraries in SharePoint 2013, SharePoint 2016, and SharePoint Online environments, or your OneDrive for Business library in SharePoint 2013 or SharePoint 2016. To use the old OneDrive for Business program, you’ll need to install either Office 2013 or Office 2016.
The old OneDrive for Business sync client Use this to synchronize document libraries in SharePoint 2013, SharePoint 2016, and SharePoint Online environments, or your OneDrive for Business library in SharePoint 2013 or SharePoint 2016. To use the old OneDrive for Business program, you’ll need to install either Office 2013 or Office 2016.
![]() See Also
See Also
For more information about installing the old OneDrive for Business program, go to https://support.microsoft.com/en-us/kb/2903984.
Both sync programs can run side by side, which means that you can synchronize one or more SharePoint environments in addition to Office 365 OneDrive for Business and OneDrive consumer.
When you see the synced libraries in File Explorer, having two sync clients can be very confusing:
![]() The new sync client creates two folders:
The new sync client creates two folders:
• OneDrive – Personal
• OneDrive – <Office 365 tenant name> <Office 365 tenant name> is usually the name of your company.
A blue cloud icon is displayed to the right of both folders.
![]() The old sync client creates two folders:
The old sync client creates two folders:
• OneDrive for Business This is where the files from your synced SharePoint 2016 OneDrive for Business library are stored; it has a blue cloud icon.
• SharePoint This folder is indicated by a SharePoint icon; under it is a subfolder for each synced SharePoint library, regardless of whether the library resides in Office 365 or SharePoint 2016. These subfolders have the naming convention <site name> - <library name>. The folder name is limited to 35 characters, with a maximum of 29 characters for the site name.

You use the two OneDrive for Business sync clients to access Office 365 and SharePoint 2016 libraries
By default, both sets of folders are created in your %UserProfile% folder—for example, C:UsersstevesOneDrive for Business and C:UsersstevesSharePoint. You can change this location during installation and after you install the sync client.
You can use the sync client icons in the notification area to manage your synced content:
![]() The white cloud icon is for OneDrive – Personal content.
The white cloud icon is for OneDrive – Personal content.
![]() The blue cloud icon is the new sync client.
The blue cloud icon is the new sync client.
![]() The icon showing blue clouds outlined in white is the old sync client.
The icon showing blue clouds outlined in white is the old sync client.
![]() See Also
See Also
To find out which OneDrive sync program you are using, go to https://support.office.com/en-us/article/Which-OneDrive-sync-client-am-I-using-19246eae-8a51-490a-8d97-a645c151f2ba.
After the OneDrive for Business sync client is installed on your computer, you can choose to synchronize files from SharePoint libraries and your OneDrive for Business library to your local computer so that you can work offline. It is advisable to check out files before updating them offline. When you modify a file from a synchronized library, the updated file is synchronized back to the SharePoint library when you are next online. You should then check in the file.
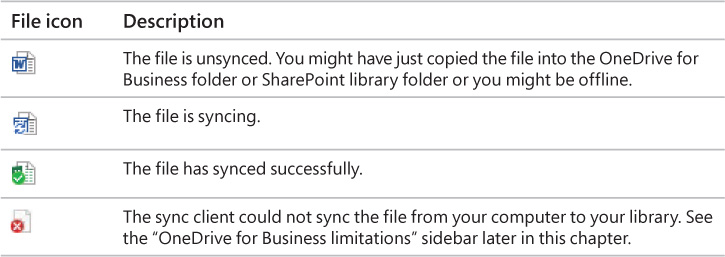
You can view the synced files by using File Explorer or by selecting the OneDrive for Business sync client. The OneDrive for Business program is available with Office 2013 and Office 2016 or with an Office 365 subscription that includes Office 2016. You can upload files into your synced libraries by copying and pasting them or by dragging them. You can watch the file icons change to determine when the file is synced to the SharePoint library, as described in the following table.
![]() Tip
Tip
The same icons are used on the OneDrive for Business and SharePoint folders to indicate the sync status of the files in the folder. A red circle with a white x at a folder level indicates that there is a problem with a least one of the files in the folder.
It is not recommended that you sync files when:
![]() You have sensitive or confidential data in your library and your local computer does not provide mechanisms to restrict access to the files, if you lose your computer or your computer is hacked.
You have sensitive or confidential data in your library and your local computer does not provide mechanisms to restrict access to the files, if you lose your computer or your computer is hacked.
![]() You are using a shared computer.
You are using a shared computer.
![]() You have more data in your SharePoint libraries and your OneDrive for Business library than storage space on your device.
You have more data in your SharePoint libraries and your OneDrive for Business library than storage space on your device.
![]() Important
Important
When you create, modify, move, or delete a file or folder from your synchronized library on your computer, you are also making those changes in the SharePoint library. You can recover a deleted file from the library’s Recycle Bin or from your computer’s Recycle Bin.
To open File Explorer to display your OneDrive for Business folder
1. On your computer, do one of the following:
• Open File Explorer, and then in the navigation pane, select the OneDrive for Business folder.
• In the notification area, select the the appropriate blue cloud icon, and then select Open your OneDrive for Business folder.
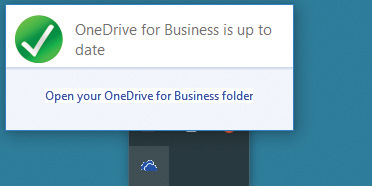
Open your OneDrive for Business folder to see the files that have synced to your computer
• In the notification area, right-click the appropriate blue cloud icon, and then select Open your OneDrive for Business folder.
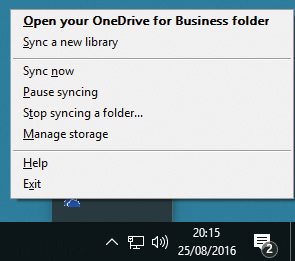
Use the OneDrive For Business menu to manage the syncing of your SharePoint content
File Explorer opens, showing the files synced from your OneDrive for Business library.
![]() Tip
Tip
To display your OneDrive Personal folder, either open File Explorer and select the OneDrive folder or, in the notification area, select the white cloud icon and then select Open Your OneDrive Personal Folder. For more information about using your personal OneDrive, go to https://support.office.com/en-US/article/OneDrive-Help-5943c2b9-fafc-4cb4-95c0-9cc73fcabb30.
The remaining procedures in this chapter detail using the OneDrive for Business sync client and not the new sync client. For more information about setting up your computer to use the new sync client with your OneDrive for Business library in Office 365, go to https://support.office.com/en-us/article/Set-up-your-computer-to-sync-your-OneDrive-for-Business-files-in-Office-365-23e1f12b-d896-4cb1-a238-f91d19827a16 and https://support.office.com/en-US/article/OneDrive-for-Business-Help-1eaa32e9-3229-47c2-b363-0a5306cb8c37.
To open a synced library or folder in your browser
1. In the File Explorer navigation pane, right-click a synced library or folder, select OneDrive for Business, and then select Go to browser.
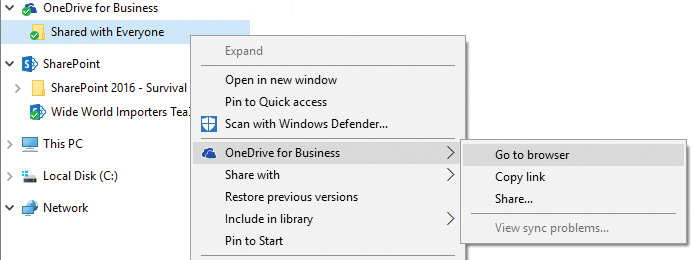
Use File Explorer to quickly go to the synced library in your browser
To open the OneDrive for Business Recycle Bin in your browser
1. In the notification area, right-click the icon with blue clouds outlined in white, and select Manage storage.
2. Select Open OneDrive for Business Recycle Bin.
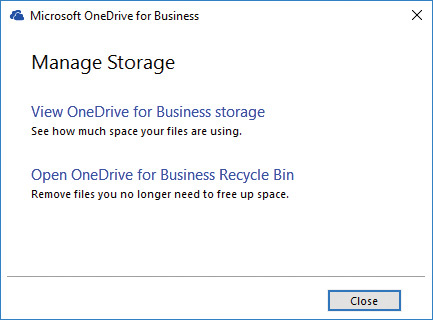
Use the Manage Storage dialog box to view OneDrive for Business storage and to access the Recycle Bin
To sync to a SharePoint library by using the OneDrive for Business sync client
1. In the notification area, right-click the icon with blue clouds outlined in white, and select Sync Now.
1. In the notification area, right-click the icon with blue clouds outlined in white, and select Pause syncing.
![]() Tip
Tip
When you look at the OneDrive for Business icon in the notification area, it will now have a red circle with a white x.
1. In the notification area, right-click the icon with blue clouds outlined in white, and select Resume syncing.
1. In the notification area, right-click the icon with blue clouds outlined in white, and select Stop syncing a folder.
2. In the Stop syncing a folder dialog box, select the library you want to stop syncing, and then select Stop syncing.
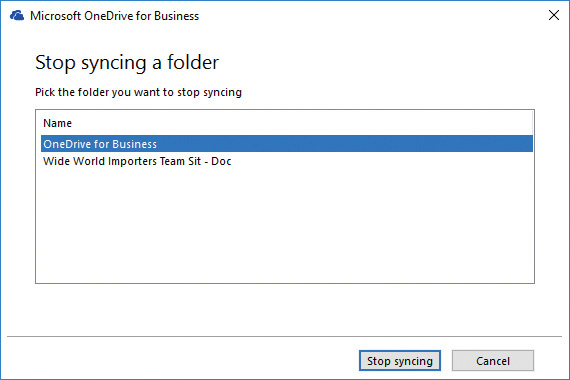
Use this dialog box to stop syncing with your OneDrive for Business library or a SharePoint library
3. Select Yes to confirm that you permanently want to stop syncing.
4. Select OK in the dialog box that states that the library will no longer sync with your PC.
![]() Tip
Tip
The blue cloud or SharePoint icons will be removed from the folder, and files you’ve already downloaded will be kept in the folder.
To view the size of your OneDrive for Business (Documents) library
1. On your computer, in the notification area, right-click the icon with blue clouds outlined in white, and select Manage storage.
2. Select View OneDrive for Business storage to open the Storage Metrics page in your browser.
Or
1. In your browser, display your OneDrive library, and then in the Settings menu, select Site settings.
2. Under Site Collection Administration, select Storage Metrics.
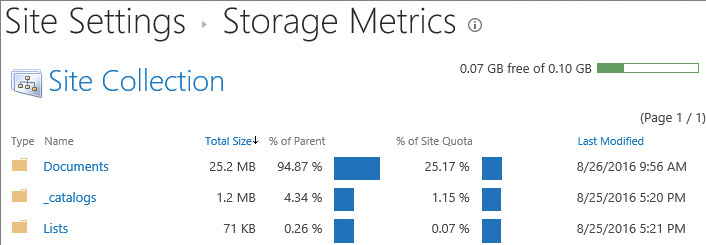
Use the Storage Metrics page to see the size of your OneDrive For Business Documents library
![]() Tip
Tip
To view the storage size of folders on your computer, in File Explorer, right-click the synced folder, and then select Properties.
To stop the OneDrive for Business sync client from running on your computer
1. In the notification area, right-click the icon with blue clouds outlined in white, and select Exit.
OneDrive for Business limitations
See Also
For a list of restrictions for the new sync clients, go to https://support.microsoft.com/en-us/kb/3125202.
![]() Number of Items that can be synced 20,000 items (files or folders) across all synchronized libraries. There are also limits to the number of items that can be synchronized for each library type:
Number of Items that can be synced 20,000 items (files or folders) across all synchronized libraries. There are also limits to the number of items that can be synchronized for each library type:
• 20,000 items in a OneDrive for Business library.
• 5,000 items in a SharePoint library, which includes files and folders.
![]() Size limit when syncing files You can synchronize files up to 2 GB in size.
Size limit when syncing files You can synchronize files up to 2 GB in size.
![]() Character limit for files and folders These limits apply to un-encoded URLs and not to encoded URLs:
Character limit for files and folders These limits apply to un-encoded URLs and not to encoded URLs:
• For SharePoint Server 2013, file names can have up to 128 characters.
• For SharePoint Online and SharePoint 2016, file names can have up to 256 characters.
• Folder names can have up to 250 characters.
• Folder name and file name combinations can have up to 250 characters.
![]() Invalid characters
Invalid characters
• SharePoint 2013: /:*?”<>|#{}%~&
• SharePoint 2016 and SharePoint Online: /:*?”<>|#%
![]() Invalid files types or files that will not sync:
Invalid files types or files that will not sync:
• File extensions: .tmp, .ds_store, and SharePoint 2016 blocked file types
• Files: desktop.ini, thumbs.db, ehthumbs.db, any file that is currently open by any program, OneNote notebooks
![]() Windows user profile types
Windows user profile types
Tip
The old OneDrive for Business sync client is not supported if you use a roaming, mandatory, or temporary Windows user profile or when you are using a client session hosted on Windows 2008 Terminal Services or Windows 2012 Remote Desktop Services (RDS).
See Also
For a list of unsupported folder names, go to https://support.microsoft.com/en-us/kb/2933738. For information about how to resolve problems with the OneDrive for Business sync client, go to https://office.microsoft.com/redir/HA104047973.aspx, and https://support.office.com/en-us/article/Fix-OneDrive-for-Business-sync-problems-e12c6a8b-4bbe-4391-9c23-1a52b55a1967.
Skills review
In this chapter, you learned how to:
![]() Converse and monitor by using the Newsfeed page
Converse and monitor by using the Newsfeed page
![]() Work with OneDrive for Business
Work with OneDrive for Business

![]() Important
Important
You must have sufficient permissions to perform the operations involved in each practice task to complete that practice task. For more information, see Appendix A, “SharePoint 2016 user permissions and permission levels.”
Understand your My Site
Go to your Newsfeed page, and then perform the following tasks:
1. Go to the People I’m Following page, and follow a person in the Suggested People list or someone who is following you who you are not already following.
2. Return to the Newsfeed page, and follow one of the trending #tags.
3. Go to the Sites page, and pin one of the sites you are following to the top of the list.
Converse and monitor by using the Newsfeed page
Go to your Newsfeed page, and then perform the following tasks:
1. In the Start a conversation box, enter, I’m organizing our sponsor booth at the #2016Oslo #furniture #conference. I understand you are attending, and I’m looking for volunteers to help, and then mention at least one person.
2. Post the microblog, and then go to the About #2016Oslo page.
3. Add a related tag, choosing an existing hashtag from the suggested list.
4. Go to the Newsfeed page to view your recent activity, and delete the microblog you created in step 1.
Work with OneDrive for Business
In your browser, go to your OneDrive, and then perform the following tasks:
1. Start the library sync to your local computer, if you have not already done so.
2. In File Explorer on your local computer, go to the OneDrive for Business folder to confirm that the library has synced.
3. Copy the WideWorldImportersExpenses document from the practice file folder to your OneDrive for Business folder, and sync.
4. Open your OneDrive for Business library in your browser and confirm that the library has synced.