
Displaying text using the Literal and Label Web controls
Using the Literal Web control
Using the Label Web control
Understanding the differences between the Literal and Label Web controls
Altering the appearance of the Label Web control
We’ll be examining a variety of Web controls throughout this book. Web controls, like regular HTML markup, are placed in the ASP.NET page’s HTML portion. But unlike HTML elements, Web controls can be accessed programmatically from the page’s code. In this manner, Web controls serve as an intermediary between the source code and HTML portions of an ASP.NET page.
ASP.NET’s various Web controls can be divided into a number of categories, such as Web controls that are used to display text, Web controls that are used to collect user input, Web controls that are used to display data from a database, and so on. In this hour we examine the two ASP.NET Web controls used for displaying text.
Recall from our discussions in Hour 4, “Designing, Creating, and Testing ASP.NET Web Pages,” that when an ASP.NET web page is visited through a browser, the ASP.NET engine executes the page, producing HTML that is then sent back to the web server. The HTML produced by an ASP.NET web page can come from
The static HTML in the HTML portion
The HTML that is rendered by the page’s Web controls
The static HTML in the HTML portion is passed on to the browser exactly as it’s typed in. However, the HTML produced by a Web control depends on the values of its properties.
Two ASP.NET Web controls are designed for displaying text: the Literal Web control and the Label Web control. The differences between the Literal and Label Web controls lie in the HTML produced by each control. The Literal Web control’s rendered markup is the value of its Text property. The Label Web control, on the other hand, has a number of formatting properties, such as BackColor, ForeColor, Font, and so on, that specify how the Label’s Text property should be displayed.
The Literal Web control is one of the simplest Web controls. The HTML rendered by the Literal Web control is precisely the value of its Text property.
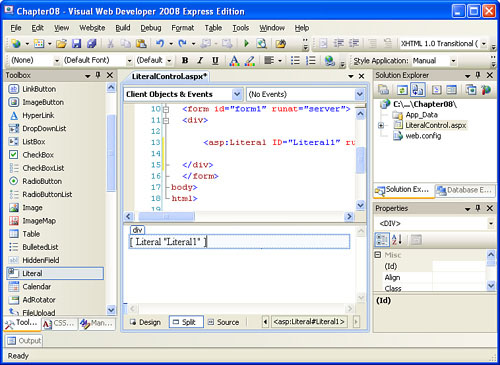
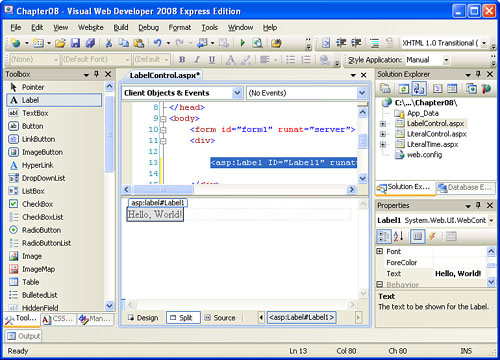
To illustrate the Literal’s behavior, let’s create an ASP.NET page that has a Literal control. Start by creating a new ASP.NET web page named LiteralControl.aspx. Next, drag the Literal control from the Toolbox onto the page. Figure 8.1 shows the Design view after the Literal control has been added.
Make sure that the Literal Web control you just added is selected, and then examine the Properties window in the lower-right corner. Note that the Literal Web control has only six properties. These six properties, as displayed in the Properties window, are
Text
EnableViewState
Mode
Visible
(Expressions)
(ID)
The only two properties that we will work with in this hour are the ID and Text properties. The ID property uniquely names the Web control so that its properties can be referenced in the source code portion of the ASP.NET web page. The Text property is the value that is displayed in the ASP.NET web page when the Literal Web control is rendered.
When the Literal Web control’s Text property is not set, the Literal Web control is shown in the designer as
[Literal "ID"]where ID is the value of the Literal Web control’s ID property. In Figure 8.1 the Literal control is displayed as [Literal "Literal1"] because the Text property is not set and the ID property value is Literal1.
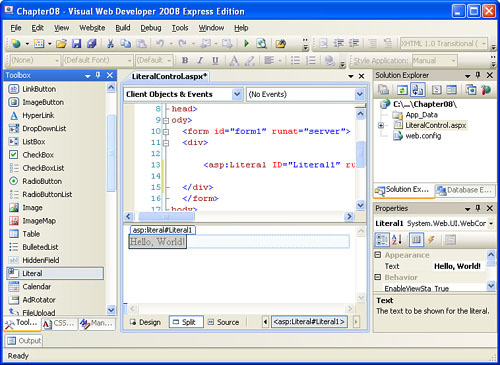
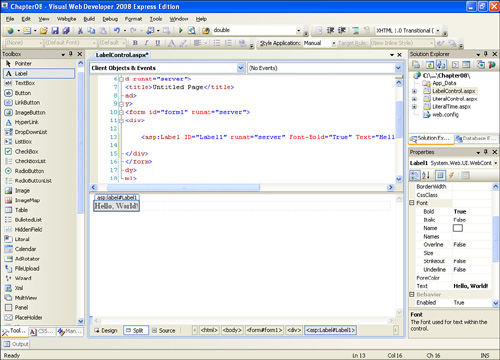
If the Text property is set to some value, though, the designer displays this value. For example, take a moment to change the Literal Web control’s Text property to Hello, World! Figure 8.2 shows the designer after this change has been made. Note that the Literal Web control is displayed in the designer as the text “Hello, World!”
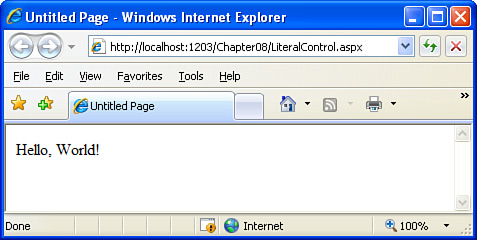
Now that we’ve added this Literal Web control and set its Text property, let’s view this ASP.NET page through a browser. Go to the Debug menu and choose Start Without Debugging. Figure 8.3 shows the LiteralControl.aspx web page when viewed through a browser. Note that the output is simply the value “Hello, World!”
As we just saw, the Text property of the Literal Web control can be set through the Properties window. If you know what the Text property’s value should be, nothing is wrong with using this approach. However, if you want the value of the Text property to be dynamic, you will have to set the property value through the source code portion of the ASP.NET page.
For example, imagine that you wanted to use a Literal control to display the current date and time. Programmatically, the current date and time can be retrieved by the DateTime.Now property.
To set the Literal control’s Text property programmatically, use the following syntax in the source code portion:
LiteralControlID.Text = value
Here, LiteralControlID is the value of the Literal Web control’s ID property, and value is the string value to assign to the Literal Web control’s Text property.
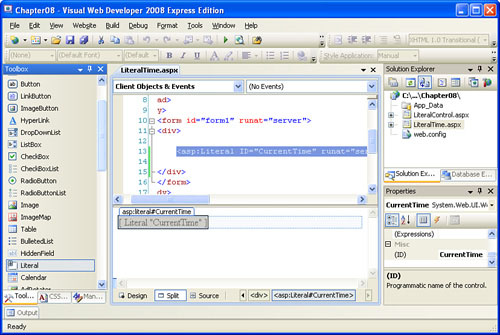
Let’s create an ASP.NET web page that uses a Literal Web control to display the current date and time. Start by creating a new ASP.NET web page named LiteralTime.aspx and then drag and drop a Literal Web control onto the designer. There’s no need to set the Text property through the Properties window because we will be setting this property programmatically. We should, however, rename the Literal Web control’s ID property from the ambiguous Label1 to something more descriptive, such as CurrentTime.
After you have added the Label Web control and changed its ID property to CurrentTime, take a moment to compare what your screen looks like with Figure 8.4.
After you’ve added the Literal Web control and set its ID property to CurrentTime, you’re ready to add the needed source code. For this ASP.NET web page, we want the Literal Web control’s Text property set to the current date and time whenever the page is visited. Therefore, create an event handler for the page’s Load event.
Enter the following code into the Page_Load event handler:
CurrentTime.Text = DateTime.Now
At this point your ASP.NET page’s source code portion should be identical to the code in Listing 8.1.
Example 8.1. The Current Date and Time Is Displayed in the CurrentTime Literal Control
1: Partial Class LiteralTime
2:     Inherits System.Web.UI.Page
3:
4:     Protected Sub Page_Load(ByVal sender As Object, ByVal e As System.EventArgs) Handles Me.Load
5:         CurrentTime.Text = DateTime.Now
6:     End Sub
7: End Class
Whenever a browser requests the LiteralTime.aspx web page, the ASP.NET engine executes the page. The Page_Load event handler is fired, and the source code within that event handler is executed. The code on line 5 sets the CurrentTime Literal control’s Text property to the current date and time.
Save the ASP.NET web page and view it through a web browser. Figure 8.5 shows LiteralTime.aspx when viewed through a browser.
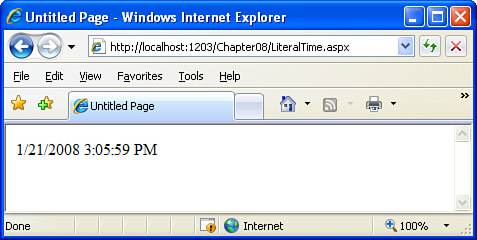
To convince yourself that the current date and time are being shown, refresh your web browser every few seconds, noting that the time displayed is updated accordingly. When refreshing your web browser, the entire page execution process is repeated—the Page_Load event handler sets the Literal’s Text property to the current date and time and the Literal control is rendered, sending down the value of its Text property to the requested browser.
By the Way
What do you think the output of the LiteralTime.aspx web page would be if we changed the code in the Page_Load event handler from
CurrentTime.Text = DateTime.Now
to
CurrentTime.Text = "The current time is: " & DateTime.Now
I encourage you to try this code change to see how the output differs.
The Literal Web control does not contain any properties to specify the format of its output. That is, no properties specify that the text should be displayed in a larger font, or that it should be underlined. If you need to format the Literal control’s output, you have to insert the appropriate HTML in the control’s Text property. For example, to display the current time in a bold font, you need to explicitly include the HTML bold element (<b>):
CurrentTime.Text = "<b>" & DateTime.Now & "</b>"
Clearly, the Literal Web control is not well suited for displaying formatted text. The Label Web control, which we’ll examine in the next section, has a host of properties that make formatting the output a breeze.
The Literal Web control is most useful in scenarios in which you need precise control over the rendered output. The Label control’s emitted markup depends on both its Text property and its formatting properties. The Literal control, on the other hand, offers finer control over the output because it emits just the value of its Text property—nothing more, nothing less.
The Label Web control differs from the Literal Web control in that it contains a number of formatting properties that, when set, specify how the Text property should be displayed in the user’s web browser. For example, we can display the Label text in a bold font by setting the control’s Font property’s Bold subproperty to True; to have the text displayed in a red font, set its ForeColor property to Red.
Let’s create a new ASP.NET web page to demonstrate using the Label Web control. Start by creating an ASP.NET page named LabelControl.aspx; next, drag a Label Web control onto the page. Select the Label and note its list of properties in the Properties window. There are far more properties listed here than with the Literal Web control.
First, set the Label Web control’s Text property to Hello, World! After you have done this, your screen should look like Figure 8.6.
Let’s configure the Label so that it displays its content in a bold font. To accomplish this, select the Label Web control to load its properties in the Properties window. One of the properties listed is Font. To the left of this property name, you’ll find a plus, which indicates that this property has subproperties. Click the plus sign to expand these subproperties.
The subproperties of the Font property are listed in Table 8.1. One of these subproperties is Bold, which defaults to a value of False. Change this value to True. This has the effect of making the Label Web control’s text in the designer appear bold, as you can see in Figure 8.7.
Table 8.1. The Subproperties of the Label Web Control’s Font Property
Subproperty Name | Description |
|---|---|
| A Boolean value indicating whether the |
| A Boolean value indicating whether the |
| The preferred font to use when displaying the text. Common font choices include Arial, Helvetica, and Verdana. |
| A sequence of font names. If the browser visiting the page does not support one of the fonts, it will try using the next listed one. |
| A Boolean value indicating whether the |
| The size that the |
| A Boolean value indicating whether the |
| A Boolean value indicating whether the |
Go ahead and view the ASP.NET page through a web browser. When viewing the LabelControl.aspx page through a browser, you should see the message “Hello, World!” in a bold font, just like what is shown in the designer.
The Label Web control contains a number of formatting properties. We’ve already seen how to make the text of the Label Web control bold. Numerous other Label Web control formatting properties are worth examining. These formatting properties can be divided into the following classes: color properties, border properties, font properties, and miscellaneous properties. We’ll examine each of these classes of properties in the next four sections.
The Label Web control contains two properties for specifying the color of the outputted text: ForeColor and BackColor. If you couldn’t guess, ForeColor specifies the text’s foreground color, whereas BackColor specifies its background color.
Let’s create a new ASP.NET web page to try out these two color properties. Create an ASP.NET web page named ColorLabel.aspx and drag and drop a Label Web control onto the page. After adding the Label Web control, change the Text property to This is a test of the color properties.
Now, set the BackColor to a dark blue color and the ForeColor to white. To accomplish this, make sure that the Label Web control is selected so that its properties are displayed in the Properties window. Then find the BackColor property in the Properties window.
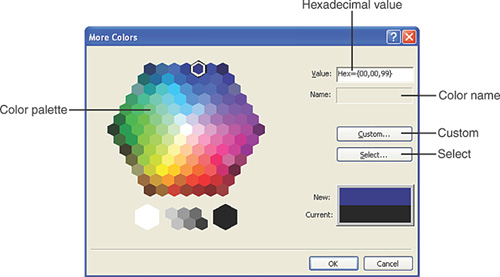
Selecting the BackColor property displays the More Colors dialog box shown in Figure 8.8. The More Colors dialog box allows you to pick a color from the palette on the left. If you do not see a color you like in the palette, click the Custom button, which presents an interface where you can specify the precise color settings.
Did you Know?
If you want to replicate a color shown somewhere on your screen, click the Select button. This turns your mouse cursor into an eyedropper icon. Click the eyedropper on the color you want to replicate, and the More Colors dialog box selects that precise color.
Choose a dark blue color from the palette and click OK to assign the color selection to the BackColor property.
The Label Web control’s ForeColor property indicates the foreground color of the text displayed. When the ForeColor property is selected, the same More Colors dialog box appears. Set the ForeColor to white.
By the way: How Colors Are Expressed in HTML
Colors in a web page are typically expressed in one of two ways: as a named color; or as a hexadecimal string specifying the amount of red, green, and blue that, mixed together, makes up the color.
There are only 16 “official” named colors (although most browsers support many unofficial named colors, as well). Some of the official named colors include black, white, red, green, blue, orange, and yellow.
Colors can also be expressed based on its quantities of red, green, and blue, with values ranging from 0 to 255. This information is typically denoted as a six-character hexadecimal string. Hexadecimal is an alternative numbering system that has 16 digits—0, 1, 2, ..., 8, 9, A, B, ..., E, F—instead of 10. The numbers 0 through 255 can be represented in hexadecimal as 00 through FF. A color, then, can be denoted using hexadecimal as RRGGBB, where RR is the amount of red, GG the amount of green, and BB the amount of blue.
As Figure 8.8 shows, the More Colors dialog box displays the hexadecimal value for the selected color as Hex={RR, GG, BB}. It also includes a Name label that shows the color’s associated defined name, if one exists.
For more information on the hexadecimal system and how colors can be denoted using hexadecimal, see www.mathsisfun.com/hexadecimal-decimal-colors.html.
At this point we’ve set three of the Label Web control’s properties. We set the Text property to “This is a test of the color properties,” the BackColor to a dark blue color, and the ForeColor to white. The designer should show the text “This is a test of the color properties” in a white foreground color with a dark blue background color, as shown in Figure 8.9.
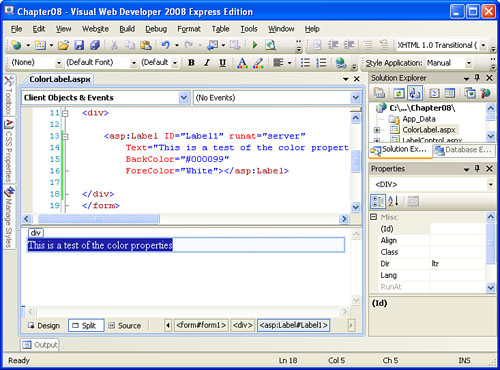
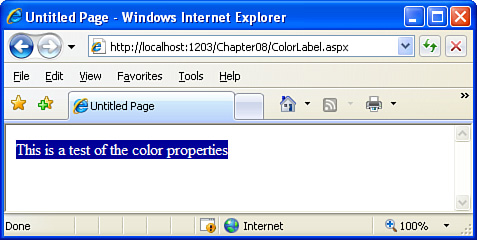
Figure 8.10 shows this page when viewed through a browser. As you would expect, the display in the browser matches the display in Visual Web Developer’s designer.
It is possible to put a border around the text displayed by a Label Web control.
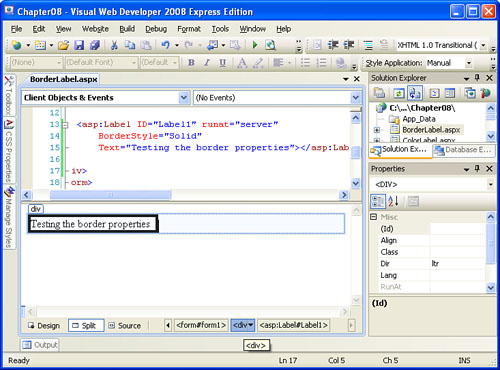
To practice adding a border, create a new ASP.NET page titled BorderLabel.aspx. Drag and drop a Label Web control onto the page and set its Text property to Testing the border properties. Next, click the Label’s BorderStyle property. This should open a drop-down list that contains various options for the style of border to be placed around the Label Web control. These options are enumerated in Table 8.2.
Table 8.2. The BorderStyle Property Can Be Set to Any One of the Following Values
Description | |
|---|---|
| The default option. The border around the Label Web control depends on external style sheet rules. |
| No border is displayed. |
| A dotted border is displayed. |
| A dashed border is displayed. |
| A solid border is displayed. |
| A double border is displayed. |
| A grooved border is displayed. |
| A ridged border is displayed. |
| An inset border is displayed. |
| An outset border is displayed. |
Select the Solid option for the BorderStyle property. In the designer, you see a solid border appear around the edges of the Label Web control. At this point your screen should look similar to Figure 8.11.
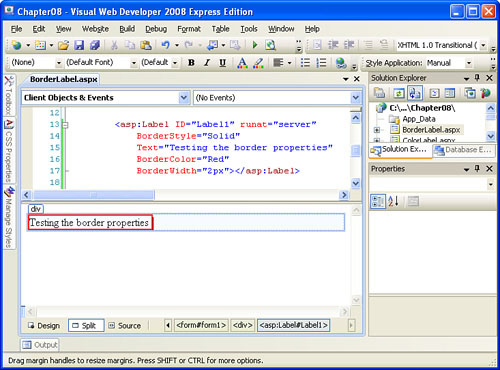
Note that the border displayed in Figure 8.11 is black. We can change the border’s color via the BorderColor property. The interface for selecting the BorderColor property is identical to that used for selecting the BackColor and ForeColor properties. Set the BorderColor to red.
In addition to the BorderStyle and BorderColor properties, there’s a BorderWidth property as well. Go ahead and enter a value of 2 as the BorderWidth property, which creates a border 2 pixels wide.
Figure 8.12 shows the Design view after the BorderColor and BorderWidth properties have been set. Your screen should look similar.
Take a moment now to view this ASP.NET web page through a browser. You should see the text “Testing the border properties” displayed with a red, solid border 2 pixels thick, just like in the designer.
As we saw earlier in this hour, the Label Web control has a Font property that contains a number of subproperties, such as Bold, Italic, Underline, Name, and others. We already saw how setting the Bold subproperty to True makes the text of a Label Web control appear in a bold font.
To further our examination of the other Font property’s subproperties, create a new ASP.NET page named LabelFont.aspx, and drag a Label Web control onto the designer. Set this Web control’s Text property to Working with the Font properties. Next, expand the Label’s Font property by clicking the plus sign to the left of the Font property name. This will list its subproperties. (You can find a complete list of the Font property’s subproperties in Table 8.1.)
Let’s set some of the Font property’s subproperties. Start by setting the Italic subproperty to True, which will make the Label’s text appear in an italic font in the designer. Next, under the Name property, choose the font name Arial. Finally, set the Size subproperty to 22pt. This will cause the Label Web control’s text in the designer to enlarge to a 22-point size.
Figure 8.13 shows Visual Web Developer at this point. If you’re following along, your screen should look similar.

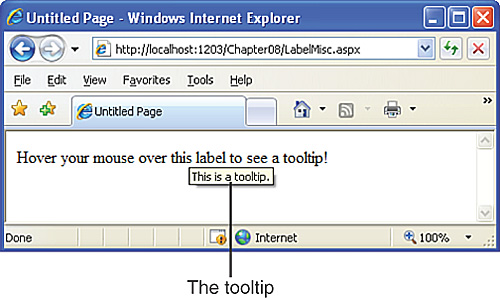
The remaining Label Web control properties can be classified as miscellaneous properties. For example, there is a ToolTip property. If you specify a value for the ToolTip property, it is displayed in a light yellow box whenever a visitor hovers his mouse pointer over the label’s text. Figure 8.14 shows an ASP.NET web page that has its ToolTip property set to “This is a tooltip.”
Two other miscellaneous Label Web control properties are Height and Width. These two properties can be set to specific values through the Properties window.
The Visible property determines whether the Label Web control is rendered when the ASP.NET page is executed. If the Visible property is set to True (the default), the Label Web control’s rendered HTML is sent to the browser. If, however, Visible is set to False, no HTML is sent to the browser for the Label Web control.
You may be wondering why in the world anyone would ever want to use this property. If a page developer doesn’t want to display a Label Web control, why create it and set its Visible property to False? Why even create it in the first place?
In the next few hours, when we examine using Web Forms to collect user input, we’ll see scenarios in which we just might want to create a Label Web control and hide it initially, showing it at a later point. For example, imagine that we had an ASP.NET page that prompted the user for her username and password. If the user provides an incorrect username or password, we want to display an appropriate message. Therefore, we can place a Label Web control on the web page that has such a message and initially set its Visible property to False. Then, if the user enters an incorrect password, we can programmatically set the Label Web control’s Visible property to True, thereby displaying the message in response to an invalid password.
In this hour we looked at the two ASP.NET Web controls designed for displaying text output: the Literal Web control and the Label Web control.
When the Literal Web control is rendered, its Text property is returned as its HTML. No formatting is applied, and no extraneous HTML tags are added.
The Label Web control is useful for displaying formatted text. For example, use the Label control if you want to display some text in a bold font or with a yellow background color. The Label Web control has a number of formatting properties, such as BackColor, ForeColor, Font, BorderColor, BorderStyle, and so forth.
Now that we’ve examined how to use the Literal and Label Web controls, we’re ready to turn our attention to the Web controls that are designed to collect user input, such as the TextBox, DropDownList, RadioButton, and others. Before we do, though, we need to examine how an ASP.NET web page collects data from a web visitor and returns that data to the web server. We’ll tackle this subject in the next hour, “Web Form Basics.”
Is there any difference in the HTML sent to the browser for a Literal and a Label Web control? | |
Recall from our discussions in this hour that when the ASP.NET engine executes an ASP.NET page, the Web controls are rendered into HTML. The precise HTML generated depends on the Web control and the values of its properties. ASP.NET offers two Web controls for displaying text: the Literal and Label. If you create an ASP.NET page with Literal and Label Web controls and set the In such a web page, the HTML produced by the Literal control is This is a test Note that the HTML produced by a Literal control is literally the value of its The Label Web control, however, actually uses a <span>This is a test</span> The Label Web control wraps its <span style="font-weight:bold;">This is a test</span> | |
In this hour we saw how to set the Label’s formatting properties through the Properties window. Can they also be set programmatically, in the ASP.NET page’s source code portion? | |
All of the Label’s properties may be set declaratively—through the Properties window—or programmatically. For example, in Hour 6, “Managing Program Flow with Visual Basic’s Control Structures,” we created an ASP.NET page that displayed a different message depending on the hour of the day. The page’s code portion used conditional statements and programmatically set the Label control’s In particular, if the message “Good morning” is displayed, have it rendered in a bold font. For “Good afternoon” set the I’ll get you started with the “Good morning” message. The following code sets the Label’s If DateTime.Now.Hour >= 6 And DateTime.Now.Hour < 12 Then
Message.Text = "Good morning."
Message.Font.Bold = True
End If |