
Hour 1 Get to Know Microsoft Expression Web 2
What You’ll Learn in This Hour:
![]() What Expression Web 2 is and what you can use it for
What Expression Web 2 is and what you can use it for
![]() How to navigate and customize the workspace layout
How to navigate and customize the workspace layout
![]() How to open and close toolbars and task panes
How to open and close toolbars and task panes
![]() How to reset the workspace to the default settings
How to reset the workspace to the default settings
Opening this book, you probably want to jump right in and start creating websites. But before you start it’s a good idea to take the time and familiarize yourself with the program. Whether you are a first-time user or a seasoned web designer, Expression Web 2 has something new to offer. And because you’ll be spending a lot of time with the program, learning it before you start working on projects will probably save you both time and frustration. If you are too impatient, you can always jump ahead to Hour 3, “A Website Is Really Just Text—Build One in 5 Minutes,” and come back here later. But as my father always told me, “If you want to bottle an elephant, you better read the manual first.” Getting to know your tools before using them makes your life easier in the long run.
Introducing Expression Web 2
Expression Web 2 is a complete web publishing suite bundled into one program. It’s an HTML editor, a WYSIWYG editor, an authoring tool, a code debugger, a CSS (Cascading Style Sheets) generator, and a file management tool all wrapped up in one convenient package—a one-stop shop for putting content on the Web. Whether you are a designer with no previous code experience, a developer with no previous design experience, or somewhere between the two, Expression Web 2 can help you work faster and more effectively.
![]()
Jargon and acronyms litter the language of web design and development. Rather than providing just a direct translation, I explain each term or acronym the first time it appears in the text.
![]()
WYSIWYG: What You See Is What You Get. An acronym used for visual web-editing applications where the user can view and edit the page as it appears in a browser rather than simply viewing and editing code.
As you will quickly see when working with web design, this name is a bit misleading: The fact that a web page looks a certain way in a WYSIWYG editor doesn’t necessarily mean it will look the same when viewed through an actual web browser. There are also different kinds of content that cannot be displayed in WYSIWYG editors such as Silverlight applications and dynamic web content. You will be introduced to these components and learn how to deal with this problem later on in the book.
In spite of this the WYSIWYG editor is a powerful tool that gives you a fairly accurate picture of what your design will look like on the web.
Expression Web 2 is a new link in a long chain of web-authoring tools. What makes it unique is that it gives the user the ability to create 100% standards-based sites even without knowing what the term standards-based means. Expression Web 2 is in many ways a shortcut that opens the world of standards-based code, previously accessible to only the web developer elite, to anyone using it. And because creating standards-based sites is (or should be) the ultimate goal of any web designer, Expression Web 2 gives you a huge advantage. Of course that doesn’t mean your sites will be perfect, but you will spend far less time picking at finicky code and solving browser incompatibilities.
![]()
The terms standards-based and web standards refer to the formal standards and technical specifications set out by the W3C (World Wide Web Consortium) to describe how the World Wide Web works. If you follow these standards, your web page should look the same in all web browsers. (I emphasize should because not all web browsers follow these standards.) By creating standards-based websites, you avoid many of the problems associated with browser incompatibilities and build clean and functional websites accessible to people with disabilities and anyone on slower connections or older computers. The terms refer to a website’s coding, not what it looks like. So, don’t worry: A standards-based website does not have to be boring or ordinary, just built properly. If you want more information on web standards, a good place to start is the W3C website: www.w3.org.
With Expression Web 2 you can create new pages and sites from scratch or from templates; view, edit, and alter existing pages and sites; and build new server-based applications with ASP .NET (Active Server Pages .NET) and PHP (PHP: Hypertext Preprocessor—its name is recursive). In short, Expression Web 2 is a complete package for creating and publishing websites whether on a local computer, a network, or the Web.
Getting and Installing Expression Web 2
Expression Web 2 was launched in May 1st, 2008 and is available through most software retailers or through the Microsoft Expression website (http://www.microsoft.com/expression). Consider purchasing the software as a download from Microsoft rather than through a retailer. Not only is it much quicker than going to a store or ordering from an online retailer, but you save the planet from all the unnecessary waste created in the production and shipping of the product.
If you are new to the field and unsure of whether you want to use this program, you can download from the same site a fully functional trial version that gives you 30 days to make up your mind.
![]()
Interestingly you can make your 30-day trial into a 60-day trial if you plan your installation right. It turns out that even though it says “30-day trial period” the trial version of Expression Web 2 expires on the last day of the first month after you installed it. This means that if you install the trial on November 1st it won’t expire until December 31st!
Expression Web 2 is designed for the Microsoft Windows platform and works on both Microsoft Windows XP Service Pack 2 and Windows Vista. It also runs on a Mac running Windows XP or Windows Vista via Bootcamp or in virtualization software such as VMWare Fusion or Parallels.
Installing the software, whether it’s from a download or from a DVD, is straightforward. If you purchased the software from a vendor, your activation key is inside the box. If you purchased the software from the Microsoft Expression website, you received your activation code during the purchase. If you are using a trial version, you can get a trial activation code by following the link provided during installation.
![]()
If you have any problems with the installation or the program doesn’t work after you install it, troubleshooting tips, FAQs, and forums on the Microsoft Expression website can walk you through the process and get you up and running.
Getting Acquainted with the Workspace
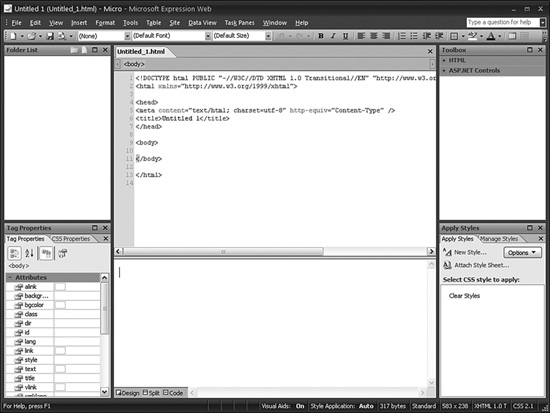
When you open Expression Web 2 for the first time, it presents several views, task panes and toolbars containing tools and information (see Figure 1.1). In the middle, the Code view and the Design view show you the current page. Together these panes and toolbars give you a complete picture of the project you are working on and multiple ways of working with and editing that project.
Figure 1.1 Expression Web 2 as it appears when first opened.

The Program Bar
The address and name of the current file you are working with are at the top of the workspace. Right now it says Untitled 1 (untitled1.html). When you open the program for the first time, it displays this default empty web page. Later on you will learn how to decide what the program displays when it opens.
The Menu Bar
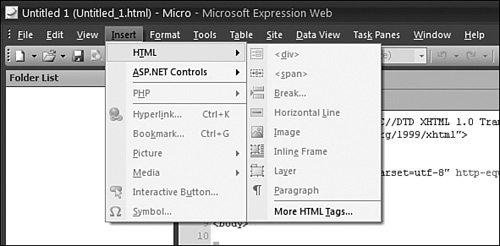
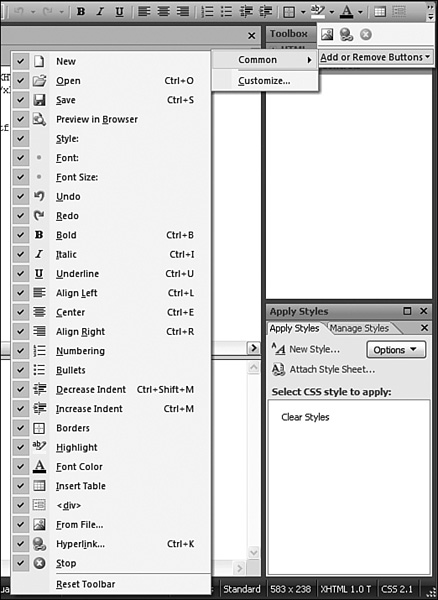
The menu bar is directly under the address bar. This bar is familiar to anyone who has used a computer program. The menu bar is the program’s control center from which you can access any tool, feature, or functionality. Clicking a menu item reveals that item’s drop-down menu (see Figure 1.2). Sliding your mouse left and right displays the drop-down menus for each menu item. Some drop-down menu items have an arrow icon to their right. Hovering your mouse pointer over the arrow reveals additional submenus. We will cover each of these options in later hours. To collapse the menus, simply click anywhere outside the drop-down menu.
Figure 1.2 Example of a drop-down menu from the menu bar.
Try it Yourself
Use the Menu Bar to Close and Open Design View and Code View
If you have never used a web design application like Expression Web 2 before the window with all its menus and task panes and views might seem a bit intimidating. However, when you understand how to use and manipulate them you will see that they are there for one reason only: To help you get your job done faster and more efficiently.
At the center of the page is the View pane. By default it is split in half horizontally with the Code view on the top and the Design view on the bottom. These views will be explained in detail later but for now let’s see how you can change them to see only what you want (see Figure 1.3).
1. Click View and hover the mouse pointer over the Page item.
Figure 1.3 The View menu with the Page submenu open.
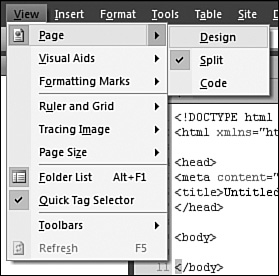
2. Click Design in the submenu that opens to the right.
3. Notice that the middle of the workspace now shows only Design view.
4. Repeat step 1 and click Code in the submenu. You now see only Code view.
5. Repeat step 1 and click Split. Notice that doing so restores the workspace to what it was when you started.
Common and Other Toolbars
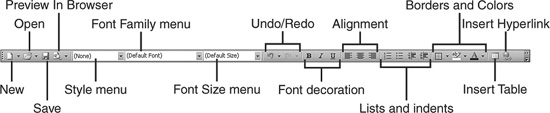
The Common toolbar is under the menu bar (see Figure 1.4). This toolbar contains the most commonly used functions in the program, such as New, Open, Save, Font, Alignment, and so on. In addition to being an excellent tool for quick access to frequently used functions, the Common toolbar also displays information about your current selections. This toolbar is highly customizable, so fill it with whatever tools you find most helpful.
Figure 1.4 The Common toolbar holds the most commonly used tools for easy access.
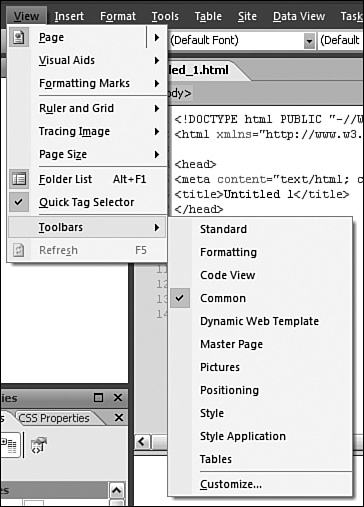
In addition to the Common toolbar are numerous other toolbars that serve different functions (see Figure 1.5). You can activate these toolbars by clicking View on the Main menu and selecting Toolbars. When you open a new toolbar, it floats on top of the workspace. You can grab the toolbar and dock it to the top, left, right, or bottom walls of the workspace or position it somewhere else on your desktop for easy access.
Figure 1.5 The different toolbars are accessible from the Toolbars submenu under View.
![]()
When you hover your mouse over a button or function throughout the program, a small ScreenTip appears explaining what the button or function does and, in some cases, giving you the shortcut for that action. Learning shortcuts not only speeds up your work but prevents muscle and joint problems caused by excessive mouse use.
Try it Yourself
Add and Remove Contents in the Common Toolbar
Even though the Toolbars are equipped with many important and helpful functions they can only fit so much content. Because Expression Web 2 comes equipped with far more functions than could fit on any one toolbar and not every designer or developer thinks the same functions are important to have immediately available you can add and delete these functions from the toolbars to customize and personalize your workspace.
1. Click the Toolbar Options button on the far right of the Common toolbar.
2. Hover over the Add or Remove Buttons item and then the Common item that appears to the left as in Figure 1.6.
Figure 1.6 From the Common toolbar menu you can select what icons should be visible on the toolbar.
3. Click to deselect the Font item. Notice how the Font area disappears from the view.
4. Click to select or deselect other items to see how the toolbar changes accordingly.
5. Click Reset Toolbar on the bottom to restore the Common toolbar to its original state.
Code, Design, and Split View
As its name suggests, Code view displays the code or “back end” of the file you are working on (see Figure 1.7). All web pages are in reality just code documents and Code view gives you a behind-the-scenes look at the inner workings of your page. Code view has many features to help you in your work, from color coding and line numbering to IntelliSense and snippets. You use this view not only to inspect the code Expression Web 2 created for you but also to make alterations and add your own code. If you are working with a strict code file (.css, .php, .js, and so on) this is the only view available.
Figure 1.7 Design View, Split View, and Code View buttons as they appear on the bottom of the workspace.
![]()
![]()
When you open a page in your web browser you are really looking at the browser’s interpretation of the code in the file. Web pages are written in a markup code language that, when interpreted, turns into what you see in your browser. What you don’t see is that many of these pages actually consist of several different files, many of which only contain programming code. These are what I refer to as “strict code files” and they are an important part of functional web design. By placing code in a strict code file you can use this one file as the code source for multiple pages and thus make sweeping changes to all the related files by editing just one. In this book you will learn how to use one such strict code file known as a Style Sheet to control the look and feel of multiple pages at the same time.
Design view is the WYSIWYG editor (see Figure 1.8). This view emulates a web browser and (at least in theory) displays your files as they will appear in a web browser.
This is probably where you will do most of your work. In Design view, you can visually edit HTML and other markup files by dragging and dropping content, editing text, and moving borders in much the same way you would work in word processing software such as Microsoft Word. It also features visual aids to help you see how the page functions. Design view provides a much less intimidating approach to web design and people starting out in the subject often prefer it to Code view.
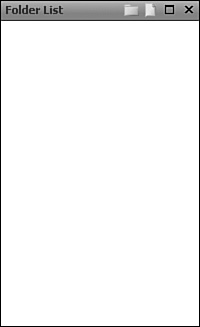
Figure 1.8 Folder list task pane.
Split view gives you the best of both worlds: Code view on top and Design view on the bottom (see Figure 1.9). In Split view, you can see in real time how changes in one view effects the other. For a beginner, working in Split view can greatly enhance the learning process whether you come from a coding background or a design background.
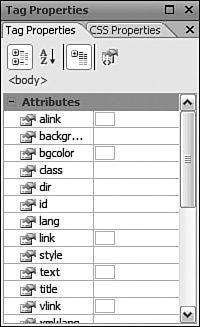
Figure 1.9 Tag Properties task pane.
As you work on your pages you will need to switch back and forth between the different views frequently. To make this as easy as possible the View pane comes equipped with three buttons to toggle the different views on and off as seen in Figure 1.7.
Left and Right Task Panes
On the left and right sides of the code workspace are four task panes, described in the following sections. These panes contain tools, information, and content you can use in the design process.
Folder List (top left)
The Folder List pane shows the folder and file tree in the project or site you are working within (see Figure 1.8).
Tag Properties and CSS Properties (bottom left)
This pane contains two tabbed subpanes. The Tag Properties (see Figure 1.9) and CSS Properties (see Figure 1.10) panes display the current tag or CSS properties of the selected object. Clicking different parts of the code in Code view shows how the tag properties change depending on the code you click. We will cover both panes in more detail in later hours.
Figure 1.10 CSS Properties task pane.

Toolbox (top right)
The Toolbox pane contains code segments and tags frequently used while editing in Code view (see Figure 1.11). These make up two main sections, HTML and ASP .NET Controls, and each section has multiple categories. By clicking the + and – icons, you can explode and collapse the categories to see what they contain.
Figure 1.11 Toolbox task pane.

Apply Styles and Manage Styles (bottom right)
This pane contains two tabbed subpanes. The Apply Styles pane displays the CSS styles available to the current page and enables you to apply styles to objects in Design view (see Figure 1.12). The Manage Styles pane has similar functionality with the addition of a preview area where you can see what each style does to your content (see Figure 1.13). Both panes give you the ability to either apply styles or create new styles.
Figure 1.12 Apply Styles task pane.
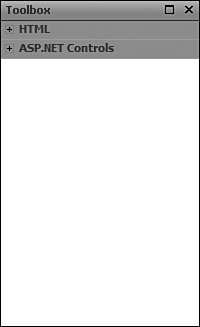
Figure 1.13 Manage Styles task pane.
All the task panes are intelligent—they learn from how you use the program. If you use a particular item often, it moves higher on the list to make it more accessible. A rarely used item moves down on the list. The panes also help you by turning currently unavailable functions gray so that you don’t waste time trying to do something impossible.
The status bar is at the bottom of the workspace (see Figure 1.14). It provides information about the program itself as well as general information such as file size and overall settings (what code format you are using and so on) of the page you are working on. In addition the status bar has tools that warn you if there is invalid or incompatible code in your page. Unlike the task panes, you cannot move the status bar. If you want to close it you need to click Tools, Application Options and uncheck Show Status Bar under General.
Figure 1.14 The Status bar appears on the bottom of the workspace and gives you constant and current information about the file you are working on.
![]()
Changing and Customizing the Workspace
Depending on what you are doing, you might want to have a certain task pane or menu more prominently featured or you might want to open a new task pane with more functions. To accommodate this, the workspace is completely customizable: You can grab any horizontal and vertical border within the workspace to make a pane smaller or larger. You can also grab toolbars and task panes and move them around both by repositioning them within the workspace and by undocking and floating them on top of or outside the window (see Figure 1.15). This technique is particularly useful if you are using a dual monitor setup because you can dedicate the main window to Code view and Design view and leave all the tools on the other screen.
As you saw earlier, each task pane can contain several subpanes. Each subpane becomes accessible through tabs. Expression Web 2 groups related subpanes together for convenience, but you are free to move them around in any way you like.
The Task Panes menu on the menu bar controls the task panes (see Figure 1.16). From here you can select what task panes are active (marked by a yellow check mark). If you click one not currently featured in the workspace, the program adds it to the relevant task pane. You can remove a task pane from view by clicking the small X in its upper-right corner.
As you perform different tasks while working on a page or website your needs will change in terms of what tools and information should be prominently displayed and what can be hidden. For this reason Expression Web 2 gives you complete control over what task panes are available and where they are positioned at any time.
Figure 1.15 The Tag Properties task pane floating above the workspace.
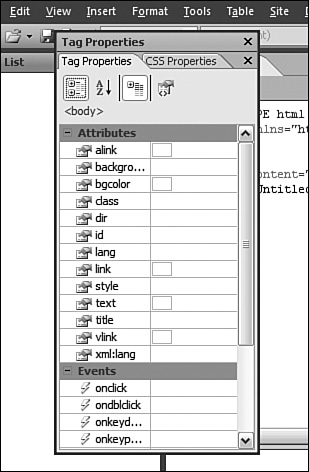
Figure 1.16 You can turn all available task panes on and off from the Task Panes menu.

1. Hover your mouse pointer over the vertical line that separates the Code and Design views from the right task panes.
2. Click and drag the separator to the left to create more space for the task panes (see Figure 1.20).
3. Do the same with the horizontal line separating the top and bottom task panes to allow more space for the bottom pane.
4. Hover your mouse pointer over the horizontal line that separates Code view and Design view.
5. Click and drag the separator upward to create more space for Design view.
6. Click and hold on the empty gray area at the right side of the menu bar. The pointer changes to a four way arrow. Alternatively you can use the gripper icon at the left side of the bar to do the same.
7. Drag the menu bar down until it is on top of the main content and let go. Notice that it changes shape and appears to float on top of the content (see Figure 1.17).
8. Click and hold the empty gray area of the menu bar again and drag it to the far left of the workspace. It docks to the left wall like a magnet.
9. Click and hold the empty gray area of the Common toolbar, drag it to the far right wall of the workspace, and let it dock there.
10. Click and hold the Apply Styles task pane and drag it around inside the workspace. Notice how it suggests different docking positions depending on which area you hover over (see Figure 1.18).
11. Drag the Apply Styles task pane to the edge of the workspace so that it floats on top before letting go. If you have a dual monitor setup, drag the task pane to the other monitor so that it doesn’t cover the main window (see Figure 1.19).
12. Click the Task Panes button on the menu bar (now on the left side of your workspace) and select Behaviors. Notice that even with the Apply Styles pane undocked, the Behaviors tab appears within it.
13. Click and hold the Behaviors tab in the floating pane and drag it away from the pane until it floats on its own (see Figure 1.20).
14. Return the menu bar to its original position by dragging it to dock at the top of the workspace.
15. Return the Common toolbar to its original position below the menu bar in the same way.
16. Click the Task Panes button on the menu bar and select Reset Workspace Layout to restore its original configuration.
Figure 1.17 The menu bar floating on top of the workspace.

Figure 1.18 Suggested position for the Apply Styles task pane.
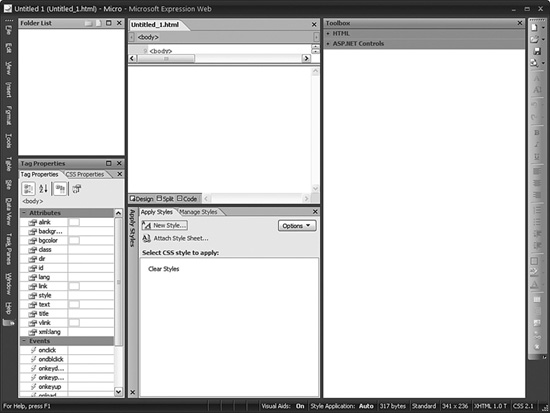
Figure 1.19 The Apply Styles pane floating over the workspace.

Figure 1.20 Behaviors pane floating on its own in the final reorganized workspace.

Summary
In this hour, you learned how Expression Web 2 works and how you can customize it to suit your needs. To some readers, this information might seem rudimentary or even redundant. But as you progress through the next 23 hours, you will see that having a solid understanding of the program makes a world of difference when you encounter new challenges. By knowing the basics, your understanding of the more advanced issues will be much easier. And because you’ll be spending a lot of time with this program, it’s worth your time to get to know it properly first.
For convenience, this book uses the default workspace and task pane layout. But now that you know how to customize them, feel free to organize their layout any way you see fit.
Q&A
Q. The Common toolbar looks a lot like the Formatting toolbar in Microsoft Word. Does that mean that it works the same way?
A. Both yes and no. The Common toolbar has many of the same functions as Microsoft Word’s Formatting toolbar, but when you click a button on the Common toolbar, a change happens through the addition or modification of a snippet in the code or hypertext rather than in the text. (The program refers to these code snippets as styles.) So yes, they look similar, but no, what happens when you push a button is different.
Q. Can I accidentally lose a pane or a toolbar and not be able to open it again?
A. No. All the panes are accessible from the Task Panes button on the menu bar. If you close a pane by accident, you can always open it again from there. Furthermore you can always reset the original layout of the task panes by clicking Task Panes and Reset Workspace Layout. All the toolbars are accessible by clicking View and selecting Toolbars.
Workshop
The Workshop has quiz questions and exercises to help you put to use what you just learned. If you get stuck, the answers to the quiz questions are in the next section. But try to answer the questions first. Otherwise you’ll only be cheating yourself.
Quiz
1. What is the proper way of creating a web page?
A. Using only Code view
B. Using only Design view
C. Using Split view
2. How many task panes can you have open at one time?
A. 8
B. 14
C. As many as you like
Answers
1. D. None of the above. (Sorry, it was a trick question.) There is no right or wrong when it comes to how you create a web page. Some people create spectacular sites using only Notepad, whereas others create just as spectacular sites without ever seeing a line of code. To get the most out of this book, use Split view as much as possible. That way you get to see what happens in Code view when you make changes in Design view and vice versa. But, in the end, what works best is up to the individual user.
2. C. In theory you could fill your entire screen with task panes and toolbars, but if you did it would be hard to get any work done. With that said, however, you are free to set up your workspace any way you please.