
Hour 11 Creating Data-Driven Workflows
What You’ll Learn in This Hour:
![]() Overview of CAG
Overview of CAG
![]() Discussion of CAG and data-driven workflows
Discussion of CAG and data-driven workflows
![]() Configuring the CAG
Configuring the CAG
![]() Using the CAG to support a dynamic approval sample
Using the CAG to support a dynamic approval sample
The ConditionedActivityGroup (CAG) contains one or more lanes that each hold one or more activities, as does a Parallel activity. The CAG contains two optional condition properties. The first governs its overall execution and the second governs the individual lanes. The CAG runs until its overall condition is true (it’s an UntilCondition). During this CAG’s overall execution, each lane will execute, potentially more than once, while its individual condition is true. If no overall condition is set, the CAG will execute until all its child activities complete. A CAG lane with no condition executes exactly once.
The CAG is conceptually similar to a Parallel activity embedded in a While activity. Adding a condition to each branch of the Parallel activity embedded in a While activity even more closely resembles the CAG. The activities across CAG lanes will alternate processing, much as is the case with the Parallel activity (covered in Hour 8, “Working with Parallel Activities and Correlation”). See Hour 9, “Working with the Replicator and While Activities,” for a description on how WF alternates activity execution across branches (Parallel activity terminology) or lanes (CAG activity terminology). This hour is focused on using the CAG’s conditional capabilities to determine which lanes to execute and then executing them in their entirety.
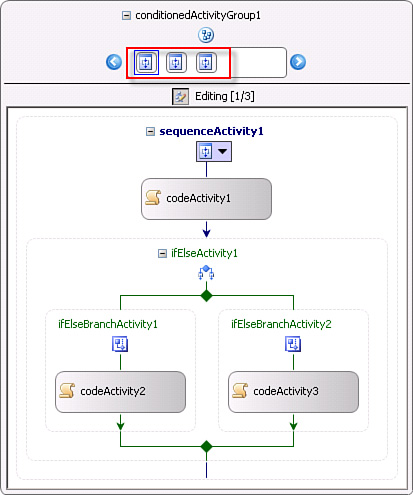
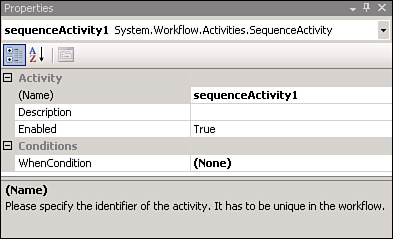
One way to understand a CAG is to look at it its properties. Figure 11.1 contains a CAG. The figure shows the three CAG lanes (shown across the film strip at the top of the activity), and the details of one of its lanes are shown in the body of the activity. Figure 11.2 shows the overall CAG’s properties, the key being its UntilCondition. Figure 11.3 shows the properties for one of the CAG lanes, the key being its WhenCondition.

This hour demonstrates using the CAG activity to permit three approvers to determine whether an order should be approved or declined. While creating this process, you will learn both basic CAG configuration and how current data values determine which CAG lanes execute.
Although the CAG is an activity that is added to a workflow (as are the IfElse and Code activities), it is also an alternative data-driven workflow approach to the better-known sequential and state machine styles. Generally, sequential workflows are recommended for deterministic processes that have a well-defined beginning and end. State machine workflows are best suited for dynamic processes that iterate through states without a guaranteed order. Data-driven workflows, on the other hand, are best suited when the data determines the process execution order. There are many pricing and promotional algorithms that may not execute a branch based on the data at the beginning of a process that will later do so when other parts of the process change the data the branch depended on. For instance, the order may not be subject to a discount until after tallying the line items.
Depending on your needs, the CAG activity may be the only activity on a sequential workflow. In this case, your child activities will be embedded in the CAG, and you will have created a data-driven workflow. In other cases, you may embed a CAG into a larger sequential or state machine workflow. In this case, only a subset of your workflow will be data driven.
In this section you create the workflow and run the CAG.
Follow the next steps to create the project and add references.
Follow the next steps to add some variable. They are used to control the CAG’s execution, and their use will become clear as you proceed.
1. Right-click CAGWorkflow.cs in the Solution Explorer and select View Code.
2. Add the following using directive:
using System.Windows.Forms;
3. Add the variable declarations in the next snippet below the constructor:
// Receive results from dialogs
DialogResult level1Dr = new DialogResult();
DialogResult level2Dr = new DialogResult();
DialogResult level3Dr = new DialogResult();
// Used to track number of approvals and rejections to
// control CAG operations, which is necessary since it
// will execute multiple times if left unchecked.
int numApprovals = 0;
int numRejections = 0;
// Used to determine which approvers are required
ArrayList approvers = new ArrayList();
4. Add the following code into the constructor below the call to InitializeComponent:
approvers.Add("Level2Approvers");
approvers.Add("Level3Approvers");
Follow the next steps to add the CAG to the workflow and configure it.
1. Drag and drop a CAG activity onto the workflow.
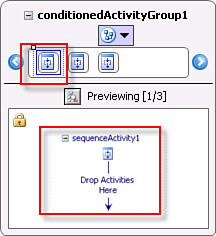
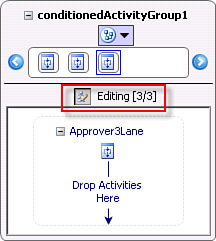
2. Create the three CAG lanes by adding three Sequence activities to the CAG. Drag and drop three Sequence activities one at a time onto the CAG over the message that says Drop Activities Here (across the filmstrip, as shown in Figure 11.4).
3. Click the left activity (lane) in the CAG filmstrip. You should see the message: Drop Activities Here in the middle of the CAG. Enter Approver1Lane in the name property. See Figure 11.5 for an example.
4. Click the middle activity (lane) in the CAG filmstrip and change the name to Approver2Lane.
5. Click the right activity (lane) in the CAG filmstrip and change the name to Approver3Lane.
6. Click the icon next to the word Previewing in the middle of the CAG to change it from previewing mode to editing mode.
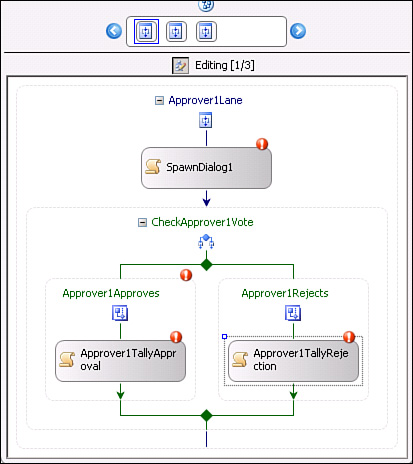
The Approver1Lane lane is for the first approver who will always be required to approve. Therefore, this lane contains no WhenCondition, which means this lane will execute exactly once. You will add a Code activity and an IfElse activity to this lane. You will then add Code activities to both the left and right branches of the IfElse activity.
The first Code activity spawns a dialog that requests approval. The left branch of the IfElse activity checks whether approval is granted. The Code activities in the left and right branches update the approval count (left branch) or the rejection count (right branch).
Follow the next steps to add child activities to the Approver1Lane.
1. Click the Approver1Lane in the CAG filmstrip. You should see the message “Drop Activities Here” in the middle of the CAG. See Figure 11.6 for an example.
2. Add a Code activity and name it SpawnDialog1.
3. Add an IfElse activity below the Code activity and name it CheckApprover1Vote. Name the left branch Approver1Approves and the right branch Approver1Rejects.
4. Add Code activities to both branches of the IfElse activity and name the one in the left branch Approver1TallyApproval and the one in the right branch Approver1TallyRejection.
Follow the next steps to add code-beside to the activities in the Approver1Lane.
1. Double-click the SpawnDialog1 activity above the IfElse activity and enter the following in the handler to spawn an approval dialog:
level1Dr = MessageBox.Show
("Level 1 approves the order?", "", MessageBoxButtons.YesNo);
2. Add the following comments above the method declaration of the code condition handler you just edited:
//
// Level 1 section
//
3. Click the left branch of the IfElse activity, select Code Condition from its Condition property drop-down, click + to the left of the Condition property, enter level1ApprovalCondition, and press Enter.
4. Add the following code to the level1ApprovalCondition handler:
e.Result = this.level1Dr.ToString() == "Yes";
5. Add the following comment above the method declaration of the Code Condition you just updated:
// Selecting which branch to execute based on answer to dialog
6. Double-click the Approver1TallyApproval activity in the left branch of the IfElse activity and enter the following in the handler:
// Tallying approvals
numApprovals++;
Console.WriteLine
("Level 1 order approved. Approvals {0}", numApprovals);
7. Double-click the Approver1TallyRejection activity in the right branch of the IfElse activity and enter the following in the handler:
// Tallying rejections
numRejections++;
Console.WriteLine
("Level 1 order rejected. Rejections {0}", numRejections);
The code entered in this section should look like Listing 11.1.
LISTING 11.1 Level1 Section Code-Beside
//
// Level 1 section
//
private void SpawnDialog1_ExecuteCode(object sender, EventArgs e)
{
level1Dr = MessageBox.Show
("Level 1 approves the order?", "", MessageBoxButtons.YesNo);
}
// Selecting which branch to execute based on answer to dialog
private void level1ApprovalCondition(object sender, ConditionalEventArgs e)
{
e.Result = this.level1Dr.ToString() == "Yes";
}
private void Approver1TallyApproval_ExecuteCode(object sender, EventArgs e)
{
// Tallying approvals
numApprovals++;
Console.WriteLine
("Level 1 order approved. Approvals {0}", numApprovals);
}
private void Approver1TallyRejection_ExecuteCode(object sender,
EventArgs e)
{
// Tallying rejections
numRejections++;
Console.WriteLine
("Level 1 order rejected. Rejections {0}", numRejections);
}
That concludes the Approver1Lane lane. Setting up the next two lanes or approvers is similar.
![]()
In a real-world scenario, the dialog box requesting a vote would not be part of the workflow. The vote would be taken in a UI application and the results sent back to the workflow. A CallExternalMethod activity would send a request to a Windows Forms, email, or other client. A response would then be submitted from the client. A HandleExternalEvent activity would capture this response. This hour uses dialog boxes in place of a more elaborate process to focus on the CAG and not the actual communication wiring method used.
A second approver may or may not be necessary. Therefore the Approver2Lane lane (which holds the second approver) contains a WhenCondition.
Placing a condition on a CAG lane also triggers another change in the way the CAG behaves. Lanes with no conditions execute exactly once, whereas lanes with conditions execute 0 or more times. The CAG’s capability to reexecute lanes is part of its power. You must, however, be aware of it, so that you do not continually request approval from approver2, for instance, in this case.
The next two bullets describe how to ensure approver2 will be requested to approve only when the process calls for approval from approver2 and that this request will happen only once:
![]() Check the approvers
Check the approvers ArrayList defined earlier to see if it contains an entry for Level2Approvers. This is populated once and does not change throughout the process.
![]() To ensure approval is requested once and only once, a couple of variables will be used. The first tallies approvals, and the second rejections. The second approver should not be requested unless the sum of these two variables equals 1, because approval is performed in order. One of these variables will be updated after each approver tallies a vote. Setting the condition to execute only when the sum of these variables is 1 ensures that the
To ensure approval is requested once and only once, a couple of variables will be used. The first tallies approvals, and the second rejections. The second approver should not be requested unless the sum of these two variables equals 1, because approval is performed in order. One of these variables will be updated after each approver tallies a vote. Setting the condition to execute only when the sum of these variables is 1 ensures that the Approver2Lane lane does not execute until after the first Approver1Lane lane completes, and that it does not continue to request a vote over and over.
Follow the next steps to add child activities to the Approver2Lane.
1. Click the Approver2Lane in the CAG filmstrip.
2. Add a Code activity and name it SpawnDialog2.
3. Add an IfElse activity below the Code activity and name it CheckApprover2Vote. Name the left branch Approver2Approves and the right branch Approver2Rejects.
4. Add Code activities to both branches of the IfElse activity and name the one in the left branch Approver2TallyApproval and the one in the right branch Approver2TallyRejection.
Follow the next steps to add code-beside to the activities in the Approver2Lane.
1. Now you’ll set a condition that will determine when and if this lane executes. Click the middle Approver2Lane lane in the filmstrip, select Code Condition from its WhenCondition property drop-down, click + to the left of the Condition property, enter Approver2LaneCondition, and press Enter.
2. Add the following code to the Approver2LaneCondition handler (this is the when condition that evaluates whether the Approver2LaneCondition lane should execute):
e.Result = approvers.Contains("Level2Approvers")
&& numApprovals + numRejections == 1;
3. Add the following comments above the method declaration of the code condition handler you just edited:
//
// Level 2 section
//
// Is level 2 approval required?
4. Double-click the SpawnDialog2 activity above the IfElse activity and enter the following in the handler:
level2Dr = MessageBox.Show
("Level 2 approves the order?", "", MessageBoxButtons.YesNo);
5. Add a Code Condition named level2ApprovalCondition to the left branch of the IfElse activity.
6. Add the following code to the level2ApprovalCondition handler:
e.Result = this.level2Dr.ToString() == "Yes";
7. Double-click the Approver2TallyApproval activity in the left branch of the IfElse activity and enter the following in the handler:
// Tallying approvals
numApprovals++;
Console.WriteLine("Level 2 order approved. Approvals {0}", numApprovals);
8. Double-click the Approver2TallyRejection activity in the right branch of the IfElse activity and enter the following in the handler:
// Tallying rejections
numRejections++;
Console.WriteLine("Level 2 order rejected. Rejections {0}",
numRejections);
That’s it for the Approver2Lane lane.
The CAG is now functional. It will request both level 1 and level 2 votes. There is no level 3 yet.
Follow the next steps to add a Code activity to tally the results and run the workflow.
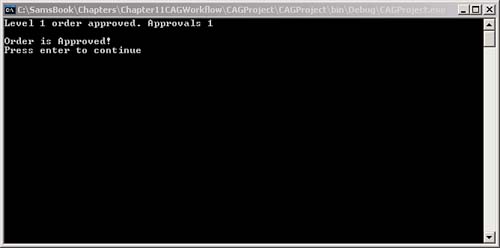
1. Add a Code activity below the CAG activity named DisplayResults that will print success if there are two approvals and rejection if there are fewer than two.
2. Double-click the Code activity and add the following code to its handler:
Console.WriteLine();
if (numApprovals == 2)
Console.WriteLine("Order is Approved!");
else
Console.WriteLine("Order is rejected!");
3. Click the Approver3Lane in the CAG filmstrip and set its Enabled property to false.
4. Run the workflow, and you should see similar results to Figure 11.8. Remember to pause the host if you run the workflow with debugging by adding a Console.Read statement.
This lane mirrors the second lane in that it contains a WhenCondition. However, the condition will evaluate to true only if the first two voters split, creating the need for a tie breaker. This demonstrates how the CAG can be used for additional approval levels and for other items that change mid-process.
You’ll now set up the third lane, which is nearly identical to the second.
Follow the next steps to add child activities to the Approver3Lane.
1. Click the Approver3Lane in the CAG filmstrip and set its enabled property to true.
2. Add a Code activity and name it SpawnDialog3.
3. Add an IfElse activity below the Code activity and name it CheckApprover3Vote. Name the left branch Approve3Approves and the right branch Approver3Rejects.
4. Add Code activities to both branches of the IfElse activity and name the one in the left branch Approver3TallyApproval and the one in the right branch Approver3TallyRejection.
Follow the next steps to add code-beside to the activities in the Approver3Lane.
1. Now you’ll set a condition that will determine when and if this lane executes. Click the Approver3Lane lane in the filmstrip, select Code Condition from its WhenCondition property drop-down, click + to the left of the Condition property, enter Approver3LaneCondition, and press Enter.
2. Add the following code to the Approver3LaneCondition handler to ensure that this lane executes only if there is a tie:
e.Result = approvers.Contains("Level3Approvers")
&& numApprovals == 1 && numRejections == 1;
3. Add the following comments above the method declaration of the code condition handler you just edited:
//
// Level 3 section
//
// Is level 3 approval required?
4. Double-click the SpawnDialog3 activity above the IfElse activity and enter the following in the handler:
level3Dr = MessageBox.Show
("Level 3 approves the order?", "", MessageBoxButtons.YesNo);
5. Add a Code Condition rule named level3ApprovalCondition to the left branch of the IfElse activity.
6. Add the following code to the level3ApprovalCondition handler:
e.Result = this.level3Dr.ToString() == "Yes";
7. Double-click the Approver3TallyApproval activity in the left branch of the IfElse activity and enter the following in the handler:
// Tallying approvals
numApprovals++;
Console.WriteLine("Level 3 order approved. Approvals {0}", numApprovals);
8. Double-click the Approver3TallyRejection activity in the right branch of the IfElse activity and enter the following in the handler:
// Tallying rejections
numRejections++;
Console.WriteLine("Level 3 order rejected. Rejections {0}",
numRejections);
That’s it for the Approver3Lane lane.
The CAG is now complete. It will request both level 1 and level 2 votes. In case of a tie, it will request the third tiebreaker vote. If the first two votes result in two approvals or rejections, no third vote occurs.
Follow the next steps to run the workflow and see the new processing logic with the third lane.
1. Run the workflow, approve at level 1, and approve at level 2. The workflow should complete without requesting level 3 approval.
2. Run the workflow again, approve level 1, and reject at level 2. You should now be requested to perform a level 3 approval. The final approval will match your level 3 choice—it is the tiebreaker.
3. If you like, remove level3Approvers from the approvers ArrayList and you will not be prompted for level 3 approval.
That’s it for the three lane CAG.
In this hour, you experimented with the CAG activity. The CAG activity represents WF’s third workflow authoring style, known as data driven. In this hour’s example, three lanes were each covered by a different WhenCondition variant. The overall CAG did not have an UntilCondition in this example. The CAG is generally considered WF’s most dynamic and flexible workflow style and is well suited for workflows that are data driven. It is also useful when embedded in the other workflows that call for its functionality as part of a larger workflow. It is not as transparent as the other two styles of workflow, because the contents in its lanes are hard to see, so its use should be limited to scenarios that call for it.