
Hour 18 Working with Web Services and ASP.NET Hosting
What You’ll Learn in This Hour:
![]() Exposing a workflow as a web service using the
Exposing a workflow as a web service using the WebServiceInput and WebServiceOutput activities
![]() Calling a web service from a workflow using the
Calling a web service from a workflow using the InvokeWebService activity
![]() Returning SOAP faults via the
Returning SOAP faults via the WebServiceFault activity
![]() A description of how workflows are published as web services
A description of how workflows are published as web services
![]() A description of the
A description of the WebServiceProxy property
![]() Hosting WF in an ASP.NET application
Hosting WF in an ASP.NET application
The first part of this hour walks you through the creation of two workflows. The first is exposed as a web service. The second is capable of calling a web service from a workflow. The second workflow then calls the first to bring it all together. The workflow published as a web service receives a customer ID and then returns approved or rejected. The calling workflow uses an InvokeWebService activity to call the published workflow. It passes the customer ID in the call and receives the results.
The next part of this hour shows you how to use SOAP faults on the service provider and the service consumer.
The third part of this hour discusses the files that are generated when publishing a workflow as a web service. You also learn how to customize communication between the client and the service to add security and other needed components in web service communication.
The fourth and final part of this hour covers hosting WF, or the WorkflowRuntime, in an ASP.NET application.
See Hour 2, “A Spin Around Windows Workflow Foundation,” if you need help creating solutions or projects.
1. Create a new blank solution in the C:SamsWf24hrsHoursHour18WorkingwithWebServicesandAspNet directory and name it WebServiceWorkflows.
2. Add a Sequential Workflow Library project to the solution and name it PublishedWorkflows.
3. Rename Workflow1.cs to PublishedWorkflow.cs.
4. Add a Sequential Workflow Console Application project to the solution and name it CallWebServices.
5. Rename Workflow1.cs to CallWebService.cs.
This section contains a brief summary of what is required to create and publish a workflow as a web service. The activities mentioned will be described shortly. Publishing a workflow as a web service requires using a WebServiceInput activity that is bound to the web service proxy that receives the call from the calling web service. If the web service call is synchronous, there will be a WebServiceOutput activity as well that returns the results to the calling web service. The final two steps are to create an interface that serves as a contract for both the WebServiceInput and WebServiceOutput activities. Finally, you must publish the workflow as a web service.
Let’s now walk through the steps to create and publish a workflow as a web service.
Follow the next steps to create the dependency properties that will hold the CustomerId passed to the web service and the CustomerStatus returned from the web service.
1. Open the PublishedWorkflow in code view.
2. Right-click below the constructor, select Insert Snippet, double-click Other, double-click Workflow, double-click DependencyProperty—Property, name it CustomerId, and press Enter to accept the remaining defaults.
3. Right-click below CustomerId DependencyProperty, select Insert Snippet, double-click Other, double-click Workflow, double-click DependencyProperty—Property, name it CustomerStatus, and press Enter to accept the remaining defaults.
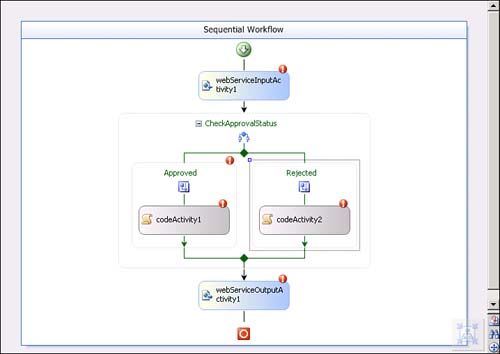
Follow the next steps to model and publish the workflow as a web service. The workflow will receive the call from the web service through the WebServiceInput activity, evaluate the CustomerId, and return approved or rejected depending on which CustomerId is received.
1. Open the PublishedWorkflow in design mode.
2. Add a WebServiceInput activity to the workflow.
3. Add an IfElse activity below the WebServiceInput activity, name it CheckApprovalStatus, name the left branch Approved, and the right branch Rejected.
4. Place a Code activity in each branch of the IfElse activity.
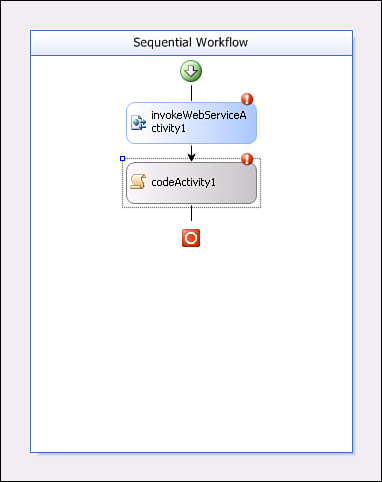
5. Add a WebServiceOutput activity below the IfElse activity. The modeled and unconfigured workflow should look like Figure 18.1.
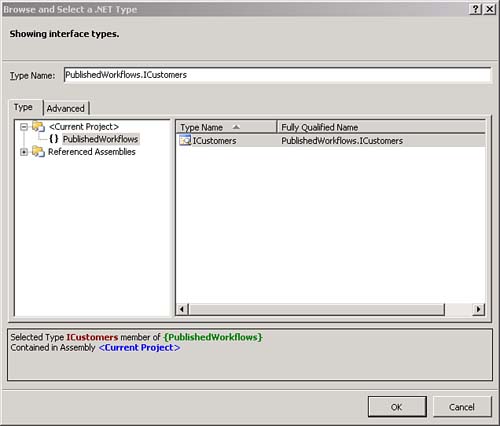
Follow the next steps to create a standard .NET interface, not a WF-specific local service. The interface will contain the method name exposed by the WebServiceInput activity, the value received as a parameter by the WebServiceInput activity, and the value returned by the WebServiceOutput activity. The value returned is expressed as an out parameter.
1. Right-click the PublishedWorkflow project and select Add, New Item; choose Interface, and name it ICustomers.
2. Add the following code to the interface that signifies CustomerId will be sent to the PublishedWorkflow web service, and the CustomerStatus will be returned from the PublishedWorkflow web service.
void CheckCustomer(string CustomerId, out string CustomerStatus);
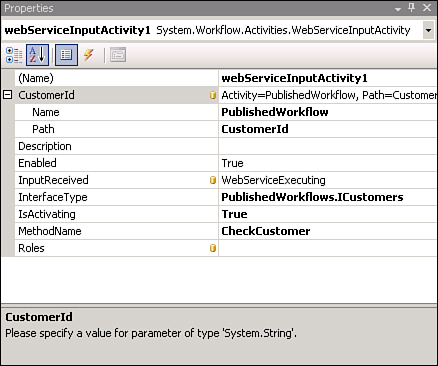
The WebServiceInput activity exposes the workflow as a web service. It receives the method and parameter information from the interface you just created. In addition to configuring method and parameter related information, the IsActivating property and the InputReceived properties must also be set.
Follow the next steps to configure the WebServiceInput activity.
1. Click the WebServiceInput activity, click the ellipsis in its InterfaceType property, click the + next to Current Project, and select the ICustomers interface in the middle of the form, which should look like Figure 18.2.
3. Click the drop-down in the MethodName property and choose the CheckCustomer method.
4. Click the ellipsis in the CustomerId property of the WebServiceInput activity and select the CustomerId property from the list of variables in the dialog. This binds the workflow property value to the activity property.
5. Click the InputReceived property (that points to a handler that is executed when the CheckCustomer method of the web service is called), enter WebServiceExecuting, press Enter, and then enter the following code in the handler to write to the event log the time the CheckCustomer method is invoked:
System.Diagnostics.EventLog.WriteEntry("PublisedWorkflow",
"CheckCustomer method invoked at" + DateTime.Now);
6. Click the drop-down in the IsActivating property and select True. This tells WF that this WebServiceInput activity starts a new workflow instance. There may be WebServiceInput activities on the workflow that receive information mid-process and therefore do not trigger a new workflow instance.
7. The property window for your WebServiceInput activity should now look like Figure 18.3.
Follow the next steps to configure the IfElse activity and its child activities.
1. Click the Approved branch of the IfElse activity. Then click its Condition property, select Declarative Rule Condition, click the + that appears next to the Condition property, and enter ApprovedCustomerRule in the ConditionName property. Click the ellipsis in the ConditionName property, click the Edit button (to update the ApprovedCustomerRule), and enter the following in the dialog box.
CustomerId=="000001"
2. Click OK twice to exit the dialogs.
3. Double-click the Code activity in the Approved branch and enter the following in its handler:
CustomerStatus = "Approved";
4. Double-click the Code activity in the Rejected branch and enter the following in its handler:
CustomerStatus = "Rejected";
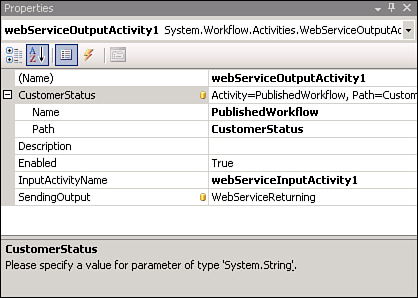
The WebServiceOutput activity is mandatory for all incoming, synchronous web service calls. Its purpose is to return results for the WebServiceInput activity that it is bound to.
If you look at the workflow, you will see a red exclamation mark on the WebServiceInput activity, even though all necessary properties it exposes have been set. This is so because it has yet to be bound to a WebServiceOutput activity, and because this is a synchronous web service (per the interface), being bound is mandatory.
Follow the next steps to configure the WebServiceOutput activity.
1. Click the WebServiceOutput activity, select the drop-down in its InputActivityName property, and select webServiceInputActivity1.
2. Click the SendingOutput property (which points to a handler that is executed when the GetCustomer method of the web service responds), enter WebServiceReturning, press Enter, and then enter the following code in the handler to write to the event log the time that the CheckCustomer method is returning results to the consumer:
System.Diagnostics.EventLog.WriteEntry("PublishedWorkflow",
"CheckCustomer method returning results at" + DateTime.Now);
3. Click the ellipsis in the CustomerStatus property of the WebServiceOutput activity and select the CustomerStatus from the list of variables. Then click OK.
4. The property window for your WebServiceOutput activity should now look like Figure 18.4.
Follow the next steps to publish the workflow as a web service.
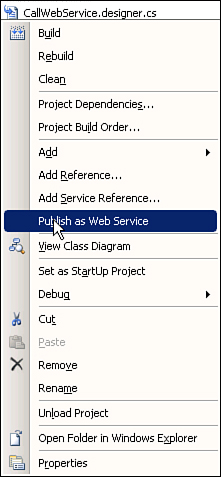
1. Right-click the PublishWorkflow project and select Publish as Web Service, as shown in Figure 18.5.
2. You should see a dialog that says the workflow has been successfully published. If so, click OK. Otherwise, look at any error messages and try to resolve the problem.
3. You should now see a PublishedWorkflows_WebService project in your solution that contains the files shown in Figure 18.6.
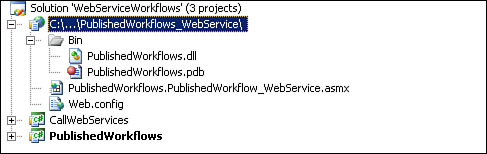
The files are described in the “Exploring Generated Project and Cookie Usage” section later in the hour.
You are going to create a workflow and configure it to call a web service. It will call the workflow you just published as a web service. The workhorse in this section is the InvokeWebService activity that sets off the standard .NET Web Reference wizard that creates a proxy the client can use to call the remote web service.
Follow the next steps to create the CustomerId and CustomerStatus dependency properties. The client workflow sets the CustomerId property, passes it to the service, and receives the CustomerStatus property back from the service.
1. Open the CallWebService code-beside file.
2. Right-click below the constructor, select Insert Snippet, double-click Other, double-click Workflow, double-click DependencyProperty—Property, name it CustomerId, and press Enter to accept the remaining defaults.
3. Right-click below CustomerId DependencyProperty, select Insert Snippet, double-click Other, double-click Workflow, double-click DependencyProperty—Property, name it CustomerStatus, and press Enter to accept the remaining defaults.
Follow the next steps to place an InvokeWebService activity and a Code activity on the workflow. Because of the way the web reference wizard works, you will also partially configure the InvokeWebService activity.
1. Open the CallWebService workflow in design mode.
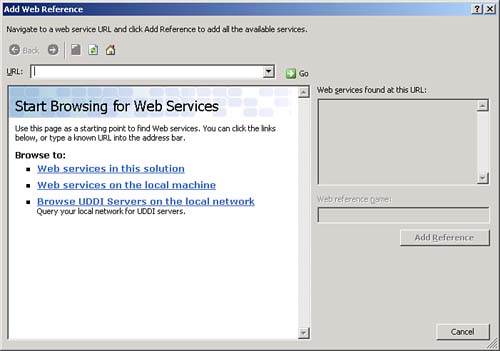
2. Add an InvokeWebService activity, and you will see the standard .NET Add a Web Reference dialog shown in Figure 18.7.
3. Click the web service in this solution link in the middle of the form.
4. Click the PublishedWorkflows.PublishedWorkflow link.
5. Click the AddReference button (leave the default localhost web reference name) and ignore the namespace warning if you receive one.
6. Add a Code activity below the InvokeWebService activity.
Follow the next steps to complete configuring the InvokeWebService activity.
1. In the invokeWebServiceActivity1, click the drop-down in the MethodName property and select the CheckCustomer method.
2. Click the ellipsis in the ReturnValue property of the InvokeWebService activity and select the CustomerStatus property. Then click OK.
3. Enter 000001 into the CustomerId property to hard-code this value to the property.
4. Double click the Code activity and add the following to its handler:
Console.WriteLine("The customer is " + CustomerStatus);
Follow the next steps to pause the host and run the workflow.
1. Modify Program.cs in the CallWebServices project to pause the host. If you need help, see Hour 3, “Learning Basic Hosting.”
2. Set the CallWebServices project as the startup project, and press F5 to run the solution. The customer will be approved, as shown in Figure 18.9.
3. Enter a different value in the CustomerId property and run the solution. This time the customer will be rejected.
You learned the very basics of invoking a web service from a workflow and publishing a workflow as a web service in the previous section. In this section you will learn about some of the more advanced topics: SOAP faults, web service publisher generated files, and using the WebServiceProxy object. SOAP faults will be covered in a hands-on lab typical of this book. The other two topics will be summarized only, with the intent of pointing you in the right direction. This balance was chosen because although the latter two are advanced topics, being aware of them is important because they are frequently important parts of real-world applications.
You will modify the PublishedWorkflow to check for CustomerIds with a length of 0. When a CustomerId with a length of 0 is found, a SOAP fault will be sent to the calling workflow. To enable this, a new IfElse activity named CheckForFaults is added to the workflow and the existing CheckApprovalStatus is added to the left branch of the new CheckForFaults IfElse activity. A SOAP fault is thrown if the length of the CustomerId is 0.
The WebServiceFault activity does not throw an exception in the workflow that it occurs in. It sends an exception to the calling workflow. Therefore, a workflow will continue executing in its normal sequential path after processing a WebServiceFault activity. You should use a Throw activity to throw an exception if you want internal WF exception handling to be triggered.
The calling workflow must catch the exception and handle it. Therefore, the workflow published as a web service throws a fault, and the fault is returned to the client workflow as a SOAP exception. Finally, the client workflow must catch and handle the exception.
Follow the next steps to reconfigure the workflow to process SOAP faults.
1. Add an IfElse activity to the PublishedWorkflow above the current CheckApprovalStatus IfElse activity and name it CheckForFaults.
2. Drag and drop the existing CheckApprovalStatus IfElse activity into the left branch of the CheckForFaults IfElse activity you just placed on the workflow.
3. Drag and drop the WebServiceOutput activity already on the workflow and place it in the left branch of the CheckForFaults IfElse activity below the CheckApprovalStatus IfElse activity.
4. Add a WebServiceFaultActivity to the right branch of the CheckForFaults IfElse activity.
5. Add a Code activity below the WebServiceFault activity and add the following code to its handler (which, a bit counterintuitively, will be executed even though it follows the WebServiceFaultActivity):
System.Diagnostics.EventLog.WriteEntry("PublishedWorkflow",
"After SOAP Fault " + DateTime.Now);
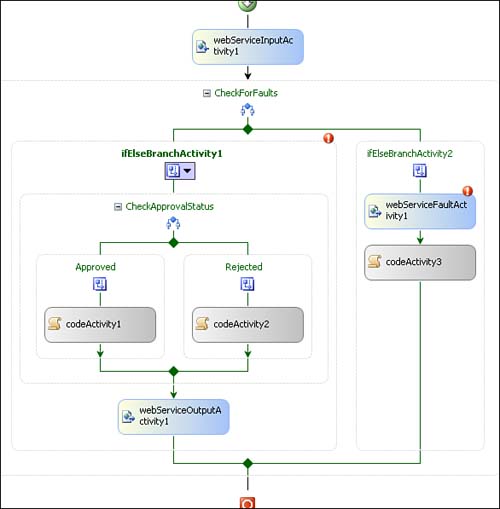
In the first version of the workflow, there was one WebServiceInput activity and one WebServiceOutput activity. They were a singular pair that always completed with execution of the WebServiceOutput activity (barring an exception). Now things are a bit more complex because the WebServiceFault activity is also a valid partner to the WebServiceInput activity. When a WebServiceInput activity is partnered with both a WebServiceOutput activity and a WebServiceFault activity, it is up to you to model the workflow so that exactly one will execute on a given workflow instance.
If processing works, the results must be returned to the calling workflow via the WebServiceOutput activity. If processing does not work, they must be returned via the WebServiceFault activity. That is why we placed one of these activities in the left branch of the CheckForFaults IfElse activity and the other in the right branch.
The WebServiceFault activity contains two primary properties: InputActivityName and Fault. The first is the WebServiceInput activity it partners with. The second is a variable of type exception. The last property, SendingFault, is an optional handler you can use to log or perform other tasks when the WebServiceFault activity executes.
Follow the next steps to configure the WebServiceFault activity.
1. Go to the code-beside file of the PublishedWorkflow and enter the following code below the constructor to create a variable of type exception:
public Exception ex = new Exception();
2. Click the ellipsis in the Fault property of the WebServiceFault activity and select the ex property. Then click OK.
3. Click the drop-down in the InputActivityName property and choose the webServiceInputActivity1 property.
Follow the next steps to configure the NullCustomerRule.
1. Click the drop-down in the Condition property of the left branch of the IfElse activity, select Declarative Rule Condition, click the + that appears next to the Condition property, and enter NullCustomerRule in the ConditionName property. Click the ellipsis in the ConditionName property, click the Edit button (to update the NullCustomerRule), and enter the following in the dialog box:
this.CustomerId.Trim().Length != 0
2. Click OK to close all open dialogs.
No additional soap fault activities need to be added to the client workflow. It simply must be able to receive and handle a SOAP fault. Remember to switch to the client workflow. Follow the next steps to configure the client workflow to receive a SOAP fault.
1. Go to the code-beside file of the CallWebService workflow and enter the following code below the constructor to create a variable of type exception:
public Exception ex = new Exception();
2. Right-click the CallWebService workflow away from any activity and select View Fault Handlers.
3. Add a FaultHandler activity to the filmstrip near the top of the FaultHandlers activity.
4. Set its FaultType to SOAPException by clicking the ellipsis, selecting System.Web.Services, SOAPException, and clicking OK.
5. Add a Code activity to the FaultHandler and add the following to its handler:
Console.WriteLine("Workflow faulted");
See Hour 16, “Working with Exceptions, Compensation, and Transactions,” for instructions on extracting more information from the exception.
Follow the next steps to run the solution with the newly configured SOAP faultenabled workflow.
1. Right-click the workflow and select View SequentialWorkflow.
2. Click the InvokeWebService activity, enter 000001 in the CustomerId property, and run the solution. Approved should be returned, as it was when you ran the workflow previously.
3. Delete the content in the CustomerId property and run the solution. This time you will see the fault message you just entered in the console window (Figure 18.11).

The Publish as Web Service Wizard created an ASP .NET Web Service project, which can be published as a website to your chosen version of IIS. First, you learn about cookie usage, and then each of the project files are summarized (as seen earlier in Figure 18.6).
WF workflows exposed as web services may run for long periods of time and therefore persist, as is the case with any workflow. The runtime needs the workflow instance ID to reinstate a workflow. Therefore, the client must store and forward the workflow instance ID. By default, this is achieved through the use of client-side cookies that hold the workflow instance ID. The WorkflowWebHostingModule (referenced in the Web.config file) module routes the workflow instance ID between the client cookie and the workflow web service. If client cookies are not permitted, you must use custom SOAP or HTTP handlers to add a key to the SOAP header to exchange the workflow instance ID, which is not covered in this book.
The Web.config file contains two sections related to WF. The first is contained in the WorkflowRuntime section, where the ManualWorkflowSchedulerService and DefaultWorkflowCommitWorkBatchService runtime services are added. The first sets the threading operations to better fit the IIS host that runs workflows published as web services (described in Hour 17, “Learning Advanced Hosting”). The second controls transactions. The second relevant section contains a reference to the aforementioned WorkflowWebHostingModule module.
As with a typical .NET web service, this file contains a reference to the web service class.
WF activities have the capability to produce source code as part of the activity programming model (which is briefly discussed in Hour 20, “Creating Basic Custom Activities”). The WebServiceOutput activity takes advantage of this capability to produce a proxy object. Unlike most proxy generators on .NET, however, there is only a DLL produced; there is no source code.
One problem with the generated code is that it embeds http://tempuri.org as the namespace. This is a problem because of the lack of source code. Fortunately, at least two workarounds exist. The first is to create your own proxy class that derives from WorkflowWebService, which communicates between the workflow and the web service and starts the runtime. The second involves changing the Registry to not delete the source and then manually modifying the namespace. Although neither of these topics is covered in this book, some resources follow.
The following link is to a blog entry that contains the source code to build a web service workflow proxy that derives from WorkflowWebService. Looking at it offers the added bonus of showing you what happens under the hood when you publish a workflow via the Publish as Web Service Wizard.
www.request-response.com/blog/PermaLink,guid,21c95c2c-63d7-44f6-8357-1be0ecb6f264.aspx
The next link contains directions to change the Registry and manually change the proxy source code.
Our client workflow is connected to the workflow web service through a web reference. It communicates via HTTP and does not perform any type of authentication. If you do need to perform authentication, set the URL dynamically, encrypt the transmitted data, access Web Service Enhancements 3.0, or perform any of a number of other functions, you can use the WebServiceInvokeActivity.WebServiceProxy property. We will not completely perform any of these tasks but I will show how to access the WebServiceProxy property.
You can access the WebServiceProxy property from the Invoking property of the InvokeWebService activity. You cast the InvokeWebServiceEventArgs.WebServiceProxy passed into the handler to the web reference name plus the workflow (localhost.PublishedWorkflow_WebService in this case).
Follow the next steps to explore the WebServiceProxy property.
1. Enter InvokeWebServiceInvoking in the Invoking property, and enter the following code in the handler to generate the URL at runtime:
(e.WebServiceProxy as localhost.PublishedWorkflow_WebService).Url =
"http://mydoman.com/workflowwebservice.asmx";
2. Enter a period (.) before the .URL to see the many items available to you from the WebServiceProxy. All these properties are available to you when communicating to a web service.
Again, the WebServiceProxy property will be essential to you in many real-world applications. This concludes its brief coverage here.
You can also call a workflow from an ASP.NET application. The workflow then provides the “logic” on behalf of the ASP.NET application. IIS is a stateless server architected to provide high scalability. It also manages resources, including threads, stringently. Therefore, in most cases you should use the ManualWorkflowSchedulerService, as described earlier in this hour (and in detail in Hour 17, “Learning Advanced Hosting”) to run workflows synchronously on the same thread used by the ASP.NET application.
Although ASP.NET applications are stateless, the WorkflowRuntime should be started only once during the ASP.NET application’s lifecycle to avoid the hit that would be incurred if was instantiated on each page request. Therefore, you will load it in the Gloabal.asax page.
This section covers running a workflow (or more specifically, hosting the WorkflowRuntime) in an ASP.NET application. This is different than calling a workflow published as a web service. Doing the latter involves calling a web service. Therefore, the rules for calling a workflow published as a web service from an ASP.NET application are largely the same as calling any other web service from an ASP.NET application.
![]()
Most of the underlying logic used to host a workflow in ASP.NET is explained in previous hours that cover hosting. See Hour 3, “Learning Basic Hosting” for an introduction to hosting and Hour 17 for more advanced coverage, including details on the scheduling service used in this section to run workflows in ASP.NET.
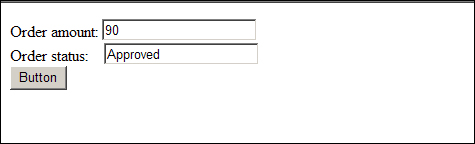
In this section you open an existing solution that already has a workflow. The workflow checks whether the order amount that you will pass in from the host form you will create is less than 100. If so, the order is approved; otherwise it is rejected. The workflow has two properties, OrderAmount and OrderStatus. The first, the OrderAmount, is sent from the host web form you create to the workflow in a Dictionary object. It is then evaluated by the workflow. The second, the OrderStatus is updated by the workflow to either approved or rejected, subject to the workflow’s evaluation. The workflow completed handler implemented by the host retrieves the OrderStatus. The result is displayed on the web form you create.
Follow the next steps to open the solution and add the ASP.NET project.
1. Open the AspNetHostingSolution in the C:SamsWf24hrsHoursHour18WorkingwithWebServicesandAspNetAspNetHostingSolution directory.
2. Add an ASP.NET Web Application project, which can be found by expanding C# and Web. Name the project AspWfRuntimeHost.
3. Add a reference from the AspWfRuntimeHost project to the workflow trio: System.Workflow.Activities, System.Workflow.ComponentModel, and System.Workflow.Runtime. Then add a reference to the AspNetHostedWorkflowProject.
The WorkflowRuntime is instantiated and configured in the Global.asax OnStart handler. The instantiated WorkflowRuntime is stored to an application level variable so that it can be accessed throughout the ASP.NET application. The WorkflowRuntime is also configured to use the ManualWorkflowSchedulerService.
Follow the next steps to instantiate the WorkflowRuntime in the Global.asax file.
1. Right-click the AspWfRuntimeHost in Solution Explorer and select Add, New Item, Web, Global Application Class, and click Add.
2. Open the Global.asax file in code view and add the following using directives:
using System.Workflow.Runtime;
using System.Workflow.Runtime.Hosting;
3. Enter the following code in the Application_Start handler to start the WorkflowRuntime and to store it to an application variable:
WorkflowRuntime workflowRuntime = new WorkflowRuntime();
Application["WorkflowRuntime"] = workflowRuntime;
4. Enter the following code to configure the WorkflowRuntime to use the ManualWorkflowSchedulerService and to configure the service to restart when timers expire (Delay activities), and to create an application level variable to hold the scheduler service:
ManualWorkflowSchedulerService manualScheduler =
new ManualWorkflowSchedulerService(true);
Application["ManualScheduler"] = manualScheduler;
workflowRuntime.AddService(manualScheduler);
workflowRuntime.StartRuntime();
5. The completed Application_Start handler should look like Listing 18.1.
LISTING 18.1 WorkflowRuntime Started in Application_Start Handler
WorkflowRuntime workflowRuntime = new WorkflowRuntime();
Application["WorkflowRuntime"] = workflowRuntime;
ManualWorkflowSchedulerService manualScheduler =
new ManualWorkflowSchedulerService(true);
Application["ManualScheduler"] = manualScheduler;
workflowRuntime.AddService(manualScheduler);
workflowRuntime.StartRuntime();
6. Add the code shown to the Application_End handler to stop the WorkflowRuntime.
WorkflowRuntime workflowRuntime;
workflowRuntime = Application["WorkflowRuntime"]
as WorkflowRuntime;
workflowRuntime.StopRuntime();
Follow the next steps to create the ASP.NET form that will start the workflow instance.
1. Open Default.aspx in design view by right-clicking it in the Solution Explorer and selecting View Designer.
2. Add two TextBox controls and a Button to the form. Then enter Order amount: to the left of the first textbox and Order status: to the left of the second. Your form should now look like Figure 18.12.
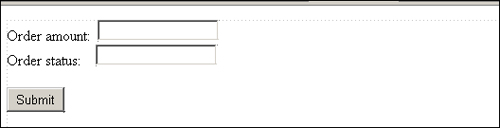
3. Set the ID property of the first TextBox to TextBoxOrderAmount and the second to TextBoxOrderStatus. Change the property of the Button to Submit.
Follow the next steps to configure the SubmitButton handler to start a WorkflowInstance and to send data to it in a Dictionary object. The main differences compared to hosting in a Windows Forms or Console application as you have done throughout this book are that the WF runtime and scheduling services are retrieved from the application variables you created, and the RunWorkflow method is called to start the workflow because the manual scheduling service is used.
1. Double-click the Submit button to create a handler for it. First add the following using directives:
using System.Workflow.Runtime;
using System.Workflow.Runtime.Hosting;
using System.Collections.Generic;
2. Add the following code the Submit_Click handler you just created to create and populate a Dictionary object with the order amount:
Dictionary<string, object> parameters =
new Dictionary<string,object>();
parameters.Add("OrderAmount",
double.Parse(TextBoxOrderAmount.Text.ToString()));
3. Add the following code to retrieve the WF runtime and manual scheduler from the application variables you created. Then it instantiates both the WF runtime and manual scheduler.
WorkflowRuntime workflowRuntime =
Application["WorkflowRuntime"] as WorkflowRuntime;
ManualWorkflowSchedulerService manualScheduler =
Application["ManualScheduler"] as
ManualWorkflowSchedulerService;
4. Add the following code to register the completed event handler with the runtime:
workflowRuntime.WorkflowCompleted +=
new EventHandler<WorkflowCompletedEventArgs>
(workflowRuntime_WorkflowCompleted);
5. Add the following code to instantiate a WorkflowInstance, pass it the Dictionary object, and to start the instance:
WorkflowInstance instance =
workflowRuntime.CreateWorkflow(
typeof(AspNetHostedWorkflowProject.Workflow1), parameters);
instance.Start();
6. Now add code to run the workflow via the scheduler services RunWorkflow method. This step is necessary because the manual scheduling service is being used.
manualScheduler.RunWorkflow(instance.InstanceId);
7. Add the workflow completed event handler below the Submit button handler. It will populate the order status text box with the order approval status returned from the workflow:
void workflowRuntime_WorkflowCompleted
(object sender, WorkflowCompletedEventArgs e)
{
TextBoxOrderStatus.Text =
e.OutputParameters["OrderStatus"].ToString();
}
8. The code to start the workflow instance from an ASP.NET application should look like Listing 18.2.
LISTING 18.2 WorkflowInstance Started in ASP.NET Application
protected void Submit_Click(object sender, EventArgs e)
{
Dictionary<string, object> parameters =
new Dictionary<string, object>();
parameters.Add("OrderAmount",
double.Parse(TextBoxOrderAmount.Text.ToString()));
WorkflowRuntime workflowRuntime =
Application["WorkflowRuntime"] as WorkflowRuntime;
ManualWorkflowSchedulerService manualScheduler =
Application["ManualScheduler"] as
ManualWorkflowSchedulerService;
workflowRuntime.WorkflowCompleted +=
new EventHandler<WorkflowCompletedEventArgs>
(workflowRuntime_WorkflowCompleted);
WorkflowInstance instance =
workflowRuntime.CreateWorkflow(
typeof(AspNetHostedWorkflowProject.Workflow1), parameters);
instance.Start();
manualScheduler.RunWorkflow(instance.InstanceId);
}
void workflowRuntime_WorkflowCompleted
(object sender, WorkflowCompletedEventArgs e)
{
TextBoxOrderStatus.Text =
e.OutputParameters["OrderStatus"].ToString();
}
Follow the next steps to run the workflow and see the results returned to the form.
This hour demonstrated publishing workflows as web services and calling web services from workflows. Then the ability to return SOAP fault from the called workflow was added and the client workflow was configured to receive the SOAP fault. The project structure and the WebServiceProxy property were covered next. Finally, the hour wrapped up with a lesson on hosting the WF runtime in ASP.NET.