
Now that you know how to plan, build, and run a Microsoft Expression Web Web site, the only areas that remain are publishing and managing the Web site. Publishing a Web site is the process of copying all of the files that make up a Web site to a predetermined destination, while managing a Web site is the process of administering the day-to-day maintenance, which includes viewing reports and creating, assigning, and performing tasks.
You can publish copies of your Web site content files, and also copies of additional Expression Web files. However, it will require the server to display pages and perform Web functions. Using Publishing view, you can publish an entire Web site or individual files. Expression Web can publish to any Web server running any version of the FrontPage Server Extensions (FPSE).
Expression Web also provides tools to help you make sure your Web site adheres to HTML and Accessibility industry standards. You can use Compatibility Reports to check the compatibility of your code to make sure your Web site works properly and complies to standards and rules, and you can use Accessibility Reports to check the compatibility of your Web site for the accessibility of users with disabilities.
Expression Web provides a collection of reports to help you manage your Web site. With Expression Web, you can generate reports on a wide variety of on-site activities, including a site summary, files, shared content, and problems. In the Files area, you can find out the age of all files, who is assigned to them, when they were last edited, and when they first appeared on your site. In the Problems area, you can produce reports on maintenance problems, such as large pages (big files download slowly) or pages containing broken hyperlinks. You can view any of the reports using the Site submenu on the View menu. While you’re viewing a report, you can sort information by category, filter information by category values, and edit individual entries.
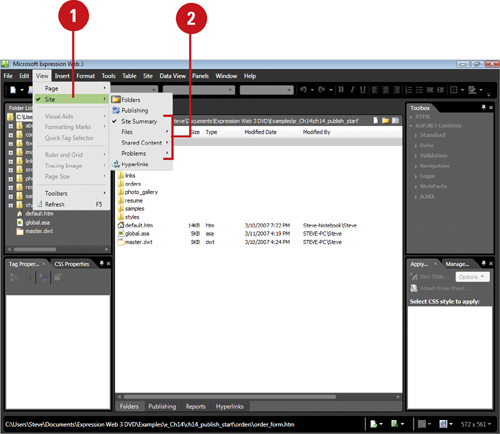
 Click the View menu, and then point to Site.
 Point to a command or submenu to display a list of reports.
Site Summary. Displays an overview of your site’s vital statistics, from number of files to number of hyperlinks.
Files. Access reports: All Files, Recently Added Files, Recently Changed Files, Older Files, and Checkout Status.
Shared Content. Access reports: Dynamic Web Templates, Master Pages, and Style Sheet Links.
Problems. Access reports: Unlinked Files, Slow Pages, and Hyperlinks.
 Click a report. The report opens.
 To open other reports from within Reports view, click the list arrow at the left of the Reports View toolbar.
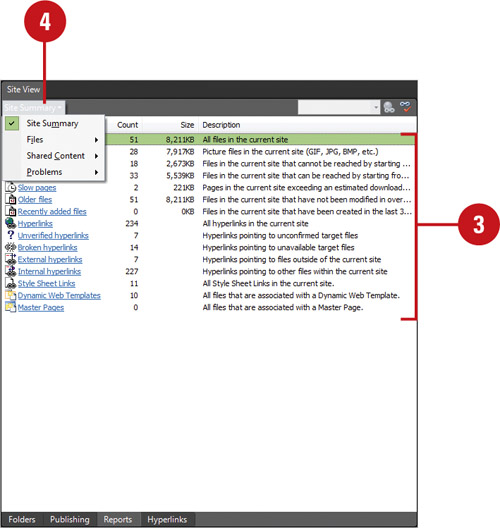
- Click the View menu, point to Site, point to a submenu to display a list of reports, and then click a report.
- To sort choices in a report by the information in a column (Name, Title, etc.), click the column heading.
- To filter a report by a specific column values, click the list arrow next to the column header, and then select a filter method.
All. Removes a filter already in place.
Custom. Opens the Custom AutoFilter dialog box, where you can apply a filter using two conditions.
- To edit a field in a report, click the report line, click the field, and then edit the field or select an option from a list.

See Also
See “Customizing Reports View” on page 370 for information on changing the information gathered in Reports view.
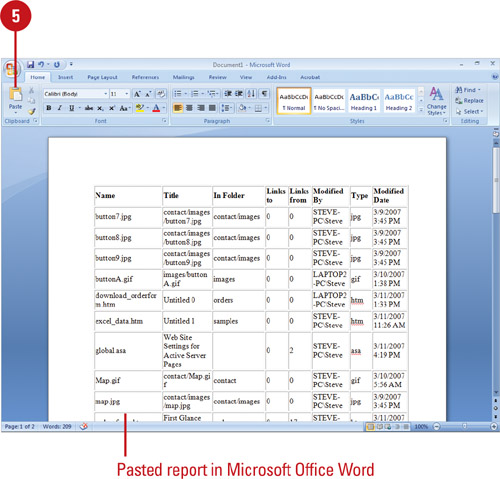
After you create a site report, you can save or copy the data to HTML or into other Microsoft programs, such as Microsoft Office Word or Excel, which is helpful for sharing and saving the report information. You save a report as an HTML file in the same way you save a Web page. If you want to use report data in another program, you can quickly copy the report, switch to the other program, and then paste it.
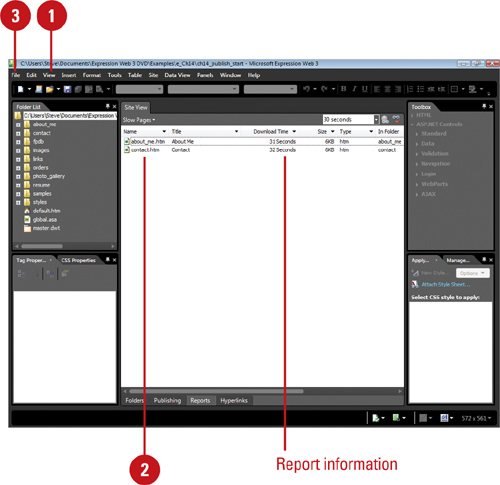
- Click the View menu, point to Site, point to a submenu to display a list of reports, and then select the report you want to save.
- Modify the report to display the information you want.
- Click the File menu, and then click Save As.
- Navigate to the drive and folder location where you want to save the Web site report.
 Type a name for the report file.
 Click Save.
- Click the View menu, point to Site, point to a submenu to display a list of reports, and then select the report you want to save.
- Modify the report to display the information you want.
- Right-click anywhere in the report, and then click Copy Report.

- Switch to the program where you want to copy the information.
- Click to place the insertion point, and then click the Paste button on the toolbar or right-click the location, and then click Paste.
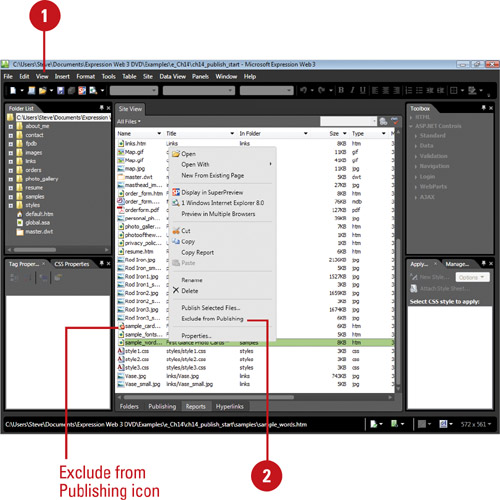
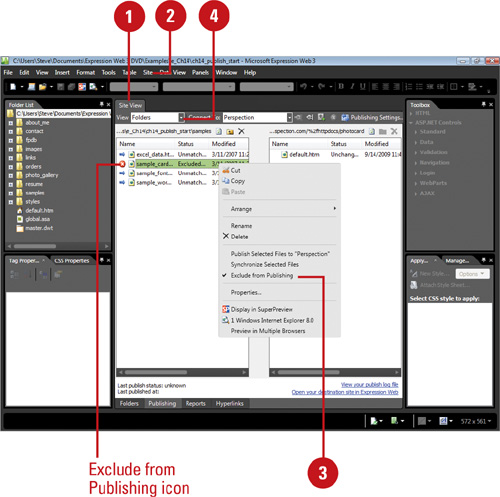
Before you publish your Web site, it’s a good idea to check the publishing status of your site files. Some files may not be ready to publish on the Web. By default, all Web pages are marked “Publish,” unless you change it. If a Web page is not ready, you can mark it “Exclude from Publishing,” which adds a red x to the file icon. You can use the All Files report to quickly review the marked files on your Web site and prevent you from accidentally publishing pages before they are ready.
- Click the View menu, point to Site, point to Files, and then click All Files to display the files you want to mark.
- Right-click the file you want to change, and then click Exclude from Publishing.
- To unmark a file to publish, right-click the file you want to change, and then click Exclude from Publishing to deselect the check mark.
Expression Web can help to check the compatibility of your Web site for the accessibility of users with disabilities. The Accessibility Checker checks your Web site to determine whether it meets industry-wide accessibility standards against WCAG and Section 508 requirements and provides a comprehensive report of the results. Priority 1 problems need to be corrected for a Web page to be compliant. Priority 2 problems should be fixed, but not essential. After you check for accessibility problems, the results appear in the Accessibility panel, where you can review and fix any problems, and generate an HTML report.
- Click the Tools menu, and then click Accessibility Reports.
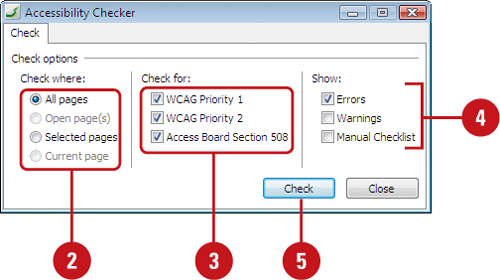
- Click the option to specify which pages you want to search.
- Select or clear the Check for check boxes you want to include or exclude.
- Select or clear the Show check boxes you want to include or exclude.
Errors. Shows priority 1 accessibility problems.
Warnings. Shows possible accessibility problems.
Manual Checklist. Lists the general requirements for the selected standards.
- Click Check.
- In the Accessibility panel, right-click inside the pane, point to Arrange, and then select the arrangement type you want.
 To correct a problem, double-click the entry to open the page, where you can correct the code.
 To generate an HTML report, click the Generate HTML Report button.
 When you’re done, click the Close button in the panel.
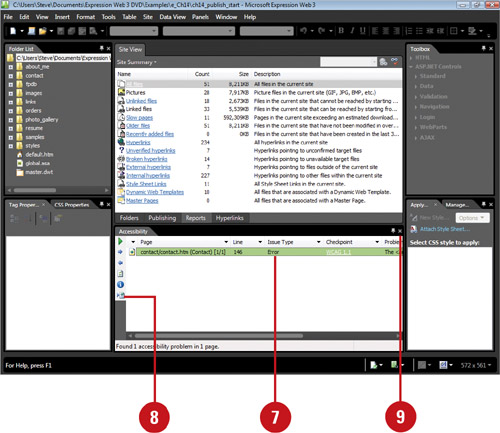
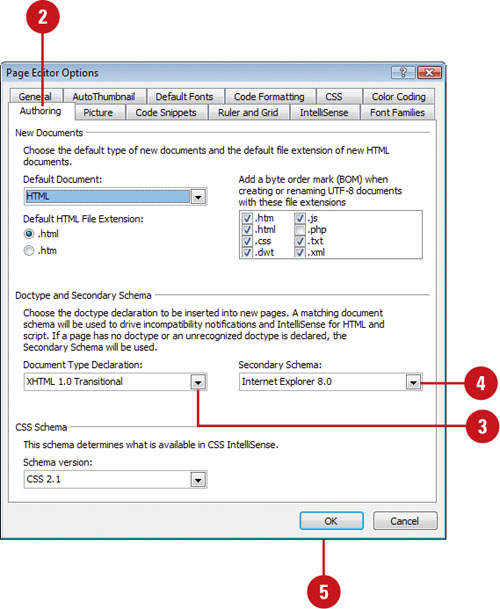
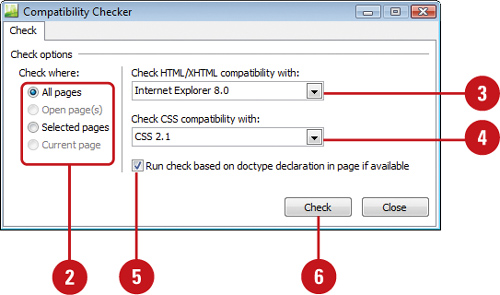
Expression Web can help to check the compatibility of your code to make sure your Web site works properly and complies to standards and rules. Expression Web uses the specified doctype declaration (such as XHTML 1.0 Transitional rules; the latest standard) to determine compatibility, which appears at the top of HTML pages. If a doctype doesn’t exist, Expression Web uses a secondary schema, which is a set of rules that defines the elements and content used in an HTML document. In the Page Editor Options dialog box, you can select the Document Type Declaration and Secondary Schema standards you want. In Code view, invalid code appears with a red underline, while errors in code appear in yellow. When you point to it, a ScreenTip appears, informing you of the problem. After you create your site, you can check pages and CSS files—internal and external—for code errors and compatibility issues with the doctype and CSS schema you select. Results appear in the Compatibility panel, where you can view and fix problems and generate an HTML compatibility report.
- Click the option to specify which pages you want to search.
- Click the Check HTML/XHTML compatibility with list arrow, and then select the schema you want to check incompatibility against.
- Click the Check CSS compatibility with list arrow, and then select the CSS version you want to check internal and external CSS against.
- If you have a doctype declaration on your pages, select the Run check based on doctype declaration in page if available check box.
- Click Check.
The Compatibility panel opens.
- To correct a problem, double-click the entry to open the code page, where you can correct the code.
- To sort or filter the results, use the following:
Sort the Results. Click the name of the column in which you want to sort. To reverse a sorted list, click the name of the column again.
Filter the Results. Click the down arrow next to the column heading, and then select the criterion to filter the results.
- To generate an HTML compatibility report in Design view, click the Generate HTML Report button.
 When you’re done, click the Close button in the panel.???
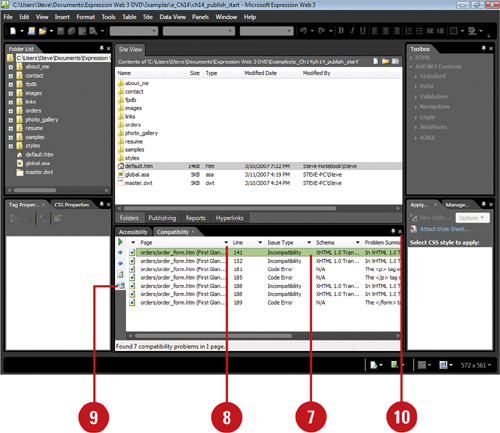
Sometimes Web developers leave things in Web pages, such as comments, whitespace, and other HTML attributes, which have no value to visitors. Expression Web allows you to optimize your HTML code when you publish a Web site or Web page or when you are working on a page in Design view. Optimizing HTML code makes the code easier to read and faster to download on the Web. Expression Web is more aggressive optimizing individual pages in Design view. If the changes cause problems you can undo the change.
- Open the Web site you want to publish, click the Site menu, and then click Site Settings.
- Click the Publishing tab.
- Select the Optimize HTML during publishing check box.
- Click Customize.
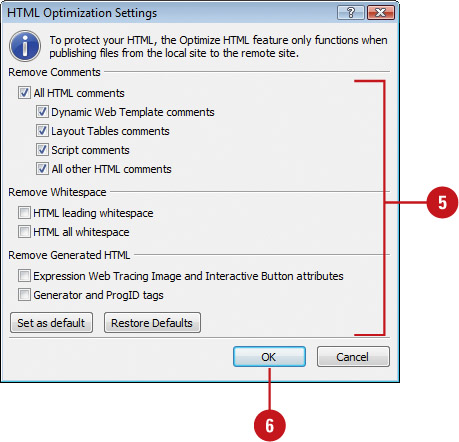
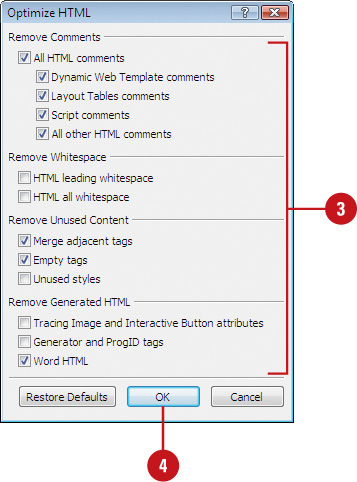
- Click the options you want. Some of the common ones include:
All HTML comments. Select to remove all comments; selects all the comments check boxes.
HTML Whitespace. Select either check box to remove leading or all whitespace.
HTML Generated. Select either check box to remove generated HTML tags or Web tracing image and interactive button attributes.
- Click OK.
- Click OK.
- Open the Web page in which you want to optimize in Design view.
- Click the Tools menu, and then click Optimize HTML.
- Select the check boxes with the settings you want to optimize. Some of the common options include:
All HTML Comments. Select to remove all comments; selects all the comments check boxes.
Merge Adjacent Tags. Select to combine multiple tags into one.
Empty Tags. Select to remove tags with no content.
Unused Styles. Select to remove unused styles.
Word HTML. Select to remove extra HTML elements from Microsoft Word.
- Click OK.
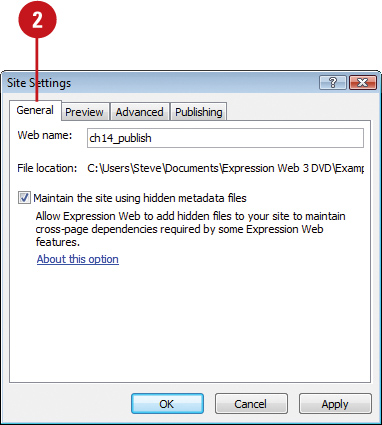
Expression Web provides the Site Settings dialog box to specify options that affect an entire Web site. The dialog box contains five tabs including General, Preview, Advanced, and Language. The General tab allows you to change the Web site name, configure the use of metadata. Metadata is used by Dynamic Web Templates and Expression Web to maintain hyperlinks between pages, which is stored in hidden folders (that begin with _vti). The Preview tab provides options to configure the way your Web site previews in a browser. The Microsoft Expression Development Server allows you to locally preview PHP and ASP.NET Web pages without having to install server software. You can specify a PHP executable for previewing PHP pages for typical use or a specific Web site. The Advanced tab specifies the script language used for form field validation, determines whether or not to show hidden files and folders, and allows for the deletion of temporary files. The Language tab specifies the language used for server messages and defines the encoding used for Web pages.
- Click the Site menu, and then click Site Settings.
- Click the General tab.
Type a name for the Web site.
To allow Expression Web to add hidden files to your site, select the Manage the Web site using hidden metadata files check box.
- Click the Preview tab.
If you want to preview PHP or ASP.NET Web pages on your local computer, click the Preview using Web site URL option, select the Microsoft Expression Development Server check box, and then click the For only PHP and ASP.NET Web pages or For all Web pages option.
The For all Web pages option allows you to check non-PHP and ASP.NET pages too.
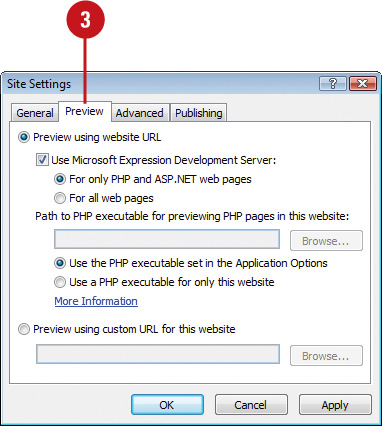
Expression Development Server provides PHP and ASP.NET support on your computer for development purposes; it gets installed with .NET Framework 3.5 or later.
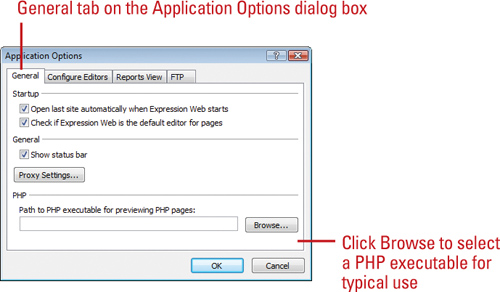
For PHP pages, click the Use a PHP executable for only this website option, and then click Browse to select a PHP executable to use; or click the Use the PHP executable set in the Application Options option, and then click Browse on the General tab of the Application Options dialog box to select a default PHP executable for typical use; click the Tools menu, and then click Applications Options.
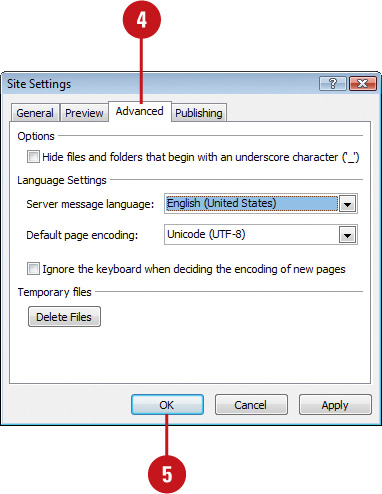
- Click the Advanced tab.
Select the Hide files and folders that begin with an underscore character (‘_’) check box to hide them or deselect it to show them.
Select the language you want for server-side messages.
Select the default page encoding (for character set compatibility) you want to use. The default for HTML encoding is Unicode (UTF-8).
To delete temporary files created by Expression Web, click Delete Files.
- Click OK.
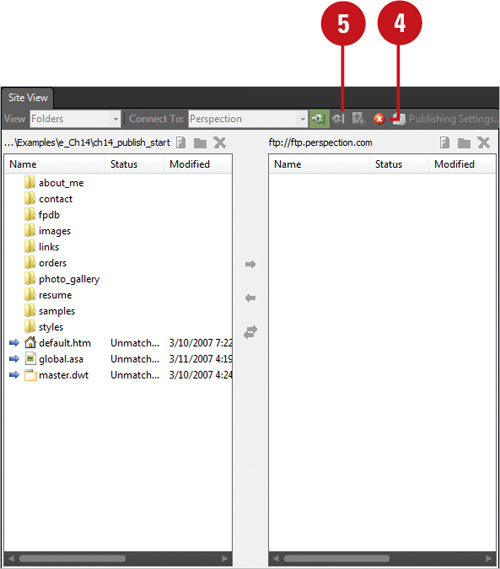
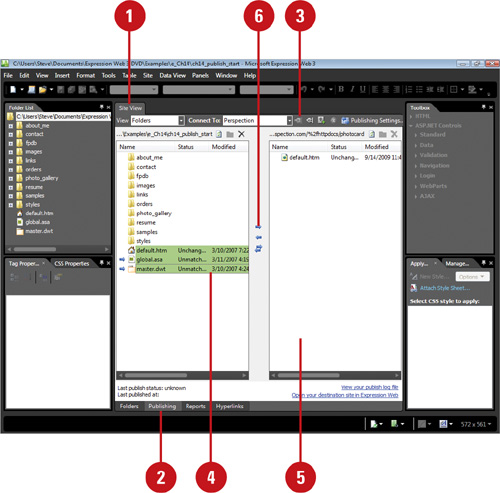
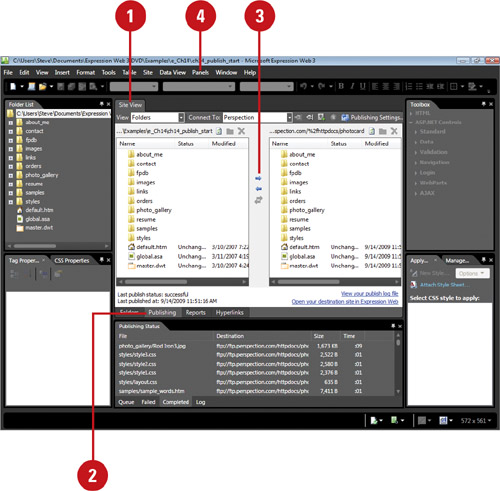
The Publishing view allows you to compare the content of the current local Web site and a target remote Web site. Typically, the local Web site contains the development version of a site and the remote Web site on a Web server contains the “live” site on the Internet. Using Publishing view (New!), you can publish an entire Web site or individual files. You can add multiple Web sites for publishing (New!). If you display Publishing view for a site you have not published, a blank window appears with the message “Add a publishing destination...” You can publish your files to a Web site with FTP (File Transfer Protocol), SFTP (Secure Shell File Transfer Protocol, FTPS (File Transfer Protocol over Secure Sockets Layer), FrontPage Server Extensions, WebDAV (Distributed Authoring and Versioning), or Windows file system.
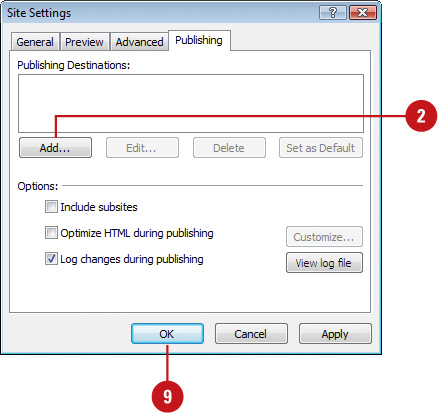
- Click the Site menu, and then click Publishing Settings.
The Site Settings dialog box opens, displaying the Publishing tab.
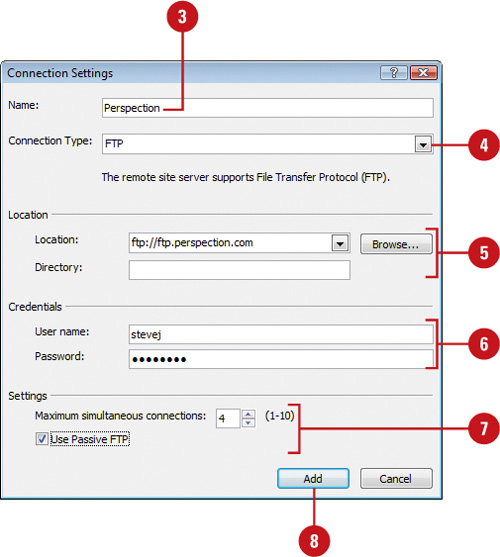
- Click Add.
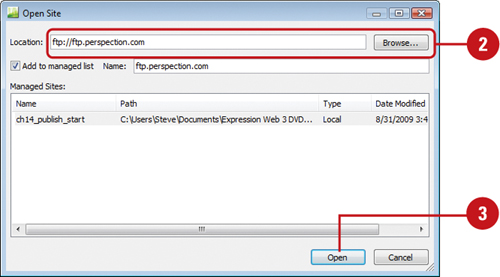
- Type a name for the remote Web server location.
- Click the Connection Type list arrow, and then click the option with the remote Web server type in which you want to publish your files.
FTP. The site supports File Transfer Protocol (FTP); use ftp://URL and the directory path.
SFTP. The site supports Secure Shell File Transfer Protocol (SFTP); use sftp://URL and the directory path.
FTPS. The site supports File Transfer Protocol over Sockets Layer (FTPS/SSL); use ftps://URL and the directory path.???
FrontPage Server Extensions. The site is running FrontPage Server Extensions; use http://URL.
WebDAV. The site supports WebDAV; use http://URL.
File System. The site resides on a local or network drive; use C:MyWeb or \ServerMyWeb.
- Type the remote Web site location or use Browse to select it.
- Type the user name and password to access the Web server location.
- Select any of the available options, which vary depending on the settings:
Maximum number of simultaneous connections. (New!) This option sets the number of simultaneous connections to the same site you can establish, which reduces the publishing time by transferring several files at once, instead of one at a time. Check with your ISP for number of simultaneous connections you can use.
Use Passive FTP. This option depends on the network; some work with the option enabled, while others work with it disabled.
- Click Add.
- Click OK.???
See Also
See “Customizing FTP Options” on page 371 for information on using the Use Passive FTP option.???
Expression Web allows you to maintain multiple remote Web site locations for publishing (New!). For example, you can create a publishing location for main site and another for testing. On the Publishing tab of the Site Settings dialog box, you can add, edit, or delete one or more publishing sites, known as destination. If you consistently publish to a specific site, such as your main site, you can set it as the default, so you can quickly connect to it when you want. In Publishing view, the default publishing destination is selected, however, you can always choose another from your publishing destinations list.
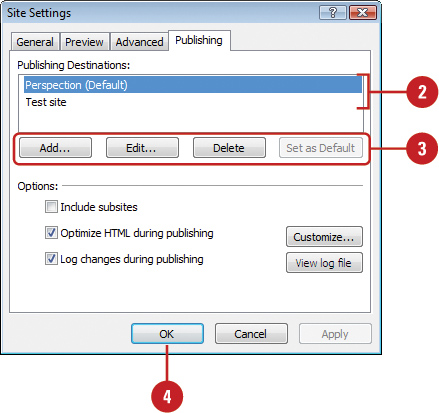
- Click the Site menu, and then click Publishing Settings.
The Site Settings dialog box opens, displaying the Publishing tab.
- Select the site you want to work with.
- Click any of the following buttons:
Add. Click to add another remote publishing Web site. When you’re done, click Add.
Edit. Click to edit the selected remote publishing Web site. When you’re done, click Save.
Delete. Click to remove the selected remote publishing Web site; make sure you want to delete the site. This option is not undoable if you click Cancel.
Set as Default. Click to mark the selected remote publishing Web site as the default when you establish a connection.
- Click OK.
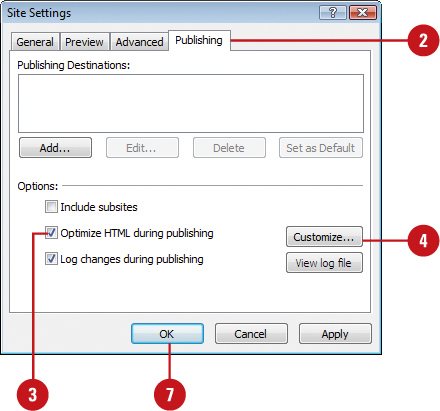
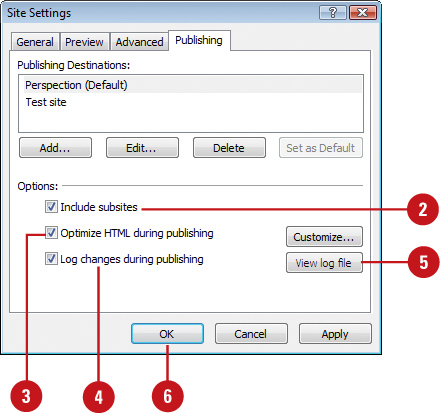
In addition to creating multiple publishing destinations, you can also use the Publishing tab in the Site Settings dialog box to set other publishing options (New!). You can set options to publish all Web sites contained within the main Web site, optimize HTML code during the publishing process to display Web pages faster, and keep a log of changes.
- Click the Site menu, and then click Publishing Settings.
The Site Settings dialog box opens, displaying the Publishing tab.
- To publish all Web sites contained within the main Web site, select the Include Subsites check box.
- To optimize HTML code during the publishing process, select the Optimize HTML during publishing check box, and then click click Customize to set specific options to remove comments, whitespace, or generated HTML.
- To keep a log of changes, select the Log changes during publish check box.
- To display the log for the most recent publish operation, click View log file.
- Click OK.
See Also
See “Optimizing HTML Before Publishing” on page 348 for more information on setting options in the HTML Optimization Settings dialog box.
Before you can publish your Web site to a Web server, you need to establish a connection to the computer on the Internet. In Publishing view (New!), you can select the site you want to access, and then establish a connection. If you decide not to establish the connection, you can use the Stop button to cancel it. When you’re finished with the connection, you can disconnect it. Web allows you to maintain multiple remote Web site locations for publishing. Typically you work on a local site and then transfer your files the remote site. However, if you need to work directly on the remote site, you can connect to it.
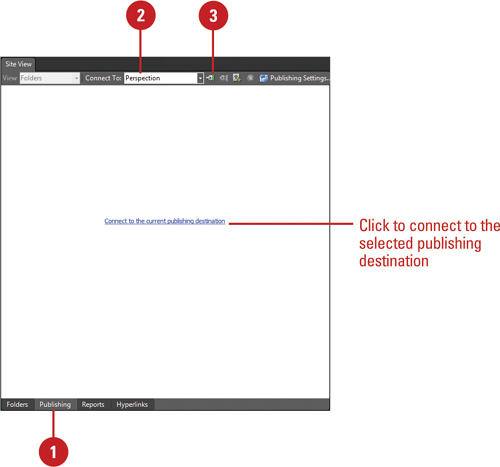
- Click the Site menu, and then click Publishing, or click the Publishing tab in Site View.
Publishing view appears.
- Click the Publishing destinations list arrow on the toolbar, and then click the site you want.
The default publishing destination appears when you switch to Publishing view.
- To connect to the selected publishing destination, click the Connect button on the toolbar.
If you’re not connected to a site, you can also click the Connect to the current publishing destination link on the blank page in Publishing view.
- To stop a connection during the connection process, click the Stop button on the toolbar.
- To disconnect from the current site, click the Disconnect button on the toolbar.
- Click the Site menu, and then click Publishing, or click the Publishing tab in Site View.
Publishing view appears.
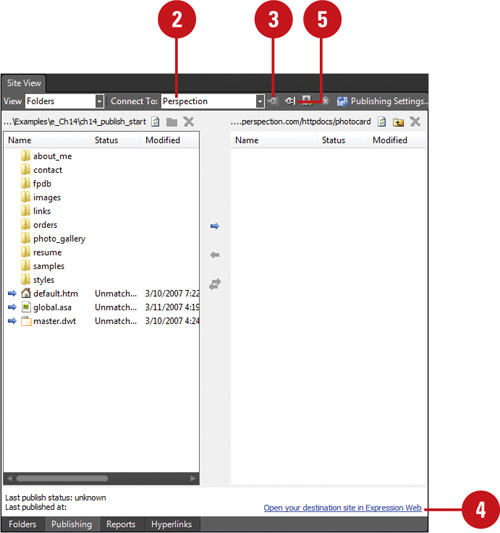
- Click the Publishing destinations list arrow on the toolbar, and then click the site you want.
- Click the Connect button on the toolbar.
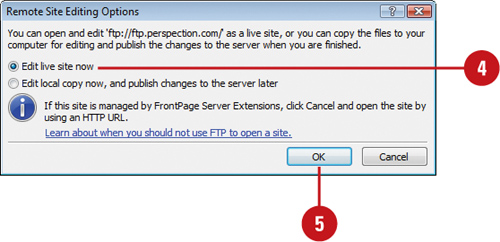
- To work directly on a remote production server using WebDAV or FrontPage Server Extensions, click the Open your destination site in Expression Web link.
- To disconnect from the current site, click the Disconnect button on the toolbar.
Publishing a Web site refers to the process of copying all of the files that make up a Web site to a predetermined destination. In Expression Web, you typically publish your site for one of two reasons. The first reason is to launch the site on either a company intranet (a network limited to members of a specific group, usually a business) or on the World Wide Web. The second reason is to back up the site on either your computer or a network drive. Using Publishing view in Expression Web, you can publish all your Web files, only those that have been edited, or individual files. You can publish your Web files to a folder on your local or network drive, or on a Web server. When you publish a site, Expression Web maintains all the hyperlinks.
- Open the Web site you want to publish.
- Click the Site menu, and then click Publishing, or click the Publishing tab in Site View.
- Click the Connect button on the toolbar to connect to a Web server.
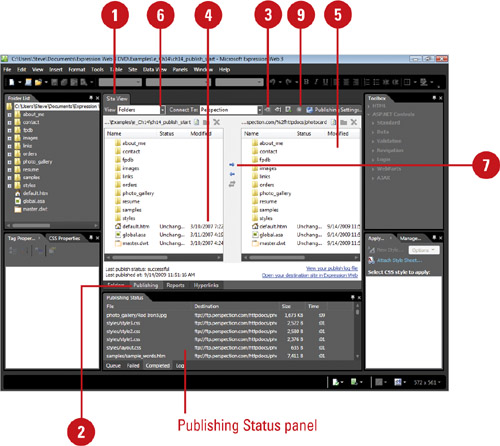
- Display the folder with the local Web site.
- Display the folder with the remote Web site.
- To view only specific files, click the View list arrow, and then select a view option: Folders, All Files, Changed Files, Excluded Files, or Files in Conflict.
- Click the Publish files to the destination site button (the Right Arrow (-->) button) between the two Web sites.
The Publishing Status panel opens, displaying status information.
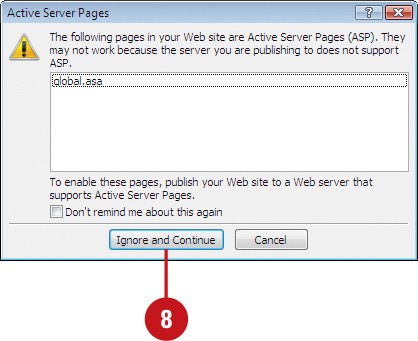
- If a file conflict occurs, a dialog box appears, click Ignore and Continue, Overwrite Remote Files, or Cancel.
- To stop the process, click the Stop button on the toolbar.
In addition to publishing an entire Web site, you can also publish individual files and folders. Instead of waiting for Expression Web to compare all the files to find the one or two you changed, you can quickly select the files and publish them. When you are working on a large Web site, publishing individual files gives you the control you need and saves times.
- Open the Web site you want to publish.
- Click the Site menu, and then click Publishing, or click the Publishing tab in Site View.
- Click the Connect button on the toolbar to connect to a Web server.
- Display the folder with the local Web site and select the Web page you want to publish.
- Display the folder with the remote Web site.
- Click the Publish files to the destination site button (the Right Arrow (-->) button) between the two Web sites.
- If a file conflict occurs, a dialog box appears, click Ignore and Continue, Overwrite Remote Files, or Cancel.
Historically, a site that does not periodically update its material will not attract many repeat visitors. Housekeeping, therefore, is a crucial component of Web maintenance. You can opt to publish only those files that have been edited or altered in some way. Expression Web can compare the files in the working site on your local computer to the published files on the server, and determine if changes have been made on each file. If it detects a more recent version on your computer, that’s what gets published. You can also choose which files you don’t want to publish. For example, if a page is incomplete, not directly part of your Web site, or simply out-of-date, you can mark the file as Exclude from Publishing. If you have multiple developers working on pages, the local and remote sites might become different. You can synchronize files from the remote site. In addition to publishing files, you can also delete the ones you no longer want, and then refresh the screen as needed to view the updated results of the operation.
- Open the Web site you want to update, and then modify the Web pages you want to update.
- Click the Site menu, and then click Publishing.
An arrow appears next to files that need to be updated.
- To mark a file as don’t publish, select the files you don’t want to publish, right-click one of the files, and then click Exclude from Publishing.
A small stop sign icon appears next to the file.
- To view only specific files, click the View list arrow, and then select a view option: Folders, All Files, Changed Files, Excluded Files, or Files in Conflict.
- Click the publishing option you want to use.
Local To Remote. Copies changed files from the local to the remote site. Click the Publish files to the publishing destination button (the Right Arrow (-->) button).
Remote To Local. Copies changed files from the remote to the local site. Click the Get files from the publishing destination button (the Left Arrow (<--) button).
Synchronize. Copies all remote files to local. Click the Synchronize files between the publishing source and the publishing destination button (the Right/Left Arrow (<-->) button).
The Publishing Status panel opens, displaying status information.
- To stop the process, click the Stop button on the toolbar.
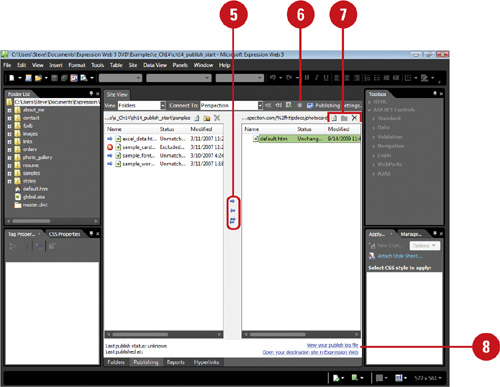
- Use any of the buttons above the Local or Remote site panes to manage it:
Refresh. Click the Refresh button to redisplay the files.
Up One Level. Click the Up One Level button to view the parent folder.
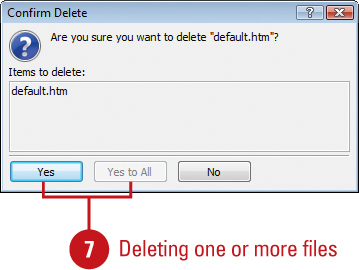
Delete Files. Select the files or folders you want to remove, click the Delete button, and then click Yes or Yes to All.
- To view a log of the publishing operation, click the View your publish log file link.
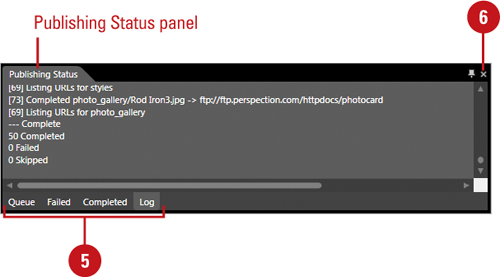
When you start the publishing process from a local site to a Web server site, the Publishing Status panel (New!) opens, displaying status information about the operation. You can also manually open the Publishing Status panel from the Panels menu. The Publishing Status panel displays the files to be published (Queue), the files that failed, the files that completed, and a log with statistics.
- Open the Web site you want to publish.
- Switch to Publishing view, connect to the publishing destination, display the local site, and if you desire, select specific files you want to publish.
- Click the Publish files to the destination site button (the Right Arrow (-->) button) between the two Web sites.
- If necessary, click the Panels menu, and then click Publishing Status.
The Publishing Status panel opens, displaying status information.
- Click any of the following tabs to get publishing information:
Queue. Displays the files to be published.
Failed. Displays the files that failed to be published.
Completed. Displays the files that successfully published.
Log. Displays a log of completed, failed, and skipped files.
- Click the Close button on the Publishing Status panel.
If you’re working on a Web site with a team of people, a source control system can help you manage Web site files and minimized the risk of one person inadvertently deleting the changes of someone else. Source files are stored in a source control system repository, where team members check files out to a working folder on their computer, make changes to them, and then check them back in to the main repository. When files are checked back in, information about the change is recorded by the team member so others can view the status. By following the check out/check in process and documenting changes, an entire team can securely work together on the development of a Web site.
Expression Web 3 supports the Team Foundation source control system (New!). Before you can use it, you need to install the following software available on the Web at www.microsoft.com in the order listed: Microsoft Team Explorer 2008, TFS patch (VS90SP1-KB960881-x86), and Visual Studio 2008 SP1.
After you complete the software installation, you need to create a Team Foundation workspace before you can use the source control system in Expression Web.
 Click the Start menu, click All Programs, point to Microsoft Visual Studio 2005, point to Visual Studio Tools, and then click Visual Studio Command Prompt.
 Type the following to create a directory where you want to store your personal copy of the files in the server:
 mkdir path Type:
Type: cddir path Type the following, where servername is the name of your Team Foundation Server:
 tf workspace / new /s:servername In the Add Workspace dialog box, check the name, and then click OK.
After you create a Team Foundation workspace, you can create a new site in the source control system.
- In Expression Web, click the Site menu, and then click New Site to create a new site or click Open Site to use an existing site.
- Browse to a location in the project workspace and create the new site.
- In the Folders panel, right-click the root folder, and then click Add to Source Control.
To add one or more files to the source control, select the file(s) in the Folders panel, right-click the selection, and then click Add to Source Control.
After you add the site files to the source control system, you can start to work with the files. Before you check files out and in, you need to make sure it’s the latest version. If you’re not sure about the changes in a files, you can view it’s history.
To get the latest version of a file or site, right-click the file or root folder in the Folders panel, and then click Get Latest Version.
To check out a file, right-click the file in the Folders panel, and then click Check Out for Edit.
To check in a file, right-click the file in the Folders panel, and then click CheckIn.
To view an informational history of a file, right-click the file in the Folders panel, and then click View History. In the dialog box, select a version and click Details to see more information, click View to see file as it was in that earlier version. Select two version and click Compare to see what changed between the two version.