
Expression Web is part of the Microsoft Expression Studio, which also includes Expression Design, Blend plus Sketchflow, and Encoder. Expression Design is a professional illustration and graphic design tool that lets you build compelling elements for both Web and desktop application user interfaces. Expression Blend plus Sketchflow is a professional design tool that allows you to create engaging, Web-connected, user experiences for Windows. Sketchflow allows you to quickly prototype a Blend project. Expression Encoder is a program that allows you to prepare your edited video projects for use and playback on the Web in Silverlight media applications. If you don’t have the Expression Studio software, you can purchase and download it online at www.microsoft.com/expression or you can download trial versions of each program and take them for a test drive.
The Expression Studio programs work together to create graphics and organize media for use on the Web. In terms of a process, you can use Expression Design to create vector and bitmapped graphics for use in Expression Blend and Expression Web.
Expression Blend and Expression Encoder allow you to create Silverlight media applications, which you can insert into Web pages with Expression Web and display in a Web browser with the Microsoft Silverlight cross-browser, cross-platform plug-in. Microsoft Silverlight is an exciting new technology that helps you design, develop, and deliver media-enabled experiences and rich interactive applications for the Web. Expression Studio also installs SDK (Software Development Kit) files, which are important if you’re an application developer that uses Expression Blend and Expression Encoder. You can access the SDK files on the Start menu along with the other Microsoft Expression Studio programs.
Expression Design is a professional illustration and graphic design tool that lets you build compelling elements for both Web and desktop application user interfaces.
Expression Design 3 (New!) provides extensive drawing tools that lets you create vector and bitmapped graphics for use in other programs, such as Expression Web, Expression Blend, or Microsoft Office. Vector graphics are comprised of anchor points connected to each other by lines and curves, called vectors. Because they are general descriptions of the coordinates of a shape, they are resolution-independent; that is they can be resized without any loss to the quality of the graphic. Bitmapped graphics are made up of small, colored squares, called pixels that form a grid. Because of this, bitmaps are dependent on resolution (the number of pixels in the grid). Resizing up or down forces pixels to be created or removed to accommodate the new grid size, which can result in a loss of image quality.
Before you can create or edit a graphic in Expression Design, you need to open or create one, known as a document. With an open document, you can explore the user interface in Expression Design.
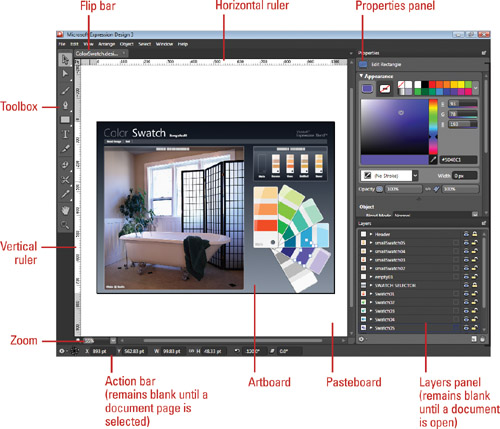
You can either open an existing graphic or create one of your own. You can use the Open command on the File menu to browse and select the graphic you want to change. To create your own graphic, you open a new document and specify an artboard size and resolution. A blank new document window appears, where you can create your art work, known as the artboard. You can also use the area outside the artboard, known as the pasteboard, to work with graphic elements. Anything on the pasteboard, including overlapping elements, doesn’t appear in the graphic.
 Click the Start button, point to All Programs, click Microsoft Expression, and then click Expression Design 3 (New!).
 Click the File menu, and then click New.
 Enter a name for the document.
 Click the Presets list arrow, and then select an artboard size, or enter a width and height.
 Enter a resolution value for the type of graphic you want to create (96 ppi is the standard for on-screen display; 72 ppi is standard for Web graphics; and 220 ppi is a minimum for print graphics).
 Click OK.
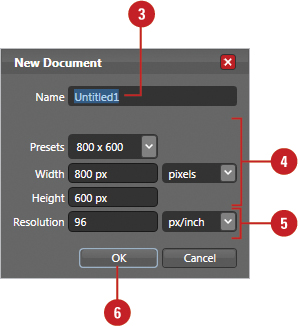
A frame appears, displaying the artboard.

You can navigate around the Document window in Expression Design by using scroll bars and several tools in the Toolbox. The Pan tool (hand) allows you to scroll in any direction within the document, while the Zoom tool (magnifying glass) increases or decrease the view magnification size. You can also use the Zoom list arrow to select a specific view size or command, such as Fit to Screen. As you work with a graphic, you use the other tools in Toolbox to select all or part of a graphic, draw with a paintbrush (create bitmapped graphics), draw with a pen (create vector graphics), create shapes, add text, add fill and gradient effects, modify vector paths, and use color and attributes in different places. A tool icon with a small triangle in the lower-right corner represents a tool group, which means there are more tools available; click and hold to access them. In addition, you also use two basic panels: Properties and Layers. The Properties panel provides easy access to graphic options relating to Appearance, Object, Edit, and Effects based on the current selection. The Layers panel provides easy access and control over the graphic parts, also called objects, displayed as individual transparent layers in the Document window.
- Click the Start button, point to All Programs, click Microsoft Expression, and then click Expression Design 3 (New!).
- Click the File menu, click New, use the default settings and then click OK.
- Click the Window menu, and then click Layer to hide the panel, so you can view the Properties panel.
- Click and hold the Rectangle tool in the Toolbox, and then click the Polygon tool.
- Change the Points slider to 5 in the Create Polygon category of the Properties panel.
- Change the Inner Depth slider to 50%.
 Change the Twirl Angle slider to 10%.
 In the artboard, drag to draw a star shape.
When you release the mouse, the drawing appears in the artboard.
 Click the Selection tool in the Toolbox.
 Click the edge (the stroke or path) or a filled area of the object to select it.
 With the object selected, you can perform any of the following:
Move. Drag the edge of the object.
Resize. Drag one of the corner resize handles. Hold down the Shift key to maintain proportion.
Rotate. Point outside one of the corner resize handles to display a curved double arrow cursor, and the drag.
 Click the Fill icon in the Appearance panel.
 Click a color box or a point in the color spectrum. In the color spectrum, drag the black arrows to change the color range.
 To fill the object with a gradient (fade from one color to another), image or none, click the option you want (next to the color boxes).
 Click the Stroke icon in the Appearance panel, and then adjust the brush stroke and width:
Brush Stroke. Click the Brush Stroke list arrow, and then select the stroke you want to apply from the gallery.
Brush Width. Change the Width slider.
 In the Object panel, specify options to apply color blending mode effects and fill rules to objects and joint, caps, and dashes to strokes.
 Click the File menu, click Save, specify a name and location, and then click Save.

Microsoft Expression Encoder is a stand-alone video encoding—a process to compress/optimize for maximum quality—and live broadcasting program that helps you prepare and save video clips to the Web for playback using Microsoft Silverlight or Windows Media Player.
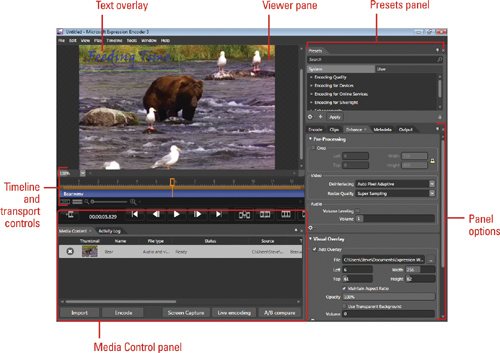
The Expression Encoder window provides four areas to work in: Viewer pane, Timeline and transport controls, Media Content panel, and various settings panels, which include Presets, Encode, Clips, Enhance, Metadata and Output. The Viewer pane displays video images and allows you to zoom in and out. The timeline and transport controls allows you to manually control playback, add a leading or trailer video, view and adjust markers, and trim the video points. The Media Content panel lists imported videos along with the Video information bar, displays an activity log, and encodes your video to create a Silverlight application. The Presets panel provides preset options for ease of use and allows you to save your settings. The Encode, Clips and Enhance panels provide options to modify encoding and video profiles, import and modify overlay images, and attach leaders and trailers. The Metadata panel provides options to add metadata information, import and edit scripts and markers. The Output panel provides options to create a Silverlight or Windows Media output file.
Expression Encoder is also used by Expression Web to insert Silverlight videos (New!). If you have other kinds of video, you can encode and insert it as a Silverlight video into a page. You can insert videos as Silverlight in a variety of formats: WMV (Windows Media Video), AVI (Audio Video Interleave), MPG, ASF (Advanced Systems Format), DVR-MS (Microsoft Digital Video Recording), MPEG, and TS (Transport Stream for MPEG). To insert a video, open the Web page you want to use in Expression Web, click the Insert menu, point to Media and then click Silverlight Video, select the video file, click Open, specify the following options in the Insert Silverlight Video dialog box, and then click Encode:
Encoding. Sets the encoding profile.
Destination. Sets the folder location to store related output files.
Template. Sets the display for the video controls and output.
Width and Height. Sets the dimensions for the encoded file.
Other options. Set various options, including the following: Automatically start video when cued, Automatically cue video when page is loaded, and Enable player popout.
Stretch Mode. Sets the resize mode to fit dimensions of the video.

You start working with Expression Encoder by creating an encoding session, called a job. A job is a collection of one or more videos or audios that you can modify—add markers, trim, add overlays, or attach a leader or trailer—and save as a file to create the output you want. A job file consists of an XML description of the job settings and references to the imported source media. After you complete your job changes, you need to set encoding options, known as profiles, for each video in the job. You can create your own profile (PRX), or use a default profile provided by Expression Encoder. When your profiles are all set, you can encode your job with one of the built-in Silverlight templates (created in Expression Blend), which provide graphically rich skins and interactivity, or as a high-quality Windows Media video (WMV) file. As an additional option, you can also encode live media that you can stream over the Web using Live Encoding mode.
- Click the Start button, point to All Programs, click Microsoft Expression, and then click Expression Encoder 3 (New!).
- Click the Import button in the Media Content panel to start a new job file or click the File menu, and then click Open Job to use an existing job file.
- To use a standard set of preset options, click an expand arrow for a category as needed, click a preset, and then click Apply. Common presets include:
Encoding Quality. Balanced, Best Quality, or Fastest.
Encoding for Online Services. Facebook, Vimeo, or YouTube.
Encoding for Silverlight. H.264, IIS Smooth Streaming, or VC-1.
Enhancements. Expression Bumper, Sample Overlay, or Silverlight Trailer.
- To save your settings as a preset, click the Create new user preset button, enter a name, select the options you want, and then click OK.

- Click the Encode tab, and then select an encoding profile options for video and audio.
- To view and work with video clips, click the Clips tab.
- Click the Enhance tabs, and then select an overlay file and add a leader or trailer (both optional).
- Click the Metadata tab, and then enter metadata information and make any adjustments to markers.

- To encode with Silverlight, click the Output tab, click the Template list arrow, select a template, and then select any other job output options; skip this step to encode as a WMV file.
- Click the Encode button in the Media Content panel for all items, or right-click a video, and then click Encode Selected Item.
- Click the File menu, and then click Save. For a new job file, specify a name, and then click Save.

Did You Know?
You can capture video and graphics from your computer screen. With Microsoft Expression Encoder 3 Screen Capture program, installed by default with Expression Studio 3, you can record all your on-screen actions. This includes video and audio as well as images. Click the Start button, point to All Programs, click Microsoft Expression, and then click Microsoft Expression Encoder 3 Screen Capture. Click the Edit Options button, select the options you want, and then click OK. Click the Record button, capture video or an image, and then click the Stop button. In the Review window, preview/play video, save the capture, or launch Expression Encoder.
Expression Blend is a professional design tool to create engaging, interactive, Web-connected user experiences. With Expression Blend 3 (New!), you can create or modify a Windows Presentation Foundation (WPF) or Silverlight based media application. You can insert a Silverlight application into a Web page with Expression Web and display it in a Web browser with the Microsoft Silver-light cross-browser, cross-platform plug-in.
When you create an application, known as a project, in Expression Blend, the program generates XAML code (in the background), which is a declarative markup language used by the Silverlight browser plug-in. XAML is similar to HTML, yet more powerful and extensible.

Expression Blend uses three views: Design, XAML, and Split. Design view, also known as the artboard, is where you visually create your project. XAML view is where Blend generates XAML code based on what you create in Design view. If you have some experience with XAML code, you can make adjustment directly in XAML view. Split view displays a split screen with Design view at the top and XAML view at the bottom.
When you create a new project in Expression Blend, the program creates a main canvas, also known as a page in Design view, in XAML, which is designed to contain position shapes and controls. Every object you create is positioned within the main canvas, including other canvas objects. The main canvas and other canvas objects have individual properties, which you can change using the Properties panel and the Object and Timeline panel.
After you finish creating your project in Expression Blend, you can test it to see how it works. As you test your project, you can use the Results panel—available using the Window menu—to see if there are any errors that you need to debug and fix. If you like what you see, you can build it for insertion in a Web page using Expression Web.

Project Solution
You can start working with Expression Blend (by opening an existing project or creating a new one. You use the tools in Toolbox to select an object, draw with a paintbrush (create bitmapped graphics), draw with a pen (create vector graphics), create shapes, add text, add fill and gradient effects, and use color and other attributes in different places. A tool icon with a small triangle in the lower-right corner represents a tool group, which means there are more tools available; click and hold to access them. After you create an object, you can use the Properties panel to modify it.
- Click the Start button, point to All Programs, click Microsoft Expression, click Expression Design 3 (New!), and then click Close to the Welcome Screen, if necessary.
- Click the File menu, and then click New Project.
- Click a Silverlight icon, and then specify a name, location, and language.
- Click OK.

A new blank project appears within the Document window.
- Click LayoutRoot in the Objects and Timeline panel.
- Click the Properties tab.
- Click the Solid Color Brush tab, and then select a color from the color spectrum to change the background.

Timesaver
If you can’t find a property in the Properties panel, you can use the Search box at the top to help you locate it.
See Also
See “Working with Silverlight Media” on page 162 for information on Microsoft Silverlight.
- Click the Rectangle tool in the Toolbox.
A [Rectangle] object appears in the Objects and Timeline panel.
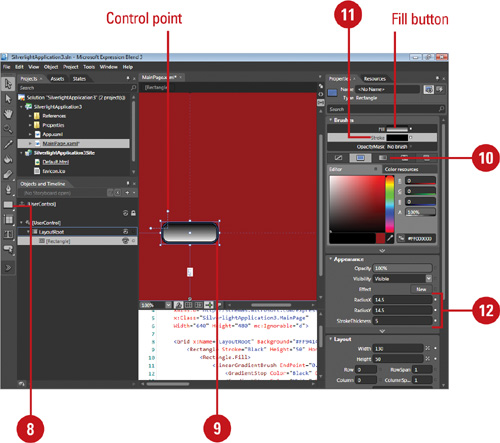
- Drag a rectangle in the artboard to the size you want, and then drag a control point to round the corners.
The rectangle is selected, along with the Fill button in the Brushes pane.
- Click the Gradient Brush tab.
A blank to white gradient appears.
- Click the Stroke button in the Brushes pane.
- Change the StrokeThickness to make the rectangle edge thicker, and set the RadiusX and RadiusY.
- Click the TextBlock tool in the Toolbox, and then drag a text box in the artboard.
A [TextBlock] appears in the Objects and Timeline panel.
- Click the Selection tool in the Toolbox, double-click the text in the textblock to select the text, change the font size, color, and style in the Text pane, and then type a name to change the text.
- Hold down Ctrl, and the click the [Rectangle] and [TextBlock] items in the Objects and Timeline panel.
 Click the Object menu, point to Group Into, and then click Canvas.
The objects appear under a new canvas.
- Click the Project menu, and then click Run Site or press F5 to open the project in your browser.

- Click the File menu, click Save, click the File menu, and then click Close Project.
After you create the user interface with Expression Blend for your application, including buttons, menus, etc., you need to add interactivity and functionality, known as an event listener, or handler, to the individual objects to make them work. You attach an event handler to an object by adding XAML code to the canvas object. For example, when you attach the MouseEnter and MouseLeave events to a button object, the corresponding functions get executed when the mouse pointer enters or leaves the button object. You define these functions in the C# (.cs) or Visual Basic (.vb) file (depending on the project language), which you can access from the Project tab.
- In Expression Blend 3 (New!), click the File menu, point to Open, and then click Site to open the project you want to change.
- To rename an object, click the object in the Object and Timeline panel to highlight it, type the name you want, and then press Enter.
- Click the XAML or Split view button to display XAML code.
- In XAML code view, enter the following event code as shown in the illustration:
<Canvas x:Name="Button"
MouseEnter="ButtonMouseEnter"
MouseLeave="ButtonMouseLeave"
.... >To display more of XAML view, click the Autohide icon for the panels to hide them. After you finish, display them again.

- Click the Project tab.
- Double-click the MainPage .xaml.cs or MainPage.xaml.vb file in the Projects panel to open it.
- Type the code as shown in the illustration.
- Click the File menu, click Save, click the File menu, and then click Close Project.

Deep Zoom technology in Silverlight 3 allows you to view images on the Web like never before. You can smoothly zoom and pan images in high resolution. With Deep Zoom Composer (New!), you can import images, arrange and position them, and then export the results as either a Deep Zoom composition (single image) or collection (multiple images). Deep Zoom Composer is a stand-alone program that doesn’t come installed with Expression Web or Expression Web Studio. However, the program is available free for download on the Microsoft Web site.
 In Expression Web 3, click the Help menu, click Microsoft Expression Web Online, and then click Downloads.
 Click Download for Deep Zoom Composer, and then follow the on-screen instructions to install it.
 Click the Start button on the taskbar, point to All Programs, and then click Microsoft Expression, and then click Deep Zoom Composer.
 In the startup screen, click New Project to start and name a new one or click Open Project to open and work with an existing one.
 To import images, click the Images tab, click Add image, select the images you want, and then click Open.
 Click the Compose tab, and then arrange and manipulate the images the way you want.
 Click the Export tab, click the Custom tab, and then specify the options you want, and then click Export.
 When you’re done, save and exit the program.
With Deep Zoom Composer (New!), you can import images, arrange and resize them, and then export the results as either a Deep Zoom composition (single image) or collection (multiple images). After you export a Deep Zoom file, you can insert it into your Web pages in Expression Web (New!), and then show it in your browser. In your browser, you can use buttons (based on the selected template) to smoothly zoom and pan images in high resolution.
- Click the Start button on the taskbar, point to All Programs, click Microsoft Expression, and then click Deep Zoom Composer.
- In the startup screen, click New Project, specify a title and location, and then click OK, or click Open Project, select a project, and then click Open.
- To import images, click the Images tab, click Add image, select the images you want, and then click Open.
- Click the Compose tab, and then use tools on the Toolbox to select, arrange, align, and resize the images the way you want.

- Click the Export tab, click the Custom tab, and then specify the options you want Output type, Name, Location, Export as, Template, and Image settings), and then click Export.
- Click the File menu, and then click Save.
- Click the Close button on the program window to exit.

See Also
See “Inserting Deep Zoom Composer Images” on page 165 for more information on inserting a Deep Zoom Composer image into Expression Web.