
Chapter 17. Advanced Portal Techniques
In this chapter
Using Portals to Create Calendars
FileMaker Extra: Portals and Record Locking
Portals in FileMaker Pro
Portals are important tools in the FileMaker toolbox. In their most basic form, they display data that pertains to the essential relationships in a given system. For example, a record for a neighborhood might show all the related house records in a portal, or a record for a class might show a portal of all the students enrolled in that class. Portals in cases like those reflect the primary relationships in a database. This is especially true if you make use of portal functionality allowing for the creation of related records; portals then can serve as the mechanism by which related records are created.
Portals can also serve a wide variety of user interface needs. They can be used to present a pick list for selecting records for various functions. They can be used to display ad hoc reports. They can even be used to present navigation or function options to users, display images, or offer alternative list views combined with form views of data. Portals can be used whenever a developer needs to display n rows of virtually anything on a layout.
This chapter begins by covering some basic portal details, but after we’ve moved through that information, we get to some more advanced techniques. We recommend this chapter for everyone, including beginners and advanced developers: Working with portals is a fundamental part of becoming adept with FileMaker, for whatever purpose.
Many of the examples in this chapter are based on an extended version of Task Management SJ, which was created originally in Chapter 6, “Working with Multiple Tables.” The Chapter 17 version of Task Management SJ can be downloaded from the author’s website, www.northcountryconsulting.com, as described in the Introduction.
Portal Basics
As previously mentioned, a portal is a view into a related table. In each row of your portal, you will see fields from records as they relate to the current record to which the portal is tied.
Another way to think of portals is that they offer a view into another table from a specific perspective. The match criteria you establish determine the perspective, and, depending on how you set things up, it is possible to change that perspective to useful ends.
FileMaker Pro 7 introduced new relationship operators, beyond the single equijoin (=), and portals have become even more flexible than in the past. However, a portal’s basic function of displaying one record per row from a related table remains essentially the same. A Cartesian cross-product operator (x), for instance, relates all the records in one table to all the records in another table, regardless of key values. A portal based on such a relationship would therefore display all the records of the related table. Similarly, a ≤ operator compares the match fields on either side of your relationship, and the rows in your portal display accordingly. As a final example, a ≠ operator enables you to exclude certain records from your portal.
![]() To learn more about relationships and working with portals, see “Working with Related Data,” p. 202.
To learn more about relationships and working with portals, see “Working with Related Data,” p. 202.
One of the most important details to keep in mind is that the match field in the table from which you want to view records must be indexed (with a value index) for the relationship to properly resolve and display records in a portal.
![]() To understand indexing, see “Storage and Indexing,” p. 110
To understand indexing, see “Storage and Indexing,” p. 110
Keep in mind that you can index calculations as long as they do not reference related or unindexed fields themselves. It is entirely possible to relate to a calculation field in another table, rather than always relying on data input by users. You cannot create records through that relationship, however. Just as users cannot modify a calculation field, neither can FileMaker Pro itself. As you might recall, portals can be set to allow for the creation of related records. A user can click the first empty row in a portal and enter data directly. FileMaker Pro then does the equivalent of a Set Field step and rightly places the match field value—key—in the analogous field on the other side of the relationship.
Indexing is not required for the match field in your current table. You can use global fields or unstored calculation values to create the bridge between two tables. We get into those techniques later in the chapter. The important thing to remember is that the match field in the “distant” or related table must be indexed for the relationship to resolve properly and that in many cases, FileMaker takes care of this behind the scenes for you.
Portals Versus List View/Table View
Knowing when to use portals is often a matter of personal preference, user interface requirements, and data architecture. Quite often developers go through phases of infatuation with using various ways to display multiple records in a single view. The three tools for doing this are List views, Table views, and portals. Each has its own pros and cons, and we’d argue that the three are best used for very different purposes.
We encourage laziness (it breeds a need for efficiency), so we tend to favor Table view when a developer or user needs to access raw data with no regard to interface. You get a good bit of functionality at no charge, such as column sorting, column headers, and the capability to resize and reorder columns. The main downside to Table view is that you cannot add buttons or other visual objects to your rows. You also cannot rename or modify the appearance of column headers. Table view, therefore, is generally used for layouts that are accessible only to developers. They’re usually not suitable for end users.
For cases in which control over the user interface is of paramount importance, List view and portals come into play. The key difference between the two, from a user’s perspective, is that a List view can dynamically represent whatever found set your table currently has, and portals always display a set of related records (although that set can change based on the relationship to the table in the portal).
List view displays records in their creation order unless a user or script explicitly sorts the records. Unless you’ve controlled and turned off or altered menu access, users can omit records, show all records, and otherwise manipulate the found set in an ad hoc manner to suit their needs. List views display the number of rows that will fit on a screen, expanding as much as a user has monitor space. When you’re printing a List view of records, all the records can be printed; page breaks are placed between records as necessary.
Portals are differently focused. They are always driven by a specific relationship and always display a fixed number of related rows—only the content changes. They are always sorted (at a minimum in the order in which their related records were created, unless otherwise specified), so if you have a particularly large set of related data, your screen redraw speed might become an issue with hundreds of thousands of records. The obvious advantage of portals is that you can combine them on the same layout with data from other tables—both with fields from a related record and with other portals. Unlike List views, portals are not particularly well suited to printing sets of records because the print output is limited to a specific number of related rows. That is, the portal prints as it appears on the layout; if you want to print all the related rows instead of printing a portal, create a report layout based on the table inside the portal. For onscreen viewing of related records, you normally base a layout on a high-level table and show the related records in a portal. For reports, you usually base the layout on the lower-level (child) records and use the related higher-level table data in subsummary parts.
New Portal Setup
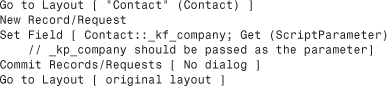
To add a portal to a layout, use the Portal tool from the Status Area in Layout mode, and draw a rectangle that approximates how large you want your portal to be. You are presented with the Portal Setup dialog, from which, at least, you need to choose a table occurrence on which to base the portal (see Figure 17.1).
Figure 17.1. These options enable you to govern how a specific portal behaves.
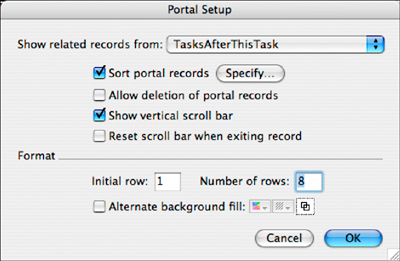
Setting new portal options in the Portal Setup dialog does not affect other portals in your solution, regardless of whether others are tied to the same table occurrence.
When choosing from the list of table occurrences, note that it is not possible to create a portal showing records from an unrelated table. By definition, portals show related records. If you need to display records in an unrelated manner, create a Cartesian cross-product relationship to the table occurrence in question—but this is still a relationship. It will display all the records from that table.
As a helpful reminder, in Layout mode, the name of the table occurrence to which the portal is tied is displayed in the lower left, along with its row format options. We cover those options shortly.
Specifying Portal Sorting
You can specify the order in which the related records display by specifying sort criteria in the Portal Setup dialog (refer to Figure 17.1). It’s thus possible to create two portals side by side, based on the same table occurrence, which offer two different sort views from the same related tables. You can also place two portals that display the same base table with two different relationships to two different table occurrences in the Relationships Graph, as shown in Figure 17.2.
Figure 17.2. Two portals can show the same table occurrence data in different sorted orders. Just as easily, they can show two table occurrences’ data based on the same base table.
Note that the sort order is hard-coded to the portal. For users to change the sort order, they’d have to enter Layout mode and modify the Portal Setup dialog options. A technique for dynamic, user-based portal sorting is covered later in the chapter.
Note that the relationship from the current table occurrence to the destination table occurrence might also have a sort defined, but a portal sort, if defined, overrides the relationship sort. If the table occurrence is multiple hops away on the Relationships Graph, the last relationship is the one that determines the sort order.
Allowing Portal Row Deletion
By enabling the Allow Deletion of Portal Records option, you enable users to select a portal row and delete a record by pressing the Delete or Backspace key. They are then prompted by FileMaker as to whether they want to delete the related record in question.
You might instead want to overlay buttons attached to scripts in portal rows to delete related records so that you can more fully control the behavior of portals. This enables you to perform your own functions before deleting a record or to create your own calculation-based container fields to offer a different user experience. Given that it’s not possible to alter FileMaker’s default selection mask color, you can opt to use a container field to create row shading that is more to your liking.
In the same vein as never attaching anything but scripts to buttons for the purposes of control and maintainability, we almost never use the capability to delete records in portals with FileMaker’s default behavior. We opt instead to place buttons (complete with an explicit icon or text indicating that it performs a delete function), attached to scripts, to do so.
Nonetheless, FileMaker’s default portal row deletion capability is a handy feature to enable if you’re working with a database that uses FileMaker’s native user interface behaviors.
Setup Options
FileMaker’s Portal Setup options enable you to specify a starting row, how many rows (tall) a portal should be, whether to offer a vertical scrollbar, and whether to alternate row colors between that which you set for the portal itself and an alternative color. The row choices are noteworthy. If you turn off your scrollbar, you can opt to display rows 1–8 in one portal, and rows 9–16 from the same relationship in another. Keep in mind that the end point is artificial; a child table can potentially hold millions of child records. With scrollbars turned on, a portal simply allows you to scroll from the initial row downward.
 To know what pitfalls to look for in starting a portal on a row besides the first one, see “Portal Rows Not Displaying” in the “Troubleshooting” section at the end of this chapter.
Relationship Properties
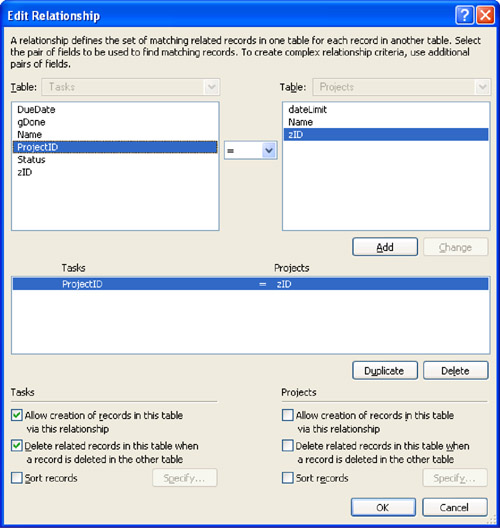
Relationship properties have a direct bearing on a portal’s behavior. These properties were covered in some detail in Chapter 6; however, we’d like to draw your attention to some particular aspects of the Edit Relationship dialog, shown in Figure 17.3 and in the sections that follow.
Figure 17.3. The options you choose in the lower portion of the Edit Relationship dialog affect portal behavior.
Creating Related Records
Notice in Figure 17.3 that one of the options you can specify for a relationship is Allow Creation of Records in This Table via This Relationship. When you check this option, a portal based on the relationship will contain a blank row under its related records (however many there are) that is readily available for data entry. When a user commits data in that blank row, FileMaker creates a record in the table into which the portal relates, and automatically pushes the value from the current parent record’s match key into the related match field.
In the Edit Relationship dialog, be careful to look at the top of the dialog to see which related table is on which side. Because FileMaker Pro relationships are bidirectional, either table can be on either side. In fact, the direction in which you drew the original relationship is what determines this, but normally you do not worry about which direction you draw the relationship.
This behavior is possible only with relationships that include the = operator (=, ≥, and ≤) in which FileMaker can determine exactly the foreign value to populate in the newly created record. In the case of greater-than-or-equal and less-than-or-equal operators, FileMaker pushes data into newly created records based on the equal-to value. You also must be able to modify the field in question. If the relationship is tied to a calculation field, FileMaker Pro cannot automatically populate it with a value from a related record (see Figure 17.4).
Figure 17.4. Note that the match field, shown here in the third column, is populated automatically.
The match field is filled in as soon as you click out of a field in the new portal row and thereby commit the data entry for a new record. At that time, the match field is filled in (whether or not it is shown in the portal), and a new blank row is added in the portal.
![]() For more depth on relationships and relationship properties, see Chapter 6, “Working with Multiple Tables,” p. 195.
For more depth on relationships and relationship properties, see Chapter 6, “Working with Multiple Tables,” p. 195.
Cascading Deletion of Related Records
The next option is Delete Related Records in This Table When a Record Is Deleted in the Other Table. Choosing this option ensures that when a user deletes a record in one related table, all its related records are deleted as well. This cascading effect ensures that your database doesn’t orphan records by allowing a user to delete records without their respective related records. A good example might be a contact person’s record and related phone number records. It is unlikely that you’d want to retain just the phone number records after deleting the contact record to which related phone records belong.
The downside, of course, is that users might not realize that along with deleting the current record, they are also going to delete all the records they see displayed in a portal. Or, worse yet, that they will be deleting records they might not currently see onscreen.
![]() For more detail on referential integrity and cascading deletion, see Chapter 6, “Working with Multiple Tables,” p. 195.
For more detail on referential integrity and cascading deletion, see Chapter 6, “Working with Multiple Tables,” p. 195.
Relationship-Based Sorting
The Sort Records option at the bottom of the Edit Relationship dialog enables you to define a sort order for that relationship. If set, it drives the order in which rows display in portals based on this relationship. Portals themselves have their own sorting options and their options override whatever sort properties you set here; however, it’s useful enough to consider this a default sort, if you want. But in general, sorting a portal is better than keeping the entire relationship sorted all the time (particularly if you are entering a lot of data, which means the relationship sort order continually has to be updated). In fact, sorting is generally overused in databases: alphabetizing data is much less efficient than just finding what you want, for example.
Sticky Portals
Portals in FileMaker Pro maintain their scroll position by default, even after a record has been committed or exited. In the past, FileMaker “popped” back to the top of a portal after a user finished entering data, regardless of how far down in a given related recordset the user might have scrolled. In FileMaker 7 Pro, you could opt to change that behavior by turning off field frames. Happily, in FileMaker Pro, this is no longer an issue. If you prefer to have a portal reset to the top each time a user finishes working with it, turn on the new feature called Reset Scroll Bar When Exiting Record in the Portal Setup dialog.
When this option is turned off, the scroll state of your portal is honored until you refresh the screen by changing modes, close the window in question, quit FileMaker Pro, perform a sort or script, or change records. All these actions result in a screen refresh. If you change from one record to another and return to the original, its portal position reverts to the top as well. Portals maintain their position when users actively edit fields in portal rows.
Scripted New Portal Records
It’s quite common for developers to choose to disallow the creation of related records in portals. You might want to avoid the need for users to scroll to the bottom of a portal to create new related records. You might want to have your portal serve as a display-only tool, or you might simply have too many rows and don’t want to force users through a bunch of unnecessary scrolling. Doing so means having to modify the relationship itself. You cannot simply turn on and off this behavior on a case-by-case basis at the portal level. (Consider that a feature request, FileMaker!)
If the Allow Creation of Records in This Table via This Relationship option setting is turned off, you’ve got the task of figuring out how—other than driving users to the related table in question—to create new related records. One approach to manage the creation of new records is to use a Set Field script step in combination with passing the necessary key match value via script parameter:
Note that this script makes no assumptions about the originating context from which it is called. This is an example of a nicely flexible script that simply creates related contact records and returns the user to the layout from which he came after calling the script.
One reason to script all new records in a relationship is that doing so avoids the interface confusion confronting users when some portals (based on equijoin relationships) allow entry in a blank row at the bottom of a portal’s data and others do not. Because the blank row option applies to only certain types of relationships, the scripted addition of related records is preferable because it applies to all types of relationships.
Horizontal Portals
Working with user interfaces and creating new records form a large part of working with portals. Another issue developers often face is the desire to have a portal scroll from left to right rather than vertically.
Horizontal portals are one of the grails that FileMaker developers seek. Although FileMaker Pro doesn’t offer the capability to scroll through columns, rather than rows, of related records (or simply scroll horizontally to view more data in a related record row), you can easily display a fixed number of related records side by side without any fuss. Use the format options in the Portal Setup dialog to display related records to control different starting rows for multiple, side-by-side portals. Figure 17.5 shows an example.
Figure 17.5. Notice that the rightmost portal has a scrollbar. That ensures that however many related records this record has, they will all be accessible to your users.
Using Portals to Create Calendars
We often use the technique of placing seven portals next to each other to create calendar-like views within FileMaker. You can create a portal and relationship for each day of the week and include in the match values a _kf_dayofWeek value to ensure that only Mondays appear in the first portal, Tuesdays in the second, and so on. To your users this will feel like a completely natural calendar. You will need seven relationships—one for each day of the week—and a data table in which one record equates to a single day.
Be careful to ensure that you have all your date records available. If you have missing records, you might get your days out of sync and display, say, Tuesday 14th to the right of Monday 6th. FileMaker displays records in each portal in order. If you have a Tuesday missing, for example, any Tuesday records that follow will appear to be out of sync with the other days of the week. This approach depends on your having data records for each full week that you choose to display in this way.
The obvious shortcoming to this technique is that you cannot use a scrollbar. Given that you have seven portals side by side, scrolling one portal would not behave intuitively for users. Saturday, for example, would scroll, but none of the other days would. In these cases, we will often choose to create page-up/page-down routines that increment and decrement a “seed” date that controls the first records in each portal. If a user clicks your page-up button, the routine simply subtracts 7 from each date. Likewise, clicking the page-down button adds 7 to each date. To learn how to apply this technique, refer to “Filtered Portals” later in this chapter.
Note that a variance to this technique is to create a data table of week records, instead of days, with a field for each day. This is a significantly simpler data model that does away with the scrolling and syncing problem discussed previously; however, it’s a rare system that can be served without discrete day records. Your reporting capabilities will be significantly limited by week-based records.
Filtered Portals
In this chapter thus far, we have dealt only with portals driven by fixed relationships. The data displayed remains constant and changes only when the data itself changes; that is, when records are added to or deleted from a database.
A portal filter extends your capabilities to allow you to dynamically alter or constrain the rows of data displayed in a portal. Think of it somewhat as performing a find in List view.
For example, imagine a case in which you have hundreds of customers in a database and a portal displaying all customers. Your portal actively shows only a modest fraction of all customers in your system and forces users to scroll quite a bit. (Most users don’t have monitors that can support a portal hundreds of rows tall.) To solve this usability problem, you can turn either to a List view supported by Find mode to reduce the found set, or to a filtered portal.
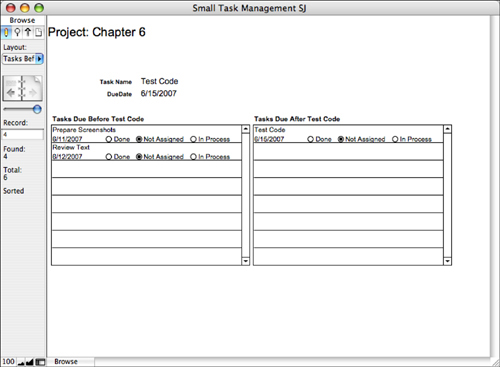
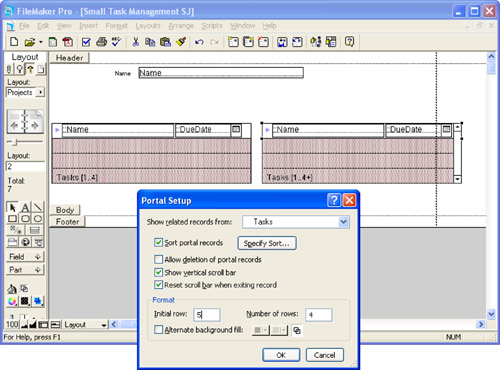
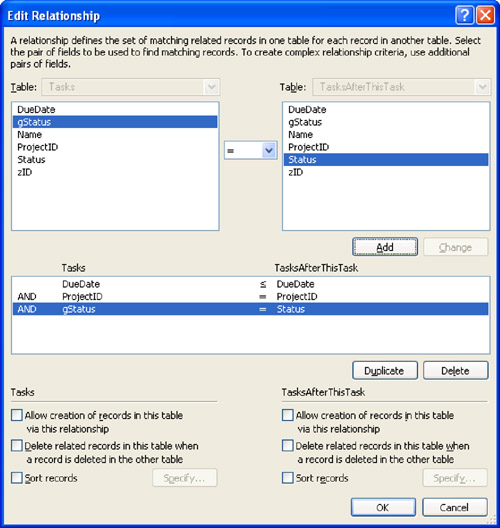
Generally, filters enable users to dynamically specify match criteria—often a status or type field of some kind—and then view only portal rows that match those criteria. In the Task Management SJ database (if you download it, make certain that you download the Chapter 17 version), self-joins and filters make a portal particularly useful. Figure 17.6 shows a task (Review Text) for a project (Chapter 6). Two portals show the project’s other tasks that are due before or after this task. Furthermore, a filter lets you select a status for the related tasks to be displayed.
Figure 17.6. In this example, choosing from the Show Related Tasks value list alters the rows displayed in the portals.
The filtering illustrated here expands on the global relationship based on gDone described in Chapter 7, “Working with Relationships,” as well as the TasksBeforeThisTask relationship. Figure 17.7 shows the Relationships Graph. The changes from Chapter 7 are the addition of TasksAfterThisTasks and the change of gDone in the Tasks table to gStatus. It is still a global, but its name is changed. By changing it in the Fields pane of the Tasks table, it automatically changes in all relationships and in the Relationships Graph.
Figure 17.7. A new table occurrence for TasksAfterThisTask is added and the gDone global is renamed gStatus.
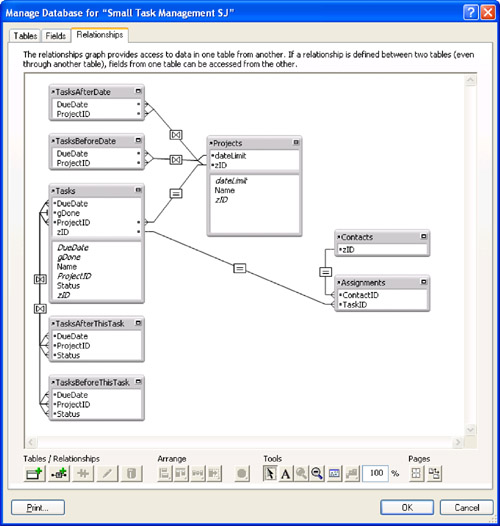
TasksAfterThisTask is almost exactly the same as the TasksBeforeThisTask relationship, except that the date relationship is ≤ instead of > as it was in TasksBeforeThisTask. The reason is that one of the relationships should include tasks due the same day as the base task. Whether you add the current day to the before or after tasks does not matter. Here, the TasksBeforeThisTask relationship uses > DueDate, and TasksAfterThisTasks uses ≤. You could equally well choose > and ≤ to place the current task’s same-day tasks in TasksBeforeThisTask. Or you could leave both relationships without equality (that is, as ≤ and >) and create a third relationship that consists of tasks due on this task’s due date. Figure 17.18 shows the relationship actually implemented here.
Figure 17.8. Create the relationships for TasksAfterThisTask.
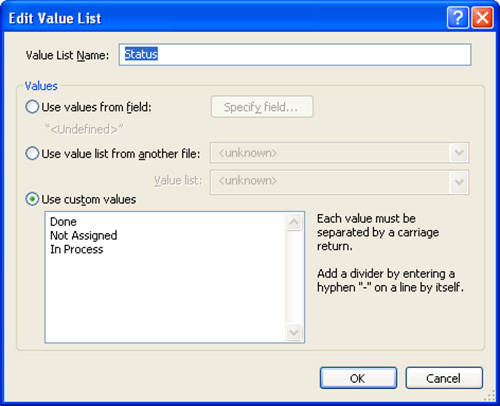
The last step in creating the useful layout shown previously in Figure 17.6 is to create a value list of status values as shown in Figure 17.9. You also should auto-enter Not Assigned to all new records so that some value exists for matching.
Figure 17.9. Create the value list.
Multivalue And Filtered Portals
What has just been created here is a multivalue And filtered portal. There are multiple values in the relationship, with all of them being applied (a logical And). This is an important point to note because when described that way, another possibility arises.
Multivalue Or Filtered Portals
A natural extension to the example you’ve been exploring is a case wherein you want the portal to match one or another criterion but not necessarily both criteria. For example, what if you want to extend the relationship so that you can see all the status values? You need to add All to the value list, and find a way to match on that value.
Create a calculation field in the Tasks table like this and name it StatusWithAll:
Status & ¶ & "All"
Now change the listing side of the relationship from Status to the new calculation field, StatusWithAll. (Remember there are two relationships to change: TasksBeforeThisTask and TasksAfterThisTask). This is the only change (beyond adding the “All” option to your filter value list) that you need to make to turn this into an Or filter. This relationship resolves where values in the status list include one of the three statuses or “All”. The reason this works is because you have created two values in the StatusWithAll field: the original Status value and a second value, which is always All, and which, of course, will always match the gStatus value All.
Ranged, Multivalue Or Filtered Portals
Multivalue Or filters can become quite powerful. Consider a new example: Imagine wanting to provide users with a filtered list of contact names from a pool of hundreds or even thousands of records in a contact table. Instead of creating a value list by which to filter, allow your users to type a few characters of text into a filter field. If a user enters co, your (presumed) contacts returned in the portal might be a list like this:
Coleen Neff
Corbin Daniels
Cordelia Henrich
If someone enters col, the list might return only Coleen Neff.
The way to approach this is to use the relationship operators for comparing ranges of text. Consider an example in which you have the following fields in a contact table:
gMatchField— A text field stored globally where users type whatever portion of text by which they’d like to matchNameFirst— The first name of your contact person
You now need to compare the text co against some set of values to get the record for Coleen Neff to appear from the list.
Consider that a ≤ c is a valid expression in FileMaker Pro. By relying on text string comparisons, you can create a relationship comparing your gMatchField to NameField. If you create a calculation field called MatchHigh with this calculation
NameFieldzzz, calculation = [NameField & "zzz"]
and then create a relationship in which gMatchField ≤ NameFieldzzz, a portal using this sample comparison will display all names that are comparatively less than “Coleenzzz.” This gets you only halfway there. “Anthony” and “Beth” are, for example, comparatively less than “Coleenzzz.” You need to create a second calculation field called MatchLow with this calculation:
NameFieldaaa, calculation = [If (IsEmpty (gMatchField); "0"; gMatchField )]
In cases in which gMatchField has a value, say "co", the comparisons now would be
- “Coleen” > “co” and “Coleen” ≤ “cozzz”
- “Conrad” > “co” and “Conrad” ≤ “cozzz”
- “Cordelia” > “co” and “Cordelia” ≤ “cozzz”
In this example, “Anthony” and “Beth” would both not be valid match conditions. Both are comparatively less than “co.” Figure 17.10 shows a table with the three fields in it.
Figure 17.10. The global and calculation fields that drive the relationship.
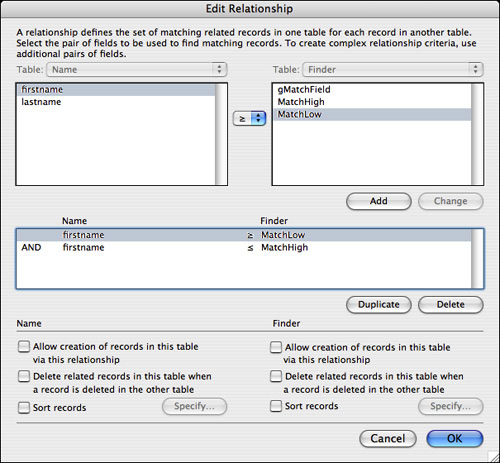
Figure 17.11 shows the relationship driving a portal of this nature.
Figure 17.11. Notice that relationships can accept multiple And criteria.
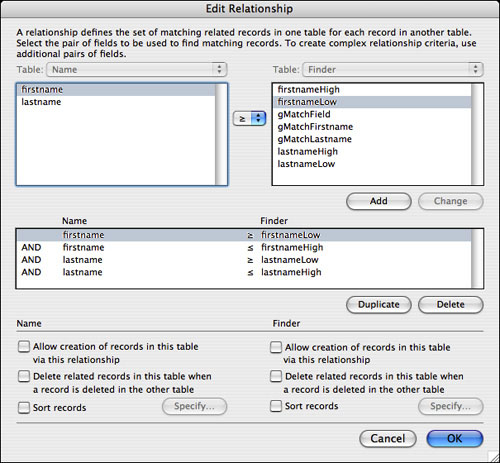
Consider the NameFieldaaa field. When empty, it returns zero—a value that no text string will be less than. This then means that when gMatchField is empty, all the records in your contact table will be valid matches and all records will show in the portal. You can opt to add further fields to drive the relationship in the portal by adding additional pairs of gMatchField and its two comparison fields for both a first and last name (or for a name and a city, perhaps).
Dynamic Portal Sorting
Developers often place column labels above portals, and one of the first things we’ve seen users do with a newly minted database is click those ever-so-tempting column headers expecting them to sort. As discussed previously in this chapter, you can sort portals either at the portal level or at the relationship level, but whichever method you choose, the portal remains controlled by those baked-in sort options. Users cannot re-sort portals on the fly. One of the more common requests we get as developers is to allow users to sort by whatever column they want. Unfortunately, there’s no way to programmatically define by which field a portal sorts. There is, however, a method for dynamically sorting a portal.
Using a calculation field, you provide FileMaker with the data by which you want a portal sorted. You need to create two new fields for your database: a control field, gSortPref, to hold the name of the field by which you want to sort, and a field for the actual sorting, sortCalc. We suggest you place sortCalc in the same table in which the rest of your portal fields sit. Your control field serves as a mechanism for choosing sort order. There are multiple ways to allow the user to change the values in it: You can use a value list, set by script when a user clicks on a column header, or perhaps a script available in the Scripts menu. However you manage this field, it’s the result that is important. Your sortCalc field depends on it. Here’s an example of how you might define sortCalc:
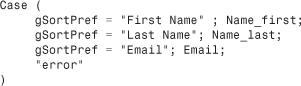
If you set a portal to sort by sortCalc, notice that depending on what choice someone makes for gSortPref, the calculation returns the data by which the user expects to sort. If gSortPref = “First Name”, the related portal data from sortCalc might look like this:
- Alex
- Beth
- Coleen
If gSortPref = “Email”, sortCalc’s data would change to be this:
By establishing this calculated field as the field by which your portal sorts, as the user chooses a sort preference, its data updates and the order in which rows appear should change. However, one remaining task to be done is managing screen refresh. Your user might change gSortPref and sortCalc updates accordingly, but your portal doesn’t actually re-sort until the user changes layouts or modes, or performs one of a range of other possible actions. You could write a script to take the user into Preview mode and back into Browse mode, but to force the screen to refresh with a minimum of screen flashing, it’s better to reset the key that controls the front of the portal relationship. Use a Set Field () script step, and set the key field to itself. This forces the portal to refresh—because you’ve just altered one of the sides of its relationship—without requiring the user to navigate or change modes.
To establish sort buttons at the top of column headers, simply create as many buttons as there are fields in your portal, and then attach a script that, using Set Field, controls what parameter is passed to gSortPref. An alternative technique would be to have gSortPref hold the actual name of the field by which you want to sort, and then instead of a Case statement, use a GetField function to populate sortCalc. This works well when all your fields are of the same type; however, both techniques fail when you are dealing with multiple field types—for example, NameFirst, NameLast, BirthDate, and Age. You still need a Case statement in that scenario.
Multiple Field Type Portal Sorting
If you are using the technique just described, sortCalc must be a calculation that returns text, so numbers and dates sort by the rules that govern text. Unfortunately, it’s not possible to dynamically control which data type a calculation returns, so the following data—1, 8, 9, 12, 82—sorts like so:
![]()
To get numbers to sort properly as text, you need to ensure that all your numbers contain an equal number of digits. The numbers 01, 03, and 10 sort properly, whereas 1, 3, and 10 do not.
Dates in your text calculation, likewise, sort like so:
1/12/2006
10/1/2006
10/10/2006
10/2/2006
3/1/2006
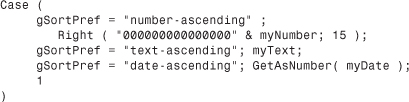
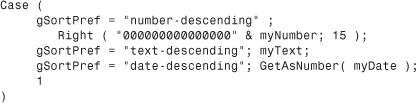
Remember that FileMaker stores dates internally as integers. This is the key to solving the puzzle. The idea here is that if FileMaker compares the integer representations of dates, the sort works properly. sortCalc needs to be set as the following, assuming that you have three fields that you want to display in your portal (myNumber, myText, and myDate):

This calculation converts all your numbers into 15-digit numbers. It concatenates 15 zeros with whatever number has been entered into myNumber, and then truncates the result to 15 characters. This ensures that 1, 3, 10, and 999 respectively return 000000000000001, 000000000000003, 000000000000010, 000000000000999.
Quite likely, the integer representation of your date field already uses the same number of digits. Remember that dates are stored in FileMaker as integers. 4/1/2006 is 732402. To drop below or above six digits, you’ll have to work with dates approximately before 274 A.D. or after 2738 A.D. Most databases are a safe bet at six digits, but if you’re calculating dates for a sci-fi novel or are dealing with ancient times, feel free to use an identical approach to add digits.
Descending Dynamic Portal Sorting
It’s possible to extend the technique discussed in the preceding section so that the portal can be sorted in either ascending or descending order. To accomplish this function, you need to sort by two fields—one ascending and one descending—instead of just one.
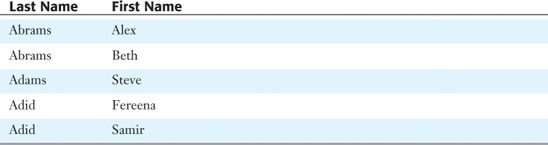
Recall how sorting by multiple fields works: FileMaker Pro sorts all like values from the first field in a sort request together, and then orders records with identical values in that first field by a second field. Table 17.1 shows an example in which a user sorted by last name, and then first name.
Table 17.1. Contacts Ascending
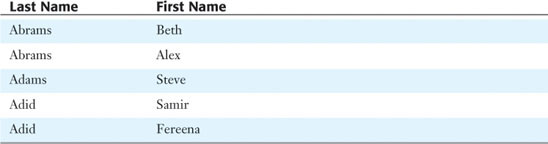
Recall also that sort fields can be set for ascending or descending behaviors. If you change the first name in Table 17.1 to sort descending, the list would look as shown in Table 17.2.
Table 17.2. Contacts First Name Descending
You can use FileMaker Pro’s capability to properly sort in descending order for your sortCalc field. To toggle between the two behaviors, ensure that the first field always contains identical values when a user wants to have a portal sort by the second field—in this case set to descending order.
The formula for your sortAscend field looks like this:
And the corresponding calculation for sortDescend is as follows:
Notice that in the case that someone chooses one of the descending options, all the values in sortAscend equal 1. If you set up your sort dialog to first sort by sortAscend (ascending) and second by sortDescend (descending), your first field overrides the second when a user chooses one of the ascending options from gSortPref. Otherwise, that field is set to all the same values, and by definition the values in sortDescend will apply, happily making use of the descending sort behavior built into FileMaker.
To put the finishing touches on your user interface, you might consider making icons that indicate when a portal column is sorted ascending or descending. The script that sets your gSortPref can also control which images appear in container fields to provide visual feedback to the user.
There is one caveat to the portal sorting technique described in this section: It depends on being able to change the data in the sortCalc field for each record being sorted. If another user has a record locked (by actively editing data in that record), the value in sortCalc will not update and one (or more) of the rows in question will not sort properly. We recommend checking for locked records in the script you use for your user interface for setting sortCalc.
Troubleshooting
Portal Rows Not Displaying
I know I have a valid relationship established, but some of or all my portal rows aren’t showing. What could be some of the issues?
You can opt to display only a specific set of rows via Portal Setup format options, but it is possible that you’d have a case of related records in your data that would never show up for a user. If you turn off vertical scrollbars and set a portal to show rows 4–8, rows 1–3 and 9+ won’t display.
This applies to creating rows as well. If you’ve allowed the creation of related records and a portal’s bottommost row is intended to allow such, your users cannot access that feature if the row falls outside your range of visibly formatted rows. As in the example of showing only rows 4–8, there would have to already be at least three related records in the database before the editable row would appear for users.
Creating Related Rows for Non-Equijoin Relationships
How do I create records via relationships that aren’t equijoins? The option is grayed out.
When you allow creation of related records in a relationship, you might have noticed that this works only for the equijoin (=) operator. In cases in which your primary relationship is driven by a different operator, we recommend establishing an equijoin relationship with different table occurrences to create new records. If you’re still not happy doing so, perhaps over concerns of cluttering your Relationships Graph, there is only one other alternative. Create a script that takes a parameter—the primary key of your parent table’s current record—navigates to a layout attached to your child table occurrence, and uses the Create New Record/Request script step in combination with a manual Set Field [childTable::_kf_ParentID; Get (ScriptParameter)] for the match key.
Multiuser Selected Data
I have used a regular field—not a global field—for storing the ID of the related record I want selected in a selection portal and related fields. In multiuser environments, this will break if two users are working with the same record at once. How do I work around that problem, while still not using globals that might display the wrong related data for a given record?
In cases in which the field tracking a portal row selection is a standard field, as opposed to a global field, you will run into problems in multiuser environments. Two users might be viewing the same record at the same time and make two different row selections on a portal. Only one state would be valid (the latter of the two), but no event or screen refresh would occur for the first user.
There are two ways to deal with this problem. To employ the first, make certain that users never end up working with the same record by either scripting a check-in/check-out approach or possibly building a one-record-only user interface for each user. This first approach is quite script- and development-intensive.
The second approach makes use again of multikeys. To track what portal row is selected, keep track of your account name in a global field and populate a multikey that concatenates accountName and rowID into the selectionID field. You need to use the Substitute function to parse in and out as multiple users work with the portal, but this is multiuser-safe as long as they don’t run into actual record-locking problems.
FileMaker Extra: Portals and Record Locking
Record and portal rows do not lock until a user begins actively editing a field or when a script performs an Open Record/Request script step. At the point when a user begins actively entering data (or modifying existing data), a record lock is established until such time as the user exits the record and commits or reverts the record.
It is important to keep this behavior in mind and to understand how it applies to portals. When a record is being modified and is related to other records viewed in a portal, it and the portal itself are locked; however, other users (or the same user in a different window) can navigate to one of the related records and edit it directly.
Portal rows and related records are created when the record is committed. FileMaker treats the entire set, including the parent record and all related child records, as a single transaction. It is possible to create a new parent record, tab from field to field entering data, tab into a portal and create a few rows (including potentially entering data into fields from a grandchild record), and either commit the entire batch at once or roll back and revert the entire batch. To support such functionality, FileMaker locks the entire portal for a given record.
Record locking used to be more of an issue for both users and scripts in versions before FileMaker 7. Although versions of FileMaker since 7 don’t do away with record locking—nor would we want them to, for maintaining data integrity—the behavior you need to anticipate is far more localized than in version 6 and earlier.