
Chapter 3. Defining and Working with Fields and Tables
In this chapter
FileMaker Extra: Indexing in FileMaker
Working Under the Hood
Fields and tables are the heart of any database. By storing information in properly categorized fields within well-organized tables, you impart both function and meaning to what would otherwise be an incomprehensible pile of raw data.
We’ll spend much of this chapter describing what kinds of fields exist in FileMaker Pro, how they store information, and how to ensure proper data integrity in your database solutions. We’ll also discuss naming conventions for fields and tables—techniques that you can use to make your FileMaker Pro databases meaningful to yourself and others for the long period of time that they may be in use.
If you’re new to development in FileMaker Pro, this chapter is a good place to start. No doubt some of the topics we cover will lack a certain context, but establishing a solid foundation in field definition is a vital part of becoming a practiced developer.
New Databases Begin with Field Definitions
To create a new database, simply launch FileMaker Pro and then choose File, New Database. The Quick Start screen will appear, and you can choose the Create Database view to get started. At that point, you can choose to begin with a Starter Solution or an empty file of your own.
After you’ve stepped through these first tasks, you’ll be taken to the Fields tab of the Manage Databases dialog. You can also open this dialog directly with File, Manage Database.
Using the Manage Database Dialog
When you choose to start a new, empty database, FileMaker Pro creates a file for you, stores it in a location you specify, and automatically opens the Manage Database dialog (shown in Figure 3.1). As a developer, you’ll spend a good bit of time in the three tabs in this dialog. FileMaker Pro’s Manage Database dialog allows you to create the fields, tables, and relationships you need to form your database. It also enables you to modify a wide range of attributes associated with fields, such as auto-entry functions, validation, storage, and calculation formulas. These elements compose a database’s structure or schema. It is here that you form your database behind the scenes.
Figure 3.1. The three tabs allow you to switch among defining tables, fields, and relationships.
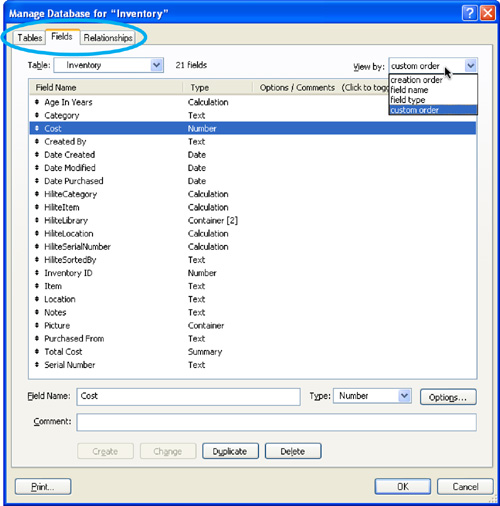
Notice the active table in Figure 3.1. The fields you define are associated with this selected table.
FileMaker Pro will have already created a default table for you, named the same as the file itself. Notice the Table menu selection on the Fields tab of the dialog in Figure 3.1. Any fields you create will be created in that table.
![]() For some basic information on tables, see “Understanding Tables,” p. 39.
For some basic information on tables, see “Understanding Tables,” p. 39.
![]() For a detailed discussion of multiple-table solutions, see Chapter 6, “Working with Multiple Tables,” p. 195.
For a detailed discussion of multiple-table solutions, see Chapter 6, “Working with Multiple Tables,” p. 195.
Notice the third tab in the Manage Database dialog: Relationships. We won’t be covering relational databases in this chapter, but it is on that tab that you’d create the relational associations among tables in your solution.
Commenting is a vital discipline to develop. Spending a few moments to add information to the Comment text box, below the field name, as you create something will save time later in trying to figure out what you were thinking at the time. Don’t bother repeating information that is in the field name. If the field represents pixels or pennies, it might be worthwhile to add that to the field name (as in Width_In_Pixels). Use comments for in-progress remarks (such as “Added 4/1/2007 JF for task restructure” or “for reporting only”).
You can access the comments for a field using the FieldComment function in FileMaker Pro. This means that, if you choose, you can use the comments in interface elements. You can even combine them with text in tooltips. Of course, if you are going to make field comments available in this way, you need to enforce some standards for their wording that are stricter than the comments intended only for developers. To view comments, toggle between options and comments at the top of your field list.
Working with Tables
As you have seen in the previous chapter, your database consists of tables, each of which is made up of rows or records with columns or fields that contain the data. A database can consist of a single table or of a number of tables.
By default, when you create a new database, a single table is created that has the same name as the database. That actually might not be what is best. You might want to rename that default table so that it fits into the naming convention of all the tables in your database.
Table Naming Conventions
The Manage Database dialog lets you create and name (and rename) fields and tables. It is a good idea from the start to enforce some naming conventions on both fields and tables.
![]() For more information on file naming conventions for tables, fields, and other entities, as well as for other FileMaker development standards, a white paper from FileMaker is available for download at http://www.filemaker.com/downloads/pdf/FMDev_ConvNov05.pdf.
For more information on file naming conventions for tables, fields, and other entities, as well as for other FileMaker development standards, a white paper from FileMaker is available for download at http://www.filemaker.com/downloads/pdf/FMDev_ConvNov05.pdf.
FileMaker Pro’s flexibility with regard to things such as legal characters in names and the length of names for tables and fields can be too much of a good thing. You can use up to 100 characters in a name, but chances are you will need far fewer for your actual names.
Here are some recommendations, primarily drawn from the white paper cited previously but with some additional ones added that might be of use. Remember that these are suggestions, and, in some cases, might be inconsistent. Pick what are the most useful conventions, but stick with them.
Stick with them, that is, within a single database or even a project. One problem with implementing design conventions is that the world is a large place, and it is likely that your naming conventions will need to interact with naming conventions of other systems and databases. Being internally consistent keeps your own house in order. That is the most that you can hope for, unless you volunteer to serve on a committee that drafts conventions for your organization, industry, or other group.
Naming tables is simultaneously simple and almost irrelevant. The reason is that as soon as you have a database with more than one table in it, you will most likely be using the Relationships graph (described in Chapter 7, “Working with Relationships”). The Relationships graph initially shows each table with the name that you assign to it. However, you will create additional instances of your tables in the Relationships graph, and you will name each of these. In practice, you will usually be working not with the base table, but with the additional instances.
For example, you might have a table called Personnel. In the Relationships graph, you might have instances of this table called PersonnelByID, PersonnelByName, PersonnelByDepartment, and so forth. Practically, you could name the base table Table 1, and, as long as the other names appear in the Relationships graph (and in your code), everything would be clear (but this is presented only as a hypothetical example, not a good practice).
When you create a database, by default you will wind up with a database, a single table, and an instance in the Relationships graph all with the same name. Many people begin by renaming that first table right away. Here are some of the suggested standards:
- Use only the characters 0–9 and a–z (both uppercase and lowercase).
- If table names contain several words, separate them with underscores or with intermediate capitalization (as in personnelSalaryInfo or personnel_salary_info).
- Be consistent in capitalization and number (that is, use table names such as Contacts or Contact, contacts or contact).
- Do not use special characters or reserved words in table names. Reserved words include FileMaker reserved words as well as words that might be reserved in SQL or other languages you can use to access the tables. Select is not a good table name, because, although it might be useful for storing selection values for records in your database, it is an SQL reserved word.
In addition, consider whether you want to place any descriptive information in the table name. If you do so, the usual convention is to place it at the end following an underscore. This is particularly useful if you separate words within the table name using intermediate capitalization. For example, inventorySuppliers_pub and inventory_Quantities_pri are reasonable names for inventory tables that, respectively, contain the publicly available names and addresses of suppliers and the private quantities of inventory items on hand. You can enforce access to these tables with your security accounts and privileges, but it can be useful to indicate not only what is in the tables but also the sensitivity of the data.
Creating New Tables
To create a table, go to the Manage Database dialog (File, Manage Database). Click the Tables tab to show the view shown in Figures 3.2 and 3.3. Note that this is one of the places in which FileMaker Pro and FileMaker Pro Advanced differ.
Figure 3.2. Use the Tables tab in Manage Database to create, change, and delete tables in FileMaker Pro.
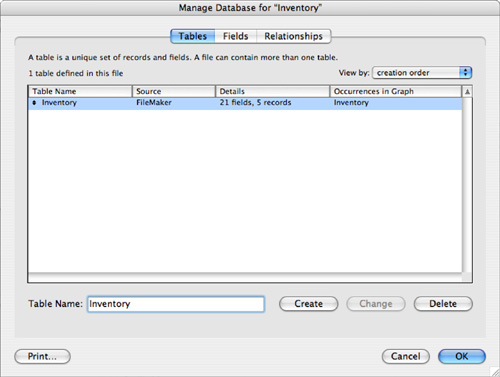
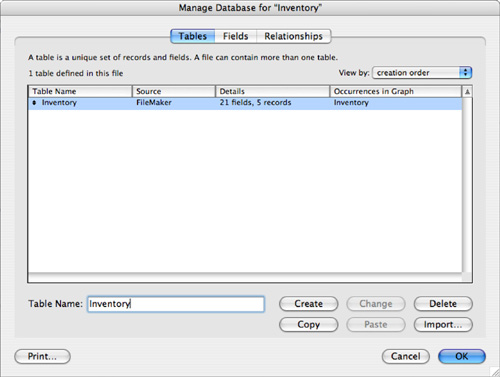
Figure 3.3. Use the Tables tab in Manage Database to create, change, and delete tables in FileMaker Pro Advanced.
To create a new table, enter a name for the table at the bottom. Click Create, and your table will be created in the list of tables. An instance of the table will also be created automatically in the Relationships graph. To rename a table, highlight its name in the list of tables in the Tables tab, type in the new name at the bottom, and click Change.
To delete a table, highlight its name and click Delete. If you want to print out the fields in one or more tables, highlight it (or them), and click Print.
The Manage Database dialog in FileMaker Pro Advanced has three additional buttons in the lower-right corner as shown in Figure 3.3. You can copy a table and paste it into your database (thereby duplicating it), or copy and paste it into another database. You can also import a table definition, not the data, from another FileMaker Pro database. In addition, you can import data along with the table definition, but that is done with the Import command, described in Chapter 22, “Importing Data into FileMaker Pro.”
Working with Fields
The heart of the database is the data within it, data that is stored in fields. This section provides some basics about working with fields.
Field Naming Conventions
The naming conventions for tables with regard to spaces, characters, capitalization, and so forth apply also to fields. There are some additional considerations when it comes to naming fields. Specifically, they have to do with the identification of field types and the naming of internally used fields.
Many developers use abbreviations for data types in field names. Often it’s handy to know the data type of a given field when working with it without having to refer to the Manage Database dialog. Here we’ve used “t” for text, “n” for number, and “c” for calculation:
- ProductName_t
- Price_n
- TaxRate_n
- Tax_c
Some developers also note whether a field is indexed (“x” for indexed, “n” for unindexed):
- Location_Name_tx
- Location_Desc_tn
- Location_Size_nn
Some naming conventions also break out a division between data fields and what are commonly referred to as developer fields—those fields that you need only to make your FileMaker Pro solution work. If you ever went to import your database wholesale into another system, you would probably leave behind the developer fields. Here we have two abbreviations: “k” for key (or match field), and “z” (so that it sorts to the bottom of the list) for developer utility fields. We also use underscores to ensure that keys sort to the top of our field list, with the primary key coming first.
![]() To understand how keys are used to identify records in tables and form relationships, see Chapter 5, “Relational Database Design,” p. 163.
To understand how keys are used to identify records in tables and form relationships, see Chapter 5, “Relational Database Design,” p. 163.
- __kp_primary_AlbumID
- _kf_foreign_ArtistID
- AlbumName
- Date
- z_SelectedPortalRow
- z_UserColor_Preference
- z_UserGenre_Preference
Many developers use a minimal set of field-naming standards. It relies on leading lowercase characters to indicate the field type. If you choose to use that minimal set, here are the conventions used:
- g—Global
- c—Calculation
- s—Summary
- z—Internal use (This causes the field name when shown in an alphabetical list to be at the bottom.)
Descriptions of field types might or might not use this set of standards, which you can add to the end of the field name following an underscore:
- t—Text
- n—Number
- d—Date
- ts—Timestamp
- tm—Time
- c—Container
Putting these together, you could have field names such as these:
- creationDate_d
- gProcessingOffice_t
- gcNextInvoiceNumber_n
You can even go further by not bothering with field types where the field name already includes it. creationDate_d really adds no information to creationDate.
Whatever you do, be consistent. The point is not to create a set of naming conventions that overshadows the database but, rather, to create naming conventions that help you and future developers build and maintain the solution.
Don’t imagine that all of the fields on your Relationships Graph will adhere to these naming conventions. You control your own fields, but as you begin to use external data sources, you will be incorporating fields from other databases. You can have a field in your own table called payrollDate_d, but if you are relating it to a field in the corporate database called datePaid, chances are slim that the database administrator will want to rename the field to make it consistent. The ProjectID field in your database might be related to a field in another FileMaker database that you do not control that is called JobNumber. And, in a global world, the external data source names might just be in another language. Be as clear and consistent as you can, but do not assume that you can control the names of fields in other databases. (In general, the owner of the Payroll database wins out.)
 If you’re planning on using FileMaker Pro as a web back end, refer to “Problematic Field Names” in the “Troubleshooting” section at the end of this chapter.
![]() For more information on using databases on the Web, see “Designing for IWP Deployment,” p. 701, as well as Chapter 26, “Custom Web Publishing with XML/XSLT,” p. 715.
For more information on using databases on the Web, see “Designing for IWP Deployment,” p. 701, as well as Chapter 26, “Custom Web Publishing with XML/XSLT,” p. 715.
Adding Field Comments
Notice also that you can add comments to your field definitions. We don’t mean to be pedantic, but we want to drive home that establishing good programming habits will serve you well for the rest of your life as a developer: Use the field comments feature. Explain to yourself a year from now why a field exists, any dependencies or assumptions you made, and possibly how you intend to use it.
You can extract field comments using the FieldComment function so that you can use them in a tooltip or other dynamic documentation in your solution.
Creating New Fields
To create fields in FileMaker Pro, you need to enter some text in the Field Name area of the Manage Database dialog and click Create. One important aspect of databases to keep in mind is that it’s important to establish a discrete field for each bit of information you want to store. If you create a field called Contact Information and cram an entire address and a set of phone numbers into it, technically it will work fine. But if it ever comes time to export that information, sort by area code, or run a report by city, you won’t be able to cull the information you want from the field without suffering a good headache.
![]() To database wonks, the Contact Information example would be a violation of first normal form, or more colloquially, “one fact, one field.” For information on relational data modeling and defining fields, see “Relationship Types,” p. 171.
To database wonks, the Contact Information example would be a violation of first normal form, or more colloquially, “one fact, one field.” For information on relational data modeling and defining fields, see “Relationship Types,” p. 171.
As shown previously in Figure 3.1, the Manage Database dialog lets you create, change, duplicate, and delete fields. As with the Tables tab, FileMaker Pro Advanced has additional buttons: Copy and Paste. If you select a field or fields, you can click Copy and paste the fields into the same or another table. Pasting them into the same table is the same as duplicating them.
Working with Field Types
Some of the most important aspects of understanding FileMaker Pro involve comprehending field types, realizing how they differ from one another, and knowing how to use them effectively. Simply stated, field types identify what kind of information each field of your database expects to hold. A person’s name is text, the purchase amount for a transaction is a number, a birthday is a date, and so on. Generally it should be quite clear to you what each needs to be.
Field types determine what types of operations can be performed on a given field, what information a field can accept, and the rules by which a field is sorted. The combination of a proper identifying field name and a data type definition is what gives a database its context and meaning.
Use the most specific field type you can. This allows you to use FileMaker Pro editing and formatting. Although FileMaker can convert a text field to a number where necessary, it can apply numeric formatting only to a number field. The same goes for dates and times.
Text
Text fields are the most free-form of the field types. Users can enter any range of information in them, including carriage returns, and there’s no expectation of what form or sort of information a text field will hold. The only requirement is that it be character based—in other words, you can’t place a picture in a text field. A text field can store up to 2GB of information, limited by RAM and hard drive space, of course, and indexes up to approximately 100 characters, depending on what language you’re using. We’ll cover indexing in more depth later in the chapter. For now, simply remember that each field type has different limits and approaches on indexing.
Number
Number fields can store values from 10-400 up to 10400, and negative values in the same range. FileMaker Pro indexes the first 400 significant digits (numbers, decimal points, or signs) of a number field, ignoring letters and other symbols. Number fields can accept text (although not carriage returns), but any text in a numeric field is ignored. FileMaker interprets 12ax3 as 123 if you enter it into a numeric field, for example.
Something to keep in mind with FileMaker Pro: You can express a number field as a Boolean. A Boolean value is either true or false, and often used to test the condition of something. FileMaker Pro treats a zero or null value in a number field as false in the Boolean sense; it treats any other data as true. You will often run across the use of number fields to store Boolean values.
The primary distinction between a number field and a text field lies in how they sort: A text field sorts 1, 10, 2, 20, 3, 4, 5, whereas a number field sorts 1, 2, 3, 4, 5, 10, 20.
Date
Date fields accept only Gregorian calendar dates. FileMaker Pro honors whatever date formatting your country follows by taking the standard your operating system uses at the time you create a new file. Date formats—the order of year, month, and day—are common for a given file. Although it’s possible to change the way FileMaker Pro displays dates, it fixes basic ordering at the time of file creation.
Dates in FileMaker Pro are internally stored as the number of days since 01/01/0001. January 1, 2004, for instance, is 731581. If you need to compare dates or perform any functions on them, remember that behind the scenes they’re really just numbers. This feature is actually quite handy. To switch a date to a week prior, all you need to do is subtract 7. Date fields can store values from January 1, 0001, to December 31, 4000.
If your fields are sorting or displaying oddly, see “Mismatched Data Types” in the “Troubleshooting” section at the end of this chapter.
Time
Time fields hold HH:MM:SS.ddd information. Notice that you can add a decimal to the end. An additional useful fact: If a user enters 25:00, FileMaker Pro rightly interprets this as 1:00 a.m. 99:30 becomes 3:30 a.m. The clock simply keeps rolling over. This behavior is useful when you need to add, say, 30 hours to a time, and don’t want to be bothered with calculating what hour that becomes. Likewise, if you are doing data entry in a time-tracking system and don’t want to create two entries for a case in which you worked from 2:00 p.m. until 2:00 a.m. on Monday (really Tuesday), entering 26:00 for the ending time in your system rightly calculates to 12 hours.
As in dates, FileMaker Pro stores time internally as the number of seconds from 12:00:00 on the current day. 1 is 12:00:01, and 43200 is 12:00 p.m. As it does with date formats, FileMaker Pro establishes your time format during the creation of the file, based on system operating system settings.
The maximum time value you can store in a FileMaker Pro time field is 2,147,483,647. That’s a lot of time.
Timestamp
The timestamp data type combines date and time information. It appears as a field with both date and time values, separated by a space: 1/1/2004 12:00:00. As in date and time formats, timestamps are also stored as numbers: the count of seconds from 1/1/0001 00:00:00. Be prepared to work with large numbers when using this field type. Timestamps are an important aid to interoperability with other databases (such as those powered by the SQL language), which often store date and time information in a single timestamp field. The maximum value of a timestamp is 12/31/4000 11:59:59.999999 p.m. or 126,227,764,799.999999 seconds.
To extract just the date from timestamp data, simply use the GetAsDate() function. Likewise, use GetAsTime() to extract just the time. In a layout, you can format a timestamp as a date or as a time (as well as leaving it as a timestamp). If you format a timestamp as a date, the time value is not shown in the layout.
Container
Container fields are different from the five already mentioned: They store binary information. Information is often inserted into container fields rather than being entered manually (you can copy and paste). You can place any sort of digital document in your database, limited again by the practical limits of your computer hardware, up to 4GB.
Container fields also support displaying/playing three native types of media: pictures, QuickTime movies, and sounds. Refer to the FileMaker help system for supported formats, but most common image formats are included...as well as some you won’t expect. For example, by using QuickTime, it’s possible to display and play a Macromedia Flash 5 .swf file. Last, on Windows, container fields support a wide range of OLE objects, including Microsoft Excel documents, PDF, and more. (The first page of PDF documents placed in containers will always be rendered on both operating systems.)
There’s one important thing to remember about using container fields: Either you can store the file or media in FileMaker itself, requiring disk space, or you can simply store a path reference to the file instead. If you choose to store just a reference to the file, FileMaker Pro displays the image or file icon as necessary, but it does not hold the actual document. A nice feature of storing references is that you can double-click documents in your container fields to launch them in your operating system.
Keep in mind that if you move the source document, the FileMaker Pro reference remains but is no longer valid.
Calculation
Calculations evaluate formulas and return the requisite results. When you create a calculation field, the Specify Calculation dialog opens, as shown in Figure 3.4. You use the same dialog to specify calculations used for script parameters, web viewers, security privileges, and other purposes in FileMaker Pro.
Figure 3.4. Calculations form an essential part of FileMaker Pro development.
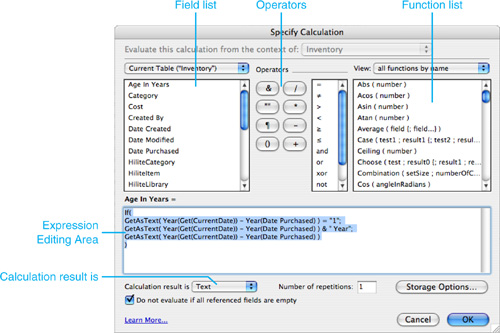
There is a Learn More link in the lower left of the Specify Calculation dialog.
Features of the Specify Calculation dialog box include the following:
- Field list— Select fields to include in your calculation from the list below the table menu. Use the drop-down menu to change from table to table. Note that double-clicking inserts a field into your calculation where your cursor currently sits.
- Operators— Use these buttons to insert math and special operators.
- Function list— Just below the View drop-down menu is a list of functions. Here you’re able to scroll through all of FileMaker Pro’s various functions and then double-click to insert. It’s a good idea to start here to get your syntax correct. The menu above enables you to filter your list by category to show the functions you need.
- Expression text box— This is where you assemble your actual formula or expression. This is a simple text entry area: If you want, work in a text editor and paste calculations here.
- Calculation Result Is list— Calculations return varying information, depending on what data/field type is required. If you want the field to be sortable by alphabet, set the return data type to Text. If you have a field returning, say, a price, set the type to Number.
Examples of calculations include the following:
3 + 4always displays its result of7.Sale + Taxdisplays the sum of two fields named Sale and Tax.Personnel::EmployeeIDdisplays the value of a field in a related table. This type of calculation is sometimes utilized to create a field in a table that takes part in a sort or other routine where you cannot use a related field. In old FileMaker Pro databases, relationships cannot be used more than one table away. Calculations designed simply to provide an in-table copy of a related value frequently litter such databases.Position ( Notes; "a"; 1; 1 )returns a numeric position, starting from the first character in the field Notes, for the first “a” found.IsEmpty ( MyField )returns a zero or one (Boolean) depending on whetherMyFieldhas a value in it, including zero. If a zero is entered, the field is technically empty. Only a null value is considered empty.If ( MyDate > 900; "yes" ; "no" )displays ayesfor dates entered inMyDategreater than 6/19/0003; otherwise, it displaysno(remember that you just tested for the number of days past 1/1/0001).
You can use the Specify Calculation dialog to create a calculation just by clicking fields, operators, and functions. However, you can also type directly into the expression text box. As Figure 3.4 shows, you can spread your calculation out—spaces do not matter except within quotation marks. You can also use indentation to clarify the calculation. Comments can be inserted using two slashes (//), which mean that the remainder of the line is ignored. Multiline comments can be entered starting with /* and ending with */.
![]() For more detail on calculations, see Chapter 8, “Getting Started with Calculations,” p. 249, and Chapter 15, “Advanced Calculation Techniques,” p. 433.
For more detail on calculations, see Chapter 8, “Getting Started with Calculations,” p. 249, and Chapter 15, “Advanced Calculation Techniques,” p. 433.
If your calculation formula looks correct but FileMaker is returning an odd result or ?, see “Mismatched Calculation Results” in the “Troubleshooting” section at the end of this chapter.
You can use calculations to create calculation fields with data derived from other fields or constants. Calculation can also format data, just as fields in layouts can be used to format data.
In general, good database design separates the presentation of data from the content of data, and layouts are the primary tools to be used to format data. However, with FileMaker, the situation is now not so clear. Because you can access FileMaker Pro databases over the Web, with ODBC, and from remote copies of FileMaker Pro that use their own layouts, you might want to consider formatting data with calculations, rather than layouts. Calculation fields that round a number to two decimal places or that perform automatic formatting of dates and so forth produce formatted results visible to all potential users of the FileMaker Pro database, not just those using a layout in the database itself.
Summary
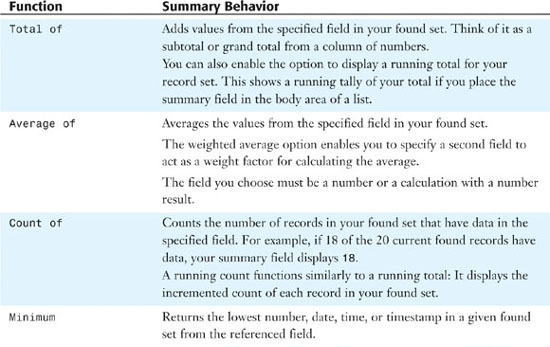
Summary fields allow you to evaluate information across a found set of records. Sum, Average, Max, Min, and Count are among the summaries you can establish. Don’t forget that they apply to found sets: Change your found set, and the result changes.
For example, say you have a table called Transaction, which contains Transaction_Date and Transaction_Amount fields. You can then define and place a summary field on a layout to total the Transaction_Amount field. The summary field adds the values of the Transaction_Amount fields for the currently active set of records. If you perform a find, by date, on 10/1/2006–10/31/2006, your found set will be all the transactions for the month of October, and the summary field will show just the aggregate monthly transaction amount. Perform a different find request and your total changes, reflecting the aggregate of the new found set. Table 3.1 contains a list of summary field functions.
Table 3.1. Summary Field Functions
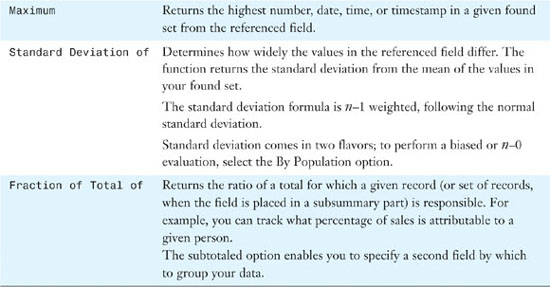
When you create a summary field, the Options for Summary Fields dialog opens, prompting you to choose the function you want to use and the field for which you want a summary (see Figure 3.5).
Figure 3.5. Summary fields are useful for performing functions across sets of records, but use them with care. They can increase the time it takes to load any given layout.
In Browse mode, a summary field evaluates your found set and displays a result when it is actually visible on a layout. For example, if a summary field is below the visible portion of a layout, it displays information only when the user scrolls to that portion of the window. Summary fields evaluate a found set for a given layout whenever you enter Preview mode, which is the logical behavior for printing—the primary use of Preview mode.
Working with Field Options
In addition to establishing fields and assigning data types, you can assign various options to your fields as well. These range in function from managing auto-entry of default data to validation checks and internal storage settings. They can vary for each field type.
After you name a field and choose its type on the Fields tab of the Manage Database dialog box, click Create to save it to your database. You can then opt to apply further behaviors via the Options button on the right. The first set of options is the auto-entry behaviors.
Auto-Entry Field Options
When defining noncalculation fields in FileMaker Pro, you can choose to have data automatically entered into a field as records are created and/or modified. The applications for this can range from assigning default values to fields, to automatically reformatting data, to inserting values from other fields based on certain trigger events.
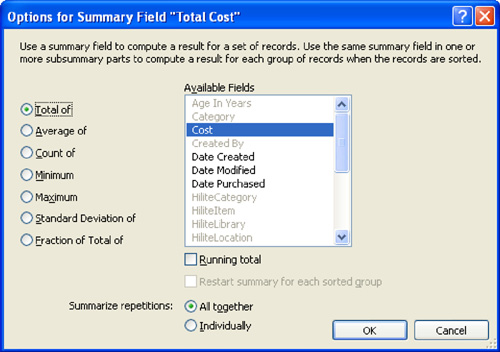
In some cases you might also want to prevent users from modifying these auto-generated values, such as when tracking a serial ID or applying a date you don’t want adjusted afterward (see Figure 3.6).
Figure 3.6. FileMaker’s auto-entry options allow you to define rules for automatically populating data into fields in your database.
Based on some trigger event, FileMaker inserts auto-entry data into a field. The most common event is record creation: When a user clicks New Record, data can be prepopulated into the record and be accessible for making changes. Each auto-entry function has its own particular rules for what trigger event applies. In addition to new record creation, other trigger events include record modification and modification of a particular field. We will cover both cases in the sections that follow.
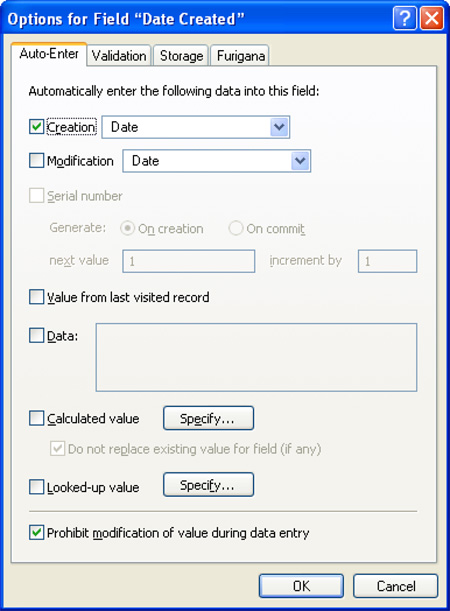
Creation and Modification
The first two options on the Auto-Enter tab deal with tracking and applying certain values as a record is committed to your database. They behave essentially the same way, with Creation values being applied the first time a record is committed, and Modification values applied thereafter as it is subsequently modified (committed again).
Values that can be automatically entered include the current date, current time, current timestamp, current username (from the General tab of the Preferences dialog under the Edit menu), and current account name (the one entered by the user when logging in to the database).
Both the name and account name can be problematic because users can change them. Knowing how your solution will be used can help you to decide what value to use. The name value is the name of the computer user—obviously not a good choice if your database will be used in a public library. The FileMaker environment typically controls account names, so they can be a better choice as long as people do not share them.
If you do not change any of the account settings of a new file, FileMaker establishes two default accounts for you: Guest and Admin. Both begin with full access to the database.
Serial Number
Using this option allows you to auto-enter a number that increments every time a new record is added to the table. Often this number uniquely identifies individual records in a table. The value can be generated either when the record is created or when it is committed. The difference is subtle: In the case of incrementing on creation, your number increments even if a user reverts and effectively cancels a record’s creation. The next record will then have skipped a number in your sequence. This doesn’t have much of an effect on your database unless your business requires strict tracking of each serial number, even those voided. In those cases, choosing On Commit helps avoid spaces in the sequence.
It is possible to include text characters in addition to a number as the starting value if you want. This enables you to create serial numbers that look something like “a1, a2, a3, a4....” Only the rightmost numeric portion of the value is incremented; the text portion remains unchanged. If you do this, you will want to use a Text field to allow for the alphanumeric combination.
One of the common uses of auto-entry options is in establishing serialized key values or IDs. This is a vital element of your database structure when you’re working with more than one table, but we encourage you to adopt some best practices regardless of how complex or simple your plans.
For every table in your database, the first field you should create is a primary key or ID field. These IDs uniquely identify each record in your database. You could go about having the system establish unique IDs automatically in several ways; our recommendation in most cases is to use a serial number set to increment automatically.
We can’t stress this practice strongly enough. If you ever want to tackle relational data structures, these serial IDs are a vital element in doing so. Further, if you ever export your data to another system or need to interact with other databases, having a key field that uniquely identifies each record in your database guards against confusion or even possible loss of data integrity. To create a serial key field, use the following steps:
- Define a number field. It is generally advisable to use number-based serial keys, but it is possible to use text as well; the important thing is to make certain your keys are unique and users cannot modify them.
- Go into the Options for that field and select the Serial Number option.
- Click the Prohibit Modification of Value During Data Entry option at the bottom of the dialog. This is an important step: If you establish unique identifiers that your users can override, you’re risking the chance that they’ll introduce duplicate IDs.
If you need an ID field for a business purpose (SKUs, student IDs, employee IDs from your organization, and so on), we recommend that you create separate fields for such cases. Generally, users should never need to access this serialized ID field, but you can opt to put it on a layout and allow entry in Find mode so that they can search if they choose.
![]() For a full discussion of the use of keys (or match fields), see the discussion in “Working with Keys and Match Fields,” p. 201.
For a full discussion of the use of keys (or match fields), see the discussion in “Working with Keys and Match Fields,” p. 201.
Value from Last Visited Record
Used most often as a way to speed data entry when information repeats often for groups of records, this function copies the value from a prior record into a given new record. Bear in mind that Visited means the last record in which you entered data. If you enter data in a record and then view a second record without clicking into and activating a field, a new record obtains its value from the data in the first, edited record.
Data
Here you can specify literal text for auto-entry. This is frequently used to set default states for field entry. For instance, in an Invoice table, you might have a text field called Status where you want to enter Not Paid as a default. As a regular text field, the value is still fully modifiable by a user.
Calculated Value
In addition to establishing a field as a calculation field, where a defined formula determines its value, it is possible to insert the result of a calculation into a field of another type, including a container field, by using an auto-entry option. Furthermore, if you uncheck the Do Not Replace Existing Value for Field (If Any) option, the result of the calculation formula is entered into the field, overriding any existing value, anytime a field referenced by the calculation changes.
Put differently, any field referenced in your calculation statement acts as a trigger: Anytime that referenced field updates, the calculation retriggers, and puts its result back into the auto-entry field.
![]() To learn more about advanced calculation functions, including custom functions, see Chapter 15, “Advanced Calculation Techniques,” p. 433.
To learn more about advanced calculation functions, including custom functions, see Chapter 15, “Advanced Calculation Techniques,” p. 433.
Looked-Up Value
This auto-entry option copies a value from a record in a related table into a field in the current table. (If there are multiple related records, the value from the first record will be copied; this means that you might want to think twice about using looked-up values for relations in which there might be more than one related record.) Anytime the field controlling your association to the related record changes, FileMaker Pro updates the value in the lookup field. For example, if a user enters a postal code into a given record, it’s possible you could have another table auto-populate your city and state fields with the appropriate information.
When a user enters a postal code in the record, the City and State fields trigger to pull values from the ZipCodes table. An important fact to keep in mind is that FileMaker copies the values from the ZipCodes table. If the source data changes or is deleted, this record remains unmodified until it is retriggered by someone editing the Zip Code field again.
Take special note that lookup auto-entry functions work just as all auto-entry functions do: They copy or insert information into a field. You are not displaying related information, nor are you controlling content by calculation. Thus, lookup values are not live links to related data. If you were to delete the records in the ZipCodes table in the preceding example, all your people records would remain untouched, preserving your city and state data.
This is an important distinction to understand, especially as we get into indexing later in this chapter. Consider an example for product prices: If you were to build an Orders database that tracks the prices of products, you’d want to store the price of each Order line item or product within the order itself. That way if your prices change, your historical orders preserve their original prices. To see how to create a lookup field, refer to Figure 3.7.
Figure 3.7. Often you’ll want only exact matches, but in some cases you can use the closest value based on a comparison of the trigger values in your related table.
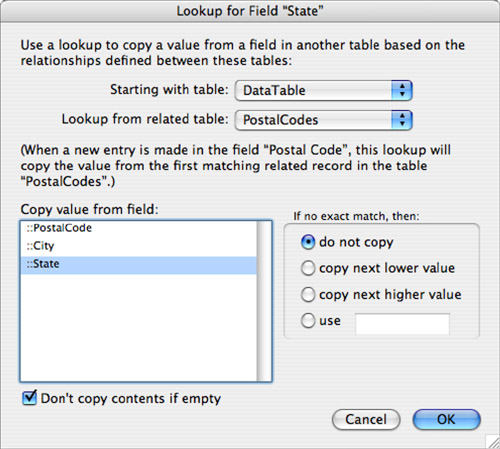
Remember that anytime your match field changes, your lookup refreshes. In this case, the auto-entry function does not act on record creation, but rather on committing/triggering.
When you’re performing a lookup, it is possible to work with near matches in addition to exact matches. In the case of the postal codes example, obviously you’d want only an exact match or you might end up with incorrect data. In a different case, however, you need not be so strict. Consider a scheduling system that automatically finds the closest available appointment: Enter a target date into a field, and the lookup function could return the closest match. Another application might be a parts database with units of measurement. You may not be able to find a .78’ wrench, but a .75’ might work. This sort of requirement is easy to meet by using the Copy Next Lower Value setting.
How you set up your trigger values is important here. It’s easy to compare numbers and come up with the next closest value. If your trigger field is text, FileMaker Pro uses ASCII value rules to compare and determine order.
Housekeeping Creation and Modification Fields
As a best practice, we also recommend that you create another set of fields in all tables that help track changes. Create a timestamp field and in the Auto-Enter options, choose Creation Timestamp. Define another timestamp field for Modification Timestamp, and text fields for Creation and Modification Account Names.
These four fields tell you exactly when a record was created or modified and by whom (assuming that you assign an account to each individual person using your database). If you ever need to identify problem records for a given day range, time, or account, these fields allow you to do this. We strongly recommend that you add them every time you create a new table. The only downside to following this practice is that additional storage space is required for this data; in this version of FileMaker Pro, this is unlikely to be a concern.
Using FileMaker Pro’s capability to import tables allows you to create a boilerplate new table, complete with a primary key serial ID, four housekeeping fields, and whatever other standard fields you want to define. Whenever you need to add a table to your database, import from the boilerplate rather than having to re-create these standard fields. If you are using FileMaker Pro Advanced, you can use the copy and paste commands for fields or a table containing these fields.
Field Validation
Storing correct and complete information is critical for generating accurate reports; establishing proper, expected conditions on which other functions and calculations are performed; and ensuring overall data integrity. Unfortunately, most data applications suffer from a chronic condition of having humans interacting with them; although some humans are worse than others, none is perfect. We all make mistakes.
As a user enters data into FileMaker Pro, you might opt to apply one or more validation checks to test that a record meets certain conditions before allowing the user to commit it to your system. This can be as simple as ensuring that a field isn’t empty, or as complex as making sure that an invoice doesn’t contain multiple entries for the same product. To review the various validation options available, see Figure 3.8.
Figure 3.8. You can set validation rules for the database fields.
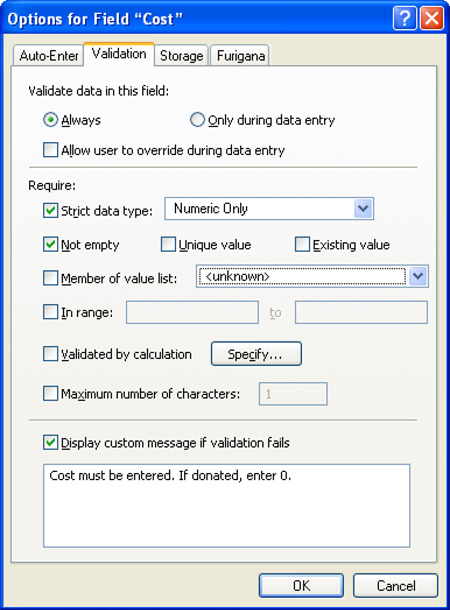
This example demonstrates a common approach to ensuring proper maintenance of your primary keys. This might be overkill if you’ve enabled the Prohibit Modification of Value During Data Entry option on the Auto-Enter tab, but on the chance that a developer turns that option off for some reason or that users import records into your database, this is a handy bit of insurance.
![]() Importing records can circumvent your carefully designed field validation rules. For a full discussion, see Chapter 22, “Importing Data into FileMaker Pro,” p. 627.
Importing records can circumvent your carefully designed field validation rules. For a full discussion, see Chapter 22, “Importing Data into FileMaker Pro,” p. 627.
Validation Conditions and Failure
Field validation simply tests whether one or more conditions, as defined in your Validation dialog, are false. If all validation tests are true, FileMaker Pro does not interrupt or prompt the user for action. Figure 3.9 shows an example of what your users might see when validation fails.
Figure 3.9. The Yes option appears only if a user has the option to override the validation warning.
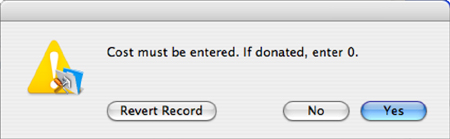
In this case, the check box allowing users to override has been left enabled, so they have the option to ignore the warning. When that function is disabled, the field does not allow bad data to be committed, and the system forces users to deal with the problem. They can choose either to revert the field to its previous state or to clear it.
When Validation Occurs
Validation occurs when users manually enter data into the field being validated; some validations happen the moment the user leaves the field, whereas other validations are deferred until the user commits the record. Remember, however, direct entry is not the only way to get information into a field. You can also import records or use various script steps, such as Set Field().
Simply clicking or tabbing into a field does not trigger validation; a change has to be attempted. Keep in mind that validation does not apply in cases in which users modify other, nonvalidated fields of a given record. A given field’s validation check occurs only when data in that specific field changes.
At the top of the Validation tab of the Options dialog (refer to Figure 3.8); notice the Always and Only During Data Entry choices. The latter choice tests for validation conditions only when users modify the field in question. If you enable the Always option, validation occurs during scripts and imports as well as during data entry.
If an import process attempts to write invalid data to a field, FileMaker Pro simply ignores the improper entry. The field remains unchanged and does not import your data. You will see a note in the Import Records Summary dialog listing how many errors FileMaker Pro encountered. If you enable the Only During Data Entry option, FileMaker Pro would insert the improper data into your database.
If you get trapped in a series of validation dialogs, refer to “Validation Traps” in the “Troubleshooting” section at the end of this chapter.
Some designers make a distinction between validation errors and quality errors. In general, validation errors must always be corrected and can never be ignored by users. They are hard and fast rules about the data: no nonnumeric data in a numeric field, no missing data, and so forth.
Quality errors (which FileMaker Pro nevertheless implements through the Validation tab of Options) can be overridden. You can construct a quality edit based on a calculation that compares the entered value to the value from the previous record; a difference of more than a certain margin might result in a flag and require the user to confirm the value. This type of quality checking can catch many keying errors.
Storage and Indexing
Field storage and indexing options exist on the Storage tab in your Field Options dialog. These options control how FileMaker Pro indexes each field to speed up searches and sorts and form relationships.
Global Storage
A developer can designate a field to have global storage on the Storage tab of the Field Options dialog. Fields with this option are commonly referred to as global fields, and collectively they’re usually referred to as globals. Global fields exist independently from any specific record in the database and hold one value per user session. Developers often use global fields to establish special relationships or to display unchanging information, such as interface graphics or field labels, across multiple records and layouts.
One vital element to learn is when data is committed and stored for globals: In a single-user environment, any change to a global field is permanent and saved across sessions. In other words, whatever value you last entered into a global will remain the next time you open your database. In the case of a multiuser environment, where a FileMaker Pro solution is hosted on FileMaker Server or via multiuser hosting, global values for each guest default to the value from the last time the database was in single-user mode; any change made to these defaults will be specific only to a given user’s session. Other users continue to see the default values, and after the database session is closed, the database reverts to its original, default state.
In the case of globals with values that can change, it is good to initialize them in a startup script. This could mean having pairs of globals. One of them can never change, and the other one can be changed by various users at various times, but you will always reset it in a startup script to the unchanging value. Now that local and global variables are available, it is often the case that they are better suited than globals for values that might change.
Using globals is a great way to keep track of certain states of your database. For example, you could use a global field to store which row of a portal was last selected. This field could then be used in scripts or calculation formulas.
![]() For an example of using a global to drive portal behaviors, see Chapter 17, “Advanced Portal Techniques,” p. 495.
For an example of using a global to drive portal behaviors, see Chapter 17, “Advanced Portal Techniques,” p. 495.
Another common use of globals is for storing system graphics. Establish a container field, set it for global storage, and paste a favorite company logo, a custom button graphic, or any number of elements that you can then control globally in a field rather than having to paste discrete elements on each and every layout.
Beginning with FileMaker 8, a new feature was created in the form of variables defined within scripts (as well as similar variables defined by using the Let() function within calculations). These variables exist only in memory and are not permanent fields that you add to your database schema. In the past, developers had to content themselves with using a slew of global fields; starting in FileMaker 8, the need for global fields has dropped considerably. However, you will still encounter them in legacy databases.
![]() To learn more about variables in FileMaker, see Chapter 16, “Advanced Scripting Techniques,” p. 477.
To learn more about variables in FileMaker, see Chapter 16, “Advanced Scripting Techniques,” p. 477.
Repeating Fields
The second section of the Storage tab on the Field Options dialog lets developers allow a field to contain multiple values. Such fields are known as repeating fields. On a given layout, the developer can array repetitions either horizontally or vertically, and in scripts can refer to specific repetitions within the field.
Repeating fields can be problematic. They behave just as individual fields might and are really just a shortcut for having to define multiple instances of a given field. It’s possible, for example, to have no values in the first and second repetitions, but to have a value in the third. This sounds convenient and makes sense intuitively, but imagine having to write a script that references that field. How do you know which repetition of the field to reference? Unlike an array in other programming languages, you cannot manipulate a repeating field as a whole. You can reference only one specific repetition at a time.
FileMaker 8 extended the usefulness of repeating fields somewhat by allowing the script step Set Field to programmatically reference a repeating instance. You can now open a Specify Calculation dialog to point a script to a specific cell within a repeating field. Note that the same is true for setting variables.
Repeating fields do have their place, however. Sometimes a single data value does have several components. An RGB color, for example, has three values: one for red, one for green, and one for blue. Creating an RGBColor field with three repetitions makes a great deal of sense.
Indexing
Databases store data by definition, of course, but they are also required to perform functions such as searches and sorts with that data. FileMaker Pro, like many databases, can index some of the data in a file to increase the speed at which it performs some of these functions and to enable it to relate data across tables.
An index is somewhat like a database within a database. FileMaker Pro can store, along with a specific value in a given field, a list of all the records in which that exact data is used. This enables FileMaker to recall those records quickly, without having to resort to a linear scan of your file. Aptly named, these indexes work just as a book index works: They facilitate finding all the locations in which a given item is used, without searching page by page through the entire book.
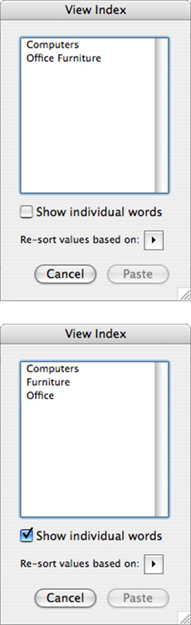
To familiarize yourself with the concept, look at a given field’s index. Click into a field and select Insert, From Index. If the field is indexable, and has already been indexed, you see a dialog box showing all the discrete values indexed for a given field. Just as when selecting from a value list, you can opt to choose from this list rather than type. As you can see in Figure 3.10, FileMaker Pro can create the index based on data values or individual words.
Figure 3.10. You can view index values using From Index in the Insert menu.
Allowing a user to select from an index is only one of the reasons to use indexes in FileMaker. Indexes enable FileMaker Pro to quickly perform find requests, sort records, and establish relationships.
There are two kinds of indexes in FileMaker: value indexes and word indexes. Value indexes apply to all field types, with the exception of container or summary fields. Word indexes apply only to text fields and are based on a given language or character set. The difference between the two index types, and when either is specifically enabled, lies in their applications.
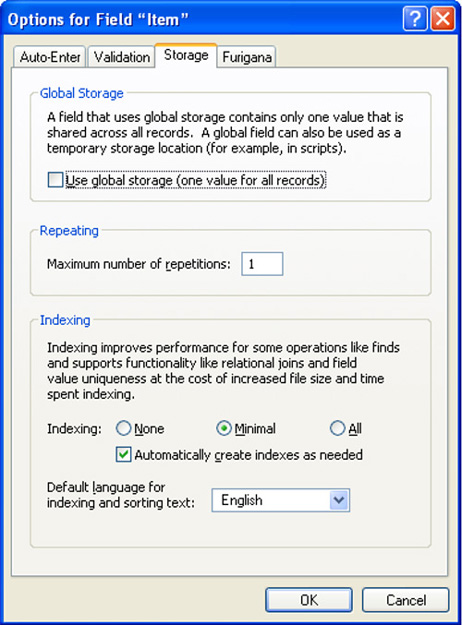
FileMaker Pro’s default indexing setting (found on the Storage tab of the Field Options dialog, displayed in Figure 3.11) is None, with the check box for Automatically Create Indexes As Needed enabled. Most developers, even the more advanced, should find that this setting serves most of their needs. (The Minimal checkbox produces a value index for text fields or calculation fields returning text. For all indexable fields, the All check box creates a value index, and for text fields or calculation fields returning text, it also produces a word index.)
Figure 3.11. FileMaker creates either one type of index or both, depending on how users define and use a field.
A database’s schema definition establishes value indexes, as a developer defines fields and builds relationships. In addition, value indexes allow for relationship matches and value lists. If a developer creates a serial ID and joins a relationship via such a field, FileMaker Pro creates a value index for the serial ID field.
Unless a developer explicitly sets a field to generate an index, FileMaker Pro creates word indexes as users are interacting with and using a given database. Word indexes are utilized in text fields for find requests; they are created when a user explicitly chooses Insert, From Index. If a user enters data in a find request for a field that lacks a word index, FileMaker Pro enables indexing for that field and builds one (unless it’s explicitly unindexed or an unindexable calculation).
At this point you might be wondering what all the fuss is about. Why not index every field in a database and be done with it? The downside to indexes is increased file size and the time it takes FileMaker to maintain the indexes. Creating new records, and deleting, importing, and modifying them, all take more time, in addition to the fact that the indexes themselves take up more file space.
Notice that FileMaker doesn’t allow you to explicitly control word and value indices. Value indices are possible for all field types; word indices apply only to text fields. The Minimal setting is an available option only for text fields, and when you see it marked, it indicates that at least one of the two indices exists for the field. There’s no straightforward way of determining which index exists. If you explicitly set the field to Minimal, FileMaker creates, on demand, either of the two indices based on how the field is used. When a user creates a find request including that field, FileMaker creates a word index; if a developer uses the field in a relationship, FileMaker creates a value index.
Only a subset of the fields in your database will ever need to be indexed, and FileMaker’s “on demand” approach makes things simple for developers. In general, it’s best if a field is indexed only when necessary.
![]() To explore the vagaries of storage and indexing considerations for calculation fields, see “Options,” p. 257.
To explore the vagaries of storage and indexing considerations for calculation fields, see “Options,” p. 257.
An important point to remember is that some fields are not indexable. This means that they will be slow when used in sorts and find requests, but, most important, you cannot use them to establish relationships. A field is unindexable if it is a calculation based on a related field, a summary field, or a global field, or if it references another unindexed, unstored calculation field.
You can also explicitly make a field unindexable by turning indexing options to None and unchecking the Automatically Create Indexes As Needed setting. In the case of a calculation field, an additional radio button option is available: Do Not Store Calculation Results—Recalculate When Needed. These settings are important to remember; they allow you to force FileMaker to reevaluate and display dynamic information. The Get (CurrentDate) function, for example, displays the current date if you have indexing turned off, but displays whatever date was last stored with the record if you leave indexing (and storage) turned on.
Furigana
The fourth tab in the Field Options dialog is one that many English-speaking developers will have trouble properly pronouncing, let alone using. Because of the adoption of Unicode support in FileMaker Pro 7, it is now possible to offer Asian-language double-byte language support. As a result, you can now manage Japanese.
Japanese is written using a combination of kanji, complex glyphs borrowed from Chinese that represent complete concepts, and hiragana, a simpler alphabet that represents the phonetic syllables of the language. Furigana is a smaller version of hiragana that acts as a cheat sheet for readers who aren’t familiar with a kanji character’s reading. The Furigana feature in FileMaker makes it possible to render a kanji-based block of text into its phonetic hiragana equivalent—quite useful when you don’t know how to read one of the more than 20,000 kanji characters. Suffice it to say that unless you’re a student of Japanese, native or otherwise, this tab will likely not attract much of your attention.
Troubleshooting
Mismatched Data Types
My data isn’t sorting properly. Where should I look first to diagnose the problem?
One of the most common bugs you’ll run into in FileMaker Pro is confusion stemming from mismatched data types. If your users are entering text data into a field you have defined as numeric, you’re bound to get unexpected results, and sorting will be unpredictable. Check your field types when your data appears to be misbehaving.
Mismatched Calculation Results
One of my date calculations looks like an integer. What’s going on?
Some of the more subtle extensions of the data type problem are calculation fields. Note that their result is both the determination of their formula and a data type that you set at the bottom of the Specify Calculation dialog. If you’re working with dates and return a number, for example, you’ll get an entirely valid calculation that will look nothing like “12/25/2003.”
Problematic Field Names
My web programmers are complaining about my field names in FileMaker Pro, and that I keep changing them. What should I consider when naming fields?
Some other systems are not as flexible as FileMaker Pro—this is especially true for URLs and the Web. Spend some time with Chapters 25, 26, and 27 if you ever plan to publish your database to the Web. FileMaker Pro breeds a certain freedom when it comes to changing field names as the need arises, but you’ll send your XSLT programmer into fits every time you do.
Also be sure to check the restrictions of various SQL databases in your organization. If you need to interoperate with them, your field names might have to conform to stricter naming standards.
You’ll be safe if you never use spaces or special characters and start each field with a letter of the alphabet or an underscore.
Validation Traps
My field validation seems to have gone haywire. I defined a field that now simply throws up one error message after another. What’s the problem?
At the end of the day, field validation is only a helpful bank of sandbags against the storm of human interaction your database will suffer. And as in all aspects of your database, the first and worst human in the mix is the developer. Just as with any programming logic, carefully test your validation conditions. FileMaker Pro can’t totally prevent you from illogically conflicting restrictions. For example, if you set a field to be unique and nonempty but also prohibit modification in the auto-entry options, the first record you create will trap your system in an irresolvable conflict.
It’s a good idea to leave the Allow User to Override During Data Entry option enabled while you’re building a solution and turn it off only when you have completely tested the field in question.
Recreating Indexes
I am getting find errors returned for valid requests. What has happened? What should I do?
This can be a symptom of a corrupted index. In Manage Databases, go to the Fields tab and select Options, then the Storage tab. This is where you manage indexes. Note the settings, then click the None checkbox and turn off Automatically Create Indexes As Needed. Close the various dialogs until you are back in FileMaker itself. If you want to be absolutely safe, quit FileMaker, restart it and then reopen the database. You will then have no indexes on the field in question. Go back to Manage Databases, through the Fields tab, Options button, and the Storage tab. Turn indexing back on using the settings that you noted. The index is recreated and should be correct.
FileMaker Extra: Indexing in FileMaker
One of the more significant changes beginning in FileMaker 7 revolves around indexing. In prior versions, indexing was restricted to 60 characters total, broken into blocks of up to 20-character words. Relationships had to be built around match fields or keys that were relatively short and generally nondescriptive. This fact is one reason we generally advocate using simple serial numbers for indexing purposes. It’s rare that you’d need more than 20 digits to serialize the records in a data table.
FileMaker 9 can index words up to approximately 100 characters. It can index text fields to a total of 800 characters, and numbers up to 400 digits. The limits to indexing have been effectively removed.
What this means to developers is that we can now use far more complex concatenated key combinations (ironically there will be less of that in FileMaker 9, given that data can be related across multiple tables), use longer alphanumeric keys, or, as suggested earlier, introduce descriptive elements to keys.
In the past, FileMaker Pro would identify “Special_Edition_Using_FileMaker_9” (32 characters) as identical to “Special_Edition_Using_MS_Access”—clearly a terrible mistake to make. It’s now possible to match against paragraphs of text or very large numbers. Determining matches is more exact, and finds and sorts are more robust.