
Chapter 28. Deploying and Extending FileMaker
In this chapter
FileMaker Deployment Options
One of the strengths of FileMaker is that a solution can be deployed in various ways. It can be used by a single user running FileMaker Pro 9 or FileMaker Pro 9 Advanced, it can be shared with peer-to-peer networking, it can run on FileMaker Server 9 or, with FileMaker Server 9 Advanced it can be published to the Web. With FileMaker Mobile, it can even be deployed to handheld devices. This chapter explores runtime solutions, customized deployment options, and plug-ins—additional ways to deploy FileMaker databases.
Runtime Solutions
For some solutions, the best deployment option is as a bound, runtime solution. A runtime solution can be distributed to users who can run it without having a copy of FileMaker Pro on their machine. Runtime solutions are created with the Developer Utilities, which are available only in FileMaker Pro 9 Advanced.
A typical example of a solution that you might deploy as a runtime solution is a product catalog. Perhaps you developed a gorgeous FileMaker database of all your products, and you want to send it to all your customers on a CD. You could create a runtime version of the files and do just this. Your customers would be able to browse and search for items, maybe even print or email orders to you, all without having a copy of FileMaker on their machines.
If you need to distribute a runtime solution to both Mac and PC users, you must bind a separate version for each platform, and you therefore need access to both a Mac and a PC during development—either on separate computers or on an Intel-based Macintosh that can run both operating systems.
Runtime solutions are primarily designed to be run as single-user applications. A runtime solution can’t be shared peer-to-peer. You can, however, host a runtime solution with FileMaker Server; users would need FileMaker Pro to access it, just as they would for any other hosted file. This does take away one of the main points of a runtime solution, which is the capability to distribute it widely to users who don’t have FileMaker—but it might be useful if you want to create a solution with two distribution models. One model would be to release it as a standalone, non-networkable solution, the other to release it as a networkable solution that does require FileMaker Pro and FileMaker Server.
Another deployment option that’s available via the Developer Utilities is to create a kiosk from your FileMaker solution. When run as a kiosk, a solution takes up the entire screen. Users don’t even have access to the Status Area or any menus, which means you must provide buttons for every conceivable action they might perform.
FileMaker Pro Advanced allows you to perform a range of functions on a grouped set of files; you’ll find them in the Developer Utilities under the Tools menu. This function of FileMaker Pro Advanced focuses largely on modifying your files in preparation for specific types of deployment.
Renaming Files
This might sound trivial, but don’t let the apparent simplicity here deceive you. Multifile solutions in FileMaker depend on filenames to maintain internal references. If you arbitrarily rename one of the files in a given solution via your operating system, FileMaker prompts you with a File could not be found error when it next tries to resolve a reference to that file. You risk breaking table occurrence references, script references, value list references, and more by renaming your files manually. We very strongly recommend against manually renaming individual files within a solution. You can, however, place all the solution’s files within a single folder (which is generally a good idea) and then copy or rename the entire folder without worrying. It is the renaming of individual files, not their enclosing folder, which causes the problems.
If you run across a file that shows signs of having been incorrectly renamed or lost altogether, the Database Design Report is a great place to turn to root out “file missing” problems.
![]() To explore issues of file references in converting files from prior versions of FileMaker Pro, see “Fix File References and External Data Sources,” p. 587.
To explore issues of file references in converting files from prior versions of FileMaker Pro, see “Fix File References and External Data Sources,” p. 587.
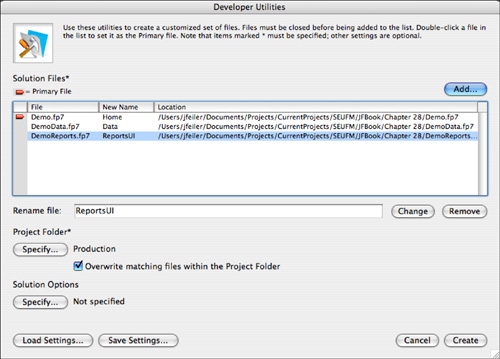
You can name your files by using the Developer Utilities dialog. Notice, as in Figure 28.1, that you will need to add all the files for a given solution to the dialog. This is important: You have to add both the file you want to rename and all the files that reference it. Then set new names for however many files you need to change. For example, suppose that you have a system composed of 10 linked files. Load all the files into the Developer Utilities dialog. Rename just the one file you intend to rename by typing in a new name and clicking Change. When you click Create, FileMaker generates new files in your destination project folder, leaving the old files unchanged. In the 10-file example, the one file would have its name changed, and all 10 files would have any references to that file updated to use the new name.
Figure 28.1. The files in this example are prepared for renaming.
After you click Create, the files are copied to the new location that you set by clicking Project Folder and selecting (or creating) a new folder. Note that you can choose to overwrite files with the same names.
The consequence of changing the names, setting a new project folder, and clicking Create is to copy the files to the new location and to change their names. But much more important is the fact that FileMaker changes the file pathlist appropriately. Figure 28.2 shows the before and after file references.
Figure 28.2. The file paths are updated appropriately.
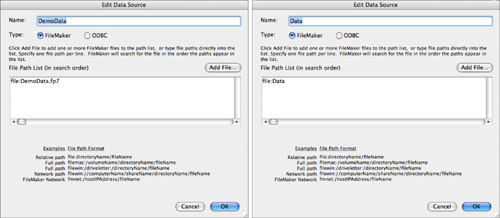
The appropriate updates to the filenames and paths are not just what you see by comparing Figure 28.1 to Figure 28.2a (before) and Figure 28.2b (after). It’s important that you realize what you are not seeing: The no-longer-needed file paths are removed. Particularly if you manually rename individual files, over time the file paths can become long lists of files no longer needed. In time, it is even possible for files that you no longer need and have long ago renamed to reappear as you clean up your hard disk; lo and behold, your FileMaker solution can break.
 To learn how to manually address filename and reference problems, refer to “File Reference Errors” in the “Troubleshooting” section at the end of this chapter.
Solution Options
Using the Specify button under Solution Options, you’ll find a range of actions that FileMaker Pro Advanced can perform as it creates a new solution and a new set of files. All these options generally pertain to readying your files for deployment; you would not necessarily use them during development, but rather at the end when you’re preparing files for hand-off to users.
Creating a Runtime Application
FileMaker Pro Advanced enables you to bind a set of files into a runtime application—one that includes the FileMaker engine and does not require that the user buy a copy of FileMaker Pro to make use of the solution you’ve built. This is a great way to create distributable software with FileMaker Pro, and FileMaker, Inc.’s licensing terms allow you to do so without further obligation.
You’ll find FileMaker Pro Advanced’s licensing details for runtime solutions in the Licensing PDF in the root folder of your FileMaker Pro 9 Advanced installation.
You’ll have to keep some conditions in mind. On its own, a bound runtime version does not support further development; a runtime solution does not include Layout mode, ScriptMaker, and the Manage Database functions, thus disallowing further editing of the files. However, unless you have bound it with the option to remove Admin privileges, you can open a bound runtime version with FileMaker Pro to make such changes. A runtime solution works only with the files bound with it; it may not be linked to other databases, either other runtimes or files hosted via FileMaker Server. Finally, a runtime solution is single-user only. If end users want to share the files, they have to turn to FileMaker Server and standard copies of FileMaker Pro.
It’s sometimes thought that a runtime file is necessarily read-only, but this isn’t the case. Assuming that the database user has the correct permissions, a runtime can be used to create, edit, and delete records just as with the regular FileMaker client. The misconception might stem from the fact that bound files are often distributed on CD, and such files are indeed read-only until they’re copied from the CD to a writable medium such as a hard drive.
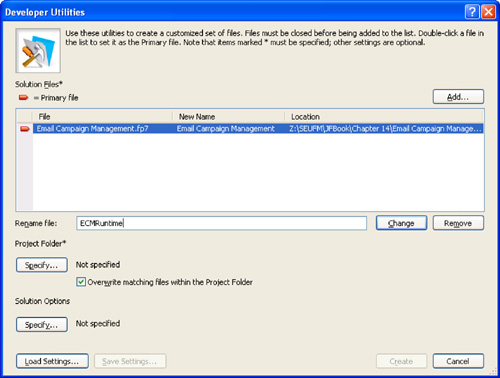
Let’s look in more detail at the process of creating a runtime solution. As with any other use of the Developer Utilities, you first have to choose the files you want to include in the bound solution, and load them into the Developer Utilities dialog window. Next, specify a project folder where the resulting solution files will be written (in their own directory) as shown in Figure 28.3.
Figure 28.3. Create a runtime solution.
Next, click Specify to open the Specify Solution Options dialog shown in Figure 28.4. This is very similar to the Specify Solution Options dialog that you can open if you click Specify when renaming files.
Figure 28.4. Solution options enable you to prepare a set of files for deployment with options beyond simply posting to a server.
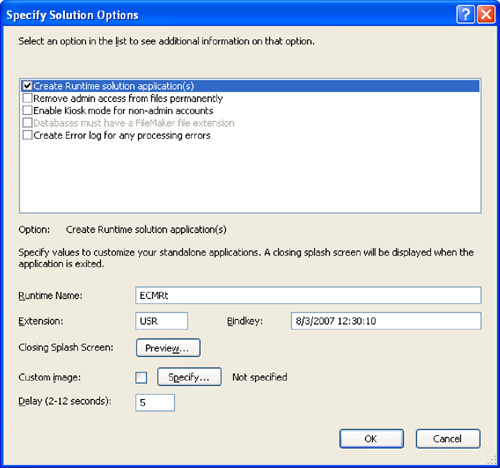
Here’s a brief rundown on these options:
- Runtime Name— The runtime name will be used to name the resulting solution directory, and it will also be the name of the master file created for the runtime (more details on the master file follow this list).
- Extension— To distinguish the runtime files from regular FileMaker files, which in many senses they still are, the binding process adds a custom file extension to each of the solution files. You can choose your own extension; otherwise, a default extension of .usr will be applied.
The extension for FileMaker-bound runtime solutions determines, in both Mac OS X and Windows, what application becomes associated with your individual solution files—which by definition is the runtime application you’re in the process of creating. These file extensions simply help identify the application that should open your files and differentiate them from other FileMaker Pro documents.
Mac OS X uses four-character extensions (creator codes), and FileMaker simply inserts an uppercase F after the first character (usr becomes uFsr). On Mac OS X, we recommend registering your creator code with Apple: http://developer.apple.com/dev/cftype/find.html.
On Windows a somewhat incomplete check can be found directly via http://shell.windows.com/fileassoc/0409/xml/redir.asp?Ext=fp7 (where the last three letters are the extension you want to investigate). Another source of information can be found at http://filext.com/. - Bind key— To have the runtime application recognize its associated files, the bind key in a given file needs to match the bind key of the application. This simple pairing ensures that a given application will authorize use of specific FileMaker Pro files. Notice in Figure 28.4 that FileMaker Advanced inserts a timestamp, by default, as a bind key. (If you are going to be binding both Windows and Mac OS X versions, you may choose to use the same bind key for both. This means that if you use the default timestamp bind key for the first solution that you bind, you should retype it exactly—or copy-and-paste it—into the second solution that you bind.)
Consider cases in which you’d want to be able to add files to a solution to upgrade functionality or address bugs. This introduces the complex issue of upgrade paths in a FileMaker Pro solution. You must remember that after someone begins using your solution, he will be adding and storing data in your files. If you were to simply replace those files with no concern for exporting or managing that data, users would open their applications and discover an empty shell waiting again for the creation of the first records.
To replace or add a file to a solution that has already been bound, use the same bind key when preparing that new file, and users will be able to drop the file in question directly into their solution folders. You need not replace the entire solution.
- Closing Splash Screen— When users close your solution, they will see a small closing splash screen. You can determine how long the screen will be visible (2–12 seconds).
- Custom Image— By default, the closing splash screen shows a FileMaker logo. You can instead include an image of your own for display on the closing splash screen. If you choose to include a custom closing image, size it for 382x175 pixels at 72 dpi. JPEG and GIF both work best in cross-platform environments; we don’t recommend any other file type.
After you’ve chosen your solution options, you can click OK to start the process of creating the solution. The solution files are written into a directory with the same name as the runtime name you established previously. It’s a common misconception about the runtime binding process that the result is one single, monolithic file. Try the process for yourself and you’ll see that this is not the case (remember, it creates a new set of solution files, so there’s no need to worry about hurting your current files). On the Mac you’ll get a sparse file set, whereas with Windows you’ll get dozens of supporting DLLs. Don’t be surprised by the differences between the two platforms, and keep the following caution in mind.
Creating a bound runtime solution is a platform-specific process. A solution bound on the Mac OS cannot be used on Windows and vice versa. The binding also has to occur on the target platform. To create a bound solution for the Mac OS, you have to run FileMaker Pro 9 Advanced on a Mac, and likewise for Windows. It’s not possible to create both Mac and Windows runtimes in a single pass, from a single machine.
Regardless of platform, each bound solution contains a master file, of which you’ll want to take special note. The file has the name solution_name.extension, where solution_name is the solution name you chose when binding, and extension is the custom extension you chose. If you were creating a solution called Sales, and chose the default .usr extension, the master solution file would be called Sales.usr.
In addition to the master file, there will also be a single additional file for each FileMaker file that went into the solution. Each will be named with your chosen file extension. So, if your Sales solution was made up of files called Contact, Company, and Order, the bound solution would contain the following files: Sales.usr (the master file), Contact.usr, Company.usr, and Order.usr.
The master file is significant because this is the file that must be run to gain access to the solution. For example, if you were packaging the runtime onto a CD, the CD might contain your solution directory, but also a shortcut to the master file at the root level of the CD. You’d rather users not have to rummage around in a directory full of files to find the right one.
The individual database files (as opposed to the master file) are actually not much changed by the binding process. The database files within the application remain FileMaker Pro files, accessible from FileMaker Pro proper, assuming that you haven’t disabled such access via the Remove Admin Access solution option covered later in this section. You could continue to work with these files in FileMaker Pro or FileMaker Advanced, add features, and simply redeploy the altered files without having to re-create a runtime solution each and every time a change is called for. Likewise, you can have some users make use of the runtime applications and still others access separate copies of the files (or share files) with full versions of FileMaker Pro. It’s rare that you’d build a database that could be used in both single-user and multiuser modes, but the point here is that it’s possible.
Note that this somewhat mitigates the point that bound solutions are platform-specific. This is true of the solution as a whole, but the constituent database files remain for all intents and purposes FileMaker files and can be edited as such on either platform.
Some bound runtime solutions require a good bit of data entry prior to their being ready to distribute to a wide audience. It can be convenient to host the files—just as they are—on FileMaker Server to allow multiple people to enter data. The fact that the FileMaker files themselves are unaltered by the binding process means that you can swap them between a bound runtime application and FileMaker Pro or Server as needed.
Removing Admin Access
Removing admin access often goes hand-in-hand with creating a runtime solution, but it doesn’t necessarily have to. To prevent anyone—including yourself—from changing the files in a given solution (regardless of whether you intend to bind them into a runtime), it is possible to remove all admin (or better, perhaps, developer) access to a set of files.
There’s no going back after you remove the access—so be certain that you have all the kinks worked out of your solution, and keep your original files backed up!
You’ll remove access to the Manage Database, Value Lists, File References, Accounts & Privileges, and Custom Functions dialogs. Access to Layout mode and ScriptMaker is also removed.
In addition, removing admin access removes any accounts set up explicitly with the [Full Access] privilege set. This is quite important because it actually modifies the account and privilege settings of your files. Your “developer” account will be removed. If you have written scripts that depend on a certain account being there, you must be careful in how you accomplish such functions. You also have to ensure that you have a password that will allow you into the solution after you run this process.
It’s possible to define an account and assign a custom privilege set that has the equivalent of full access without assigning it to the built-in [Full Access] set, but keep in mind that, again, the capability to use all editing functions will be removed from the files. Those menu options, regardless of the account you used to sign in, will be grayed out.
![]() For a complete understanding of security in FileMaker, see Chapter 12, “Implementing Security,” p. 371.
For a complete understanding of security in FileMaker, see Chapter 12, “Implementing Security,” p. 371.
We recommend, at a minimum, making certain there’s a good way to export all data from a solution before removing admin access. Just write a scripted routine that saves all records to XML files. This at least ensures that you can extract data from a locked-down version of your solution.
Developing Kiosk Solutions
Kiosks are good ways to present users with a completely encapsulated user experience. As an example, one of our favorite projects was building a kiosk-based wine recommendation service for grocery stores using touch-screen input.
Kiosk mode allows FileMaker Pro to open full-screen, with no toolbars or menus. On Windows and Mac OS X, the taskbar and Dock, respectively, become unavailable as well. This has the effect of taking over the entire computer environment and allowing you to build complete appliances that serve a specific purpose. If you combine kiosk mode with an alternative means of data input—touch-screen input, bar-code readers, or other devices—the result can be something that very much departs from what you might think of as a database.
When preparing a solution for kiosk mode, you need to consider several unique issues, not the least of which are important user interface elements. Because FileMaker’s menus are inaccessible in kiosk mode, a vital requirement is to offer users a means for at least exiting the application. Without a scripted quit routine, users have to force-quit the application and might lose data as a result.
Being able to exit the application, though, is just the first requirement. Any function you’d like users to be able to perform must be scripted and attached to a layout object. You can opt to leave the FileMaker Status Area open if you want, but none of FileMaker’s native keyboard shortcuts will work (for, say, creating or deleting records).
Most kiosks offer a complete set of scripted functions attached to a custom-crafted user interface, and very rarely do developers opt to leave the Status Area open. Therefore, you need to create scripts and buttons for navigating from layout to layout, for creating records, for managing any importing or exporting of data, and for dealing with upgrading the files themselves, if necessary.
After deploying a kiosk to end users (it need not be a kiosk—it could just be a copy of a FileMaker database you’re distributing widely), you leave the world of modifying and managing workgroup solutions and enter the world of commercial development, where your ability to tweak things becomes exponentially more difficult. This suggests that a solution needs to be completely tested and perfect before it goes out the door—or else you have to craft and implement an upgrade strategy that allows you to pass new functionality to your users without leaving them lost, with no means of preserving whatever data they might have input. This strategy could be as simple as exporting all data from the old version and importing into the new, or you could build a distributed file system in which it’s possible to replace certain files without altering the data itself.
![]() For ideas on user interface approaches, see Chapter 14, “Advanced Interface Techniques,” p. 415.
For ideas on user interface approaches, see Chapter 14, “Advanced Interface Techniques,” p. 415.
Polishing Your Custom Solution
When distributing a custom solution, you can better tailor its look and feel by creating a custom menu scheme that reflects and supports the identity of your application. You can implement a completely customized menu scheme. Note that this will not be of any use in a solution destined for kiosk mode because kiosk mode removes menu access, as explained in the preceding section.
A custom menu scheme allows you a very high degree of control over your solution: You could write a complete help system that might include opening a FileMaker Pro file or interface in itself. Users might then be able to perform find requests and employ other familiar approaches to using your system. The About menu could be as simple as a window with an image or a logo that is brought forward, or you could get as fancy as a QuickTime movie that is played within a container field. FileMaker Pro Advanced gives you the opportunity to truly customize a solution so that it takes on an identity of its own.
![]() For more information on custom menus, see “Working with Custom Menus,” p. 421.
For more information on custom menus, see “Working with Custom Menus,” p. 421.
This might seem a minor point, but we’ve found that if you take pains to give your solution a name and add even simple levels of customization, end users will more easily accept the system that they will presumably spend a good percentage of their work lives using.
It’s also somewhat helpful in getting users and IT folks to differentiate FileMaker Pro—the technology—from your specific solution. If you name and modestly customize it, you foster a better sense of differentiation by creating an identity other than “the FileMaker database.”
Error Log
As Developer Utilities runs, it can keep track of any errors it encounters. To generate a log, simply turn on this option in the Solution Options. A text file named LogFile.txt is created in your solution folder. Some Developer Utilities processes run into errors that don’t prompt dialogs, so it’s a good idea to check the log before wrapping up a solution for end users. The following are the errors you’ll find in the log:
Updating File Specs for this destination file skipped due to a previous fatal error.Destination file could not be created, and all further processing on it was skipped. File:Skipped runtime generation, due to missing or damaged resources.Destination folder could not be created, and all further processing was skipped. Folder name:
As you can see, these messages aren’t particularly illuminating and generally indicate that you have a significant problem with the interaction between your OS and FileMaker’s processes. In testing for these conditions, a full hard drive was the cause for some of these issues. If you see such messages, verify that it’s possible and practical to create a solution directory in the place you chose (meaning, check for a full disk, restrictive permissions, and the like), and verify that the source files open correctly and don’t appear corrupted.
Plug-ins
Plug-ins extend FileMaker Pro’s capabilities and are quite varied. Their offerings range from charting functionality, OS-level file manipulation, and bar-code readers to scientific math functions, credit-card authentication, help systems, telephony, and more.
We encourage you to visit FileMaker’s website to explore a wide range of plug-ins. Just go to http://solutions.filemaker.com and click Plug-ins in the For Developers area at the lower right.
Plug-ins are written and compiled in accordance with FileMaker Pro’s plug-in API. They’re not something many FileMaker developers will ever have to create, and you generally do not have access to the code from which they’re built.
If you want to delve into writing your own plug-ins, you must be an expert in either the C or the C++ language. (We don’t recommend a FileMaker plug-in as your first C++ project!) You also need a development environment, such as Xcode for the Mac or Visual Studio for Windows, and the plug-in API documentation and sample files that ship with FileMaker Pro Advanced. Plug-ins are platform specific, so if you want your plug-in to work on both Mac and Windows, you need to do at least some reengineering to get your code to compile and run correctly on both Mac and Windows.
As in all third-party software products, we recommend you get to know a given plug-in well and test it along with the rest of your solution before deploying. Another obvious consideration is cost: Some of your clients might benefit from utilizing a plug-in, but remember that this is third-party software that might require a purchasing license.
Understanding Plug-ins
Plug-ins work by adding external functions to your calculation functions list. Generally, but not always, they take a single text parameter (although the parameter may be internally delimited, containing several values). The result of the plug-in operation is delivered in the form of a calculation result.
An actual external call might look like this:
XMpl_Add( numberInput1; numberInput2 )
If you use this plug-in function, it returns the sum of two numbers. To make use of the function, you generally have to store its result someplace; often in the context of a script step that puts the value into a field or variable:
Set Variable [$sum; XMpl_Add( numberInput1; numberInput2 )]
The name of the plug-in function is a string specific to the plug-in you’re working with. The plug-in governs the string’s syntax, and if it follows proper FileMaker, Inc., conventions, the string includes the name of the plug-in as well. In this case, the example is drawn from FileMaker’s included sample plug-in (described further in the next section), and XMpl_ is the prefix FileMaker chose. Likewise, the expected parameters passed as text vary widely from none to complex data arrays. FileMaker Pro 9’s data storage limit of 2GB per field means that we could be facing some quite complex programming within the realm of a single text field. One of our favorite charting plug-ins (xmCHART, found at www.x2max.com) requires that a complex array of information be passed both to format and then populate the charts it returns.
The results of a plug-in are returned as a calculation result, but often some other action might be performed as well. For example, a dialog might appear. Often the calculation field simply serves as a means for passing error conditions.
For example, a plug-in might copy an image file from one directory to another. Or it might display a dialog of some kind. Or it might create a chart image and place it on your clipboard. The possibilities are nearly endless and we recommend, again, exploring available plug-ins to understand specific cases.
Some older-style plug-ins may appear in the functions list as external ( plugin ; param ).
Using FileMaker’s Sample Plug-in
The installation disk for FileMaker Pro Advanced includes a sample plug-in, including the C++ library and code necessary for building it.
The example is in English Extras/Examples/FMExample (or Extras en Francais/Exemples/FMExample or Italiano Extra or Deutsch Extras) on the distribution CD or the downloadable disc image. It is not in the English Extras folder inside the FileMaker Pro 9 Advanced folder installed on your computer.
FMExample offers some basic functions that should get you thinking about what plug-ins are capable of:
XMpl_Add— Adds two numbers. This is totally superfluous because you’d always use a calculation to do so, but it serves as the most basic example of a plug-in function.XMpl_Append— Appends the contents of one text field to another. You can continue to add parameters to the function. It simply appends all those that you pass it. This function is redundant with the&operator.XMpl_NumToWords— Converts a number (1111) to words (One Thousand, One Hundred and Eleven).XMpl_StartScript— Initiates a script as specified by filename and script name.XMpl_UserFormatNumber— Reformats a number based on user preference. The plug-in’s default is a standard (111) 222-3333 North American phone number.
The sections that follow discuss the process of installing and configuring plug-ins in FileMaker.
Installing Plug-ins
There are two distinct types of plug-ins: purely client-based and client-based with a server-side component. Deployment is consistent between the two, and it has two varieties:
- Extensions Folder for the Application— To enable a plug-in, place it in the Extensions folder with the FileMaker application folder for each client, regardless of whether it has a server-side component. In addition to the client-side installation, server-side plug-ins have to be deployed to the Extensions folder on the server as well. This is true for both Windows and Mac OS X platforms.
- Extensions Folder for the User— Instead of placing the plug-in in the FileMaker application’s Extensions folder, you can place it in an individual user’s FileMaker Extensions folder. The locations of these folders are:
Windows XP: C:Document SettingsUser NameLocal SettingsApplicationDataFileMakerExtensions
Windows Vista: C:UsersUser NameAppDataLocalFileMakerExtensions
Mac OS X: Macintosh HD/Users/User Name/Library/Application Support
If your plug-in is not responding, refer to “Plug-in Not Responding or Not Installing” in the “Troubleshooting” section at the end of this chapter.
Deploying Plug-ins via FileMaker Server
FileMaker Server offers auto-update functionality that copies a plug-in from the server machine onto a client computer when a requisite plug-in is either out of date or missing altogether on the client. This saves a great number of headaches and makes it possible to seamlessly fold a plug-in into a workgroup solution.
The functions that manage auto-update are called by scripts and require, ironically, that the Auto-Update plug-in be installed and enabled on all client computers. Fortunately, it is installed and enabled by default with FileMaker Pro and FileMaker Pro Advanced. Note that the auto-update functionality deploys the plug-ins to the user Extensions folders (the second option described in the previous section).
![]() For a full discussion of using plug-ins with FileMaker Server, see “Automatically Updating Plug-ins,” p. 820.
For a full discussion of using plug-ins with FileMaker Server, see “Automatically Updating Plug-ins,” p. 820.
Configuring and Enabling Plug-ins
To enable a particular plug-in, visit the Preferences dialog within your FileMaker Pro or FileMaker Pro Advanced application. Notice that to use a given plug-in, you have to explicitly enable it by marking its respective check box, as shown in Figure 28.5.
Figure 28.5. Plug-ins are enabled and configured via the Preferences dialog.
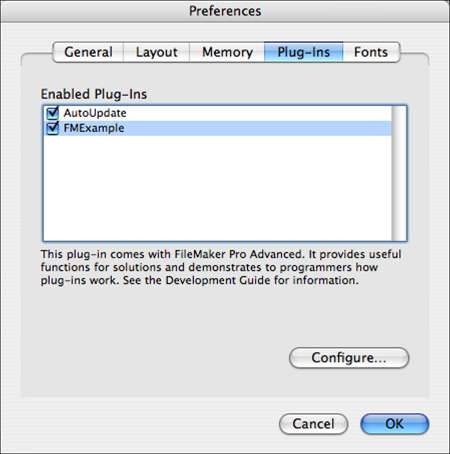
Notice also that your AutoUpdate plug-in is enabled in this list as well. It is here that you can find all the plug-ins available for a given client.
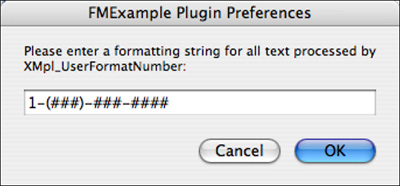
Some plug-ins offer configuration choices (see Figure 28.6). Every plug-in is different; here we’re using the sample plug-in that ships with FileMaker Pro Advanced, FMExample.
Figure 28.6. FileMaker’s FMExample plug-in gives users the option to specify a number format for one of its functions in its configuration attributes.
If you’ve just installed a plug-in, you might have to close and restart your FileMaker Pro client to gain access to its external functions. An exception is the case in which a plug-in is downloaded and installed by the Auto Update function, as discussed in Chapter 29, “FileMaker Server and Server Advanced.” In that case the plug-in is immediately enabled for use.
Troubleshooting
Plug-in Not Responding or Not Installing
My plug-in isn’t working. Where do I start to diagnose and fix the problem?
Issues with plug-ins can be difficult to troubleshoot. If a plug-in isn’t responding, check first to see that you have the latest version, and make sure that it is enabled on your client computer. Restarting FileMaker Pro (or Developer) after adding a plug-in to the Extensions folder is also a necessary first step.
Beyond that, your testing has to encompass the functionality of the plug-in itself. You might, for example, be struggling with a plug-in written for another version of FileMaker Pro. Some plug-ins are limited to specific versions of FileMaker.
When using the Auto Update feature, one of the most common mistakes to make is forgetting to turn on the Auto Update option at the server itself.
On Intel Macs, some plug-ins might require that the FileMaker application itself have the Use Rosetta option in the Get Info dialog checked. Select the FileMaker application and choose Get Info from the File menu to check the status of Rosetta.
File Reference Errors
I renamed my files, but still seem to have problems with missing files. How can I manipulate my file references by hand?
If you encounter problems with file references, where you get “file missing” error messages when FileMaker Pro opens your database solution or you notice such in your DDR, we recommend first working with the Define File References dialog, (Manage, File References, under the File menu). You might be able simply to repoint a file reference to repair some issues. In other cases, you might have to reestablish connections manually; to identify all such places where that will be necessary, refer to the DDR.
Again this is a symptom of a file having been manually renamed at the OS level. The Rename Files function in FileMaker Developer is a great way to rename files all you like; we encourage you to use it whenever this is necessary.