
Chapter 14. Advanced Interface Techniques
In this chapter
User Interfaces in FileMaker Pro
FileMaker Extra: User Interface Heuristics
User Interfaces in FileMaker Pro
FileMaker Pro provides you with a variety of tools with which to build the interface. This chapter discusses some of the advanced tools you can use. But the user interface is not just a matter of graphics. It includes everything that lets a user manipulate the database as well as database features (such as calculations) that work with the interface to not only let the user manipulate the database but to also understand what the options might be.
![]() The graphical user interface, calculations, scripting, and other features of FileMaker Pro all work together. For more information on topics that integrate these tools, see Chapter 18, “Advanced FileMaker Solution Architecture,” p. 517.
The graphical user interface, calculations, scripting, and other features of FileMaker Pro all work together. For more information on topics that integrate these tools, see Chapter 18, “Advanced FileMaker Solution Architecture,” p. 517.
Create a prototypical layout and menu set for your system and then test it with users before building the rest of your system. Establish a common standard for where things go, how large the screen is, how portals look, where field labels sit, and how you’ll use menus, and then get buy-in from the people who will ultimately live with the database day in and day out. Have users test the interface—that means use it. Very often, the first reaction of users to an interface is that the font is too small (or large), the colors too subtle, and so forth. It is only by sitting in front of a computer (with a screen resolution the size that the user will actually use) that the functional capabilities of an interface can be evaluated.
As you test, don’t teach. Provide the user with the basic information you will expect to provide when the system is complete (six basic interface elements and their functionality should be plenty). Then watch for mistakes. Don’t teach or instruct. Watch what the user does right and wrong. The mistakes the user makes are most often mistakes you have made in the interface design.
When moving forward in your system, it will be easier to duplicate your template layout than to start from scratch each time. This also saves time: After solving the problem of look and feel, you won’t have to spend more time thinking about it as you create new layouts.
FileMaker’s Native User Interface
A primary consideration for your user interface (UI) is to what degree to use FileMaker’s own native elements—the Status Area, menu commands, and Scripts menu—or how to go about replacing them with your own buttons, scripts, or custom menus.
It is entirely possible to build a perfectly usable FileMaker database without adding a single button to any of your layouts. Users can rely on the Layout pop-up menu in the Status Area and, for those reports and functions that require scripts, turn to the Scripts menu, or to any special menus you added as custom menus. Relying heavily on FileMaker’s native UI delivers some significant benefits in the time it takes you to build a database. Your users are likely already to understand at least some of the basics of working with a FileMaker database as well. This bare-bones approach can “just get it working” quite quickly. The downside, aside from simple aesthetics, is that your database might not be particularly intuitive for nondevelopers to manipulate in cases in which your data structure becomes complex.
A major consideration in using the native FileMaker interface is who your users are. If they are used to running a variety of FileMaker solutions, they are probably familiar with the menus and commands. Making them learn your own interface is counterproductive.
We strongly recommend embracing FileMaker’s raison d’Étre: flexibility. Although it’s possible to pull off some quite advanced custom-crafted user interface designs, make sure that you take on added complexity deliberately, by choice, and recognize the cost.
Be sure that if you use a native approach in FileMaker, do so fully and make use of its security. You can still leave FileMaker’s menu commands available to your users if you carefully think through your security setup.
You can also disable the native menu choices you don’t want used or override them with your own custom scripts by creating custom menu sets. Refer to the section “Working with Custom Menus,” later in this chapter.
![]() For complete details on FileMaker security, see Chapter 12, “Implementing Security,” p. 371.
For complete details on FileMaker security, see Chapter 12, “Implementing Security,” p. 371.
Building Your Own Interface
The alternative to a native FileMaker approach is to replace the Status Area and menu functions with your own buttons, scripts, and custom menus. The approach here gives you the most control but also signs you up for the most work.
When following such an approach, you will have to replace all the functions of the Status Area in three of the four modes (it is not possible to replicate its functions in Layout mode), and you’ll likely opt to close and lock the Status Area after you have done so.
This process is identical in nature to building other interface elements: You must create objects to serve as buttons (images, text, or some other FileMaker layout object) and then create scripts to replicate the functions of the Status Area, such as “go to next record” or “go to previous record.” One of the more challenging elements of re-creating all the functions of the Status Area can be the Omit check box control while in Find mode.
Note also that with the capability to modify menus beginning with FileMaker Pro 8 Advanced’s Custom Menus features, FileMaker systems no longer have to be either/or propositions with regard to using all native FileMaker controls or locking them down completely. In past versions, if there was one element of the native FileMaker controls you wanted to prevent users from accessing—the Delete All Records menu item, for example—you had only one choice: Lock down all menus. This then meant you faced replicating a good deal of functionality to control just those items you wanted to customize.
By using FileMaker Pro 9 Advanced, you can leave elements of native FileMaker functionality available while locking down just those you need to restrict.
A Happy Medium
In reality, the best interface is likely to be a combination of the native FileMaker interface and a totally customized UI. Draw two lines in the sand: the first represents your users’ degree of familiarity with FileMaker and its command. The second represents those essential items of control and functionality that cannot easily be achieved with the standard interface. With those two lines in the sand drawn, you should find it easy to decide how to proceed.
The interface should be predictable and consistent—definitely within your own solution and, if possible, with others the users are familiar with. Inside the English Extras folder in the FileMaker folder, you will find a two-page PDF document about the starter solutions. It identifies the elements of the consistent interface used there. It is a good starting place.
In working with the starter solutions, remember that FileMaker has made the interfaces consistent, but some of the functionality is deliberately inconsistent so that you can see different ways of doing things.
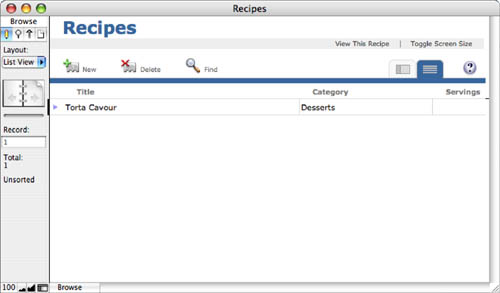
Figure 14.1 shows a standard starter solution form. The top of the layout provides information and standard controls. Users quickly learn text in the gray bar is clickable (View This Recipe and Toggle Screen Size); you do not need to emphasize that these are buttons once this convention is in place.
Figure 14.1. Use the starter solutions as interface guidelines.

Users also quickly learn to switch between the Form view shown in Figure 14.1 and the List view shown in Figure 14.2. The consistent icons in the pseudo-tabs as well as the small blue disclosure triangle in Figure 14.2 mean that the user never gets lost.
Figure 14.2. Navigation between layouts is consistent and simple.
This is one of the simpler starter solutions. Many of the others use the tab control shown previously in this book (and discussed further in this chapter). It is an incredibly powerful interface tool and a remarkably easy way to put a substantial amount of information into a small area. (The first rule of computer interfaces is this: The screen is never large enough.)
Interface Look and Feel
Remember that container fields, as well as graphical objects pasted onto a layout, can be turned into buttons and thus associated with a script action. This enables you to design quite complete user interface elements in the image-editing software of your choice. Buttons can be far more than simply gray rectangles, and it’s quite possible to create a user experience that feels nothing like FileMaker in its native state.
We recommend that you insert all such graphical UI elements into container fields set for global storage, rather than pasting them directly on layouts. If you ever need to make a change, you need only do so in one place, rather than having to paste a modified element back onto all the layouts on which it was used and reapply its script or button behavior.
To use this container method, simply create a single repeating container field set to global storage. When placing buttons on your layouts, instead of placing the graphic element itself, simply place a field with the proper dimensions and set it to show repetition X through X (say 3 through 3) to display the applicable graphic. Then attach a button behavior to that field. From this point forward in the chapter, when we speak of placing button objects on a layout, this is the method we prefer, but we will not refer to it continually throughout the chapter.
Remember, when you are placing a button object on multiple layouts, first apply the script behavior to the object, and then copy and paste on all layouts with the button behavior intact. If the button has a different implementation on different layouts, consider making the script it calls parameterized so that the only modifications you need to make are changes in script parameters from layout to layout. This means not attaching New Customer or New Order to buttons but rather creating a New script that can receive parameters such as Customer or Order.
For maximum control, it’s even possible to create a kiosk experience in FileMaker Pro that takes complete control of the screen. FileMaker’s menus will not appear in kiosk mode, and you can choose to close and hide the Status Area as well. For all intents and purposes, the entire look and feel of the screen will be in your hands. A kiosk typically isn’t something you’d want to deploy for use on desktops: It takes over the entire screen and isn’t well suited for working with other applications. However, it is ideal for certain types of environments, including retail and museum applications.
![]() To learn more about creating kiosks in FileMaker Pro Advanced, see “Developing Kiosk Solutions,” p. 776.
To learn more about creating kiosks in FileMaker Pro Advanced, see “Developing Kiosk Solutions,” p. 776.
Single File Interface Versus Distributed Interface
With the advent of the new architecture in FileMaker 7, there were many discussions about the best way to develop FileMaker solutions. Now it seems as if the answer is clear: use a separate file (or files) for interface than for data. The data files might contain scripts, but they should not be interactive. If they need to alert the user about something, they should return script result codes. The interface files frequently contain scripts that call scripts in the data files; they can check the result values and pose alerts. That is the distinction: UI files are interactive, and data files are not.
This also simplifies the development process. If no data lives in the interface files, you can email them back and forth and not worry about having to send or receive large amounts of data; the security issues are much simplified.
The only data that normally lives in UI files is perhaps a table with some global fields (including global container fields for interface elements) and, occasionally, a table of activity logs. You can make a powerful argument that a table that tracks user sessions belongs in the interface file, not the data file.
![]() To review working with multiple files from an architectural perspective (beyond just interface considerations), see “How and When to Use Multiple Files,” p. 239.
To review working with multiple files from an architectural perspective (beyond just interface considerations), see “How and When to Use Multiple Files,” p. 239.
Obviously, there might be times when you have no choice: Your database might have been converted from a version before FileMaker 7, in which case you have to do substantial rewriting to bring the interface elements into one file. It is often best to live with the separate files created by the conversion process, given that security settings and so forth have already been replicated for you during conversion.
![]() For more information on converted files, see Chapter 20, “Converting Systems from Previous Versions of FileMaker Pro,” p. 581.
For more information on converted files, see Chapter 20, “Converting Systems from Previous Versions of FileMaker Pro,” p. 581.
Working with Custom Menus
To modify the menu sets in FileMaker, you have to develop using FileMaker Pro 9 Advanced; however, anyone working with FileMaker Pro (or a bound runtime solution) can utilize the custom menus you create. The custom menus feature dramatically alters the user interface landscape for FileMaker: Developers can now control menus beyond simply turning them off and can drive a great deal of application logic.
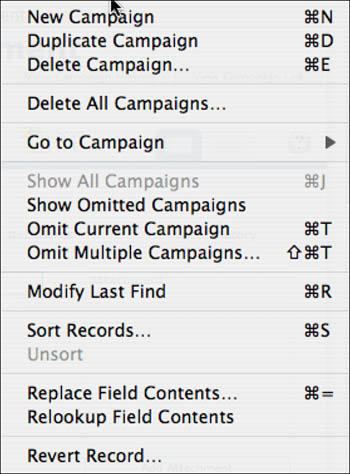
An example serves to illustrate the usefulness of custom menus. In the Email Campaign Management starter solution, the familiar (to you) Records menu is changed to a Campaigns menu; within it, commands such as New Record become New Campaign, as shown in Figure 14.3.
Figure 14.3. The Campaigns menu from the Email Campaign Management starter solution.
In a more complex case, suppose that you have built a solution with a section for customers and another for orders. Assume that the system is somewhat complex and that you as a developer do not want users creating new order records or new customer records by selecting New Record from the Records menu in FileMaker—perhaps new record creation needs also to create child records in parallel or do some other bookkeeping within your system. Instead you want scripts that you’ve written to manage the creation of these important records.
In past versions of FileMaker, you would have had to either train your users not to use the New Record menu item—an impractical solution at best—or disable user access to most of the menu system. This in turn would have forced you to re-create much of FileMaker’s functionality, beyond the new order and new customer scripts, for all the other commands users would need and ordinarily access from the menus. Disabling menu commands was an all-or-nothing proposition.
In FileMaker Pro 9 Advanced, you can create your own menu set and control at the most granular level when menu items appear, how they work, and even what keyboard shortcuts they use. Such customizations, if made, apply throughout the FileMaker interface, affecting contextual menus, the close box on Windows systems, and potentially every menu item in FileMaker.
Using custom menus allows you to do the following:
- Change the names of menus or menu items
- Override or extend the functionality of native FileMaker menu items with your own scripts
- Change or add keyboard shortcuts to existing or new menu items
- Disable or remove individual menu items or entire menus
- Load custom menu sets on demand or tie menu sets to particular layouts, modes, or operating systems
Before delving further into custom menus, you have to be clear on the nomenclature used. There are four separate elements to consider when working with custom menus:
- Menu Item— This is a single item on a menu. A user can often select it, as is the case with New Record or Save As menu items. Menu items can also be separators or submenus.
- Command— Commands refer to the native controls “baked into” FileMaker: They perform an action in FileMaker. In FileMaker’s standard menu set, all the actions are predefined by the application—for example, entering Find mode or opening the Help system. You can also create custom commands that initiate a script you as a developer will have written. It is possible to tie a menu item to a command in FileMaker and thus offer the native functionality that the command controls.
- Menu— A menu is a collection of menu items and comprises the full set of menu items available, regardless of whether they are all active or visible in any given mode or situation. Examples of menus are File and Edit. The File menu starts with the New Database, Open, and Open Remote menu items.
- Menu Set— A menu set is the set of all menus currently active or potentially available in FileMaker. It is a collection of menus and is the element you will load or associate with layouts. The FileMaker Standard menu set includes all the menus we’ve worked with for years: File, Edit, View, Insert, and so on.
Note that any specific menu or menu item is present or not, grayed out or not, depending on certain conditions. For example, in Browse mode, the standard FileMaker Pro 9 Advanced menu set includes the Records menu; but in Layout mode, the Records menu is not available and instead the Layouts menu becomes available. These conditional states can be tied to FileMaker modes, layouts, or user platform.
One important concept you will need to grasp is that FileMaker controls all custom menu elements at the menu set level. That means if you want your Records menu to show New Customer on a Customers layout and New Order on an Orders layout, you will need to create two additional custom menu sets, one to contain each new variant of the Records menu.
This does not mean, however, that you have to create duplicate menus or menu items. Menus and menu items can be used by multiple menu sets. You need only create menu items that are unique and require customization. In the preceding example, you’d have to create two menu sets (a Customers set and an Orders set), two versions of the Records menu, and also two new menu items (New Customer and New Order).
When you change from one set to the other, all the user will see is that one menu item has changed; however, in the mechanics of working with custom menus, you will in fact have loaded a new menu set altogether.
In this section, the examples are from the Email Campaign Management starter solution. These are the custom menus implemented there without any additional changes made.
Menu Sets Interface
The interface for managing custom menus is somewhat complex, but just as with the security controls in FileMaker 9, there’s a lot of power under the hood. When you choose Tools, Custom Menus, Manage Custom Menus, you’ll see a dialog box with two tabs, shown in Figure 14.4.
Figure 14.4. The initial view of the Manage Custom Menus dialog shows each menu available in the file, both those that are standard and those you’ve created.
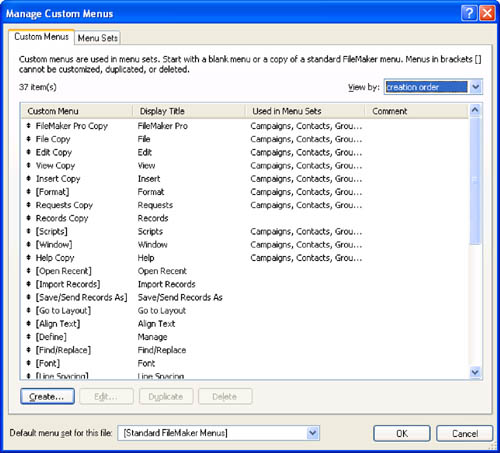
The first tab, Custom Menus, shows all the individual menus in your file. Remember that you can mix and match menus and menu sets; a single menu might appear in multiple menu sets. This list then is the superset of all menus defined within a given file.
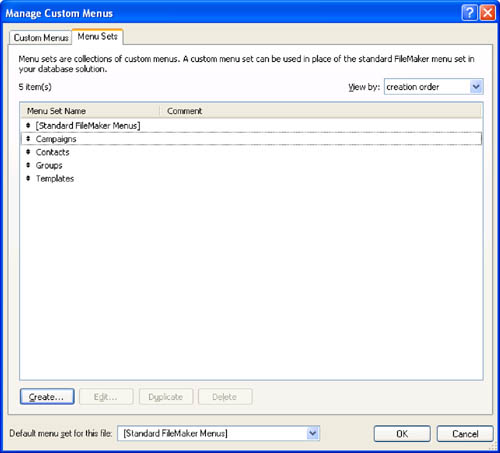
Each FileMaker file contains duplicates of the standard FileMaker 9 menus, grouped into a single custom menu set called Custom Menu Set 1. This provides developers with an easy starting point from which you can further customize these duplicates without fear of breaking your system. If you turn to the second tab, Menu Sets, in Figure 14.5, you will see that five menu sets are defined: the standard FileMaker menu set, Campaigns, Contacts, Groups, and Templates. The Custom Menu Set 1 that is present before customization has been modified and added to.
Figure 14.5. The Menu Sets tab allows you to view all the menu sets defined in a given file.
One aspect of custom menus that can prove a little confusing is the interplay between FileMaker’s standard menu set and its menus and your own additional custom menus. The term custom menus really refers to additional menus within your file. It is not possible to delete or change FileMaker’s standard menu set or its menus. As a developer, you will need to load a custom menu set and work with copies of the standard menus in FileMaker to change your interface.
If you refer to Figure 14.4, you’ll notice that some menus have a value in the third column denoting to which menu sets they belong, but in other cases no information is given. These menus might not be used anywhere, or they are often submenus available as hierarchical children to other menus. You can opt to add additional hierarchical submenus to menus as needed.
Some menus have square brackets around their names. These are the standard menus in FileMaker used by FileMaker’s standard menu set. They are included in this list so that they can be used in other custom menu sets, but they cannot be edited or deleted.
In Figure 14.6, notice that Campaigns includes the [Format], [Scripts], and [Window] menus, which are not editable.
Figure 14.6. The Edit Menu Set dialog is where you can add and remove individual menus to and from a menu set, picking and choosing from among standard and custom menus.
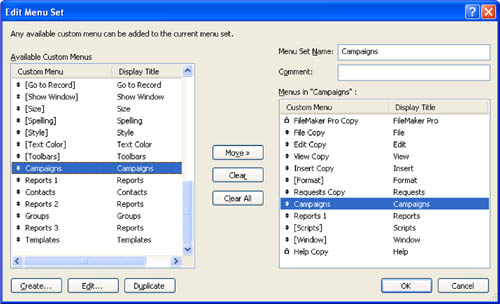
It is here in the Edit Menu Set dialog that menu sets can be created, deleted, and assembled from various menus available. If you select a menu in the left column, you can then click Edit to edit a single menu and create menu items.
You can select items in either list and move them back and forth into the menu set using the buttons in the middle of the dialog.
Customizing a Menu
Recall from the previous sections that to present users with a custom menu item, you must load an entire custom menu set and that the standard menu set for FileMaker is not modifiable. To change any behavior in FileMaker’s menus, you will have to work with either the pregenerated Custom Menu Set 1 or a menu set you’ve created. We will cover how to create your own menu set later in the chapter.
If you are starting from the default Custom Menu Set 1, you can select it from the list in the Manage Custom Menus dialog shown in Figure 14.5 and then click Edit. You can do the same for any other menu set you have created, or you can create a new one there. However you do it, you will open the dialog shown in Figure 14.7.
Figure 14.7. The Edit Custom Menu dialog allows you to change the appearance and behavior of a menu, which is composed of menu items.
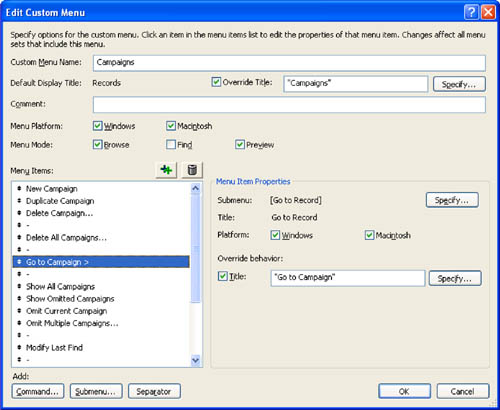
This dialog offers a range of options for controlling a menu. Notice that the name of the menu and its title can be different. The name is an internal identifier you can use in whatever ways you need. The title is that which users see and select in their FileMaker interface, and you can override it with a calculation.
It’s important to note that the title of a menu can be not only changed with a fixed value but also controlled programmatically via the Calculation dialog. This allows you to create dynamic labels in which (for example) your FileMaker database could be localized in different languages based on a global preference setting.
Also note that each menu can be set to appear only within certain FileMaker modes (Browse, Find, and Preview) and can be tied to an operating system platform as well. It’s important to remember that this behavior will remain true for all the menu sets with which this menu is associated.
The Menu Items Properties information at the lower right of Figure 14.7 changes depending on what menu item is selected. You can add separators, create submenu items, and insert new commands—menu items—to the list as you need. Note, too, that you can reorder the list of menu items using the up/down icon in the leftmost portion of the Menu Items list.
In the case shown in Figure 14.7, the Go to Campaign item is a submenu that is the FileMaker [Go to Record] menu (the square brackets indicate that it is not modifiable). This means that the submenu commands for Go to Campaign are Next, Previous and Specify—the Go to Record commands.
Before reordering menus and menu commands, make certain that you understand the interface guidelines of the platform on which you are working and FileMaker itself. Menus from left to right are generally more and more specific. The padlocks in Figure 14.6 means that those menus are not movable: The first menu is the FileMaker Pro menu, and the last menu on the right is the Help menu. Users expect that the Edit menu (if it exists) will follow the application (FileMaker Pro) menu, and that the View menu will follow the Edit menu. Do not change the order of menus (but feel free not to use a menu that does not make sense).
On a slightly less important level, be careful about how you order and reorder commands within a menu. There is a logic here that often goes beyond FileMaker. Do what users expect so that they do not have problems using your application.
That said, it is important to note that sometimes (on rare occasions) interface guidelines are inconsistent. In the case of FileMaker, you will notice that the Preferences command is found in the FileMaker Pro menu on Mac OS X and in the Edit menu on Windows. That is because the two platforms have different standards for the Preferences command, and it is common enough that users get used to finding it in a certain place.
Loading and Activating Menu Sets
As described in previous sections, the way to make a new menu item or custom menu available to your users is by including it in a menu set and then making that set active. There are several ways in which you can load a menu set:
- Assign a custom menu set as the default menu set for an entire file.
- Assign a specific custom menu set to a layout.
- Load a menu set on demand by using a script.
- Load custom menu sets on demand, or tie menu sets to particular layouts, particular modes, or a particular operating system.
- Choose from among the available custom menus in the Tools, Custom Menus menu choices. This last option assumes that you’re working with FileMaker Pro 9 Advanced and that you have [Full Access] privileges in the file.
You can assign a custom menu set to work across an entire file at the bottom of the Define Custom Menus dialog shown earlier in Figure 14.5. The menu set you choose loads with the file and is overridden only if you employ one of the means of loading another custom menu set in its place.
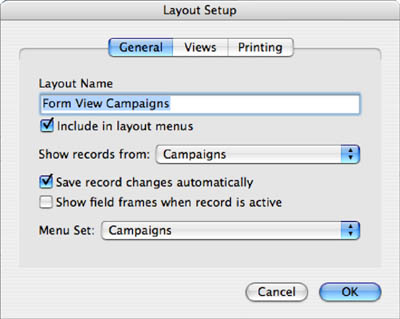
Custom menu sets can also be applied on a layout-by-layout basis. On the General tab of the Layout Setup dialog, shown in Figure 14.8, you can specify which menu set a given layout should present to users.
Figure 14.8. You can assign a custom menu set to each layout within your system.
Last, you can exert the most control over your database solution by using the Install Menu Set script step. When you use this script step, you can override a file’s default menu set or you can simply load a menu set that remains active until some other condition prompts it to change, such as encountering another Install Menu Set script step or navigating to a layout that calls for a different menu set.
Note that running this script changes the menu set only for the current session (for the user running the script) and does not affect either the permanent default menu set assigned in the Define Custom Menus dialog or other users in the system. When a user closes and reopens a FileMaker file, the default menu set will load again.
Creating a New Menu from Scratch
Use the Manage Custom Menus dialog shown previously in Figure 14.4 and click Create at the bottom to open the window shown in Figure 14.9.
Figure 14.9. You can choose to associate a new menu with an established FileMaker menu or make it an entirely additional menu.
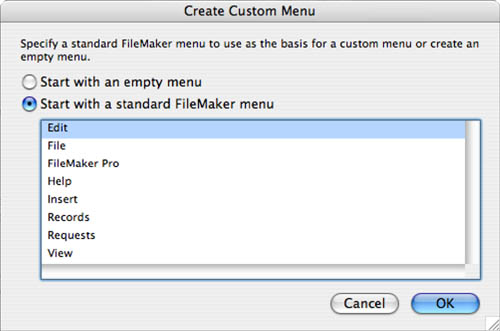
Here you can associate a new menu with an established FileMaker menu (thus making use of its accessibility in toolbars and contextual menus) or create a new, empty menu. In the scenario we’re describing here, an empty menu is the way to go. You are adding to the interface, not replacing it.
After you create a new menu, simply click the Edit button and you can add new menu items as you need. If you have other custom menus prepared, you can choose to add them to a menu as a submenu or you can choose to add commands to your menu. In this scenario, you’d likely want to create a single command for each report you want listed, and then attach the script that drives that report to each new menu item.
Custom menus are an extremely powerful part of FileMaker; in the past, many developers opted to shut down access to the standard menus in FileMaker to maintain control and ensure data integrity within their database solutions. With this new feature, it’s possible to drive much more of the application from its native controls provided out of the box and to tweak only those elements necessary as a given solution requires.
Conditional Formatting
FileMaker’s text formatting functions—RGB, TextColor, TextFont, TextSize, TextStyleAdd, TextColorRemove, TextFontRemove, TextSizeRemove, and TextStyleRemove—give you the ability to format data using calculations. This can be an important component of the interface because the formatting can provide clues about the validation status of data, status, and so forth.
Developers quickly discovered that for many cases, the text formatting functions were in the wrong place. In many cases, they are not inherently part of the data, but, rather, are useful in the interface. With FileMaker 9, conditional formatting addresses this.
In Layout mode, select the field to which you want to apply conditional formatting, and choose the Conditional command from the Format menu to open the dialog shown in Figure 14.10.
Figure 14.10. Use conditional formatting to provide user feedback.
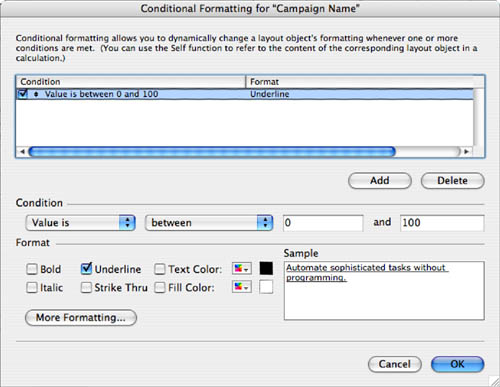
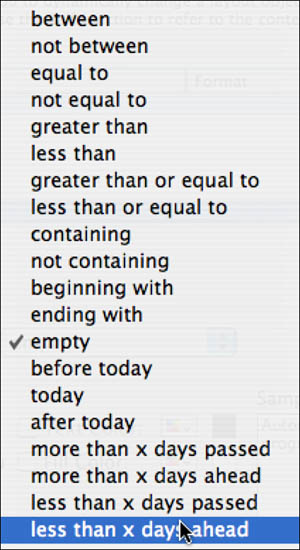
You can set two choices. One is to set the condition based on the value of the field. To do this, you select the test shown in Figure 14.11 and type in a value to use in the test.
Figure 14.11. Select the test to perform.
You can also specify a formula to evaluate as shown in Figure 14.12.
Figure 14.12. You can supply a formula for the test.
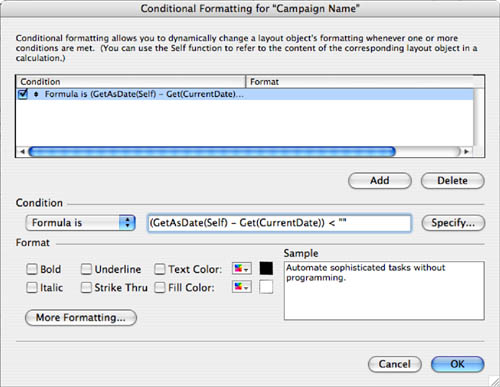
Note that this formula uses the New Self function in FileMaker 9 that lets you refer to the value of the current field.
![]() To learn about the basics of calculation functions, see Chapter 8, “Getting Started with Calculations,” p. 249.
To learn about the basics of calculation functions, see Chapter 8, “Getting Started with Calculations,” p. 249.
![]() For detailed examples of text-formatting functions, see Chapter 15, “Advanced Calculation Techniques,” p. 433, and Chapter 19, “Debugging and Troubleshooting,” p. 551.
For detailed examples of text-formatting functions, see Chapter 15, “Advanced Calculation Techniques,” p. 433, and Chapter 19, “Debugging and Troubleshooting,” p. 551.
Working with Table View
There’s a lot to be said for something that’s free and “just works.” If you’re in an environment where a simple user interface is an option for your users, consider turning to Table views. They deliver a fair amount of functionality with zero development effort. Regardless of your end users’ needs, as a developer you’ll find Table views invaluable for working with simple views of raw data.
One technique we use to make Table views even more useful can be found in the Table View Properties dialog under the Layout Setup dialog: You can opt to include header and footer parts on your layout, as well as control other aspects of your layout.
Header and footer parts can hold any FileMaker layout object you need. This includes your navigation or function buttons and whatever header might be common to the rest of your system, but most important, they can hold fields. Your users can see a combined list-and-detail view that displays the currently selected row’s data in either the header or the footer.
There are a few drawbacks to using this technique. For one, you cannot overlay buttons on top of the rows—which is otherwise a handy way to allow users to navigate to detail layouts or perform other functions directly from List view. You also cannot turn off or alter the column headers. Your column headers are based directly on your field names, which, depending on your naming conventions, might be aesthetically imperfect or downright abstruse. Nonetheless, this is a cheap, easy way to deliver a good bit of advanced functionality for virtually no effort.
FileMaker Extra: User Interface Heuristics
We opened this chapter by saying we wouldn’t preach to you about what makes a good interface and what doesn’t. Well, we’re breaking our word here. Although we won’t argue about pop-up windows versus single-pane applications, or whether buttons should be 3D beveled or just text on the screen, here are a few guidelines we recommend to all our clients, students, and developers alike:
- Use real-world terminology— You should strive to speak your customers’ language. Use terms they’ll find familiar. In some cases, you might need to retrain them, but whenever possible, leverage the body of knowledge already in place in an organization to make your system more intuitive.
- Impart meaning with more than just labels— Text is only one of many things your users will see on a layout. They’ll also see colors, shapes, headlines, subheads, footers, and so on. Use all the objects in your toolbox to impart meaning: Consider, for example, changing the background color of find layouts or perhaps making navigation buttons look different from functional buttons. Keep this in mind though: Don’t rely too heavily on color. A great many people have varying degrees of colorblindness.
- Give users the freedom to click around without fear— Users should be able to cancel out of any destructive function (delete, for example) so that they can explore your application and learn by doing.
- Be consistent— We can’t stress this enough. Whatever the colors, shapes, sizes, styles, and so on that you prefer, make sure that your layouts follow whatever set of rules you establish. Name fields and buttons consistently, place them in the same positions, and give your users a visual grammar for your system they can learn.
- Manage errors— Errors happen. Handle them behind the scenes whenever possible, but when they’re unavoidable, make sure that you present the users with a graceful error routine that informs them, proffers a course of action, and then returns them to what they were doing.
- Focus your screens— Less is more. Whitespace is your friend. Leave the important bits on your layouts and dialogs and remove the objects that can be pushed elsewhere. If you offer focus to users, you will help them understand what to do on a given layout.
- Remember your power users— Contrary to all the earlier advice, don’t forget your power users. Offer keyboard shortcuts through “Are you sure?” dialogs, give them simple Table view access to your data, and don’t bother them with wizards.