
APPENDIX E
TCP/IP GAME
E.1 INTRODUCTION
The purpose of this game is to help you better understand how messages are transmitted in TCP/IP-based computer networks. Players are organized into five-person teams that represent different computers in the network. Each person in the team assumes the role of one layer of software or hardware on that computer (e.g., data link layer) and works with the others to send messages through the network.
E.1.1 General Rules
- This is a team game. The class will be broken into a set of five-member teams, with each team being one computer in the communications network. Each person in the team will role-play one layer in the computer, either the application layer, the transport layer, the network layer, the data link layer, or the physical layer.
- Messages will be created by the application layer and passed to the transport layer. The transport layer will break the message into several smaller messages if necessary and pass them to the network layer. The network layer will address and route the message and pass the message to the data link layer. The data link layer will format the message and perform error control (which will involve sending ACKs and NAKs) and pass the message to the physical layer for transmission. The physical layer will transmit the message to the physical layer of the destination computer. Messages are sent using the forms in Figure E.1. Be sure to make lots of copies of the forms before the game starts.
- Each layer will have a set of instructions to follow to ensure the messages are sent and received properly. Follow them carefully. These instructions explain what you are to write on the message forms. Never write anything on the message form in an area used by another layer.
- At some point, someone will make a mistake. If you receive a message that contains an error, hand it back to the person who gave it to you and explain the error to that person.
- And remember, the game is meant to be fun, too!
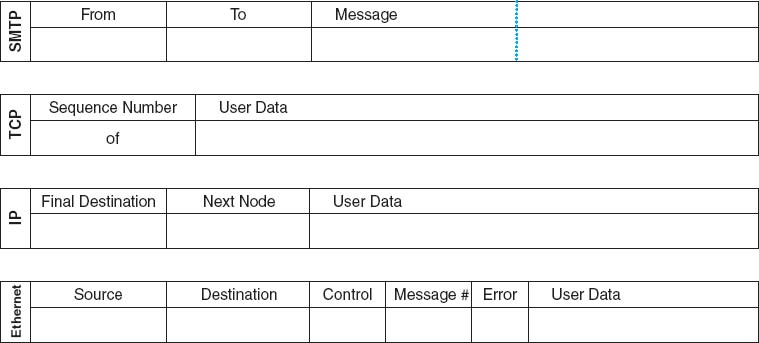
FIGURE E.1 Forms for the TCP/IP game
E.2 APPLICATION LAYER
E.2.1 Activities
E.2.2 Tools Needed
- Several blank SMTP forms
- List of messages
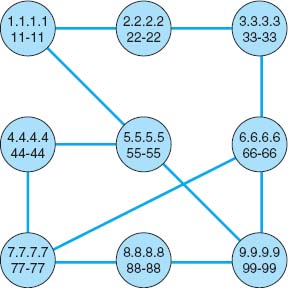
- Network map (Figure E.2 shows an example; the instructor will draw one for your class)
- A blank piece of paper
E.2.3 Sending Outgoing Messages
To send a message, you must:
- Find a blank SMTP packet.
- Write the IP address of your computer in the From box.
- Use the network map to select a computer as the destination for this message. Write the IP address of the destination computer in the To box. Don't send all your messages to one computer; we want to even out the messages. Try to send a few messages to computers close to you and a few to computers far away.
- Write the message you wish to send in the Message box. To make the message simple to understand, please use a hyphen (-) to indicate spaces between words. Select a message from the list of messages (see below). Try to have at least one hyphen in the message (this is to help the data link layer do error control) or add one at the end or at the start if you must.
- Write the message and the name of the computer to which you send the message on the blank piece of paper. This will help you understand the responses you get to your messages.
- Pass the message to the transport layer.
E.2.4 Responding to Incoming Messages
Eventually, you will receive an incoming message from the transport layer that was sent to you by some other computer asking you a question. To respond to the message, you will send a message that answers the question. Follow the same steps above to send a message, but in step 4, write your answer in the Message box. For example, if the message you received asked what your favorite color was, you might write red or blue in the Message box.
E.2.5 List of Messages
Here are a list of messages you can send. Remember to use a hyphen instead of a space to separate the words. Rather than writing the entire message, you can omit the words What is your.
- What is your favorite color?
- What is your birthday?
- What is your phone number?
- What are your favorite holidays?
- What is your favorite car?
E.3 TRANSPORT LAYER
E.3.1 Activities
- Accept outgoing SMTP messages from the application layer, packetize them, and pass them to the network layer.
- Accept incoming messages from the network layer and, if they are made up of several packets, assemble the entire SMTP message before passing it to the application layer.
E.3.2 Tools Needed
- TCP forms
- Tape
E.3.3 Accepting Outgoing Messages from the Application Layer
Every few minutes, the application layer will hand you an outgoing message to transmit. To transmit them, you must:
- Break the SMTP message into smaller packets. Tear the SMTP packet into two parts at the dotted line. If there is writing on both parts, then you must send each part as a separate message. If the second half of the SMTP packet has no writing on it, throw it away and ignore it.
- Find one or two blank TCP packets.
- Fill in the Sequence Number box. If there is only one part of the SMTP packet, write “1 of 1” in the Sequence Number box. If there are two parts of the SMTP packet, write “1 of 2” on the first TCP packet and “2 of 2” on the second TCP packet.
- Tape the SMTP packet(s) to the TCP packet(s) over the User Data space. (The packet(s) will be too big to fit, but don't worry about it.)
- Pass the TCP + SMTP packet(s) to the network layer.
E.3.4 Accepting Incoming Messages from the Network Layer
Every few minutes, the network layer will hand you an incoming message. To process it, you must:
- If the message is complete (that is, if the Sequence Number box says “1 of 1”):
- Take the TCP packet off of the SMTP packet and throw away the TCP packet.
- Pass the SMTP packet to the application layer.
- If the message is not complete (that is, if the Sequence Number box says “1 of 2”):
- Wait for the second part of the message to arrive.
- Take the TCP packets off of both SMTP packets and throw away the TCP packets.
- Tape the two parts of the SMTP packet back together.
- Pass the SMTP packet to the application layer.
E.4 NETWORK LAYER
E.4.1 Activities
- Accept messages from the transport layer, route them, and pass them to the data link layer.
- Accept messages from the data link layer and, if they are addressed to you, pass them to the transport layer; if they are not addressed to you, route them and pass them back to the data link layer.
E.4.2 Tools Needed
E.4.3 Accepting Outgoing Messages from the Transport Layer
Every few minutes, the transport layer will hand you an outgoing message to transmit. To transmit them, you must:
- Find a blank IP packet.
- Address the message by copying the IP address from the To box of the SMTP packet into the Final Destination box of the IP packet.
- Route the message by finding the next computer in the network map to which the message should be sent and writing its Ethernet address in the Next Node box. If your computer is directly connected to the final destination computer, the next node is the same as the final destination. If your computer is not directly connected to the destination, you must select the best route that the message should follow and specify one of the computers to which you are connected.
- Tape the TCP + SMTP packet to the IP packet over the User Data space. (It will be too big to fit, but don't worry about it.)
- Pass the IP + TCP + SMTP packet to the data link layer.
E.4.4 Accepting Incoming Messages from the Data Link Layer
Every few minutes, the data link layer will hand you a message to process. You must:
- If the message is addressed to you (that is, if the Final Destination box in the IP packet lists your IP address):
- Remove the IP packet from the SMTP + TCP packet and throw the IP packet away.
- Pass the SMTP + TCP packet to the transport layer.
- If the message is not addressed to you (that is, if the Final Destination box in the IP packet lists someone else's IP address):
- Scratch out or erase the address in the Next Node box.
- Route the message by finding the next computer in the network map to which the message should be sent and writing its data link layer address in the Next Node box. If your computer is directly connected to the destination computer, the next node is the same as the final destination. If your computer is not directly connected to the destination, you must select the best route that the message should follow and specify one of the computers to which you are connected.
- Pass the message to the data link layer.
E.5 DATA LINK LAYER
E.5.1 Activities
- Accept outgoing messages from the network layer, format them, add error-control information, and pass them to the physical layer.
- Accept incoming messages from the physical layer. If they are data messages and contain no errors, send an ACK and pass them to the network layer. If they are data messages with an error, send an NAK. If they are an ACK, destroy the message they acknowledge. If they are an NAK, retransmit the original message.
E.5.2 Tools Needed
- Ethernet forms
- Tape
- Network map
- Some blank pieces of paper. You will discover that you are receiving and storing many different types of messages. To help you organize those messages, we suggest that before you begin, you use three blank pieces of paper to create three message storage piles:
- Label one pile Messages from the Network Layer.
- Label the second pile Messages from the Physical Layer.
- Label the third pile Messages Transmitted.
E.5.3 Accepting Outgoing Messages from the Network Layer
Every few minutes, the network layer will hand you a message to transmit. If you receive more messages from the network layer than you can process right away, put them in the Messages from the Network Layer pile until you can process them. For each message, you must:
- Find a blank Ethernet packet.
- Format the message for the physical layer by writing your Ethernet address in the Source box. Copy the Ethernet address from the Next Node box in the IP packet into the Destination box. Write an asterisk (*) in the Control box.
- Number the message. Write a two-digit number in the Message Number box. This should be 01 for the first message you send, 02 for the second, and so on. Use the blank piece of paper to help you remember what numbers you have used.
- Add error-control information. Most error control is very sophisticated, but in this game, we'll use something very simple. Count the number of hyphens in the user data (the SMTP packet, the TCP packet, and the IP packet [but not the Ethernet packet]) and write this number in the Error box on the Ethernet packet.
- Tape the SMTP + TCP + IP packet to the Ethernet packet over the User Data space. (It will be too big to fit, but don't worry about it.)
- Pass the message to the physical layer. In a few moments, the physical layer will return the packet to you. Save it in the Messages Transmitted pile!
E.5.4 Accepting Incoming Messages from the Physical Layer
Every few minutes, the physical layer will hand you a message to process. If you receive more messages than you can process right away, put them in the Messages from the Physical Layer pile. These messages will either be data messages, ACKs, or NAKs. Each is processed differently.
- If the Control box contains an asterisk (*), this is a data message. Do the following:
- Perform error checking. Count the number of hyphens in the user data (the SMTP packet, the TCP packet, and the IP packet [but not the Ethernet packet]). If this number is the same as the number in the Error box, no errors have occurred. If they are different, an error has occurred.
- If no errors have occurred, you must send an ACK to the sender and send the incoming message to the next layer:
- Find a blank Ethernet packet.
- Write your Ethernet address in the Source box. Write the Ethernet address contained in the Source box of the incoming message in the Destination box of your message. (This ACK message is going to the sender of the original message.) Write ACK in the Control box. Write the two-digit number contained in the Message Number box of the incoming message in the Message Number box.
- Pass the outgoing ACK message to the physical layer.
- Remove the Ethernet packet from the incoming message and throw the Ethernet packet away.
- Pass the incoming SMTP + TCP + IP packet to the network layer.
- If an error has occurred, you must send an NAK to the sender and discard the incoming message:
- Find a blank Ethernet packet.
- Write your Ethernet address in the Source box. Write the Ethernet address contained in the Source box of the incoming message in the Destination box of your message. (This NAK message is going to the sender of the original message.) Write NAK in the Control box. Write the two-digit number contained in the Message Number box of the incoming message in the Message Number box.
- Pass the outgoing NAK message to the physical layer.
- Throw away the incoming message containing the error.
- If the Control box contains an ACK, this is an ACK message. Do the following:
- Find the original message you sent, in the Messages Transmitted pile, that has the same message number as the ACK.
- Destroy the original message and the ACK.
- If the Control box contains an NAK, this is an NAK message. Do the following:
- Find the original message you sent, in the Messages Transmitted pile, that has the same message number as the NAK.
- Give the original message to the physical layer to transmit again. In a few moments, the physical layer will return the packet to you. Save it in the Messages Transmitted pile.
- Destroy the NAK.
E.6 PHYSICAL LAYER
E.6.1 Activities
- Accept messages from the data link layer and pass them to the physical layer of the computer to which they are to go, possibly introducing a transmission error.
- Accept messages from the physical layer of other computers and pass them to the data link layer.
E.6.2 Tools Needed
- Ethernet forms
- IP forms
- TCP forms
- SMTP forms
- Network map
- Transmission forms
- Two coins
E.6.3 Accepting Messages from the Data Link Layer
Every few minutes, the data link layer will hand you a message to transmit. These messages will either be data messages or control messages (ACKs or NAKs). Each is processed differently.
- If the Control box contains an asterisk (*), this is a data message. Do the following:
- Determine if there will be an error in transmission by tossing two coins; if they are both heads, you will introduce an error.
- Copy the entire contents of the message packet onto new forms; that is, copy the SMTP packet to a new SMTP packet, the TCP packet to a new TCP packet, the IP packet to a new IP packet, and the Ethernet packet to a new Ethernet packet. If you are to introduce an error, omit all the data in the SMTP Message box. Be sure to tape the packets together in the right order.
- Pass the copied SMTP + TCP + IP + Ethernet packet to the physical layer of the computer whose address is listed in the Destination box.
- Pass the original SMTP + TCP + IP + Ethernet packet back to the data link layer and make sure that that person understands that you are giving back the message that he/she just gave you to transmit.
- If the Control box contains an ACK or an NAK, this is a control message. Do the following:
- Simply pass the Ethernet packet to the physical layer of the computer whose address is listed in the Destination box. Things are complicated enough without ACKs and NAKs getting destroyed.
E.6.4 Accepting Messages from the Physical Layer of Another Computer
Every few minutes, the physical layer of another computer will hand you a message. Simply hand the message to the data link layer.
E.7 NOTE TO INSTRUCTORS
E.7.1 Background
This game helps students really understand what the various layers actually do and how they must work together to send a message. Reading about it is one thing; having to perform a simple version of the function is something else altogether. Experiential learning can be an extremely powerful tool. I have noticed a distinct improvement in students’ understanding of this material since I have begun using the game.
The game is an extremely simplified version of what happens in a real TCP/IP network. Nonetheless, it can be complicated. Students have to work together and sometimes make mistakes. Ideally, students will recognize mistakes themselves and will help one another learn. Participation is key to the learning objectives. It's also key to making a somewhat dry conceptual set of issues more real—and more fun.
When I teach the course, I usually use this game after I complete Chapter 5, The Network and Transport Layers. At this point students will have learned everything they need to know to run the game, and it will reinforce the material.
E.8 PREPARING TO TEACH THE GAME
This game contains all the materials you will need to run the game, except a set of coins and paper (which you can rely on students to have), enough tape for each group (bring several rolls), and a network map (which you draw on the board just before the game starts). You will also have to make copies of the four types of packets. It takes an average of three SMTP, TCP, and IP forms and four Ethernet forms for each message, so you will need a lot of them. I usually plan on the class sending about 10–15 messages per team; for a 40-person class, this means you will need 250–350 SMTP, TCP, and IP forms and 350–500 Ethernet forms.
I have found from experience that it takes the students a little while to catch on to the game. Be sure to tell the students to read the game before they come to class.
E.9 TEACHING THE GAME
It usually takes 20 minutes before the game gets going. The first step is to organize the class into five-person teams. Each team represents one computer in the network. If there are more than five people in a team, have two people play the data link layer; if there are less than five, then combine the application, transport, and/or network layers.
Draw the network map on the board. The map will have a circle to represent each team (i.e., computer). Try to draw the circles to represent the actual physical placement of the teams within the classroom. Inside each circle, write:
- The IP address (e.g., 1.1.1.1). Arbitrarily choose a number for each team but keep it short and easy to remember.
- The Ethernet address (e.g., 11-11). Arbitrarily choose a number for each team but keep it short and easy to remember. It helps if it matches the IP address in some way. Be sure to have at least one hyphen in the address to help reinforce the error-control concepts.
Next, connect the computers (i.e., teams) by drawing lines (i.e., circuits) between the circles. Don't draw in all possible circuits, because you want some teams to have to route messages through other teams to reach their final destination. Likewise, don't put too few circuits, or else all messages will take a long time to send.
Do a simple example. Walk through the sending of one message on the board and have the students follow by replicating each step you do for one of their own messages. Once the message has reached the physical layer on the next computer, I turn the students loose and let them play. I usually walk around the classroom answering questions and listening in on discussions as the game progresses.
Because each layer performs a unique function, it is useful to have each student play each layer if time permits. I try to have students rotate layers after 15 minutes. I keep the game going so that the students playing one layer need to explain to the person taking over their layer what is going on and how to play. The easiest way to rotate is downward; that is, the person playing the application layer moves to the transport layer, and so on.
E.9.1 Discussion Questions
After each person has had the opportunity to play several layers, it is useful to ask what the students have learned. This gives you the opportunity to reinforce the concepts the game was designed to teach. Some possible discussion questions are:
- Why are standards important?
- How could you improve network performance by changing the topology?
- What layer is the busiest? How could you improve network performance by changing the protocol at this layer?