
Chapter 8
XSLT
WHAT YOU WILL LEARN IN THIS CHAPTER:
- What XSLT is used for
- How writing XSLT code is different than writing code in traditional languages
- The basic XSLT constructs
- How XSLT uses XPath
- The more advanced XSLT constructs
- XSLT 2.0 improvements
- The future of XSLT
XSLT stands for Extensible Stylesheet Language Transformations and is one of the big success stories among the various XML technologies. In this chapter you’ll find out why there is constant need for transformations from one XML format to another, or from an XML format to a plain text document. You will see how XSLT, as a declarative language (you tell it what you want done in a specific circumstance and you let the XSLT processor decide how it should be done), differs from the majority of common coding languages such as Java and C# because they are procedural (essentially a series of low-level instructions on how to manipulate data). You’ll then be introduced to the mainstay of XSLT, the template, and see how judicious use of this makes processing XML simpler than having to provide detailed instructions. You will also see how XSLT is a functional language where results are defined as the result of function calls, rather than data being directly manipulated. Programming with declarative, functional languages can take some getting used to; it needs a different mindset from that used in procedural code, and this puts off many people when they start with XSLT. You shouldn’t fall into that group because the examples shown in this chapter will make you appreciate the simplicity and power that XSLT possesses. You’ll also see how XPath integrates closely with XSLT; it pops up in a number of places so what you learned in Chapter 7 will be invaluable. After demonstrating a number of basic techniques you’ll take a look at version 2.0 of XSLT and see how its new features have been designed to cope with many day-to-day problems that people have struggled with in version 1.0. The chapter concludes with a brief look at what’s scheduled to appear in version 3.0, which promises to make XSLT an extremely powerful functional language, along the lines of Haskell, Lisp, or F#.
WHAT XSLT IS USED FOR
At its heart, XSLT has a simple use case: to take an existing XML document and transform it to a different format. The new format might be XML, HTML, or just plain text, such as a comma-separated values (CSV) file. This is an extremely common scenario. One of the main reasons for XML is to have a facility to store data in a presentation- and application-neutral format so that it can easily be reused. XSLT is used in two common situations:
- To convert from XML into a presentation-specific format, such as HTML.
- To convert from the format understood by one application into the structure required by another. This is particularly common when exchanging data between different organizations.
Since XSLT was originally conceived it has grown and now has the ability to process non-XML files too, so you can take a plain text file and transform it into XML or any other format.
XSLT differs from many mainstream programming languages such as C# or Java in two main ways. First, XSLT is a declarative language, and second, it is a functional language.
XSLT as a Declarative Language
Most mainstream programming languages are considered procedural. Data is fed to the software, which then manipulates it step-by-step. Each code statement or block generally has a clearly defined task which is responsible for minor changes to the data; these individual changes are combined to produce the overall data transformation required. Take a typical example: you have a collection of Author objects, each of which has a FirstName and a LastName property. You are asked to display the full name of each Author in the collection. The Author collection is zero-based so the first Author has an index of zero and the last has an index of one less than the total number of Author objects. Your code will probably look something like this (this code is not written in any particular language but uses the C#/Java style):
int index;
for (index = 0; index < allAuthors.Count; index++)
{
  Author thisAuthor = allAuthors[index];
  Console.WriteLine(thisAuthor.FirstName + “ “ + thisAuthor.LastName);
}
This is a standard piece of coding. You loop through all the authors by using an index that is gradually incremented from zero to the number of Author objects minus one. At each pass through the loop, you assign the current Author to a variable, thisAuthor, and then access the two properties you are interested in, FirstName and LastName. Now, this is fairly low-level coding; you have to determine the total number of Author objects using the Count property and keep track of which Author you are processing using an index. Many languages let you write this code at a more declarative level, where it’s not necessary to keep track of these things. In C#, for example, you can use the foreach construct:
foreach (Author thisAuthor in allAuthors)
{
  Console.WriteLine(thisAuthor.FirstName + “ “ + thisAuthor.LastName);
}
This is more declarative code. You’re not worried about keeping track of the individual Author objects—you just ask for each Author, one by one, and display its details. Another example of declarative programming is SQL, used to query relational databases. In SQL, if you wanted to see the names of all the authors in a table you’d use something like this:
SELECT FirstName, LastName FROM Authors;
Again, in this code, you don’t need to keep track of the individual rows in the Authors table. You let the database query engine worry about the low-level operations.
XSLT takes this idea of letting the processor look after the low-level details one stage further. It is designed from the ground up as a declarative language, so you needn’t concern yourself with how something is done. Rather, you concentrate on describing what you want done. For example, if you want to perform a similar operation to output all author names from an XML document containing many <author> elements, such as this one:
<authors>
  <author>
    <firstName>Danny</firstName>
    <lastName>Ayers</lastName>
  </author>
  <author>
    <firstName>Joe</firstName>
    <lastName>Fawcett</lastName>
  </author>
  <author>
    <firstName>William</firstName>
    <lastName>Shakespeare</lastName>
  </author>
</authors>
you’d use an XSLT template such as:
<xsl:template match=”author” />
  <xsl:value-of select=”firstName” /> <xsl:value-of select=”lastName” />
</xsl:template>
As you can see, you haven’t had to declare a variable to keep track of the <author> elements or write any code that loops through them. You just tell the XSLT processor to output the value of the <firstName> and the <lastName> element whenever you come across an <author> element. You’ll learn more about how this all works when you’ve dealt with another aspect of XSLT programming—the fact that it’s a functional language.
How Is XSLT a Functional Language?
If you’ve grown up with languages such as Java, C++, C#, PHP, or others, you’ve used what are known as imperative programming languages; imperative literally means that you order the computer exactly what you want it to do. Imperative languages tend to manipulate the state of an object to represent changes of circumstance. To stick with the current example, if an author changed his last name, the standard paradigm to reflect this in code would be to get a reference to an Author object representing the particular person and modify the LastName property. The pseudo-code for this would look like:
Author authorToEdit = getAuthor(12345); //Get the required author using their ID
authorToEdit.LastName = “Marlowe”; //Change last name
A functional language takes a different approach. The output is considered the result of one or more functions applied to the input. In a strict functional language you cannot change the value of a variable, nor have any functions that have side effects, such as incrementing a counter while reading a value. XSLT follows this pattern, the main advantage of which is that often the order of execution of a complete transformation is irrelevant, leaving the processor free to optimize the proceedings. The main downside to functional programming is that it takes some getting used to at first. You are likely far too accustomed to be able to re-assign values to variables, rely on the order of your code to determine the order of operations, and have functions that have global side effects. However, once you get the hang of the functional way of doing things you’ll find that tasks such as testing become much easier and also that making changes to any particular piece of code is much less likely to break something elsewhere.
SETTING UP YOUR XSLT DEVELOPMENT ENVIRONMENT
Before you start to run any XSLT code, you need to set up an environment to write and process your transformations. The Saxon processor runs the examples in this chapter for three reasons:
- It’s the acknowledged leader in its field with the most up-to-date implementation of XSLT.
- It’s free to use (although commercial versions have more features).
- It has both a Java and a .NET version, making it suitable to run on nearly all environments.
The version used for this chapter is 9.3HE (home edition), which you can download from http://saxon.sourceforge.net/. As stated before, you can choose to use the .NET or the Java version. If you’re running a machine with .NET installed, this version is slightly easier to use but it’s really a personal preference.
To begin set-up, create a folder called saxon on your C Drive and download the .NET or Java version of the zip file to:
C:saxon
Once the zip file has downloaded you will need to take a few further steps, which differ slightly depending on whether you are going to run the .NET version or the Java one. The following sections cover each scenario.
Setting Up Saxon for .NET
Running the Saxon for .NET installation should add the path to the Saxon executables to your machine’s PATH environment variable. It’s worth checking, however, because sometimes security settings prevent this from happening. The advantage of having the Saxon in your PATH is that you won’t have to type the full path to the executable each time you want to run a transformation from the command line.
How to change the PATH environment variable depends slightly on which version of Windows you are running. For Windows 7:
You can now test whether everything is working as expected by opening a command window (Start ![]() Run, type in cmd, and press Enter). When the command window appears type Transform -? and press Enter. You should see some information regarding Saxon and a miniature help screen. If you don’t get this screen, check that you are on the correct drive where Saxon is installed—if it’s on the C: drive, type C: and press Enter. If you are on the correct drive and still don’t get the help screen, double-check that the PATH environment variable is set correctly. That’s all you need to do to enable command-line transformations. If you need more help with the installation there is a full online guide at www.saxonica.com/documentation/about/installationdotnet.xml.
Run, type in cmd, and press Enter). When the command window appears type Transform -? and press Enter. You should see some information regarding Saxon and a miniature help screen. If you don’t get this screen, check that you are on the correct drive where Saxon is installed—if it’s on the C: drive, type C: and press Enter. If you are on the correct drive and still don’t get the help screen, double-check that the PATH environment variable is set correctly. That’s all you need to do to enable command-line transformations. If you need more help with the installation there is a full online guide at www.saxonica.com/documentation/about/installationdotnet.xml.
Setting Up Saxon for Java
If you want to run the Java version of Saxon you need a Java Virtual Machine (JVM) installed. You can find out if this is the case by opening a command window, as described previously, and typing:
java -version
If Java is installed, you’ll see something like this:
java version “1.6.0_23”
Java(TM) SE Runtime Environment (build 1.6.0_23-b05)
Java HotSpot(TM) 64-Bit Server VM (build 19.0-b09, mixed mode)
Otherwise you’ll see this:
'java' is not recognized as an internal or external command,
operable program or batch file.
If the latter happens, you can download the required files from www.oracle.com/technetwork/java/javase/downloads/index.html. If you just want to perform command-line transformations, download and install the JVM (or JRE as it is referred to on the download site); otherwise, if you want to use Saxon programmatically, i.e. calling it from within code rather than from the command line, download the full Java SDK. To run the examples in this chapter you’ll only need the JVM, not the full JDK. You’ll also need to add the Saxon jar file to your machine’s CLASSPATH variable.
Adding Saxon to your CLASSPATH environment variable for Windows is much the same process as editing the PATH environment variable. Follow the initial steps but look for a variable named CLASSPATH. This might be in the upper panel, as was PATH, or in the lower panel with the system environment variables. If it’s not there, click the New button in the upper panel and add the variable name, CLASSPATH, and the path to the Saxon jar, such as <installation path>/saxon9he.jar.
You should now be able to test whether everything is set up by opening a command window (Start ![]() Run
Run ![]() CMD [Enter]) and typing:
CMD [Enter]) and typing:
java net.sf.saxon.Transform -?
You should see a mini help screen detailing various Saxon options. If this doesn’t happen, double-check that the CLASSPATH environment variable is set correctly. If you need more help with the installation, there is a full online guide at www.saxonica.com/documentation/about/installationjava.xml. That completes the set up needed for both the .NET and the Java versions.
Next, you look at the basic elements used in XSLT and how they are combined to produce both simple and sophisticated transformations.
FOUNDATIONAL XSLT ELEMENTS
XSLT is based on the idea of templates. The basic concept is that you specify a number of templates that each match XML in the source document. When the matching XML is found, the template is activated and its contents are added to the output document. For example, you may have a template that matches a <Person> element. For each <Person> element encountered in the source document the corresponding template will be activated. Any code inside the template will be executed and added to the output. The code within the templates can be complex and has full access to the item that was matched and caused the template to run as well as other information about the input document.
Using templates to process various parts of the source document in this manner is one of the most powerful features of XSLT and one that you’ll be exploring in this section. Initially you’ll be introduced to the following basic XSLT constructs that enable you to write basic transformations:
- <xsl:stylesheet>: This is the all-encompassing document element used to hold all your templates. You also use it for some configuration, such as setting which version of XSLT you want to use.
- <xsl:template>: This is the bedrock of XSLT and has two main features. It details what items from the source document it should handle and uses its content to specify what should be added to the output when it is executed.
- <xsl:apply-templates>: This element is responsible for deciding which items in the source document should be processed; they are then handled by the appropriate template.
- <xsl:value-of>: This element is used to evaluate an expression and add the result to the output. For example, you may be processing a <Person> element and use <xsl:value-of> to add the contents of its <Name> element to the output.
- <xsl:for-each>: Occasionally you need to process a number of items in a similar fashion but using an <xsl:template> isn’t a good option. In that case you can use this element to group the items and produce output based on each one.
Before you start learning about these templates, you are going to need an XML input document for your transformations. Listing 8-1 is a fairly simple document that details some famous politicians.
![]() LISTING 8-1: People.xml
LISTING 8-1: People.xml
<People>
  <Person bornDate=”1874-11-30” diedDate=”1965-01-24”>
    <Name>Winston Churchill</Name>
    <Description>
      Winston Churchill was a mid-20th century British politician who
      became famous as Prime Minister during the Second World War.
    </Description>
  </Person>
  <Person bornDate=”1917-11-19” diedDate=”1984-10-31”>
    <Name>Indira Gandhi</Name>
    <Description>
      Indira Gandhi was India's first female prime minister and was
      assassinated in 1984.
    </Description>
  </Person>
  <Person bornDate=”1917-05-29” diedDate=”1963-11-22”>
    <Name>John F. Kennedy</Name>
    <Description>
      JFK, as he was affectionately known, was a United States president
      who was assassinated in Dallas, Texas.
    </Description>
  </Person>
</People>
The style of this XML, mixing attributes and elements in the way it does, is probably not the best, but it’s typical of files that you’ll have to deal with and demonstrates the different techniques needed to deal with these items. Your first XSLT concentrates on a common use case: transforming the XML into an HTML page.
The <xsl:stylesheet> Element
Listing 8-2 shows the basic shell used by all XSL transformations.
![]() LISTING 8-2: Shell.xslt
LISTING 8-2: Shell.xslt
<xsl:stylesheet version=”1.0” xmlns:xsl=”http://www.w3.org/1999/XSL/Transform”>
  <!-- rest of XSLT here -->
</xsl:stylesheet>
An analysis of this file shows that the XSLT elements are in the http://www.w3.org/1999/XSL/Transform namespace. The second point is that the version number is declared as 1.0. Although Saxon is a version 2.0 processor it will run files marked as version 1.0 in backward-compatibility mode. This namespace URI doesn’t change between the two versions, so to change the version you’d just need change this attribute.
Although Listing 8-2 is a legal style sheet, it doesn’t actually do anything very useful. (It will produce some output if run against your example XML, but you’ll see why this is after you’ve covered the other basic elements.)
To actually create a new output you need to do two things: you have to select some elements or attributes to process; and you need to describe the output required based on these items. The element used to describe what output to create is the <xsl:template> instruction.
The <xsl:template> Element
The <xsl:template> element is a cornerstone of the entire technology, so understanding how it works is key to the entire process. If you add an <xsl:template> element to your example transformation you get Listing 8-3.
![]() LISTING 8-3: PeopleToHtml-Basic.xslt
LISTING 8-3: PeopleToHtml-Basic.xslt
<xsl:stylesheet version=”1.0” xmlns:xsl=”http://www.w3.org/1999/XSL/Transform”>

  <xsl:template match=”/”>
    <!-- basic output here -->
  </xsl:template>
</xsl:stylesheet>
This instruction, as it’s known in XSLT terminology, essentially says to the processor: Execute the code in this template whenever you meet an item that matches those specified in my match attribute. Because the match attribute specifies / as its value, the template is called when the root node is encountered by the XSLT processor.
The contents of the template are then evaluated using the root element as the context. In XSLT the term context has a very specific meaning as most XPath expressions are evaluated relative to the context.
What Exactly Is Meant by Context?
Context has a specific meaning when it comes to XSLT. Nearly all processing is executed in the context of a particular item, or node as they are termed in XSLT, of the document. In Listing 8-3 the root is the context node. This means that any requests for data that use XPath are made relative to the root node. Take the following XPath in relation to the Listing 8-1 document shown previously:
People/Person
This XPath, executed in the context of the root node, will bring back three elements named <Person>. This is because you are starting at the root, then moving one level down, along the child axis, to the <People> element, and then, following the child axis once more, to reach the <Person> elements. If you change the XPath to read
Person
and then execute this in the context of the root node, you’ll find that no elements are returned. This is because if you start at the root node and move one step along the child axis there are no <Person> elements. For this XPath to succeed you’d need to execute it in the context of the <People> element. You’ll be meeting the concept of context many times in this chapter; so remember that within an XSL transformation the context will determine the starting point of any relative XPath statements that occur.
You now need to see how you can add some output to the <xsl:template> element.
Adding Output to a Template
Adding output to an <xsl:template> element is easy. Anything appearing between the start tag and the end tag will be sent to the result tree, the technical term for the output from a transformation. You’ll start by using your template to create an HTML shell as shown in Listing 8-4
![]() LISTING 8-4: PeopleToHtml-BasicStructure.xslt
LISTING 8-4: PeopleToHtml-BasicStructure.xslt
<xsl:stylesheet version=”1.0”
 xmlns:xsl=”http://www.w3.org/1999/XSL/Transform”>
  <xsl:template match=”/”>
    <html>
      <head>
        <title>Famous People</title>
      </head>
      <body>
        <h1>Famous People</h1>
        <hr />
      </body>
    </html>
  </xsl:template>
</xsl:stylesheet>
You’ve now added some basic HTML elements to the template; note that because an XSLT document is XML, the contents must be well-formed. This means that you have to use constructs such as <hr /> rather than just <hr>. XSLT processors have the special rules about HTML embedded in them, so they’ll automatically output these elements correctly if they can recognize that you’re creating an HTML file.
You can now try to run this transformation, just to see if everything’s working as expected. Open a command window and navigate to the folder where the People.xml and PeopleToHtml-BasicStructure.xslt files (from Listings 8-3 and 8-4) are located. If you’re using the Java version, type the following line before pressing Enter (this command needs to be all on one line):
java net.sf.saxon.Transform -s:People.xml
               -xsl:PeopleToHtml-BasicStructure.xslt -o:People-BasicStructure.html
If you are using the .NET version use the following command:
Transform -s:People.xml -xsl:PeopleToHtml-BasicStructure.xslt
 -o:People- BasicStructure.html
The command options used in these transformation examples are:
- -s: The source document, that is, the XML you want to transform.
- -xsl: The path to the XSL transform.
- -o: The name of the output file you want to create. It can be left blank if you want the results to be displayed in the console.
Once you run this transformation, you should see that a new file, People-BasicStructure.html, has been created in the same directory as the XML and XSLT. This is shown in Listing 8-5.
![]() LISTING 8-5: People-BasicStructure.html
LISTING 8-5: People-BasicStructure.html
<html>
  <head>
    <META http-equiv=”Content-Type” content=”text/html; charset=utf-8”>
    <title>Famous People</title>
  </head>
  <body>
    <h1>Famous People</h1>
    <hr>
  </body>
</html>
You can see that the basics of an HTML page have been created, along with a <META> element to declare the content type. You now need to include some of the information from Listing 8-1. As a first step you’ll just output their names using a bulleted list. To do this, first you need to create a new template to process the individual <Person> elements and add this to the transformation as shown in Listing 8-6.
![]() LISTING 8-6: PeopleToHtml-PersonTemplate.xslt
LISTING 8-6: PeopleToHtml-PersonTemplate.xslt
<xsl:stylesheet version=”1.0”
      xmlns:xsl=”http://www.w3.org/1999/XSL/Transform”>
  <xsl:template match=”/”>
    <html>
      <head>
        <title>Famous People</title>
      </head>
      <body>
        <h1>Famous People</h1>
        <hr />
      </body>
    </html>
  </xsl:template>

  <xsl:template match=”Person”>
    <li><!-- Person details here --></li>
  </xsl:template>
</xsl:stylesheet>
Next, you need to instruct the transform to actually process these elements, and for this you’ll need a new instruction.
The <xsl:apply-templates> Element
The <xsl:apply-templates> element uses a select attribute to choose which nodes to process. The processor then searches the XSLT for an <xsl:template> element that has a match attribute that matches those nodes. To instruct the XSLT engine to process the <Person> elements add the <xsl:apply-templates> instruction to your transformation code and put it inside HTML unordered list tags (<ul>), as shown in Listing 8-7.
![]() LISTING 8-7: PeopleToHtml-ProcessPerson.xslt
LISTING 8-7: PeopleToHtml-ProcessPerson.xslt
<xsl:stylesheet version=”1.0”
            xmlns:xsl=”http://www.w3.org/1999/XSL/Transform”>
  <xsl:template match=”/”>
    <html>
      <head>
        <title>Famous People</title>
      </head>
      <body>
        <h1>Famous People</h1>
        <hr />
        <ul>
          <xsl:apply-templates select=”People/Person” />
        </ul>
      </body>
    </html>
  </xsl:template>

  <xsl:template match=”Person”>
    <li><!-- Person details here --></li>
  </xsl:template>
</xsl:stylesheet>
You can see that you used the XPath mentioned earlier, People/Person, to choose the nodes you want to display. This will select the three <Person> elements and pass them to the template that matches them.
Finally, you’ll need to extract some data—in this case, the first and last names—from the <Person> elements. You have a number of ways to extract information from nodes in an XML document; when it’s simply textual content the normal choice is to use <xsl:value-of>.
The <xsl:value-of> Element
The <xsl:value-of> element is very simple to use. It has an attribute, named select, which takes an XPath to the node you need. If you specify an element as the target you get all the text within that element; if you specify an attribute you get the value of the attribute as a string. Because you are inside the template that matches the <Person> element, this is the current context; therefore, the XPath you need is just Name. You wrap this inside a list item as shown in Listing 8-8.
![]() LISTING 8-8: PeopleToHtml-PersonName.xslt
LISTING 8-8: PeopleToHtml-PersonName.xslt
<?xml version=”1.0” encoding=”utf-8”?>
<xsl:stylesheet version=”1.0” xmlns:xsl=”http://www.w3.org/1999/XSL/Transform”>

  <xsl:template match=”/”>
    <html>
      <head>
        <title>Famous People</title>
      </head>
      <body>
        <h1>Famous People</h1>
        <hr />
        <ul>
          <xsl:apply-templates select=”People/Person” />
        </ul>
      </body>
    </html>
  </xsl:template>

  <xsl:template match=”Person”>
    <li>
      <xsl:value-of select=”Name” />
    </li>
  </xsl:template>
</xsl:stylesheet>
Now run one of the following command lines (the first is for Java, the second for .NET):
java net.sf.saxon.Transform -s:People.xml
 -xsl:PeopleToHtml-PersonName.xslt -o:People-PersonName.html
or:
Transform -s:People.xml -xsl:PeopleToHtml-PersonName.xslt -o:People-PersonName.html
The output created will now look like Listing 8-9.
![]() LISTING 8-9: People-PersonName.html
LISTING 8-9: People-PersonName.html
<html>
  <head>
    <META http-equiv=”Content-Type” content=”text/html; charset=utf-8”>
    <title>Famous People</title>
  </head>
  <body>
    <h1>Famous People</h1>
    <hr>
    <ul>
      <li>Winston Churchill</li>
      <li>Indira Gandhi</li>
      <li>John F. Kennedy</li>
    </ul>
  </body>
</html>
You now have a complete working transformation using a combination of <xsl:apply-templates> to specify the nodes to be processed and <xsl:template> elements to handle them. This method is often known as push processing because the processor marches through the source XML and pushes the nodes selected by <xsl:apply-templates> to the relevant <xsl:template>. Sometimes, however, it’s more convenient to use pull processing by grabbing nodes directly and using their contents. For this type of processing you need the <xsl:for-each> element.
The <xsl:for-each> Element
The <xsl:for-each> element enables you to select a group of nodes and to apply an operation to each of them. It does not work like the similarly named construct in other languages, which is used to loop through an array or collection. As stated earlier, XSLT is a functional language, and within the processing there is no guarantee to the order of processing within the group of nodes selected. Similarly, you can exit the loop using a break statement. Listing 8-10 shows how the example XSLT you have so far looks if you replace the call to <xsl:apply-templates> with an <xsl:for-each> instruction.
![]() LISTING 8-10: PeopleToHtml-ForEach.xslt
LISTING 8-10: PeopleToHtml-ForEach.xslt
<?xml version=”1.0” encoding=”utf-8”?>
<xsl:stylesheet version=”1.0” xmlns:xsl=”http://www.w3.org/1999/XSL/Transform”>

  <xsl:template match=”/”>
    <html>
      <head>
        <title>Famous People</title>
      </head>
      <body>
        <h1>Famous People</h1>
        <hr />
        <ul>
          <xsl:for-each select=”People/Person”>
            <li>
              <xsl:value-of select=”Name” />
            </li>
          </xsl:for-each>
        </ul>
      </body>
    </html>
  </xsl:template>
</xsl:stylesheet>
The <xsl:for-each> element has a select attribute that points to the nodes you want to process. For each node in the group the contents of the <xsl:for-each> instruction is executed. Therefore, the select attribute uses the People/Person XPath as before and for each <Person> a list item is created. For this XSLT, the output is identical to that of the previous version.
Push-Processing versus Pull-Processing
So now you have two ways of processing nodes: pushing them to an <xsl:template> or pulling them using <xsl:for-each>. Which one is best? Although there’s no firm rule, it’s typically best to start by trying to use an <xsl:template>. They are more flexible and, as later examples show, they are usually easier to maintain. They also give you the chance to build up XSL transformations from smaller modules, something not really possible using <xsl:for-each>. In general I use <xsl:for-each> only for quick and dirty code or small snippets that I don’t think will need to change over time.
Before you move on to using some of the other XSLT instructions, you need to understand the role of XPath.
The Role of XPath in XSLT
You’ve already seen a number of cases of XPath being used in XSLT as the select attribute. These have included:
- <xsl:apply-templates>
- <xsl:for-each>
- <xsl:value-of>
Typically, a select attribute takes an XPath expression to the set of nodes you want to process. There is, however, no golden rule about which attributes can take an XPath expression—you just have to refer to the specification if you’re in doubt. The XSLT 2.0 version is located at www.w3.org/TR/xslt20.
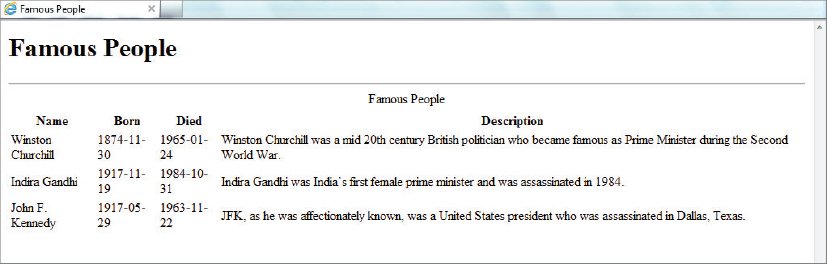
In addition to the select attribute, there are many more XSLT instructions that use XPath, and this section takes a look at these alternative instructions. You can start by extending the example in Listing 8-8 in two ways: first you’ll make the output page more interesting by using an HTML table and displaying the born and died dates as well as the description. You are going to stick with the <xsl:apply-templates> version, using push-processing. This means that you only need to modify the main template so that the basic HTML table is created and then alter the template that matches the Person elements. The new XSLT looks like Listing 8-11.
![]() LISTING 8-11: PeopleToHtml-WithTable.xslt
LISTING 8-11: PeopleToHtml-WithTable.xslt
<xsl:stylesheet version=”1.0”
     xmlns:xsl=”http://www.w3.org/1999/XSL/Transform”>

  <xsl:template match=”/”>
    <html>
      <head>
        <title>Famous People</title>
      </head>
      <body>
        <h1>Famous People</h1>
        <hr />
        <table>
          <caption>Famous People</caption>
          <thead>
            <tr>
              <th>Name</th>
              <th>Born</th>
              <th>Died</th>
              <th>Description</th>
            </tr>
          </thead>
          <tbody>
            <xsl:apply-templates select=”People/Person” />
          </tbody>
        </table>
      </body>
    </html>
  </xsl:template>

  <xsl:template match=”Person”>
    <tr>
      <td>
        <xsl:value-of select=”Name” />
      </td>
      <td>
        <xsl:value-of select=”@bornDate” />
      </td>
      <td>
        <xsl:value-of select=”@diedDate” />
      </td>
      <td>
        <xsl:value-of select=”Description” />
      </td>
    </tr>
  </xsl:template>
</xsl:stylesheet>
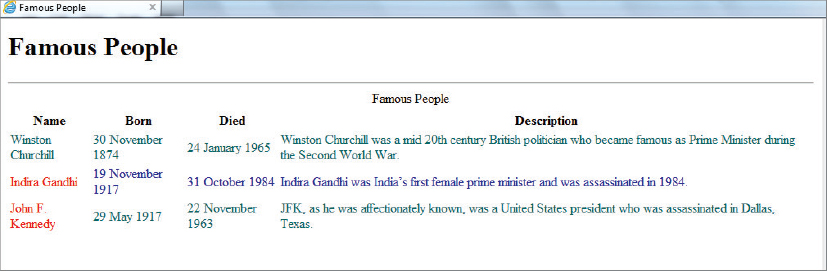
Notice how you selected the two date attributes using the XPath @bornDate and @diedDate. You can see the results of running the transformation in Figure 8-1.
You can see that the dates aren’t in a very user-friendly format; they are still using the official XML format of year-month-date. If you want to change that you need to process that value before displaying it. In version 2.0 you have a number of choices but in version 1.0 you are going to have to use named templates. These act in a similar way to the templates you’ve already seen; they process nodes. The difference is that they are called by name, rather than by using a match attribute, which makes them similar to functions in standard programming languages.
Using Named Templates
Your final addition to the HTML page is to display the full date in an unambiguous fashion. Named templates can act in a similar way to functions and do some basic processing on the date so that the year falls at the end. You can also remove the ambiguity about which value represents the month by using the month’s name instead of a two-digit code. This will give you a chance to use a named template and also show how to use XPath functions to manipulate a string value. Start by creating a named template that accepts a parameter of a date in the standard XML format as shown in the following snippet:
<xsl:template name=”iso8601DateToDisplayDate”>
    <xsl:param name=”iso8601Date” />
    <xsl:variable name=”yearPart”
                  select=”substring($iso8601Date, 1, 4)” />
    <xsl:variable name=”monthPart”
                  select=”substring($iso8601Date, 7, 2)” />
    <xsl:variable name=”datePart”
                  select=”substring($iso8601Date, 9, 2)” />
    <xsl:value-of
                  select=”concat($datePart, '/', $monthPart, '/', $yearPart)” />
</xsl:template>
A named template obviously needs a name and, not surprisingly, there is a name attribute that reflects this. You normally have an <xsl:template> that has either a match or a name attribute. In some instances, however, it’s useful for them to have both. You can’t have an <xsl:template> with neither a match nor a name attribute though.
A named template can also have any number of <xsl:param> elements as its children. These are used in the same way that parameters are used in functions within standard programming languages—they let you pass values into the template. The preceding example has one parameter that is passed in, the date from which you will extract the individual components of year, month and day. You extract the different parts of the full date—the date, month, and year—and place them into three variables named $datePart, $monthPart, and $yearPart, respectively. To do this you use the XPath substring function. This takes three parameters, of which the third is optional:
- The string on which to operate
- The character on which to start the operation
- The length of the result string
If the third parameter is omitted, the whole of the string, starting at the character in the second parameter, is returned. So to access the month part, start with the full date and take two characters starting at the sixth character. You then repeat this operation for the day by taking two characters starting at the ninth character. Once you have the three separate parts you use another XPath function, concat(), to chain them back together separated by a suitable delimiter.
The <xsl:variable> element is a little strange compared to its counterpart in standard non-functional languages. It can be initialized only once within its lifetime. You can do this in two ways: use a select attribute, as was exhibited earlier, or use the contents of the element itself. This second method looks like this:
<xsl:variable name=”myVariable”>
  <myElement>Some content</myElement>
</xsl:variable>
In general, if you can use the select attribute to specify what you want in the variable, you should. The second way can lead to complications because a new tree has to be constructed and an outer node added. This can lead to problems when using the variable. Once you have set the contents of a variable, you can access it by using the name of the variable preceded by a $ sign. It is important to note that the scope of variables is enforced strictly by the processor. If you declare a variable as a top-level element, a direct child of <xsl:stylesheet>, then it can be used anywhere in the document. If you create it within an <xsl:template>, it can only be used there, and it can only be used within the parent in which it was created. As an example, the following code snippet contains two attempts to use the variable named $demo. The first time is fine because $demo is declared with the <xsl:for-each> element as its parent and is used within that element. The second attempt will produce an error because an attempt is made to access $demo outside of the parent in which it was created.
<xsl:template name=”usingVariables”>
  <xsl:for-each select=”someElements/someElement”>
    <xsl:variable name=”demo” select=”'Some text'” />
    <!-- this next line is okay as $demo is in scope -->
    <xsl:value-of select=”concat(someElement, $demo)” />
  </xsl:for-each>
  <!-- this next line is an error as $demo is out of scope -->
  <xsl:value-of select=”$demo” />
</xsl:template>
To utilize this template you need to modify the code that creates the table and take advantage of the <xsl:call-template> element; the new version of the style sheet that does just that is shown in Listing 8-12.
LISTING 8-12: PeopleToHtml-FriendlyDate.xslt
<xsl:stylesheet version=”1.0”
    xmlns:xsl=”http://www.w3.org/1999/XSL/Transform”>
  <xsl:template match=”/”>
    <html>
      <head>
        <title>Famous People</title>
      </head>
      <body>
        <h1>Famous People</h1>
        <hr />
        <table>
          <caption>Famous People</caption>
          <thead>
            <tr>
              <th>Name</th>
              <th>Born</th>
              <th>Died</th>
              <th>Description</th>
            </tr>
          </thead>
          <tbody>
            <xsl:apply-templates select=”People/Person” />
          </tbody>
        </table>
      </body>
    </html>
  </xsl:template>

  <xsl:template match=”Person”>
    <tr>
      <td>
        <xsl:value-of select=”Name” />
      </td>
      <td>
        <xsl:call-template name=”iso8601DateToDisplayDate”>
          <xsl:with-param
                name=”iso8601Date” select=”@bornDate” />
        </xsl:call-template>
      </td>
      <td>
        <xsl:call-template name=”iso8601DateToDisplayDate”>
          <xsl:with-param
                name=”iso8601Date” select=”@diedDate” />
        </xsl:call-template>
      </td>
      <td>
        <xsl:value-of select=”Description” />
      </td>
    </tr>
  </xsl:template>

  <xsl:template name=”iso8601DateToDisplayDate”>
    <xsl:param name=”iso8601Date” />
    <xsl:variable name=”yearPart”
           select=”substring($iso8601Date, 1, 4)” />
     <xsl:variable name=”monthPart”
           select=”substring($iso8601Date, 6, 2)” />
     <xsl:variable name=”datePart”
           select=”substring($iso8601Date, 9, 2)” />
    <xsl:value-of
          select=”concat($datePart, '/', $monthPart, '/', $yearPart)” />
  </xsl:template></xsl:stylesheet>
The <xsl:call-template> Element
The <xsl:call-template> element has an attribute, name, that identifies which template to call. Contained within the element can be any number of <xsl:with-param> elements that pass values to the <xsl:template>. These values are received by the <xsl:param> elements within the called template. The <xsl:with-param> elements have a select attribute to retrieve whatever values are required. The results of this new transformation are shown in Figure 8-2.
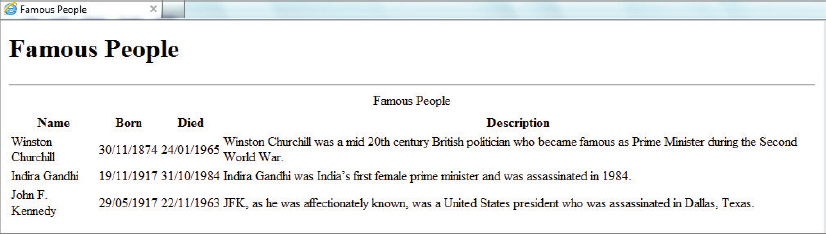
As you can see, though, the date format, although clear enough in this instance, is not really suitable for a page that may be viewed in many different countries. It follows the European standard of date-month-year rather than the U.S. standard of month-date-year. To remove this ambiguity you can modify the named template to show the month using its name. This will give you a chance to see a new aspect of XSLT—how to embed and retrieve lookup information both from an external source and within the transformation using the document() function.
The document() Function in XSLT
The document() function is one of the most useful functions in the XSLT library. At its simplest it takes one argument, which is a string pointing to an external document, usually in the form of a URL. XSLT processors can support schemes other than HTTP and HTTPS but those tend to be the only ones that most can cope with. So if you have an XSL transformation that processes an XML file but you also want to incorporate information from a document held at http://www.wrox.com/books.xml, you’d use code similar to the following:
<xsl:variable name=”books” select=”document('http://www.wrox.com/books.xml')” />
Assuming the URL http://www.wrox.com/books.xml points to a well-formed document and is accessible, the variable $books will now hold a reference to the root node of the document and other nodes can be accessed in the usual way using XPath. For example, each book might be found using the expression:
$books/Books/Book
You’ll now see how the document() function can help you complete your current task, turning the month represented as a number into the full month name.
![]() LISTING 8-13: Months.xml
LISTING 8-13: Months.xml
<?xml version=”1.0” encoding=”utf-8”?>
<Months>
  <Month index=”1”>January</Month>
  <Month index=”2”>February</Month>
  <Month index=”3”>March</Month>
  <Month index=”4”>April</Month>
  <Month index=”5”>May</Month>
  <Month index=”6”>June</Month>
  <Month index=”7”>July</Month>
  <Month index=”8”>August</Month>
  <Month index=”9”>September</Month>
  <Month index=”10”>October</Month>
  <Month index=”11”>November</Month>
  <Month index=”12”>December</Month>
</Months>
<xsl:variable name=”allMonths” select=”document('months.xml')” /> <xsl:template
name=”iso8601DateToDisplayDate”>
<xsl:param name=”iso8601Date” />
<xsl:variable
name=”yearPart” select=”substring($iso8601Date, 1, 4)” />
<xsl:variable
name=”monthPart” select=”substring($iso8601Date, 6, 2)” />
<xsl:variable
name=”monthName”
select=”$allMonths/Months/Month[@index = number($monthPart)]” />
<xsl:variable
name=”datePart” select=”substring($iso8601Date, 9, 2)” />
<xsl:value-of select=”concat($datePart, ' ', $monthName, ' ', $yearPart)” />
</xsl:template>![]() LISTING 8-14: PeopleToHtml-MonthNames.xslt
LISTING 8-14: PeopleToHtml-MonthNames.xslt
<?xml version=”1.0” encoding=”utf-8”?>
<xsl:stylesheet version=”1.0” xmlns:xsl=”http://www.w3.org/1999/XSL/Transform”>

  <xsl:variable name=”allMonths” select=”document('months.xml')” />

  <xsl:template match=”/”>
    <html>
      <head>
        <title>Famous People</title>
      </head>
      <body>
        <h1>Famous People</h1>
        <hr />
        <table>
          <caption>Famous People</caption>
          <thead>
            <tr>
              <th>Name</th>
              <th>Born</th>
              <th>Died</th>
              <th>Description</th>
            </tr>
          </thead>
          <tbody>
            <xsl:apply-templates select=”People/Person” />
          </tbody>
        </table>
      </body>
    </html>
  </xsl:template>

  <xsl:template match=”Person”>
    <tr>
      <td>
        <xsl:value-of select=”Name” />
      </td>
      <td>
        <xsl:call-template name=”iso8601DateToDisplayDate”>
          <xsl:with-param name=”iso8601Date” select=”@bornDate” />
        </xsl:call-template>
      </td>
      <td>
        <xsl:call-template name=”iso8601DateToDisplayDate”>
          <xsl:with-param name=”iso8601Date” select=”@diedDate” />
        </xsl:call-template>
      </td>
      <td>
        <xsl:value-of select=”Description” />
      </td>
    </tr>
  </xsl:template>

  <xsl:template
       name=”iso8601DateToDisplayDate”>
    <xsl:param name=”iso8601Date” />
    <xsl:variable
       name=”yearPart” select=”substring($iso8601Date, 1, 4)” />
    <xsl:variable
       name=”monthPart” select=”substring($iso8601Date, 6, 2)” />
    <xsl:variable
  name=”monthName” select=”$allMonths/Months/Month[@index = number($monthPart)]” />
    <xsl:variable
       name=”datePart” select=”substring($iso8601Date, 9, 2)” />
    <xsl:value-of select=”concat($datePart, ' ', $monthName, ' ', $yearPart)” />
  </xsl:template>

</xsl:stylesheet>
The results of running this transformation are shown in Figure 8-3.
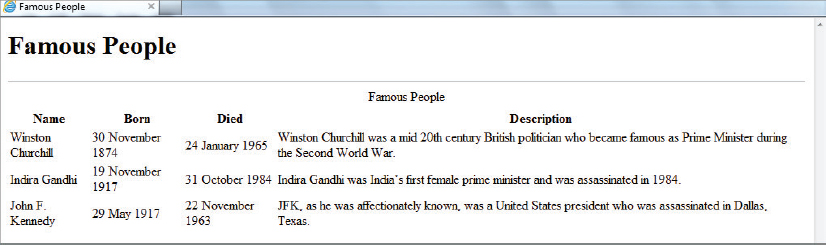
The document() function opens some exciting possibilities. There’s no reason, for instance, that the file you try to access has to be a static file—it could be the results of a web service call. As long as the content returned is well-formed, the document() function will treat what is returned as a valid XML document. However, there’s no way of posting data—the web service has to be able to accept parameters in the querystring or be a RESTful type. For example, you might have coded a web service that accepts the number of the month and returns the full name. It might be called like this, using querystring parameters:
<xsl:variable name=”monthName”
   select=”document('http://www.wrox.com/services/getMonthName.asmx?index=3')” />
or this, using a RESTful-style service:
<xsl:variable name=”monthName”
   select=”document('http://www.wrox.com/services/months/3')” />
To be fair, the example with an external lookup file for the months was somewhat overkill—in many cases you might just want to embed the lookup data within the actual XSLT. To embed something within the XSLT, you use the same format for the data; the only small change is to ensure the processor understands that this is your data and that it is clearly separate from both the XSLT itself and any elements you want to appear in the output. To ensure this separation, you need to group the elements under a namespace.
 <xsl:stylesheet version=”1.0” xmlns:xsl=”http://www.w3.org/1999/XSL/Transform”
xmlns:myData=”http://wrox.com/namespaces/embeddedData” >
<xsl:variable name=”allMonths” select=”document('months.xml')” />
<myData:Months>
<Month index=”1”>January</Month>
<Month index=”2”>February</Month>
<Month index=”3”>March</Month>
<Month index=”4”>April</Month>
<Month index=”5”>May</Month>
<Month index=”6”>June</Month>
<Month index=”7”>July</Month>
<Month index=”8”>August</Month>
<Month index=”9”>September</Month>
<Month index=”10”>October</Month>
<Month index=”11”>November</Month>
<Month index=”12”>December</Month>
</myData:Months>
<!-- rest of stylesheet -->
</xsl:stylesheet>
 <xsl:stylesheet version=”1.0” xmlns:xsl=”http://www.w3.org/1999/XSL/Transform”
xmlns:myData=”http://wrox.com/namespaces/embeddedData” >

  <xsl:variable name=”allMonths” select=”document('months.xml')” />

  <myData:Months>
    <Month index=”1”>January</Month>
    <Month index=”2”>February</Month>
    <Month index=”3”>March</Month>
    <Month index=”4”>April</Month>
    <Month index=”5”>May</Month>
    <Month index=”6”>June</Month>
    <Month index=”7”>July</Month>
    <Month index=”8”>August</Month>
    <Month index=”9”>September</Month>
    <Month index=”10”>October</Month>
    <Month index=”11”>November</Month>
    <Month index=”12”>December</Month>
  </myData:Months>

  <!-- rest of stylesheet -->
</xsl:stylesheet>
PeopleToHtml-LocalDocument.xslt
<xsl:variable name=”thisDocument” select=”document('')” />![]() LISTING 8-15: PeopleToHtml-LocalDocument.xslt
LISTING 8-15: PeopleToHtml-LocalDocument.xslt
<?xml version=”1.0” encoding=”utf-8”?>
<xsl:stylesheet version=”1.0”
              xmlns:xsl=”http://www.w3.org/1999/XSL/Transform”
              xmlns:myData=”http://wrox.com/namespaces/embeddedData”>

  <xsl:variable name=”thisDocument” select=”document('')” />

  <myData:Months>
    <Month index=”1”>January</Month>
    <Month index=”2”>February</Month>
    <Month index=”3”>March</Month>
    <Month index=”4”>April</Month>
    <Month index=”5”>May</Month>
    <Month index=”6”>June</Month>
    <Month index=”7”>July</Month>
    <Month index=”8”>August</Month>
    <Month index=”9”>September</Month>
    <Month index=”10”>October</Month>
    <Month index=”11”>November</Month>
    <Month index=”12”>December</Month>
  </myData:Months>

  <xsl:template match=”/”>
    <html>
      <head>
        <title>Famous People</title>
      </head>
      <body>
        <h1>Famous People</h1>
        <hr />
        <table>
          <caption>Famous People</caption>
          <thead>
            <tr>
              <th>Name</th>
              <th>Born</th>
              <th>Died</th>
              <th>Description</th>
            </tr>
          </thead>
          <tbody>
            <xsl:apply-templates select=”People/Person” />
          </tbody>
        </table>
      </body>
    </html>
  </xsl:template>

  <xsl:template match=”Person”>
    <tr>
      <td>
        <xsl:value-of select=”Name” />
      </td>
      <td>
        <xsl:call-template name=”iso8601DateToDisplayDate”>
          <xsl:with-param name=”iso8601Date” select=”@bornDate” />
        </xsl:call-template>
      </td>
      <td>
        <xsl:call-template name=”iso8601DateToDisplay”>
          <xsl:with-param name=”iso8601Date” select=”@diedDate” />
        </xsl:call-template>
      </td>
      <td>
        <xsl:value-of select=”Description” />
      </td>
    </tr>
  </xsl:template>

  <xsl:template name=”iso8601DateToDisplayDate”>
    <xsl:param name=”iso8601Date” />
    <xsl:variable name=”yearPart”
             select=”substring($iso8601, 1, 4)” />
    <xsl:variable name=”monthPart”
             select=”substring($iso8601Date, 6, 2)” />
    <xsl:variable name=”monthName” select=
“$thisDocument/xsl:stylesheet/myData:Months/Month[@index = number($monthPart)]”
    />
    <xsl:variable name=”datePart”
                  select=”substring($iso8601Date, 9, 2)” />
    <xsl:value-of select=”concat($datePart, ' ', $monthName, ' ', $yearPart)” />
  </xsl:template>

</xsl:stylesheet>
Now there’s one main area of processing that you haven’t covered yet and that is conditional logic—how can you change what processing occurs depending on a condition?
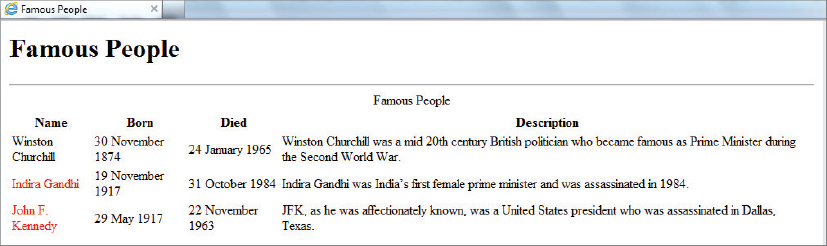
Conditional Logic
There are two main ways to use conditional logic in XSLT version 1.0, with a third appearing in version 2.0 courtesy of the enhanced powers of XPath available in the later version. The first way is to use an <xsl:if> element. This enables you to make simple tests but doesn’t give you the option of an else statement. The basic structure of the element is:
<xsl:if test=”test condition goes here”>
  <!-- instructions if the condition is true -->
</xsl:if>
The <xsl:if> element has an attribute named test. The value of this attribute is an XPath expression that produces a Boolean value of true or false. If the condition evaluates to true, the instructions within the element are carried out. Example tests might be:
- Person: Evaluates to true if there is at least one Person element.
- Name = 'Indira Gandhi': Evaluates to true if the Name element has the text 'Indira Gandhi'.
- number(substring(Person/@bornDate, 1, 2)) = 19: Takes the first two characters of the bornDate attribute and returns true if they are equal to 19.
You can use this last test in your current transformation to mark the names of people born in the twentieth century in a different color. To do so, add the test to the template that matches the <Person> element and then perform the following steps:
The final result looks like the following code snippet:
PeopleToHtml-ColoredNames.xslt
When you run the transformation you get the result shown in Figure 8-4 where the first politician, Winston Churchill, is in black and the others are colored red.
<xsl:if> is quite limited. When you need something more powerful to handle more than one condition, use <xsl:choose>. This instruction takes the following form:
<xsl:choose>
  <xsl:when test=”test condition goes here”>
    <!-- instructions if the condition is true -->
  </xsl:when>
  <!-- more when elements can go here -->

  <!-- the otherwise is optional -->
  <xsl:otherwise>
    <!-- instructions if all when conditions fail -->
  </xsl:otherwise>
</xsl:choose>
Basically, you can have any number of <xsl:when> elements inside <xsl:choose>. You can also have an optional <xsl:otherwise> that is executed if all the previous tests have failed. As an example of using choose suppose you want to improve the look of your output document by giving every odd numbered row in the table a different background color than the even numbered ones. You can accomplish this by testing against the results of the position() function, which gives the index of the node being processed starting at one. So in your Person template you can add the following:
 <xsl:template match=”Person”>
  <xsl:variable name=”rowCSS”>
    <xsl:choose>
      <xsl:when test=”position() mod 2 = 0”>color:#0000aa;</xsl:when>
      <xsl:otherwise>color:#006666;</xsl:otherwise>
    </xsl:choose>
  </xsl:variable>

  <!-- rest of template -->
</xsl:template>
PeopleToHtml-ColoredRows.xslt
The test here uses the position() function, which tells you which <Person> element you are processing, and the mod operator, which returns the remainder after dividing the position by two. If the remainder is zero, it’s an even numbered row and you assign a color of #0000aa, otherwise you assign a color of #006666.
You can then add this variable to the style attribute of the <tr> element:
  <tr style=”{$rowCSS}”>
      <td style=”{$nameCSS}”>
        <xsl:value-of select=”Name” />
      </td>
The complete template now looks like:
PeopleToHtml-ColoredRows.xslt
When you run this transformation using one of the following command lines you get the result shown in Figure 8-5 where the first name, Winston Churchill, is in black but the names after that are in red:
java net.sf.saxon.Transform -s:People.xml
 -xsl:PeopleToHtml-ColoredRows.xslt -o:People-ColoredRows.html
or:
Transform -s:People.xml -xsl:PeopleToHtml-ColoredRows.xslt
 -o:People-ColoredRows.html
The technique of using a variable or any XPath expression within an attribute’s value, as used in the preceding snippet, is a powerful one. In the snippet the variable, $rowCSS was embedded inside the style attribute’s value as shown here:
<tr style=”{$rowCSS}” >
The variable is surrounded by braces, {}, to inform the XSLT processor that the contents need to be treated as XPath and replaced with whatever value the XPath expression evaluates to. These braces are only needed when the element whose attribute they appear in is not a built-in XSLT instruction. For example in the following snippet the braces are not required as the <xsl:value-of> element is intrinsic to XSLT and its select attribute expects the following XPath expression:
<xsl:value-of select=”$rowCSS” />
So the rule to decide whether or not an XPath expression needs to be surrounded by braces is simple: Does the attribute expect XPath or not? If it does, just write the XPath expression; if it doesn’t, use the XPath surrounded by braces. The technique of embedding XPath within attributes that usually take literal values is known as attribute value templates (AVT) and if you look at the XSLT specification you will see that attributes definitions are accompanied with whether or not attribute value templates can be used with them.
So far you’ve seen how to process both a main input document and how to take advantage of external documents using the document() function. Next you see how to pass in simple pieces of information to a transformation using the <xsl:param> element.
The <xsl:param> element
To make your transformations reusable it’s often necessary to pass arguments to them that affect the processing. To do that you can declare any number of <xsl:param> elements as children of the <xsl:stylesheet> element. These can be set before the transformation takes place. The way these parameters are initialized is not defined by the XSLT specification but is left to the designer of the processor. The processor you are using, Saxon, enables parameters to be set on the command line or via Java or .NET code. In reference to the ongoing example, suppose you want to modify the part of the transform that highlights the name in the resulting HTML. Currently you highlight anyone born in the twentieth century or later by checking the first two digits of the year. To change that, pass in a parameter specifying a year and highlighting anyone born after that by performing the following steps.
    <xsl:stylesheet version=”1.0”
           xmlns:xsl=”http://www.w3.org/1999/XSL/Transform”
           xmlns:myData=”http://wrox.com/namespaces/embeddedData”>

      <xsl:param name=”targetYear” select=”3000” />
PeopleToHtml-BornAfter
    <xsl:variable name=”nameCSS”>
    <xsl:if test=”number(substring(@bornDate, 1, 4)) > $targetYear”>color:red;</xsl:if>
    </xsl:variable>
PeopleToHtml-BornAfter
    java net.sf.saxon.Transform -s:people.xml -xsl:peopleToHtml-BornAfter.xslt
                            -o:People-BornAfter.html targetYear=1916
    Transform -s:people.xml -xsl:peopleToHtml-BornAfter.xslt
-o:People-BornAfter.html targetYear=1916When processing nodes from the source document it’s sometimes important to be able to sort them based on various criteria rather than just have them appear in the output in the same order as the input. For this task you can use the <xsl:sort> element.
The <xsl:sort> Element
The <xsl:sort> element is fairly simple. It can be used as a child of <xsl:apply-templates> or <xsl:for-each>. It has the following attributes to control the sorting process:
- select: An XPath expression pointing to the node(s) to sort on.
- data-type: How to treat the node values, usually either text or number.
- order: Either ascending or descending. Ascending is the default.
Say you want to sort the people in your HTML table based on their year of birth. This is going to need two stages: first you need to convert the full date, which is currently in the format yyyy-mm-dd, into a number that can be sorted; and second, you need to use the <xsl:sort> element.
For the first stage you need to make use of the translate() function. This function takes three arguments. The first is an expression pointing to the data to work on, the second parameter is what to search for, and the third is what to replace any found characters with. For example:
translate('The first of the few ', 'fiw', 'wot')
This would look for the characters f, i, and w and change them to w, o, and t, respectively. This would result in:
The worst of the wet.
Now back in the example, use the translate() function to remove the hyphens from the dates:
translate(@bornDate, '- ', '')
This leaves you with an eight-digit string that can be compared with directly with another similarly treated date meaning that a number of different dates can be sorted solely on their numeric value. The <xsl:sort> element is a child of the call to <xsl:apply-templates>, as shown in the following:
<xsl:apply-templates select=”People/Person”>
  <xsl:sort select=”translate(@bornDate, '-', '')” data-type=”number”/>
</xsl:apply-templates>
The select attribute in this snippet uses the @bornDate but with the hyphens removed and the data-type attribute set to number.
Now that you have enabled sorting the dates by translating them into numeric values and then added the <xsl:sort> instruction within the call to <xsl:apply-templates>, you can try the transformation again. When this new code is run the HTML table produced looks like Listing 8-16.
![]() LISTING 8-16: People-SortedRows.html
LISTING 8-16: People-SortedRows.html
<html xmlns:myData=”http://wrox.com/namespaces/embeddedData”>
  <head>
    <META http-equiv=”Content-Type” content=”text/html; charset=utf-8”>
    <title>Famous People</title>
  </head>
  <body>
    <h1>Famous People</h1>
    <hr>
    <table>
      <caption>Famous People</caption>
      <thead>
        <tr>
          <th>Name</th>
          <th>Born</th>
          <th>Died</th>
          <th>Description</th>
        </tr>
      </thead>
      <tbody>
        <tr style=”color:#006666;”>
          <td style=””>Winston Churchill</td>
          <td>30 November 1874</td>
          <td>24 January 1965</td>
          <td>
      Winston Churchill was a mid-20th century British politician who
      became famous as Prime Minister during the Second World War.
    </td>
        </tr>
        <tr style=”color:#0000aa;”>
          <td style=””>John F. Kennedy</td>
          <td>29 May 1917</td>
          <td>22 November 1963</td>
          <td>
      JFK, as he was affectionately known, was a United States president
      who was assassinated in Dallas, Texas.
    </td>
        </tr>
        <tr style=”color:#006666;”>
          <td style=””>Indira Gandhi</td>
          <td>19 November 1917</td>
          <td>31 October 1984</td>
          <td>
      Indira Gandhi was India's first female prime minister and was
      assassinated in 1984.
    </td>
        </tr>
      </tbody>
    </table>
  </body>
</html>
Note that the order of the people has now changed with Indira Gandhi appearing last because she was born latest.
When extracting information from the source document you have so far only used the <xsl:value-of> instruction. This is handy when you want snippets of data but less useful when you need to copy entire elements. <xsl:value-of> always returns the text from an element or the value of an attribute. If it is passed a set of nodes, it returns the text of the first element or the value of the first attribute (in version 1.0 at least). In XSLT terminology it returns an atomic value as opposed to a node or a node set. If you want to copy elements in their entirety you have two options: <xsl:copy> and <xsl:copy-of>.
<xsl:copy> and <xsl:copy-of> Elements
Both these elements can be used to copy content from the source to the output tree. <xsl:copy> performs a shallow copy—it just copies the current node without any children, or attributes if it’s an element. If you want any other nodes to appear you need to add them manually. <xsl:copy-of> performs a deep copy—it copies the specified node with all its children and attributes. Creating a simple transformation can better examine the difference between <xsl:value-of>, <xsl:copy>, and <xsl:copy-of. Listing 8-17 shows a basic XSLT that processes each of the <Person> elements.
![]() LISTING 8-17: CopyingNodes.xslt
LISTING 8-17: CopyingNodes.xslt
<xsl:stylesheet version=”1.0” xmlns:xsl=”http://www.w3.org/1999/XSL/Transform”>
  <xsl:output method=”xml” indent=”yes”/>

 <xsl:template match=”/”>
   <People>
     <xsl:apply-templates select=”People/Person” />
   </People>
  </xsl:template>

  <xsl:template match=”Person”>
    <valueOf>
      <xsl:value-of select=”.” />
    </valueOf>

    <copy>
      <xsl:copy />
    </copy>

    <copyOf>
      <xsl:copy-of select=”.”/>
    </copyOf>
  </xsl:template>
</xsl:stylesheet>
After the initial <xsl:stylesheet> element you have added an <xsl:output> element. This has a number of uses. Its primary purpose is to specify what format the output will take using the method attribute. The options are xml (the default), html, and text, with the fourth option of xhtml available if you are using XSLT version 2.0. So far you haven’t had to use this element because any output document starting with an <html> tag is assumed to be HTML. Similarly, any document beginning with any other element is treated as XML. The reason you use the element in this transformation is that you want to specify that the output is indented to make it easier to read—this is achieved when the indent attribute is set to yes. Another attribute often seen on <xsl:output> is encoding. This allows you to state whether the output should be in something other than utf-8, for example iso-8859-1.
In Listing 8-17, the first <xsl:template> matches the root node (/), and this simply adds a <People> element at the document element of output. Then <xsl:apply-templates> is called as before and the <Person> elements are selected for processing. They are caught by the second <xsl:template>, which outputs three different views of each <Person>. The first, contained within a <valueOf> element, uses <xsl:value-of>. This just extracts all the text and ignores all attributes and child elements. The second outputs a <copy> element and then uses <xsl:copy>. This just outputs the <Person> element itself without any attributes or children. The third view of the <Person> element uses the <xsl:copy-of> instruction. This makes a deep copy and includes the <Person> element along with its attributes and all children, including the text nodes. The results of the transformation are shown in Listing 8-18.
![]() LISTING 8-18: CopyingNodes.xml
LISTING 8-18: CopyingNodes.xml
<?xml version=”1.0” encoding=”utf-8”?>
<People>
  <valueOf>
    Winston Churchill

      Winston Churchill was a mid-20th century British politician who
      became famous as Prime Minister during the Second World War.

  </valueOf>
  <copy>
    <Person />
  </copy>
  <copyOf>
    <Person bornDate=”1874-11-30” diedDate=”1965-01-24”>
    <Name>Winston Churchill</Name>
    <Description>
      Winston Churchill was a mid-20th century British politician who
      became famous as Prime Minister during the Second World War.
    </Description>
  </Person>
  </copyOf>
  <valueOf>
    Indira Gandhi

      Indira Gandhi was India's first female prime minister and was
      assassinated in 1984.

  </valueOf>
  <copy>
    <Person />
  </copy>
  <copyOf>
    <Person bornDate="1917-11-19" diedDate="1984-10-31">
    <Name>Indira Gandhi</Name>
    <Description>
      Indira Gandhi was India's first female prime minister and was
      assassinated in 1984.
    </Description>
  </Person>
  </copyOf>
  <valueOf>
    John F. Kennedy

      JFK, as he was affectionately known, was a United States president
      who was assassinated in Dallas, Texas.

  </valueOf>
  <copy>
    <Person />
  </copy>
  <copyOf>
    <Person bornDate="1917-05-29" diedDate="1963-11-22">
    <Name>John F. Kennedy</Name>
    <Description>
      JFK, as he was affectionately known, was a United States president
      who was assassinated in Dallas, Texas.
    </Description>
  </Person>
  </copyOf>
</People>
REUSING CODE IN XSLT
Another important facet of development, in any language, is code reuse. XSLT has two ways to let you write style sheets that can be used in more than one place: <xsl:include> and <xsl:import>.
The <xsl:include> Element
<xsl:include> allows you to include one style sheet within another. This has the same effect as simply copying and pasting the code from the included style sheet into the main one, but enables you to build up modules of useful code. For example, the template you used earlier to convert a date into a more user-friendly format could be extracted from the main transformation. It could then be included in a number of other transformations without having to write the code again.
The following Try It Out takes you through a scenario that is often found in software development, refactoring code into separate and reusable modules. These modules can then be incorporated into multiple transformations. Reusing code in this fashion has two main advantages. First, it means not having to write the same functionality time and again; and second, if you find a mistake within the reusable code module, you can simply correct it in one place and any other transformation using that module will benefit.
![]() LISTING 8-19: DateTemplates.xslt
LISTING 8-19: DateTemplates.xslt
<?xml version=”1.0” encoding=”utf-8”?>
<xsl:stylesheet version=”1.0”
           xmlns:xsl=”http://www.w3.org/1999/XSL/Transform”
           xmlns:myData=”http://wrox.com/namespaces/embeddedData”
           exclude-result-prefixes=”myData”>

  <xsl:variable name=”thisDocument” select=”document('')” />

  <myData:Months>
    <Month index=”1”>January</Month>
    <Month index=”2”>February</Month>
    <Month index=”3”>March</Month>
    <Month index=”4”>April</Month>
    <Month index=”5”>May</Month>
    <Month index=”6”>June</Month>
    <Month index=”7”>July</Month>
    <Month index=”8”>August</Month>
    <Month index=”9”>September</Month>
    <Month index=”10”>October</Month>
    <Month index=”11”>November</Month>
    <Month index=”12”>December</Month>
  </myData:Months>

  <xsl:template name=”iso8601DateToDisplayDate”>
    <xsl:param name=”iso8601Date” />
    <xsl:variable name=”yearPart”
         select=”substring($iso8601Date, 1, 4)” />
    <xsl:variable name=”monthPart”
         select=”substring($iso8601Date, 6, 2)” />
    <xsl:variable name=”monthName”select=
“$thisDocument/xsl:stylesheet/myData:Months/Month[@index = number($monthPart)]” />
    <xsl:variable name=”datePart”
         select=”substring($iso8601Date, 9, 2)” />
    <xsl:value-of select=”concat($datePart, ' ', $monthName, ' ', $yearPart)” />
  </xsl:template>

</xsl:stylesheet>
![]() LISTING 8-20: PeopleToHtml-UsingIncludes.xslt
LISTING 8-20: PeopleToHtml-UsingIncludes.xslt
<?xml version=”1.0” encoding=”utf-8”?>
<xsl:stylesheet version=”1.0” xmlns:xsl=”http://www.w3.org/1999/XSL/Transform”
                 xmlns:myData=”http://wrox.com/namespaces/embeddedData”>

  <xsl:include href=”DateTemplates.xslt” />

  <xsl:param name=”targetYear” select=”3000” />

  <xsl:template match=”/”>
    <html>
      <head>
        <title>Famous People</title>
      </head>
      <body>
        <h1>Famous People</h1>
        <hr />
        <table>
          <caption>Famous People</caption>
          <thead>
            <tr>
              <th>Name</th>
              <th>Born</th>
              <th>Died</th>
              <th>Description</th>
            </tr>
          </thead>
          <tbody>
            <xsl:apply-templates select=”People/Person”>
              <xsl:sort
                 select=”translate(@bornDate, '-', ''”)
                 data-type="number"/>
            </xsl:apply-templates>
          </tbody>
        </table>
      </body>
    </html>
  </xsl:template>

  <xsl:template match="Person">
    <xsl:variable name="rowCSS">
      <xsl:choose>
        <xsl:when test="position() mod 2 = 0">color:#0000aa;</xsl:when>
        <xsl:otherwise>color:#006666;</xsl:otherwise>
      </xsl:choose>
    </xsl:variable>
    <xsl:variable name="nameCSS">
      <xsl:if
     test="number(substring(@bornDate, 1, 4)) > $targetYear">color:red;</xsl:if>
    </xsl:variable>
    <tr style="{$rowCSS}">
      <td style="{$nameCSS}">
        <xsl:value-of select="Name" />
      </td>
      <td>
        <xsl:call-template name="iso8601DateToDisplay">
          <xsl:with-param name="iso8601Date" select="@bornDate" />
        </xsl:call-template>
      </td>
      <td>
        <xsl:call-template name="iso8601DateToDisplayDate">
          <xsl:with-param name="iso8601Date" select="@diedDate" />
        </xsl:call-template>
      </td>
      <td>
        <xsl:value-of select=”Description” />
      </td>
    </tr>
  </xsl:template>

</xsl:stylesheet>
java net.sf.saxon.Transform -s:people.xml -xsl: PeopleToHtml-UsingIncludes.xslt
                            -o:People-UsingIncludes.html
Transform -s:people.xml -xsl: PeopleToHtml-UsingIncludes.xslt
                           -o:People-UsingIncludes.html
The <xsl:import> Element
This element acts in a very similar way to <xsl:include> with one difference—if the templates imported clash with any already in the main XSLT, they take a lower precedence. This means that if you have two templates that match <Person>, for example, the one in the main style sheet is executed rather than the template in the imported one. For many transformations this is irrelevant, and as long as you don’t have any templates that match the same nodes then <xsl:import> and <xsl:include> behave in the same way.
Another common use case that arises is when you want to process the same node more than once. This can occur when you want to show a summary or a table of contents. To process nodes more than once you need to use two <xsl:template> elements and specify a mode attribute.
The <xsl:template> Mode Attribute
Say you want to add a menu to your People.html page. This will take the form of three anchors at the start of the HTML that link to the relevant section in the table below. To create this new menu, perform the following:
    <xsl:template match=”Person” mode=”menu”>
      <a href=”#Person{position()}”>
        <xsl:value-of select=”Name” />
      </a>
      <br />
</xsl:template> <body>
<h1>Famous People</h1>
<hr />
<xsl:apply-templates select=”People/Person” mode=”menu”>
<xsl:sort select=”translate(@bornDate, '-', '')” data-type=”number”/>
</xsl:apply-templates>
<hr />
<table> <td style=”{$nameCSS}”>
<a name=”Person{position()}”>
<xsl:value-of select=”Name” />
</a>
</td> <tbody>
<xsl:apply-templates select=”People/Person” mode=”details”>
<xsl:sort
select=”translate(@bornDate, '-', '')” data-type=”number”/>
</xsl:apply-templates>
</tbody>The complete style sheet is shown in Listing 8-21.
![]() LISTING 8-21: PeopleToHtml-WithMenu.xslt
LISTING 8-21: PeopleToHtml-WithMenu.xslt
<?xml version=”1.0” encoding=”utf-8”?>
<xsl:stylesheet version=”1.0”
xmlns:xsl=”http://www.w3.org/1999/XSL/Transform”
xmlns:myData=”http://wrox.com/namespaces/embeddedData”
exclude-result-prefixes=”myData”>
<xsl:include href=”DateTemplates.xslt” />
<xsl:param name=”targetYear” select=”3000” />
<xsl:template match=”/”>
<html>
<head>
<title>Famous People</title>
</head>
    <body>
            <h1>Famous People</h1>
            <hr />
            <xsl:apply-templates select=”People/Person” mode=”menu”>
              <xsl:sort select=”translate(@bornDate, '-', '')” data-type=”number”/>
            </xsl:apply-templates>
            <hr />
            <table>
<caption>Famous People</caption>
<thead>
<tr>
<th>Name</th>
<th>Born</th>
<th>Died</th>
<th>Description</th>
</tr>
</thead>
<tbody>
<xsl:apply-templates select=”People/Person” mode=”details”>
<xsl:sort
select=”translate(@bornDate, '-', '')” data-type=”number”/>
</xsl:apply-templates>
</tbody>
</table>
</body>
</html>
</xsl:template>
<xsl:template match=”Person” mode=”menu”>
<a href=”#Person{position()}”>
<xsl:value-of select=”Name” />
</a>
<br />
</xsl:template>
<xsl:template match=”Person” mode=”details”>
<xsl:variable name=”rowCSS”>
<xsl:choose>
<xsl:when test=”position() mod 2 = 0”>color:#0000aa;</xsl:when>
<xsl:otherwise>color:#006666;</xsl:otherwise>
</xsl:choose>
</xsl:variable>
<xsl:variable name=”nameCSS”>
<xsl:if
test=”number(substring(@bornDate, 1, 4)) > $targetYear”>color:red;</xsl:if>
</xsl:variable>
<tr style=”{$rowCSS}”>
    <td style=”{$nameCSS}”>
            <a name=”Person{position()}”>
              <xsl:value-of select=”Name” />
            </a>
          </td>
<td>
<xsl:call-template name=”iso8601DateToDisplayDate”>
<xsl:with-param name=”iso8601Date” select=”@bornDate” />
</xsl:call-template>
</td>
<td>
<xsl:call-template name=”iso8601DateToDisplayDate”>
<xsl:with-param name=”iso8601Date” select=”@diedDate” />
</xsl:call-template>
</td>
<td>
<xsl:value-of select=”Description” />
</td>
</tr>
</xsl:template>
</xsl:stylesheet>
If you’ve been experimenting with your own style sheets, or when you do so in future, you may experience a strange phenomenon—some of the text from the source document will appear in the output even when you didn’t ask for it. This is a problem often encountered and occurs because of two features of XSLT: built-in templates and built-in rules.
UNDERSTANDING BUILT-IN TEMPLATES AND BUILT-IN RULES
Before the built-in templates and rules are explained in depth it will be best to start with an example of how they operate. Create a basic shell transformation consisting entirely of an <xsl:stylesheet> element, as shown in the following snippet:
<xsl:stylesheet version=”1.0” xmlns:xsl=”http://www.w3.org/1999/XSL/Transform”>
</xsl:stylesheet>
Now if you run it against the People.xml file you’ll find that, although there are no <xsl:templates> in the transformation, the output consists of all the actual text within the XML. However, no elements are output. This happens because there is a built-in rule for each of the different item types in a document—elements, attributes, comments, and so on—that is applied if you haven’t specified an explicit one yourself. The basic rule for the root node or an element is simply: apply templates to the children of the root node or element. This means that the empty style sheet in the preceding code is the equivalent of the following:
<xsl:stylesheet version=”1.0” xmlns:xsl=”http://www.w3.org/1999/XSL/Transform”>

  <xsl:template match=”/”>
    <xsl:apply-templates select=”*” />
  </xsl:template>
</xsl:stylesheet></xsl:stylesheet>
Now there isn’t a template matching the child of the root node, which is <People>, so the built-in template kicks in. This simply outputs all text content of the element. In effect there is a template added for <People>, which just selects the element’s value, like so:
<xsl:stylesheet version=”1.0” xmlns:xsl=”http://www.w3.org/1999/XSL/Transform”>

  <xsl:template match=”/”>
    <xsl:apply-templates select=”*” />
  </xsl:template>

  <xsl:template match=”People”>
    <xsl:value-of select=”.”/>
  </xsl:template>
</xsl:stylesheet>
As long as you provide templates for any elements you select you won’t have this problem; if you do select elements using <xsl:apply-templates> and there are no matching <xsl:template> elements to process them, you’ll most likely encounter unwanted text in your output. You can always get around this by overriding the built-in template with one of your own that outputs nothing; in the following simple example a template matches all text nodes and effectively discards them getting rid of all the output created by the built-in rules:
<xsl:stylesheet version=”1.0” xmlns:xsl=”http://www.w3.org/1999/XSL/Transform”>
  <xsl:template match=”text()” />
</xsl:stylesheet>
If you run this transformation against People.xml, or any other file, you shouldn’t see any output because there is now an <xsl:template> element that matches any text found and ignores it.
You’ve now covered the majority of elements and their attributes found in version 1.0 of XSLT. You’ve seen how the whole idea of the language is based on the premise of <xsl:template> elements that deal with specific parts of the input document. You’ve also seen how these templates are executed, either being called by name using an <xsl:call-template> instruction or by matching the nodes selected by <xsl:apply-templates>. You also saw that inside <xsl:template> it was possible to extract values relative to the node being processed, known as the context node. You saw how you have a number of different choices of what format this information takes, using <xsl:value-of> to extract a simple string value or using <xsl:copy> and <xsl:copy-of> to output full nodes as XML. The other main elements covered were <xsl:include> and <xsl:import> which are designed to enable reusable XSLT modules to be designed that can then be incorporated in other transformations.
You are now going to look at version 2.0 of XSLT and see what new features were introduced and what problems they are designed to help solve.
USING XSLT 2.0
After XSLT 1.0 had been in use for some time, it became apparent that there were a number of areas that could be improved and a number of use cases that it couldn’t cope with, at least in a relatively simple manner.
Some of the new features in version 2.0 that you’ll be looking at in this section include:
- Stronger data typing: Version 1.0 only really dealt with numbers, text, Booleans, and, to a limited extent, dates. In version 2.0 there is much more granular control.
- User-defined functions: Although you can use <xsl:call-template> as a limited function substitute in version 1.0, version 2.0 enables you to create your own functions that can be called from within an XPath expression.
- Multiple result documents: In version 2.0 you can produce more than one file from a single transformation; this is a common use case when you need to split a large XML document into smaller ones.
- Multiple input documents: Version 1.0 allowed extra input by way of the document() function. Version 2.0 adds a collection() function that allows processing of multiple documents; for example, you could process a whole folder.
- Support for grouping: Grouping in version 1.0 was very difficult; in version 2.0 it’s much simpler.
- The ability to process non-XML input: You can now take a CSV file, for example, and turn it into XML.
- Better text handling: A number of new elements can assist in the parsing of textual content; for example, using a regular expression to break long pieces of text into smaller chunks.
- Support for XPath 2.0: XPath 2.0 contains a wealth of new functions that can all be used in the newer version of XSLT.
You’ll take a look at these features in the next few sections and see how they help solve problems that were difficult or impossible in version 1.0.
Understanding Data Types in XSLT 2.0
XSLT 1.0 had very limited type support—basically text, numbers, and Booleans. There was no support for other common types found in many other languages and even dates were often manipulated as numbers. In version 2.0 you can specify a much wider range of types based on those found in XML Schema; this includes integers, doubles, and decimals as well as support for time durations such as day, month, and year. You can also import types from other XML Schemas if you are using a schema-aware processor.
Support for these extra types means that you can now label variables, templates and functions as holding, outputting and returning, respectively, a particular type. This means that if you try to use text where an integer had been expected, the processor will flag an error rather than try to perform a silent conversion. This makes debugging much easier. The full list of built-in types is available at http://www.w3.org/TR/xpath-functions/#datatypes. You’ll see how to use some of the newer date time types when you’ve covered the next new feature, functions.
Creating User-Defined Functions
The ability to create functions was sorely missing in version 1.0. In version 2.0 this is remedied by adding the <xsl:function> element. The resulting function can be used anywhere the built-in XPath functions, such as concat() and substring(), can be used.
The following Try It Out shows how to write a function in XSLT using the <xsl:function> element. You’ll see the process involved in converting a named template to a function, how the code differs, and what advantages a function has over a template.
![]() LISTING 8-22: DateFunctions.xslt
LISTING 8-22: DateFunctions.xslt
<xsl:stylesheet version=”2.0”
     xmlns:xsl=”http://www.w3.org/1999/XSL/Transform”
     xmlns:myData=”http://wrox.com/namespaces/embeddedData”
     xmlns:myFunc=”http://wrox.com/namespaces/functions/datetime”
     xmlns:xs=”http://www.w3.org/2001/XMLSchema”
     exclude-result-prefixes=”myFunc”>

  <xsl:variable name=”thisDocument” select=”document('')” />

  <myData:Months>
    <Month index=”1”>January</Month>
    <Month index=”2”>February</Month>
    <Month index=”3”>March</Month>
    <Month index=”4”>April</Month>
    <Month index=”5”>May</Month>
    <Month index=”6”>June</Month>
    <Month index=”7”>July</Month>
    <Month index=”8”>August</Month>
    <Month index=”9”>September</Month>
    <Month index=”10”>October</Month>
    <Month index=”11”>November</Month>
    <Month index=”12”>December</Month>
  </myData:Months>

  <xsl:function name=”myFunc:iso8601DateToDisplayDate” as=”xs:string”>
    <xsl:param name=”iso8601Date” as=”xs:date” />
    <xsl:variable name=”yearPart”
         select=”year-from-date($iso8601Date)” as=”xs:integer” />
    <xsl:variable name=”monthPart”
        select=”month-from-date($iso8601Date)” as=”xs:integer” />
    <xsl:variable name=”monthName” select=
“$thisDocument/xsl:stylesheet/myData:Months/Month[@index = number($monthPart)]”
/>
    <xsl:variable name=”datePart”
           select=”day-from-date($iso8601Date)” as=”xs:integer” />
    <xsl:value-of select=”concat($datePart, ' ', $monthName, ' ', $yearPart)” />
  </xsl:function>
</xsl:stylesheet>
![]() LISTING 8-23: PeopleToHtml-UsingFunctions.xslt
LISTING 8-23: PeopleToHtml-UsingFunctions.xslt
<xsl:stylesheet version=”2.0” xmlns:xsl=”http://www.w3.org/1999/XSL/Transform”
                 xmlns:myFunc=”http://wrox.com/namespaces/functions/datetime”>

  <xsl:include href=”DateFunctions.xslt” />
  <xsl:param name=”targetYear” select=”3000” />

  <xsl:template match=”/”>
    <html>
      <head>
        <title>Famous People</title>
      </head>
      <body>
        <h1>Famous People</h1>
        <hr />
        <xsl:apply-templates select=”People/Person” mode=”menu”>
          <xsl:sort select=”translate(@bornDate, '-', '')” data-type=”number”/>
        </xsl:apply-templates>
        <hr />
        <table>
          <caption>Famous People</caption>
          <thead>
            <tr>
              <th>Name</th>
              <th>Born</th>
              <th>Died</th>
              <th>Description</th>
            </tr>
          </thead>
          <tbody>
            <xsl:apply-templates select=”People/Person” mode=”details”>
              <xsl:sort select=”translate(@bornDate, '-', '')”
                   data-type="number"/>
            </xsl:apply-templates>
          </tbody>
        </table>
      </body>
    </html>
  </xsl:template>

  <xsl:template match="Person" mode="menu">
    <a href="#Person{position()}">
      <xsl:value-of select="Name" />
    </a>
    <br />
  </xsl:template>

  <xsl:template match="Person" mode="details">
    <xsl:variable name="rowCSS">
      <xsl:choose>
        <xsl:when test="position() mod 2 = 0">color:#0000aa;</xsl:when>
        <xsl:otherwise>color:#006666;</xsl:otherwise>
      </xsl:choose>
    </xsl:variable>
    <xsl:variable name="nameCSS">
      <xsl:if
      test="number(substring(@bornDate, 1, 4)) > $targetYear">color:red;</xsl:if>
    </xsl:variable>
    <tr style="{$rowCSS}">
      <td style="{$nameCSS}">
        <a name="Person{position()}">
          <xsl:value-of select="Name" />
        </a>
      </td>
      <td>
        <xsl:value-of select=”myFunc:iso8601DateToDisplayDate(@bornDate)” />
      </td>
      <td>
        <xsl:value-of select=”myFunc:iso8601DateToDisplayDate(@diedDate)” />
      </td>
      <td>
        <xsl:value-of select=”Description” />
      </td>
    </tr>
  </xsl:template>

</xsl:stylesheet>java net.sf.saxon.Transform -s:people.xml -xsl:peopleToHtml-UsingFunctions.xslt -o:people-usingFunctions.html
transform -s:people.xml -xsl:peopleToHtml-UsingFunctions.xslt -o:people-usingFunctions.html
<xsl:function name=”myFunc:iso8601DateToDisplayDate” as=”xs:string”>
    <xsl:param name=”iso8601Date” as=”xs:date” />
    <!-- rest of function -->
</xsl:function>
<xsl:function name=”myFunc:iso8601DateToDisplayDate” as=”xs:string”>
  <xsl:param name=”iso8601Date” as=”xs:date” />
  <xsl:variable name=”yearPart”
       select=”year-from-date($iso8601Date)” as=”xs:integer” />
  <xsl:variable name=”monthPart”
       select=”month-from-date($iso8601Date)” as=”xs:integer” />
  <xsl:variable
   name=”monthName” select=
 “$thisDocument/xsl:stylesheet/myData:Months/Month[@index = number($monthPart)]” />
  <xsl:variable name=”datePart”
     select=”day-from-date($iso8601Date)” as=”xs:integer” />
  <xsl:value-of select=”concat($datePart, ' ', $monthName, ' ', $yearPart)” />
</xsl:function>
<td>
  <xsl:value-of select=”myFunc:iso8601DateToDisplayDate(@bornDate)” />
</td>
 <td>
  <xsl:value-of select=”format-date(@bornDate, '[D1] [MNn] [Y]')” />
</td>
PeopleToHtml-FormatDate.xslt
The next new features you’ll cover are how to create multiple documents from one transformation and how to use multiple documents as input.
Creating Multiple Output Documents
Many people using version 1.0 requested the ability to produce more than one output document from a single transformation. A common use case was where the input document had many child elements underneath the root, perhaps a list of employees, and each one was to be formatted and output separately. Many processor vendors added extensions to their products to allow this but in XSLT 2.0 there is a new instruction, <xsl:result-document>, that allows this task to be performed quite simply. For this example you’ll take People.xml and create a transformation that splits it into three documents, one for each <Person> element. The code is shown in Listing 8-24.
![]() LISTING 8-24: PeopleToSeparateFiles.xslt
LISTING 8-24: PeopleToSeparateFiles.xslt
<xsl:stylesheet version=”2.0”
                xmlns:xsl=”http://www.w3.org/1999/XSL/Transform”>

  <xsl:template match=”/”>
    <personCount>
      <xsl:value-of select=”count(People/Person)”/>
    </personCount>
    <xsl:apply-templates select=”People/Person” />
  </xsl:template>

  <xsl:template match=”Person”>
    <xsl:result-document href=”Person{position()}.xml”>
      <xsl:copy-of select=”.” />
    </xsl:result-document>
  </xsl:template>

</xsl:stylesheet>
The first template matches the root node and outputs an element containing the number of <Person> elements in the source file. This acts as a report for the transformation. The Person elements are then selected using <xsl:apply-templates> and matched by the second template. To output a second document you use the <xsl:result-document> element along with its href attribute to specify the name of the output file. Here you’ve said that the name should be PersonN.xml with the N replaced by the position of the Person element in the set. Within the <xsl:result-document> you’ve simply done a deep copy of the current node, so all of the <Person> elements will appear. If you run one of the following command lines:
java net.sf.saxon.Transform -s:people.xml
 -xsl:peopleToSeparateFiles.xslt -o:peopleReport.xml
or:
transform -s:people.xml -xsl:peopleToSeparateFiles.xslt -o:peopleReport.xml
you’ll get four new files. There will be a standard output, which will contain the following code:
<personCount>3</personCount>
peopleReport.xml
Then there will be three files named Person1.xml, Person2.xml, and Person3.xml produced in the same folder as the XSLT. They will each contain one <Person> element. For example, Person2.xml looks like:
 <Person bornDate=”1917-11-19” diedDate=”1984-10-31”>
  <Name>Indira Gandhi</Name>
  <Description>
    Indira Gandhi was India's first female prime minister and was
    assassinated in 1984.
  </Description>
</Person>
Person2.xml
This technique of splitting a larger XML document into smaller ones is often used in situations where orders are received via XML. The actual orders, from various clients, are typically aggregated by a third party into one large document and need to be treated separately. They are first split into individual orders and then processed. The advantages of splitting before processing are to make it easier to identify which order is a problem if an error should arise as well as being able to process each order differently if, for example, there were varying business rules for each customer.
Using the collection() Function
The opposite task of splitting one file into many is processing many files at once, and this is achieved using the collection() function. The collection() function can be used in a number of ways, but commonly it is used to process a complete folder or tree of folders. As a simple example you’ll create a style sheet that takes the three PersonN.xml files created in Listing 8-24 and recombines them. The way that processors fully implement the collection() function is vendor dependent and Saxon has a number of extra features that allow the documents in the folder to be filtered based on their name. You will pass a filter along with the name of the folder to be treated so that only the target files are combined. The XSLT is shown in Listing 8-25.
![]() LISTING 8-25: CombinePersonElements.xslt
LISTING 8-25: CombinePersonElements.xslt
<xsl:stylesheet version=”2.0”
                xmlns:xsl=”http://www.w3.org/1999/XSL/Transform”>

  <xsl:template name=”main”>
    <People>
      <xsl:for-each
       select=”collection('file:///C:/Xml/Examples/Files?select=Person*.xml')”>
        <xsl:copy-of select=”.”/>
      </xsl:for-each>
    </People>
  </xsl:template>

</xsl:stylesheet>
The first thing to note is the name attribute on the <xsl:template> element. Because you won’t be processing a single source document you need to be able to specify where processing starts. The template contains a literal element, <People>, which will hold all the combined <Person> elements. It then uses <xsl:for-each> to process all files returned from the collection() function. This takes a single string parameter, which takes the URI to a folder and then adds a querystring parameter named select. This accepts a pattern that any found files must match if they are to be returned. The pattern says the name must start with Person, be followed by some extra characters, and end with .xml. The path to the folder needs to be a URI so even in Windows it uses the forward slash as a folder delimiter and must start with the file:// scheme. You’ll obviously have to modify the path to your files if you want to test this example. To run this transformation you need a slightly different command line, like so:
java saxon.net.sf.Transform -it:main
  -xsl:combinePersonElements.xslt -o:CombinedPerson.xml
or:
transform -it:main -xsl:combinePersonElements.xslt -o:CombinedPerson.xml
Instead of supplying a source document with the -s switch you specify an initial template with the -it switch. The output file will be the same as your initial People.xml.
Grouping in XSLT 2.0
A common use case in XSLT is to group elements in various ways and then process them together. For example, an input file may contain a list of all employees and the requirement is to group them alphabetically before displaying their information. This was a challenge in version 1.0 but has become much simpler in version 2.0 with the addition of the new elements and functions.
The file used for the examples so far, People.xml from Listing 8-1, doesn’t have enough <Person> elements for grouping to be demonstrated so another file, Employees.xml, is used for this example. The file is shown in Listing 8-26.
![]() LISTING 8-26: Employees.xml
LISTING 8-26: Employees.xml
<employees>
  <employee firstName=”Joe” lastName=”Fawcett”
            jobTitle=”Developer” department=”IT”/>
  <employee firstName=”Max” lastName=”Bialystock”
            jobTitle=”CEO” department=”Management”/>
  <employee firstName=”Phineas” lastName=”Barnum”
            jobTitle=”Head of Sales” department=”Sales and Marketing”/>
  <employee firstName=”Leo” lastName=”Bloom”
            jobTitle=”Auditor” department=”Accounts”/>
  <employee firstName=”Danny” lastName=”Ayers”
            jobTitle=”Developer” department=”IT”/>
  <employee firstName=”Carmen” lastName=”Ghia”
            jobTitle=”PA to the VP of Products” department=”Management”/>
  <employee firstName=”Ulla” lastName=”Anderson”
            jobTitle=”Head of Promotions” department=”Sales and Marketing”/>
  <employee firstName=”Grace” lastName=”Hopper”
            jobTitle=”Developer” department=”IT”/>
  <employee firstName=”Bob” lastName=”Cratchit”
            jobTitle=”Bookkeeper” department=”Accounts”/>
  <employee firstName=”Charles” lastName=”Babbage”
            jobTitle=”Head of Infrastructure” department=”IT”/>
  <employee firstName=”Roger” lastName=”De Bris”
            jobTitle=”VP of Products” department=”Management”/>
  <employee firstName=”Willy” lastName=”Loman”
            jobTitle=”Salesman” department=”Sales and Marketing”/>
  <employee firstName=”Franz” lastName=”Liebkind”
            jobTitle=”Developer” department=”IT”/>
  <employee firstName=”Luca” lastName=”Pacioli”
            jobTitle=”Accountant” department=”Accounts”/>
  <employee firstName=”Lorenzo” lastName=”St. DuBois”
            jobTitle=”Project Manager” department=”IT” />
</employees>
Your requirement is to output each department in a separate element and, within each department, output the employees in alphabetical order. You’ll be using the new <xsl:for-each-group> instruction as well as the current-group() and current-grouping-key() functions.
The style sheet is shown in Listing 8-27.
![]() LISTING 8-27: EmployeesByDepartment.xslt
LISTING 8-27: EmployeesByDepartment.xslt
<xsl:stylesheet version=”2.0” xmlns:xsl=”http://www.w3.org/1999/XSL/Transform”>

  <xsl:template match=”/”>
    <employeesByDepartment>
      <xsl:for-each-group select=”employees/employee” group-by=”@department”>
        <xsl:sort select=”@department” data-type=”text” />
        <department name=”{current-grouping-key()}”>
          <xsl:apply-templates select=”current-group()”>
            <xsl:sort select=”@lastName” data-type=”text” />
            <xsl:sort select=”@firstName” data-type=”text” />
          </xsl:apply-templates>
        </department>
      </xsl:for-each-group>
    </employeesByDepartment>
  </xsl:template>

  <xsl:template match=”employee”>
    <employee jobTitle=”{@jobTitle}”>
      <xsl:value-of select=”concat(@lastName, ', ', @firstName)”/>
    </employee>
  </xsl:template>
</xsl:stylesheet>
The following steps explain how the transformation is accomplished and what role the newly introduced elements, such as <xsl:for-each-group>, play in the proceedings:
The second template, matching the <employee> elements, just uses standard methods to output a new <employee> element along with their department and their full name. If you run one of the following commands (on one line):
java net.sf.saxon.Transform  -s:employees.xml
           -xsl:EmployeesByDepartment.xslt -o:EmployeesByDepartment.xml
or:
transform -s:employees.xml
          -xsl:EmployeesByDepartment.xslt -o:EmployeesByDepartment.xml
you’ll see the resulting file as shown in Figure 8-6.
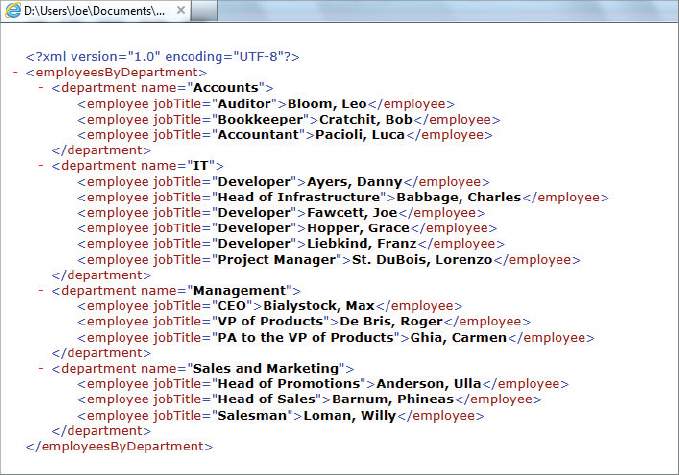
The next new feature you’ll cover is how to process non-XML input using XSLT.
Handling Non-XML Input with XSLT 2.0
As with most of the new features in version 2.0, many 1.0 users requested that 2.0 be equipped to handle input documents that were not XML. A typical use case is to convert a traditional CSV file, maybe exported from Excel or a legacy database system, into an XML format that could then be consumed by a separate application. There are two new features in version 2.0 that make this possible. First is the unparsed-text() function, which, as the name implies, enables the retrieval of a text file the URI of which is specified as an argument, similar to the document() function. The second feature is the XPath tokenize() function, which is used to split the text into separate tokens based on a regular expression. The example that follows takes a simple three-column CSV file and uses these two new features to create an XML representation of the data.
The first file is shown in Listing 8-28. This is the CSV that you should import to perform the following steps. It has three columns for last name, first name, and job title.
![]() LISTING 8-28: Employees.csv
LISTING 8-28: Employees.csv
Fawcett, Joe, Developer
Ayers, Danny, Developer
Lovelace, Ada, Project Manager
    <xsl:stylesheet version=”2.0”
                    xmlns:xsl=”http://www.w3.org/1999/XSL/Transform”
                    xmlns:xs=”http://www.w3.org/2001/XMLSchema”>

      <xsl:param name=”dataPath” select=”''” as=”xs:string”/>
</xsl:stylesheet> <xsl:stylesheet version=”2.0”
xmlns:xsl=”http://www.w3.org/1999/XSL/Transform”
xmlns:xs=”http://www.w3.org/2001/XMLSchema”>
<xsl:param name=”dataPath” select=”''” as=”xs:string”/>
<xsl:variable name=”employeesText” select=”unparsed-text($dataPath)”
as=”xs:string” />
</xsl:stylesheet> <xsl:stylesheet version=”2.0”
xmlns:xsl=”http://www.w3.org/1999/XSL/Transform”
xmlns:xs=”http://www.w3.org/2001/XMLSchema”>
<xsl:param name=”dataPath” select=”''” as=”xs:string”/>
<xsl:variable name=”employeesText” select=”unparsed-text($dataPath)”
as=”xs:string” />
<xsl:template name=”main”>
<xsl:variable name=”lines” select=”tokenize($employeesText, '
?
')”
as=”xs:string*” />
</xsl:template>
</xsl:stylesheet> <xsl:stylesheet version=”2.0”
xmlns:xsl=”http://www.w3.org/1999/XSL/Transform”
xmlns:xs=”http://www.w3.org/2001/XMLSchema”>
<xsl:param name=”dataPath” select=”''” as=”xs:string”/>
<xsl:variable name=”employeesText” select=”unparsed-text($dataPath)”
as=”xs:string” />
<xsl:template name=”main”>
<xsl:variable name=”lines” select=”tokenize($employeesText, '
?
')”
as=”xs:string*” />
<employees>
<xsl:for-each select=”$lines”>
<employee>
<xsl:variable name=”employeeData” select=”tokenize(., ',s*')”
as=”xs:string+” />
</employee>
</xsl:for-each>
</employees>
</xsl:template>
</xsl:stylesheet>![]() LISTING 8-29: EmployeesFromCSV.xslt
LISTING 8-29: EmployeesFromCSV.xslt
<xsl:stylesheet version=”2.0”
                xmlns:xsl=”http://www.w3.org/1999/XSL/Transform”
                xmlns:xs=”http://www.w3.org/2001/XMLSchema”>

  <xsl:param name=”dataPath” select=”''” as=”xs:string”/>
  <xsl:variable name=”employeesText” select=”unparsed-text($dataPath)”
                as=”xs:string” />

  <xsl:template name=”main”>
    <xsl:variable name=”lines” select=”tokenize($employeesText, '
?
')”
                  as=”xs:string*” />
    <employees>
      <xsl:for-each select=”$lines”>
        <employee>
        <xsl:variable name=”employeeData” select=”tokenize(., ',s*')”
                      as=”xs:string+” />
          <lastName>
            <xsl:value-of select=”$employeeData[1]”/>
          </lastName>
          <firstName>
            <xsl:value-of select=”$employeeData[2]”/>
          </firstName>
          <jobTitle>
            <xsl:value-of select=”$employeeData[3]”/>
          </jobTitle>
        </employee>
      </xsl:for-each>
    </employees>
  </xsl:template>
</xsl:stylesheet>
If you run this by using the following command line (on one line):
java saxon.net.sf.Transform -it:main -xsl:EmployeesFromCSV.xslt
 dataPath=Employees.csv -o:EmployeesFromCSV.xml
or:
transform -it:main -xsl:EmployeesFromCSV.xslt
      dataPath=Employees.csv -o:EmployeesFromCSV.xml
then, assuming Employees.csv is in the same directory as the style sheet, you’ll see the results as in Listing 8-30.
![]() LISTING 8-30: EmployeesFromCSV.xml
LISTING 8-30: EmployeesFromCSV.xml
<employees xmlns:xs=”http://www.w3.org/2001/XMLSchema”>
  <employee>
    <lastName>Fawcett</lastName>
    <firstName>Joe</firstName>
    <jobTitle>Developer</jobTitle>
  </employee>
  <employee>
    <lastName>Ayers</lastName>
    <firstName>Danny</firstName>
    <jobTitle>Developer</jobTitle>
  </employee>
  <employee>
    <lastName>Lovelace</lastName>
    <firstName>Ada</firstName>
    <jobTitle>Project Manager</jobTitle>
  </employee>
</employees>
As well as incorporating plain text from external sources and being able to use the tokenize() function to break it into smaller parts there is also a powerful new element in XSLT 2.0 that can be used to separate textual content into two groups, those that match a regular expression and those that don’t. This element is <xs:analyze-string>.
For an example of its use take a look at the source document in Listing 8-31:
![]() LISTING 8-31: Addresses.xml
LISTING 8-31: Addresses.xml
<addresses>
  <address name=”The White House”>
    1600 Pennsylvania Ave NW,  Washington, DC 20500-0001
  </address>
  <address name=”The Statue of Liberty”>
    Liberty Island, New York, NY 10004
  </address>
  <address name=”The Empire State Building”>
    350 5th Avenue,  New York, NY 10118
  </address>
  <address name=”Utopia”>
    Who knows?
  </address>
</addresses>
Listing 8-31 shows the addresses of three famous landmarks and a fictitious address, designed to show that it can cope with data that is in an unexpected format. The aim is to transform this file so that each valid address is split into four constituent parts representing the first line of the address, city, state and zip code. The transformation will use the <xsl:analyze-string> element as shown in Listing 8-32:
![]() LISTING 8-32: Analyze-String.Xslt
LISTING 8-32: Analyze-String.Xslt
xsl:stylesheet version=”2.0”
                xmlns:xsl=”http://www.w3.org/1999/XSL/Transform”>

  <xsl:output indent=”yes” />

  <xsl:template match=”addresses”>
    <addresses>
      <xsl:apply-templates select=”address” />
    </addresses>
  </xsl:template>

  <xsl:template match=”address”>
   <address name=”{@name}”>
     <xsl:analyze-string select=”.”
      regex=
  “^s*([^,]+)s*,s*([^,]+)s*,s*([A-Z]{{2}})s*(d{{5}}(-d{{4}})?)s*$”>
       <xsl:matching-substring>
         <addressLine1><xsl:value-of select=”regex-group(1)”/></addressLine1>
         <city><xsl:value-of select=”regex-group(2)”/></city>
         <state><xsl:value-of select=”regex-group(3)”/></state>
         <zip><xsl:value-of select=”regex-group(4)”/></zip>
       </xsl:matching-substring>
       <xsl:non-matching-substring>
         <xsl:value-of select=”.” />
       </xsl:non-matching-substring>
     </xsl:analyze-string>
   </address>
  </xsl:template>
</xsl:stylesheet>
The code starts in the usual way, matching the <addresses> element and, within that template, calling <xsl:apply-templates> to process each individual <address>.
The second template, the one that matches <address>, contains the new <xsl:analyze-string> element. This has two attributes: select, that chooses what text to process, and regex which defines the regular expression used to break down the text into smaller units.
The regular expression is little complex, but it can be broken down into four main parts:
- ∧s*([∧,]+)s*,
The first section starts with the caret (^), which means match from the beginning of the string, and s* means any number of spaces, including none should come first. These are followed by a group, in parentheses, which is defined as [^,]+ representing any character that is not a comma occurring one or more times. This is followed by any number of spaces (s*) and then another comma (,). This will be your first regular expression group and is used as the value for <addressLine1>.
- s*([∧,]+)s*,
The next part of the expression is almost identical; again it looks for any number of spaces (s*) followed by a number of non-comma characters, some more spaces, and a comma. This group is used for the <city> element.
- s*([A-Z]{{2}})
The third part of the regular expression is used to populate the <state> element. It looks for a number of spaces followed by two uppercase characters in the range A to Z ([A-Z]). Notice how the quantity specifier, 2, must appear between doubled braces, {{2}}, as opposed to the standard single braces, {}, normally used in regular expressions. This is because single braces are used to define embedded XPath in XSLT.
- s*(d{{5}}(-d{{4}})?)s*$
The last part of the expression is used to extract the contents for the <zip> element. It searches for some spaces followed by digits (d) that occur precisely five times ({{5}}). It then looks for a hyphen followed by four digits (d{{4}}). This secondary group is followed by a question mark (?) meaning that the latter part of the zip code is optional. The final $ sign is used to show that the regular expression extends to cover all the way to the end of the string being analyzed.
The <xsl:matching-substring> element is called whenever the regex succeeds (as shown in the following code). Within this element you use the regex-group(n) function to output any matching sections of the regular expression that appear within parentheses. You specify which section by passing in an index to regex-group(). There are five sets of parentheses in the expression, but only four are needed as the last one is for the second part of the zip code and this group is also contained within the fourth one.
       <xsl:matching-substring>
         <addressLine1><xsl:value-of select=”regex-group(1)”/></addressLine1>
         <city><xsl:value-of select=”regex-group(2)”/></city>
         <state><xsl:value-of select=”regex-group(3)”/></state>
         <zip><xsl:value-of select=”regex-group(4)”/></zip><!--   -->
       </xsl:matching-substring>
       <xsl:non-matching-substring>
         <xsl:value-of select=”.” />
       </xsl:non-matching-substring>
     </xsl:analyze-string>
The final part of the code is called if the regular expression doesn’t match all or part of the string being analyzed. In this case you use it when an address does not appear in the expected format. In this case the original address is simply output verbatim.
You can try the code for yourself by using one of the following command lines:
java net.sf.saxon.Transform -s:addresses.xml -xsl:analyze-string.xslt
  -o:ParsedAddresses.xml
or:
Transform -s:addresses.xml -xsl:analyze-string.xslt -o:ParsedAddresses.xml
You should get a result similar to Listing 8-33:
![]() LISTING 8-33: ParsedAddresses.xml
LISTING 8-33: ParsedAddresses.xml
<addresses>
   <address name=”The White House”>
      <addressLine1>1600 Pennsylvania Ave NW</addressLine1>
      <city>Washington</city>
      <state>DC</state>
      <zip>20500-0001</zip>
   </address>
   <address name=”The Statue of Liberty”>
      <addressLine1>Liberty Island</addressLine1>
      <city>New York</city>
      <state>NY</state>
      <zip>10004</zip>
   </address>
   <address name=”The Empire State Building”>
      <addressLine1>350 5th Avenue</addressLine1>
      <city>New York</city>
      <state>NY</state>
      <zip>10118</zip>
   </address>
   <address name=”Utopia”>
    Who knows?
  </address>
</addresses>
That concludes your tour of XSLT 2.0; you’ll now take a brief look at what’s possibly coming in version 3.0.
XSLT AND XPATH 3.0: WHAT’S COMING NEXT?
XSLT 3.0 is currently at draft status. By looking at the W3C’s specifications it seems like the main drive is to make it a much more powerful functional language. Most functional languages share certain features, the main one being the ability to treat functions as arguments to other functions; for example, the map() function, which takes two arguments, a sequence of nodes, and a function to apply to each node in turn. This and similar functions are present in the current XPath draft and it seems certain that they’ll be included in the final spec.
There are also a number of new instructions for XSLT. These include <xsl:try> and <xsl:catch> for better error handling; and <xsl:iterate> which can select a sequence of nodes and then process them one by one but which also has the ability to cease processing and break out of the loop if required—something not currently possible with <xsl:for-each> because there is no guaranteed order of processing. There is also <xsl:evaluate>, which enables dynamic evaluation of XPath. You can construct a string and have it treated as an XPath expression; this is something that has been requested since XSLT launched.
If you’re desperate to try out these new features some of them are implemented already in the Saxon processor. Go to www.saxonica.com/documentation/using-xsl/xslt30.xml for more information on how to turn on version 3.0 processing, but note that currently it’s still in an experimental state and is only available for the paid for versions of Saxon.
SUMMARY
In this chapter you’ve learned:
- The basic premise behind XSLT is transforming an XML document to a different XML format, HTML or plain text.
- The basic <xsl:template> element matches specified XML and outputs new content
- <xsl:apply-templates> groups nodes that are then processed by their matching <xsl:template>.
- XPath is used throughout XSLT to specify nodes to process and to extract specific data items.
- The more advanced elements <xsl:include> and <xsl:import> enable you to write reusable code modules.
- Improvements in XSLT 2.0 include better handling of non-XML content using the unparsed-text() function as well as better processing of text through regular expressions by using functions such as tokenize() and elements such as <analyze-string>.
- Better error handling using <try>/<catch> and dynamic evaluation of strings as XPath using <xsl:evaluate> are coming up in the next version of XSLT.
EXERCISES
Answers to Exercises can be found in Appendix A.
WHAT YOU LEARNED IN THIS CHAPTER
| TOPIC | KEY POINTS |
| XSLT 1.0 Uses | To transform XML to another XML format, HTML, or plain text. |
| XSLT 2.0 Uses | Same as for 1.0 but can also transform plain text. |
| Language Style | Declarative: Specify what you want not how you want Functional: Output is a function of input |
| Main Elements: | <xsl:template> elements are executed when the processor encounters items that correspond to their match attribute. <xsl:apply-templates> elements are used to select groups of nodes that will then be tested against each <xsl:template> elements are used to see if they match. |
| Code Reusability | Achieved using <xsl:import> and <xsl:include>. |
| XSLT 2.0 Improvements | Plain text input to transformations. Ability to declare functions. Better text analysis using regular expressions. Ability to group nodes and process them as a group. |