
VARIABLE DECLARATIONS
The complete syntax for a variable declaration is as follows:
[attribute_list] [accessibility] [Shared] [Shadows] [ReadOnly]
Dim [WithEvents] name [(bounds_list)] [As [New] type]
[= initialization_expression]
All declarations have only one thing in common: They contain a variable’s name. Other than the name, different declarations may have nothing in common. Variable declarations with different forms can use or omit any other piece of the general declaration syntax. For example, the following two declarations don’t share a single keyword:
Dim i = 1           ' Declare private Integer named i. (Option Explicit Off)
Public j As Integer ' Declare public Integer named j.
The many variations supported by a variable declaration make the general syntax rather intimidating. In most cases, however, declarations are straightforward. The previous two declarations are fairly easy to understand.
The following sections describe the pieces of the general declaration in detail.
Attribute_List
The optional attribute list is a comma-separated list of attributes that apply to the variable. An attribute further refines the definition of a variable to give more information to the compiler and the runtime system.
Attributes are rather specialized and address issues that arise when you perform very specific programming tasks. For example, when you write code to serialize and de-serialize data, you can use serialization attributes to gain more control over the process.
The following code defines the OrderItem class. This class declares three public variables: ItemName, Price, and Quantity. It uses attributes on its three variables to indicate that ItemName should be stored as text, Price should be stored as an attribute named Cost, and Quantity should be stored as an attribute with its default name, Quantity.
Public Class OrderItem
    <XmlText()>
    Public ItemName As String

    <XmlAttributeAttribute(AttributeName:="Cost")>
    Public Price As Decimal

    <XmlAttributeAttribute()>
    Public Quantity As Integer
End Class
The following code shows the XML serialization of an OrderItem object:
<OrderItem Cost="1.25" Quantity="12">Cookie</OrderItem>Because attributes are so specialized, they are not described in more detail here. For more information, see the sections in the online help related to the tasks you need to perform. For more information on XML serialization attributes, for example, search for “System.Xml.Serialization Namespace,” or look at these web pages:
- XML Serialization in the .NET Framework, http://msdn.microsoft.com/ms950721.aspx.
- Controlling XML Serialization Using Attributes, http://msdn.microsoft.com/2baksw0z.aspx.
- Attributes That Control XML Serialization, http://msdn.microsoft.com/83y7df3e.aspx.
For more information on attributes in general, see the “Attributes” section of the Visual Basic Language Reference or go to http://msdn.microsoft.com/39967861.aspx.
For a list of attributes you can use to modify variable declarations, search the online help for “Attribute Hierarchy,” or see these web pages:
- Attributes Used in Visual Basic, http://msdn.microsoft.com/f51fe7sf.aspx.
- Attribute Class, http://msdn.microsoft.com/system.attribute.aspx. (Look for the “Inheritance Hierarchy” section to see what attributes inherit from the Attribute class.)
Accessibility
A variable declaration’s accessibility clause can take one of the following values:
- Public — You can use the Public keyword only for variables declared at the module, class, structure, namespace, or file level but not inside a subroutine. Public indicates that the variable should be available to all code inside or outside of the variable’s module. This allows the most access to the variable.
- Protected — You can use the Protected keyword only at the class level, not inside a module or inside a routine within a class. Protected indicates that the variable should be accessible only to code within the same class or a derived class. The variable is available to code in the same or a derived class, even if the instance of the class is different from the one containing the variable. For example, one Employee object can access a Protected variable inside another Employee object.
- Friend — You can use the Friend keyword only for variables declared at the module, class, namespace, or file level, not inside a subroutine. Friend indicates that the variable should be available to all code inside or outside of the variable’s module within the same project. The difference between this and Public is that Public allows code outside of the project to access the variable. This is generally only an issue for code and control libraries where some other project may use the library. For example, suppose that you build a code library containing dozens of routines and then you write a program that uses the library. If the library declares a variable with the Public keyword, the code in the library and the code in the main program can use the variable. In contrast, if the library declares a variable with the Friend keyword, only the code in the library can access the variable, not the code in the main program.
- Protected Friend — You can use Protected Friend only at the class level, not inside a module or inside a routine within a class. Protected Friend is the union of the Protected and Friend keywords. A variable declared Protected Friend is accessible only to code within the same class or a derived class and only within the same project.
- Private — You can use the Private keyword only for variables declared at the module, class, or structure level, not inside a subroutine. A variable declared Private is accessible only to code in the same module, class, or structure. If the variable is in a class or structure, it is available to other instances of the class or structure. For example, one Customer object can access a Private variable inside another Customer object.
- Static — You can use the Static keyword only for variables declared within a subroutine or a block within a subroutine (for example, a For loop or Try Catch block). You cannot use Static with Shared or Shadows. A variable declared Static keeps its value between lifetimes. For example, if a subroutine sets a Static variable to 27 before it exits, the variable begins with the value 27 the next time the subroutine executes. The value is stored in memory, so it is not retained if you exit and restart the whole program. (Use a database, the System Registry, or some other means of permanent storage if you need to save values between program runs.)
Shared
You can use the Shared keyword at the class or structure level, not within a module or subroutine. This keyword means that all instances of the class or structure containing the variable share the same variable.
For example, suppose that the Order class declares the Shared variable NumOrders to represent the total number of orders in the application. Then all instances of the Order class share the same NumOrders variable. If one instance of an Order sets NumOrders to 10, all instances of Order see NumOrders equal 10.
You can access a Shared variable by using the class’s name. For example, the following code sets the Orders class’s shared NumOrders value to 101.
Order.NumOrders = 101 ' Use the class to set NumOrders = 101.You cannot use the Shared keyword with the Static keyword. This makes sense because a Shared variable is in some fashion static to the class or structure that contains it. If one instance of the class modifies the variable, the value is available to all other instances. In fact, even if you destroy every instance of the class or never create any instances at all, the class itself still keeps the variable’s value safe. That provides a persistence similar to that given by the Static keyword.
Shadows
You can use the Shadows keyword only for variables declared at the class or structure level, not inside a subroutine. Shadows indicates that the variable hides a variable with the same name in a base class or structure. In a typical example, a subclass provides a variable with the same name as a variable declared in one of its ancestor classes.
Example program ShadowTest, which is available for download on the book’s website, uses the following code to demonstrate the Shadows keyword:
Public Class Person
    Public LastName As String
    Public EmployeeId As String
End Class

Public Class Employee
    Inherits Person
    Public Shadows EmployeeId As Long
End Class

Public Class Manager
    Inherits Employee
    Public Shadows LastName As String
End Class

Private Sub TestShadows()
    Dim txt As String = ""

    Dim mgr As New Manager
    mgr.LastName = "Manager Last Name"
    mgr.EmployeeId = 1

    Dim emp As Employee = CType(mgr, Employee)
    emp.LastName = "Employee Last Name"
    emp.EmployeeId = 2

    Dim per As Person = CType(mgr, Person)
    per.LastName = "Person Last Name"
    per.EmployeeId = "A"

    txt &= "Manager: " & mgr.EmployeeId & ": " & mgr.LastName & vbCrLf
    txt &= "Employee: " & emp.EmployeeId & ": " & emp.LastName & vbCrLf
    txt &= "Person: " & per.EmployeeId & ": " & per.LastName & vbCrLf

    txtResults.Text = txt
    txtResults.Select(0, 0)
End Sub
The code defines a Person class that contains public String variables LastName and EmployeeId. The Employee class inherits from Person and declares its own version of the EmployeeId variable. It uses the Shadows keyword so this version covers the version defined by the Person class. Note that Shadows works here even though the two versions of EmployeeId have different data types: Long versus String. An Employee object gets the Long version, and a Person object gets the String version.
The Manager class inherits from the Employee class and defines its own version of the LastName variable. A Manager object uses this version, and an Employee or Person object uses the version defined by the Person class.
Having defined these three classes, the program works with them to demonstrate shadowing. First it creates a Manager object, and sets its LastName variable to “Manager Last Name” and its EmployeeId variable to 1. The LastName value is stored in the Manager class’s version of the variable declared with the Shadows keyword. The EmployeeId value is stored in the EmployeeId variable declared with the Shadows keyword in the Employee class.
The program then creates an Employee variable and makes it point to the Manager object. This makes sense because Manager inherits from Employee. A Manager is a type of Employee so an Employee variable can point to a Manager object. The program sets the Employee object’s LastName variable to “Employee Last Name” and its EmployeeId variable to 2. The LastName value is stored in the Person class’s version of the variable. The EmployeeId value is stored in the EmployeeId variable declared with the Shadows keyword in the Employee class. Because the Manager class does not override this declaration with its own shadowing declaration of EmployeeId, this value overwrites the value stored by the Manager object.
Next, the program creates a Person variable and makes it point to the same Manager object. Again this makes sense because a Manager is a type of Person so a Person variable can point to a Manager object. The program sets the Person object’s LastName variable to “Person Last Name” and its EmployeeId variable to “A.” The Person class does not inherit, so the program stores the values in the versions of the variables defined by the Person class. Because the Employee class does not override the Person class’s declaration of LastName with its own shadowing declaration, this value overwrites the value stored by the Employee object.
Finally, the program prints the values of the EmployeeId and LastName variables for each of the objects.
The following output shows the program’s results. Notice that the Employee object’s value for EmployeeId (2) overwrote the value saved by the Manager object (1) and that the Person object’s value for LastName (Person Last Name) overwrote the value saved by the Employee object (Employee Last Name).
Manager: 2: Manager Last Name
Employee: 2: Person Last Name
Person: A: Person Last Name
Normally, you don’t need to access shadowed versions of a variable. If you declare a version of LastName in the Employee class that shadows a declaration in the Person class, you presumably did it for a good reason and you don’t need to access the shadowed version directly.
However, if you really do need to access the shadowed version, you can use variables from ancestor classes to do so. For example, the previous example creates Employee and Person objects pointing to a Manager object to access that object’s shadowed variables.
Within a class, you can similarly cast the Me object to an ancestor class. For example, the following code in the Manager class makes a Person variable pointing to the same object and sets its shadowed LastName value:
Public Sub SetPersonEmployeeId(employee_id As String)
    Dim per As Person = CType(Me, Person)
    per.EmployeeId = employee_id
End Sub
Code in a class can also use the MyBase keyword to access the variables defined by the parent class. The following code in the Manager class sets the object’s LastName variable declared by the Employee parent class:
Public Sub SetEmployeeLastName(last_name As String)
    MyBase.LastName = last_name
End Sub
ReadOnly
You can use the ReadOnly keyword only for variables declared at the module, class, or structure level, not inside a subroutine. ReadOnly indicates that the program can read, but not modify, the variable’s value.
You can initialize the variable in one of two ways. First, you can include an initialization statement in the variable’s declaration, as shown in the following code:
Public Class EmployeeCollection
    Public ReadOnly MaxEmployees As Integer = 100
    ...
End Class
Second, you can initialize the variable in the object’s constructors. The following code declares the ReadOnly variable MaxEmployees. The empty constructor sets this variable to 100. A second constructor takes an integer parameter and sets the MaxEmployees to its value.
Public Class EmployeeCollection
    Public ReadOnly MaxEmployees As Integer

    Public Sub New()
        MaxEmployees = 100
    End Sub

    Public Sub New(max_employees As Integer)
        MaxEmployees = max_employees
    End Sub
    ...
End Class
After the object is initialized, the program cannot modify the ReadOnly variable. This restriction applies to code inside the module that declared the variable, as well as code in other modules. If you want to allow code inside the same module to modify the value but want to prevent code in other modules from modifying the value, you should use a property procedure instead. See the section “Property Procedures” later in this chapter for more information.
Dim
The Dim keyword officially tells Visual Basic that you want to create a variable.
You can omit the Dim keyword if you specify Public, Protected, Friend, Protected Friend, Private, Static, or ReadOnly. In fact, if you include one of these keywords, the Visual Basic editor automatically removes the Dim keyword if you include it.
If you do not specify otherwise, variables you declare using a Dim statement are Private. The following two statements are equivalent:
Dim num_people As Integer
Private num_people As IntegerOne place where the Dim keyword is common is when declaring variables inside subroutines. You cannot use the Public, Private, Protected, Friend, Protected Friend, or ReadOnly keywords inside a subroutine so you must use either Static or Dim.
WithEvents
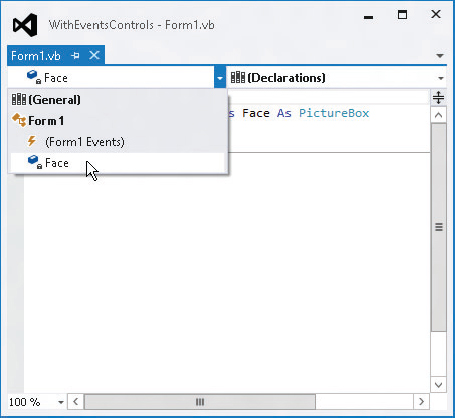
The WithEvents keyword tells Visual Basic that the variable is of an object type that may raise events that you will want to catch. For example, the following code declares the variable Face as a PictureBox object that may raise events that you want to catch:
Private WithEvents Face As PictureBoxWhen you declare a variable with the WithEvents keyword, Visual Basic creates an entry for it in the left drop-down list in the module’s code window, as shown in Figure 14-1.
FIGURE 14-1: Visual Basic creates a drop-down entry for variables declared WithEvents.
If you select the object in the left drop-down list, Visual Basic fills the right drop-down list with the object’s events that you might want to catch, as shown in Figure 14-2.
FIGURE 14-2: When you select an object declared WithEvents in the left drop-down list, Visual Basic fills the right drop-down list with events you might want to catch.
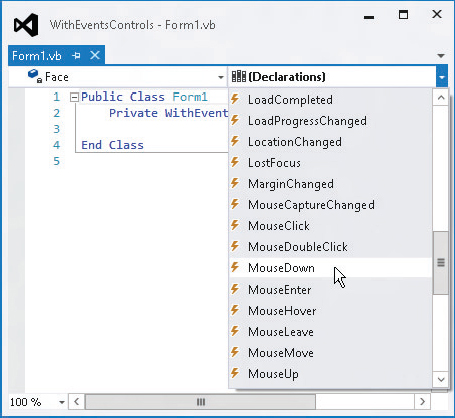
If you select an event, Visual Basic creates a corresponding empty event handler. Letting Visual Basic automatically generate the event handler in this way is easier than trying to type the event handler yourself, creating all of the required parameters by hand.
Declaring variables using the WithEvents keyword is a powerful technique. You can make the variable point to an object to catch its events. Later, if you want to process events from some other object using the same event handlers, you can set the variable to point to the new object. If you no longer want to receive any events, you can set the variable to Nothing.
Unfortunately, you cannot declare an array using the WithEvents keyword. That means you cannot use a simple declaration to allow the same event handlers to process events from more than one object. However, you can achieve this by using the AddHandler method to explicitly set the event handler routines for a series of objects. For more information on this technique, see the section “Catching Events” in Chapter 23.
Name
A declaration’s name clause gives the name of the variable. This must be a valid Visual Basic identifier. The rules for valid identifiers are a bit confusing, but generally an identifier should begin with a letter or underscore, followed by any number of letters, digits, or underscores.
If the identifier begins with an underscore (which is unusual), it must contain at least one other valid character (letter, digit, or underscore) so that Visual Basic doesn’t confuse it with a line continuation character.
Identifier names cannot contain special characters such as &, %, #, and $, although some of these may be used as data type characters.
Here are some examples:
| num_employees | Valid |
| NumEmployees | Valid |
| _manager | Valid (but unusual) |
| _ | Invalid (contains only a single underscore) |
| __ | Valid (two underscores is valid but could be very confusing) |
| 1st_employee | Invalid (doesn’t begin with a letter or underscore) |
| #employees | Invalid (contains the special character #) |
Normal identifiers cannot be the same as a Visual Basic keyword. However, you can escape an identifier (mark it to give it a special meaning) by enclosing it in square brackets, and if you escape an identifier, you can give it the same name as a Visual Basic keyword. For example, in the following code, the ParseString subroutine takes a single parameter named String of type String:
Public Sub ParseString([String] As String)
    Dim values() As String = Split([String])
    ...
End Sub
If you begin writing a call to this subroutine in the code editor, the IntelliSense pop-up describes this routine as ParseString(String As String).
These rules let you come up with some strange and potentially confusing identifier names. For example, you can make escaped variables named String, Boolean, ElseIf, and Case. Depending on your system’s settings, underscores may be hard to read either on the screen or in printouts. That may make variables such as __ (two underscores) seem to vanish and may make it hard to tell the difference between _Name and Name.
Although these identifiers are all legal, they can be extremely confusing and may lead to long, frustrating debugging sessions. To avoid confusion, use escaped identifiers and identifiers beginning with an underscore sparingly.
Bounds_List
A variable declaration’s bounds_list clause specifies bounds for an array. This should be a comma-separated list of non-negative integers that give the upper bounds for the array’s dimensions. All dimensions have a lower bound of zero. You can optionally specify the lower bound, but it must always be zero.
The following code declares two arrays in two different ways. The first statement declares a one-dimensional array of 101 Customer objects with indexes ranging from 0 to 100. The second statement defines a two-dimensional array of Order objects. The first dimension has bounds ranging from 0 to 100 and the second dimension has bounds ranging from 0 to 10. The array’s entries are those between orders(0, 0) and orders(100, 10) giving a total of 101 * 11 = 1111 entries. The last two statements define similar arrays, while explicitly declaring the arrays’ lower bounds.
Private customers(100) As Customer
Private orders(100, 10) As Order
Private customers2(0 To 100) As Customer
Private orders2(0 To 100, 0 To 10) As Order
You may find that specifying the lower bound makes the code easier to read because it gives the lower bound explicitly rather than requiring you to remember that lower bounds are always 0. It can be particularly helpful for those who have used Visual Basic 6 and earlier versions because those versions of Visual Basic allowed arrays to have lower bounds other than 0.
Note that declarations of this sort that use an object data type do not instantiate the objects. For example, the first declaration in the previous example defines 101 array entries that all point to Nothing. They do not initially point to instances of the Customer class. After this declaration, the program would need to create each object reference individually, as shown in the following code:
Private customers(100) As Customer
For i As Integer = 0 To 100
    customers(i) = New Customer()
Next i
Alternatively, the program can use an initialization statement to declare and initialize the objects in a single step. See the section “Initialization_Expression” coming up shortly for more information on initializing arrays in their declarations.
If you provide parentheses but no bounds_list, Visual Basic defines the array, but doesn’t create it with specific bounds. Later, you can use the ReDim statement to give it bounds. Note that you can also use ReDim to change the bounds of an array that you initially give bounds. The following example declares two arrays named a1 and a2. Initially, the program allocates 11 items for array a1 but no items for array a2. The program then uses ReDim to allocate 21 entries for both arrays.
Dim a1(10) As Integer
Dim a2() As Integer

ReDim a1(20)
ReDim a2(0 To 20)
The ReDim statement cannot change the number of dimensions in an array. If you want to declare but not initialize a multidimensional array, include commas as if you were defining the bounds. The following code declares a three-dimensional array and initializes it in separate steps:
Dim a1(,,) As Integer

ReDim a1(10, 20, 30)
New
If you are declaring an object variable, the New keyword tells Visual Basic to create a new instance of the object. Without this keyword, Visual Basic makes an object variable that doesn’t yet hold a reference to any object. It initially holds Nothing.
For example, the first line in the following code declares an Employee object variable named emp1. After that line, the variable is defined, but it doesn’t point to anything. The second line sets emp1 equal to a new Employee object. The last line creates an Employee object variable named emp2 and assigns it to a new Employee object. This does the same thing as the first and second lines but in a single statement.
Dim emp1 As Employee
emp1 = New Employee()

Dim emp2 As New Employee()
If the object’s class has constructors that take parameters, you can include the parameters after the class name. For example, suppose that the Employee class has two constructors: one that takes no parameters and a constructor that takes first and last name strings as parameters. Then the following code creates two Employee objects using the different constructors:
Dim emp1 As New Employee()
Dim emp2 As New Employee("Rod", "Stephens")
As Type and Inferred Types
The As clause tells Visual Basic what kind of variable you are declaring. For example, the following As statement indicates that the variable cx has type Single:
Dim cx As SingleIf Option Infer is on, you do not need to declare a local variable’s data type. If you omit the As clause, Visual Basic infers the variable’s data type from the value that you assign to it. For example, the following code declares a variable named message. Because the code assigns a string value to the variable, Visual Basic infers that the variable should be a String.
Dim message = "Hello!"Unfortunately, inferred data types make the code harder to understand later. You can figure out that the previous declaration makes a variable that is a String, but it is much more obvious if you explicitly include the As String clause. In this example, type inference only saves you a few keystrokes and makes the code slightly harder to understand. Now, consider the following statement:
Dim x = 1.234Does this statement make variable x a Single, Double, Decimal, or some other data type? In this case, it’s much less obvious what data type Visual Basic will decide to use. (It makes x a Double.)
The only times when type inference is essential is when you cannot easily figure out the type needed by a variable. For example, LINQ lets a program generate results that have confusing data types, so type inference can be very handy when working with LINQ. For more information on LINQ, see Chapter 20, “LINQ.”
Initialization_Expression
The initialization_expression clause gives data that Visual Basic should use to initialize the variable. The most straightforward form of initialization assigns a simple value to a variable. The following code declares the variable num_employees and assigns it the initial value zero:
Dim num_employees As Integer = 0More complicated data types may require more complex initialization clauses. If the declaration declares an object variable, you can use the New keyword to initialize the variable. For example, the first line in the following code declares an Employee variable named emp1 and sets it equal to a new Employee object. The second statement uses the As New form of declaration to do the same thing without a separate initialization clause. This version is slightly more compact, but you can use whichever version seems most natural to you.
Dim emp1 As Employee = New Employee("Rod", "Stephens")
Dim emp2 As New Employee("Rod", "Stephens")
The With keyword allows you to initialize an object without using a special constructor. This statement lets you assign values to an object’s public properties and variables right after the object is created. The following code creates a new Employee object and sets its FirstName and LastName values much as the previous statements do:
Dim emp3 As New Employee With {.FirstName = "Rod", .LastName = "Stephens"}Initializing Arrays
Arrays have their own special initialization syntax. To declare and initialize an array in one statement, you must omit the array’s bounds. Visual Basic uses the initialization data to discover the bounds.
Place the array’s values inside curly braces separated by commas. The following code initializes a one-dimensional array of integers:
Dim fibonacci() As Integer = {1, 1, 2, 3, 5, 8, 13, 21, 33, 54, 87}If you have Option Infer on, you can omit the array’s data type and Visual Basic will try to deduce it from the values that you use to initialize it. For example, the following code creates three arrays. Visual Basic can infer that the first contains Integers and the second contains Strings. The third array contains Strings, Integers, and Doubles so Visual Basic makes it an array of Objects.
Dim numbers() = {1, 2, 3}
Dim strings() = {"A", "B", "C"}
Dim objects() = {"A", 12, 1.23}
For a multidimensional array, put commas in the variable’s parentheses to indicate the number of dimensions. Use curly braces to surround the array data. Nest each dimension of data inside the previous one, enclosing each dimension’s data with braces and separating entries with commas.
This probably makes the most sense if you think of a multidimensional array as an array of arrays. For example, a three-dimensional array is an array of two-dimensional arrays. Each of the two-dimensional arrays is an array of one-dimensional arrays. You can use indentation to make the array’s structure more obvious.
The following code declares and initializes a two-dimensional array of integers:
Dim int_values(,) As Integer =
    {
        {1, 2, 3},
        {4, 5, 6}
    }
The following code declares and initializes a three-dimensional array of strings. The text for each value gives its position in the array. For example, the value str_values(0, 1, 1) is “011.”
Dim str_values(,,) As String =
    {
        {
            {"000", "001", "002"},
            {"010", "011", "012"}
        },
        {
            {"100", "101", "102"},
            {"110", "111", "112"}
        }
    }
Example program InitializeArrays, which is available for download on the book’s website, uses similar code to demonstrate array initialization.
Note that you must provide the correct number of items for each of the array’s dimensions. For example, the following declaration is invalid because the array’s second row contains fewer elements than its first row:
Dim int_values(,) As Integer =
    {
        {1, 2, 3},
        {4, 5}
    }
Initializing Object Arrays
The basic syntax for initializing an array of objects is similar to the syntax you use to initialize any other array. You still omit the array bounds from the declaration and then include values inside curly braces. The values you use to initialize the array, however, are different because object variables do not take simple values such as 12 and "Test" that you would use to initialize integer or string arrays.
If you create an array of objects without an initialization clause, Visual Basic creates the object variables but does not create objects for them. Initially, all of the array’s entries are Nothing.
The following code creates an array containing 11 references to Employee objects. Initially, all of the references are set to Nothing.
Dim employees(0 To 10) As EmployeeIf you want to initialize the objects, you must initialize each object in the array separately using the class’s constructors. Optionally, you can add a With statement to set public properties and variables after creating the object. The following code declares an array of Employee objects. It initializes two entries using an Employee object constructor that takes as parameters the employees’ first and last names, two entries with an empty constructor and a With statement, two with an empty constructor only, and two final entries with the value Nothing.
Dim employees() As Employee =
    {
        New Employee("Alice", "Andrews"),
        New Employee("Bart", "Brin"),
        New Employee With {.FirstName = "Cindy", .LastName="Cant"},
        New Employee With {.FirstName = "Dan", .LastName="Diver"},
        New Employee(),
        New Employee(),
        Nothing,
        Nothing
    }
To initialize higher-dimensional arrays of objects, use the syntax described in the previous section. Use Nothing or the New keyword and object constructors to initialize each array entry individually.
Initializing XML Variables
To initialize an XElement object, declare the XElement variable and set it equal to properly formatted XML code. Visual Basic reads the data’s opening tag and then reads XML data until it reaches a corresponding closing tag so the XML data can include whitespace just as an XML document can. In particular, it can span multiple lines without line continuation characters.
In fact, if you use line continuation characters within the XML, the underscore characters become part of the XML data, which is probably not what you want.
For example, the following code declares a variable named book_node that contains XML data representing a book:
Dim book_node As XElement =
    <Book>
        <Title>The Bug That Was</Title>
        <Year>2012</Year>
        <Pages>376</Pages>
    </Book>
This type of declaration and initialization makes it easy to build XML data directly into your Visual Basic applications.
You can initialize XML literal values with much more complicated expressions. For example, you can use LINQ to select values from relational data sources and build results in the form of an XML document. For more information on LINQ, see Chapter 20.