
DRAWING BASICS
The previous section describes the UsePrintPreview example program, which draws some simple shapes and text. It focuses mostly on the PrintDocument events that support the printing process, however, and glosses over exactly how the graphics are drawn.
A program uses three things to produce graphics: a Graphics object, pens, and brushes. It uses those things whether the output should be printed on a printer, displayed on the screen, or drawn into an image file such as a bitmap or JPG file.
The following sections describe Graphics objects, pens, and brushes.
Graphics Objects
A Graphics object represents a drawing surface. You can think of it as the canvas or paper on which the program will draw.
The Graphics class provides many methods for drawing lines, rectangles, curves, and other shapes. The following table summarizes these methods.
| METHOD | DESCRIPTION |
| DrawArc | Draws an arc of an ellipse. |
| DrawBezier | Draws a Bézier curve. |
| DrawBeziers | Draws a series of Bézier curves. |
| DrawClosedCurve | Draws a smooth closed curve that joins a series of points, connecting the final point to the first point. |
| DrawCurve | Draws a smooth curve that joins a series of points. This is similar to a DrawClosedCurve, except that it doesn’t connect the final point to the first point. |
| DrawEllipse | Draws an ellipse. (To draw a circle, draw an ellipse with equal width and height.) |
| DrawIcon | Draws an icon. |
| DrawIconUnstretched | Draws an icon without scaling. If you know that you will not resize the icon, this may be faster than the DrawIcon method. |
| DrawImage | Draws an image. Bitmap is a subclass of Image, so you can use this method to draw a Bitmap. |
| DrawImageUnscaled | Draws an image without scaling. If you know that you will not resize the image, this may be faster than the DrawImage method. |
| DrawLine | Draws a line. |
| DrawLines | Draws a series of connected lines. If you need to draw a series of connected lines, this is much faster than using DrawLine repeatedly. |
| DrawPath | Draws a GraphicsPath object. |
| DrawPie | Draws a pie slice taken from an ellipse. |
| DrawPolygon | Draws a polygon. This is similar to DrawLines, except that it connects the last point to the first point. |
| DrawRectangle | Draws a rectangle with horizontal and vertical sides. |
| DrawRectangles | Draws a series of rectangles. If you need to draw a series of rectangles, this is much faster than using DrawRectangle repeatedly. |
| DrawString | Draws text. |
The methods listed in the preceding table draw the outline of something such as a line, rectangle, or ellipse. The Graphics class also provides corresponding methods that fill many of these shapes. For example, the DrawRectangle method outlines a rectangle, and the corresponding FillRectangle method fills a rectangle. The filling methods include FillClosedCurve, FillEllipse, FillPath, FillPie, FillPolygon, FillRectangle, and FillRectangles.
The “Draw” methods take a pen as a parameter and use that pen to determine how the outline is drawn. In contrast, the “Fill” methods take a brush as a parameter and use the brush to decide how to fill the area.
The one exception is the DrawString method. Even though its name begins with “Draw,” this method takes a brush as a parameter and uses it to fill the text. The following two sections describe pens and brushes in greater detail.
See the online help for specific information about the Graphics class’s drawing and filling methods. You can find links to the pages describing these methods at the Graphics class’s web page http://msdn.microsoft.com/library/system.drawing.graphics.
There are several ways a program can obtain a Graphics object on which to draw. For example, a PrintDocument’s PrintPage event handler provides a parameter named e that has a property named Graphics that is a Graphics object that represents the printout being generated. The UsePrintPreviewDialog example program described earlier uses the following code to draw the triangle shown on its first printed page:
Dim points() As Point =
{
    New Point(e.MarginBounds.Left + e.MarginBounds.Width  2,
        e.MarginBounds.Top),
    New Point(e.MarginBounds.Right, e.MarginBounds.Bottom),
    New Point(e.MarginBounds.Left, e.MarginBounds.Bottom)
}
e.Graphics.DrawPolygon(the_pen, points)
This code creates an array of Points that define the triangle’s corners. It then calls the e.Graphics object’s DrawPolygon method, passing it a Pen object (pens are described in the next section) and the Points.
Just as the PrintPage event provides a Graphics object on which a program can draw, so too does the Paint event. When a form, PictureBox, or other control is hidden and then exposed, it raises a Paint event. The e.Graphics parameter gives the program a Graphics object that it can use to redraw the control’s contents. The DrawInPaintEvent example program, which is available for download on the book’s website, demonstrates this technique.
The last common way to obtain a Graphics object is to create one that is associated with a Bitmap. The program can then use the Graphics object to draw on the Bitmap. The DrawOnBitmap example program, which is also available for download on the book’s website, uses the following code to draw on a Bitmap and display it on the form’s background:
' Draw on a bitmap and use it as the form's background.
Private Sub Form1_Load() Handles MyBase.Load
    Dim bm As New Bitmap(16, 16)
    Using gr As Graphics = Graphics.FromImage(bm)
        gr.DrawEllipse(Pens.Blue, 2, 2, 12, 12)
    End Using
    Me.BackgroundImage = bm
End Sub
When the program starts, this code creates a 16 × 16 pixel Bitmap and associates a Graphics object with it. It draws a circle on the Bitmap and then sets the form’s BackgroundImage property to the Bitmap.
Pens
The Pen object determines how lines are drawn. It determines the lines’ color, thickness, dash style, join style, and end cap style.
A program can explicitly create Pen objects, but often it can simply use one of the more than 280 pens that are predefined by the Pens class. For example, the following code draws a rectangle using a hot pink line that’s one pixel wide:
gr.DrawRectangle(Pens.HotPink, 10, 10, 50, 50)The following table summarizes the Pen class’s constructors:
| CONSTRUCTORS | DESCRIPTION |
| Pen(brush) | Creates a pen of thickness 1 using the indicated Brush. |
| Pen(color) | Creates a pen of thickness 1 using the indicated color. |
| Pen(brush, thickness) | Creates a pen with the indicated thickness (a Single) using a Brush. |
| Pen(color, thickness) | Creates a pen with the indicated thickness (a Single) using the indicated color. |
The following table describes some of the Pen class’s most useful properties and methods:
| PROPERTY OR METHOD | PURPOSE |
| Brush | Determines the Brush used to fill lines. |
| Color | Determines the lines’ color. |
| CompoundArray | Lets you draw lines that are striped lengthwise. |
| CustomEndCap | Determines the line’s end cap. |
| CustomStartCap | Determines the line’s start cap. |
| DashCap | Determines the cap drawn at the ends of dashes. This can be Flat, Round, or Triangle. |
| DashOffset | Determines the distance from the start of the line to the start of the first dash. |
| DashPattern | An array of Singles that specifies a custom dash pattern. The array entries tell how many pixels to draw, skip, draw, skip, and so forth. Note that these values are scaled if the pen is not one pixel wide. |
| DashStyle | Determines the line’s dash style. This value can be Dash, DashDot, DashDotDot, Dot, Solid, or Custom. If you set the DashPattern property, this value is set to Custom. Note that the dashes and gaps between them are scaled if the pen is not one pixel wide. |
| EndCap | Determines the cap used at the end of the line. This value can be ArrowAnchor, DiamondAnchor, Flat, NoAnchor, Round, RoundAnchor, Square, SquareAnchor, Triangle, and Custom. If LineCap is Custom, you should use a CustomLineCap object to define the cap. |
| LineJoin | Determines how lines are joined by methods that draws connected lines such as DrawLines or DrawPolygon. This value can be Bevel, Miter, and Round. |
| SetLineCap | Specifies the Pen class’s StartCap, EndCap, and LineJoin properties at the same time. |
| StartCap | Determines the cap used at the start of the line. |
| Width | The width of the pen. |
The DrawInPaintEvent example program, which is available for download on the book’s website, uses the following code to draw two shapes on the program’s form:
Private Sub Form1_Paint(sender As Object, e As PaintEventArgs) Handles Me.Paint
e.Graphics.SmoothingMode = Drawing2D.SmoothingMode.AntiAlias
' Draw a dashed ellipse.
Using ellipse_pen As New Pen(Color.Black, 5)
ellipse_pen.DashStyle = Drawing2D.DashStyle.DashDotDot
e.Graphics.DrawEllipse(ellipse_pen, 50, 50, 150, 100)
End Using
' Draw a polygon.
Using polygon_pen As New Pen(Color.Gray, 10)
polygon_pen.LineJoin = Drawing2D.LineJoin.Bevel
Dim points() As Point =
{
New Point(20, 20),
New Point(200, 20),
New Point(100, 50),
New Point(230, 190),
New Point(20, 150)
}
e.Graphics.DrawPolygon(polygon_pen, points)
End Using
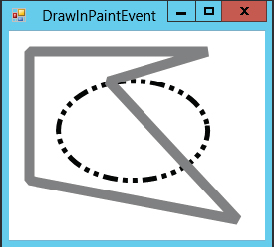
End SubThe code creates a black pen of thickness 5. It sets the pen’s DashStyle property to DashDotDot and then draws an ellipse with it.
The code then creates a gray pen of thickness 10. It sets the pen’s LineJoin property to Bevel so line joins are beveled and draws a polygon with it. Figure 27-2 shows the result.
FIGURE 27-2: The DrawInPaintEvent program demonstrates dashed lines and beveled line joins.
Brushes
The Brush object determines how areas are filled when you draw them using the Graphics object’s methods FillClosedCurve, FillEllipse, FillPath, FillPie, FillPolygon, FillRectangle, and FillRectangles. Different types of Brushes fill areas with solid colors, hatch patterns, and color gradients.
The Brush class is an abstract or MustInherit class, so you cannot make instances of the Brush class itself. Instead, you can create instances of one of the derived classes SolidBrush, TextureBrush, HatchBrush, LinearGradientBrush, and PathGradientBrush. The following table briefly describes these classes:
| CLASS | PURPOSE |
| SolidBrush | Fills areas with a single solid color |
| TextureBrush | Fills areas with a repeating image |
| HatchBrush | Fills areas with a repeating hatch pattern |
| LinearGradientBrush | Fills areas with a linear gradient of two or more colors |
| PathGradientBrush | Fills areas with a color gradient that follows a path |
The BrushSamples example program, which is available for download on the book’s website, uses the following code to demonstrate four kinds of brushes:
' Draw some brush samples.
Private Sub Form1_Paint(sender As Object, e As PaintEventArgs) Handles Me.Paint
Dim rect As New Rectangle(10, 10, 100, 50)
Using solid_brush As New SolidBrush(Color.Gray)
e.Graphics.FillRectangle(solid_brush, rect)
End Using
rect.Y += 60
Using gradient_brush As New LinearGradientBrush(
rect, Color.Black, Color.Gray, 0)
e.Graphics.FillRectangle(gradient_brush, rect)
End Using
rect = New Rectangle(120, 10, 100, 50)
Using texture_brush As New TextureBrush(My.Resources.smile)
e.Graphics.FillRectangle(texture_brush, rect)
End Using
rect.Y += 60
Using hatch_brush As New HatchBrush(
HatchStyle.DiagonalBrick, Color.Black, Color.White)
e.Graphics.FillRectangle(hatch_brush, rect)
End Using
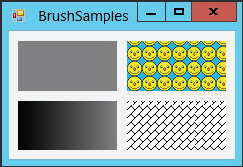
End SubThis example uses SolidBrush, LinearGradientBrush, TextureBrush, and HatchBrush objects to fill four rectangles. You can see the result in Figure 27-3.
FIGURE 27-3: The BrushSamples program fills four rectangles with different kinds of brushes.
You can find more information about the brush classes at http://msdn.microsoft.com/library/system.drawing.brush.aspx.