
4
Controlling Exposure
Exposure is a judgment based on five variables. First and foremost is the amount of light itself. You can turn on more or fewer lights, move your lights closer or farther away, dim them up or down, or choose to shoot in bright daylight or on an overcast day or at night. Each of these choices will affect exposure. The other four exposure variables are shutter speed, aperture (f/stop), neutral density (ND) filters, and gain. Each of these compensates for the amount of light, and each is selectable for adjustment in the G10/XA10. Presetting or changing any of these variables will affect the exposure balance and will have consequences for the other variables. The choices involved in exposure affect highlights, shadow, tonal range, and the aesthetic impression of the shot. In addition, these choices affect motion blur, motion strobing, flicker, depth of field, or the aesthetic quality of the image.
Shutter Speed
Shutter speed is the amount of time that light hits the sensor to expose each frame of video. A too-slow shutter speed produces motion blur and a softer image, whereas an overly fast shutter speed produces a strobing effect, which can be distracting for the viewer if it appears to be too heavy. The typical shutter speed for camcorders in the U.S. is ![]() of a second for frame rates of PF30 and 60i, and a shutter speed of either
of a second for frame rates of PF30 and 60i, and a shutter speed of either ![]() or
or ![]() when the frame rate is PF24 or 24P. The shutter speed is usually a quicker exposure time for each image than the frame rate in order to produce a sharper picture with less motion blur.
when the frame rate is PF24 or 24P. The shutter speed is usually a quicker exposure time for each image than the frame rate in order to produce a sharper picture with less motion blur.
In Tv (Time value) Priority mode, you can pre-select and lock a particular shutter speed while the G10/XA10 automatically varies the aperture, ND, and gain for the appropriate exposure. (Choose FUNC > Rec. Programs > Tv [Shutter Priority] and set the shutter speed.) Or in the full Manual Exposure panel, you can individually set the shutter speed along with aperture, ND, and gain. (Choose FUNC > Rec. Programs > Manual Exposure and set all the exposure variables.) See Figure 4.1.
Figure 4.1 Shutter speed on the Tv (Time value) and Manual Exposure panels.
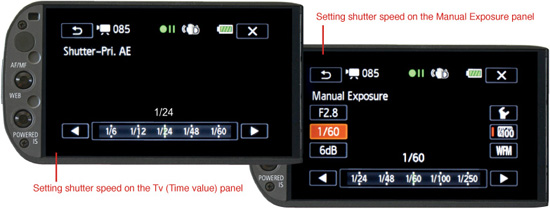
A particular shutter speed is usually set for the entire scene, although in some situations it might vary shot by shot. Presetting shutter speed allows you control when the consequence of a particular speed is important. In situations with potential flicker from fluorescents, sodium vapor, and mercury vapor lights, you should lock the camcorder to a shutter speed of ![]() in the United States. In Europe and Asia, the frequency of alternating current is 50Hz, so a shutter speed of
in the United States. In Europe and Asia, the frequency of alternating current is 50Hz, so a shutter speed of ![]() may be appropriate on the Vixia G10/XA10. For international use, it would have been ideal if Vixia models came with a selectable shutter speed of
may be appropriate on the Vixia G10/XA10. For international use, it would have been ideal if Vixia models came with a selectable shutter speed of ![]() , which is an even better match to eliminate 50Hz flicker. But that speed is available only on the Canon Legria models sold in Europe and Asia. If
, which is an even better match to eliminate 50Hz flicker. But that speed is available only on the Canon Legria models sold in Europe and Asia. If ![]() doesn’t minimize 50Hz flicker on the American Vixia model, try a slower shutter speed like
doesn’t minimize 50Hz flicker on the American Vixia model, try a slower shutter speed like ![]() ,
, ![]() or
or ![]() , which may be an improvement over
, which may be an improvement over ![]() even though it is not a perfect match.
even though it is not a perfect match.
Slower shutter speeds can be useful for shooting in very low light. ![]() of a second needs only half the light, and
of a second needs only half the light, and ![]() needs only one-quarter the light of a standard shutter speed of
needs only one-quarter the light of a standard shutter speed of ![]() . However, very slow shutter speeds from
. However, very slow shutter speeds from ![]() to
to ![]() will have considerable motion blur. Also, because they are slower than your frames per second, they will display motion with a stylized step-by-step appearance. This could mean sacrificing visual quality to obtain a low-light shot that would otherwise be lost or choosing a slow shutter speed specifically for its stylized look. Music video and experimental productions might exploit how the slow shutter defamiliarizes reality. Even a documentary or fiction production might use a slow shutter to represent an urban nightscape as an expressive smear of headlights and tail lights progressing through city streets or to portray a human gesture as less real and more metaphoric.
will have considerable motion blur. Also, because they are slower than your frames per second, they will display motion with a stylized step-by-step appearance. This could mean sacrificing visual quality to obtain a low-light shot that would otherwise be lost or choosing a slow shutter speed specifically for its stylized look. Music video and experimental productions might exploit how the slow shutter defamiliarizes reality. Even a documentary or fiction production might use a slow shutter to represent an urban nightscape as an expressive smear of headlights and tail lights progressing through city streets or to portray a human gesture as less real and more metaphoric.
A shutter speed of ![]() of a second produces motion blur but will not have a step-printed appearance on the Internet, which often uses a display rate of 15 images per second. A shutter speed of
of a second produces motion blur but will not have a step-printed appearance on the Internet, which often uses a display rate of 15 images per second. A shutter speed of ![]() matching a frame rate of PF24 or 24p, and a shutter speed of
matching a frame rate of PF24 or 24p, and a shutter speed of ![]() matching a frame rate of PF30 or 60i, are viable options for shooting in less light with only a slight loss in sharpness and a slight increase in motion blur. It will not have the step-printed look of the very slow speeds where the shutter is longer than the frame rate. The extra blur at
matching a frame rate of PF30 or 60i, are viable options for shooting in less light with only a slight loss in sharpness and a slight increase in motion blur. It will not have the step-printed look of the very slow speeds where the shutter is longer than the frame rate. The extra blur at ![]() or
or ![]() can sometimes help blend very contrasty motion that might otherwise strobe at
can sometimes help blend very contrasty motion that might otherwise strobe at ![]() or
or ![]() . Images shot at shutter speeds of
. Images shot at shutter speeds of ![]() or slower will generally look softer when handheld. Image stabilization helps improve the image at these speeds, as does mounting the camcorder on a monopod or tripod.
or slower will generally look softer when handheld. Image stabilization helps improve the image at these speeds, as does mounting the camcorder on a monopod or tripod.
Fast shutter speeds are used to help maintain proper exposure in very bright situations and to produce crisp, motion-frozen images on each frame. The strobe effect increases with fast shutter speeds because there is less motion blur to help the spectator’s eye blend progressive positions of a moving image into a continuous motion. Fast shutter speeds might be selected for shots that will be subjected to frame-by-frame motion analysis or freeze-framed or shots where the strobe effect is aesthetically intended. ![]() should produce clean images of a jumper mid-air.
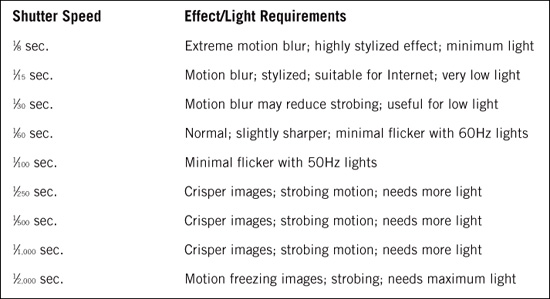
should produce clean images of a jumper mid-air. ![]() should produce sharp images of every droplet in a water spray. See Tables 4.1 and 4.2 for the effect of shutter speed on the appearance of the image and the amount of light needed. The PAL versions of these camcorders, the Legria HF G10 and XA10, shoot at 25 and 50 frames per second, the European and Asian standard. Legria camcorders have the following shutter speeds:
should produce sharp images of every droplet in a water spray. See Tables 4.1 and 4.2 for the effect of shutter speed on the appearance of the image and the amount of light needed. The PAL versions of these camcorders, the Legria HF G10 and XA10, shoot at 25 and 50 frames per second, the European and Asian standard. Legria camcorders have the following shutter speeds: ![]() ,
, ![]() ,
, ![]() ,
, ![]() ,
, ![]() ,
, ![]() ,
, ![]() ,
, ![]() and
and ![]() .
.
Table 4.1 Possible Shutter-Speed Settings for PF30 and 60i
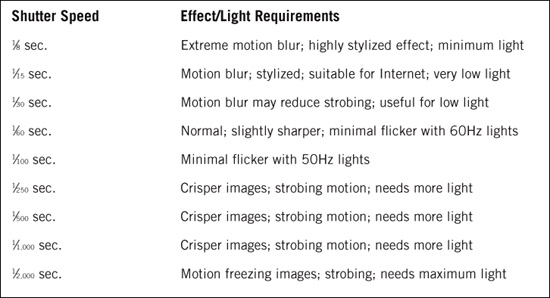
Table 4.2 Possible Shutter-Speed Settings for PF24 and 24p
Selecting an Aperture
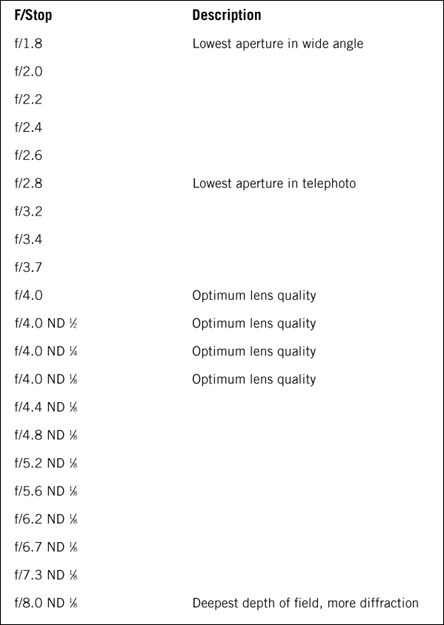
Aperture settings on the G10/XA10 lens are available in ![]() -stop increments from f/1.8, letting through the most amount of light in wide angle (which becomes f/2.8 in telephoto at its widest aperture), up to f/8, which lets through the least light. An aperture from f/1.8 to f/8 can be selected and set in the Av (Aperture value) Priority mode or in Manual Exposure mode.
-stop increments from f/1.8, letting through the most amount of light in wide angle (which becomes f/2.8 in telephoto at its widest aperture), up to f/8, which lets through the least light. An aperture from f/1.8 to f/8 can be selected and set in the Av (Aperture value) Priority mode or in Manual Exposure mode.
Lenses contain a matched set of glass elements to correct for chromatic aberration, curvature of field, diffraction, and various forms of distortion. A single element like a magnifying glass can bring only one portion of the visual spectrum into focus on the photo sensor. The other two-thirds of the spectrum will come into focus a little before or a little beyond the focal plane, creating soft edges and fringing (which is a condition called chromatic aberration). A second corrective element can start to bring two-thirds of the visual spectrum into focus and produce an achromatic lens that might be photographically usable. It usually takes at least three elements and often four, five, or more to create a correction on a correction on a correction to bring the entire visual spectrum into focus on the same plane with flat edge-to-edge focus instead of a curvature of field and corrected for other aberrations including diffraction.
Zoom lenses have even more elements. The zoom on the G10/XA10 has 12 elements in 10 groupings. One set of elements focuses on the image, another set magnifies or demagnifies the image to create the zoom effect, banks of elements move with a mechanical compensation so that focus does not drift as you zoom, and the aperture changes its physical size to maintain a proportional relationship to the focal length from wide angle to telephoto. So, a zoom lens is both optically and mechanically complicated.
The corrective elements needed when a lens is wide open (like f/1.8), where light comes through the full curvature of each lens element, are not the same as when the lens is set for a high f/stop number (like f/8), where light comes through the central axis and is somewhat defocused by diffraction (bending around the edges of the smaller iris). Because no set of corrections is perfect for the whole range of apertures, all lenses are a set of compromises, usually designed to balance their optical corrections for somewhere in the middle of their aperture range. For the G10/XA10, the lens is the most optically perfected around f/4. What this means is that f/4 will produce the sharpest images on the plane of focus, a pleasing bokeh for images that are out of focus, and the best contrast, gray range, and color rendition that the G10/XA10 is capable of delivering. (“Bokeh” is a Japanese term for the visual quality of an out-of-focus image.) However, by necessity, we often shoot at other apertures to adjust exposure or control depth of field.
Depth of field is affected by the distance from the camcorder’s sensor to the subject, the focal length (for example, 4.25mm versus 42.5mm), and the size of the aperture (for example, f/1.8 versus f/8). In spite of some loss in optical quality, the widest or nearly widest apertures might be chosen for working in low light or to create the shallowest depth of field. The highest (f/8 on the G10/XA10) or nearly highest aperture setting might be chosen for working in very bright light or to ensure a deeper depth of field in telephoto. If extremes of depth of field are not an issue, selecting an aperture close to f/4 will produce the best optical quality—provided this can be done with an adequate balance of gain and shutter speed for the optimum exposure.
There are reasons for wanting to lock in a fixed aperture and reasons to let the aperture be variable. Reasons to let an aperture be variable include needing to shoot at a fixed shutter speed and wanting to limit your gain. The consequences of having the aperture vary in auto exposure may be that you are not always shooting at the aperture of highest optical quality and your depth of field changes as the aperture varies. Reasons to set a particular aperture in Av Priority mode or in Manual Exposure mode are to choose f/4 for its optical quality or to choose one of the extremes to control depth of field. The lower the f/stop number, the shallower your depth of field. Although in small-format video you inherently have a deep depth of field to begin with, particularly with wide-angle and normal settings. A high aperture might be needed to adequately extend deep focus to telephoto. Conversely, if you want to take advantage of selective focus with a shallow depth of field, you will need to shoot with your aperture wide open or nearly so.
Neutral Density
Canon has incorporated a series of internal neutral density filters that automatically kick in so the lens never has to get to a detrimentally high aperture like f/16 or f/22. (This saves Canon from having to design a more optically compromised lens with a greater range of f/stops.) The camcorder has an incremental set of built-in neutral density (ND) filters to hold onto the optimum aperture of f/4 for as many exposure increases as possible before continuing to a maximum in bright sunlight of f/8 plus an ND filter that absorbs up to three additional f/stops of light. This is the equivalent of shooting at f/22 but with the optical quality of f/8. Canon’s ND system is ingeniously designed to get the most out of your lens.
The internal ND filters progressively reduce the light to ½, ¼, or ![]() its nominal value, and extend the ability of the lens to prevent overexposure by three f/stops. Auto-exposure, programmed exposure, and full manual exposure modes interpolate these neutral-density values before raising the aperture setting above 4.0 to f/5.6 and above. This is a scheme to maintain the best optical quality from the lens by keeping it close to the optimum aperture of f/4 in situations with bright light. In Av and Manual Exposure mode, an aperture value will appear on the screen that indicates both the f/stop and the ND value—for example, “f/4 ND
its nominal value, and extend the ability of the lens to prevent overexposure by three f/stops. Auto-exposure, programmed exposure, and full manual exposure modes interpolate these neutral-density values before raising the aperture setting above 4.0 to f/5.6 and above. This is a scheme to maintain the best optical quality from the lens by keeping it close to the optimum aperture of f/4 in situations with bright light. In Av and Manual Exposure mode, an aperture value will appear on the screen that indicates both the f/stop and the ND value—for example, “f/4 ND![]() .” If for some reason you prefer to shoot at f/5.6 or f/8 without ND kicking in, you can defeat the automatic ND filters (or activate them if they had previously been turned off) by choosing FUNC > MENU > Camera icon > ND and choosing OFF (or Automatic).
.” If for some reason you prefer to shoot at f/5.6 or f/8 without ND kicking in, you can defeat the automatic ND filters (or activate them if they had previously been turned off) by choosing FUNC > MENU > Camera icon > ND and choosing OFF (or Automatic).
In Table 4.3 you can see how progressive ND filters are used to automatically hold onto the optimum aperture of f/4 as light increases. Keeping ND turned to Automatic is highly recommended. In general, it is better to leave the filters on unless you really need to maximize the depth of field in less light.
The built-in ND filters do not preclude using external neutral density. The front of the camcorder’s lens accommodates a 58mm screw-in filter. Adding a high-quality multicoated ND.6 or ND.9 glass ND filter could allow you to move the exposure toward an aperture like f/4 for the best optical quality in bright sunlight or toward something like f/1.8 to 2.8 for more selective focus under less intense light. An ND.6 lowers your aperture setting by two f/stops and an ND.9 allows the lens to open three f/stops.
Table 4.3 Aperture/ND Settings on the G10 and XA10
Gain
Changing the gain does not change the quantity of light that hits the photo sensor as the aperture does, and it does not change the duration for which the light hits the sensor as shutter speed does. Gain simply takes what may already be an inadequate amount of light and artificially amplifies the photo sensor’s signal, which also inherently amplifies randomness, visual noise, and grain. Consequently, increasing the gain progressively degrades the image. The ideal setup is to shoot with the lowest gain that will permit an acceptable exposure by manipulating the remaining exposure variables: aperture, shutter speed, and the amount of light.
Gain is the equivalent of the ISO or ASA sensitivity setting in film. High gain settings are like pushing film to make it more sensitive. On the G10/XA10, gain is measured in decibels, and standard gain is 0dB. A one f/stop increase is a gain of 6dB. Every increase of 6dB doubles the sensitivity and allows you to shoot in less light. The XA10 is capable of applying up to 24dB of gain (16 times more sensitive than 0dB) plus a significant step beyond called “Max.” The consequence of very high gain is that it amplifies both the signal as well as its imperfections. Try to keep the gain at the lowest setting that will provide an acceptable exposure for your particular subject matter and purpose.
When you are in full AUTO mode, gain is one of the variables that will rise up and down, and there is little you can do about it. When you are in a programmed record mode, the Automatic Gain Control (AGC) program panel enables you to select a maximum limit for gain while leaving the range below that point automatic. The gain limit puts a cap on the graininess and degradation that can be caused by excessive gain. In low-light situations when shutter speed and aperture have already reached their appropriate maximums, the gain limit on the CUSTOM dial can be a useful manual tool to darken or lighten shots. It enables you to balance the choice of visual degradation versus underexposure in these low-light situations.
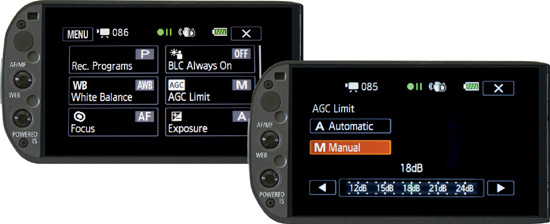
To set the gain limit, go to the AGC program panel. (While in M or CINEMA mode, choose FUNC > AGC Limit > M Manual and then set the AGC limit, as shown in Figure 4.2.) Alternatively, you can engage and assign AGC to the CUSTOM key. (Press and hold the CUSTOM key for two seconds, dial to AGC, and press the CUSTOM key again to set it.)
Figure 4.2 Choose FUNC > AGC Limit > M Manual; then set the dB limit.
The gain limit will operate only in Programmed AE, Tv, or Av. Pressing the CUSTOM key now toggles between fully automatic gain versus a gain limit that you can adjust with the dial. It is possible to leave the dial active and manually raise or lower the gain limit as you shoot. In Tv (Time value) Priority or Av (Aperture value) Priority mode, you can lock the shutter or the aperture respectively, then control the gain limit on the CUSTOM dial as your exposure variable while shooting.
If you choose to shoot without adequate gain, you will lose detail in shadows—but for some purposes, denser shadows might look better than getting a grainy, muddy image at full gain.
Shooting in daylight is almost always possible at 0dB (the lowest gain setting). Shooting indoors in available light will typically need 6, 12, or 18dB, and sometimes higher in a room with a ceiling light, a table lamp, or floor lamp. You will have to decide how much gain is acceptable. You can preset the maximum gain so that even in Programmed AE, gain does not rise to a detrimental level. Balancing graininess with the need for visibility will be a matter of choice as you amplify the signal in high gain. In very low light, you eventually face the decision of whether you accept underexposure; raise the gain and accept a degraded image; or raise the base level of the light to improve the image. Bouncing a little extra light into a room might enable you to retain the character of the existing light and save you from having to amplify the sensitivity up to 24dB or beyond. A setting like 12dB will look considerably better.
In auto exposure and in the Programmed AE mode, the G10/XA10 automatically adjusts a combination of the shutter speed, aperture, neutral density, and gain for what it assumes will be an acceptable exposure under average conditions. But auto exposure and Programmed AE are not taking into consideration the unique nature of your subject or your intentions; in addition, the settings will ride up and down as the composition of the frame changes. Individual programmed settings and full Manual Exposure mode give you complete control of exposure and its effect on the image.
In full Manual Exposure mode, you must set each exposure variable individually. Locking to a particular gain setting in Manual Exposure mode tells the camcorder to use that specific setting—no higher, no lower. This has different consequences than simply setting a limit. You will need zebra patterns or the waveform monitor to effectively make the judgments necessary for full manual exposure.
Touch Exposure
An automatic version of Touch Exposure operates when either Face Detection or Touch & Track kicks in. The camcorder’s logic system not only focuses on the face or the point of interest you have selected, but the system also bases its exposure on the area that you touched.
To access more complete manual control of exposure with the touchscreen, switch to M mode and go to the +/− Exposure program panel (a.k.a. Touch Exposure). The +/− Exposure panel, shown in Figure 4.3, enables you to select a point of interest within the composition on which to base exposure. Unlike Touch & Track, the +/− Exposure panel operates independently of focus; instead of automatically riding up and down as the shot develops, the selected exposure will not change until you adjust it higher or lower in the interface, select another point of interest, or toggle between manual and auto exposure. This provides a professionally consistent exposure that does not fluctuate as it can in auto exposure.
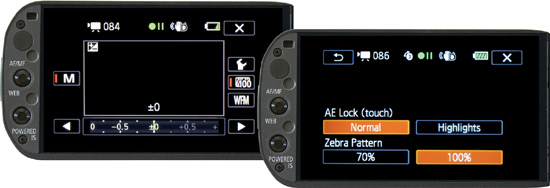
Figure 4.3 Press FUNC and select the +/− Exposure program panel.
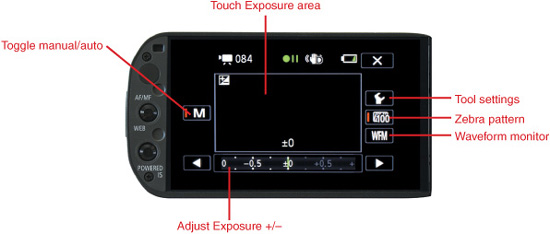
Touch Exposure is particularly useful if your subject is lighter or darker than the rest of the composition or when the tonal range of your composition is complex. The +/− Exposure panel provides access to zebra patterns and a small but professional waveform monitor for evaluating and monitoring exposure values. (Zebra patterns and the waveform monitor are discussed later in this chapter.) The Tool icon on the +/− Exposure panel allows a choice of Normal, which averages highlight and shadow when a surface is selected, and Highlights, which bases Touch Exposure on peak values and prevents selections from losing detail by being too bright.
In delicate or complicated exposure situations, you may want to keep this panel open principally for the monitoring it provides and the ability to intercede and adjust exposure at any moment with the tip of your finger. The +/−Exposure panel is available in all record program modes except full Manual Exposure mode and in all content-based scene modes except Fireworks.
CUSTOM Key and Dial
Exposure can be manually controlled with the CUSTOM key and dial at the rear of the camcorder. Some users complain that having exposure adjustments at the rear is inconvenient because the left hand is needed for focus at the front of the camcorder and at the touchscreen for other adjustments. But considering how little space there is near the front of the camera for a key and rotating dial, the placement is reasonable and eliminates any chance of pressing the wrong control by mistake. Besides, these same exposure controls can be selected and operated directly from the touchscreen if you prefer, which disables the key and dial until you exit the controls on the touchscreen.
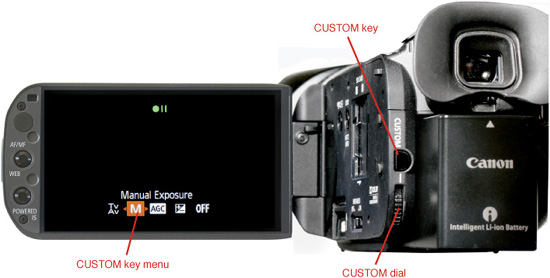
One might argue that the CUSTOM key ought to be called the EXPOSURE key because the only custom options that can be assigned are various ways to set exposure. You set up the identity of the CUSTOM key and dial in one of two ways. One is to press and hold down the CUSTOM key for two seconds, set the dial to Tv/Av, M, AGC, +/−, or Off, and press the CUSTOM button again. Another is to choose FUNC > MENU > Tool icon > CUSTOM Key/Dial and then choose Tv/Av, M (manual), AGC, +/−, or OFF (see Figure 4.4).
Figure 4.4 The Custom key and dial, and their on-screen menu.
If you intend to use the CUSTOM key to control exposure, you have to select an exposure mode on the program panel and separately select the assignment of the CUSTOM key to control that function or a parallel function. In other words, you have to go through two procedures to enable the CUSTOM key to actually control exposure. You can select the exposure mode itself in the program panel (Programmed AE, Tv, Av, Manual Exposure, AGC Limit, or a programmed type of scene) and then assign the CUSTOM key to a function that is compatible with the selected exposure mode.
If you have assigned the CUSTOM key to read for a different mode than the one you happen to be in, the key and dial will be useless and exposure adjustments can be made only on the touchscreen or not at all. When you activate the CUSTOM key to a compatible function, previous touchscreen control of exposure is deactivated. It would have been much easier and more intuitive if the CUSTOM dial instantly adapted its set of functions to whatever mode you selected in the program panel, and if adjustments were available on both the touchscreen and the CUSTOM dial without one disabling the other. The current arrangement causes frustration among first-time users.
To complicate matters further, the M selection on the CUSTOM key option menu works only when full Manual Exposure mode is also selected in the program panel. Tv and Av work with either shutter or aperture exposure modes on the program panel. AGC (gain limit) works with three program exposure modes, and +/− Exposure is compatible with 11 program exposure modes, but not all. Once you have figured out which sets of controls are compatible with which programmed exposure modes, and have appropriately activated both, you are ready to control exposure with the CUSTOM key and dial. To sort this out, Table 4.4 lays out CUSTOM key options. The first column represents an exposure mode selectable on the program panel after tapping FUNC. The second column represents the CUSTOM key assignment selected from the Tool menu or by holding down the CUSTOM key and selecting with the dial. The numbers in the third column represent one, two, or three toggle positions on the CUSTOM key.
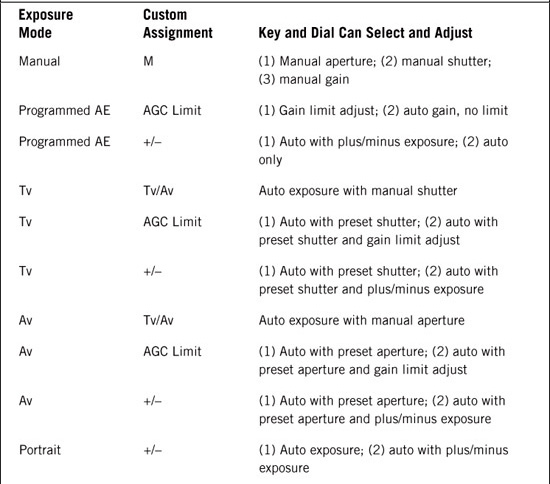
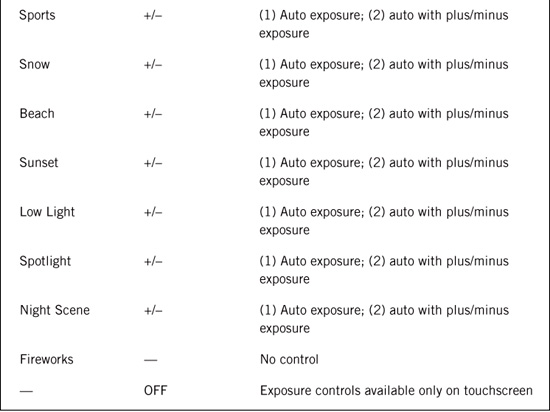
Note that Fireworks is not adjustable on the CUSTOM key and dial. The alternative for all these settings (except Fireworks) is to control exposure variables on the touchscreen by opening the +/− Exposure panel (Touch Exposure), which deactivates the CUSTOM key.
The LCD Screen
If you set exposure manually, you will need to know what your limits are and when you are getting an acceptably exposed image. You cannot entirely trust the look of the image in the viewfinder. A 3½-inch uncalibrated viewfinder will not really tell you whether you are losing detail by crushing it in the shadows or clipping it in the highlights. To judge exposure in the highlights, you need zebra patterns; and to judge both highlight and shadow detail, you need a waveform monitor. The image on the LCD screen offers an instant indication of whether you have a picture where skin tones look somewhat acceptable and compositional emphasis seems right, but the tiny screen doesn’t tell you the subtle details. You wouldn’t want to rely on it for determining exposure.
The LCD screen has its own brightness control. It will also look different with different light falling on it. Consequently, it isn’t a constant reference. It isn’t really going to tell you whether your exposure is giving you the maximum amount of detail, the greatest latitude, or even whether tones have the precise quality you want. When shooting in a very dark space, the LCD monitor’s brightness itself may make you think your exposure is greater than you need. When shooting in bright sunlight, it might give the opposite impression. The saturation of color may look different depending on the ambient light hitting the viewfinder. So don’t rely on the LCD screen for anything other than a general impression. If you are going to take manual control, you need the zebra pattern and waveform monitor to more precisely set exposure.
Zebra Patterns
Zebra patterns appearing in highlight areas provide a visual indication that exposure in certain parts of a visual image has reached a threshold—for example, 70 percent or 100 percent. Zebra patterns appear only on the camcorder’s LCD monitor or viewfinder and are not part of the recorded file. They are an accurate guide for setting exposure based on actual peak brightness values within the composition. To set up zebra patterns, do one of the following:
![]() Choose FUNC > MENU > Tool icon; then turn Zebra Pattern on and set it for 100 percent or 70 percent.
Choose FUNC > MENU > Tool icon; then turn Zebra Pattern on and set it for 100 percent or 70 percent.
![]() Choose FUNC > Rec. Programs > Manual Exposure > Tool icon; then choose 70 percent or 100 percent and turn on Zebra Pattern.
Choose FUNC > Rec. Programs > Manual Exposure > Tool icon; then choose 70 percent or 100 percent and turn on Zebra Pattern.
![]() Choose FUNC > Rec. Programs > +/− Exposure > Tool icon; then choose 70 percent or 100 percent and turn on Zebra Pattern (see Figure 4.5).
Choose FUNC > Rec. Programs > +/− Exposure > Tool icon; then choose 70 percent or 100 percent and turn on Zebra Pattern (see Figure 4.5).
Figure 4.5 The Tool icon on the Exposure panel allows you to set the response characteristics of zebra patterns.
In M mode, you will want to use zebra patterns and the waveform monitor as aids in determining the right exposure. The waveform monitor is available only while in the Manual Exposure setup screen or within the +/− Exposure program panel. Zebra patterns can also be activated and set for 70 percent or 100 percent on those screens as well as in the Tool menu. Once they are enabled, they will stay on after the screen is closed including in the full AUTO mode.
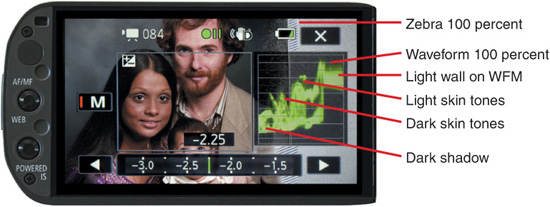
Zebra patterns are slanted stripes that appear on the camcorder’s screen as visible indicators that parts of the picture have reached a certain brightness threshold. My preference with other camcorders is to set the zebra threshold to 90 percent (or 90 IRE) and allow them to just barely appear in the brightest parts of the picture as an indication that these points are ½ stop below full exposure. But 90 percent is not an option on the G10/XA10. To use the 100 percent threshold, you increase exposure until zebra patterns just begin to appear in the very brightest white areas in the picture. You might let them remain if you intend for those spots to be overexposed; more typically, however, you back off the exposure to the point where the stripes just disappear. This places white at just below 100 percent but doesn’t leave a few stripes in the composition to let the operator know whether the brightest points have fallen lower during the course of shooting. If there is nothing in the composition that ought to be close to 100 percent, hold a white card in the frame as an exposure reference while you manually adjust exposure.
The other threshold on the G10/XA10 displays zebra patterns at 70 percent, which is about 1½ stops below full exposure. At this setting, you expect to see stripes on white and near-white surfaces, and on the highlights of lighter skin tones including the brows and nose ridge. 70 percent is also a useful threshold for setting exposures for compositions that have no white reference or in low light where there might not be enough gain to attain a setting close to 100 percent.
Waveform Monitor (WFM)
In the analog video era, waveform monitors were calibrated in IRE units, named after the Institute of Radio Engineers, who set the technical standards before broadcast television actually existed. An IRE unit equaled ![]() of a volt. The picture part of the signal stretched from 7.5 IRE (black) to 100 IRE (white), leaving 7.5 down to 0 IRE as a buffer between picture black and control signals (which were minus values below zero). As a measure of brightness, IRE did not actually equal percent because an increase of every 20 IRE represented a doubling of brightness, and monitors were calibrated up to 120 IRE to account for a recorded signal that was up to one stop (one doubling of exposure) above broadcast white (100 IRE). Consequently, the scale of the waveform monitor represents five f/stops (five doublings) from 0 IRE to 100 IRE. A reading of 90 IRE would be half an f/stop short of maximum picture brightness for broadcast.
of a volt. The picture part of the signal stretched from 7.5 IRE (black) to 100 IRE (white), leaving 7.5 down to 0 IRE as a buffer between picture black and control signals (which were minus values below zero). As a measure of brightness, IRE did not actually equal percent because an increase of every 20 IRE represented a doubling of brightness, and monitors were calibrated up to 120 IRE to account for a recorded signal that was up to one stop (one doubling of exposure) above broadcast white (100 IRE). Consequently, the scale of the waveform monitor represents five f/stops (five doublings) from 0 IRE to 100 IRE. A reading of 90 IRE would be half an f/stop short of maximum picture brightness for broadcast.
In the digital era, the signal itself is a stream of digital numbers instead of a varying voltage, and the control signal (below 0 IRE) no longer appears on the visual waveform. Some manufacturers continue to use the term “IRE units” on waveform monitors that read a digital signal. Even though IRE no longer refers to a fraction of a volt, the calibrations 0, 7.5, and 100 IRE have the same relative meanings in the digital era. Other manufacturers, like Canon, have simply replaced the term “IRE” with “percent,” meaning percentage of the calibration—not really a linear percentage of brightness because an increase of 20 percent on this scale still indicates a doubling of brightness as it did with IRE. Others have calibrated digital waveform monitors from 0 to 255 (representing the 256 steps in an 8-bit signal, 0 being the lowest step) so that 0 equals absolute black, 16 equals picture black, 235 equals maximum picture white, and 255 equals maximum overexposed white.
I mention these three kinds of calibration because you might see “percent” on your G10/XA10 and IRE or 0–255 on WFMs built into other camcorders, monitors, and editing programs. They all mean pretty much the same thing: absolute black, picture black, maximum picture white, and maximum overexposure. There is some ambiguity about whether there has to be a separation between 0 and 7.5 (16 on a digital scale). The Japanese use no separation and allow picture black to be as dark as absolute black, while many American broadcasters have kept the old standard of starting picture black at 7.5—particularly because so many shows are in rerun that were mastered to that standard. Ultimately it comes down to how viewers have adjusted the pedestal (brightness settings) on their individual monitors, which is obviously not consistent. (Figure 4.6 shows the waveform monitor on the G10/ XA10.)
Figure 4.6 When activated in the +/− Exposure panel or in Manual Exposure mode, the waveform monitor appears on the right of the screen.
Sometimes, you will want to find scenes with a majority of tones within a five-stop range or will apply fill light to get the range within five stops. In other cases, you may want a perfectly exposed background with silhouetted foreground figures or normally exposed figures in front of a very darkened or maximum white background. This is where you will have to make a choice on what is best for the scene and where to preserve detail.
Setting Manual Exposures
For full manual control of aperture, shutter, and gain, and for access to the waveform monitor, choose FUNC > Rec. Program > Manual Exposure > WFM; then tap and adjust Aperture, Shutter, and Gain. This gives you complete manual control over exposure on the touchscreen with access to the waveform monitor (as long as you stay in the Manual Exposure program panel) and to zebra patterns even after you leave the window. You set the manual values with an on-screen slider. Any previous setting for gain limit will not be in effect because in Manual Exposure mode, you are setting the gain to a fixed position; there is no need for a limit. You can shoot while in the Manual Exposure program panel if you need continued access to the WFM beyond initially setting up the exposure. When you touch X, you have locked in the exposure settings, and the WFM and other icons leave the screen. The upper left of the touchscreen displays your manual settings for aperture, shutter, and gain. You can assign continued control of the individual manual adjustments to the CUSTOM key by doing one of the following:
![]() Choose FUNC > MENU > Tool icon > CUSTOM Key > M.
Choose FUNC > MENU > Tool icon > CUSTOM Key > M.
![]() Hold down the CUSTOM key for two seconds, move the CUSTOM dial to M, and press the CUSTOM key again.
Hold down the CUSTOM key for two seconds, move the CUSTOM dial to M, and press the CUSTOM key again.
Pressing the CUSTOM key now toggles between the Aperture, Shutter, and Gain settings, which are individually adjustable on the dial instead of the touchscreen. With the CUSTOM key and dial, you no longer have visual access to the waveform monitor, but the screen is less cluttered with icons and monitors. After setting two parameters, you might leave the dial assigned to the one you prefer to vary while shooting. You can recall the monitor and touchscreen control by pressing FUNC > Rec. Programs > M (Manual Exposure). Alternatively, if an M appears in the lower right of the touchscreen, pressing it returns you there more directly.
For complete control of aperture, shutter, and gain in Manual Exposure mode, choose FUNC > Rec. Programs > Manual Exposure. Then select the following:
![]() Aperture
Aperture
![]() Shutter
Shutter
![]() Gain
Gain
![]() WFM
WFM
![]() Zebra
Zebra
![]() Tool
Tool
Three separate manual exposure parameters are now adjustable on the screen, as is access to a waveform monitor and zebra patterns. If in addition you have preset the CUSTOM key to Manual, you will be able to adjust individual exposure levels with the dial after you exit the Manual Exposure setup screen. Tap the CUSTOM key on the rear of the camcorder to toggle to each of the three choices and rotate the dial to individually adjust each parameter. After your initial settings, you will probably leave the dial set for the exposure variable you expect to adjust the most. In this way you can use the interface like an aperture, shutter, or gain priority, but with greater knowledge and control of all the settings.
In low light, you eventually get to the choice of whether you open the aperture, lower the shutter speed, or raise the gain past the point that degrades the image, or (preferably) raise the base level of the light itself to improve the image. It is sometimes possible to increase the existing ambient light or to bounce in a little extra light without radically changing the character of the original location.