

16
Developing Your Astrophotography Session Plan
This chapter helps you develop a detailed plan for your nightscape session based on your understanding of astronomy and photography. It includes a pre-determination of your shooting location, a detailed schedule and suggested camera settings, along with the appropriate lenses and any specialized equipment that you might need for all your shots. Sounds good, right? Spending the time beforehand to clearly think through your objectives will help you stay on track when you are in the field. It will allow you to concentrate on the creative aspects of your session instead of getting bogged down in technical details and distractions that could have been minimized or avoided altogether. Having a plan will make the difference between being unpleasantly surprised by the unexpected appearance, or lack thereof, of a crucial night sky object; or enjoying the confirmation of observing an anticipated sequence of astronomical events unfolding on schedule before your eyes.
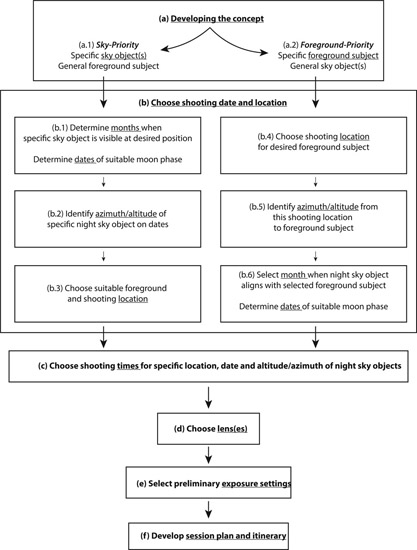
The general sequence of steps for developing a comprehensive plan for a nightscape photo session is shown in Figure 16.1. There are six main steps: (1) developing the concept, Figure 16.1(a); (2) choosing the shooting location and date, Figure 16.1(b); choosing the shooting time, Figure 16.1(c); selecting the appropriate lens, Figure 16.1(d); choosing the appropriate exposure settings, Figure 16.1(e); and summarizing your plans and timeline for the session, Figure 16.1(f). It’s easier than it sounds! The main reason for laying out each of these steps explicitly is to make sure we don’t overlook anything. Also, this structure helps provide a logical sequence to the many decisions that you may wish to make. We will now go through each step in detail.
Pre-Visualization and Developing the Concept
Begin your planning process with a specific concept in mind; be it star trails, an image of the Milky Way, a meteor shower, or perhaps the full moon rising, Figure 16.1(a). Chapter 15 is full of great ideas, as is the Distinguished Guest Gallery! Better yet, pre-visualize your nightscape image—close your eyes and think carefully about the image you’d like to create. Be as detailed as possible; is there a specific foreground subject in your image like a particular mountain peak or a well-known rock arch; or more general subjects like patches of wildflowers or a lake with a fishing pier? How are the night sky objects positioned relative to the foreground; does the Milky Way appear to rise directly upwards out of a river or waterfall; or does it arch horizontally across the sky? If you are creating star trails, how exactly are they oriented relative to the horizon—do they angle upwards, curve across the horizon, or form complete circles? How well illuminated is the foreground; are you looking for dark silhouettes, or is a well-lit foreground important? Is the moon rising over, or next to some historic or natural landmark? While it may sound obvious, pre-visualizing your images gives you the answers needed to narrow down your choices of dates, times, locations, lens choices, camera setting, and exposure strategies to those that will practically guarantee that you’ll return home with memory cards chock full of exciting images!
Having a pre-visualized scene in mind also helps enormously as you scout your destination during both the day and at night. I have experienced déjà vu many times as I’ve come across scenes that uncannily match their pre-visualized version; the process of pre-visualization can help in “knowing” when you’ve arrived at a good spot. Also, it is always surprising how many unexpected distractions develop in the field to pry your attention away from the subtleties of composition. For example, mosquitoes, thick brush, ticks, incipient clouds, incipient moonrise, cold, wind, difficulty in achieving focus, lights from other people, dying batteries, dehydration, not getting lost and even sleepiness can all interfere with the creative process of landscape astrophotography. Having a well
16.1
The six main stages of planning a nightscape photo shoot. (a) Developing the concept; (b) choosing the shooting location and date, (c); choosing the shooting time; (d) selecting the appropriate lens; (e) choosing the appropriate exposure settings; and (f) summarizing your plans and timeline for the session.
thought out, pre-visualized image in mind, with all the critical elements clearly identified, helps keep you on track.
It is often helpful to draw inspiration from the work of others in developing your concepts. I am continually motivated at the creativity, imagination, and skill of fellow landscape astrophotographers. Online communities such as The World At Night (TWAN) and those on Google+, Instagram, Flickr, Pinterest, and Facebook are especially inspirational and educational. There may be some aspect of an image from a different part of the world that you can apply to a scene right in your backyard, whether it has to do with composition, lighting, or something else.
Finally, once you arrive at your destination, be sure to visit local visitor centers and gift shops. They are often stocked with scenic postcards, maps, and guidebooks with images of popular and lesser-known photo destinations. I usually make a point to visit visitor centers of nearby National Parks, US Forests and State Parks, along with the local AAA office and the public library.
You might find it helpful to keep a small notebook easily available to jot down any photo ideas or sketches that may come to mind. I find that I am struck with inspiration for images at the most unpredictable of times, visions often triggered by scenes I may stumble upon unexpectedly. When you review the notes you’ve accumulated over the course of months and years, you will likely spot trends or themes in the types of images you wish to create. These themes are your personal style, and can be very helpful in orientating yourself in new shooting situations.
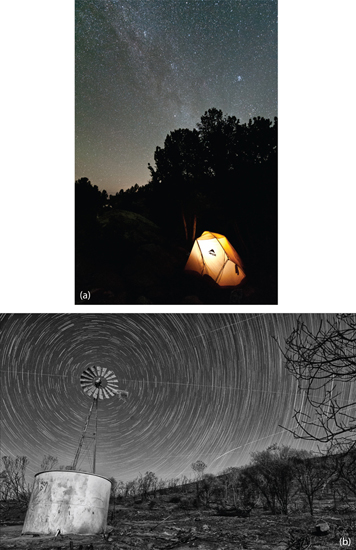
You may also develop a library of what I like to call “favorite images” and “favorite places.” One example of a favorite image might be a scene with the Milky Way rising vertically from the horizon with an internally lit tent in the foreground, Figure 16.2(a). An example of a favorite place might be the edge of a wilderness area that allows you to position specific objects at the center of star trails encircling the celestial pole, Figure 16.2(b). As you create your own repository of images, you may find it beneficial to keep a library of ones that especially resonate with you filed away either digitally in “the cloud” or via prints. It is often possible to gain fresh perspective and motivation by reviewing them from time to time, especially when you’re in the field looking for inspiration.
The next step is to turn your concept into a rough sketch to help fill in as many details as possible. One of my own examples is shown in Fig. 16.3 (overleaf). It shows a scene with the Milky Way rising from the intersection of a river and mountains along the horizon. The river is flanked by trees on either side, and is flowing toward the viewer. This was the concept sketch drawn months in advance of the actual image shown in Figure 8.1(b). In it, I’ve attempted to capture what I felt to be the essence of the image; the curving flow of the Milky Way seamlessly merging with the flow of the river. The benefits of drawing such sketches are many, but most importantly they serve as a helpful source of answers during your planning. You may even surprise yourself by discovering key elements that had previously been hidden only in your subconscious!
In preparing your sketches, it is worth following basic rules of photographic composition. For example, creating your composition in accordance with the Rule of Thirds often yields visually pleasing results. Positioning a leading line coming into the composition from the lower left corner helps guide the eye of the viewer into the scene. Creating a sense of tension between contrasts—in color, texture, shape always imparts dynamism to the scene. Much has been written elsewhere on the subject of composition in photography and you are urged to explore it in more detail.
16.2
Examples of two of the author’s “favorites:” (a) A “favorite image:” a scene with the Milky Way rising vertically from the horizon with an internally lit tent in the foreground. (b) A “favorite place:” the edge of a wilderness area that allows you to position specific objects at the center of star trails encircling the celestial pole.

16.3
A rough concept sketch from the author’s files showing a scene with the Milky Way rising from the intersection of a river and the horizon. The river is flanked by trees and perhaps mountains on either side, and is flowing toward the viewer. This was the concept sketch drawn months in advance of the actual image shown in Figure 8.1(a).
Once you’ve developed a series of sketches for your planned shots, one image per page, try organizing them into categories. My typical categories include, “Partial Moon Shots,” for images created with a waxing crescent or waning crescent moon illuminating the foreground; “Dedicated All-Nighters,” for images that require a dedicated camera body/lens/tripod/power system for the entire night; “Milky Way Shots,” for those that require the Milky Way; “Dark Sky Shots,” that simply require dark skies with no particular foreground or night sky subject needed. I find this process helps me focus on my priorities for a given session. It also allows me to organize the shots within each category in terms of their significance and lens usage, together with the expected visibility window of night sky objects. This categorization process also helps when developing the schedule for the nightscape session.
As you review your image concepts and categories, you will likely find that all your nightscape concepts, regardless of category, will have one of two broad themes. The first necessitates a very specific feature of the night sky coupled with a less stringently defined foreground subject. We will designate these as sky-priority nightscapes, Figure 16.1(a.1). For example, in images of star trail circles over a lake, or of a vertical Milky Way rising above a waterfall, what is important is the vertical Milky Way and the circular star trails; almost any properly oriented lake or waterfall will do the job. In contrast, the second type emphasizes a very specific foreground object in conjunction with a general night sky object. We will designate these types of concepts foreground-priority nightscapes, Figure 16.1(a.2). Examples of foreground priority images include a very specific mountain peak, for example Mt. Rainier, next to the Milky Way; or a very specific lighthouse, for example Split Rock Lighthouse along the north shore of Lake Superior with the full moon rising directly over its top. We’ll go through the planning process for sky-priority images first, followed by a description of how to plan for foreground-priority images.
Choosing Candidate Dates and Shooting Locations—Sky-Priority Nightscapes
Now that we’ve identified our nightscape concept and prepared a rough sketch, the next step is to choose a few candidate dates and possible shooting locations based on our knowledge of what will be visible in the sky throughout the year, Figure 16.1(b). The details of this process differ depending on whether we are considering a sky-priority or a foreground-priority image. Specifically, for sky-priority images, the date is chosen first, which then affects the choice of shooting location and foreground subject, Figure 16.1(b.1–b.3). For foreground-priority images, however, the reverse is true: the shooting location and foreground subjects are chosen first, which then determine the optimum dates, Figure 16.1(b.4–b.6).
We will start with sky-priority images, Figure 16.1(b.1–b.3). For some, the dates are already set: solar eclipses, meteor showers, and the nights of the full moon. For others, your knowledge of astronomy will guide you in selecting the best general viewing months. For example, May through September would be the months to view the Milky Way’s galactic core, whereas November through May would be the months to view the constellation Orion. At this stage of the planning process, we are only interested in the months when the night sky subject is visible; we will narrow the dates in the next steps.
We now want to consider the dates of the appropriate moon phases within each of the candidate months for your specific night sky subject—new, gibbous, crescent or full, Figure 5.8. Here is where your pre-visualized concept and rough sketch will help: do they indicate a well-lit foreground or one that is in silhouette? Each month will likely have only a few dates with the suitable moon phase.
Choosing Azimuth and Altitude of the Night Sky Subject
The next phase of planning involves identifying the general compass direction, or azimuth of your night sky subject on the selected dates, along with its height above the horizon, or its altitude, measured in degree, Figure 16.4 (overleaf). While you may recall correctly from Chapter 2 that the azimuth and altitude of night sky objects change during the night, we only need to assess their general range at this stage.
You may obtain the azimuth and altitude of your night sky subjects at various times on your candidate dates with the help of the star charts, planispheres, and planetarium described in Chapter 2, Figures 2.11 and 2.12. Monthly publications of star charts are available online, and also appear in magazines such as Astronomy or Sky & Telescope. Several useful apps and programs are also available, as described in the next section, such as Distant Suns, Star Walk, Stellarium, and Google Sky.
Choosing the Location
We can now explore a few locations where we might set up our equipment for the night, provided a suitable foreground subject is available. Start with a location with the darkest possible skies, free from cities and other sources of light pollution. Even if your general destination is dictated by other constraints, it is worthwhile driving a short distance if it can help alleviate light pollution levels.

16.4
Schematic illustrations of the azimuth (compass direction) and altitude (angular height above the horizon) of the subject, in this case a planetary conjunction, in our sky-priority image. The planets are positioned at an azimuth of approximately 95° E with an altitude of approximately 12°, shortly after sunrise on October 28, 2015.
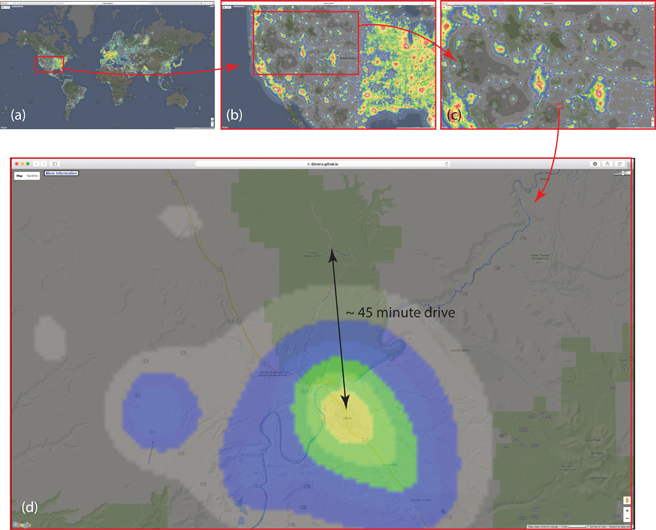
My go-to source for dark sky information is the excellent website: https://djlorenz.github.io/astronomy/lp2006/overlay/dark.html, which integrates with Google Earth. An example is shown in Figure 16.5 for the area around Moab, Utah. I have used this site on many trips and found it invaluable. In addition to giving precise levels of darkness surrounding known metropolitan areas, it also reveals light pollution from unexpected sources. For example, during the planning stages of a trip through the Australian outback, I was surprised to find significant light levels indicated in a nominally unpopulated area of significant size. Closer examination revealed the presence of several large surface mines that were no doubt the source of the light. Thus I was saved the unpleasant surprise of traveling to what would appear to be a dark sky area only to find the night sky light levels to be equivalent to those of a metropolitan suburb!
16.5
Example of light pollution maps with an emphasis on the area around Moab, Utah. Successive areas of zoom are shown in (b), (c), and (d). Note that simply by driving approximately 45 minutes to the north of the city, (d), the light pollution levels are reduced dramatically.
Source: https://djlorenz.github.io/astronomy/lp2006/overlay/dark.html
If you are considering a trip far from home, a helpful step at this stage is to consult the treasure trove of historical and forecast weather information for your candidate destinations from websites like the Weather Underground for sites around the world. You can use such sources to determine which of your candidate dates and locations are more or less prone to clear or cloudy skies by looking at historical levels of average rainfall, Figure 16.6. If your trip is commencing within the next week or two, a reliable short-term weather forecast is essential and can also be obtained from Weather Underground, Figure 17.7(b), as well as the U.S. National Weather Service and other sources. Finally, if your session is planned within the next 36 hours, the hour-by-hour predictions for the expected viewing conditions found on the Clear Dark Skies website can be extremely accurate, Figure 17.7(c).

16.6
An example of historical data from Weather Underground for the month of August in Centennial, Wyoming. This information can be used to anticipate general trends in future weather. Average daily rainfalls of over, say, 0.5 inches suggest inclement weather is reasonably likely.
Source: wunderground.com
Once the general area of the session location has been identified, the next stage is to pinpoint the exact destination based on the requirements of your pre-visualized image or theme. Here, Google Earth is my standby—its ability to explore distant lands from a virtual, aerial perspective is incredibly helpful, especially when coupled with its built-in ruler, which allows the determination of precise distances and orientations of objects. Being able to tilt and rotate the scene is icing on the cake! The 7.5-minute topographical quadrangles from the U.S. Geological Survey are my other primary tool. These may be printed or ordered ahead of time. They may also be purchased locally from outdoor or wilderness supply shops.
Let’s see how to do this by way of an example. Consider the situation shown in Figure 16.7, where we have decided we wish to photograph the Milky Way over some spectacular rock arches in Arches National Park. We have already determined that we need to locate our tripod generally at an azimuth of 100° E in order to be able to view the Milky Way band arcing upwards at an altitude of

16.7
This figure illustrates the process of determining precisely where to set up our tripod for our sky-priority image. We know that we need to locate our tripod generally at an azimuth of 100° E in order to be able to view the Milky Way band arcing upwards at an altitude of approximately 30° around 11 pm in late June, which is when we will be visiting the area. (a) We see that there is a trail that runs alongside our foreground subject, so we just need to find out where along the trail we should stand. We accomplish this by positioning a line oriented at our required azimuth, e.g. 100° E, with one end intersecting our foreground subject and the other end intersecting the trail at the exact location where we should assemble our tripod for (b) the resultant shot!
Source: (a) http://app.photoephemeris.com/

16.8
Virtual exploration of a prospective shooting location with, for example, Google Earth, can yield surprisingly accurate results, as seen here in this comparison of an (a) actual and (b) virtual view of the same region within the Santa Monica Mountains National Recreation Area in California. Such virtual explorations can save you immense effort and valuable time in the field at your actual location.
Source: (b) Google Earth
approximately 30° around 11 pm in late June, which is when we will be visiting the area. We need to find a location that simultaneously keeps the Milky Way at our desired azimuth (sky-priority) while positioning a suitable rock arch within the foreground.
So where precisely should we position our tripod? We see that there is a trail that runs alongside a potential foreground subject, so we need to find out where along the trail we should stand. We accomplish this by positioning a line oriented at our required azimuth, e.g. 100° E, with one end intersecting our foreground subject, Figure 16.7(a). The point where the other end intersects our trail is the precise location where we should assemble our tripod. The results, Figure 16.7(b), agree quite well with expectations!
We can now examine our location at closer range within Google Earth to explore various compositions. For example, we can tilt and rotate our view, zooming in and out, and the results are often in remarkable agreement with reality, Figure 16.8. This type of advance planning can be enormously valuable in preserving precious time and energy in the field.
This sky-priority planning example teaches us several valuable lessons that are worth emphasizing. First, suppose that we had done no planning at all, and that we simply went to the destination on a random date hoping to photograph the Milky Way. What are the chances that it would be visible during dates of when the skies had no moon? If we visited during the late fall and early winter months, we would be totally out of luck. Even if we were lucky enough to visit when the Milky Way is perfectly positioned during the prime days in July or August, without planning or foreknowledge, we would be forced to scramble around in near total darkness amidst rough terrain trying to find somewhere to set up, meanwhile with the Milky Way slowly moving across the sky as time passes. Clearly, and as described further in Chapter 19, advance planning not only greatly increases the efficiency of the process but often can save a nightscape photo outing from being disappointing.
Choosing Candidate Dates and Shooting Location—Foreground-Priority Nightscapes
Let’s see how the process of choosing candidate dates and shooting locations changes when we’re planning foreground-priority images, Figure 16.1(b.4–b.6). The only real difference is in the order in which we perform our planning steps; otherwise the steps remain the same. For foreground-priority images, we begin by choosing the foreground subject and shooting location first. These choices then dictate the optimum shooting dates, rather than the dates governing the choices of foreground subject and shooting location as was the case of sky-priority images. Again, let’s see how this works by way of example.
Suppose we wish to create an image with the Milky Way in immediate proximity to Mt. Banner in the Ansel Adams Wilderness in California’s High Sierra, Figure 16.9(a). We study the map of the location and determine a suitable location to set up our camera and tripod; in this case, across Thousand Island Lake, Figure 16.9(b) (overleaf). Having established the shooting location, Figure 16.1(b.4), the next step is to find the azimuth to Mt. Banner, Figure 16.1(b.5), which turns out to be 206° E, Figure 16.9(b).

16.9
Determining the azimuth for our desired foreground-priority object, in this case, Mt. Banner (a) in the Ansel Adams Wilderness in California’s High Sierra. We see that the azimuth is 206° E if we position ourselves across Thousand Island Lake (b).
Source: www.usgs.gov

16.10
The final image resulting from our foreground-priority subject planning, showing the Milky Way positioned immediately adjacent to Mt. Banner.
The only remaining step in our plan is to find the approximate dates and times when the Milky Way will be positioned at the required azimuth of 206° E, Figure 16.1(b.6). This is easily accomplished with any of the previously described tools: a planisphere, home planetarium, planning app, or software. The outcome of our plan is shown in Figure 16.10, and, as desired, features the Milky Way positioned immediately next to Mt. Banner.
Establishing Shooting Schedules
So far we have gathered approximate dates, times, and azimuths for our nightscape session. These three parameters go hand-in-hand, as you may recall from our study of the movements of the night sky objects covered in Chapter 2. For example, if you wanted to photograph the constellation Orion at an azimuth of 138° and an altitude of 32°, you may find that it appears at that position at 10 pm on one date, but at the same position at 8 pm a month later. Or you might wish to make an image with the primary band of the Milky Way Galaxy intersecting the horizon at an azimuth of 206° as shown in Figure 16.10, in which case you could select from the following dates and times: April at 4 am; May at 2 am; June at midnight, July at 10 pm, and August at 8 pm. Partly dependent upon the night sky object visibility, partly depending on the specific foreground objects from your image concept, partly dependent on site accessibility; your selection of the best date and time for your photo shoot is usually an iterative process whose final outcome ultimately depends on the unique characteristics of the individual situation.
Another important parameter to check before embarking on your night photography session concerns the exact times of the various twilights, as described in Chapter 3. If your goal is to make your images with the darkest sky possible, you will want to schedule your session after the end of astronomical twilight in the evening and before its beginning the following morning. Alternatively, you may wish to synchronize the beginning of your session with civil, nautical, or astronomical twilight, depending on the color of the sky that you seek for your particular subject; several useful examples are given in Chapter 15.
A summary of the best, approximate times to create common nightscape images is shown in Figure 16.11. The importance of the moment of sunrise/sunset, and the twilight transition times, is clear. Be sure to note that depending on the time of year, and your latitude, the relative lengths of each of the stages of twilight and darkness will vary significantly. For example, during June in Los Angeles, California, full darkness lasts almost exactly 4 hours, whereas on the same dates in Ely, Minnesota, only fourteen degrees to the north, it only lasts for an hour and a half!
Choosing Lens and Camera Settings
The last stage of preparation before we summarize our overall plan is to select the appropriate lens and exposure settings, Figure 16.1(d, e). Lens selection can be done with reference to the lens field of view (FOV) tables in Chapter 11. Namely, you will want to select the appropriate lens needed to create your pre-visualized image based upon the azimuth and altitude requirements of your night sky subject(s) as well as the necessary FOV needed to include your foreground. For example, if you wish to create a star trails image with trails encircling the North Star with land-based foreground objects also visible, then the angular FOV of the lens must be wide enough to exceed the angular position of the North Star above the horizon, which you may recall is approximately equal to your latitude, as illustrated in Figure 16.12(a) (overleaf). Alternatively, if you wish to create a Milky Way image similar to the one depicted in Figure 11.19, you will want to select a lens with a narrower FOV; e.g. one with a focal length of 35 mm or greater. Finally, if you wish to create an image containing a specific range of constellations, for example, Sagittarius and Scorpius, then you’ll need to match the FOV of your lens to the required FOV of the constellations, which can be obtained from the simulation apps described in Chapter 17, as illustrated in Figure 16.12(b). Choosing and mounting the correct lens ahead of time avoids the significant hassle and time wastage associated with the necessity of changing lenses in the field owing to an inappropriate FOV; something easily avoidable with proper preparation. Note that we will confirm our choice of lens selection during our day scouting exercise, described in the next section.
Next, you can identify a good starting point for each of the camera’s exposure settings, Figure 16.1(e): ISO, aperture and shutter speed with reference to the information in Chapters 10 and 12. The specific settings you will settle upon once you’re in the field will undoubtedly change; the estimated initial values nonetheless reduce the number of decisions you need to make when you’re setting up in the dark with many other distractions likely competing for your attention.

16.11
Guide to the best times to create different nightscapes. Be sure to note that the actual durations of each phase of twilight and night varies significantly according to latitude and season.

16.12
Example of lens selection based on field of view (FOV) for two common images: (a) one with star trails encircling a celestial pole with land-based foreground objects also visible, such that the angular FOV of the lens must be wide enough to exceed the angular position of the North Star above the horizon, and (b) an image containing a specific range of constellations, for example, Sagittarius and Scorpius, in which case you’ll need to match the FOV of your lens to the required FOV of the constellations, which you can obtain from the planetarium simulation software described in Chapter 17.
Equipped with the likely lens and aperture combination suitable for your nightscape image, one final parameter to check is the near-focus distance of the chosen lens and aperture combination. This will be the case either with a focus distance of infinity or through hyperfocal focusing. You will recall from Chapter 11 that the near-focus distance dictates the closest distance an object can be from the camera and still remain in focus. If, however, part of the foreground is still too close to the lens despite your best efforts, all is not lost. All that is needed, as described in detail in Chapter 22, is to take a second image with just the foreground objects in focus, and to blend both images to create a final image with perfect focus throughout.
Developing the Landscape Astrophotography Workflow and Plan
The culminating stage of our planning process is to summarize our ideas in the form of a worksheet and overall schedule for the astrophotography session, Figure 16.1(f). This schedule will include a time estimate for all the images we wish to acquire. This is extremely important since many of the images and image sequences can consume a surprising amount of time. For example, a multi-image Milky Way panorama comprised of twelve 2-minute apiece exposures will take

16.13
Typical workflow timeline for an evening landscape astrophotography session. Starting with golden hour before sunset, there is the sunset event itself, immediately followed by the appearance of the earth’s shadow and the onset of alpenglow. If the full moon will rise, now is the time when that occurs. Next is the blue hour, including civil twilight, nautical, and astronomical twilights. Star trail images are often initiated during astronomical twilight, transitioning into full darkness when Milky Way images are typically made. Astronomical twilight and complete darkness are also when the Aurora Borealis may become visible.
approximately one-half hour. And that’s just for one (really good!) image. A single star trail image can take 4 or 5 hours! Furthermore, you may wish to change lenses midway through your shooting session; something that is best kept to an absolute minimum when you’re in the field. Finally, different images may necessitate specialized equipment that you will want to ensure you have before heading into the field for the night, such as intervalometers, panoramic heads, lens filters, tracking heads, and so on. Clearly, scheduling and prioritizing the sequence of what images to take with which lenses, is critical.
Let’s go through the timeline of a typical evening astrophotography session to appreciate the range of nightscape image possibilities, as shown in Figure 16.13. Starting with golden hour approximately an hour before sunset, there is the sunset event itself, immediately followed by the appearance of the earth’s shadow, then by the onset of alpenglow upon clouds and mountain peaks. If the full moon will rise, now is the time when that occurs. The next hour or so is the so-called blue hour within civil twilight, followed by nautical and astronomical twilights. Star trail images are often initiated during astronomical twilight, transitioning into the period of full darkness when Milky Way images are typically created. These latter stages of astronomical twilight into the time of full darkness are also when the Aurora Borealis may become visible.
The landscape astrophotography worksheet template that I use to plan my nightly shooting schedule is shown in Table 16.1. As is always the case, the defining point in time is the moment of sunset and the immediate onset of civil twilight, followed by nautical twilight, astronomical twilight, and then full darkness. You may notice that I have included suggestions for the camera, lens, any specialized equipment, such as intervalometers, tracking mounts and panoramic heads. I have found this worksheet to be especially helpful on-location after having awoken in the middle of the night in preparation for the astrophotography session and barely being able to think! I have also found it helpful to note the file number(s) for the specific subject during the photo session; it’s helpful to have this confirmation for later review.
My process for completing the worksheet is to take the stack of hand-drawn sketches created earlier, and in which I’ve organized the shots into categories and priority within each category, and use these to write down the sequence of images I wish to take. My goal is to condense my plan on a single sheet of paper that I can use as a reference during the evening. This allows me to direct my attention to safety and the process of creating the images, without losing precious time in the field trying to decide what images I should take, in which order and with what lens.
If I am out in the field for multiple nights, I often create a second worksheet, or log, that summarizes my planned/completed images during the trip, Table 16.2. This way I can keep track of the flexibility I have to take advantage of local opportunities in weather and composition to adjust the shooting sequence developed earlier. It also keeps me on track to be sure I complete all the shots I wish to attempt during a given trip.
LOCATION:
SUNSET/SUNRISE TIME:
SUNSET/SUNRISE AZIMUTH:
MOON PHASE:
MOONSET/MOONRISE TIME:
MOONSET/MOONRISE AZIMUTH:
CIVIL TWILIGHT BEGINS/ENDS:
NAUTICAL TWILIGHT BEGINS/ENDS:
ASTRONOMICAL TWILIGHT BEGINS/ENDS:
DEPA RTURE TIME FROM HOME/HOTEL/CAMP/PA RKING LOT/TRAILHEAD:
Table 16.1 Landscape Astrophotography Session Plan

Table 16.2 Example Concept/Image Log (Depends on Conditions)
| IMAGE (EXAMPLES) | THURSDAY | FRIDAY | SATURDAY | SUNDAY |
| MILKY WAY/LAKE | √ | √ | ||
| MILKY WAY/FLOWERS | √ | |||
| STAR TRAILS/TENT | √ | √ | ||
| SCORPIUS/MOUNTAIN | √ | |||
| COMPLETE SUNSET TIME-LAPSE TRANSITION | √ | √ |
Bibliography
https://djlorenz.github.io/astronomy/lp2006/
Kingham, David, Nightscapes, 2014, Craft & Vision, Vancouver, Canada
Patterson, Freeman, Photography and the Art of Seeing, 2004, Third Edition, Key Porter Books Limited, Toronto, Ontario, Canada
Rowell, Galen, Galen Rowell’s Vision, 1995, Sierra Club Books, San Francisco, California
Rowell, Galen, Inner Game of Outdoor Photography, 2001, W.W. Norton & Company, New York, London
www.vitotechnology.com/star-walk.html