
C H A P T E R 8
![]()
Managing Security Within the Database Engine
Managing security within the Database Engine is one of the most important tasks for a database administrator. Controlling access to SQL Server and the roles and rights that each user has within SQL Server, as well as the security of the data, are the main security concerns. Throughout this chapter, our goal is to discuss security in the manner in which we believe security measures are encountered: Windows security, SQL Server security, database security, and then protecting the physical data itself.
![]() Note Security starts with the physical security of the equipment, network security, and detailed information about Windows security. But detailed information outside of Windows authentication and discussing the available options in the SQL Server Configuration Manager is beyond of the scope of this book.
Note Security starts with the physical security of the equipment, network security, and detailed information about Windows security. But detailed information outside of Windows authentication and discussing the available options in the SQL Server Configuration Manager is beyond of the scope of this book.
Security Language
In SQL Server 2005, Microsoft introduced several new security features and changed the verbiage used when discussing security. Granted, terms like users, roles, and permissions still exist, but new words like principals, schemas, and securables emerged into discussions. SQL Server 2008 utilizes the same verbiage, so we want to make sure you are clear on the new terms and what they mean. Figure 8-1 provides a good visual representation of the security features and how they relate to each other. You may find it helpful to refer back to Figure 8-1 throughout the chapter as we discuss these features.
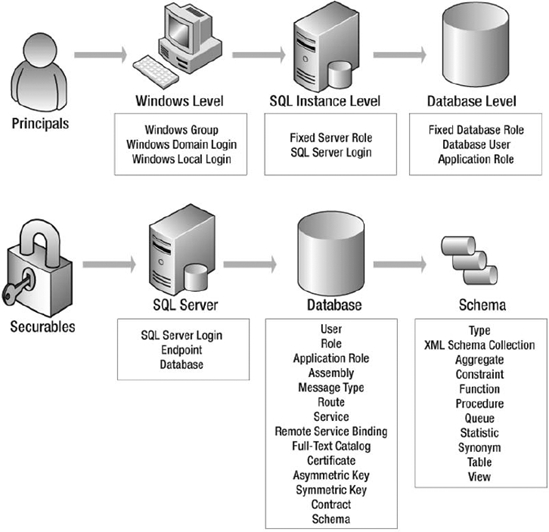
Figure 8-1. SQL Server 2008 security features
Principals
Principals are entities or objects that can request and access objects within SQL Server. There are three basic types: Window's principals, SQL Server principals, and database principals. The following list briefly defines the three types:
- Windows-level principals are generally domain and local server user accounts that authenticate to SQL Server using Windows authentication.
- SQL Server-level principals are SQL Server logins that authenticate to SQL Server using SQL Server authentication.
- Database-level principals are database users, database roles, or application roles.
Keep in mind, you have to map Windows and SQL Server principals to database principals in order to access the objects within a database.
Securables
Securables are the objects within SQL Server that can be controlled and managed through SQL Server security. SQL Server 2008 distinguishes between three scopes, which are nested hierarchies of securables:
- Server scope securables consist of endpoints, logins, and databases. Server securables are objects that exist at the server level, not the database level.
- Database scope securables entail users, roles, assemblies, and other objects that do not belong to specific schemas.
- Schema scope securables are types, XML schemas, and objects. Objects are the tables, views, stored procedures, and other creatable objects within a schema.
Schemas
Database schemas exist in SQL Server 2000 as single users, but in both SQL Server 2005 and SQL Server 2008, you can assign multiple users to a schema. The schema container can consist of many different objects, such as tables, views, and stored procedures. Schemas are database specific, meaning their names must be unique within a database. Schemas are not new; they are simply the owner of objects like sys. or dbo. However, Microsoft has expanded schemas in SQL Server 2005 and SQL Server 2008 to enhance security. We will dive into schema security when discussing database security later on in this chapter.
Creating SQL Server Principals
This section will discuss the server-level principals provided for you in SQL Server 2008. Once again, those principals are SQL Server logins and SQL Server roles. We also will touch on user creation for certificates, asymmetric keys, credentials, and Windows principals.
Creating Logins for SQL Server
SQL Server 2008 supports both Windows and SQL Server authentication. SQL Server authentication does the username and password validation for users attempting to gain access to SQL Server, while Windows handles the user validation for Windows-authenticated users. In order to use SQL Server authentication, you must configure your instance of SQL Server to utilize Mixed Mode authentication. Mixed Mode authentication means that the instance will support both Windows authentication and SQL Server authentication. While you can configure SQL Server to enable only Windows authentication, there is no way to enable SQL Server to use only SQL Server authentication without allowing Windows authentication as well.
Creating SQL Server logins using T-SQL follows the same basic syntax as credentials, certificates, asymmetric keys, Windows principals, and SQL Server–authenticated logins. The following syntax in Listing 8-1 shows you how to create SQL Server logins.
Listing 8-1. Syntax for Creating SQL Server Logins
CREATE LOGIN loginName {WITH PASSWORD OPTIONS, Additional Options

| FROM SOURCE}
When creating a SQL Server login, you have to specify the login name, and depending on the type of SQL Server login you are creating, specify password options or another source with which to associate the username. The available password options allow you to supply a password in standard text or a hash value. If you supply a password in standard text, then SQL Server will convert the password to hash before storing it within the database. So don't worry about your password being compromised if you create an account with a password in standard text.
The password options available to you when creating SQL Server logins are as follows:
MUST_CHANGE: Specifies that users must change their password when they login.CHECK_EXPIRATION: Determines if the password expiration policy is enforced. The default value is OFF.CHECK_POLICY: Specifies if the Windows policies of the computer/server running SQL Server are enforced on the login. The default value is ON.CREDENTIAL: Identifies the name of the credential to associate to the login.DEFAULT_DATABASE: Specifies the default database for the new login. If you do not specify the default database parameter, SQL Server will assign the master database as the default database for the login.Default_Language: Specifies the default language for the new login. If you do not supply the default language parameter, SQL Server will use the default language for the instance of SQL Server.SID: Allows you to specify theuniqueidentifierthat will be assigned to the newly created login. SQL Server will assign a randomuniqueidentifierif you do not supply this parameter in theCreate Loginstatement. TheSIDoption is only valid for SQL Server logins.
The available sources in the FROM SOURCE clause are certificates, asymmetric keys and Windows. We will discuss associating SQL Server logins to certificates and asymmetric keys in the upcoming section “Associating Logins with Certificates and Asymmetric Keys.” We will also discuss creating SQL Server logins for Windows principals in the next section.
Creating SQL Server Logins for Windows Principals
SQL Server 2008 permits Windows principals, local Windows users, or domain groups and users to gain access to SQL Server without resupplying a password. In order for Windows principals to access SQL Server, SQL Server uses Windows to confirm the identity of the user. Windows authentication is more secure and is the default authentication method for SQL Server. We recommend using Windows authentication whenever possible.
Creating Windows users and groups is outside of the scope of this book. However, after the creation of a Windows principal, granting access to that user within SQL Server is not complex. Using the syntax from Listing 8-1, in order to create a SQL Server user for a Windows user, you specify the SQL Server login name that you want to create, specify that the source is Windows, and then define the Windows options. The available Windows options allow you to define the default database and default languages if you want. The following code example creates a SQL Server login for a Windows principal.
USE MASTER

GO


CREATE LOGIN [mediacentersql] FROM WINDOWS WITH DEFAULT_DATABASE =_

AdventureWorks2008;

GO
![]() Note Unlike previous versions of SQL Server, SQL Server 2008 starts restricting access to SQL Server for Windows users during the installation process. By default, you have to grant access to Windows users or groups to SQL Server 2008 in order for the user to have any access to SQL Server. Historically, users within the Windows administrator group would have administrator access to SQL Server, but that is no longer the case. Remember in Chapter 4, during the installation process, you were given the opportunity to grant Windows users access to SQL Server. If access is not granted to Windows users during the installation process, then you will have go through a process similar to the preceding example to grant those users or groups access to SQL Server.
Note Unlike previous versions of SQL Server, SQL Server 2008 starts restricting access to SQL Server for Windows users during the installation process. By default, you have to grant access to Windows users or groups to SQL Server 2008 in order for the user to have any access to SQL Server. Historically, users within the Windows administrator group would have administrator access to SQL Server, but that is no longer the case. Remember in Chapter 4, during the installation process, you were given the opportunity to grant Windows users access to SQL Server. If access is not granted to Windows users during the installation process, then you will have go through a process similar to the preceding example to grant those users or groups access to SQL Server.
Creating SQL Server–Authenticated Logins
When creating SQL Server–authenticated logins, the usernames and passwords are stored within the database. Unlike Windows authentication, users have to supply their usernames and passwords to log in to SQL Server.
To create a SQL Server–authenticated login using the syntax in Listing 8-1, specify the login name and the password. Remember, you can provide a hash password or a standard text password. If you are creating a password for a person, you may want to utilize the MUST_CHANGE option. That way, you can provide the user with a simple password like Abc123#@ and require them to change it when they login. Finally, determine the default database, the default language, and whether you want the password policy and password expiration enabled. In order to enable password expiration, then you must enable the password policy. Review the following SQL Server script to create a standard SQL Server login.
USE MASTER

GO


CREATE LOGIN apressSecurity WITH PASSWORD = 'P@ssw0rd!' ,CHECK_POLICY_

= ON, CHECK_EXPIRATION = ON, DEFAULT_DATABASE = Adventureworks2008;
Associating Logins with Certificates and Asymmetric Keys
In SQL Server 2008, you can associate SQL Server logins to certificates and asymmetric keys. Mapping a SQL Server user to a certificate or asymmetric key controls the application rights and access levels in SQL Server. We will review certificates and asymmetric keys in detail later on in this chapter. Here we briefly discuss and provide an example of associating users to Certificates and Asymmetric Keys.
![]() Note SQL Server logins enclosed in double pound signs (
Note SQL Server logins enclosed in double pound signs (##) represent internal logins created from certificates. The installation process will create users like ##MS_PolicyEventProcessingLogin##, so do not be alarmed when you see them on your server.
Referring back to Listing 8-1, you can see that creating SQL Server logins for certificates and asymmetric keys are fairly simple, assuming you have a certificate or key already in place. You specify the login name that you would like to create, then reference the certificate or asymmetric key that you are associating the user to, and you are all set. Make sure the key or certificate that you are associating the user to resides in the master database. Review the following example of a certificate creation followed by a user that is created using the certificate.
Use master;

GO


CREATE CERTIFICATE apressCert

ENCRYPTION BY PASSWORD = '5qlS3rvErR0cks'

WITH SUBJECT = 'book',

START_DATE = '01/01/2009',

EXPIRY_DATE = '12/31/2010'

GO


CREATE LOGIN apressCertUsr

FROM CERTIFICATE apressCert
Linking Credentials to Logins
SQL Server 2008 allows you to create SQL Server logins and associate them to credentials. Credentials contain authentication information for connecting to resources outside of SQL Server. Credentials generally contain Windows username and password information used internally by SQL Server to access an outside resource. You can associate credentials to Windows and SQL Server–authenticated logins; however, the information stored within a credential allows SQL Server–authenticated users to connect to resources outside of SQL Server. Picture this: A user connects to SQL Server using their SQL Server login account, and then they need to perform an action on the server using the credential that they are associated with to access that resource. SQL Server will use the username and password from the credential to fulfill the request. You can map multiple SQL Server logins to the same credential.
In this example, you are going to link a credential to a SQL Server login. Following the syntax in Listing 8-1, you can see that linking a login to a credential is straightforward. The first thing you do is supply the username that you want associated to the credential and the password, and then specify the credential name that you are assigning the user to. (See the following code sample.) The example also shows you how to create a credential.
CREATE CREDENTIAL apressCred

WITH IDENTITY = 'sylvester',

SECRET = 'password'

go


CREATE LOGIN apressCredUsr

WITH PASSWORD = 'P@ssw0rd!',

CREDENTIAL = apressCred

GO
Generally, we recommend that you use Windows authentication because it provides the benefits of user administration and increased security. In most organizations, domain accounts or local server accounts have password policies in place that force users to have strong passwords as well as modify their passwords in a predetermined amount of time. Luckily, if you are unable to use Windows authentication, SQL Server 2008 has the ability to set password expiration and enforce strong passwords for SQL accounts.
![]() Note According to SQL Server Books Online, strong passwords have a minimum of eight characters, have numbers, characters, and symbols, are not found in the dictionary, are not the names of commands, are not a username, are not the name of a person, are significantly different than the last password, are not the computer name, are changed regularly, contain or start with a space, and start with a $ or @ sign. SQL Server 2008 can enforce the same password policy as Windows 2003, which is not quite the same as what Books Online recommends. If you choose to enforce the same password policy as Windows 2003, then each password must not contain all or part of the account name, the password must be eight characters long, must include a capital letter, a lower case letter, a number, and a non-alphanumeric character.
Note According to SQL Server Books Online, strong passwords have a minimum of eight characters, have numbers, characters, and symbols, are not found in the dictionary, are not the names of commands, are not a username, are not the name of a person, are significantly different than the last password, are not the computer name, are changed regularly, contain or start with a space, and start with a $ or @ sign. SQL Server 2008 can enforce the same password policy as Windows 2003, which is not quite the same as what Books Online recommends. If you choose to enforce the same password policy as Windows 2003, then each password must not contain all or part of the account name, the password must be eight characters long, must include a capital letter, a lower case letter, a number, and a non-alphanumeric character.
Enabling the password enforcement policy adds additional security to SQL Server accounts. Still, we recommend using Windows authentication when possible. Removing additional user account administration from your long list of daily tasks enables you to spend more time doing fun DBA stuff, like tuning queries and solving performance problems. No one enjoys the repetitive task of constantly resetting user passwords.
SQL Server–Level Roles
SQL Server 2008 has predefined roles or groups that enable you to manage permissions for SQL Server logins throughout the server. Microsoft defines the server roles, and you cannot create additional roles beyond what Microsoft has defined. Logins added to sever-level roles have the ability to add or delete other users from the role. The available server-level roles are as follows:
SysAdmin: Allows users to perform any activity on the server.ServerAdmin: Permits users to manage configuration options on the server and shut down SQL Server.SecurityAdmin: Gives users the ability to grant, revoke, and deny server- and database-level permissions. They can also manage users and passwords, as well as reset passwords of other users.ProcessAdmin: Allows users to end processes running on an instance.SetupAdmin: Creates linked servers.BulkAdmin: Performs bulk-insert statements.DiskAdmin: Manages the disk files.DBCreator: Creates, alters, or drops any databases.Public: The default role that server logins belong to.
Adding Logins to Server-Level Roles
In T-SQL, adding logins to server-level roles occurs via a stored procedure sp_addsrvrolemember. The stored procedure expects two parameters: a login name for the user that you want added to the role and the name of the role. Try the following code sample to add a login to a server-level role.
EXEC master..sp_addsrvrolemember @loginame = N'apressSecurity',_

 @rolename = N'serveradmin'

GO

EXEC master..sp_addsrvrolemember @loginame = N'apressSecurity', _

@rolename = N'securityadmin'

GO

EXEC master..sp_addsrvrolemember @loginame = N'apressSecurity',_

 @rolename = N'processadmin'

GO

EXEC master..sp_addsrvrolemember @loginame = N'apressSecurity',_

 @rolename = N'dbCreator'

GO
Removing Logins from Server-Level Roles
In T-SQL, removing logins from server-level roles also occur via a stored procedure sp_dropsrvrolemember. The stored procedure also takes two parameters; a login name that you want removed from the server-level role and the role name that you want to remove the login name from.
Database Security
The database principals include database users, database roles, and application roles. These principals control a user's rights within the database. Keep in mind that you must map Windows and SQL Server principals to database principals for the Windows and SQL Server principals to have access to the objects within the database.
Creating Database Users
Database users are one type of principal that you can grant permissions for accessing objects within the database. The permissions granted to a user will determine their capabilities within the database (we will talk about permissions later on in this chapter). Server principals have no rights in databases until you assign them to a database principal, and for the purposes of this discussion, that database principal is a database user.
Assigning server principals to database principals is not a complex task. You've probably done it naturally without thinking about the proper verbiage used to describe the process. Review the following syntax to see how you create a database user.
CREATE USER username

[ { {FOR | FROM}

   {LOGIN loginName

    | CERTIFICATE certificateName

    | ASYMMETRIC KEY asymmetricKeyName

  }

  | WITHOUT LOGIN

]

WITH DEFAULT_SCHEMA = schemaName
Using the preceding syntax, you create a database user by first supplying a name. Next, specify the server login name that you want to associate to the user. If you do not specify the server login name, then SQL Server will try to map the user to a server login with the same name. Instead of specifying the server login, you may instead associate the user to a certificate or asymmetric key. Finally, specify the schema that you want to associate to the user. If you do not specify the default schema, SQL Server will map the user to the dbo schema.
![]() Note SQL Server 2008 allows you to create a database user without specifying a server login. Most of the reasons that we could think of to use this option would require some double work. At some point, you are going to have to go back and associate those users to server logins. We are not saying that the option is good or bad; we're merely pointing out that the option exists if you want to use it.
Note SQL Server 2008 allows you to create a database user without specifying a server login. Most of the reasons that we could think of to use this option would require some double work. At some point, you are going to have to go back and associate those users to server logins. We are not saying that the option is good or bad; we're merely pointing out that the option exists if you want to use it.
See the following code for an example of creating a database user for an existing server principal.
USE AdventureWorks2008

GO


CREATE USER apressSecurity

FOR LOGIN apressSecurity

WITH DEFAULT_SCHEMA = dbo

GO
Now, test the following code sample to easily combine the creation of a SQL Server login with the mapping of the database user.
USE master

GO


CREATE LOGIN apressReader WITH PASSWORD = 'P@ssw0rd!' ,CHECK_POLICY = ON,_

CHECK_EXPIRATION = ON,

DEFAULT_DATABASE = Adventureworks2008;

GO


USE AdventureWorks2008

GO


CREATE USER apressReader

FOR LOGIN apressReader

WITH DEFAULT_SCHEMA = dbo

GO
Database Roles
SQL Server 2008 supports two types of database roles: fixed and flexible roles. Fixed roles are the predefined database roles created by Microsoft for SQL Server. These roles cannot be modified. You can add database users to them, but you cannot (nor should you try to) change them.
Flexible roles are the roles you create to group users together, in terms of functionality that they perform, within your database. Generally, grouping database users together within a database role enables you to more easily control their permissions. From an administrative point of view, you should find it easier to define the permissions for the role and then add users to the role accordingly than to repeatedly define the same permissions for each user. That way, you can minimize the amount of time it takes to grant users access to the objects within the database.
Understanding Fixed Roles
Following is a list of the fixed database roles that are currently available:
DB_Owner: Performs all configuration and maintenance tasks within the database.DB_SecurityAdmin: Modifies role membership and manages permissions.DB_AccessAdmin: Controls the addition and removal of access to the database for Windows users, Windows groups, and SQL Server logins.DB_BackupOperator: Possesses the ability to back up the database.DB_DDLAdmin: Contains the ability to execute data definition commands.DB_DataWriter: Inserts, updates, and deletes data from the tables in the database.DB_DataReader: Selects or reads data from the tables in the database.DB_DenyDataWriter: Restricts insert, update, and delete data from the tables in the database.Public: The default role database users are granted access to.
It is up to you to decide what fixed roles to grant users access to and what roles you may want to create. Microsoft's goal with fixed roles is to make it easy for you to delegate commonly performed administrative tasks to users.
Creating a Database Role
To create a database role, simply supply the name of the database role that you want to create. Then specify the permissions that you want the role to have. You can specify who owns the role by using the Authorization command, but by default, the user who creates the role owns it. The only remaining task comes from assigning database users to the role by using sp_addrolemember.
Often times, junior (JR) DBAs have restricted read-only access in your production environment because they are more prone to make costly mistakes than a seasoned DBA. However, you may want JR DBAs to have the ability to query database scoped Dynamic Management Views (DMVs) in order to perform analysis on the production databases, which requires more privileges than the db_datareader role permits. In this case, you can create a new database role for the JR DBAs instead of granting them access to the database using a fixed role.
Execute the code in Listing 8-2 to create a JR_DBA role and to grant the appropriate permissions to the role. Once you have created the role, you can assign users to it just as if it were a fixed role. Those users will then be able to query data from tables and retrieve data from database state DMVs.
Listing 8-2. Creating a Role and Granting Execute Permissions
USE AdventureWorks2008

GO


CREATE ROLE JR_DBA

GO


GRANT VIEW DATABASE STATE,SELECT to JR_DBA

GO
Application Roles
An application role is a database principal that allows an application to connect to a database and perform actions according to the permissions of the role. Unlike other database roles, application roles do not allow you to add users to the role, and they are created with passwords. By default, application roles are disabled until an application connects to the database and supplies the application role's password.
Here's an example of creating an application role:
Use AdventureWorks2008

GO


CREATE APPLICATION ROLE authorApps

WITH PASSWORD = '@uth0rA@pp5@!'

GO


GRANT SELECT, UPDATE, INSERT , DELETE to AuthorApps

GO
Having created this role, you can enable it from an application by having that application execute the following stored procedure call:
exec sp_setapprole authorApps, '@uth0rA@pp5@!'
Your application supplies the password. The stored procedure checks that password against the one you specified when you created the role. If the password is correct, the stored procedure will enable the role, giving the application all the permissions that you have granted to the role. The permissions remain in effect for the duration of the session.
Securables
Securables are objects governing the control and access of SQL Server's security system. You can grant permissions to principals to access or manage securables.
Managing Server Securables
Server securables are the objects that you govern and manage at a server level. Before granting access to a securable, SQL Server ensures that a principal has the appropriate permission. Server securables also have to be distinctive on the server such that no two server securables have the same name. And only Windows and SQL Server principals can have permission to access server securables. Examples of server securables are as follows:
- Endpoints
- Databases
- SQL Server logins
The following sections will review the steps it takes to grant and deny access to server securables.
Granting Access to Server Securables
As we discussed in the previous section, Windows and SQL Server principals are the only principals that can be granted access to server securables. The following example shows you how to grant access to a database server securable.
USE master;

GO


GRANT SHUTDOWN,CREATE ANY DATABASE, ALTER ANY DATABASE,

VIEW ANY DATABASE TO apressSecurity;
The syntax for granting access to server securables will vary depending on the securable that you are managing. However, the basic idea is the same. You specify the GRANT clause, the permissions you want to grant, and a server principal in which to grant the permissions.
Denying Access to Server Securables
Denying access to server securables is similar to granting access to server securables. Using the previous example, we will prevent that user from anything besides viewing databases. The following example prevents the user from shutting down, creating, and altering databases:
Use master;

GO


DENY SHUTDOWN, CREATE ANY DATABASE, ALTER ANY DATABASE TO APRESSSECURITY;

GO
You can see from the preceding example the similarities between granting and denying access to securables. To deny access to server securables, you specify the DENY clause, the permissions you want to deny, and the server principal that you want to deny the permissions on.
Managing Database Securables
Database securables are database-specific objects that are accessed and managed by database principals. Unlike server securables that must be unique on a server instance, database securables can exist multiple times on an instance. However, the database securable must be unique within a database. Some examples of database securables are as follows:
- Application roles
- Database roles
- Assemblies
- Asymmetric keys
- Symmetric keys
- Certificates
- Contracts
- Full-text catalogs
- Message types
- Remote service bindings
- Services
- Schemas
- Database users
The following sections will discuss granting and denying permissions to database securables.
Granting Access to Database Securables
Granting access to database securables closely resembles granting access to server securables. The following example will grant access to database-level securables:
USE Apress;

GO


GRANT BACKUP DATABASE, BACKUP LOG TO APRESSSECURITY;

GO
After reviewing this example, hopefully you can see the similarities in granting permissions to securables in SQL Server 2008. Once you understand the options that are available to you, then you should be able to get as granular as necessary to control the access to database securables for your database principals.
Denying Access to Database Securables
Denying access to database securables is equally as easy as granting access. The following example will deny database principals access to database securables:
USE Apress;

GO


DENY CREATE ASSEMBLY, ALTER ANY ASSEMBLY TO APRESSSECURITY

GO
Understanding Schema Securables
With the new role of schemas in SQL Server 2008, schema securables are important to understand. Schema securables are collections of objects owned by a user. Unlike SQL Server 2000, multiple users can be a part of a schema. Multiple schemas can exist within the database, and each schema name must be unique. Within a schema, objects must have distinct names, but a database may have objects with the same name as long as the schemas are different. The following is a list of schema securables:
Now that we have shown you the objects that can be stored within schemas, let's talk about some of the usages of schemas.
Defaulting User Schemas
When creating a user, the option exists to set the default schema for the user. The default schema determines the default objects that are accessible by the user when executing queries. The purpose of assigning a user to a schema usually means that the bulk of the objects that user requires access to will be in that schema. That will save the users from having to specify the owner in all of the queries they execute. Granting a user access to a schema by default also ensures all objects created by that user exist in their default schema.
From a security perspective, you can grant access to a user in a schema and prevent the user from accessing any of the other objects in any other schemas in the database. Granted, there are times when users need to have permissions to other schemas and granting those permissions are easily accomplished. However, the new functionality of schemas enables you to keep users within their box or schema without having to force the permissions at the database level. The next couple of examples will provide you with more detail on how schema security works.
The example in Listing 8-3 shows you how to create a SQL Server login, how to create a database user with a default schema, and finally how to add the database user to a role.
Listing 8-3. Script Used to Create a Login, to Create a User, and to Add the User to the db_datareader Role
USE master

GO


CREATE LOGIN apressWriter WITH PASSWORD = 'P@ssw0rd!' ,

CHECK_POLICY = ON,

CHECK_EXPIRATION = ON,

DEFAULT_DATABASE = Adventureworks2008

GO
USE AdventureWorks2008

GO


CREATE USER apressWriter

FOR LOGIN apressWriter

WITH DEFAULT_SCHEMA = SALES

GO


EXEC sp_addrolemember db_datareader, apressWriter

GO
If you log in using the recently created user, you will notice that you can query the tables within the SALES schema without specifying "Sales." Because the user has access to the db_datareader for the database, you can access the other schemas as well. In order to query those tables, you have to specify the schema and then the table or HumanResources.Employee. Now, create our own schema.
Creating Schemas
Creating a schema is simple and only requires a couple of steps. Review the following schema syntax:
CREATE SCHEMA schema_clause_name [ schema_element [...n]
First, you specify the name that you want to represent the schema in the database, and then you identify the owner of the schema. By default, the owner will be the creator if there is no change on the authorization of the schema. One of the interesting things about creating schemas is that you can create tables and views, as well as grant, deny, and revoke permissions all within the CREATE statement. Even if the table or view does not exist, you can go ahead and grant the schema permissions to it. The script in Listing 8-4 is going to create a schema, make the apressWriter user the owner of the schema, and remove the user from the db_datareader role.
Listing 8-4. SQL Script That Creates a Schema and a Table, and Then Removes the Previously Created User from the db_datareader Role
USE AdventureWorks2008

GO


CREATE SCHEMA APWriter AUTHORIZATION apressWriter

CREATE TABLE APWriter.books

(bookId int,

 Title varchar(100)

)

GO


EXEC sp_droprolemember db_datareader, apressWriter

GO
What do you think will happen when trying to perform actions in the newly created schema? Can you query the newly created table? Can you create objects? Run the following commands to see what your results are.
SELECT * FROM APwriter.books


CREATE TABLE APWriter.books2

(bookId int,

Title varchar(100)

)

GO


SELECT * FROM APwriter.books2
The query results show that you can actually query the table and create objects in the schema that you own even though you do not have explicit database permissions. That is because you explicitly own the schema, which enables you to perform the actions. However, you have no rights to other objects within the database. Run the following:
SELECT * FROM Sales.CreditCard
You will get an error message that prevents you from accessing the table. Think about the security options that are available to you if you really start playing with schemas and what users can access.
Permissions
Permissions are the rights granted to principals that determine the actions performed with the securables. In SQL Server 2008, there are three basic functions achieved with permissions: You can grant them, revoke them, and deny them. There are so many permissions that we are not going to be able to cover them all; however, we are going to discuss some of the types of permissions and some of the different securables that permissions are applied to. We will also discuss how you can manage permissions.
Types of Permissions
This section provides you with multiple types of permissions and securables. There are multiple types of permissions applied to securables at the server, database, and schema levels. The following list briefly discusses some of the permission types:
ALTER: Applies to tables, views, procedures, functions, and Service Broker queues. TheALTERpermission allows you to modify the object.CONTROL: Applies to tables, views, procedures, functions, synonyms, and Service Broker queues. TheCONTROLpermission provides the principal with all the permissions on the securable.DELETE: Applies to tables, views, synonyms, and their columns. TheDELETEpermission allows you to delete data from the object.EXECUTE: Applies to procedures, functions, and synonyms. TheEXECUTEpermission allows the user to execute the object.SELECT: Applies to tables, views, table-valued functions, synonyms, and their associated columns. TheSELECTpermission enables you to query or read the data from the objects.UPDATE: Applies to tables, views, and synonyms. TheUPDATEpermission enables you to update the data in the objects.VIEW DEFINITION: Applies to tables, views, procedures, functions, synonyms, and Service Broker queues. TheVIEW DEFINITIONpermission allows the user to see metadata for the objects.
Make sure you spend some time to understand the various permission types. It does not matter if you are dealing with server, database, or schema securables: You need to understand the available permission types. Once you do, you will be able to apply the appropriate permissions to the principals. Look at SQL Server Books Online for the remaining permission types.
Permission Grouping
Major categories consist of multiple types of permissions. Granting, denying, and revoking permissions are the standard actions that occur to each one of the categories. Those permissions will control all of the objects and its securables within it. The following is a list of some of the major permissions groups:
- Server: Controls the permissions that influence the entire server. Server permissions dictate who can create objects within the server, who can access objects within the server, and what can be accessed within the server.
- Database: Controls the permissions that apply to objects within the database. The database permissions decide what is accessed, created, and manipulated within the database.
- Schema: Controls the objects within a schema within a database. Schema permissions control who views, creates, executes, and manipulates objects within the schema.
- Assembly: Controls permission to assemblies to execute, alter, or take control of the assembly.
- Certificate: Controls permission to allow control or modification of a certificate.
- Object: Controls permissions that reside on schema securables that control the reads, writes, and executes on the schema's objects.
The preceding list does not contain all of the securable groups, so navigate to SQL Server Books Online to finish researching the different groups.
Managing Permissions
Permissions in SQL Server 2008 are similar to those in previous editions in terms of managing permissions. To grant, deny, or revoke permissions, you identify the Windows, SQL Server, or database principal and perform the appropriate action on the securable. In SQL Server 2008, the same rules apply. The most restrictive permissions govern the access and restriction levels for the user. The most important thing to remember about managing permissions in SQL Server 2008 is to spend a little extra time understanding the types of permissions and the different permission groups to accelerate your knowledge of the security system and its various permissions. We have reviewed multiple examples of granting and denying permissions in the previous sections, so we are not going to duplicate those examples.
GUI Security Administration
We have finished discussing SQL Server 2008 and its various principals, securables, and permissions and how to create them using T-SQL. However, at times, you will utilize SQL Server Management Studio to actually create the accounts and assign the appropriate permissions. The purpose of this section is to create a quick reference guide that shows you where to find the various security options within SQL Server Management Studio.
Creating a User
Once you have connected to SQL Server Management Studio, expand the Security folder for your database instance to display the options shown in Figure 8-2. The available security options in SQL Server 2008 are Logins, Server Roles, Credentials, Cryptographic Providers, Audits, and Server Audit Specifications. You may notice that many of the options are new, especially if you are coming straight from SQL Server 2000 where the only available options were Logins and Server Roles.
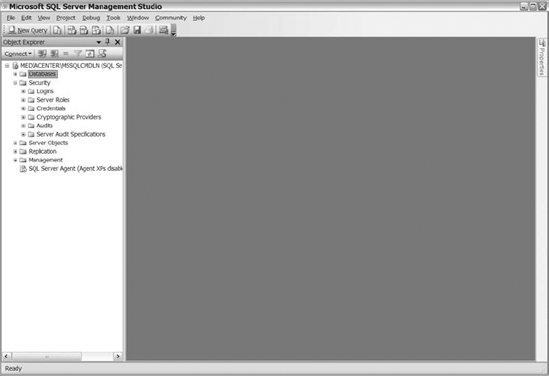
Figure 8-2. The available options under the Security folder
As with previous versions of SQL Server, the Logins folder is the category used to view and create SQL Server logins. Expanding the Logins folder will enable you to review the current list of user accounts that have access to that instance of SQL Server. After you have reviewed the user accounts and determined that the user that you intend to create does not exist, you can right-click the Logins folder (or any user contained in the Logins folder) and select New Login from the context menu to create a new user.
Selecting the New Login option will open the Login properties (General page) shown in Figure 8-3, where you can start populating the data for a new user.

Figure 8-3. Login properties (General page) dialog box
Following is a brief discussion of some of the selectable options available to you during the user-creation process:
- Windows Authentication: Specifies that the user account will utilize Windows authentication or validation method to validate the password credentials to log in to SQL Server.
- SQL Server Authentication: Determines that the user account will use SQL Server to validate password credentials in order to log in to SQL Server.
- Enforce Password Policy: Forces user accounts to abide by the strong password policy for SQL authentication only.
- Enforce Password Expiration: Requires the passwords of user accounts to expire after a predetermined interval for SQL authentication only.
- Mapped to Certificate: Allows you to identify the certificate you want to use to map the user from.
- Mapped to Asymmetric Key: Allows you to map to the asymmetric key to associate the user from.
- Mapped to Credential: Identifies the credential you want to associate the user to.
- Default Database: Identifies the database that the user will connect to upon logging into the SQL Server.
- Default Language: Identifies the default schema to associate the user with in the database.
Obviously, the Login Name option is the name that you want to utilize for the user to access SQL Server.
![]() Note If you are creating a Windows authentication account, then you can search for the user with the Search button. The Search button lets you scan the local computer, work group, or domain in order to find the user that you want added.
Note If you are creating a Windows authentication account, then you can search for the user with the Search button. The Search button lets you scan the local computer, work group, or domain in order to find the user that you want added.
After creating the login name, type in the password for the user (if you are using SQL authentication) to log in to SQL Server. Decide if you want to enforce a password policy, if you want the password to expire, and if you want users to change their passwords the next time they log in. If you are creating a user for a certificate or asymmetric key, then select the appropriate option on the screen. If the user needs access to resources outside of SQL Server and you want that user associated with a credential, then select the appropriate credential for the available options. Finally, you determine the default database that you want the user to log in to when connecting to SQL Server.
After you have reviewed your selections on the General page, then navigate to the Server Roles page to configure the roles of the user (see Figure 8-4). The fixed roles are available for you to choose from. Select the SQL Server roles that you want the user associated with.

Figure 8-4. Login properties (Server Roles page)
Once you have completed assigning the user to appropriate SQL Server roles, then you are ready to give the user access to specific databases. Figure 8-5 displays the sample User Mapping page. First, select the database that you want the user to have access to by selecting the check box in the Map column. After selecting the database, a username is populated and the manipulation of the database role membership options becomes available. The User column contains the username that provides the user with rights and permissions in the database. Options exist to enable you to modify the user to a different name, as long as that name is not already being used within the database. We prefer to leave the usernames the same for the server and the databases. That way, all usernames are consistent among all databases, which minimizes confusion. The database role membership grants the user access to perform actions within the database. Select the check box next to the appropriate role that will provide users with the access you need them to have.
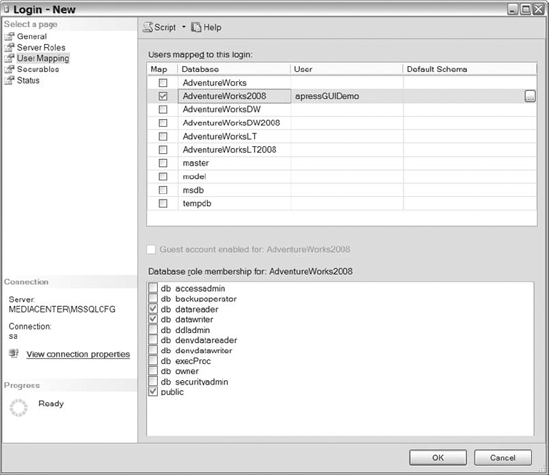
Figure 8-5. Login properties (User Mapping page)
Once you have selected all the databases you want the user mapped to, select the Securables page, shown in Figure 8-6. The Securables page enables you to specify grant or deny privileges on server-level securables. Using the Search button, you can look for servers, endpoints, or login accounts. Once you narrow down your search, you have the option to grant permissions to your username principal on the available securables.
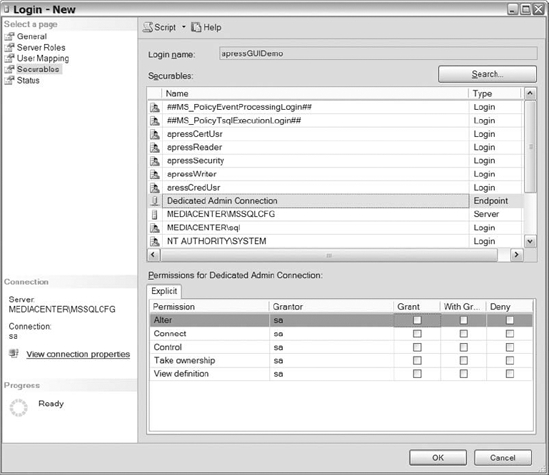
Figure 8-6. Login properties (Securables page)
The last option in the Login dialog box is the Status page, shown in Figure 8-7. The Status page provides you with the capability to give the user access to connect to the Database Engine and to enable or disable the login.
One feature of SQL Server 2008 that we really enjoy is the ability to script out the actual code that will perform the tasks accomplished in the GUI. To generate your script, select from the Script drop-down list to determine how you want the script generated for you. So after you have finished selecting the last options Login dialog box, you can script out the code changes and then determine if you want to click OK or run the code in a query window.
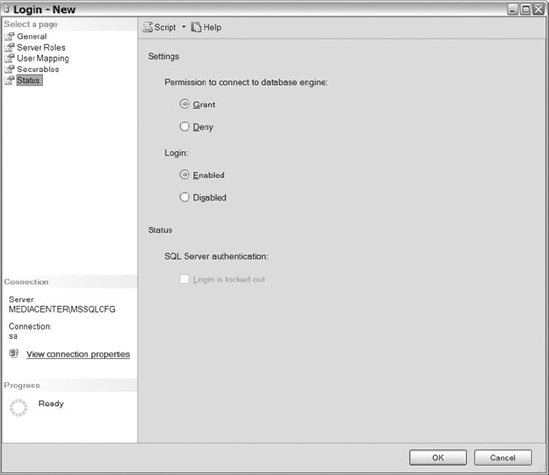
Figure 8-7. Login properties (Status page)
Review the sample creation code in Listing 8-5 to see how SQL Server generates a login script. One good tip is to keep the code in case only a portion of the user is created and a failure occurs during the GUI creation. Just execute the script past where the failure occurred, and you are good to go.
Listing 8-5. SQL Script for Creating a Login
USE [master]

GO

CREATE LOGIN [apressGUIDemo] WITH PASSWORD=N'ABC123#@' _

MUST_CHANGE, DEFAULT_DATABASE=[AdventureWorksDW2008], _

CHECK_EXPIRATION=ON, CHECK_POLICY=ON

GO

ALTER LOGIN [apressGUIDemo] ADD CREDENTIAL [apressCred]

GO

EXEC master..sp_addsrvrolemember @loginame = N'apressGUIDemo',_

 @rolename = N'dbcreator'
GO

EXEC master..sp_addsrvrolemember @loginame = N'apressGUIDemo', _

@rolename = N'securityadmin'

GO

USE [AdventureWorks2008]

GO

CREATE USER [apressGUIDemo] FOR LOGIN [apressGUIDemo]

GO

USE [AdventureWorks2008]

GO

EXEC sp_addrolemember N'db_datareader', N'apressGUIDemo'

GO

USE [AdventureWorks2008]

GO

EXEC sp_addrolemember N'db_datawriter', N'apressGUIDemo'

GO

use [master]

GO

DENY VIEW ANY DEFINITION TO [apressGUIDemo]

GO
Creating Roles
We have discussed the purpose of roles in the previous sections, so the purpose of this section is to make sure that you can create them from the GUI. Remember, Server roles are fixed and users cannot create additional roles. Therefore, the creation examples will consist of database roles.
Once you have connected to SQL Server Management Studio, navigate to the database where you would like to create a role. Keep in mind, database roles are database specific, so you have to create the role in every database you would like that role to exist.
After you expand the database, expand the Security folder. To create a role, you can right-click on the Roles folder, highlight New, and then select Database Role or Application Role (see Figure 8-8). You can also right-click on the Database Role or Application Role folder and select the appropriate new role.
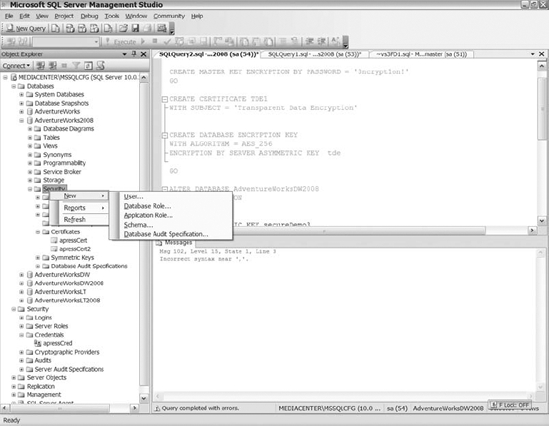
Figure 8-8. The navigation and creation options for database and application roles
For this example, we are going to create a database role. So utilize one of the methods just mentioned and select New, Database Role. Figure 8-9 shows the General page of the Database Role – New dialog box.
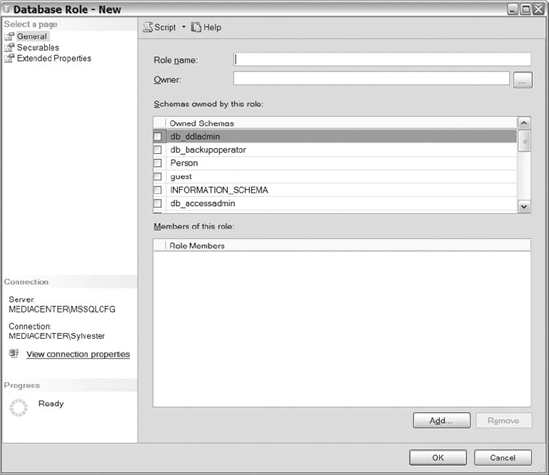
Figure 8-9. The General page of the Database Role – New dialog box
First, name your database role in the Role Name field. Next, decide who the owner of the role will be. By default, the owner will be the creator. After the owner specification, decide what schemas are owned by the role. This is a great opportunity to grant total control of the schema to the users of this role. Setting this option is another way of enabling the schema to appear owned by all users of the role from a functionality perspective. Unless permissions are restricted further, each user will have total control within this schema.
The last step on this screen is to add database principals to the role. SQL Server 2008 allows you to search for the users and roles by clicking on the Add button. Once you select the Add button, you have two options: Select Object Types and Browse (not shown in the figures). From the Select Database User or Role screen, click on the Object Types button to see the available object types. Figure 8-10 shows you the object types that are available for you to choose from.
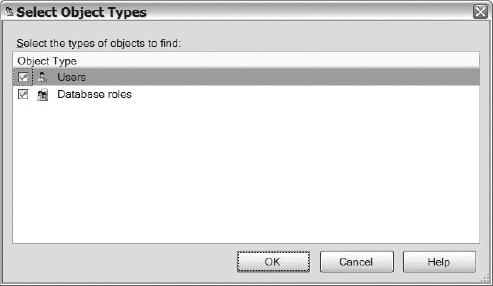
Figure 8-10. Adding database principals to a role
After you select the object types, click on the OK Button. Select the Browse button to find all of the specified object types (users and database roles) similar to those shown in Figure 8-11. Check the boxes next to the database principals you want added, click OK, and then OK again on the next screen. You will see the selected objects in the main window.
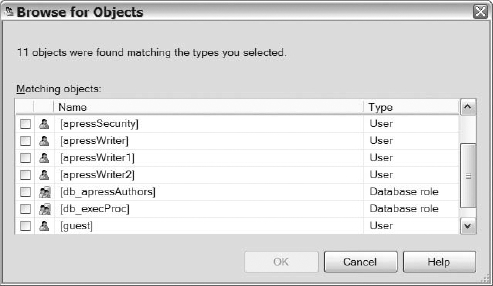
Figure 8-11. Database principals that can be added to the role
Once you complete the General page, click on the Securables page. The Securables page will allow you to select the securables or objects that you want to assign permissions to. This page is where you restrict the permissions of the database principals for the role. To manage the permissions for database securables, click on the Search button and pick the objects that you would like to search through. Figure 8-12 shows you the objects options that are available to you that are database securables. You can select specific objects, all the objects of a certain type, or all the objects that belong to a certain schema.

Figure 8-12. Types of objects that can be searched in the Securables options
Once you have finished selecting the type of objects you want to choose from, you are directed to a screen that corresponds to the selection shown in Figure 8-12. For this example, we selected specific objects. Figure 8-13 shows the various object types that are available for you to choose from.
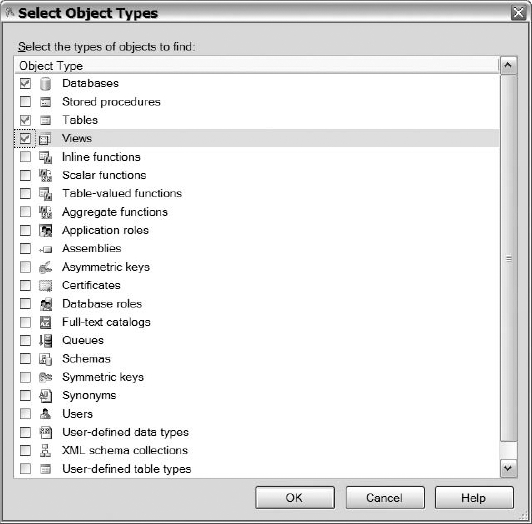
Figure 8-13. The available database securables that can be searched
After you have determined the object types that you want to search through, click the Browse button to choose the actual objects that you want to manage. After you select the specific objects, the Securables page will show the available securables on the top half of the page and available permissions for the securable on the bottom half of the page (see Figure 8-14). To manage permissions, select the securable from the top of the page (say, the books2 table), and the bottom of the page will show all of the available permissions that you can grant or deny at the database level. Continue selecting securables and managing the permissions for the objects. From these screen shots, we hope that you can see how easy it is to control the access each role has within your database. That way, you ensure security is at your pre-determined level.
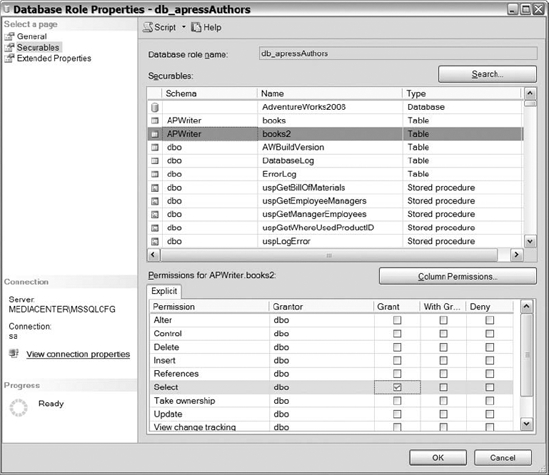
Figure 8-14. The Securables page with the available securables and associated permissions
Creating Schemas
With the emergence of schemas in SQL Server, it is important to make sure you know how to locate and create schemas from within SQL Server Management Studio. Remember that schemas are database specific. You will need to create each schema in every database that you want the schema. Schemas are located within the Security folder of the database.
To create schemas, connect to SQL Server Management Studio and navigate to the database where you want to create the schema. Next, expand the Security folder, right-click on the Schema folder or an existing schema, and select New Schema from the context menu. Review Figure 8-15 to see the General page on the Schema – New dialog box. First, name your schema and then identify its owner. Any database principal (meaning any database user, database role, or application role) can own the schema. Schema owners can also own multiple schemas. The owner of the schema will always have control permissions for the objects within the schema.
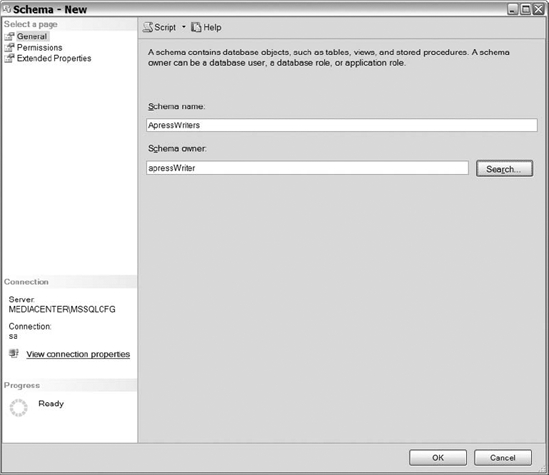
Figure 8-15. The General page of the schema creation dialog
After you have completed the available options on the General page, select the Permissions page to complete creating the schema. To grant permissions to the available database principals, click on the Search button. Select the Object Types button, and then you will be directed to the Select Object Types dialog. Figure 8-16 shows you the available database securables that you can grant access to for the schema.
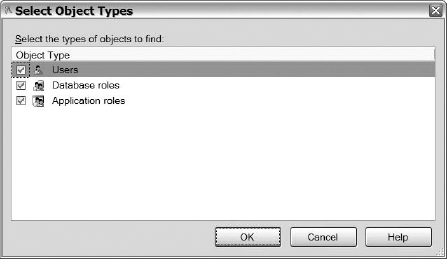
Figure 8-16. The available principals that can be added to schemas
Once you are done selecting the object types, click the OK button to return to the screen showing object types and the Browse button. Finally, click on the Browse button to see the available principals. Once you select the principals that you want to apply permissions to, click OK and you will routed back to the Permissions page. The Permission page now contains the selected database principals in the top half of the page with their corresponding available permissions on the bottom half (see Figure 8-17). Select the principal and then add the appropriate permissions to the principal.
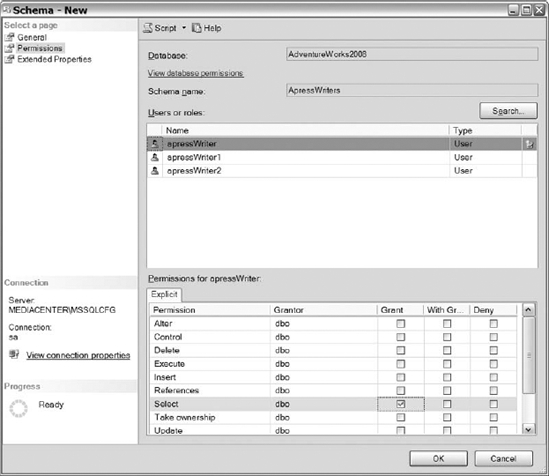
Figure 8-17. The users and roles and the permissions available to them
Encryption
Encrypting the physical data utilized by SQL Server has become increasingly popular, with a variety of restrictions placed upon the database administrators by auditing agencies. Surely, you have heard the reports of compromised data, which resulted in the stealing of customer information. A large number of the decision makers within organizations think that securing the physical data via encryption would protect the company's data in the event that your network security is compromised and hackers were able to access SQL Server. Because of that thought process and many other valid reasons for encryption, we have dedicated a section to the various SQL Server 2008 encryption methods.
Before discussing the various methodologies of encrypting your data, here is a list of some frequently used terms:
- Encryption: A method of modifying data to a binary string that cannot be easily recognized.
- Decryption: The method used to convert the binary string back to the original text data representation.
- Extensible Key Management (EKM): A module that holds symmetric and asymmetric keys outside of SQL Server.
- Asymmetric keys: Private and public keys used to encrypt and decrypt data. The private key can encrypt the data, while the public key will decrypt it and vice versa.
- Symmetric key: A method used to encrypt and decrypt the data.
- Database master key: A symmetric key that is utilized to protect keys within the database.
- Service master key: A key encrypted by Windows Data Protection application interface (API) automatically generated the first time another key needs to be encrypted.
Encrypting Data Using Certificate Encryption
Certificate encryption is used to identify people, devices, and organizations. The certificates contain information about the person, organization, or device, the usage period of the certificate (the effective and expire dates), who issued the certificate, the digital signature, and most important the public key that is bound to a private key. Certification authorities (CAs) generate certificates that validate the information issued, enabling certificates created by the authority to be trusted on most systems. You can create certificates to be used on your local network, and they can be successfully implemented as long as you don't want to use the certificate outside of your network. SQL Server 2008 allows you to create your own certificates to secure web service endpoints, forcing applications to use secure connection methods in order to access the endpoints.
Multiple options exist for creating a certificate from within SQL Server 2008. The following code sample provides you with the syntax:
CREATE CERTIFICATE certificate_name

    { FROM <existing_keys> | <generate_new_keys> }

    [ ACTIVE FOR BEGIN_DIALOG = { ON | OFF } ]
You can create a certificate from scratch by specifying the name, the subject, the expire and effective dates, and finally the encryption key. The encryption key specifies the password for the private key of the certificate. SQL Server will use the database master key if you do not specify an encryption key.
You can also create a certificate from a file, assembly, or executable. If you are using a file to create the certificate, then the file must contain the path to a file with the private key in it. The assembly must already be loaded into the database in order to create a certificate from the assemblies. Then, the CREATE CERTIFICATE statement will just reference the database assembly. When using the executable option, the path to the executable must contain the certificate. Let's review a couple of examples of certificate creation:
USE AdventureWorks2008

GO


CREATE CERTIFICATE secureDemo1

ENCRYPTION BY PASSWORD = '53cur3Dem0!'

WITH SUBJECT = 'Certificate Demonstration',

START_DATE = '01/01/2009',

EXPIRY_DATE = '12/31/2009'


GO
Remember, if you do not specify the ENCRYPTION BY PASSWORD option, then SQL Server 2008 will use the database master key to create the password. The next script shows you how to create the database master key if one does not exist.
USE AdventureWorks2008

GO


CREATE MASTER KEY ENCRYPTION BY PASSWORD = '3ncrypt1on!'

GO


CREATE CERTIFICATE secureDemo2

WITH SUBJECT = 'Certificate Demonstration2',

START_DATE = '01/01/2009',

EXPIRY_DATE = '12/31/2009'

GO
Once you have created the certificate, encryption and decryption occurs by using the ENCYRPTBYCERT and DECRYPTBYCERT functions (see the following code example in Listing 8-6).
Listing 8-6. SQL Script That Encrypts and Decrypts Text Using a Certificate
USE AdventureWorks2008

GO

declare @encryptedAuthor varchar(1000),

@author varchar(50) = 'Sylvester Carstarphen',

@decryptedAuthor varchar(1000),
@certificatePassword nvarchar(64) = '53cur3Dem0!'


set @encryptedAuthor = ENCRYPTBYCERT(cert_id('secureDemo1'),@author)

print @encryptedAuthor


set @decryptedAuthor = DECRYPTBYCERT(cert_id('secureDemo1'),@encryptedAuthor,__

@certificatePassword)

print @decryptedAuthor
The output of Listing 8-6 is shown in Figure 8-18.
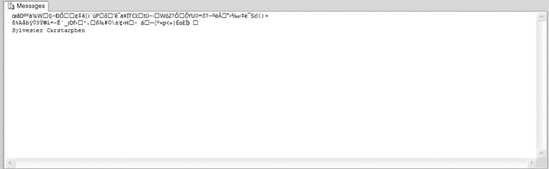
Figure 8-18. The results of the certificate encryption and decryption script
Encrypting Data Using Asymmetric Keys
Asymmetric keys consists of two keys: a public key that is transferred over networks and a private key that is not shared with anyone. As a team, the public key encrypts the data prior to sending it to the recipient, and the private key decrypts the message. Only the public and private key pair can encrypt and decrypt each other's data. Think about it this way: When someone wants to communicate with you via an encrypted message, they must have your public key in order to encrypt the message. When you receive their message, you will decrypt the message using your private key to read their response. As you may have guessed, this process has a negative impact on the CPU. Because of this, the process is rarely utilized in large data volumes.
The following code provides the syntax for creating an asymmetric key:
CREATE ASYMMETRIC KEY Asym_Key_Name    {

      FROM <Asym_Key_Source>

      |

      WITH ALGORITHM = <key_option>

   [ ENCRYPTION BY PASSWORD = 'password' ]
To create an asymmetric key, you must specify an algorithm utilized to encrypt the key or specify a location where to get the key. The three source locations where the asymmetric key can be loaded from are a file system, an executable, or an assembly. The CREATE statement also requires you to specify one of the three types of available encryption algorithms to encrypt the keys. You can also decide if you want to store the key in the EKM, map an existing SQL Server key to another key that exists in the EKM, or specify the key name to use from the EKM. Review the following code samples to see how to create asymmetric keys.
USE AdventureWorks2008

GO


CREATE ASYMMETRIC KEY secureDemo3

WITH ALGORITHM = RSA_1024

ENCRYPTION BY PASSWORD = '@5ymm3tr1c';

GO
After creating the asymmetric key, you can encrypt and decrypt data by using the ENCRYPTBYASYMKEY and DECRYPTBYASYMKEY functions (see the following code sample in Listing 8-7).
Listing 8-7. SQL Script That Encrypts and Decrypts Data Using Asymmetric Keys
declare @encryptedAuthor varchar(1000),

@author varchar(50) = 'Sylvester Carstarphen',

@decryptedAuthor varchar(1000),

@certificatePassword nvarchar(64) = '@5ymm3tr1c'


set @encryptedAuthor = ENCRYPTBYASYMKEY(ASYMKEY_ID('secureDemo3'),@author)

print @encryptedAuthor


set @decryptedAuthor = DECRYPTBYASYMKEY(ASYMKEY_ID('secureDemo3'),_

@encryptedAuthor ,@certificatePassword)

print @decryptedAuthor
Take a look at Figure 8-19 to see the output of Listing 8-7.
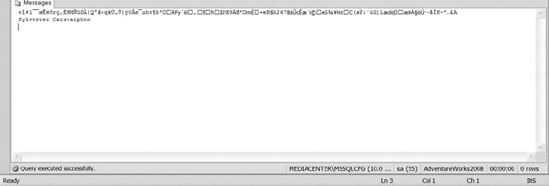
Figure 8-19. The results of the asymmetric encryption and decryption methods
Encrypting Data Using Symmetric Keys
Using symmetric keys for data encryption is one of the fastest encryption methods available in SQL Server 2008. Symmetric keys utilize the same key to encrypt and decrypt the data. From a SQL Server perspective, data encryption occurs when SQL Server writes to disk and decryption occurs when data is requested from disk by queries or other methods.
The following code provides you with the syntax for creating symmetric keys:
CREATE SYMMETRIC KEY key_name

[ FROM PROVIDER Provider_Name]

    WITH <key_options> [ , ... n]

        |

    ENCRYPTION BY <encrypting_mechanism> [ , ... n]
The creation of the symmetric key must consist of an encryption mechanism. Based on the encryption mechanism you would like to use, choose that option within the creation step and populate the requested data accordingly. The possible encryption mechanisms are encrypted by password, certificate, asymmetric, symmetric, or EKM. Lastly, there are two key options: Key Source and Identify Value, which are used to manage temporary keys. The Key Source specifies a pass phrase to derive the key from, while the Identity Value specifies a phrase used to create the globally unique identifiers (GUIDs) that identify data created by the temporary key. The following code creates a symmetric key encrypting the password using the asymmetric key that was created in the preceding section called “Encrypting Data Using Asymmetric Keys.”
USE AdventureWorks2008

GO


CREATE SYMMETRIC KEY secureDemo5

WITH ALGORITHM = TRIPLE_DES

ENCRYPTION BY ASYMMETRIC KEY secureDemo3

GO
The symmetric key allows you to encrypt and decrypt data by using the DECRYPTBYKEY and the ENCRYPTBYKEY functions. The code example in Listing 8-8 shows an example of the encryption and decryption process.
Listing 8-8. Encrypting and Decrypting Data Using Symmetric Keys
USE AdventureWorks2008

GO


declare @encryptedAuthor varchar(1000),

@author varchar(50) = 'Sylvester Carstarphen',

@decryptedAuthor varchar(1000),

@certificatePassword nvarchar(64) = '@5ymm3tr1c'


OPEN SYMMETRIC KEY secureDemo5

DECRYPTION BY ASYMMETRIC KEY secureDemo3 WITH PASSWORD = '@5ymm3tr1c'
set @encryptedAuthor = ENCRYPTBYKEY(KEY_GUID('secureDemo5'),@author)


print @encryptedAuthor


set @decryptedAuthor = DECRYPTBYASYMKEY(ASYMKEY_ID('secureDemo3'),@encryptedAuthor,_

@certificatePassword)

set @decryptedAuthor = DECRYPTBYKEY(@encryptedAuthor)

print @decryptedAuthor
The output of Listing 8-8 is shown in Figure 8-20.
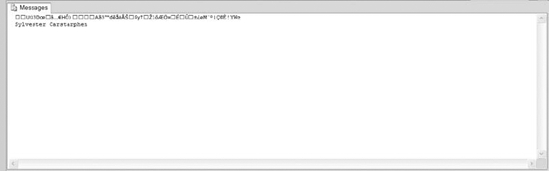
Figure 8-20. Results of the symmetric encryption and decryption script
Extensible Key Management
Extensible Key Management (EKM) is an Enterprise Edition feature that enables encryption keys that guard database files stored in a module outside of the database. Extensible Key Management is used to generate, retrieve, and store the encryption keys external to SQL Server. The Extensible Key Management module is accessed from within SQL Server 2008 using the SQL Server service mapped credentials (review the previous section to refresh your memory on credentials if needed). The Extensible Key Management module is a tool that interfaces with other vendors' encryption software and hardware to provide enhanced encryption and decryption features and functionality.
In order to utilize the Extensible Key Management module, you must enable it using sp_configure. After enabling the EKM module, you simply use the encryption key stored on the EKM to populate the ENCRYPTION BY keyword. Review the following code sample to utilize the EKM module.
EXEC sp_configure 'show advanced options', 1

GO

RECONFIGURE

GO


EXEC sp_configure 'EKM provider enabled', 1

GO

RECONFIGURE
GO

USE AdventureWorks2008

GO


CREATE SYMMETRIC KEY secureDemo6

WITH ALGORITHM = AES_256

ENCRYPTION BY EKM_secureDemo1

GO
Transparent Data Encryption
Transparent Data Encryption (TDE) is a SQL Server 2008 feature that allows the encryption of data and log files seamlessly to the application and its users. Because of the methodology utilized for TDE, database securables do not require modification of any sort. In other words, this feature does not force you to modify tables like previous editions of SQL Server. Because the objects remain the same, all data types, indexes, and keys function without data integrity or security risks.
When enabling TDE, a background process runs, encrypting all of the data stored within the data files. There are two types of locks issued during this process: an update lock and a shared lock. As long as user processes do not conflict with the issued lock, then the impact to the application is minimal. Depending on the size of your database, the initial encryption process could take some time and impact the performance of the application. We recommend enabling TDE during a maintenance window to guarantee minimal impact to production. Once the scan completes, all data stored within the data files will be encrypted. One interesting fact is that TDE will not increase the size of your database—your data files prior to the encryption process are the same size as the data files post-encryption.
TDE starts encrypting and decrypting data as data enters and leaves the buffer. When the request by a query for data that currently reside on disk occurs, the decryption process will decrypt that data prior to loading it in memory. Similarly, when data is leaving memory heading to disk, the encryption of the data occurs before reaching its destination. Handling encryption and decryption at memory level is what allows TDE to be seamless to the application and its users. Because the decryption of data occurs in memory, the result set transmitted back to the application is in plain text. Just remember, any process that will write an encrypted database to disk through memory will encrypt the data, including processes like database backups and snapshots.
As a database administrator, you should test TDE within a non-production environment before implementing it in production. Database servers that currently have low CPU and IO should not have a problem implementing TDE. For the servers that have a higher than normal CPU or IO, we would be a little hesitant to blindly turn on TDE. Keep in mind that encrypting and decrypting data is a CPU-intensive process. If you are currently having CPU problems, then do not add the additional processes on your server until the current CPU issues are resolved. Some studies have suggested that environments have experienced a 3% to 5% increase in CPU utilization due to enabling TDE. The best advice we can provide you is to baseline your environment and simulate workloads in a test environment to ensure that your application performs the same with the new encryption method enabled.
Enabling TDE is rather easy—you just enable encryption on the database. However, before enabling encryption, you want to make sure that you create a master database key, create a certificate that uses the master key, and then create a database key using the recently created certificate. Review and execute the following T-SQL example.
USE Master

GO


CREATE MASTER KEY ENCRYPTION BY PASSWORD = '3ncrypt1on!'

GO


CREATE CERTIFICATE CertTDE

WITH SUBJECT = 'Transparent Data Encryption'


USE AdventureWorks2008

GO


CREATE DATABASE ENCRYPTION KEY

WITH ALGORITHM = AES_256

ENCRYPTION BY SERVER CERTIFICATE CertTDE


GO


ALTER DATABASE AdventureWorks2008

SET ENCRYPTION ON

GO
![]() Caption Make sure you back up your master and database keys and then store them in a location on another server. If you have to restore the database on another server and you do not have the keys used to encrypt your data, then you will not be able to decrypt the data within your database. Discussions on backing up and restoring your encryption keys occurs in Chapters 11 and 12.
Caption Make sure you back up your master and database keys and then store them in a location on another server. If you have to restore the database on another server and you do not have the keys used to encrypt your data, then you will not be able to decrypt the data within your database. Discussions on backing up and restoring your encryption keys occurs in Chapters 11 and 12.
Summary
As we conclude this chapter on securing access to SQL Server 2008, the objects within the databases, and the physical data itself, we hope that you have expanded your knowledge about SQL Server 2008 security terms and methods of securing your server. Security is such an important aspect of being a database administrator that you would be cheating yourself by not understanding the verbiage. Spend some extra time experimenting with the various principals, securables, schemas, permissions, and encryption methods to better prepare for making recommendations or implementing security features. Now prepare yourself to learn how to administer the various objects within SQL Server 2008.