
Chapter 16
Maps
Mapping on your iPad, whether you have a 3G+Wi-Fi or a Wi-Fi-only model, is pretty amazing. As we explore the power of the Maps app in this chapter, you'll see how to find your location on the map—even if you're just using Wi-Fi. You'll learn how to change views between classic, satellite, hybrid, and terrain. You'll also see how, if you need to find out the best route, you can check out the traffic and construction view using Maps. If you want to find the closest pizza restaurant, golf course, or hotel to your destination, that's easy, too. And you can use Google's Street View right from your iPad to help you get to your destination. It is easy to add an address you have mapped to your contacts. There's also a digital compass feature that can be quite handy and is fun to play with.
Getting Started with Maps
The beauty of the iPad is that the programs are designed to work with one another. You've already seen how your Contacts are linked to the Maps app.
The Maps app is powered by Google Maps—the leader in mobile mapping technology. With Maps you can locate your position, get directions, search for things nearby, see traffic, and much more.
Simply touch the Maps icon to get started.
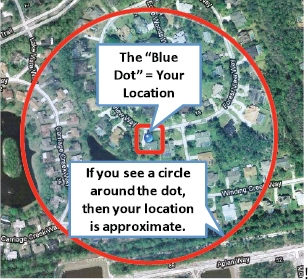
Determining Your Location (the Blue Dot)
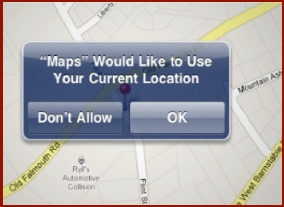
When you start the Maps program, you can have it start at your current location.
- Tap the small circle at the center of the upper navigation bar.

- Maps will ask to use your current location—touch OK or Don't Allow.
We suggest choosing OK, which makes it much easier to find directions from or to your current location.
NOTE: Even if you only have the Wi-Fi-equipped iPad, it will still be able to find your approximate location. The Wi-Fi iPad uses Skyhook router-based locations. This is usually accurate, but if someone moved to a new state with an old router, the iPad might think you are still in that old location.
Various Map Views
The default view for Maps is Classic, a basic map with a generic background and streets shown with their names. Maps can also show you a Satellite view, or a combination of Satellite and Classic called Hybrid. There's also the new Terrain view, which looks like a relief map. Finally, another view called List view appears only when you perform a search that generates a list of turn-by-turn directions. You can switch among all the views using the steps below.
Changing Your Map Views
To change from one map view to another:
- Touch the turned-up edge of the map in the lower right corner.
- The corner of the map turns up to reveal buttons for views, traffic, pin, and more. (See Figure 16-1.)
- Tap the view you'd like to switch to:
- Classic—a regular map with street names (Figure 16-2).
- Satellite—a satellite picture with no street names (Figure 16-1).
- Hybrid—a combination of satellite and classic, i.e., a satellite view with street names (Figure 16-2).
- Terrain—a relief map showing the terrain such as mountains. (Figure 16-3.)
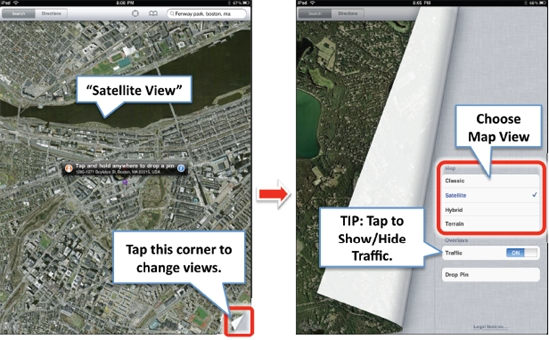
Figure 16-1. Satellite view and how to change to another map view
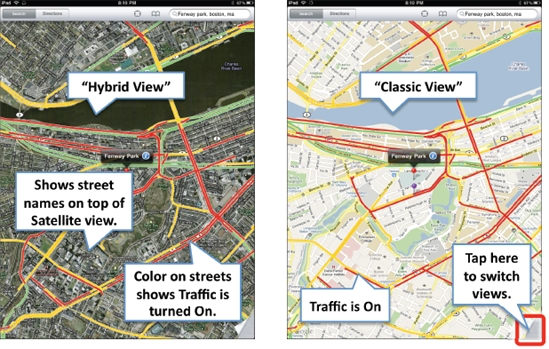
Figure 16-2. Hybrid and classic views with traffic enabled
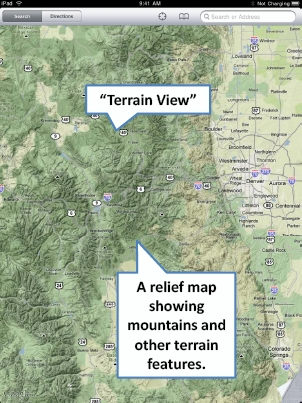
Figure 16-3. Terrain view—a relief map of the Rocky Mountains west of Denver, Colorado
As noted, List view is only available when your search produces multiple results (like “pizza 32174”) or you've asked for directions, as shown in Figure 16-4.
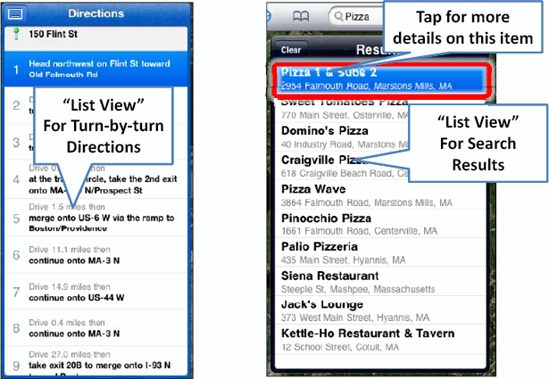
Figure 16-4. List views for directions and search results
Checking Traffic
Your Maps program can not only tell you how to get somewhere, it can check traffic along the way. This feature is supported only in the US for now.
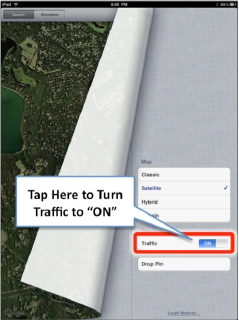
- Tap the lower right corner of the map to see the options.
- Turn Traffic to ON.
TIP: You can also “turn” the page like a book to get to this view. The animation is just like using the iBooks app.
On a highway, if there is a traffic situation, you usually see yellow lights instead of green, and sometimes, the yellow might be flashing to alert you to traffic delays.
You may even see construction worker icons to indicate construction zones.
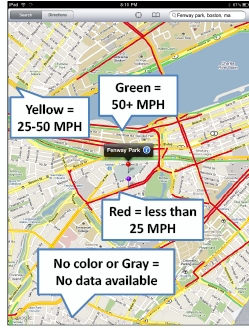
Maps uses color on major streets and highways to indicate the speed that traffic is moving:
Green = 50 MPH or more
Yellow = 25 – 50 MPH
Red = Less than 25 MPH
Gray (or no color) = No traffic data is currently available
Search for Anything
Because Maps is tied to Google Maps, you can search for and find just about anything: a specific address, type of business, a city, or other point of interest, as shown in Figure 16-5.
- Touch the Search bar in the top right corner of the screen.
- Type in your address, point of interest, or town and state you would like to map on your iPad.

Google Maps Search Tips
Enter just about anything in the search:
- First Name, Last Name, or Company Name (to match your Contacts)
- 123 Main Street, City (some or all of a street address)
- Orlando Airport (find an airport)
- Plumber, painter, roofer (any part of a business name or trade)
- Golf courses + city (find local golf courses)
- Movies + city or ZIP/postal code (find local movie theaters)
- Pizza 32174 (search for local pizza restaurants in ZIP Code 32174)
- 95014 (ZIP Code for Apple Computer headquarters in California, USA)
- Apress Publishing
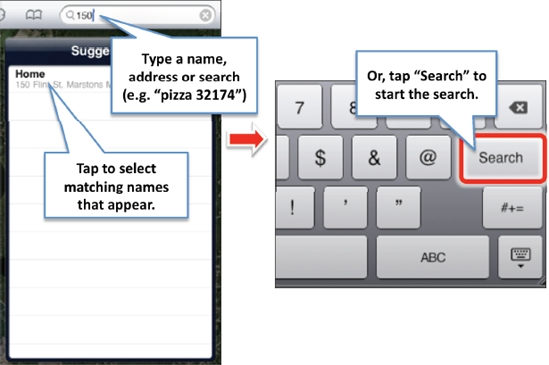
Figure 16-5. Searching in the Maps app
To use numbers, tap the 123 key on the keyboard. For letters, touch the ABC to switch back to a letter keyboard,
Mapping Options
Now that your address is on the Maps screen, there are a number of options available to you.
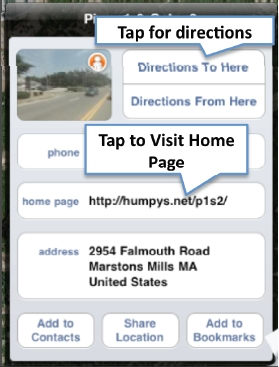
- Touch the blue Information icon
 next to the address to see some of these.
 - If you have mapped one of your contacts, you'll see the contact details as shown in Figure 16-6. You can also get directions, share a location, or add as a bookmark.
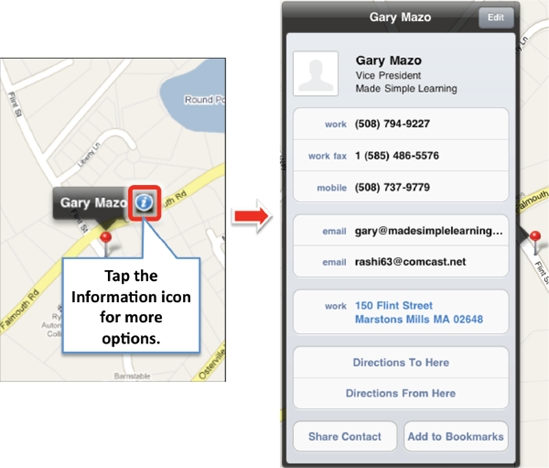
Figure 16-6. Touch the information button to see the mapped contact details.
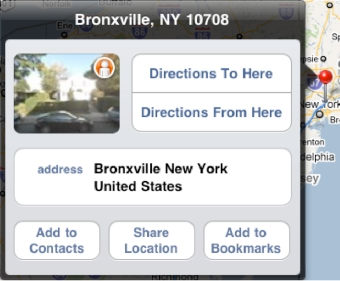
- If you have mapped an address or point of interest, you'll see a different screen when you tap the information button. You'll find a small street view image and buttons to get Directions, Add to Contacts, Share Location, or Add to Bookmarks, as shown to the right.
Working with Bookmarks
Bookmarks work in Maps very much as they do in the Safari web browser app. A bookmark simply sets a record of places you've visited or mapped and want to remember in the future. It is always easier to look at a bookmark than have to do a new search.
Adding a New Bookmark
Bookmarking a location is a great way to make it easy to find that place again.
- Map a location as shown in Figure 16-7.
- Touch the blue information icon next to the address.
- Touch Add to Bookmarks.
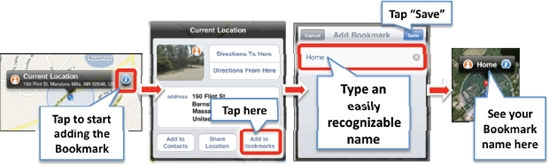
Figure 16-7. Adding a bookmark.
- Edit the bookmark name to make is short and recognizable—in this case, we edit the address to simply say Home.
- When you are done, just touch Save in the top right corner.
TIP: You can search for bookmark names just as you search for names in your Contacts.
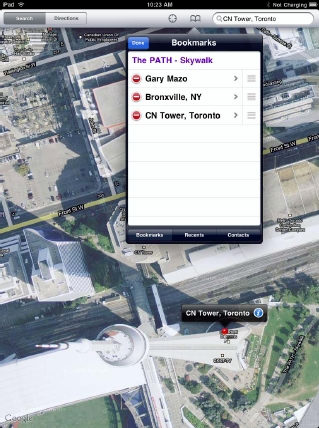
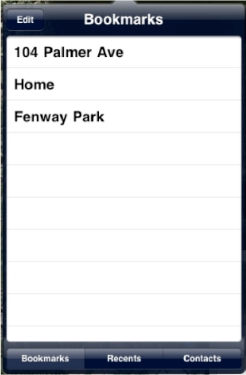
Accessing and Editing Your Bookmarks
To view your bookmarks, follow these steps:
- Tap the Bookmarks icon next to the search window in the top row.
- Tap any bookmark to immediately jump to it.
- Tap the Edit button at the top of the bookmarks to edit or delete bookmarks.
- To reorder the bookmarks, touch and drag the right edge of each bookmark up or down.
- To edit the name of a bookmark, touch it and retype the name. After editing the name, touch the Bookmarks button in the top left to get back to your list of bookmarks.
- To delete a bookmark, swipe to the left or right on the bookmark and tap the Delete button.
- Tap the Done button when you are finished editing your bookmarks.
Add a Mapped Location to Contacts
It is easy to add a location you mapped to your contact list.
- Map an address.
- Tap the information button.
- Tap Add to Contacts.

- Tap either Create a New Contact or Add to Existing Contact.
- If you choose Add to Existing Contact, you then scroll through or search your contacts and select a name. The address will automatically be added to that contact.
Searching for Things (Stores, Restaurants, Hotels, Movies, Anything) Around Your Location
- Map a location on the map or use the blue dot for your current location.
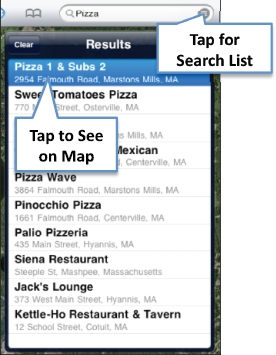
- Tap the search window. Let's say we want to search for the closest pizza restaurants, so we type pizza.

All local pizza restaurants will be mapped.
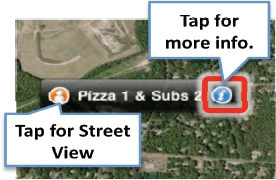
- Notice that each mapped location may have a street view icon on the left and the information icon on the right.
- If you want to zoom in or out, you can pinch the screen open or closed, or you can double-tap the screen.
- Just as with any mapped location, when you touch the blue information icon, you can see all the details, even the pizza restaurant's phone number, address, and web site.
- If you want directions to the restaurant, just touch Directions to Here and a route is instantly calculated.
NOTE: If you touch the Home Page link you will exit Maps and Safari will start up. You will then need to restart Maps again when you're done.
Zooming In and Out
You can zoom in and out in the familiar way by double-tapping and pinching. To zoom in by double-tapping, just double-tap on the screen as you would on a web page or picture.
Dropping a Pin
Let's say you're looking at the map and you find something you'd like to set either as a bookmark or as a destination.
In this example, we are zooming in and looking around greater Boston. We stumble upon Fenway Park and decide it would be great to add it to our bookmarks, so we drop a pin on it as shown in Figure 16-8.
- Map a location or move the map to a location where you'd like to drop the pin.
- Tap the lower right corner of the map.

- Tap Drop Pin.
- Now, drag the pin around the map by touching and holding it. We move it right onto Fenway Park.
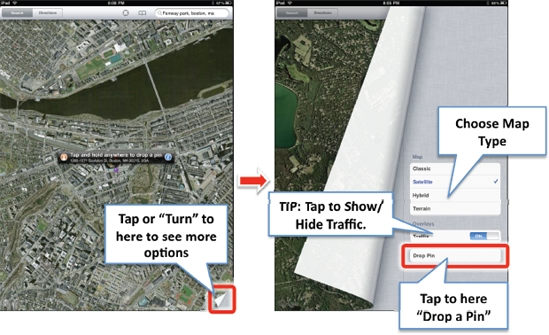
Figure 16-8. How to drop a pin
TIP: How can you find the street address of any location on the map?
When you Drop a Pin, Google Maps will show you the actual street address. This is very handy if you find a location by looking at satellite, hybrid or terrain view, but need to get the actual street address.
Dropping a pin is also a great way to keep track of where you parked—very helpful in an unfamiliar location (especially with the iPad 3G.).
Using Street View
Google Street View (Figure 16-9) is really fun in Maps on the iPad. Google has been hard at work photographing just about every address across the United States and elsewhere. The pictures are then fed into their database and that's what shows up when you want to see a picture of your destination or waypoint.
NOTE: Google Street View is not international yet, but should be at some point in the not-too-distant future.
If there is a street view available, you will see a small icon to the left of the address or bookmark on the map—a small orange icon of a person. ![]()
In this example, Gary wants to check the street view of his wife Gloria's store on Cape Cod.
- In this case, to map the address, we tapped on the work address under Gloria's name on our Contacts list. We could have mapped it by typing an address in the search window, by searching for a type of business, or by touching the address in the Contacts app.
- To the left of Gloria's name is the street view icon.
- We tap the icon to immediately shift to a street view of the address.
- What is very cool is that we can navigate around the screen in a 360-degree rotation by swiping left, right, or even up or down, looking at the places next to and across the street from our destination.
To return to the map, we just touch the lower right corner of the screen.
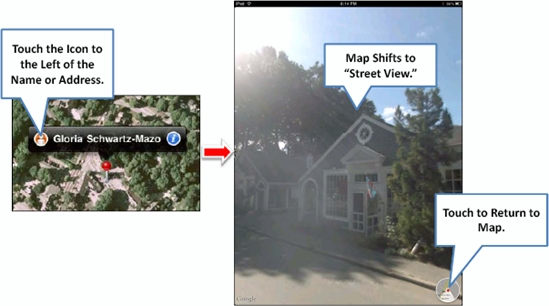
Figure 16-9. Using Google Street View
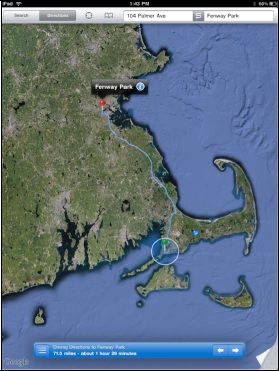
Getting Directions
One of the most useful functions of the Maps program is that you can easily find directions to or from any location. Let's say we want to use our current location and get directions from Gloria's store to Fenway Park in Boston.
Tap the Current Location Button First
To find directions to or from your current location, you don't have to waste time typing your current address—just locate yourself by tapping the current location button ![]() in the center of the top information bar. You may need to repeat it a few times until you see the blue dot on the screen.
in the center of the top information bar. You may need to repeat it a few times until you see the blue dot on the screen.
Now you can do one of two things:
- Tap the Directions button at the left end of the top information bar, or
- Touch the blue i as we did above and then select Directions from Here (see Figure 16-10). You will notice that your recent searches appear. Choose one, if appropriate or type in a new location in the search bar.
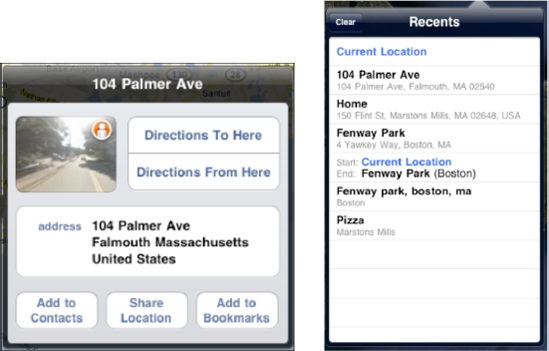
Figure 16-10. Choose Directions From Here and then Recents.
Choose Start or End location
- Touch the blue information icon above the pin.
- Tap Directions From Here.
- We could tap Bookmarks, Recents, or Contacts to find our destination.
- In this case, we tap Bookmarks.
- Tap Fenway Park.
NOTE: As soon as you touch the Directions From Here button, your recent searches will be automatically displayed as in Figure 16-10. You can also touch the Destination box

and type in a destination. - After we select Fenway Park from Bookmarks, the routing screen takes us to an overview screen.
- A green pushpin is dropped at the start location and a red one is dropped at the end location—in this case, Fenway Park.
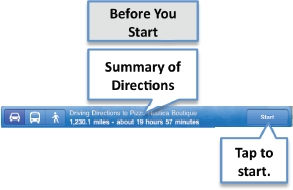
Looking at the Route
Before you start the trip, you will see a Start button in the lower right corner of the screen. Tap the Start button and the routing directions begin. The Start button changes to Arrow buttons that allow you to move between the steps in the trip.

As Figure 16-11 shows, you can look at the route as either a path on the map or as a list.
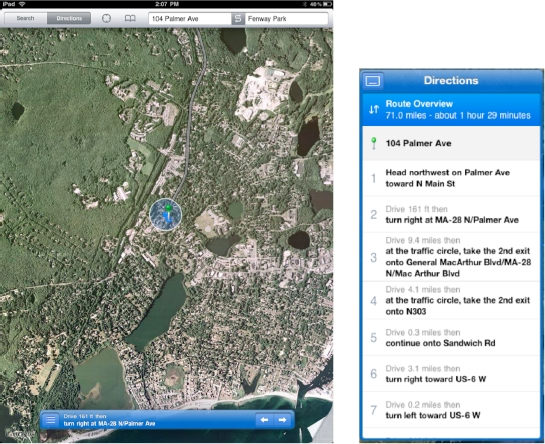
Figure 16-11. Two ways of viewing directions
You can move the screen with your finger to look at the route, or just touch the arrows ![]() at the bottom to show the route in step-by-step snapshots.
at the bottom to show the route in step-by-step snapshots.
You can also touch the List ![]() button, which will shows detailed step-by-step directions.
button, which will shows detailed step-by-step directions.
Switching between Driving, Transit, and Walking Directions
Before you start your directions, you can choose whether you are driving, using public transportation, or walking by tapping the icons on the left side of the blue bar at the bottom of the directions screen, as shown in Figure 16-12.
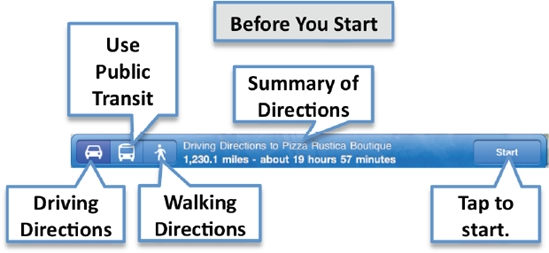
Figure 16-12. Choosing your mode of transportation
Reversing the Route
To reverse the route, touch the Reverse ![]() button, which is at the top between the Start and End fields. This can be useful if you're not great about reversing directions on your own or if your route uses lots of one-way streets.
button, which is at the top between the Start and End fields. This can be useful if you're not great about reversing directions on your own or if your route uses lots of one-way streets.
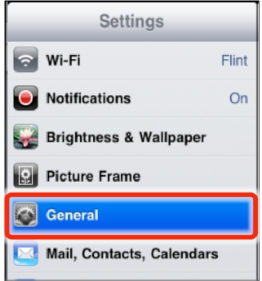
Maps Options

Currently, the only setting that affects your Maps app is Location Services, which is critical for determining your current location.
- Touch the Settings icon.
- Tap the General tab in the left column.
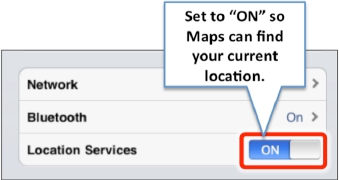
- Now find the Location Services switch about halfway down. Move this switch to the ON position so that Maps can approximate your location.
NOTE: Keeping the Location Services switch ON will reduce battery life by a small amount. If you never use Maps or care about your location, set it to OFF to save your battery life.
Using the Digital Compass
The iPad has a very cool digital compass feature built in. This can be helpful when you need to literally get your bearings and figure out which way is north.
Calibrating and Using the Digital Compass
Before you can use the digital compass, you need to calibrate it. You should only need to calibrate the compass the first time you use it.
- Start Maps as you normally would.
- Tap the current location button twice—it changes from
 to.
to. 
- You'll see a small digital compass appear on the screen, as shown in Figure 16-13.
- The first time you use digital compass, the calibration symbol appears on the screen.

- Move your iPad in a “figure 8” pattern as shown on the screen.
NOTE: The iPad may ask you to move away from any source of interference while you go through the calibration process.
- Hold your iPad level to the ground. If you calibrated it successfully, the compass will rotate and point north.
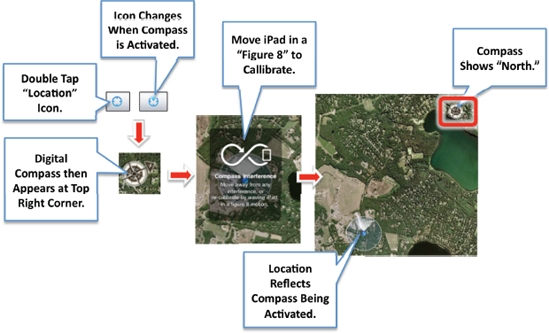
Figure 16-13. Using the digital compass