Chapter 14
Your Calendar
The iPad makes the old calendar that used to hang on the fridge obsolete. In this chapter, we will show you how to utilize the Calendar app of the iPad to its full potential. We will show you how to schedule appointments, how to manage multiple calendars, how to change views on your calendar and even how to deal with meeting invitations.
NOTE: Most of this chapter we talk about syncing your iPad calendar with another calendar because it is nice to have your calendar accessible on your iPad and other places. If you choose, you can also use your iPad in a 'stand alone' mode, where you do not sync to any other calendar. In this case all the steps we describe of adding events, viewing and managing events all apply equally to you. It is critical, however, that you use the iTunes automatic backup feature to save a copy of your calendar just in case something happens to your iPad.
Manage Your Busy Life on Your iPad
The Calendar app is a powerful and easy to use application that helps you manage your appointments, keep track of what you have to do, set reminder alarms, and even create and respong to meeting invitations (for Exchange users).
Today's Day and Date Shown on Calendar Icon
The Calendar icon is usually right on your iPad Home screen. You will quickly notice that your Calendar icon changes to show today's date and day of the week. The icon to the right shows that it is a Monday and the 19th of the month.

TIP: If you use your iPad's Calendar app often, you might want to think about pinning or moving it to the Bottom dock - you learned how to do this in the section on docking icons in Chapter 5.
Syncing or Sharing Your Calendar(s) with Your iPad
If you maintain a calendar on your computer or on a web site such as Google Calendar, you can synchronize or share that calendar with your iPad either using iTunes and your sync cable or by setting up a wireless synchronization (see Chapters 3 and 24 for more information on syncing).
After you set up the calendar sync, all of your computer calendar appointments will be synced with your iPad calendar automatically, based on your sync settings (see Figure 14-1).
If you use iTunes to sync with your calendar (e.g., Microsoft Outlook, Entourage, or Apple's iCal), your appointments will be transferred or synced every time you connect your iPad to your computer.
If you use another method to sync (e.g., Mobile Me, Exchange, or similar), this sync is wireless and automatic, and it will most likely happen without you having to do anything after the initial setup process.

Figure 14-1. Syncing PC or Mac Calendar to iPad
Viewing Your Schedule and Getting Around
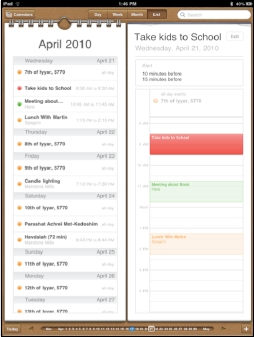
The default view for the Calendar is your Day view. It will show you at a glance any upcoming appointments for your day. Appointments are shown in your calendar (see Figure 14-2). If you happen to have several different calendars that you have set up on your computer, such as Work and Home, then you will see these as separate colors on your iPad's calendar.

Figure 14-2. The Calendar Day View Layout
You can manipulate the calendar in various ways:
Move a day at a time - If you tap the triangles next to the Slider at the bottom, you move forward or backward a day.
Change views - Use the Day, Week, Month, and List buttons at the top to change the view.
TIP: Drag the slider at the bottom by moving left or right to advance quickly through days.
Jump to today - Use the Today button at the bottom left-hand corner.
The Calendar's Four Views
Your iPad's Calendar app comes with four views: Day, Week, Month, and List. You can switch views by tapping the name of the view at the bottom of the screen. Here's a quick overview of the four views.
Day view - When you start the Calendar app, the default view is usually the Day view. This allows you to quickly see everything you have scheduled for the day. At the top of the Calendar app are buttons to change the view.


List view or Agenda view - Touch the List view button at the top, and you can see a list of your appointments along the left-hand side.
Depending on how much you have scheduled, you could see the next day or even the next week's worth of scheduled events.
Week view - Touch the Week view button at the top, and you can see all your appointments for the week.
Similarly, tap any appointment to see details about that appointment.
Once you see the details, you can tap the Edit button to change them.
Month view - Touch the Month view and you can see a layout of the full month. Days with appointments have a small dot in them. The current day will show up highlighted in blue.
TIP: Double-tap on any day to jump to the Day view for that date. To return to Today view, just touch the Today tab at the bottom left.
![]()
Go to the next month - Tap the triangle to the right of the Month slider at the bottom.
Go to the previous month - Tap the triangle to the left of the Month slider.
To advance days in Day view, just touch the arrows to either side of the Date slider at the bottom.
NOTE: While you can scroll in the Calendar app, you cannot swipe through your days, which runs counter to what you might expect.
Working with Several Calendars
Your iPad's Calendar app can track various calendars. The number of calendars you see depends on how you set up your synchronization using iTunes or other sync methods. In the example that follows, we have categorized personal appointments in our Home calendar and categorized work appointments in a separate Work calendar.
In the appointments in our Calendar app, we have our Home calendar appointments showing up in red and our Work appointments in orange or green.
When you set up your Sync settings, you were able to specify which calendars you wanted to sync with your iPad. You can customize your calendar further by following these instructions.
Changing the colors - You will need to change the color of the calendar in the program on your computer that is synced to your iPad; this will change the colors on your iPad.
Adding a new calendar - It's a two-step process to add a new calendar to sync with your iPad.
- Set up that new calendar on your computer's Calendar program.
- Adjust your Sync settings to make sure this new calendar syncs to your iPad.

Viewing only one calendar - To view just one calendar at a time, tap the Calendars button at the top and select only the calendar you wish to see.
Adding New Calendar Appointments/Events
You can easily add new appointments right on your iPad, and they will be synced (or shared with) your computer the next time the sync takes place.
Adding a New Appointment
Your instinct will most likely be to try to touch the screen at a particular time to set an appointment; unfortunately, this is not how setting appointments work.

To add a new calendar event from any Calendar view, follow these steps.
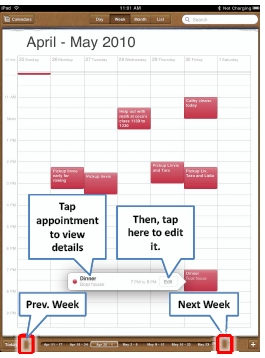
- First, tap the + icon at the bottom right corner of the screen. The Add Event screen will now show.
- Next, touch the box marked Title and Location.
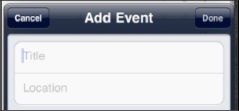
- Type in a title for the event and the location (optional). You might type “Meet with Martin” as the title and input the location as “Office.”
- Or, you might choose to type “Lunch with Martin” and then choose a very expensive restaurant in New York City.

- Touch the blue Done button in the upper right corner to return to the Add Event screen.

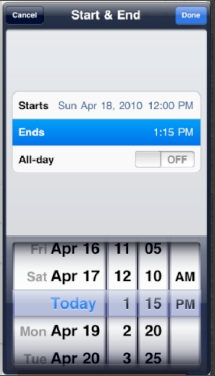
- Touch the Starts or Ends tab to adjust the event timing. To change the start time, touch the Starts field to highlight it in blue. Then, move the rotating dials at the bottom to reflect the correct date and start time of the appointment.

- To change the end time, touch the Ends field and use the rotating dials.
Alternatively, you can set an all-day event by touching the switch next to All-day to set it to ON.

NOTE: You will see a tab labeled Invitees before the Repeat tab only if you sync to an Exchange calendar. We show you how to use this Invitees tab to invite people to calendar events in Chapter 24: “Other Sync Methods.”
Recurring Events and Alerts (Alarms)

Some of your appointments happen every day, week, or month at the same time. If the appointment you are scheduling is a repeating or recurring appointment, just touch the Repeat tab and then select the correct option from the list.

Touch Done to get back to the main Event screen.
An audible reminder of an upcoming appointment - an alert - can help keep you from forgetting an important event. Follow these steps to create an alert.
- Touch the Alert tab and then select the option for a reminder alarm. You can have no alarm at all or set a time anytime from five minutes before the event all the way to two days before - whatever works best for you.

- Touch Done to get back to the main Event screen.
- After you add an alert, you are given the option to add a second (optional) alert.
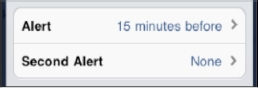
This can be really useful if you need a second reminder to ensure you do not miss the event.
For example, if you need to pick up your kids at the bus stop, you might want one alert 15 minutes ahead of time, then a final alert 5 minutes ahead of time, so you can be absolutely certain that you don't miss the pickup.
TIP: Another good example of two alerts occurs when you have to take your child out of school for a doctor or dentist appointment.
Set the first alert for the night before to write a note to the school and give it to your child.
Set the second alert for 45 minutes prior to the time, so you can leave enough time to pick up your child and get her to the appointment.

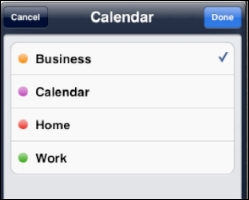
Choosing Which Calendar to Use

If you use more than one calendar in Outlook, Entourage, iCal or some other program and you sync your iPad with that program, you will have various calendars available to you.
NOTE: If you create an event and choose an Exchange calendar, you'll have an option to invite other users to the event
Touch the Calendar button in the upper left corner to see all your calendars.
Tap the calendar you want to use for this particular event. Usually, the calendar selected is the last one you selected for the previous event you scheduled on your iPad.
Switching an Event to a Different Calendar
You will notice that when you edit the calendar event on your iPad, you will not have the option to switch calendars.
If you wish to change the scheduled calendar on your iPad, you will need to delete the original event and schedule a new event on the preferred calendar.
TIP: To delete the calendar event, tap the event, and then select the Edit button. Swipe to the bottom of the Edit screen and select Delete Event. Next, you will need to confirm that you want to delete the event.
Adding Notes to Calendar Events

If you want to add some notes to this calendar event, tap Notes and type a few notes.
TIP: If this is a meeting somewhere new, you could type or copy/paste some driving directions.

Editing Appointments
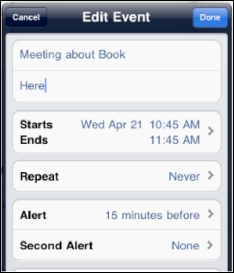
Sometimes, the details of an appointment may change and need to be adjusted (see Figure 14-3). Fortunately, this is an easy task on your iPad.
First, locate the appointment that needs to change and touch it. In the upper right-hand corner, you will see the Edit button. Touch Edit, and you will return to the Edit Event screen showing the appointment details.

Figure 14-3. Edit an Appointment.
Just touch the tab in the field you need to adjust. For example, you can change the time of this appointment by touching the Starts or Ends tab, and then adjusting the time for the event's starting or ending time.
Deleting an Event
Notice that, at the bottom of the Edit screen, you also have the option to delete this event. Simply touch Delete Event at the bottom of the screen to do so.

Meeting Invitations
For those who use Microsoft Exchange, Microsoft Outlook or Entourage regularly, meeting invitations become a way of life. You receive a meeting invitation in your e-mail, you accept the invitation, and then the appointment gets automatically placed in your calendar.
On your iPad, you will see that invitations you Accept get put right into your calendar.
NOTE: If you use an Exchange calendar or Google calendar, you can invite people and reply to meeting invitations on your iPad. See the “Working with the Google or Exchange Calendar” section of Chapter 24 “Other Sync Methods” to learn more.

If you touch the meeting invitation in your calendar, you can see all the details that you need: the dial in number, the meeting ID, and any other details that might be included in the invitation.

NOTE: As of writing, you can accept meeting invitations on your iPad from your Exchange account, and you can create them as long as you choose the Exchange calendar. Invitations will also transfer automatically from Entourage, iCal, or Outlook if you have iTunes set to sync with those programs.
Calendar Options
There are just a few options to adjust in your Calendar app; you can find these in the Settings app. Just touch Settings from your Home screen.

![]()
Scroll down to the Mail, Contacts, Calendars tab and touch it. Scroll down to Calendars, and you will see three options. The first option is a simple switch to be notified of New Invitation Alerts - if you receive any meeting invites, it is good to keep this set in the default ON position.

![]()
Next, you can choose your time zone. This setting should reflect your Home settings from when you set up your iPad. If you are traveling, however, and want to adjust your appointments for a different time zone, you can change this to any other city you would like.

Changing the Default Calendar
We mentioned earlier that you can have multiple calendars displayed on your iPad. This option allows you to choose which calendar will be your Default calendar.
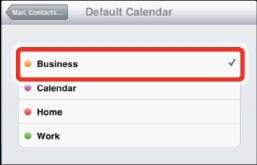
That means that when you go to schedule every new appointment, this calendar will be selected by default.
If you wish to use a different calendar - say, your Work calendar - you can change that when you actually set the appointment, as shown earlier in this chapter.