Chapter 4
Wi-Fi and 3G Connections
We live in a connected world. Wireless Internet (Wi-Fi) access has become the rule, not the exception—chances are you're already using Wi-Fi at your home or office. Now you can use it to connect your iPad. And if your iPad has a 3G radio, you can also connect to the Internet anywhere you have cellular data coverage—a much wider area than Wi-Fi networks.
In this chapter we'll talk about the differences between the two types of connections for your iPad: Wi-Fi (wireless local area network) and 3G (cellular service—the wide area data network used by your mobile phone). We'll show you all the ways to get connected or disconnected from these two types of networks. There may be times you want to disable or turn off your 3G connection and only use Wi-Fi to save money in data connection charges.
The beauty of the iPad is that it has wireless Internet access built in. Once you connect your iPad to a wireless (Wi-Fi or 3G) network, you can be sending e-mail and surfing the Web in minutes. And once you discover all the great apps and books available, you'll never want to be disconnected again.
NOTE: Your iPad may not have a 3G connection. Some iPads come with only the Wi-Fi connection and do not have the ability to connect to a 3G cellular network.
How do you know which iPad you have? A 3G-enabled iPad will have a black plastic strip along the top edge which shows more prominently along the back side of the iPad to aid in data reception.
What Can I Do When I'm Connected to a Wi-Fi or 3G Network?
Following are some of the things you can do when connected …
- Access and download apps (programs) from the App Store.
- Access and download music, videos, podcasts, and more from iTunes on your iPad.
- Browse the Web using Safari.
- Send and receive e-mail messages.
- Use social networking sites that require an Internet connection, like Facebook, Twitter, etc.
- Use your iPad as a phone with the Skype app (See Chapter 22: Social Networking).
- Play games that use a live Internet connection.
- Anything else that requires an Internet connection.
Wi-Fi Connections
Every iPad comes with Wi-Fi capability built in. If you have a 3G model (you can tell it's 3G because there is a black plastic strip along the top edge), then you have both 3G and Wi-Fi. So let's take a look at getting connected to the Wi-Fi network. Things to consider about Wi-Fi connections are:
- No additional cost for network access and data downloads (if you are using your iPad in your home, office, or a free Wi-Fi hotspot).
- Wi-Fi tends to be faster than a Cellular Data 3G connection.
- More and more places, including airplanes, provide Wi-Fi access, but you may have to pay a one-time or monthly service fee.
Setting Up Your Wi-Fi Connection
To setup your Wi-Fi connection, follow these steps:
- Tap the Settings icon
- Tap Wi-Fi in the left column to see the screen shown at the right.
- Make sure the Wi-Fi switch is set to On. Tap it if it is Off.
- Once Wi-Fi is ON, the iPad will automatically start looking for wireless networks.
- The list of accessible networks is shown below the Choose a Network… option. You can see in this screenshot that we have two networks available.
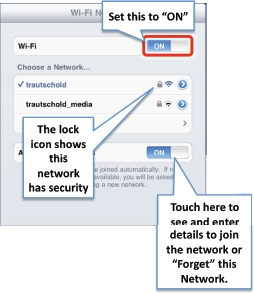
To connect to any network listed, just touch it. If the network is unsecure (does not require a password), you will be connected automatically.
NOTE: Some places, like coffee shops, use a web-based login instead of a username/password screen. In those cases, when you click on the network (or try to use Safari), iPad will slide up a browser screen and you'll see the web page along with login options.
Secure Wi-Fi Networks—Entering a Password
Some Wi-Fi networks require a password to log in. This is set when the network administrator creates the wireless network. You will have to know the exact password, including whether it is case-sensitive.

If the network does require a password, you will be taken to the password-entry screen. Type the password exactly as given to you and press the enter key on the on-screen keyboard (which is now labeled as Join).
On the next network screen: you'll see a checkmark showing that your are connected to the network.
TIP: You can paste into the password dialog, so for longer, random passwords, you can transfer them to your iPad (in an email message) and just copy and paste them. Just remember to delete the e-mail immediately after to keep things secure.
Switching to a Different Wi-Fi Network
At times you may want to change your active Wi-Fi network. This might occur if you are in a hotel, apartment or other place where the network selected by the iPad is not the strongest network, or you want to use a secure network instead of an unsecure one.
To switch from the currently selected Wi-Fi network, tap the Settings icon, touch Wi-Fi in the left column, then touch the name of the Wi-Fi network you want to join. If that network requires a password, you'll need to enter it to join. (See Figure 4-1.)

Figure 4-1. Switching to a different Wi-Fi network
Once you type the correct password (or if you touched an open network), your iPad will join that network.
Verifying Your Wi-Fi Connection
To verify that you are connected to a Wi-Fi network, look for the network name with the checkmark next to it.
When you go back to the Settings screen, you should now see the name of your Wi-Fi network with a checkmark next to it in the list under Choose a Network.

Advanced Wi-Fi Options (Hidden or Undiscoverable Networks)
Sometimes you may not be able to see the network you want to join because the name has been hidden by the administrator. Below you learn how to join such networks on you iPad. Once you have, the next time you come in contact with that network it will join automatically without asking. You can also tell your iPad to ask every time it joins a network; we show you how to do that below as well. Sometimes you may want to erase or forget a network. Say you were at a one-time convention and want to get rid of the associated network, you'll learn that here, too.
Why Can't I See the Wi-Fi Network I want to Join?
Sometimes, for security reasons, people don't make their networks discoverable and you have to manually enter the name and security options to connect.
As you can see in Figure 4-2, your list of available networks includes Other…. Touch the Other tab, and you can manually enter in the name of a network you would like to join.

Figure 4-2. You can manually enter the name of a Wi-Fi network.
Type in the Wi-Fi network name and then touch the Security tab and choose which type of security is being used on that network. If you are unsure, you'll need to find out from the network administrator.
When you have the information you need, enter it along with the proper password and this new network will be saved to your network list for future access.
Reconnecting to Previously Joined Wi-Fi Networks
The nice thing about the iPad is that when you return to an area with a Wi-Fi network you previously joined (whether it was an open or a secure, password-protected, network) your iPad will automatically join the network without asking you again. However, you can turn off this automatic-joining feature as described below.
Ask to Join Networks
By default, this switch is set to On and you will join known or visible Wi-Fi networks automatically. If networks are available that are not known to you, you will be asked before being connected.
If the switch is set to Off, you will be automatically connected only to known networks and you'll have to follow the procedure we described for manually joining unknown networks.

Why might someone turn off automatically joining a network? This could be a good security measure if, for example, you don't want your kids to be able to join a wireless network on the iPad without your knowledge.
Forget (or Erase) a Network
If you find that you no longer want to connect to a network on your list, you can “forget” it—i.e., take it off your list of networks. Just touch the small blue arrow next to that network. The screen that follows shows the network details of that particular connection.
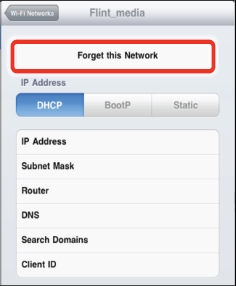
Touch Forget this Network at the top of the screen. You will be prompted with a warning. Just touch Forget Network and the network will no longer show up on your list.

3G Cellular Data Connection
If you have a 3G iPad, you will also be able to connect to the cellular data network – the same network you connect to with an iPhone or other mobile phone. Things to consider about Cellular Data Connections:
- Wider availability than a Wi-Fi connection—you can connect to 3G in a car or away from a city, whereas Wi-Fi is not typically be available in these locations.
- Extra monthly service fees for access to the Cellular Data network.
- In the US, AT&T charges about $15 for 250MB per month and about $30 for unlimited data.
NOTE: Orange UK, Vodafone UK, O2, and Rogers Canada will all be announcing pricing in late May when the iPad ships internationally.
Setting Up Your 3G Connection
Before you can connect to the 3G cellular network, you have to purchase a cellular data plan from your wireless carrier. For the iPad in the US, this is currently AT&T.
TIP: You might be able to save yourself some money with cellular data plan charges by doing the following:
- Always use Wi-Fi when possible
- Start with the lower cost cellular data plan ($14.99 for 250MB)
- Monitor your cellular data usage throughout the month to make sure you are not going to exceed the lower cost data plan.
You may find that you can live with the lower cost plan if you use Wi-Fi for most of your data needs.
To do this:
- Tap the Settings icon on your iPad.
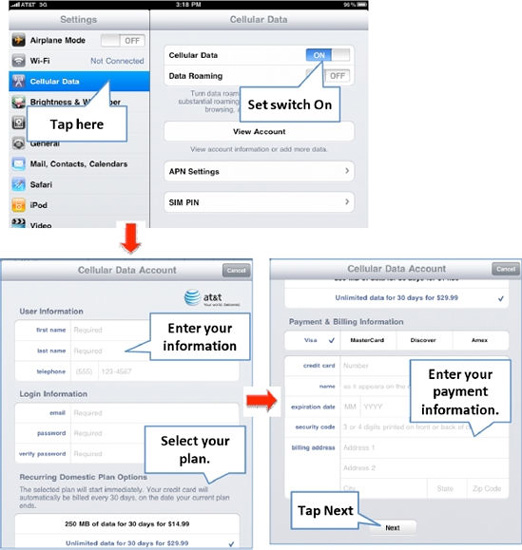
- Tap Cellular Data in the left column.
- Set the switch next to Cellular Data to On. (See Figure. 4-3.)
- The first time you do this, you will see a pop-up window asking you to setup your account.
- Enter your personal information, username and password that is specific to this new Cellular Data plan. This account is not connected your email account, cell phone plan or any other account so you could enter the same information or make it different.
NOTE: As of publishing time, the wireless carrier in the US (AT&T) only offered recurring billing plans. What this means is that you set up the plan once, and you are billed every month until you cancel the plan.
- Scroll down to see the rest of the screen and select your data plan by tapping the screen.
- Enter your credit card information.
- Enter your personal information, username and password that is specific to this new Cellular Data plan. This account is not connected your email account, cell phone plan or any other account so you could enter the same information or make it different.
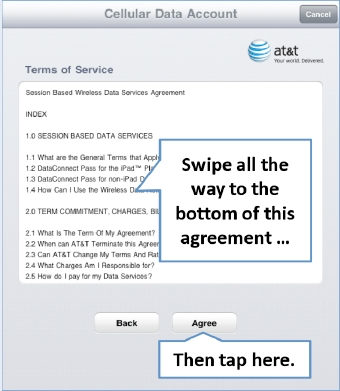
- Tap the Next button.
- On this next screen, you will need to swipe to the bottom of the agreement and tap Agree to continue. (Assuming you agree.)
- If you are traveling with your iPad, then tap Add International Data and follow the steps in the next section.
- If you do not want to add the international plan at this time (you can always add it later), then tap Submit to finish.

- After taping Submit, you will see a window similar to this one. Tap Ok to close the window.

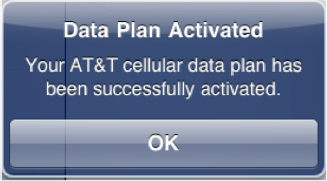
- Finally, when your new cellular data plan is setup, you will see a pop-up message similar to this one.
Adding an International Data Plan
If you plan on taking a trip, you may want to add an International Data plan to your iPad. It is easy to do by following these steps:
- Tap the Settings icon.
- Tap Cellular Data in the left column.
- Tap View Account in the right column.
- Login to the account by entering your Cellular Data username and password you used when you created this account.
- Tap Add International Plan (see Figure 4-4).
- On the International Data Plan window

Figure 4-4. Buying an International Cellular Data Plan
Monitoring Your Cellular Data Usage and Changing Your Plan
If you purchase the limited use data plan (the $15 plan for 250MB/month), you will want to check periodically to see how much data you are using on a daily basis.
To do this, follow these steps:
- Tap the Settings icon.
- Tap Cellular Data in the left column.
- Tap View Account in the right column.
- Login to the account by entering your Cellular Data username and password you used when you created this account. (See Figure 4-2 above).
- Look at your data plan, status and billing period listed in the Account Overview section at the top. You will only see actual data usage in megabytes (MB) if you have selected a plan that limits the amount of data you have purchased (e.g. 250 MB).
- If you want to change you plan or add data, then tap Add Data or Change Plan and follow the steps to adjust your plan.
NOTE: The iPad will notify you when you have 20%, 10%, and 0 left on your 250MB plan and you'll have the option of renewing that plan for another $14.99 or upgrading to the $30 unlimited plan.
INTERNATIONAL TRAVEL—HOW TO AVOID LARGE CELLULAR (3G) DATA ROAMING BILLS (FOR 3G IPAD MODELS ONLY)
We've heard of people who traveled to another country being surprised with $300 or $400 monthly roaming charges after their trip. You can avoid these by taking a few easy steps before and during your trip.
TIP: Try to use your Wi-Fi connection at free Wi-Fi networks overseas to keep your Cellular data roaming charges to a minimum.
- Sign up for a one-time International Data plan as shown above in the “Adding An International Data Plan” section. In most cases, activating the international data plan allows you to save some money over the standard data roaming charges.
- Learn about any Data Roaming Charges. Check with your cellular data supplier about any data roaming charges. You can try searching on your phone company's web site, but usually you'll have to call the help desk and specifically ask what the iPad data roaming charges are for the country or countries you'll be visiting. If you plan to use e-mail, mapping, web browsing, or any other data services, you should specifically ask about whether any of these services are charged separately.
- Explore buying and using a foreign SIM Card (MicroSIM format).
Your iPad cellular data supplier may not offer special deals on international data roaming plans or may have rates that are unreasonably high. In such cases, you can insert a SIM card that you'll purchase in the foreign country.
CAUTION: The iPad uses a MicroSIM and almost all other phones use a MiniSIM. This may make it hard to find an international carrier with a SIM card that will fit.
Often, inserting a SIM card for the country you're in will eliminate or greatly reduce data roaming charges. However, do carefully check the cost of data on that foreign SIM card. Using a foreign SIM card may save you hundreds of dollars, but it's best to do some Web research or try to talk to someone who recently traveled to the same country to make sure.
Airplane Mode – Turn Off 3G and Wi-Fi
Often when you are flying on an airplane, the flight crew will ask you to turn off all portable electronic devices for takeoff and landing. Then, when you get to altitude, they say “all approved electronic devices” can be turned back on.
You can turn off the iPad by pressing and holding the power button on the top right edge, then Slide to Power Off with your finger.
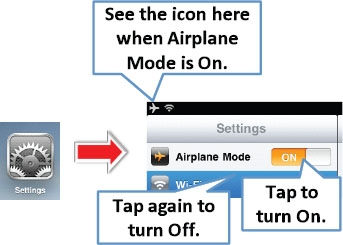
If you have a 3G/Cellular Data iPad, then you can turn on Airplane Mode in the Settings icon as follows:
- Tap the Settings icon.
- Set the switch next to Airplane Mode in the top of the left column to On.
TIP: Some airlines do have in-flight Wi-Fi networks, so in this case you will want to leave your Wi-Fi turned On.
You can turn Off or On your Wi-Fi connection by following these steps (Figure 4-5):
- Tap the Settings icon.
- Tap Wi-Fi in the top of the left column.
- Set the switch next to Wi-Fi in the top of the right column to Off.
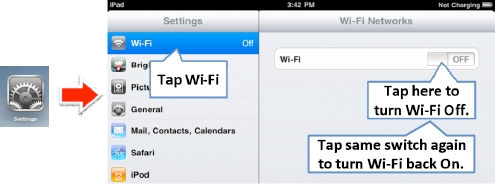
Figure 4-5. How to Turn Wi-Fi Off or On.