Chapter 12
In this chapter, we will help you explore the world of e-mail on your iPad. You will learn how to set up multiple e-mail accounts, check out all the various reading options, open attachments, and clean up your Inbox.
And for cases when e-mail is not working quite right, you will learn some good troubleshooting tips to help you get back up and running.

Getting Started with E-mail
Setting up e-mail on your iPad is fairly simple. You can sync e-mail account settings from iTunes (see Chapter 3's, “Sync E-mail Account Settings” section), or you can set up e-mail accounts directly on your iPad. You do need a network connection to get e-mail up and running.
A Network Connection Is Required
Mobile e-mail is certainly all the rage today. You can view, read, and compose replies to e-mails already synced to your iPad without a network connection; however, you will need to have network connectivity (either Wi-Fi or 3G/cellular) to send and/or receive e-mail from your iPad. Check out Chapter 4: “Wi-Fi and 3G Connectivity” to learn more. Also check out the “Reading the Top Connectivity Status Icons” section in the Quick Start Guide in Part 1.
TIP: If you are taking a trip, simply download all your e-mail before you get on the airplane; this lets you read, reply, and compose your messages. All e-mails will be sent once you land and re-establish your connection to the Internet.
Setting up E-mail on the iPad
You have two options to set up your e-mail accounts on the iPad.
- Use iTunes to sync e-mail account settings.
- Set up your e-mail accounts directly on the iPad.
If you have a number of e-mail accounts that you access from an e-mail program on your computer (e.g., Microsoft Outlook, Entourage, and so on), then it is easiest to use iTunes to sync your accounts. See the “Sync E-mail Account Settings” section in Chapter 3 for help.
If you only have a few accounts, or you do not use an e-mail program on your computer that iTunes can sync with, then you will need to set up your e-mail accounts directly on the iPad.
Entering Passwords for E-mail Accounts Synced from iTunes
In the “Sync E-mail Account Settings” section of Chapter 3, we showed you how to sync your e-mail account settings to your iPad. After this sync completes, all of your e-mail accounts should be visible on your iPad in the Settings icon. All you will need to do is enter the password for each account.
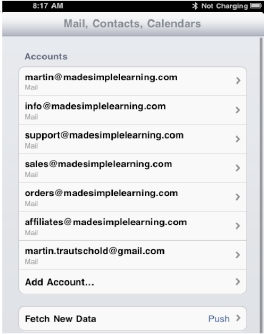
To enter your password for each synced e-mail account, follow these steps (see Figure 12-1).
- Touch the Settings icon.
- Touch the Mail, Contacts and Calendars option in the left column.
- Under Accounts in the right column, you should see all your synced e-mail accounts listed.
- Tap any listed e-mail account, type its password, and click Done.
- Repeat for all listed e-mail accounts.

Figure 12-1. Entering passwords for each e-mail account synced from iTunes
Set up Your E-mail Accounts on the iPad
To add a new e-mail account on your iPad, follow these steps:
- Touch the Settings icon.
- Touch the Mail, Contacts and Calendars option in the left column.
- Tap Add Account below your e-mail accounts.
If you have no accounts set up, you will only see the Add Account option.

TIP: To edit any e-mail account, just touch that account.
- Choose which type of e-mail account to add on this next screen.
- Choose Microsoft Exchange if you use a Microsoft Exchange e-mail server.
- You should also choose Microsoft Exchange if you use Google Calendar, and Google Contacts to store your personal information, and you want to wirelessly sync them to your iPad.
- Choose MobileMe if you use this service.
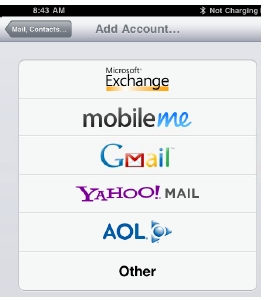
NOTE: We will show you how to set up both
Google/Microsoft Exchange and MobileMe in Chapter 24. - Choose Gmail if you use Google for only your e-mail, but you do not (or do not want to) wirelessly sync e-mail with your Google Contacts or Google Calendar.
- Choose Yahoo! Mail if you use Yahoo!
- Choose AOL if you use AOL.
- Choose Other if none of the above apply, and you want to sync a standard POP or IMAP e-mail account. Then choose Add Mail Account from the next screen.
- Type your name as you would like others to see it when they receive mail from you into the Name field. Then, add the appropriate information into the Address, Password, and a Description fields.
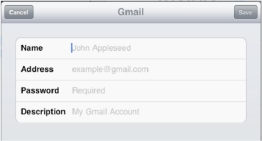
- Tap the Save or Next button in the upper right corner.
Specifying Incoming and Outgoing Servers
Sometimes, the iPad will not be able to automatically set up your e-mail account. In these cases, you will need to manually enter a few more settings for your e-mail account.
TIP: You may be able to find the settings for your e-mail provider by doing a web search for your e-mail provider's name and “e-mail settings.” For example, if you use hotmail.com, then you might search for “POP or IMAP e-mail settings for hotmail.com.” If you cannot find these settings, then contact your e-mail provider for assistance.
If the iPad is unable to log in to your server given just your e-mail address and password, then you see a screen similar to this one.
Under Incoming Mail Server, type the appropriate information into the Host Name, User Name, and Password fields. Usually, your incoming mail server is something like mail.nameofyourisp.com.
Type in Outgoing Mail Server information, which usually looks like either smtp.nameofyourisp.com or mail.nameofyourisp.com.
You can try to leave the Name and Password fields blank – if that doesn't work, you can always go back and change them.

You may be asked if you want to use SSL (secure socket layer) – a type of outgoing mail security that may be required by your e-mail provider. If you don't know whether you need it or not, just check the mail settings with your e-mail provider.
CAUTION: The authors recommend that you use SSL security whenever possible. If you do not use SSL, then your login credentials, messages, and any private information is sent in plain text (unencrypted), leaving it open to snoopers.
Verifying that Your Account Is Set Up
Once all the information is put in, the iPad will attempt to configure your e-mail account. You may get an error message – in which case you need to review the information you input.

If you are taken to the screen that shows all your e-mail accounts, look for the new account name.
If you see it, your account was set up correctly.
Fixing the Cannot Get Mail Error
If you try to enter the Mail icon, you receive an error that says “Cannot Get Mail – No password provided for (your account).” If this happens, then review this chapter's “Enter Passwords for E-mail Accounts Synced from iTunes” section.

Navigating Around Your Mail
Now that you have set up your e-mail accounts on your iPad, you are ready to learn how to navigate through your e-mail.
The Two Views of E-mail
You will enjoy two views of your e-mail on the iPad: Portrait (vertical) and Landscape (horizontal). The Portrait view gives you a full screen view of each e-mail message and allows you to focus on the message. The Landscape view shows you your Inbox on the left side and your e-mail on the right side (see Figure 12-2).

Figure 12-2. Two views of e-mail on your iPad
TIP: If you are setting your iPad down on the desk or holding it in your lap, then you may want to use the Lock switch to lock your view in either vertical or horizontal mode, so it does not keep flipping around. The Lock switch is located just above the volume keys on the upper portion of the right edge of your iPad. See the “Screen Rotation Lock” section of Chapter 1 for help.
Moving Between Your Mail Folders and Accounts
If you have more than one e-mail account on your iPad, you will want to know how to switch between the various accounts.
To move between your accounts, follow these steps (see Figure 12-3).
- If you are in Portrait mode, tap the Inbox button in the top left of the screen. If you are in Landscape mode, then you can skip to Step 2 below.
- Tap your E-mail address button next to the word Inbox at the top.
- Tap the Accounts button in the same place.
- Now you will see all your e-mail accounts; tap any E-mail account box to view it.
- Now you will see all folders synced to your iPad from that e-mail account. Tap any folder (such as the Inbox folder) to view its contents.
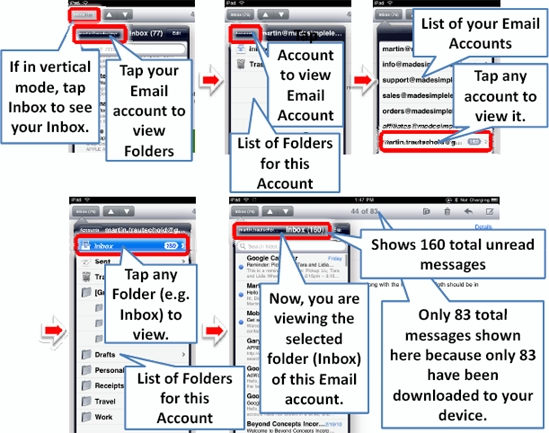
Figure 12-3. Switching between e-mail accounts and e-mail folders on your iPad
Compose and Send E-mail

To launch the e-mail program, just touch the Mail icon on your Home screen.
TIP: If you left the Mail icon while viewing a particular e-mail, list of folders, or an account, then you will be returned directly to that same place.
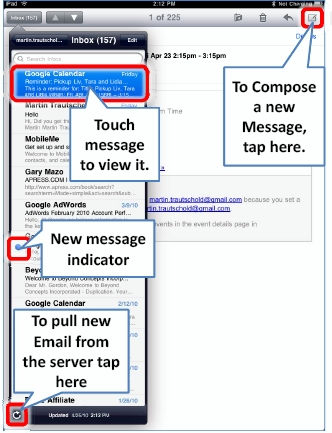
If you are going into your e-mail for the first time, you may see an empty Inbox. Hit the Refresh button in the lower left corner of the window to pull in the latest e-mail. The iPad will begin to check for new mail and then display the number of new messages for each account.
Composing a New E-mail Message

When you start the Mail program, your first screen should be your Accounts screen. At the bottom right-hand corner of the screen, you will see the Compose icon. Just touch the Compose icon to get started creating a new message.

Addressing Your Message - Choose the Recipients
You have a few options for selecting recipients, depending on whether or not the person is in your Contact List on your iPad.
Option 1 – Type an e-mail address; notice the @ and. keys on the bottom, which help your typing.
Option 2 – Type a few letters of someone's first name; hit the space key, and then type a few letters of that person's last name. The person's name should appear on the list; tap to select that person's name.
Option 3 – Hit the + sign to view your entire Contact List and search or select a name from it.

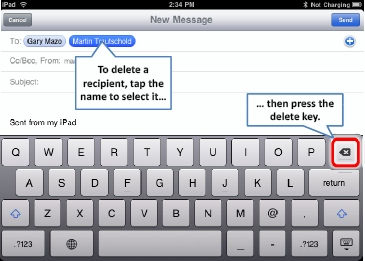
DELETING A RECIPIENT
If you need to delete a name from the recipient list (To:, Cc:, or Bcc:), tap the name and hit the Backspace key.
TIP: If you want to delete the last recipient you typed (and the cursor is sitting next to that name), hit the Delete key once to highlight the name and hit it a second time to delete it.
Changing the E-mail Account to Send from
If you have more than one e-mail account set up, the iPad will use whichever account is set as the default account. (This is set in Settings > Mail, Contacts, Calendars > Default Account.)
Follow these steps to change the e-mail account you send from.
- Tap an e-mail's From: field to highlight it.
- Tap the From: field again to see a list of your accounts.
- Tap the new e-mail account to see it listed in the e-mail's From: field.

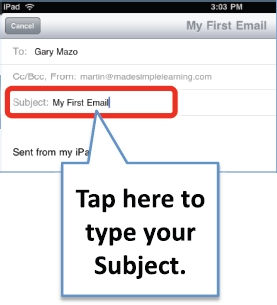
Typing a Subject
Now you need to enter a subject for your e-mail.
- Touch the Subject: line and enter text for the Subject: field of the e-mail.
- Press the Return key or tap the Body section of the e-mail to move the cursor to the Body section.
Typing Your Message
Now that the cursor is in your body of the e-mail (under the subject line), you can start typing your e-mail message.
E-MAIL SIGNATURES
If you have set up an e-mail signature for the account you are using, it will be displayed at the bottom of the Body field of the e-mail message. See the “Changing Your E-mail Signature” later in this chapter to learn how to change your e-mail signature.

Keyboard Options
While you are typing, remember you have two keyboard options – the smaller Portrait (vertical) keyboard and the larger Landscape (horizontal) keyboard (see Figure 12-4).
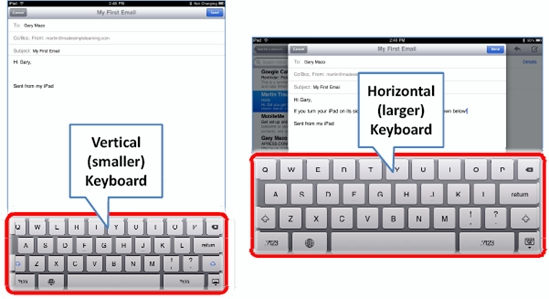
Figure 12-4. You have two built-in keyboards: the smaller vertical keyboard and the larger horizontal one.
TIP: It is much easier to type with your hands when the keyboard is larger. Once you get the hang of typing on the larger keyboard with two hands, you will find that it is much faster than typing with one finger. See Chapter 2's “Typing, Copy/Paste, and Search” section for more typing tips.
Send Your E-mail
Once you have typed your message and proofread the text, tap the blue Send button in the top right-hand corner.
Your e-mail will be sent, and you should hear the iPad's Sent sound, which confirms that your e-mail was sent (unless you have disabled this sound in your Settings icon).

Saving a Message As a Draft and Sending It Later
If you are not ready to send your message, but want to save it as a draft message to send later, follow these steps:

- Compose your message, as described earlier.
- Press the Cancel button in the upper right corner.
- Select Save from the Cancel drop down list to save this as a draft.
Later, when you want to locate and send your draft message, follow these steps:
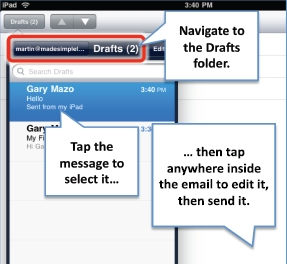
- Open the Drafts folder in the e-mail account from which you composed this message See the “Moving Between Your Mail Folders and Accounts” section in this chapter for help getting into the Drafts folder.
- Tap the e-mail message in the Drafts folder to open it.
- Tap anywhere in the message to edit it.
- Press the Send button.
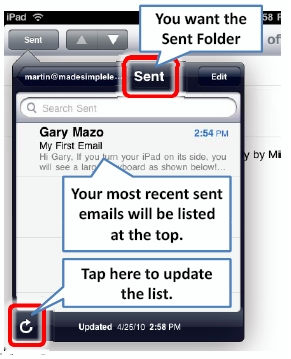
Checking Sent Messages
Follow these steps to confirm that the e-mail was sent correctly:
- Tap the E-mail account name button in the upper left corner to see the mail folders for the account you just used to send your message.
- Tap the Sent folder.
- Verify that that the top e-mail you see in the list is the one you just composed and sent.
NOTE: You will only see the Sent and Trash folders if you have actually sent or deleted e-mail from that account on the iPad. If your e-mail account is an IMAP account, you will see many folders other than those described in this chapter.
Reading and Replying to Mail
In order to read your e-mail, follow these steps:
- Navigate to the Inbox for the e-mail account you want to view using the steps described earlier in this chapter.
- To read any message, just touch it from your Inbox.
- New, unread messages are shown with a small blue dot to the left of the message.
- Flick your finger up or down in the Inbox to scroll through your messages.
- When you are reading a message, swipe up or down to scroll through it.
Zooming In or Out
As when browsing the Web, you can zoom in to see your e-mail in larger text. You can also double-tap, just as you do on the Web; and you can also Pinch to zoom in or out (see the “Zooming” section in our Quick Started Guide in Part 1 of this book.)
E-mail Attachments
Some e-mail attachments are opened automatically by the iPad, so you don't even notice that they were attachments. Examples include Adobe PDF files and some types of image, video, and audio files. You may also receive documents such as Apple Pages, Numbers, Keynote, Microsoft Word, Excel, and PowerPoint files as attachments. You will need to open these.
Knowing When You Have an Attachment
Any e-mail with an attachment will have a little Paperclip icon next to the sender's name, as shown to the right. When you see that icon, you know you have an attachment.

Receiving an Auto-open Attachment
Now say you received a one-page Adobe PDF file or an image. (Multi-page PDF files require that you tap to open them.) Once you open the mail message with this kind of attachment, you will see it directly below the message (see Figure 12-5).

Figure 12-5. Some attachments will automatically open under the e-mail message.
TIP: If you want to save or copy an auto-opened attachment, simply press and hold it until you see the pop-up window. At this point, you can select Copy or Save Image. When you save an image, it will be placed in your Photos app in the Saved Photos album.
Opening E-mail Attachments
Instead of immediately opening in the body of the email as we just described, other types of attachments, such as spreadsheets, word processing documents, and presentation files, will need to be manually opened..
Tap for Quick Look Mode
To open in a Quick Look mode, follow the steps below:
- Open the message with an attachment (see Figure 12-6).
- Quickly tap the attachment to instantly open it in Quick Look mode.
- You can navigate around the document. Remember you can zoom in or out and swipe up or down.
- If you open a spreadsheet with multiple tabs or spreadsheets, you will see tabs across the top. Touch another tab to open that spreadsheet.
- When you are done looking at the attachment, tap the document once to bring up the controls, and then tap Done in the upper left corner.
- If you would like to look at the opened document in another app (such as Numbers) so you can edit it, then tap the Open In button in the upper right corner.

Figure 12-6. Quickly viewing attachments by tapping them
Opening and Editing Docs in Other Apps
If you want to open the attachment in another application such as GoodReader, Pages, Numbers, or Keynote, then follow these steps.
- Open the e-mail message.
- Press and hold the attachment until you see the pop-up window.
- Select the Open In option.
- Select the application you would like to use from the list (Figure 12-7 shows us choosing Pages).
- Finally, you can edit the document, save it, and e-mail it back to the sender.
TIP: We show you exactly how to edit, save, and send documents with the Pages, Numbers, and Keynote apps in Chapter 18's “iWork: Productivity on Your iPad” section.
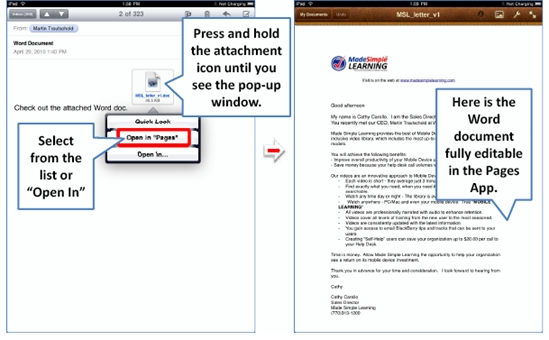
Figure 12-7. Opening attachments in other apps
Cannot Open E-mail Attachments
When you try to open an attachment, you may get an error message similar to the one shown to the right. In this example, we tried to click an attachment of the type winmail.dat, which failed.
The Mail app on the iPad can handle many types of attachments that come via e-mail – but not all. The attachments supported on the iPad are:

- .doc and .docx (Microsoft Word documents)
- .htm and .html (web pages)
- .key (a Keynote presentation document)
- .numbers (an Apple Numbers spreadsheet document)
- .pages (an Apple Pages document)
- .pdf (an Adobe Reader file)
- .ppt and .pptx (Microsoft PowerPoint presentation documents)
- .txt (a text file)
- .vcf (a contact file)
- .xls and .xlsx (Microsoft Excel spreadsheet documents)
- .mp3 and .mov (audio and video formats)
- Audio formats supported:
- HE-AAC (V1)
- AAC (16 to 320 Kbps)
- Protected AAC (from iTunes Store)
- MP3 (16 to 320 Kbps)
- MP3 VBR
- Audible (formats 2, 3, and 4)
- Apple Lossless
- AIFF
- WAV
- Video formats supported:
- H.264 video up to 720p at 30 frames per second
- Main Profile level 3.1 with AAC-LC audio up to 160 Kbps, 48kHz
- Stereo audio in .m4v, .mp4, and .mov file formats
- MPEG-4 video, up to 2.5 Mbps, 640 by 480 pixels, and at 30 frames per second
- Simple Profile with AAC-LC audio up to 160 Kbps, 48kHz, stereo audio in .m4v, .mp4, and .mov file formats
- Motion JPEG (M-JPEG) up to 35 Mbps, 1280 by 720 pixels, 30 frames per second, and audio in ulaw
- PCM stereo audio in .avi file format
In any case, you should make sure your attachment is not in some other unsupported format type.
Reply, Forward or Delete a Message
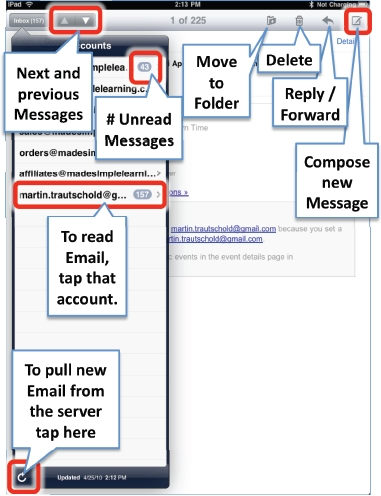
At the bottom of your e-mail-reading pane is a toolbar.
From this toolbar, you can move the message to a different mailbox or folder; delete it; or reply, reply all, or forward it.

Touch the small arrow to see these option buttons appear: Reply, Reply All, and Forward.
NOTE: The Reply All button appears only if there was more than one recipient for the e-mail message.

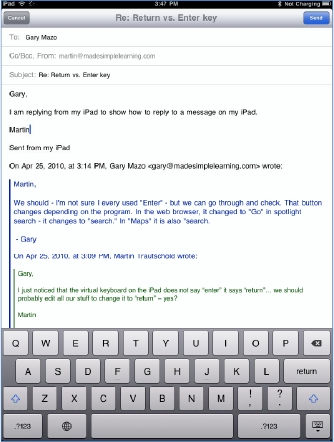
Replying to an E-mail
Most likely, the Reply command is the one you will use most often.
- Touch the Reply button.
You will see that the original sender is now listed as the recipient in the To: line of the e-mail. The subject will automatically state: “Re: (Original subject line).”
- Type your response.
- When you are done, just touch the blue Send button at the top right-hand corner of the screen.
NOTE: You may see various colors of text on the screen in an e-mail. Each color will correspond to a different message and different author.
Using Reply All
Using the Reply All option is just like using the Reply function, except that all of the original recipients of the e-mail and the original sender are placed in the address lines. The original sender will be in the To: line, and the other recipients of the original e-mail will be listed on the Cc: line. You will only see the Reply All option if more than one person received the original e-mail.
Using the Forward Button
Sometimes, you get an e-mail that you want to send to someone else. The Forward command will let you do that (see the “E-mail Attachments” section in this chapter for more about working with attachments.)
NOTE: You need to forward attachments to send them to others. If you want to send someone any attachments from an e-mail you receive, you must choose the Forward option. (Note that choosing the Reply and Reply All options will not include the original e-mail attachment(s) in your outgoing message.)
When you do touch the Forward button, you may be prompted to address whether you want to include attachments (if there were any) from the original message.
At this point, you follow the same steps described previously to type your message, add addressees, and send it.
Cleaning up Your Inbox
As you get more and more comfortable with your iPad as an e-mail device, you will increasingly find yourself using the Mail program. It will eventually become necessary to occasionally do some e-mail housecleaning. You can delete or move e-mail messages easily on your iPad.
Deleting a Single Message
To delete a single message from your Inbox, follow these steps.
- Swipe right or left on a message in the Inbox to bring up the Delete button.
- Tap Delete to remove the message.

Deleting or Moving Several Messages from Any Folder
Deleting several messages is very easy on the iPad. Follow these steps to do so.
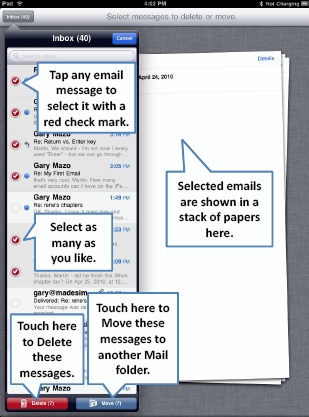
- View any mail folder on your iPad.
- Tap the Edit button.

- Select one or more messages by tapping them. You will see a red check mark for each selected message.
- Once the messages are selected, you can delete or move them.
- To delete the selected messages, tap the Delete button at the bottom.
- To move the selected messages, tap the Move button and select the folder to which you want the messages moved.
CAUTION: You do not get another prompt before a file is deleted, so be sure that you do want to delete the messages before choosing that option. While the message will be deleted on your device, a copy will still remain on the server.
Deleting from the Message Screen
Another way to delete messages can be found in the Message screen. Follow these steps to do so.
- Open any message to read it.
- Tap the Trash Can icon in the top left portion of the screen.

You will see the e-mail shrink and fly into the Trash Can, so it can be deleted.
TIP: You can set your iPad to ask you before deleting e-mail if you go into your Settings icon; tap Mail, Contacts, Calendars; and set the switch next to Ask Before Deleting to Yes.

You can organize your mail by moving it into other folders. E-mail messages can be moved out of your Inbox for storage or for reading at another time.
NOTE: In order to create folders in addition to the default Inbox and Trash folders, you need to set them up in your main e-mail account and sync them to your iPad. We will show you how to do this in this chapter's" “Fine Tune Your E-mail Settings” section.
Moving an E-mail to a Folder While Viewing It
Sometimes, you may want to organize your e-mail for easy retrieval later. For example, you might receive an e-mail about an upcoming trip and want to move it to the Travel folder. Sometimes you receive e-mails that require attention later, in which case you can move them to the Requires Attention folder. This can help you remember to work on it later.
To move an e-mail message, follow these steps.
- Open the e-mail message.
- Tap the Move icon in the upper right corner.
- Choose a new folder and the message will be moved out of the Inbox.

Copy and Paste from an E-mail
Here are a few tips to select text or pictures and copy them from an e-mail message:
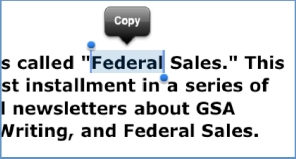
- Double-tap text to select a word, then drag the blue handles up or down to adjust the selection. Next, select Cut or Copy.
- Press and hold text, then choose Select or Select All.

- Press and hold an image, then select Save Image or Copy.

For a more complete description, please check out the “Copy and Paste” section in Chapter 2.
Searching for E-mail Messages
The iPad has some good search functionality to help you find your e-mails. You can search your Inbox by the From:, To:, Subject, or All fields. This helps you filter your Inbox, so you can find exactly what you are searching for.
Activating E-mail Search
Get to the Inbox of the account you wish to search. If you scroll up to the top, you will now see the familiar Search bar at the top of your Inbox (see Figure 12-8).
If your e-mail account supports the feature, you can also search the server for e-mail messages. At the time of writing, a few of the supported types of searchable e-mail accounts include Exchange, MobileMe, and Gmail IMAP. Follow these steps to search through your e-mail on a server.
- Touch the Search bar to see a new menu of soft keys under the Search bar.
- Type the text you wish to search for.
- Touch one of the soft keys under the search window:

Figure 12-8. Searching for e-mail using the From, To, Subject, or all text fields
For example, assume I want to search my Inbox for an e-mail I received from Martin. I would type Martin's name in the Search box and then touch From. My Inbox would then be filtered to show only the e-mails from Martin.
NOTE: If you have multiple e-mail accounts, you will not be able to search all of your inboxes at the same time – you can only search one inbox at a time. For a more global search, just use the Spotlight Search feature shown in the “Finding Things with Spotlight Search” section of Chapter 2.
Fine Tune Your E-mail Settings
You can fine tune your e-mail accounts on your iPad with the myriad options available in the Settings app.
Follow these steps to change these settings:
- Tap the Settings icon.
- Tap Mail, Contacts, Calendars in the left column.
The sections that follow explain the adjustments you can make.

Adjusting Your Mail Settings
Under the Accounts section, you can see all the e-mail settings listed under Mail. The Default settings may work well for you; but if you need to adjust any of these, you can follow these steps.
Show – This is how many e-mails are pulled from the server. Adjust anywhere from 25 – 200 messages (the default is 50 recent messages).
Preview – This is how many lines of text in addition to the Subject are shown in the Inbox preview. You can adjust this value from None to 5 lines (the default is 2 lines).

Minimum Font Size – This is the default font size shown when opening an e-mail the first time. It is also smallest font size that you are allowed to zoom out to when viewing an e-mail. Your options are Small, Medium, Large, Extra Large, and Giant (the default is Medium).
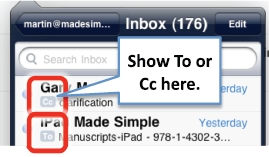
Show To/Cc Label – With this option ON, you will see a small To or Cc label in your Inbox before the subject; this label shows which field your address was placed in (the default is OFF).
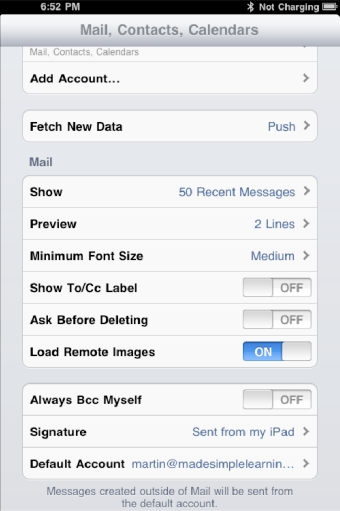
Ask Before Deleting – Turn this option ON to be asked every time you try to delete a message (the default is OFF).
Load Remote Images – This option allows your iPad to load all the graphics (remote images) that are placed in some e-mail messages. (the default is ON).
Always Bcc Myself – This option sends a blind carbon copy (Bcc) of every e-mail you send from your iPad to your e-mail account (the default is OFF).
Changing Your E-mail Signature
By default, e-mails you send will say “Sent from my iPad” – unless you change the Signature line of the e-mail.
![]()
Tap the Signature tab and type in the new e-mail signature you want at the bottom of e-mails sent from the iPad.
When you are done editing the Signature field, tap the Mail, Contacts… button in the upper left-hand corner, and you will be returned to the Mail settings screen.

Changing Your Default Mail Account (Sent From)
If you have multiple e-mail accounts set up on your iPad, you should set one of them – usually, the one you use most – as your Default Account. When you simply select the Compose from the E-mail screen, the default account is always chosen. Follow these steps to change the e-mail account you send from by default.
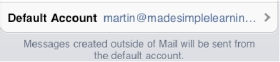
- Tap the Default Account option, and you will see a list of all your e-mail accounts.
- Tap the one you wish to use as your Default Account choice.
- When you are done, touch the Mail, Contacts… button to return to the Mail settings menu.

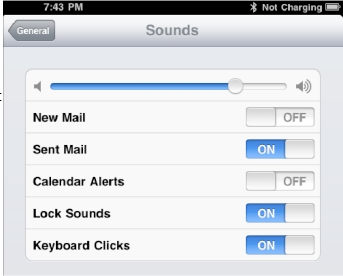
Toggling Sounds for Receiving and Sending E-mail
You may notice a little sound effect every time you send or receive e-mail. What you hear is the default setting on your iPad.
If you would like to disable this or adjust it, you do so in the Settings icon.
- Tap your Settings icon.
- Tap General in the left column.
- Tap Sounds in the right column.
- You will see various switches to turn on or off sound effects. Tap New Mail and Sent Mail to adjust the ON or OFF options.
Note: At the time of writing, the user is not able to change the sounds associated with these functions. Adjustable sounds and tones may be added in future software updates.
Advanced E-mail Options
To get to the Advanced options for each e-mail account, follow these steps:
- Touch the Settings icon.
- Touch Mail, Contacts, Calendars in the left column.
- Touch an e-mail address listed under Accounts in the right column.
- At the bottom of the mail settings pop-up window, tap the Advanced button to bring up the Advanced dialog.


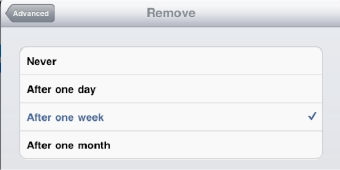
Remove E-mail Messages from iPad After Deletion
You can select how frequently you want e-mail removed completely from your iPad once it is deleted.
Touch the Remove tab and select the option that is best for you – the default setting is After one week.
USE SSL/Authentication
These features were discussed previously, but this option supplies another location to access these features for a particular account.
Delete from Server
You can configure your iPad to handle the deletion of messages from your e-mail server. Usually, this setting is left at Never, and this function is handled on your main computer. If you use your iPad as your main e-mail device, you might want to handle that feature from here. Follow these steps to remove deleted e-mails on the server from your iPad.
- Touch the Delete from Server tab to select the feature that best suits your needs: Never, Seven Days, or When removed from Inbox.
- The default setting is Never. If you want to choose Seven Days, that option should give you enough time to check e-mail on your computer as well as your iPad, and then decide what to keep and what to get rid of.

Changing the Incoming Server Port
As you did with the Outgoing Server Port earlier, you can change the Incoming Server Port if you are having trouble receiving e-mail. It is very rare that your troubles will be related to the port you receive mail on – so it is rare that you would need to change this number. If your e-mail service provider gives you a different number, just touch the numbers and input a new port. The value for an Incoming Server Port is usually 995, 993, or 110; however, the port value could also be another number.
Automatically Retrieve E-mail (Fetch New Data)
In addition to the Advanced options, another option you can configure in the E-Mail Settings is how often your email is fetched or pulled to your iPad. By default, your iPad automatically receives mail or other contact or calendar updates when they are “pushed” from the server.
- Touch the Settings icon.
- Touch Mail, Contacts, Calendars in the left column.
- Touch Fetch New Data under the e-mail accounts in the right column.
- Set Push to ON (default) to automatically have the server push data.
- Adjust the timing schedule to pull data from the server. This is how frequently applications should pull new data from the server.
NOTE: If you set this option to Every 15 Minutes, you will receive more frequent updates, but sacrifice battery life compared to a setting of Hourly.

Having automatic retrieval is very handy if you just want to turn on your iPad and see that you have messages – otherwise, you need to remember to check.
Advanced Push options
At the bottom of the Fetch New Data screen, touch the Advanced button to see a new screen with all your e-mail accounts listed.
Most accounts can be Fetched on the schedule you set or set to Manual, which requires you to retrieve data using the Update button. This screen gives you the ability to adjust between Fetch, Manual, or in some cases Push for each account you have set up.

Troubleshooting E-mail Problems
Usually, your e-mail works flawlessly on your iPad. Sometimes, whether it is a server issue, a network connectivity issue, or an e-mail service provider requirement; e-mail may not work as flawless as you would hope.
More often than not, there is a simple setting that needs to be adjusted or a password that needs to be re-entered.
If you try out some of the troubleshooting tips that follow and your e-mail is still not working, then your e-mail server may just be down temporarily. Check with your e-mail service provider to make sure your mail server is up and running; you might also check whether your provider has made any recent changes that would affect your settings.
TIP: If these tips that follow do not solve the problem, please check out Chapter 25 for more troubleshooting tips and resources.
E-mail Isn't Being Received or Sent
If you can't send or receive e-mail, your first step should be to verify you are connected to the Internet. Look for Wi-Fi or 3G connectivity in the upper left corner of your Home screen (see the “How Do I Know When I'm Connected?” section of “Quick Start Guide” for details.
Sometimes, you need to adjust the outgoing port for e-mail to be sent properly. Do so by following these steps.
- Tap Settings.
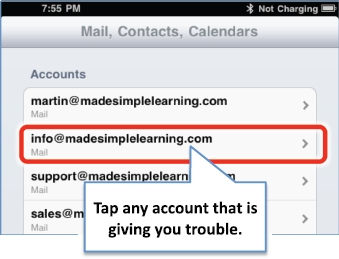
- Touch Mail, Contacts and Calendars in the left column.
- Touch your e-mail account that is having trouble sending messages under Accounts in the right column.
- Touch SMTP and verify that your outgoing mail server is set correctly; also check that it is set to On.
- Touch Outgoing Mail Server at the top and verify all the settings, such as Host Name, User Name, Password, SSL, Authentication, and Server Port. You might also try 587, 995, or 110 for the Server Port value; sometimes that helps.
- Click Done and the e-mail account name in the upper left corner to return to the E-mail settings screen for this account.
- Scroll down to the bottom and touch Advanced.
- You can also try a different port setting for the server port on this screen, such as 587, 995, or 110. If those values don't work, contact your e-mail service provider to get a different port number and verify your settings.
Verify your Mail Account Settings
To verify your account settings, follow these steps.
- Tap the Settings icon.
- Tap Mail, Contacts, Calendars in the left column.
- If you received an error message from a particular e-mail account, touch that that account.
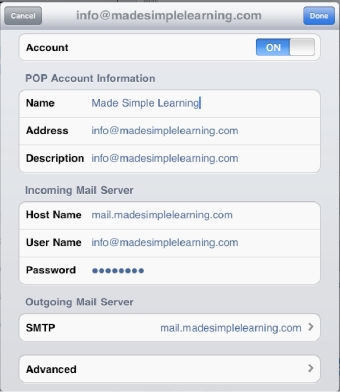
- Verify that the Account is set to ON.
- Verify that your e-mail Address is correct in the POP Account Information section.
- Verify that the information in the Host Name, User Name, and Password fields is correct.
- If you received an error message while trying to send an e-mail, the issue will be most likely in the SMTP settings in your Outgoing Mail Server area.
- Tap SMTP to adjust more settings.
- Touch the Primary Server tab and make sure that it is set to On.
- Underneath the Primary Server tab, you will see other SMTP servers that are used for your other e-mail accounts. One option is to use one of the other SMTP servers that you know is working – just touch the tab for that server and turn that switch to On.
- Tap the Primary Server address to view and adjust more settings.

- Verify that the Primary Server is ON.
- Contact your e-mail service provider to verify other settings, such as Host Name, User Name, Password, SSL, Authentication, and Server Port. We will share more details and some tips about these settings in the sections that follow.
- Tap the Done button when finished and then tap the button with your email account listed in the upper left corner to return to previous screens. Or, you can tap the Home button to exit to your Home Screen.

Using SSL
Some SMTP servers require the use of Secure Socket Layer ("SSL") security. If you are having trouble sending e-mail and the Use SSL switch is set to OFF, try setting it to ON and see if that helps.
Changing the Method of Authentication
Under the SSL switch is an Authentication tab – usually, Password is the correct setting. We don't recommend that you change this setting unless you have specific directions from your e-mail service provider to make a change.

Changing the Server Port
Most often, when you configure your e-mail account, the server port is set for you. Sometimes, there are tweaks that need to be made that are specific to your ISP.
If you have been given specific settings from your ISP, you can change the server port to try to alleviate any errors you might be receiving. Follow these steps to change the Server Port settings.
- Go back to the specific SMTP settings for your account.
- Touch the tab for the Primary Server, as you did in the “Verify Mail Account Settings” section.
- Scroll down to Server Port and touch the screen on the number indicated.
- This causes a keyboard to pop up where you can input a new port number (the one given you by your ISP.) Most often, the number provided by your ISP will be 995, 993, 587, or 110; however, if you're given a different number, just input it.
- When you are done, touch the SMTP tab in the upper left-hand corner to return to the previous screen.