Chapter 2
Typing Tips, Copy/Paste & Search
In this chapter, we show you some good ways to type and save valuable time typing on your iPad, whether you use the portrait (vertical/smaller) keyboard or the landscape (horizontal/larger) keyboard. You will learn how to select different language keyboards, how to type symbols, and other tips. We will also show you some tips and tricks when working with various external keyboard accessories for your iPad.
Later in this chapter, we will show you about the spotlight search and the Copy and Paste function. Copy and Paste will save you lots of time as well as increase accuracy when working with your iPad.
Typing on Your iPad
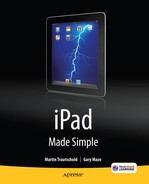
You will quickly find two on-screen keyboards on your iPad: the smaller one visible when you hold your iPad in a vertical orientation, and the larger landscape keyboard when you hold the iPad in a horizontal orientation. The nice thing is that you can choose whichever keyboard works best for you. And if you prefer a physical keyboard, we show you the ins-and-outs of a couple of nice accessory keyboards as shown in Figure 2–1.

Figure 2–1. Two optional keyboard accessories: The iPad Keyboard Dock and the Bluetooth Wireless Keyboard
Typing on the Screen with the Portrait Keyboard
You will find when you first start out with your iPad that you can most easily type with one finger–usually your index finger–while holding the iPad with the other hand.
After a little while, you should be able to experiment with thumb typing (like you see so many people doing with their iPhone or BlackBerry smartphones). Once you practice a little, typing with two thumbs instead of a single finger will really boost your speed. Just be patient, it does take practice to become proficient typing quickly with your two thumbs.
You will actually notice after a while that the keyboard touch sensitivity assumes you are typing with two thumbs. What this means is that the letters on the left side of your keyboard are meant to be pressed on their left side, and the keys on the right are meant to be touched/pressed on their right side (Figure 2–2).

Figure 2–2. Typing with two thumbs while holding the iPad vertically.
TIP: If you have larger hands and find typing on the smaller vertical keyboard challenging, then flip your iPad on its side to get the larger, landscape keyboard (see Figure 2–3).
Typing on the Screen with the Larger Landscape Keyboard
Simply turn the iPad sideways in almost any App and the keyboard will change to a larger, landscape keyboard to make it easier to type (see Figure 2–3).
- Lay the iPad on a flat surface. It usually helps if you either have the iPad in a case (see Chapter 1, “Getting Started,” to learn about various cases), or sitting on a soft surface so it does not rock while you are typing.
- Type with two hands like you would on a normal computer keyboard. With some practice, you can almost type as fast on this larger keyboard as you do on a regular physical keyboard.

Figure 2–3. Typing with two hands while letting the iPad rest on a flat surface.
TIP: For the frequent traveler, using the virtual keyboards on your iPad are perfect space savers in those cramped airline seats compared to any laptop computer!
Typing with External Keyboards (Purchase as Separate Accessories)
If you need to do a lot of typing or are simply uncomfortable with the “typing on glass” feel of the virtual keyboards, you can buy external keyboards that work with the iPad. We have tested two from Apple, Inc., but we are sure there are more keyboard dock and Bluetooth options available. Check out the iPad/iPhone/iPod blogs or online stores to find keyboards and other accessories. You can also do a quick web search for “iPad external keyboard” to find options.
TIP: If you plan to do a lot of typing on your iPad, investing some money in one of these external keyboards can be worth its weight in gold! In our testing, we preferred the Apple iPad Keyboard Dock because it held the iPad at a very nice angle for typing.
CAUTION: A few iPad apps only work in landscape orientation and will not work with the Keyboard Dock because the whole app will look sideways when in the vertical orientation—Apple Keynote is one prominent example.
Apple Wireless Keyboard (Bluetooth) — About US $70
Besides being easier and faster to type on, external keyboards give you the added benefit of showing you more of the iPad screen since the virtual keyboard is gone.
TIP: If you own another Apple computer, you may already own the Wireless Keyboard—it is the same Wireless Keyboard that Apple has made for a while.
Getting it Connected
Since it uses a wireless Bluetooth connection, you first have to connect, or “pair,” this keyboard with your iPad. (See Chapter 10, “Bluetooth,” for more help.)
- Tap the Settings icon (refer to Figure 2–4).
- Tap General in the left column.
- Tap Bluetooth in the right column.
- Make sure the Bluetooth receiver is set to ON by tapping the switch if it shows OFF.
- Turn on your Apple Wireless Keyboard by pressing the On/Off button on the right edge of the round tube under the top of the keyboard. You will know when the keyboard is on and has batteries when the green light in the upper right corner is on or flashing.
- Once the Wireless Keyboard is powered on, you should see it listed under Devices in the Bluetooth screen on the iPad. Tap the Keyboard listed under Devices to have the iPad generate a pairing number (see Figure 2–4).
- Type in the pairing code number from the iPad on the Wireless Keyboard and press the Enter/Return key on the keyboard.
- Sometimes it takes two or three tries to get the keyboard to pair with your iPad. Keep trying, it will work eventually!

Figure 2–4. Pairing a Bluetooth Wireless Keyboard to your iPad.
To Switch Between the Wireless Keyboard and the On-Screen Keyboard
Simply press the Eject key  in the upper right corner of the keyboard to temporarily disconnect the Wireless Keyboard and see the on-screen keyboard.
Press the Eject key again to re-connect the wireless keyboard and make the on-screen keyboard disappear.
Apple iPad Keyboard Dock—About US $70
Besides giving you the physical keyboard to type on, the Keyboard Dock also gives you the added benefit of holding your iPad up at an angle like a regular computer screen. It is very nice!
Other benefits of this keyboard are that it is designed by Apple specifically for the iPad so you have specially designed keys as shown in Figure 2–5. To the right of these keys, along the top, you also have media control keys: Previous Track, Play/Pause, Next Track, Volume keys, and a Lock key.

Figure 2–5. Special keys on the iPad Keyboard Dock
TIP: To wake up the sleeping iPad, you can simply tap any key on the iPad Keyboard Dock.
Unlike a laptop computer, the angle at which the iPad sits in the dock is fixed and cannot be adjusted; however, this angle seemed to work perfectly for us when we tested it.
CAUTION: The iPad can be a little unstable in the Keyboard Dock. We recommend a good flat, stable surface. Also, be careful if you have little people, or really big dogs, running around that could easily and accidentally knock the iPad off the dock.
Connecting Your iPad to the Keyboard Dock
Connecting your iPad to the Keyboard Dock is very simple–just set it on the dock to plug it into the port on the bottom of the iPad, as shown in Figure 2–6.
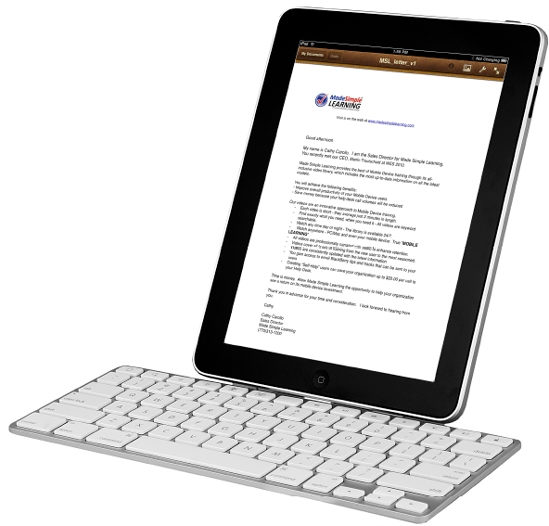
Figure 2–6. iPad sitting in Keyboard Dock—Great for typing long documents.
NOTE: If you have put your iPad in a case, you will most likely have to remove it before you connect the iPad to the Keyboard Dock. This has the added benefit of allowing the iPad to dissipate heat if you are charging it while it is in the dock.
You can then plug your USB sync and charging cable to the back of the Keyboard dock to simultaneously connect the iPad to your computer or charge it in the wall socket.
Simply pull the iPad up and out of the Keyboard Dock to disconnect it.
CAUTION: As of publishing time, standard keyboard tricks such as Command-C for Copy, Command-V for Paste, and the iPad Auto-Correction did work with the two keyboard accessories; however the iPad Auto-Capitalization and Double Space for Period shortcuts did not work.
Connecting Two Keyboards at Once
If you happen to have both the Wireless Keyboard and the Keyboard Dock, we have discovered that you could simultaneously type with both keyboards on the iPad. Take turns typing on the same document? Dueling keyboards? Duet typing? In any case, a strange but true capability of these keyboards.
Saving Time with Auto-Correction
When you are typing for a while, you will begin to notice a little pop-up window directly below some of the words you are typing–this is called Auto-Correction. (If you never see this pop-up window, then you will have to enable Auto-Correction in your Settings icon on your iPad) You can save yourself time when you see the correct word guessed by just pressing the Space key at the bottom of the keyboard to select that word.
In this example, we start typing the word “especially,” and when we get to the c in the word, the correct word “especially” appears below in a pop-up. To select it, we simply press the Space key at the bottom (see Figure 2–7).

Figure 2–7. Using Auto-Correction and suggested words.
Your first inclination might be to tap the pop-up word, but that simply erases it from the screen. It is ultimately faster to keep typing or press the Space key when you see the correct word, as there will be more situations in which the word is either correct or will become correct as you keep typing–less finger travel in the long run.
After you learn to use the Space key, you will see that this pop-up guessing can be quite a time saver. After all, you were going to have to type a space at the end of the word anyways!
TIP: With Auto-Correction, you can save time by avoiding typing the apostrophe in many common contractions, such as “wont” and “cant.” Auto-Correction will show you a little pop-up window with the contraction spelled correctly; all you need to do to select the correction is to press the Space key.

Hearing Auto-Correction Words Out Loud
You can set your iPad to speak out the Auto-text and Auto-Correction words as they appear. This might be helpful to you to help selecting the correct word. To enable this type of speaking:
- Tap the Settings icon.
- Tap General in the left column.
- Tap Accessibility near the bottom of the right column.
- Set the switch next to Speak Auto-text to On.
After you enable this feature, whenever you are typing, you will hear the Auto Correction word that pops up. If you like the word you hear, then press the Space key to accept it, otherwise keep typing. It can save you some time from looking up from the keyboard.
Accessibility Options
There are a number of useful features on the iPad to help with accessibility. The VoiceOver option will read to you from the screen. It will tell you what you tap on, what buttons are selected, and all the options. It will read entire screens of text as well. If you like to see things larger, you can also turn on the Zoom feature as described below.
Getting Your iPad to Speak To You (VoiceOver)
One cool feature of the iPad is that you can turn on the VoiceOver feature so that the iPad will speak anything on the screen. You can even get it to read to you from any email, text document or even an iBook page.
To enable VoiceOver:
- Tap the Settings icon.
- Tap General in the left column.
- Tap Accessibility near the bottom of the right column.
- Tap VoiceOver in the left column.
- Set the VoiceOver switch to On.

CAUTION: As shown on the screen to the right, the voice over gestures are different from the normal gestures. Tap the Practice VoiceOver Gestures button to get used to them.
Notice that you can adjust the Speaking Rate from slow to fast and have other adjustments such as Typing Feedback, Use Phonetics and Use Pitch Change. Give some of these a try to see which options work best for you.
When you type with VoiceOver, by default every character you type will be spoken. You can change this in the above settings screen to just words, just characters, or nothing.
To have an entire page read to you in the iBooks app, you need to simultaneously touch the bottom and top of the block of text on the screen. If you tap in the text with one finger, only a single line is read to you.
Tapping the top of a note in the Notes app will read the entire note to you.
Using Zoom to Magnify the Entire Screen
You may want to turn on the Zoom feature if you find that the text, icons, buttons or anything on the screen is a little too hard to see. With the Zoom turned on, you can zoom the entire screen to almost twice the size. Everything is much easier to read.
NOTE: You cannot use VoiceOver and Zoom at the same time, you need to choose one or the other.
To enable Zoom:
- Tap the Settings icon.
- Tap General in the left column.
- Tap Accessibility near the bottom of the right column.
- Tap Zoom in the right column.
- Set the switch next to Zoom to On.
Similar to VoiceOver, Zoom uses the three fingered gestures. Make sure to take note of them before you leave the screen.
White on Black
If the contrast and colors are difficult to see, then you might want to turn on the Whte on Black setting. To change this setting:
- Get into the Accessibility screen in the Settings app as shown above.
- Set the White on Black switch to On.
With this setting On, everything that was light on the screen becomes black, and everything that was dark or black becomes white.
Triple-Click Home Button Options
You can set a triple-click of the Home button to do various things related to Accessibility.
- Get into the Accessibility screen in the Settings app as shown above.
- Tap Triple-click the Home Button near the bottom of the right column.
- Choose from Off, Toggle VoiceOver, Toggle White on Black, or Ask.
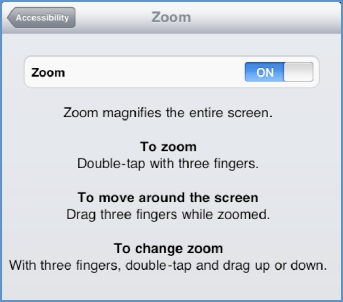
Magnifying Glass for Editing Text/Placing the Cursor
How many times have you been typing something and wanted to move the cursor precisely between two words, or between two letters?
This can be hard to do until you figure out the Magnifying Glass trick. What you do is this: Touch and hold your finger on the place where you want the cursor (see Figure 2–8). After a second or two, you will see the magnifying glass appear. Then, while you hold your finger on the screen, slide it around to position the cursor. When you let go, you will see the Copy/Paste pop-up menu, but you can ignore it.
Figure 2–8. Touch and hold the screen to see the magnifying glass and place the cursor.
Typing Numbers and Symbols
How do you type a number or a symbol using the on-screen keyboard on the iPad? When you are typing, tap the .?123 key in the lower left corner to see numbers and common symbols such as $ ! ~ & = # . _ − +. If you need more symbols, from the number keyboard, tap the #+= key just above the ABC key in the lower left corner. See Figure 2–9.

Figure 2–9. Switching between Letters, Numbers, and Advanced Symbol keyboards.
TIP: Notice that the number and basic symbols keyboard will stay active until you either hit the Space key or tap the key for another keyboard, such as ABC.
Touch and Slide Trick
These tips are courtesy of Rene Ritchie from the iPhone/iPad Blog (www.tipb.com)
Typing Upper Case Letters
Normally to type uppercase letters, you would tap the Shift key then tap the letter.
The faster way to type single uppercase letters and symbols that require the Shift key is to touch the Shift key, keep your finger on the keyboard, , slide over to the key you want, and release.
For example, to type an uppercase “M,” touch the right Shift key, then slide over to the “M” key and release.

Rapidly Typing a Single Number
If you have to type just a single number, then touch the .?123 key and slide your finger up to the number. However, to type several numbers in a row, it's best to tap the .?123 key, let go, and then tap each number.
Typing Symbols that Require Shift
The same goes for the question mark and exclamation mark (which require you to press Shift on the Letter Keyboard.) Touch the Shift key then slide over and let go on the ? key.
Typing the Apostrophe
Press and hold the Comma/Exclamation key to see the apostrophe pop-up.
Since the apostrophe is highlighted in blue, simply let go of the key to type it.

TIP: For most common contractions, your Auto-Correcting dictionary should automatically insert the apostrophe. For example, type “dont” then press the Space key to have the apostrophe inserted: “don't.”
Press and Hold Keyboard Shortcut for Typing Symbols and More
What about symbols not shown on the keyboard?
TIP: You can type more symbols than are shown on the screen.
All you do is press and hold a letter, number, or symbol that is related to the symbol you want.
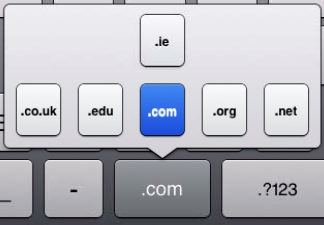
For example, if you wanted to type the EURO symbol (€), you would press and hold the $ key until you saw the other options, slide up your finger to highlight, and then let go on the EURO symbol.

This tip also works with the .com key in the Safari web browser. You can get additional web site suffixes by pressing and holding this key.
You see on the screen .co.uk plus .ie, which are not on the standard US keyboard. These are present because we have installed the English (UK) international keyboard. See earlier in this chapter for help with international keyboards.
TIP: There is a good bullet point character or the degree sign (depending on how you look at it) on the Numbers screen if you press and hold the Zero key (0). Also, press and hold the ? and ! keys to get their Spanish inverted cousins.
Keyboard Options & Settings
There are a few Keyboard options to make typing on your iPad easier. The keyboard options are located in the General tab of your Settings.
- Touch the Settings icon.
- Touch General in the right column.
- Touch Keyboard in the left column to see this screen.
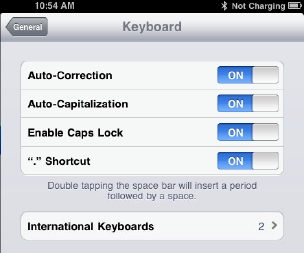
Auto-Correction ON / OFF
Using the built-in dictionary, Auto-Correction will automatically make changes in commonly misspelled words. For example, if you type in “wont,” Auto-Correction will change it to “won't” on the fly. You need to make sure it is ON if you want this feature to work. (This is the default setting.)
CAUTION: As of publishing time, the Auto-Correction, Auto-Capitalization, and Double Space for Period shortcuts did not work with either the Wireless Keyboard or the Keyboard Dock. You just have to be more careful typing with the physical keyboard!
Auto-Capitalization
When you start a new sentence, words will automatically be capitalized if Auto-Capitalization is ON.

Also, common proper nouns will be correctly capitalized. For example, if you typed “New york,” you would be prompted to change it to “New York”–again just pressing the Space key will select the correction. If you backspace over a capital letter, the iPad will assume the new letter you type should be capital as well.
This is also set to ON by default.
Enable Caps Lock
Sometimes when you type, you may want to lock the caps by pressing and holding the Cap key–just like you do on a computer keyboard. Enabling Caps Lock will allow you to do this.
This is set to OFF by default.
“.” Shortcut
If you are an iPhone user or BlackBerry user, you might be familiar with the feature that will automatically put in a period at the end of the sentence when you double-tap the Space key. This is exactly the same feature that you can enable on the iPad. By default, this is also set to ON.
Typing In Other Languages—International Keyboards
At publishing time, the iPad enables you to type in over a dozen different languages, including languages from Dutch to Spanish. Some of the Asian languages, such as Japanese and Chinese, offer two or three keyboards for different typing methods.
To enable various language keyboards, follow these steps:
- Touch the Settings icon (refer to Figure 2–10).
- Tap General in the left column.
- Tap Keyboard near the bottom of the right column.
- Tap International Keyboards.
- Tap Add New Keyboard to add additional international keyboards.
- Tap any keyboard/language listed to add that keyboard.
- Now you will see the Keyboard listed on the available keyboards.
- To adjust keyboard options, tap the listed Keyboard.
- Tap Edit in the top right corner to change the keyboard order or delete a keyboard. To change the order, drag the left edge of the listed keyboard up or down. To delete a keyboard, tap the red minus sign, then tap Delete.

Figure 2–10. Adding and customizing international keyboards.
Once you have enabled a number of keyboards, tap the Globe key to cycle between all the languages (see Figure 2–11).
Japanese and some other languages provide several keyboard options to meet your typing preferences.
In some of the languages (such as Japanese, shown in Figure 2–11), you will see the letters typed change into characters. You will also see a row of other character combinations above the keyboard. When you see the combination you want, tap it.
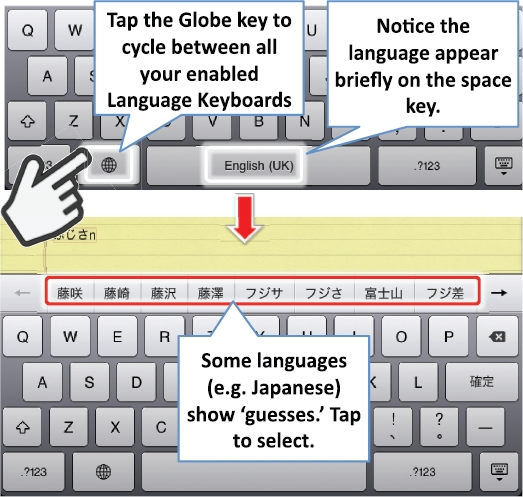
Figure 2–11. Press the Globe key to cycle between International Keyboards.
Copy and Paste
Copy and Paste is very useful for taking text from your calendar and putting it in an e-mail or taking a note and placing it in an e-mail or in your Calendar–there are lots of ways to use for Copy and Paste. You can even copy text from your Safari web browser and paste it into a Note or a Mail message.
Selecting Text with Double-Tap
If you are reading or typing text, you can double-tap to start selecting text for the copy. This works well in Mail, Messages, and Notes.
You will see a box with blue dots (handles) at opposite corners. Just drag the handles to select the text you wish to highlight and copy, as shown in Figure 2–12.

Figure 2–12. Double-tap to start selecting text, then drag the blue dots to expand the selection.
TIP: If you want to select all the text, double-tap the screen above or below the text. Then you should see a pop-up showing you Select or Select All. Tap Select to select a word. Tap Select All to highlight all the text.

Selecting Text with Two Finger Touch
The other way to select text requires that you touch the screen simultaneously with two fingers. This seems to work best if you are holding your iPad with one hand and use your thumb and forefinger from your other hand to touch the screen. What you want to do is touch the screen at the beginning and end of the text you want to select. Don't worry if you cannot get the selection exactly on the first touch. After the first touch, use the blue handles to drag the beginning and end of the selection to the correct position, as shown in Figure 2–13.

Figure 2–13. Select text by touching the screen at the same time with two fingers.
Selecting Web Site or Other Non-Editable Text with Touch and Hold
In the Safari web browser and other places where you cannot edit the text, hold your finger on some text and the paragraph will become highlighted with handles at each of the corners.
Drag the handles if you want to select even more text.

NOTE: If you drag smaller than a paragraph, the selector will switch to fine-text mode and give you the blue handles on both ends of the selection to pick just the characters or words you want. If you drag your finger beyond a paragraph, you get the gross-text selector with which you can drag up or down to select whole reams of text and graphics.
Cut or Copy the Text
Once you have the text that you wish to copy highlighted, just touch the Copy tab at the top of the screen. The tab will turn blue, indicating that the text is on the clipboard.

NOTE: If you have previously Cut or Copied text, then you will also see the Paste option, as shown.
To Paste the Text
If you are pasting the text into the same Note or Mail message:
- Use your finger to move the cursor to where you want to paste the text. Remember the Magnifying Glass trick (as we showed earlier in this chapter) to help you position the cursor.
- Once you let go of the screen, you should see a pop-up asking you to Select, Select All, or Paste.
- If you don't see this pop-up, then double-tap the screen.
- Select Paste to paste your selection.

To Paste Text or an Image Into Another Icon
To paste the text or image you have copied into another icon:
- Press the Home button (refer to Figure 2–14 ).
- Tap the icon into which you want to paste the text. In this case, lets tap Mail.
- Tap the Compose icon
 to write a new e-mail.
 - Double-tap anywhere in the body of the message.
- Tap Paste.

Figure 2–14. Bring up the Paste command by either double-tapping or pressing, holding, and releasing.
Move the cursor to the body of the text and either double-tap or touch, hold, and release your finger and you will see the Paste pop-up. Tap Paste and the text on the clipboard will be pasted right into the body of the e-mail.
Shake to Undo Paste or Typing
One of the great new features in Copy and Paste is the ability to undo either typing or the Paste you just completed.

All you have to do is shake the iPad after the paste. A new pop-up appears giving you the option to undo what you have just done.
Tap Undo Paste and or Undo Typing to correct the mistake.
TIP: There is an Undo button on the keyboard as well. Just press the .?123 key and it is in the lower left corner.
TIP: Delete Text by Selecting then Press Backspace
If you ever want to delete a number of lines of text, a paragraph, or even all the text you just typed quickly with one or two taps, this tip is for you. Use the techniques above to select the text you want to delete. Then, simply press the Delete key ![]() in the lower left corner of the keyboard to delete all the selected text.
in the lower left corner of the keyboard to delete all the selected text.
Finding Things with Spotlight Search
A great feature on your iPad to find information is the Spotlight Search–Apple's proprietary search method for a global search through your iPad for a name, event, or subject.
The concept is simple; let's say you are looking for something related to Martin. You cannot remember if it was an e-mail, a Note, or a Calendar event, but you do know it was related to Martin.
This is the perfect time to use the Spotlight Search feature to find everything related to Martin on your iPad.
Activating Spotlight Search
First, you need to get into the Spotlight Search, which resides to the left of the first page of the Home screen.
![]()
On the left side of the first circle (indicating the first page of your Home screen) is a very small magnifying glass.
Swipe to the right of this first page of icons to get to the Spotlight Search page.

TIP: If you like to use Search a lot, then you can set it so that a double-click of your Home button will bring up Search. Start your Settings icon, tap General in the left column, then tap Home in the right column. Select Search under Double-click the Home Button for:
On the Search page, type in one or a few words for your search.
TIP: If you are looking for a person, type their full name to more accurately find items from only that person (e.g., “Martin Trautschold”). This will eliminate any other Martins who might be in your iPad and make sure you find items only related to Martin Trautschold.
In the search result, you'll see all e-mails, appointments, meeting invitations, and contact information found. Tap one of the results in the list to view its contents.

Your search results stay there until you clear them, so you can go back to Spotlight Search once again by swiping to the right from your Home screen.
To clear the search field, just touch the X in the search bar. To exit Spotlight Search, just press the Home key or swipe to the left.