
C H A P T E R 33
![]()
Completing a Site: The Other 90%
Hofstadter's Law: “It always takes longer than you expect, even when you take into account Hofstadter's Law.”
You've built out content types and views and blocks and menus (and if you haven't, get back to Chapter 1). You've done some more of this and a bunch of other configuration, too (see Chapter 8). You've made a custom theme (see Chapters 15 and 16). The site is indisputably 90% built. It's just that the final 10% can easily take as much time as you've already put in. Getting a site to done usually means a lot of messing and obsessing until everything works and looks just right.
If the site is high visibility and has to look great and work easily, keep going until, as the song goes, “you've” done did everything that needs done.”
This chapter will touch on advanced configuration, but mostly you will use glue code to polish off DefinitiveDrupal.org with custom rims and modded cupholders. (Glue code is theming functions or modules written to meet site-specific needs; see Part V, Back-End Development, particularly Chapter 22 for full coverage of this approach.) You'll even see a spin-off module built for the site but made general enough to contribute to drupal.org.
This chapter does not cover theming. For this essential part of completing a site, see Chapters 15 and 16 and also the DefinitiveDrupal.org theme itself. Jacine Luisi is contributing the theme to the community as its own project, and the as-is production version is also in the site's source code. See dgd7.org/theme and dgd7.org/code.
![]() Note The online resources and discussion related to this chapter are at
Note The online resources and discussion related to this chapter are at dgd7.org/other90.
Creating a View Mode
View modes, called build modes in Drupal 6, were mentioned in Chapter 8, and they have not become any less fantastic for changing the display of content or other site entities depending on context. On DefinitiveDrupal.org, author profiles use the Full Content view mode (which inherits the Default view mode's display settings) for the standalone pages and the Teaser view mode for one of the author list views. When author profiles are shown on chapter content, however, it would be best to have another, still-smaller display of author profile content.
This is when you turn to the magic of view modes. The code in Listing 33–1
goes in a module file called dgd7glue.module; it is adapted from a presentation Benjamin Doherty made at DrupalCamp Florida and published afterward to his GitHub account at github.com/bangpound/fldrupalcamp-demo. The first function defines a view mode; it's not intuitive that this would require implementing hook_entity_info_alter(), but it's not difficult once you know how.
Listing 33–1. Defining a New Build Mode, Compact, for Nodes
<?php

/**

 * Implements hook_entity_info_alter().

 *

 * Reveals new view mode for node entities. If you don't see your view mode

 * in the Field UI's "manage display" screen, you may need to clear cache

 * or rebuild menus more than once until you do.

 */

function dgd7glue_entity_info_alter(&$entity_info) {

  $entity_info['node']['view modes']['compact'] = array(

    'label' => t('Compact'),

    'custom settings' => FALSE,

  );

}


/**

 * Implements hook_preprocess_node().

 *

 * Adds classes and theme hook suggestions specifically for view modes.

 */

function dgd7glue_preprocess_node(&$vars) {

  $view_mode = $vars['view_mode'];

  $vars['classes_array'][] = 'node-' . $view_mode;

  $type = $vars['type'];

  $vars['theme_hook_suggestions'][] = 'node__' . $type . '__' . $view_mode;

}
This second function, an implementation of hook_preprocess_node(), is not necessary to have and use view modes, but it is a tremendous theming aid. For example, the addition to ‘classes_array’ allows CSS to target content displayed with the Compact view mode by looking for the class node-compact. The addition to the 'theme_hook_suggestions' array allows a themer to copy node.tpl.php to node--profile--compact.tpl.php or node--article--teaser.tpl.php, for example, and make modifications that only affect profile content shown in Compact mode or article content in Teaser mode. Using the theme hook suggestion to create a custom template for a view mode is covered later.
![]() Note As
Note As hook_preprocess_node() can also be implemented by themes in template.php, this ability to use theme hook suggestions for view modes may already have been added there.
When writing or modifying a preprocess function (as in so many places in Drupal), you can use a debugger or use debug functions to print output to your screen. The set of variables available to hook_preprocess_node() tends to be too large for debug() to handle gracefully, so installing Devel module and using a Krumo-enhanced debug output function, such as kpr(), is recommended.
A kpr($vars); in an implementation of hook_preprocess_node() will run for every node you display, so looking at a list of nodes while your variable printing code is in your module is not recommended. Also remember that you need Devel module present and enabled to use kpr(). There is a lot you can do with preprocess functions. Anything you change or add in a preprocess function, as a rule, becomes available for use in the corresponding theme function or template. Something added to the variables array in hook_preprocess_node(), such as $vars['current_time'] = date('Y M d H:m:s', time());, will be available in node.tpl.php (and all its variations including node--article.tpl.php and the now-available node--article--teaser.tpl.php) as $current_time, to be used with print $current_time; or for render array variables print render($complex);. You will see more usage of preprocess functions later in this chapter.
![]() Note The code in Listing 33–1 needs to go in a file called
Note The code in Listing 33–1 needs to go in a file called dgd7glue.module which should go in a folder called dgd7glue which could be put in your site at sites/all/modules/custom/. Then your custom module needs a .info file also, dgd7glue.info (see Listing 33–2), which goes in the dgd7glue folder with dgd7glue.module. (Making modules is covered exhaustively in Chapters 18 to 20 and for the same purpose as here, making a site-specific module, in Chapter 22.)
Listing 33–2. dgd7glue.info
name = DGD7 Glue Code

description = [dgd7glue] Site-specific custom code for DefinitiveDrupal.org.

package = Custom

version = 7.x-1.0

core = 7.x
![]() Note The version directive is only included because this site-specific code will not be hosted on
Note The version directive is only included because this site-specific code will not be hosted on drupal.org; for contributed code, the d.o packaging script adds that line itself.
Now—after enabling the DGD7glue module or, if it is already enabled, clearing caches, very likely more than once—you can visit the manage display tab of a content type, such as Administration ![]() Structure
Structure ![]() Content types
Content types ![]() Author profile
Author profile ![]() Manage display (
Manage display (admin/structure/types/manage/ profile/display) and see that in the collapsed formset Custom display settings, there is a new view mode: Compact (see Figure 33–1).
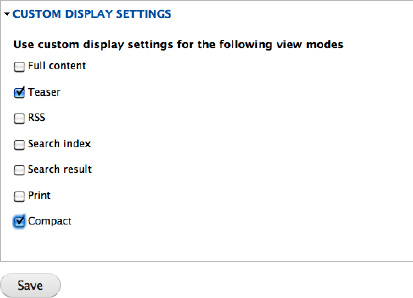
Figure 33–1. Checkbox to enable custom display settings for view modes, now with the option for Compact
![]() Tip If you want custom settings for your new view mode to be enabled automatically for all content types (the way Teaser is), you can change the custom settings line to
Tip If you want custom settings for your new view mode to be enabled automatically for all content types (the way Teaser is), you can change the custom settings line to 'custom settings' => TRUE, for your $entity_info['node']['view modes']['viewmodename'] array in the hook_entity_info_alter() implementation. It may start out with no fields displayed using this approach.

Figure 33–2. New view mode, Compact, visible at the Manage display tab
Go to the Compact sub-tab, shown in Figure 33–2, and configure the fields that should show when using the Compact view mode. You can make it show the author's picture, as a thumbnail linked to its content; the drupal.org User ID, as the account link; and the biography text, trimmed to just 300 characters. Hide all the other fields.
Next, go to the Chapter content type and manage the display of its fields. You can give it custom settings for the Compact display mode too, but the present goal is to tell its node reference Author field to use the Compact view mode for displaying author profiles. For the Author field, the Format options will probably be a drop-down containing Title (link), Title (no link), Rendered node, and <Hidden>. Choose Rendered node, and then click the gear icon to the right of the drop-down to configure settings for the Author field rendered node. This is where you can select Compact as the View mode (see Figure 33–3).
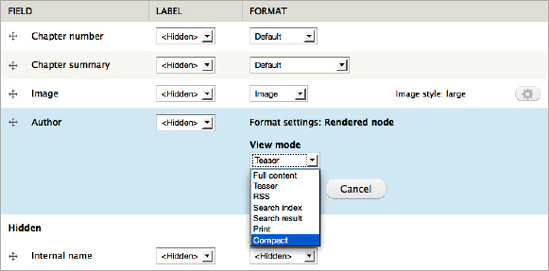
Figure 33–3. Using the Author profile in the Compact view mode when it is displayed on Chapter content. This is set via Chapter content type's Manage display page for its Default view mode.
The next section describes how to theme your view mode.
Creating a Custom Theming Template
The process of creating a custom template file for a theme hook suggestion you define yourself is exactly the same as when creating a custom template file for a template suggestion provided by core. Many suggestions, such as those based on content type, are built in. To use your own template files for all author profiles, you would create a node--profile.tpl.php file in your theme (where profile is the machine name for the Author profile content type). Below, you're going to do the same for the theme hook suggestion you created that is aware of both content type and view mode.
- Make sure you have a
node.tpl.phpfile in your custom theme's folder (or within atemplatessubdirectory in your theme's folder). Drupal won't recognize your variation of a template unless you have a version of the base template in your theme. - Copy this
node.tpl.phpfile to match the pattern of the template suggestion you want to use a custom template for. In the case of the theme hook suggestion defined previously, that pattern isnode__content_type__view_mode. Underscores are replaced with dashes in template files, so it would look likenode--content-type--view-mode.tpl.php. For the Author profile with the Compact view mode, this isnode--profile--compact.tpl.php. - Modify this file to match your theming needs.
![]() Note In Drupal 7, you need two dashes (or underscores for functions) separating each part of a suggestion. In Drupal 6, you only needed one— as you might guess from the
Note In Drupal 7, you need two dashes (or underscores for functions) separating each part of a suggestion. In Drupal 6, you only needed one— as you might guess from the node--content-type--view-mode.tpl.php example. Having two dashes prevents confusion when working with a content type that has an underscore in its machine name.
Listing 33–3 is a look at the modified node template file (you can view the original in your source code, the node.tpl.php that you copy, and at api.drupal.org/api/modules--node--node.tpl.php). The file is node--profile--compact.tpl.php as noted previously. In your theme, it goes in the templates folder. The first three lines are how to learn about the variables available; they should be deleted before use on a live site.
![]() Caution The code in Listing 33–3 uses a function provided by the Devel module— you'll need to download and enable it if you haven't already, or substitute a core Drupal function such as
Caution The code in Listing 33–3 uses a function provided by the Devel module— you'll need to download and enable it if you haven't already, or substitute a core Drupal function such as debug() or a PHP function such as print_r(). Devel's dpm() and core's debug() both send their output to Drupal's messages area; Devel's kpr() and PHP's print_r() both print out right where they are (by default), which works in template files and preprocess functions.
Listing 33–3. Custom Node Template for Author Profiles Shown with the Compact View Mode
<?php

  kpr($content);

?>

<div id="node-<?php print $node->nid; ?>" class="<?php print $classes; ?> clearfix"<?php

 print $attributes; ?>>

  <?php print render($content['field_image']); ?>

  <div class="author-info">

    <h3<?php print $title_attributes; ?>><a href="<?php print $node_url; ?>"><?php

 print $title; ?></a></h3>


    <?php

      // We hide the comments and links.  Shouldn't be any.

      hide($content['comments']);

      hide($content['links']);

      print render($content);

    ?>

  </div>

</div>
This template removes and rearranges some markup and adds a div, but the most significant thing it is doing is using the line print render($content['field_image']); to print out the author picture before the node title (the author's name). Note that when the rest of the content is printed with render(), the image is not re-printed. This is all explained in Chapters 15 and 16.
The HTML produced by the template in Listing 33–3 works with the accompanying CSS shown in Listing 33–4, developed mostly by experimenting in Firebug (see getfirebug.com).
Listing 33–4. Addition to style.css in the Theme's Directory Making Use of the New View Mode and the Custom Template to Theme the Compact Author Profiles
/**

 * Compact author profiles.

 */

.node-compact .field {

  padding: 0;

}


.node-compact .field-name-field-image {

  position: absolute;

}


.node-compact .author-info {

  margin-left: 130px;

}
The absolute positioning works because the .node div is already defined as position: relative. Altogether this makes the page look pretty good, as you can see in Figure 33–4.

Figure 33–4. Two author profiles, as attached to a chapter, with the compact view mode and CSS styling
![]() Tip Making a template file should never be your first choice; they are hardest to maintain as things change. Other approaches, such as styling with CSS, configuring through the Drupal user interface, and manipulating variables in preprocess functions can often give you all the flexibility you need.
Tip Making a template file should never be your first choice; they are hardest to maintain as things change. Other approaches, such as styling with CSS, configuring through the Drupal user interface, and manipulating variables in preprocess functions can often give you all the flexibility you need.
Remember you may be able to get pretty far with CSS (especially with the view mode added to the node body classes), and then even farther with preprocess functions, and not need to create a node template, which can be a lot of work to maintain when changes to a content type are made. As noted in Chapters 15 and 16, while you can implement theme_node__suggestion() or node--suggestion.tpl.php, there is no “hook_preprocess_node__suggestion” equivalent to these. Instead, you can use the many variables available in a hook_preprocess_node() implementation to check the value of one or two variables, such as the content type (in $vars['type']) or the view mode (in $vars['view_mode']), to decide if you want to mess with any of the other variables. (Note that $vars can be $variables or whatever you put in the parenthesis when implementing hook_preprocess_node(), and note further that this all applies the same to hook_preprocess_page(), hook_preprocess_comment(), etc. These hooks can be used in either a module or a theme and are covered in Chapters 15 and 16.)
![]() Note The template in Listing 33–3 looks clean, and it worked for your purposes, but when Drupal prints it out, there's a div each for field, field-items, and field-item. This is great for consistency: the same CSS will apply if it is a single-value field or one with fifty items. If it offends your sensibilities or gets in the way of your design, you can change the output that surrounds fields. In an approach directly analogous to providing theme hook suggestions in
Note The template in Listing 33–3 looks clean, and it worked for your purposes, but when Drupal prints it out, there's a div each for field, field-items, and field-item. This is great for consistency: the same CSS will apply if it is a single-value field or one with fifty items. If it offends your sensibilities or gets in the way of your design, you can change the output that surrounds fields. In an approach directly analogous to providing theme hook suggestions in hook_preprocess_node(), you can provide theme hook suggestions for fields by implementing hook_preprocess_field(). See dgd7.org/222.
Modifying the Chapter Number Field's Display
As noted, you can also use preprocess functions to modify fields before they are output. The Chapter number/Appendix letter field was set up to take only two characters. Drupal does not currently allow a textfield to be re-sized (though a module can override this, perhaps even safely; see dgd7.org/226), so you have to provide a code solution where it might have been better to let people type out “Chapter 1” and so forth. The good news, of course, is that an elegant code solution is possible.
As usual, you can begin your investigation by looking up relevant API functions (such as template_preprocess_field()) and, most usefully, printing out the variables available to your hook_preprocess_HOOK() implementation, in this case dgd7glue_preprocess_field(), while continuing to use the same custom module.
![]() Note The various preprocess hooks are considered special cases of
Note The various preprocess hooks are considered special cases of hook_process_HOOK()(see api.drupal.org/hook_process_HOOK) and do not have API documentation of their own at this time.
You can also implement preprocess hooks in your theme's template.php; prefix it with your theme's name instead of your module's name (see Listing 33–5).
Listing 33–5. Using Krumo to Display All Data Available to the hook_preprocess_field() Implementation
function dgd7glue_preprocess_field(&$vars) {

  kpr($vars);

}
![]() Tip Functions for debugging that use Drupal's message system, including
Tip Functions for debugging that use Drupal's message system, including debug() and Devel module's dpm(), can be inconsistent in their functioning from within preprocess functions. It is late enough in the page building, rendering, and theming cycle that printing output directly from these functions does work, so print_r() for small arrays and krumo() (with Devel module enabled) for larger arrays and objects works well. The function kpr() shown in Listing 33–5 will use krumo for arrays and will print scalar variables.
With krumo—via Devel module's kpr()—you can see that the variables available for a given field in a highly readable structure. It starts out with all sub-arrays and sub-objects collapsed; you click to open the ones you are interested in. In Figure 33–5, the element variable is expanded; you can see it provides very useful information such as the field name in #field_name, the view mode in #view_mode, and the content type in #bundle. The element variable is meant for the Render API layer (see Appendix C) and is just information at the theming layer where preprocess acts, but it is very useful information.
The rest of the variables are the ones you can change in the preprocess function; in particular items, shown fully expanded, is where you can change the value output by the field, which is currently 29. The several-deep array nesting for items translates to $vars['items'][0]['#markup'] in code.
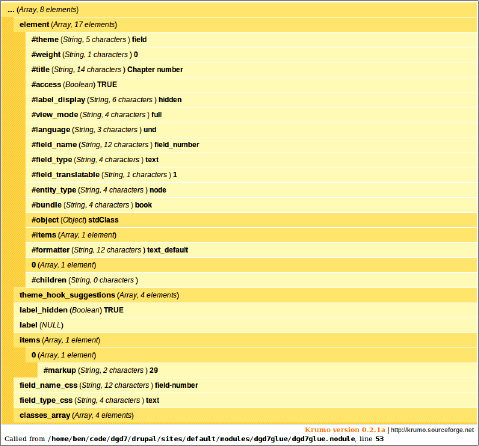
Figure 33–5. Krumo output, the result of calling kpr($vars); for an implementation of hook_preprocess_field() when viewing a page with a node that includes the ‘number’ field.
I'll mention this again, because it will save you a lot of time wondering why your changes are not taking effect. Information you can read to decide when and how to take action is in the element variable; the data you can change to affect the display of the field is in the items and other variables.
![]() Gotcha None of the values in the element array have any effect. Only
Gotcha None of the values in the element array have any effect. Only $vars['items'][0]['#markup'] changes what the field outputs for its value (for the first value for the field; the second value would be in the 1 position instead of 0). I don't know how you would know this without having read it here. A couple hours of wondering why manipulating such things as $vars['element']['#items'][0]['safe_value'] had no effect was my approach. See dgd7.org/225 for some excerpts from that fun journey.
Putting this information together, you can write code for the preprocess function that checks if it is the field and content type (bundle) you care about, prints Chapter for numbers, Appendix for letters, and further checks the view mode to print shorter text for the Compact view mode.
The end result of the code in Listing 33–6 is to print Chapter 33 instead of 33 when viewing the node for this chapter (at dgd7.org/other90), Appendix C instead of C (for dgd7.org/render), and Ch 33 and App C for these when shown on a compact list such as dgd7.org/chapters.
Listing 33–6. Implementation of hook_preprocess_field() that Converts the Number or Letter to the Text Chapter [number] or Appendix [letter], Respectively, Using a Short Form for the Compact View Mode
/**

 * Implements hook_preprocess_field().

 */

function dgd7glue_preprocess_field(&$vars) {

  if ($vars['element']['#field_name'] == 'field_number'

      && $vars['element']['#bundle'] == 'book') {

    $v = $vars['items'][0]['#markup'];

    if (is_numeric($v)) {

      if ($vars['element']['#view_mode'] == 'compact') {

        $v = t('Ch !n', array('!n' => $v),

          array('context' => 'Abbreviation for Chapter'));

      }

      else {

        $v = t('Chapter !n', array('!n' => $v));

      }

    }

    else {

      // It's not a number, so it is an Appendix.

      if ($vars['element']['#view_mode'] == 'compact') {

        $v = t('App !n', array('!n' => $v),

          array('context' => 'Abbreviation for Appendix'));

      }

      else {

        $v = t('Appendix !n', array('!n' => $v));

      }

    }

    $vars['items'][0]['#markup'] = $v;

  }

}
As a coder, you have full control of field output with preprocess functions. It's also possible to give site administrators ways to change field display by coding field formatters, covered next.
Linking to Drupal.org and Twitter Accounts with Field Formatters
As constructed in Chapter 8, Author profiles include fields for very specific connections to other web sites: a drupal.org ID, a groups.drupal.org ID, and a Twitter username. The two IDs were made integer fields and the username was made a plain text field. The task of turning this data into human-readable (and clickable) links was punted to here. Fortunately, making field formatters is fun.
You've seen formatters in action, for instance, when choosing whether a text field should be displayed as Default, Plain text, and Trimmed. To make your own formatters, you can get started by looking at Drupal's own code directly or finding an answer on api.drupal.org. Taking the latter route this time, going to api.drupal.org and clicking Topics takes you to api.drupal.org/api/drupal/groups/7 which is a long list of things that have been grouped together—two pages worth—but Field API is on the first page. In fact, Field API in some form is listed eight times (see Figure 33–6).

Figure 33–6. Field API topics listed on api.drupal.org
The first listing, “Field API”, links to all the other Field API topics (after providing a lot of background information on fields). But it's the last listing, Field Types API, that's exactly what you're looking for: “Define field types, widget types, display formatter types, storage types” (emphasis added). Click through to api.drupal.org/api/group/field_types (that's the shortest URL that works; you'll be taken to the long version) and at the bottom of a list of hooks, two are specially documented:
The Field Types API also defines two kinds of pluggable handlers: widgets and formatters, which specify how the field appears in edit forms [widgets] and in displayed entities [formatters]. Widgets and formatters can be implemented by a field-type module for its own field types, or by a third-party module to extend the behavior of existing field types.
You can extend the behavior of existing field types with a module. The referenced hook is hook_field_formatter_info(), defined at api.drupal.org/hook_field_formatter_info, and it has example code! You can change the module name part of the function name, and a few other details, and add it to the glue module (see Listing 33–7).
Listing 33–7. Basic Implementation of hook_field_formatter_info() for dgd7glue.module
/**

 * Implements hook_field_formatter_info().

 */

function dgd7glue_field_formatter_info() {

  return array(

    'dgd7glue_number_account_link' => array(

      'label' => t('Account link'),

      'field types' => array('number_integer'),

    ),

    'dgd7glue_text_account_link' => array(

      'label' => t('Account link'),

      'field types' => array('text'),

    ),

  );

}
Clear caches and visit an administration page for fields display that includes text or integer fields, such as the Manage Display page for the Author profile content type at Administration ![]() Structure
Structure ![]() Content types
Content types ![]() Author profile
Author profile ![]() Manage display (
Manage display (admin/structure/types/manage/profile/display) and you will see that you have an Account link option for the formatter of text and integer fields. It won't do anything, but it shows up! See Figure 33–7.

Figure 33–7. Account link formatter option for an integer field
If the two formatters you are defining need to be configurable, they will need some settings. You can get an example of formatter settings from both the text and integer fields provided by Drupal core. The integer field type is defined in the number module, which is inside the field module; the Number module's main file is located at modules/field/modules/number/number.module. The text module is also inside the field module. Both define much more than formatters, but you are only interested in the various formatter functions: hook_field_formatter_*() implementations— info, settings_form, settings_summary, and view.
![]() Note You could add settings to the existing text and integer field formatters with
Note You could add settings to the existing text and integer field formatters with hook_field_formatter_info_alter(), but adding a link around the field data will require its own formatter view, and so needs a new formatter.
To add settings forms and settings summaries to the field display form, you need to first add settings defaults to your implementation of hook_field_formatter_info(); see Listing 33–8.
Listing 33–8. Adding Settings Defaults for the Custom Account Link Formatters for Integer and Text Fields
/**

 * Implements hook_field_formatter_info().

 */

function dgd7glue_field_formatter_info() {

  return array(

    'dgd7glue_number_account_link' => array(

      'label' => t('Account link'),

      'field types' => array('number_integer'),

      'settings' => array('web_site' => 'drupal_org'),

    ),

    'dgd7glue_text_account_link' => array(

      'label' => t('Account link'),

      'field types' => array('text'),

      'settings' => array('web_site' => 'twitter_com'),

    ),

  );

}
This provides defaults but administrators don't yet have a way to change these defaults. You need a settings form with a select list—a form element with pre-defined options. The Number module's field formatter settings form hook implementation has a select list element from which you can borrow (api.drupal.org/number_field_formatter_settings_form). The options in this select list will be drupal.org and groups.drupal.org in the case of the number account field and twitter.com and identi.ca in the case of the text account field. The code in Listing 33–9 borrows from the number form structure and select list and adds an if statement to provide different options depending on if it is the formatter for number fields or the formatter for text fields. The select options themselves are moved to helper functions.
Listing 33–9. Settings Form for the Account Link Formatters for Text and Integer Fields
/**

 * Implements hook_field_formatter_settings_form().

 */

function dgd7glue_field_formatter_settings_form($field, $instance, $view_mode, $form,

 &$form_state) {

  $element = array();


  $display = $instance['display'][$view_mode];

  $settings = $display['settings'];


  if ($display['type'] == 'dgd7glue_number_account_link') {

    $options = _dgd7glue_number_account_link_options();

  }

  else {

    // Field type is dgd7glue_text_account_link.

    $options = _dgd7glue_text_account_link_options();

  }


  $element['web_site'] = array(

    '#title' => t('Web site or service'),

    '#type' => 'select',

    '#options' => $options,
    '#default_value' => $settings['web_site'],

    '#required' => TRUE,

  );


  return $element;

}


/**

 * Provides Account link formatter options for integer fields.

 */

function _dgd7glue_number_account_link_options() {

  return array(

    'drupal_org' => t('Drupal.org'),

    'groups_drupal_org' => t('Groups.Drupal.org'),

  );

}


/**

 * Provides Account link formatter options for text fields.

 */

function _dgd7glue_text_account_link_options() {

  return array(

    'twitter_com' => t('Twitter.com'),

    'identi_ca' => t('Identi.ca'),

  );

}
Drupal's Field API requires you to provide a summary of the settings selected. Rather than again drawing from the number field for an example, the need to state which option has been selected maps closely to the simpler one-line summary of text.module (api.drupal.org/text_field_formatter_settings_summary); see Listing 33–10.
Listing 33–10. A Summary of the Settings Selected
/**

 * Implements hook_field_formatter_settings_summary().

 */

function dgd7glue_field_formatter_settings_summary($field, $instance, $view_mode) {

  $summary = '';


  $display = $instance['display'][$view_mode];

  $settings = $display['settings'];


  if ($display['type'] == 'dgd7glue_number_account_link') {

    $options = _dgd7glue_number_account_link_options();

  }

  else {

    // Field type is dgd7glue_text_account_link.

    $options = _dgd7glue_text_account_link_options();

  }


  $summary .= t('Web site') . ': ' . $options[$settings['web_site']];


  return $summary;

}
Test that this worked by going back to the Author profile manage fields display page, selecting Account link for the Drupal ID field and see that the options drupal.org and Groups.Drupal.org appear.
![]() Caution The settings form link (gear icon) will not be displayed if the settings summary hook is not also defined.
Caution The settings form link (gear icon) will not be displayed if the settings summary hook is not also defined.
A first draft of Listings 33–9 and 33–10 did not have helper functions for the formatter options. Realizing that both dgd7glue_field_formatter_settings_form() anddgd7glue_field_formatter_settings_summary() should have the display-friendly version of the option (for instance ‘Drupal.org’ for ‘drupal_org’), they were refactored to put the options in their own functions. This way, the settings form function and the settings summary function can both call them. (Repeating information in two places in the code would have been a bad thing; when something needs to be changed, you or the next developer would be likely to miss one of the places.) In retrospect, it might be even cleaner to have one options-gathering helper function (instead of two) and do an if or switch statement on the field formatter type within it. However, the point of custom code is to do something effective and specific on your web site in a maintainable way, not to be endlessly refactored for elegance.
The next step is to implement hook_field_formatter_view(). While developing, you will likely want to look in a debugger or throw a debug($items) into dgd7glue_field_formatter_view() to see exactly what it gets for items, as shown in Listing 33–11.
Listing 33–11. Implementation of hook_field_formatter_view() to Investigate What It Is Handed
/**

 * Implements hook_field_formatter_view().

 */

function dgd7glue_field_formatter_view($entity_type, $entity, $field, $instance, $langcode,

 $items, $display) {

  foreach ($items as $delta => $item) {

    debug($item);

  }

}
Viewing an author profile page that has values for a drupal.org ID and a Twitter account now result in messages printed to the screen, for the former, a numeric field:
array (

  'value' => '64383',

)
and for the latter, a text field item
array (

  'value' => 'mlncn',

  'format' => NULL,

  'safe_value' => 'mlncn',

)
Knowing the structure of the items handed in to dgd7_field_formatter_view() and knowing the structure of the display settings form you just defined, you can write a function that combines the two.
![]() Note If you need to examine the structure of the variable
Note If you need to examine the structure of the variable $display you can look at in a debugger (see dgd7.org/ide) or output with debug() as done with $item above.
The function in Listing 33–12 has a switch statement to assign the base URL according to the web site setting (such as http://drupal.org/ for a drupal.org-designated field) and another switch statement to set the key for accessing the field's value correctly. As seen above, ‘value’ is the only property available for the integer field. This is because a validated integer field is inherently safe. Drupal provides the ‘safe_value’ property for the text field because a sanitized version is needed for you to print it safely. A user-input string could contain malicious JavaScript code.
Listing 33–12. Implementation of hook_field_formatter_view() to Show Account IDs as Links
/**

 * Implements hook_field_formatter_view().

 */

function dgd7glue_field_formatter_view($entity_type, $entity, $field, $instance, $langcode,

 $items, $display) {

  $element = array();


  // Allow a definition of a function to get the account link title.

  $title_callback = NULL;

  $item_key = 'safe_value';


  // Ordinarily, view formatters switch on the display type, but for the

  // account link formatters dgd7glue defines, the web site is what matters.

  switch ($display['settings']['web_site']) {

    case 'drupal_org':

      $href = 'http://drupal.org/user/';

      $title_callback = 'dgd7glue_drupal_page_title';

      break;

    case 'groups_drupal_org':

      $href = 'http://groups.drupal.org/user/';

      $title_callback = 'dgd7glue_drupal_page_title';

      break;

    case 'twitter_com':

      $href = 'http://twitter.com/';

      break;

    case 'identi_ca':

      $href = 'http://identi.ca/';

      break;

  }


  switch ($display['type']) {

    case 'dgd7glue_number_account_link':

      $item_key = 'value';

      break;

    default:

      $item_key = 'safe_value';

  }
  foreach ($items as $delta => $item) {

    if ($title_callback) {

      $title = $title_callback($item[$item_key], $href);

    }

    else {

      $title = $item[$item_key];

    }

    $href = $href .= $item[$item_key];

    $element[$delta] = array(

       '#type' => 'link',

       '#title' => $title,

       '#href' => $href,

     );

  }


  return $element;

}


/**

 * Get the title of a page on a Drupal site.

 *

 * Callback for account link titles in dgd7glue_field_formatter_view().

 */

function dgd7glue_drupal_page_title($account_id, $href) {

  return $account_id;

}
The first switch statement, above, provides the base for the URL depending on which web site is set in the field's display settings, and optionally a title callback to generate the text part of the link. That last function, dgd7glue_drupal_page_title(), provides that callback. As shown, however, it's only a placeholder: it doesn't do what you really want it to do. In the next section, you'll change it to fetch the author's username from drupal.org and groups.drupal.org profile pages.
The main function ends with a foreach() statement (which would handle the case if the field were to allow multiple values) that builds the element to return as a renderable array. By setting the ‘#type’ to ‘link’, Drupal knows to create a link. (As described in Appendix C, returning a render array instead of an HTML string gives other Drupal modules and the theme a chance to make changes, such as adding a class or a target attribute.)
Fetching the Username
The dgd7glue_drupal_page_title() function used previously needs to do what it says and fetch users' names from their profile pages on drupal.org and groups.drupal.org.
Even for the craziest ideas, someone may have blazed the trail for you in Drupal. In this case, that someone is Kevin Hemenway, better known as Morbus Iff. His Bot module powers Druplicon in #drupal and other IRC channels (see Chapter 9). It can be configured to magically fetch the title of a node when given the URL on a Drupal, such as http://example.com/node/523. (For issues on drupal.org, it can also get the project, status, and other information. But the interesting thing for your present use case is that it somehow grabs the title of sites with which it has no special integration.)
Knowing this, why not drush dl bot, even though you don't plan to use it—just look at it (see Listing 33–13).
Listing 33–13. Excerpt from bot_project.module
/**

 * Listen for URLs or a numerical ID and respond with information about it.

 *

 * @param $data

 *   The regular $data object prepared by the IRC library.

 * @param $from_query

 *   Boolean; whether this was a queried request.

 */

function bot_project_irc_msg_channel($data, $from_query = FALSE) {

// [Code not of interest for present purposes not shown...]

      $result = drupal_http_request($url);

      if ($result->code != 200) { continue; }


      // we'll always display a title, so grab that first for db storage.

      preg_match('/<title>(.*?) |.*?</title>/', $result->data, $title_match);

      $title = $title_match[1] ? $title_match[1] : '<' . t('unable to determine title') . '>';

// ...
The code is littered with caveats from Morbus, the module's author, about how it's not the best way to do it—but it works. You can adopt it directly, as shown in Listing 33–14.
Listing 33–14. Function to Scrape User Names from Drupal.org User Page Titles (or Any Drupal.org Page Title)
/**

 * Get the title of a page on a Drupal site.

 *

 * Callback for account link titles in dgd7glue_field_formatter_view().

 */

function dgd7glue_drupal_page_title($account_id, $href) {

  $result = drupal_http_request($url);

  // Use $account_id as title if cannot get one.

  if ($result->code != 200) {

    return $account_id;

  }

  // Extract the first part of the title from the page's HTML source.

  preg_match('/<title>(.*?) |.*?</title>/', $result->data, $title_match);

  $title = $title_match[1] ? $title_match[1] : $account_id;

  return $title;

}
This code works and is pretty awesome, replacing a number with a name. There's still a problem with it, though: it causes drupal.org to be contacted twice every time someone views an author's profile, downloading an entire profile web page each from drupal.org or groups.drupal.org. One way or another, the name needs to be cached locally instead.
![]() Tip Before you implement caching, make sure you need it. You can test if the code you are planning to cache is called with a debugger, a query logger (as provided by Devel module,
Tip Before you implement caching, make sure you need it. You can test if the code you are planning to cache is called with a debugger, a query logger (as provided by Devel module, drupal.org/project/devel), or by including a watchdog() logging command (api.drupal.org/watchdog), which you could use temporarily even on a live site. See Appendix B for ways to find performance problems on your site that need optimization.
Caching Simple Data Using Drupal's Default Cache Table
To be nice to drupal.org, to say nothing of your own site's performance, don't grab an entire page each time you want to look up a username.
Doing this work at the formatter level means it is too late for Field API's built-in caching. Defining a new cache_* table or adding a row or rows to the generic cache table are both possibilities. To implement some basic caching, you can look in the cache table and work your way backwards. Searching for keys from the cache table in the site code quickly shows that cache_set() and cache_get() are the functions Drupal uses to put and take data from cache. Searching for ‘cache_set’ or ‘cache_get’ (as with grep -nHR 'cache_get' modules from the root of Drupal's code) finds plenty of examples.
![]() Note Drupal's caching functions take care of static caching for you, which is nice. It's probably not necessary in this case, but static caching means that when the data is fetched from the cache with a database query, it doesn't repeat this query during a page request. (See
Note Drupal's caching functions take care of static caching for you, which is nice. It's probably not necessary in this case, but static caching means that when the data is fetched from the cache with a database query, it doesn't repeat this query during a page request. (See api.drupal.org/_cache_get_object which is called by cache_get().)
Taking as an example the caching for language metadata in locale.module, you can incorporate caching into the page title fetching function. The caching-related additions are shown in Listing 33–15 in bold.
Listing 33–15. Caching Added to the Function for Fetching Page Titles from Standard Drupal Sites
/**

 * Get the title of a page on a Drupal site.

 *

 * Callback for account link titles in dgd7glue_field_formatter_view().

 */

function dgd7glue_drupal_page_title($account_id, $href) {

  $url = $href . $account_id;

  if ($cache = cache_get('dgd7glue:' . $url, 'cache')) {

    $title = $cache->data;

  }

  else {

    $result = drupal_http_request($url);

    // Use $account_id as title if cannot get one, but do not cache it.

    if ($result->code != 200) {
      return $account_id;

    }

    // Extract the first part of the title from the page's HTML source.

    preg_match('/<title>(.*?) |.*?</title>/', $result->data, $title_match);

    $title = $title_match[1] ? $title_match[1] : $account_id;

    cache_set('dgd7glue:' . $url, $title);

  }

  return $title;

}
The request to load a page is now made only once, and is thereafter retrieved from the cache until caches are cleared—which can be weeks on a production site (not in development).
Streamlining an Awkward Form Element with CSS
The Suggestion content type has the Book element vocabulary attached to it. This vocabulary has a dozen terms, of which only one can be selected, presented as radio buttons listed vertically by default. This significantly increases the amount of scrolling a person needs to do when posting a suggestion.
To fix this, there is (of course) a module for that, one with a most impressive name: Multi-column checkboxes radios (drupal.org/project/multicolumncheckboxesradios). However, at the time of writing, it was still buggy for Drupal 7. Also, the Book element vocabulary doesn't have so many terms that it needs columns; it would look fine horizontal instead of vertically, and you can do that with CSS.
![]() Note Drupal 7 improves the classes added to
Note Drupal 7 improves the classes added to divs surrounding form items. In Drupal 6, it was hardcoded to ‘form-item’. Now the form element name and the type of form element are added as form-item-name and form-item-type. You can see how Drupal does this (and also see the theme function you would override to change it) at api.drupal.org/theme_form_element.
Unfortunately, you can't easily add custom classes to forms that you define or alter. However, between classes based on the type and the name, you can generally target form items with CSS or JavaScript as you need to. In general, you will be able to style your form without adding another div or other wrapping element and without overriding the theme_form_element() function; see Listing 33–16.
Listing 33–16. CSS Added to the Theme to Make the Book Element Vocabulary's Radio Buttons Span Side-to-Side
/* Make the Book element radio buttons flow horizontally. */

.form-item-field-element-und {

  display: inline-block;

  padding-right: 7px;

}
Contextual “Add New” Links for Content Types
When a user is looking at the list of suggestions or an individual suggestion, she should also be invited to submit her own, if she has permission to create a new suggestion.
Drupal 7 provides for a similar action primarily found on Administration pages, for example the + Add content link above the content listing (admin/content).
![]() Note Action links are a new interaction pattern for Drupal 7 (see Chapter 32). They are Drupal's way of saying things like “If you're on the content overview page, there's a good chance you want to add new content.” While other local tasks in Drupal take you to settings or listing pages, action links perform actions, usually adding something. Rather than being rendered as tabs like other tasks are by default, they are rendered as links directly below the help region through an
Note Action links are a new interaction pattern for Drupal 7 (see Chapter 32). They are Drupal's way of saying things like “If you're on the content overview page, there's a good chance you want to add new content.” While other local tasks in Drupal take you to settings or listing pages, action links perform actions, usually adding something. Rather than being rendered as tabs like other tasks are by default, they are rendered as links directly below the help region through an $action_links variable in the page template.
Personally, these action links (such as the + Add content type at the top of admin/structure/content-types) might as well be invisible to me—whether it's the slight indent or, more likely, being used to Drupal 6 which only ever had help text in that area, this new Drupal 7 convention hasn't become natural to me yet. However, the benefits of adopting a standard (which probably will be natural to native Drupal 7 users in any case) trumps personal taste. The fundamental concept of treating a certain type of links a certain way is sound.
![]() Note The first approach described next turns out not to be the best way to add existing pages as action links, so if you're looking for a straight answer, you can skip down to the second solution. I'm showing this one here because it's a viable solution (and the proper way to add new pages as action links) and, more importantly, demonstrates the process of investigation.
Note The first approach described next turns out not to be the best way to add existing pages as action links, so if you're looking for a straight answer, you can skip down to the second solution. I'm showing this one here because it's a viable solution (and the proper way to add new pages as action links) and, more importantly, demonstrates the process of investigation.
Finding and Following a Model
As discussed in Chapter 18, it's always good to look to Drupal core for examples, but a contrib implementation of a core convention is a good place to look, too—especially when the contributed modules is Views. On the Administer ![]() Structure
Structure ![]() Views page (
Views page (admin/structure/views), atop the listing of existing views, is the signature plus sign with text + Add new view. You can search for the text in the Views code to learn how it gets there; see Listing 33–17.
Listing 33–17. Using Grep to Search for “Add new view” within the Views Project, with Result Shown
cd ~/workspace/dgd7

grep -nHR "Add new view" sites/all/modules/views/

sites/all/modules/views/views_ui.module:38:    'title' => 'Add new view',
The search output in Listing 33–18 tells you that in the Views UI module, on line 38, the text you searched for (“Add new view”) is present. Go there and you can see that it is within an implementation of hook_menu(); see Listing 33–18.
Listing 33–18. Code that Defines the “Add New View” Link in views_ui.module
  $items['admin/structure/views/add'] = $base + array(

    'title' => 'Add new view',

    'page callback' => 'views_ui_add_page',

    'type' => MENU_LOCAL_ACTION,

  );
This is quite instructive. The menu item definition indicates that the page it is appearing on is at the path admin/structure/views, as you know it is. Its title is the text you see, “Add new view”. The special part seems to be the menu item type of MENU_LOCAL_ACTION.
Do a quick search of Drupal code for MENU_LOCAL_ACTION and you can find other examples; see Listing 33–19.
Listing 33–19. Menu Item Defined in node.module Gives Link on admin/structure/types
  $items['admin/structure/types/add'] = array(

    'title' => 'Add content type',

    'page callback' => 'drupal_get_form',

    'page arguments' => array('node_type_form'),

    'access arguments' => array('administer content types'),

    'type' => MENU_LOCAL_ACTION,

    'file' => 'content_types.inc',

  );
That's not the link that needs to be added to the top of the listing of suggestions, though. The link you want to include as an action link is ‘node/add/suggestion’. Searching for node/add in node.module (skipping past the menu item that defines the listing page of all content types that users can create) brings you to a set of menu items defined in a foreach loop—one menu item for each content type; see Listing 33–20.
Listing 33–20. Code in node.module's Implementation of hook_menu() that Creates a node/add/CONTENT_TYPE Page for Each Content Type
  foreach (node_type_get_types() as $type) {

    $type_url_str = str_replace('_', '-', $type->type);

    $items['node/add/' . $type_url_str] = array(

      'title' => $type->name,

      'title callback' => 'check_plain',

      'page callback' => 'node_add',

      'page arguments' => array($type->type),

      'access callback' => 'node_access',

      'access arguments' => array('create', $type->type),

      'description' => $type->description,

      'file' => 'node.pages.inc',

);
Is there any way to make this show up outside its location? It might seem there is no easy way, but actually you can create a second menu item at a different path that calls the same page callback and page arguments as the node add form you want. (As you'll see later, this is not the best approach here.) In this case, that's the suggestions path defined by your view and the suggestion content type.
The most important thing to note is the page callback, which is the node_add() function, and the page arguments, which is just one argument, the node type machine name.
![]() Tip The X-ray module created in Chapters 18 through 20 and available at
Tip The X-ray module created in Chapters 18 through 20 and available at drupal.org/project/xray provides the page callback and page arguments passed to it for every page you visit, and could give this information for node/add/suggestion without the need to look at hook_menu() implementations directly.
Enough looking at existing code. Time to write some code! The code in Listing 33–21 is a menu item definition that combines the definition of a node/add menu item with the MENU_LOCAL_ACTION type.
Listing 33–21. Defining a Local Action Menu Item in Your Custom Code
/**

 * Implements hook_menu().

 */

function dgd7glue_menu() {

  $items = array();

  $items['suggestions/add'] = array(

    'title' => "Add a suggestion",

    'page callback' => 'node_add',

    'page arguments' => array('suggestion'),

    'access callback' => 'node_access',

    'access arguments' => array('create', 'suggestion'),

    'file' => 'node.pages.inc',

    'file path' => drupal_get_path('module', 'node'),

    'type' => MENU_LOCAL_ACTION,

  );

  return $items;

}
![]() Gotcha Menu item definitions do not use underscores in their keys (‘page arguments’, ‘page callback’, and ‘access callback’, etc.).
Gotcha Menu item definitions do not use underscores in their keys (‘page arguments’, ‘page callback’, and ‘access callback’, etc.).
Clear caches (and make sure the module is enabled) and presto! It's there, your own action link.
PROBLEMS BETWEEN KEYBOARD AND CHAIR (PEBKAC)
Noticing and Adopting a Better Way
This method of defining a new menu item for the action link works, but is there a better way? Repeating the use of the page callback function in a new menu item means that the page to add a suggestion now exists at two paths on the site: node/add/suggestion, as expected, and the new suggestions/add. This will confuse Shortcut module (allowing the same page to be added to the shortcut bar twice) and also might confuse people using the site, reducing their feelings of comfort and understanding.
While looking at node.module's implementation of hook_menu(), you might have noticed that the + Add content action link at the top of admin/content is not defined as a MENU_LOCAL_ACTION. Searching all the files of node.module for “Add content” only brings up the node/add page itself. How does it get added to admin/content? Searching for admin/content brings the answer almost immediately: the function node_menu_local_tasks_alter(). Check it out in node.module or at api.drupal.org/node_menu_local_tasks_alter because you can take and modify the code very directly and make it your own, as done in Listing 33–22.
Listing 33–22. Adding an Action Link by Implementing hook_menu_local_tasks_alter()
/**

 * Implements hook_menu_local_tasks_alter().

 */

function dgd7glue_menu_local_tasks_alter(&$data, $router_item, $root_path) {

  // Add action link to 'node/add/suggestion' on 'suggestions' page.

  if ($root_path == 'suggestions') {

    $item = menu_get_item('node/add/suggestion'),

    if ($item['access']) {

      $data['actions']['output'][] = array(

        '#theme' => 'menu_local_action',

        '#link' => $item,

      );

    }
  }

}
Excellent! This replaces the menu item defined previously with a much more elegant solution (thank Drupal that “there's a hook for that”). Now you have added a custom action link to an existing page the correct way. It's easy when you know how. But if there's any moral to be learned from your author's stumbling around, it's that not knowing but trying anyway is one way to end up knowing how.
Views-created listings featuring one or two content types are very common in Drupal. It is a great boost to usability to place atop them links for creating the same content. Now you know how to do that with a snippet of a dozen lines.
Making a Custom Text Filter
Drupal's text format filters are a fairly simple and powerful way to change how your content is displayed. (Previous versions of Drupal called these input filters, which was misleading because Drupal, ever-respectful of user-submitted data, filters content on output.) In this section, you will once again see how easy, non-scary, and useful making a module can be, even for someone as prone to false starts as your author in this chapter.
The Definitive Guide to Drupal 7, as well as other Apress books, emphasize tips, notes, and other types of commentary by setting it apart—between two lines and in a different font.
![]() Tip At the start of any project, you won't know exactly how to do it, but knowing it can be done somehow is the crucial first step in figuring it out and doing it.
Tip At the start of any project, you won't know exactly how to do it, but knowing it can be done somehow is the crucial first step in figuring it out and doing it.
For the DefinitiveDrupal.org web site, you can produce a similar effect using HTML and CSS. The HTML with a div and spans for the CSS to change might look like this:
<div class="featured-element tip"><span class="featured-element-type">

<span class="leading-square">T</span>ip</span> Hand-entering HTML code that involves

 divs or spans and classes or IDs is a strong sign we're doing it wrong.</div>
However, you don't want the authors to have to type in HTML code each time they want a highlighted tip. Apart from the tedium, it would increase the chances of making a minor mistake that makes display inconsistent. Instead of typing the previous HTML, let's let the authors use pseudo-markup that can be replaced with the previous HTML, such as:
[tip] Hand-entering HTML code that involves divs or spans and classes or IDs is a strongsign we're doing it wrong.[/tip]
That is much harder to mess up. You know what you want to do. You have the simplified markup you want to use, and the HTML you want to produce from it. Now where do you start?
Looking for a Module that Does What You Need
The best module is one you don't have to write yourself. Look around for a module that does that has to do with creating HTML tags from other markup. Searching online for such keywords as “drupal text format transform tags,” “drupal replace markup,” “drupal input filter tags,” “drupal 7 text filters exportable” and searching drupal.org modules specifically for similar keywords (minus the “Drupal”) did turn up some prior art.
![]() Tip When searching Drupal.org for a module, apply the module filter. The URL might look like:
Tip When searching Drupal.org for a module, apply the module filter. The URL might look like: drupal.org/search/apachesolr_multisitesearch/replace%20tags?filters=ss_meta_type%3Amodule
Similar to what DefinitiveDrupal.org needs, Markdown Filter (drupal.org/project/markdown), and Textile (drupal.org/project/textile) modules (in the sense that they process text) are the BBCode (drupal.org/project/bbcode). These, however, are for known markup systems, not for meeting custom needs. They and others, like the Typogrify module (drupal.org/project/typogrify), can serve as examples for how to create filters.
Another module turned up in search: SimpleHTMLDOM (drupal.org/project/simplehtmldom), a wrapper for the namesake library available from simplehtmldom.sourceforge.net, could be useful as a tool, but your need to manipulate text is not that complex.
There is a Drupal 6 version of a module doing tag replacing, including some that looks like it does the before and after tags that you need: Rep[lacement] tags (drupal.org/project/reptag). However, it doesn't use filters and the text format system, instead relying on NodeAPI. Furthermore, the Drupal 6 version never hit a stable release. This should ease your conscience a bit about making a duplicate module, rather than porting and extending.
It's also very possible that these markup replacement needs could be done or should be done with configuration or as a sort of submodule of Flexifilter module (drupal.org/project/flexifilter), which is intended to make creating custom filters easier. A project in the same vein, Custom filter (drupal.org/project/customfilter) has been around even longer and is more actively maintained. Neither had D7 branches as of this writing, nor felt compelling enough to adopt the approach of porting and then building a submodule.
Given a short timeline, specific goals, and coding abilities, this is a justifiable time to make your own module. (It may not be the smartest or best decision, but it is not, on the face of it, a terrible idea.)
Choosing an Approach
Deciding to make a module is, of course, only the first step. How to make it is also pretty important.
Having learned about hooks and nodes in the part of the book on module development, you might be tempted to intercept nodes when they are saved using hook_node_insert() or hook_node_update() and make your changes there. You should resist this temptation. One of Drupal's distinguishing characteristics is that it does not lay a finger on content. What you see before you save is exactly what you see when you edit it again. This means your data is never corrupted. Accepting that as the Very Good Thing it is, you may then think you should replace the placeholder markup with your cool styling using a manipulation in hook_node_view(). But that means Drupal might have to do that work of processing the text every time it displayed a node. Before building a mechanism for manipulating the existing text and adding a new caching layer, it's time to take a step back and look outside the node system. (Or, if really stumped, ask on IRC, as discussed in Chapter 9.)
![]() Note For the full cornucopia of node-related hooks in Drupal 7, see
Note For the full cornucopia of node-related hooks in Drupal 7, see api.drupal.org/node.api.php or open modules/node/node.api.php in any copy of Drupal 7.
Changing the way user-inputted text looks is a common problem in Drupal. In fact, this is a problem that has long been solved by Drupal core itself. A method of managing modifications to content when it is displayed has lived in its own module, Filter module, since Drupal 5.
In Drupal 7, Filter module shows up in the administration interface at Administration ![]() Configuration
Configuration ![]() Content Authoring
Content Authoring ![]() Text formats (
Text formats (admin/config/content/formats). Looking at this core module from the code side (in the directory modules/filter) shows ten files (filter.admin.inc, filter.css, filter.js, filter.test, filter.admin.js, filter.info, filter.module, filter.api.php, filter.install, and filter.pages.inc), which seems a little intimidating. Let's take a look at it, but it would be nice to find a module that implemented just the provision of a filter, not the entire text format system.
Finding an Example (Hint: the Examples Project)
Where can you find a good example?
A project initiated by Randy Fay (rfay) while Drupal 7 was still in development provides the excellent (and now obvious) answer: the Examples suite of modules. You can download it just like any other project at drupal.org/project/examples. Sure enough, it has a filter_example module demonstrating how to define an input filter.
![]() Tip Whenever you need to implement a core API (a hook defined by Drupal core) look for examples in the Examples project (
Tip Whenever you need to implement a core API (a hook defined by Drupal core) look for examples in the Examples project (drupal.org/project/examples).
Giving a Module an Interim Name
Now that you know your approach and have an example to follow, it's time to start coding. Which leads to question zero: what to name the module? (You could start adding functions to your glue code module, but when starting major new functionality, it's cleaner to start in a separate module—especially when there's a chance of contributing the code to the Drupal community.) If inspiration for the name does not strike right away, to avoid expending energy coming up with the perfect name before the module even exists, you can use a temporary name.
There are a few guidelines in choosing an interim name, however. If you named the module “tip” and later decided to contribute it to drupal.org, you would want to rename it so as not to claim the common word “tip” when that is not a particularly apt description of what the module does. The problem is that running a find-and-replace on those common three letters would not be pretty.
Even for a module you plan to contribute, for its temporary name, follow the same practice as for custom modules and namespace it with the name of your site project. Your project name plus any distinctive word you choose should make it easy to fix all function names with find-and-replace.
![]() Tip This module will use an underscore in its provisional name, but certain aspects (such as where CSS classes and IDs, which historically use dashes instead of underscores) would be easier with both the provisional and the ultimately chosen name avoiding any underscore.
Tip This module will use an underscore in its provisional name, but certain aspects (such as where CSS classes and IDs, which historically use dashes instead of underscores) would be easier with both the provisional and the ultimately chosen name avoiding any underscore.
So let's have at it! Make a directory named whatever you choose to name the module (in this case dgd7_tip) and start making the necessary module files, also named after the module, starting with dgd7_tip.info(see Listings 33–23 and 33–24).
Listing 33–23. Command-Line Steps to Create the Module Directory and a .info File with Vim
cd sites/all/modules/custom

mkdir dgd7_tip

cd dgd7_tip/

vi dgd7_tip.info
Listing 33–24. Initial Working Content for dgd7_tip.info
name = Tip formatter

description = [dgd7_tip] Text format filter for tips, notes, hints and other emphasized

 paragraphs of text.

core = 7.x
![]() Note This author considers it a basic matter of usability for administrators and developers to be able to see module's system (or machine) names on the
Note This author considers it a basic matter of usability for administrators and developers to be able to see module's system (or machine) names on the admin/modules page and will continue to put the system name in the description until this basic functionality is accepted into core. This style is not accepted practice so only follow it if you also feel strongly.
Now create a .module file and give it its first hook, an implementation of hook_filter_info() (see api.drupal.org/hook_filter_info) adapted from the Filter example module, as shown in Listing 33–25.
Listing 33–25. Initial Contents of dgd7_tip.module
/**

 * Implements hook_filter_info().

 */

function dgd7_tip_filter_info() {

  $filters = array();

  $filters['dgd7_tip'] = array(

    'title' => t('Tip formatter'),

    'description' => t('Allows simple notation to indicate paragraphs of text to be

 emphasized as tips, notes, hints, or other specially featured interjections.'),

    'process callback' => '_dgd7_tip_process',

    'tips callback' => '_dgd7_tip_tips',

  );
  return $filters;

}


/**

 * Implements filter process callback.

 */

function _dgd7_tip_process($text, $filter) {

  return $text;

}


/**

 * Implements filter tips callback.

 */

function _dgd7_tip_tips($filter, $format, $long = FALSE) {

  $tips = '';

  return $tips;

}
There! That looks neat and tidy. Your module won't even have any undefined function errors if you enable it—though the filter callback functions are mere stub functions so they won't do anything, either. (The ‘prepare callback’ in the hook_filter_info() definition and in filter_example.module proved unnecessary for a simple filter; it is useful for complex filtering that requires making changes to content before other filters do their work. Your author initially made a stub function for it but removed it from the example. Warning: An empty prepare or process callback, or one that for whatever reason does not return a value, will result in empty content anywhere that input format is applied!)
![]() Note This module only provides one filter, but it could provide more by repeating the $filters['dgd7_tip'] array with different key and values. If you do intend to provide more than one input filter, the key should not be your module name, ‘dgd7_tip’, but rather the module name plus something descriptive of that particular filter. The same convention applies for callback names. This module is not intended to provide other input filters, so the precaution of explicit function names is premature. (The process and tips callbacks are internal functions, meant only for use in your module, as indicated by the underscore in front of them. For any API function—a function that may be called by other modules—you may want to take the precaution of choosing future-proof names.)
Note This module only provides one filter, but it could provide more by repeating the $filters['dgd7_tip'] array with different key and values. If you do intend to provide more than one input filter, the key should not be your module name, ‘dgd7_tip’, but rather the module name plus something descriptive of that particular filter. The same convention applies for callback names. This module is not intended to provide other input filters, so the precaution of explicit function names is premature. (The process and tips callbacks are internal functions, meant only for use in your module, as indicated by the underscore in front of them. For any API function—a function that may be called by other modules—you may want to take the precaution of choosing future-proof names.)
Start a Repository for Your Module
Because this module may be destined for an independent existence from the rest of the web site project, you can initiate a separate version control repository for it. With Git (see Chapter 2 and Chapter 37 for more information and resources), this is a few words typed on the command line, as shown in Listing 33–26. Do this from within the dgd7_tip directory you made.
Listing 33–26. Command-Line Steps for Starting a Repository and Making the Initial Commit of the Provisionally-Named dgd7_tip Module
git init

git add .

git commit -m ".info and .module file with stub filter API functions."
You can now commit constantly (as advocated in Chapter 14) without commit messages or with them when you have something particular to note. The git add commands and commit messages will not be marked with the code in this chapter, but you can be sure that after every significant change and many insignificant ones, there was a commit.
![]() Note The module created in this section is linked from the online chapter notes at
Note The module created in this section is linked from the online chapter notes at dgd7.org/other90, and you can see every commit made to it.
Making the Tags and Replacement Markup Form
For a completely custom module, you could skip the settings form and just hardcode the processing you want to apply to content. No need to make a user interface for administrators to use, no need to make an API for modules to use. Because there is no Drupal 7 solution for the wrapping tag replacement called for by DefinitiveDrupal.org's needs, and because you may want administrators to be able to make changes to the filter without requiring modifying a module, you can try to make a module with both a UI and an API.
Normally you would start with the API. In this case, Drupal provides an API for filter settings forms but not for filter settings data, so you can implement the form first and work backwards to understand what Drupal is doing with the data.
Each tag and replacement markup set needs to contain three pieces of data: the tag being replaced, the markup that will replace the opening version of this tag, and the markup that will replace the closing version of the tag. By adopting the HTML convention of closing tags including a slash, you can ask for only the closing tag and derive the opening tag by removing the slash. So for instance, the form could accept {{/pony}} as the tag and in the content {{pony}} would be replaced with the opening markup entered into the form and {{/pony}} would be replaced with the closing markup.
Defining a Settings Callback
For your filter to save settings, the first thing you need to do is add another callback to the filter definition in your implementation of hook_filter_info(). A settings callback allows you to define form elements that accept values from administrators. Drupal will then have those values available in the process callback (and the prepare callback, if defined).
You need to add a line giving your filter a settings callback function. Add the following to the $filters['dgd7_tip'] array you created in dgd7_tip_filter_info(). I'll show this filter-defining function again after a bit more work.
'settings callback' => '_dgd7_tip_settings',
Then, of course, you need to define the _dgd7_tip_settings() function. This function should return form elements that Drupal will stick into the filter-specific options on the text format edit pages. There is an example, naturally, in filter_example.module, and you will define a filter settings callback to suit your needs later.
Building a Form that Accepts Multiple Elements
Each tag and replacement markup set needs its own place on the form, which means the form needs to take a variable number of these sets of form elements.
Know When to Fold 'Em
The slickest way to add additional sets of form elements as they are needed is with AJAX, which can pull HTML into your page on demand. Drupal's fields provide an example of this.
![]() Note For readers who can't tell from the section title alone: you won't get any development done in this section.
Note For readers who can't tell from the section title alone: you won't get any development done in this section.
Unfortunately, the “Add another item” link that is used by unlimited value fields is specific to the Field module. The code for the AJAX callback field_add_more_js() and related functionality in modules/field/field.form.inc may be instructive, but there's nothing in Drupal 7's FormsAPI to automate it for you.
So what do you do at this point in building a module? Punt. Make it as simple as possible. It's not worth getting bogged down in complex user interface enhancements at this point. (In fact, it's best to make your module with no user interface at all in the first pass. That rule is only broken here because the usual method of saving filter information is unfortunately not API-friendly; a text format is saved as a whole.)
![]() Note As of 7, every instance of a filter has its own settings. That is, every filter on each text format is configured independently: If you change the settings of the image resize filter on the Filtered HTML text format, the settings for image resize filter on the Full HTML text format won't change. This greatly increases flexibility, but makes it a little more work to keep settings of shared filters consistent.
Note As of 7, every instance of a filter has its own settings. That is, every filter on each text format is configured independently: If you change the settings of the image resize filter on the Filtered HTML text format, the settings for image resize filter on the Full HTML text format won't change. This greatly increases flexibility, but makes it a little more work to keep settings of shared filters consistent.
Making a Filter Settings Form that Always Accepts Two Additional Rows
The settings form will instead adopt a much simpler pattern: when first presented and whenever it's saved, it will always provide at least two sets of blank form elements.
All form elements returned by the settings callback function are saved with the filter object and available at $filter->settings. The filter object, including its settings array, is available in all the filter callbacks (process, prepare, tips, and settings itself). You can put any settings you want in this array in their own nested array, such as $filter->settings['rm'] for the replacement markup information you need to store now. (Your author considered saving each tag and replacement markup pair directly to the settings array, but that way lies madness when it comes to generating the form.) The form elements for gathering the replacement markup information from administrators should also nest inside an ‘rm’ array.
Given that you need a set of form elements for each saved value, and then two more blank ones, this is a natural time for a foreach loop. However, it's not possible to add two blank tag arrays to the replacement markup settings array because each has an empty string ('') as its key and so are combined into one. Rather than repeating the code to create the form elements in two separate loops, you can factor out the creation of the form elements into its own function so you can call it as many times as you want without code duplication. The three things each set of form elements need are the (closing) tag, the opening markup that will replace its opening variation, and the closing markup (see Listing 33–27).
Listing 33–27. Defining a Set of Form Elements for the Tag and Replacement Markup in a Function that Can Be Called Repeatedly
/**

 * Add a set of form fields for adding a new tag and replacement markup pair.

 */

function _dgd7_tip_add_rm_formset(&$settings, $i, $tag = '', $replace =

 array('before' => '', 'after' => '')) {

  $settings['rm'][$i]['tag'] = array(

    '#type' => 'textfield',

    '#title' => t('Tag'),

    '#maxlength' => 64,

    '#default_value' => $tag,

  );

  $settings['rm'][$i]['before'] = array(

    '#type' => 'textfield',

    '#title' => t('Before'),

    '#maxlength' => 1024,

    '#default_value' => $replace['before'],

  );

  $settings['rm'][$i]['after'] = array(

    '#type' => 'textfield',

    '#title' => t('After'),

    '#maxlength' => 1024,

    '#default_value' => $replace['after'],

  );

}
This function is doing a couple interesting things. Mostly, it's plainly defining three form elements of type textfield. It also accepts an iterator ($i) so that it can add itself to the $settings['rm'] array as many times as needed with a different integer each time. The $settings array itself is passed in by reference (as indicated by the ampersand in front of it in the function definition) so the function doesn't need to return any value; it's making changes to the $settings variable directly. Finally, it takes default values for the tag and the replacement markup, and the function definition itself sets these to empty if none are provided to make adding blank form fields easier. That is what the $tag = '', $replace = array('before' => '', 'after' => '') part of the _dgd7_tip_add_rm_formset() function definition line does.
Listing 33–28 shows the function that provides a form with rows of elements (to edit each tag and replacement markup set that is saved) and two rows of blank form elements to allow administrators to add additional tag and replacement markup sets
Listing 33–28. Settings Callback Function
/**

 * Settings callback for tag filter.

 */

function _dgd7_tip_settings($form, $form_state, $filter, $format, $defaults) {

  // Declare the array that will hold our settings form elements.

  $settings = array();


  // Get the default settings.

  $filter->settings += $defaults;

  // "rm" is short for replacement markup.

  $rm = $filter->settings['rm'];
  $i = 0;

  foreach ($rm as $tag => $replace) {

    _dgd7_tip_add_rm_formset($settings, $i, $tag, $replace);

    // Increment our number of filters by one.

    $i++;

  }

  // Always add two empty sets of form fields to be filled in.

  $total = $i+2;

  for ($i; $i < $total; $i++) {

    _dgd7_tip_add_rm_formset($settings, $i);

  }

  return $settings;

}
The _dgd7_tip_add_rm_formset() function is called in two different loops. One iterates through any existing or default tag and replacement markup sets (I'll get to the concept of default settings in a little bit) and the second adds two more blank sets of fields to however many are already there. The $i variable keeps count so each set of fields has its own unique key. However, this integer key only makes sense when gathering the data with the form; it would be nice to get rid of it when saving the data.
Manipulating Values Before Saving with a Validate Function
Indeed, the code in Listing 33–28 doesn't quite work: the form will be saving data by its $i iteration integer, which is necessary for allowing multiple sets to be saved at once, but this arbitrary value means nothing when it comes time to get the data. The attempt at retrieving assumes that $rm array will have the tag as the key, not a number.
The following two things let you work around this in the context of filter settings on the text format form (see Listing 33–29):
- A validation function can be added to any form element by setting the
#element_validateproperty. - Validation functions can do more than validate. They can change the data that will be saved with
form_set_value().
Listing 33–29. Additions to the Settings Callback Function to Set a Validation Function to the Element Containing the Tag and Replacement Markup Sets of Form Elements
function _dgd7_tip_settings($form, $form_state, $filter, $format, $defaults) {

  // Declare the array that will hold your settings form elements.

  $settings = array();

  $settings['rm'] = array(

    '#element_validate' => array('dgd7_tip_rm_form_keys_validate'),

  );

  // [Other previously shown code not shown to save space...]

  return $settings;

}
After a good bit of experimentation, it seems the test array structure in Listing 33–30 saves into settings in a way that comes back out fine.
Listing 33–30. Experimental Function to Discover Data Structure that Drupal's Filter API Saves the Right Way
function dgd7_tip_rm_form_keys_validate($element, &$form_state) {

  $rm = array();

  $rm['{/testtag}'] = array(

      'before' => 'value for before markup',

      'after' => 'value for after markup',

  );

  form_set_value($element, $rm, $form_state);

}
The process for experimenting was saving the form and seeing if these hardcoded values showed up as expected (with {/testtag} as the tag and value for before markup and value for after markup in the replacement markup fields). One would never use a validation function to hardcode values, but it provided a convenient way to test the structure to use for saving the data. All the other parts of the form can be dispensed with, apparently, so you shall do so (see Listing 33–31).
Listing 33–31. Validation Function that Reorganizes Data to Save with Tag as the Key, Dropping the Integer Series Key
/**

 * Rearrange form elements to be keyed by tag before filter_format_save() runs.

 */

function dgd7_tip_rm_form_keys_validate($element, &$form_state) {

  $rm = array();

  // Create a tag-keyed version of each element.

  foreach ($element as $i => $value) {

    // Skip non-value form elements (the ones we care about have numbers).

    if (!is_numeric($i))  continue;

    $key = $value['tag']['#value'];

    // Do not save empty keys.

    if (!$key) continue;

    $rm[$key] = array(

      'before' => $value['before']['#value'],

      'after' => $value['after']['#value'],

    );

  }


  form_set_value($element, $rm, $form_state);

}
That may not win any prizes for elegance, but it gives sane data storage which helps an upcoming task, a task more tied to the immediate use case for this module, which is providing defaults in code. But first, let's look at a more normal use of validation.
Validating the Filter Settings
For the tag replacement to work, the module needs to make sure that the tag provided is a closing tag, with a / (forward slash) included. Surprisingly, there is no built-in validation of text filter settings, which means no obvious model to follow.
You could implement hook_form_alter() and add a form-wide validation function, just as you could if you were defining the whole form yourself. The easier, gentler approach is to use the #element_validate form property on a specific form element.
![]() Tip Read more about the element_validate form property at
Tip Read more about the element_validate form property at api.drupal.org/forms_api_reference.html#element_validate. As always, you can also look for examples in core, as with the command-line on Unix-like systems: grep -nHR 'element_validate' modules/
As with most hooks and functions, the most important thing about functions for validating elements is their function signature: $element, &$form_state, $whole_form. The ampersand, again, indicates that even though $form_state is an array, it is passed to your validating function by reference, and changes made within the function apply to the original.
The precise information you need to validate the tag to replace is verifying the existence of a slash. Searching the web for “php count number characters in a string” (and some clicking around) brought the author to php.net/substr_count (see Listing 33–32). (If you think you can guess the function name or even get close, going directly to php.net/bestguess is the fastest way to find a function, as it will automatically provide a range of possible matches.)
Listing 33–32. Validate the Tag to Be a Closing Tag That can Be Interpreted
/**

 * Validate each tag to include one and only one slash.

 */

function dgd7_tip_rm_form_tag_validate($element, &$form_state, $whole_form) {

  if (strlen($element['#value']) && substr_count($element['#value'], '/') !== 1) {

    // We describe where the error is because after submission it is likely

    // to be in a non-visible vertical tab.

    form_error($element, t('In the Replacement markup Filter settings, each tag must be in

 the form of a closing tag with exactly one slash ("/").  The opening tag is calculated by

 removing the slash.'));

  }

}
Your data-munging validation function already throws out replacement markup form data with nothing in the tag textfield, so this validation function first checks if there's anything in the form element with strlen($element['#value']). If not, it does nothing (doesn't throw an error). The second half of the if statement uses the substr_count() function; if there's not exactly one slash, then it throws the error.
Providing Instructions on the Filter Setting Form
This module should provide instruction on filling in the fields for the tag and the before and after markup. The usual Drupal way of providing a #description in your form element array is not a good fit because you want to describe all fields together (not one field or even field set at a time) and you want it before the form elements it describes (not after as #description does by default). You only want some text that's above the form.
The Image Resize Filter module (drupal.org/project/image_resize_filter), which the site is already using, happens to have this same sort of disembodied help text. So it is conveniently available to steal how its author, Nathan Haug (quicksketch), did it. Taking a look in image_resize_filter.module; you can see he pasted it right into a theme function, theme_image_resize_filter_form().
Well, you can build on that idea and make it a little more elegant—still using a form theme function, but using it to rearrange a description that is properly defined in the form array. Step 1 is to implement hook_theme() so you can define a theme function. Step 2 is to add two properties to a form element containing the form elements you want to describe: description text and an instruction to use the theme function. Step 3 is to define that theme function and have it print the description before the rest of the form. Listing 33–33 shows this theme function; note that most of the settings callback function _dgd7_tips_settings() is not shown.
Listing 33–33. Implementing a Theme Function to Put a Description at the Top of a Form Element Instead of the Bottom
/**

 * Implements hook_theme().

 */

function dgd7_tip_theme() {

  return array(

    'dgd7_tip_settings' => array(

      'render element' => 'form',

    ),

  );

}


function _dgd7_tip_settings($form, $form_state, $filter, $format, $defaults) {
// ...

  $settings['rm'] = array(

    '#description' => t('To set tags and replacement markup, enter only the closing tag

 (such as </tip>); the opening tag will be calculated automatically by removing the

 slash (<tip> in this example). Then enter the before and after markup which will

 replace the opening and closing tag, respectively.'),

    '#theme' => 'dgd7_tip_settings',

    '#element_validate' => array('dgd7_tip_rm_form_keys_validate'),

  );

// ...

}


/**

 * Theme callback to print description with settings form.

 */

function theme_dgd7_tip_settings($vars) {

  $form = $vars['form'];

  return '<p>' . render($form['#description']) . '</p>'

         . drupal_render_children($form);

}
See Chapter 9 for more about defining and using theme functions. And as described in Chapters 14 and 15, Appendix C, and elsewhere in the book, using render() to show an element will mean that element is not shown again (unless you render just it or expose it again with show()). When displaying the rest of the form, the function drupal_render_children() is needed instead of render() to avoid an infinite loop.
Making Your Own Hook
Now for the fun part. When developing Drupal, you implement other modules' hooks all the time. It's something of a rare treat to create your own hook! It's your module's chance to give back, and ask if any other modules want to join its party. The occasion is adding the tag and replacement markup sets when the filter is newly added to a format.
Creating a hook is a little metaphysical: if a hook is defined and nobody implements it, does it exist? (You can implement the hook yourself later if that question keeps you up at night.) Hooks come into being by the act of offering other code the opportunity to heed their call. The most common way of putting out this call, and so creating a Drupal hook, is to use the function module_invoke_all(), as shown in Listing 33–34.
Listing 33–34. Invoking a Hook to Give Other Modules a Chance to Provide Default Settings for a Filter
/**

 * Implements hook_filter_info().

 */

function dgd7_tip_filter_info() {

  $filters['dgd7_tip'] = array(

    'title' => t('Replacement markup'),

    'description' => t('Allows simple notation to indicate paragraphs of text to be wrapped

 in custom markup, for instance to emphasize tips, notes, or other featured interjections.'),

    'process callback' => '_dgd7_tip_process',

    // Allow other modules to declare default tags and replacement markup.

    'default settings' => array(

      'rm' => module_invoke_all('dgd7_tip_defaults'),

    ),

    'settings callback' => '_dgd7_tip_settings',

    'tips callback' => '_dgd7_tip_tips',

  );

  return $filters;

}
The module_invoke_all() function is built to take data from multiple sources and put it together. It uses the PHP function array_merge_recursive() to do this, so anything that has a new key gets added to the array it returns and anything that has the an identical key overwrites the previously existing data. For the replacement markup, if there happen to be two modules implementing this hook and providing markup for the same short tag, the last-called module will win. This is common to the way hooks work and not something you need to worry about.
Ordinarily you would pass some contextual information along when invoking your hook, even if you can't think of a reason to use it. In this case, there isn't any meaningful context that can be passed, but be attentive to your issue queue if maintaining a public module: always figure on someone else doing something stranger with your API than you could ever imagine.
Note that this solution combines code-provided defaults and administrator-set overridden or new settings, but it doesn't do so as flexibly as a true exportable configurations such as made possible with CTools. Implementing that, should this module gain respectable usage, is left as a later exercise for the author—or you.
Filtering the Content
Weren't you doing all this for a reason? Oh yes! To take the content people input and format it differently when it's displayed. To convert tags into their replacement markup, you need to implement your filter's process callback, as shown in Listing 33–35.
Listing 33–35. Process Callback for the Replacement Markup Text Filter
/**

 * Process callback for tag filter.

 */

function _dgd7_tip_process($text, $filter) {

  if (!isset($filter->settings['rm']) || !is_array($filter->settings['rm'])) {

    return $text;

  }

  foreach ($filter->settings['rm'] as $ctag => $replace) {

    dgd7_tip_replace_tags($text, $ctag, $replace['before'], $replace['after']);

  }

  return $text;

}
The first part of this function checks that there is any replacement markup to apply at all; if not, it bails early, returning the text unaltered. (Perhaps it should not be possible for there to be unset settings, but it doesn't cost much to be a little forgiving here).
![]() Caution Remember, if the process callback doesn't return any value, the text, far from displaying unchanged, will be gone entirely.
Caution Remember, if the process callback doesn't return any value, the text, far from displaying unchanged, will be gone entirely.
The Regular Expression
Looking at a regular expression—and looking at the code surrounding this regular expression—can be an experience of seeming to face the incomprehensible. Maybe a lot of other code you've looked at has already felt this way to you. It's not the ideal approach—to use something without understanding it—but you can't become an expert in everything right away. To succeed in practice as a developer, you will have to push the boundaries of your knowledge. With use comes familiarity. With familiarity may come understanding, and if not, the recognition that something you are using more than once is something you should put further effort into researching and understanding. This section takes the use-first approach, but first give yourself the ability to experiment freely.
MAKE YOUR OWN TEST.PHP FILE
Make your own test script to rapidly test code within a Drupal environment. Make a file called test.php or anything you like and keep that in the same folder as index.php. Use the first three code lines of index.php, and you have a fully bootstrapped Drupal that you can use to test all sorts of code much more quickly than setting up a page through the menu system.
Here is an example that prints out all the configuration information available to Drupal:
<?php

define('DRUPAL_ROOT', getcwd());

require_once DRUPAL_ROOT . '/includes/bootstrap.inc';

drupal_bootstrap(DRUPAL_BOOTSTRAP_FULL);
drupal_test();

function drupal_test() {

  global $conf;

  print '<pre>';

  var_export($conf);

  print '</pre>';

}
![]() Note The contents of the global
Note The contents of the global $conf variable are available to you throughout Drupal with the variable_get() function (api.drupal.org/api/function/variable_get/7).
You can test out any function here (not hook implementations, however) without needing to create and enable a module.
This section was adapted from a presentation by Chad Phillips (hunmonk) who in turn credited Karoly Negyesi (chx). It's sharing skills the open source way, and now I pass them on to you. A few more tips:
- As soon as you get in trouble, start looking at your variables.
- Use
exit($var);to end code execution at the part you care about (and optionally dump a variable available at the time). - Find an example in core. Search an install of Drupal core or ask for an example of how core does X in channel #drupal (or #drupal-contribute if youare contributing back the module you are working on).
- Clear your cache.
- Document your work. Otherwise, when you come back in a week or a year, you won't have any idea what you thought you were doing.
Testing the Regular Expression
Using a test PHP file, you can try the basics of a regular expression. (This file, using PHP functions and not Drupal ones, would not even need to bootstrap Drupal.) Because the intended use of the module is replacing pairs of opening and closing tags, you want a regular expression that matches both at once, not one alone. This makes it all a bit trickier; see Listing 33–36.
![]() Tip See
Tip See dgd7.org/regex for links to regular expression resources.
Listing 33–36. A Test Regular Expression
<?php

$text = "This is text surrounding a note.


[note] This is a note. [/note].


More text.


[note]This is another note,
a multi-line note.[/note]";

$otag = "[note]";

$ctag = "[/note]";

$before = "BEFORE";

$after = "AFTER";


$text = preg_replace('@' . preg_quote($otag) . '(.+?)' . preg_quote($ctag) . '@s',
  "$before $1 $after",

  $text);


print $text;
The resulting output is:
This is text surrounding a note. BEFORE This is a note. AFTER. More text. BEFORE This is another note, a multi-line note. AFTER
The regular expression syntax used inside the preg_replace() function is successfully matching the text between [note] and [/note]. The preg_replace() function provides the value of this inner portion of the match, the part within parenthesis, in the variable $1, which is available to the second parameter, the replacement text. (The third parameter is the original text.)
The first line builds the regular expression string; that is all it is, a string, and each dot connects one part of the string to the next. Things go crazily to hell if you don't use preg_quote() on the strings you want to match because they are likely to contain characters that have special meanings to the regular expression. (The author found this function courtesy of searches for “regular expression do not interpret string” and “php escape regex special characters.”)
The @ symbol in this string delineates where the regular expression begins and ends. This can be any character, but it can't, of course, be one that is appearing in that regular expression otherwise. Often a / is used for this but the closing tag will always have a slash, so in testing @ was used. The chosen delimiter can be escaped specifically, however, so a more robust approach for the function you are building could check for the presence of delineator characters in the opening and closing tags. In fact, because you have already validated the closing tag to contain exactly one slash, you can escape that slash and be certain that there will be no conflicts between the characters in the tag strings that get searched for and the delineators of the expression. That will be the approach you will take next.
Finally, the s modifier that follows the delineator of the end of the regular expression allows the wildcard to match a newline character, so that a line break can be within a note, as in the test. Listing 33–37 puts this together in a function or two for the module.
Listing 33–37. Function for Replacing Opening and Closing Tags with Defined Markup
/**

 * Replace with tags with markup given a closing tag (containing a /).

 *

 * @param $text

 *   String to be modified to use markup in place of tags, passed by reference.

 * @param $ctag

 *   A closing tag, identical to the opening tag except it includes a /.

 * @param $before

 *   Markup to replace the opening tag.

 * @param $after

 *   Markup to replace the closing tag.

 * @return NULL

 */

function dgd7_tip_replace_tags(&$text, $ctag, $before = '', $after = '') {

  $otag = preg_quote(dgd7_tip_otag($ctag));

  $ctag = str_replace('/', '/', preg_quote($ctag));

  $text = preg_replace(

    '/' . $otag . '(.+?)' . $ctag . '/s',

    "$before$1$after",

    $text

  );

}


/**

 * Take a closing tag and strip the slash to present the opening tag.

 */

function dgd7_tip_otag($ctag) {

  return str_replace('/', '', $ctag);

}
The creation of the opening tag by removing the slash from the closing tag is in a separate function, though it could easily fit in the one line in the replace tags function and could just as well have gone there; it simply felt like something likely to be used again. The work of quoting special characters in the search strings ($otag and $ctag) is handled along with this manipulation before putting them in the preg_replace() function, which makes that look a little cleaner. Note that replacing the slash with an escaped slash (/ with /) in the closing tag is done after special characters are escaped. Finally, "$before$1$after" looks messy and mashed together, but PHP treats each variable separately and strings them together without spaces, which is perfect for creating the replacement text.
To test, you'll have to configure a text format (under admin/config/content/formats), enable Replacement markup filter for it, and put in a few test tags and markup.
The order of input filters is very important for achieving expected results, whether it's a filter you've created or one from modules contributed by others. The Replacement markup filter has to follow the “Limit allowed HTML tags” filter (if present); otherwise the latter may strip out tags added by the former. Then you can go to any node, edit it using a text format that has Replacement markup filter configured, and stick in the opening and closing tag pair to see how the replacement turns out.
You will run into errors when developing your own code. I did, frequently. Putting every error encountered during development would make this description impossible to follow, but expect to have to fix errors. An error printed to the screen is nice; it usually tells you exactly where something is wrong. An error where nothing happens can take longer to track down, but pulling out parts of code into a test.php file to try independently can help. Finally, it's worth noting that the author did this without any deep understanding of the filter form saving system nor the preg_replace() function when he started— or necessarily when he finished. But it worked.
Renaming Your Module
You've put a lot of work into this module. You should share it, but “dgd7_tip” is not a good name at all.
After an embarrassing amount of time spent considering possible names Tagfilter? It sort of indicates that it is a filter module. Tagreplace? Reptags? Replacemarkup? Repmark? Remark! It's tempting to take the ‘remark’ project namespace, but let's leave it for something awesome having to do with the English word remark, rather than “replacing markup.” This module will be named Remarkup.
Some IDEs provide tools for replacing text in multiple files, and some provide tools for renaming files, but you can handle this with the command line, too.
With a little help from searches that lead to the Drupal handbook page “sed - replace text in single or multiple files” (data.agaric.com/raw/sed-replace-text-multiple-files) and the post “Easily renaming multiple files” on the shockingly non-Drupal site Debian Administration (debian-administration.org/articles/150), you can rename your module with four lines typed into your terminal, as shown in Listing 33–38. The last two commands are for moving outside the module folder and renaming the folder. The commands start from the directory that holds your module.
Listing 33–38. Command-Line Steps to Replace All Occurrences of a String in Multiple Files and Rename the Files
cd sites/all/modules/custom

sed -i 's/dgd7_tip/remarkup/g' *

rename 's/dgd7_tip/remarkup/' *

cd ../

mv dgd7_tip remarkup
This changes every function name and your API hook name, which incorporates your module name, per best practice to avoid namespace conflicts. Your module name is guaranteed to be unique (if the same as your project hosted on drupal.org), so prefacing your hook name with your module name helps ensure that no one else is using the hook for some other purpose. This means that once you are hosted on drupal.org, renaming a module is something you do not want to do.
![]() Note In a sign of the strength of the Drupal community, the first hit for this author's search for “replace text in multiple files” on Google (not logged in, so theoretically not customized search results) was
Note In a sign of the strength of the Drupal community, the first hit for this author's search for “replace text in multiple files” on Google (not logged in, so theoretically not customized search results) was drupal.org. When he started out, many times a post on a Mambo (now Joomla) forum would come up for general web-related tasks; now it is increasingly Drupal sites.
Conditionally Including a Stylesheet for an Administration Page
The Settings page needs some cleanup. A function for adding CSS to a page (as opposed to all pages, which can be done via a module or theme's .info file) is drupal_add_css(). Yet, there is an even better, more Drupal 7 way to conditionally include CSS when it relates to any element that is rendered, which includes forms. That way is the #attached property.
![]() Note There is no hard line between what you should just know and what is just as well looked up when you need it. Clearly, the more you do, the more you just know. This author needs pretty much everything noted and looked up each time, but most people doing Drupal show a higher capacity to learn.
Note There is no hard line between what you should just know and what is just as well looked up when you need it. Clearly, the more you do, the more you just know. This author needs pretty much everything noted and looked up each time, but most people doing Drupal show a higher capacity to learn.
The drupal_add_css() function (which is used internally for the #attached property) should be used only when there is no renderable array with which to use the #attached property. Implementation of hook_help() is an example of a place where you can't use #attached. There are numerous examples of both methods in Drupal core. You can see examples of the function at api.drupal.org/drupal_add_css because the api.drupal.org site links to usages of functions. Skip some examples from themes using it and take a look at how block module uses it: api.drupal.org/block_admin_display_form. This is almost exactly as you would want to use it, in the function for displaying an administrative form! Right at the top of the form is
drupal_add_css(drupal_get_path('module', 'block') . '/block.css'),
But Block module should use the #attached property on the form returned rather than calling drupal_add_css() directly. I filed an issue for core (drupal.org/node/1122584); Listing 33–39 shows how to do it right.
Listing 33–39. Using #attached Property to Include a CSS File when Pages with a Renderable Element Are Viewed
/**

 * Settings callback for tag filter.

 */:

function _remarkup_settings($form, $form_state, $filter, $format, $defaults) {

  // Declare the array that will hold our settings form elements.

  $settings = array();

  // [Additional already-seen code not shown...]

  $settings['rm'] = array(

    // [Additional already-seen code not shown...]

    // Add CSS to make _remarkup_add_rm_formset() form elements look good.

    '#attached' => array(

      'css' => array(drupal_get_path('module', 'remarkup') . '/remarkup.css'),

    ),

  );

  // [Additional already-seen code not shown...]

}
The CSS file attached in this way does not have to be large, as you can see by Listing 33–40.
Listing 33–40. remarkup.css Styles the Settings Form for Remarkup Text Filter
.remarkup-formset .form-item {

  display: inline-block;

  padding: 0;

  margin-bottom: 5px;

}


.remarkup-formset {

  margin-bottom: 10px;
This CSS file is attached when someone views the text format settings page, even though you did not define that page yourself. There is one important thing still missing, though: the HTML container with classes for this CSS to apply to!
Adding a Container Form Element with a Specified Class
Originally the div and class for the CSS to act on was added with a #prefix property on the tag with a line like:
  $settings['rm'][$i]['tag'] = array(

    '#prefix' => '<div class="remarkup-formset">',

    '#type' => 'textfield',
It then had a corresponding #suffix on the final markup form element. This worked, but it feels ugly. A little investigation into the Drupal API's page on form generation (api.drupal.org/api/group/form_api) uncovered, in a long line of theme_ functions meant for forms, theme_container() (api.drupal.org/theme_container). It could be set directly with the #theme_wrappers property on a form element that holds the three textfield form elements, as shown here:
  $settings['rm'][$i] = array(

    '#theme_wrappers' => array('container'),

    '#attributes' => array('class' => array('remarkup-formset')),

  );
But investigating how to use the container theme wrapper found a particularly relevant example: the form element type container. You can use the container form element for slightly cleaner code and the identical effect as the above. Listing 33–41 shows it all together in the function defining the set of form fields for the tag and replacement markup in a function that can be called repeatedly, now wrapped in a containing div and with sizes set for presentation. Note that this is the same function that was called _dgd7_tip_add_rm_formset() previously.
Listing 33–41. Defining a Set of Form Elements for the Tag and Replacement Markup, Now Wrapped in a Containing Div and with Sizes Set for Presentation
/**

 * Add a set of form fields for adding a new tag and replacement markup pair.

 */

function _remarkup_add_rm_formset(&$settings, $i, $tag = '', $replace = array('before' => '', 'after' => '')) {

  $settings['rm'][$i] = array(

    '#type' => 'container',

    '#attributes' => array('class' => array('remarkup-formset')),

  );

  $settings['rm'][$i]['tag'] = array(

    '#type' => 'textfield',

    '#title' => t('Tag'),

    '#maxlength' => 64,

    '#size' => 10,

    '#default_value' => $tag,

    '#element_validate' => array('remarkup_rm_form_tag_validate'),

  );

  $settings['rm'][$i]['before'] = array(

    '#type' => 'textfield',

    '#title' => t('Before'),
    '#maxlength' => 1024,

    '#size' => 45,

    '#default_value' => $replace['before'],

  );

  $settings['rm'][$i]['after'] = array(

    '#type' => 'textfield',

    '#title' => t('After'),

    '#maxlength' => 1024,

    '#size' => 45,

    '#default_value' => $replace['after'],

  );

}
With the CSS file, its attachment, and the additions to the function that add sets of form elements, the settings for Remarkup looks pretty good. Figure 33–8 shows it with one set of tag plus markup pair filled in and one set blank.
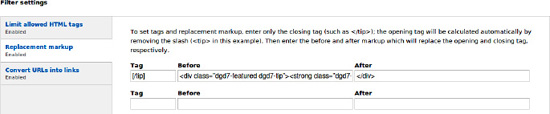
Figure 33–8. Settings form with three form elements in a row per set using CSS and wrapped HTML elements
Sharing Your Module on Drupal.org
Like sharing on Gitorious.org or GitHub.com, drupal.org lets every user create sandboxes that require no more of an application process than accepting the guidelines. In the case of drupal.org, this primarily means agreeing to post only GPL code. (If you don't yet have the ability to create full name-spaced projects on drupal.org, posting code to your sandbox is still the first step. And if you have been granted permission to promote a sandbox to a full project, a sandbox project is still the best place to start sharing your work early— it even comes with an issue queue. There's still nothing like putting the code on drupal.org as a properly released project, though, to get the attention of users and reviewers alike.)
After accepting the Drupal Git policies and adding your public key to your drupal.org account, you can create a sandbox project and push the repository for your module there (see Listings 33–42 and 33–43).
![]() Tip The public key for a user on a UNIX-like computer or virtual machine can usually be found in a file located in the user's .ssh folder in a file named
Tip The public key for a user on a UNIX-like computer or virtual machine can usually be found in a file located in the user's .ssh folder in a file named id_rsa.pub (less ~/.ssh/id_rsa.pub) or by creating a public-private key pair if necessary (ssh-keygen). See drupal.org/node/1027094.
Listing 33–42. Command-Line Steps for Sharing Code to git.drupal.org as a Full Project
git checkout master

git remote add origin [email protected]:project/remarkup.git

git push origin master

git branch 7.x-1.x

git push origin master:7.x-1.x

git checkout 7.x-1.x
Listing 33–43. Sharing New Modifications with add, commit, and push
git add .

git commit -m "Include form CSS with #attached instead of drupal_add_css()."

git push
See Chapter 37 for more about sharing your projects on drupal.org, including using Git sandboxes.
Coda on a Contributed Module
You made plenty of compromises in making this module, but you got some essential things correct:
- It has an API.
- It has a UI.
By going beyond your immediate needs—and by providing an API that allows your module to be extended without patching it—you make it much more likely that people will use your module and a little more likely someone else will pick up where you left off.
Even if you skip building a UI for site administrators and an API for module builders, it would be a good idea to share your module: git.drupal.org sandboxes are provided for you to share code that you do not necessarily intend to support.
![]() Note The source code of the module developed in this section is available at
Note The source code of the module developed in this section is available at drupal.org/project/remarkup.
Making a Site-Specific Module that Uses Your API
Wait, didn't you have some goal of your own, quite apart from making a module that other people might find useful?
It's time to write site-specific code that makes use of the module you made. The cool thing, with all the work you've already done, is that your glue code module can be quite small, as shown in Listing 33–44.
Listing 33–44. An Inefficient, Error-Prone Approach to Defining a Custom Implementation of the Remarkup Hook
/**

 * Implements hook_remarkup_defaults().

 */

function dgd7_remarkup_defaults() {

  return array(
    '[/tip]' => array(

      'before' => '<div class="dgd7-featured dgd7-tip"><span class="featured-name"><span

 class="leading-square">T</span>ip</span>',

      'after' => '</div>',

    ),

    '[/reality]' => array(

      'before' => '<div class="dgd7-featured dgd7-tip"><strong class="dgd7-name">

Reality</strong>',

      'after' => '</div>',

    ),

  );

}
But this can introduce inconsistencies due to the duplicate HTML code. Even when doing the very simple, supply-data step, you can still automate stuff, as shown in Listing 33–45.
Listing 33–45. Implementation of the Hook to Provide Default Remarkup that Abstracts Out the Repetitive Code
/**

 * Implements hook_remarkup_defaults().

 */

function dgd7glue_remarkup_defaults() {

  $rm = array();

  // Define the simple tips-style replacements, machine and human-readable.

  $tips = array(

    'tip' => t('Tip'),

    'note' => t('Note'),

    'hint' => t('Hint'),

    'reality' => t('Reality'),

    'caution' => t('Caution'),

    'gotcha' => t('Gotcha'),

    'new' => t('New in 7'),

  );

  foreach ($tips as $type => $name) {

    $rm['[/' . $type . ']'] = array(

      'before' => '<div class="dgd7-featured dgd7-' . $type . '">

<strong class="dgd7-name">' . $name . '</strong>',

      'after' => '</div>',

    );

  }

  return $rm;

}
That, if not easier, ensures consistency in the HTML code used for the tips, notes, hints, etc.
![]() Gotcha Don't forget the return statement; unless implementing a hook that receives its data by reference, it's rather important. The hook system is generally robust and is not going to complain about getting no response. So when your hook implementation seems to have no effect, the first place to look is at the bottom for a
Gotcha Don't forget the return statement; unless implementing a hook that receives its data by reference, it's rather important. The hook system is generally robust and is not going to complain about getting no response. So when your hook implementation seems to have no effect, the first place to look is at the bottom for a return $data statement!
You can now provide CSS in your module for this default-provided markup. Put the CSS in a file, such as dgd9781430231356.css, saved in the dgd7glue module directory. I won't take up space with the CSS here; it's in the project code available at dgd7.org/other90 and you can also see it, as on any web site, by viewing the CSS through your browser's view source option or with a tool such as Firebug.
Don't forget to keep your custom module's .info file current, as shown in Listing 33–46.
Listing 33–46. Adding a Dependency and Styles File to dgd7glue.info
name = DGD7 Glue Code

description = [dgd7glue] Site-specific custom code for DefinitiveDrupal.org.

package = Custom

version = 7.x-1.0

core = 7.x

dependencies[] = remarkup

styles[] = dgd9781430231356.css
The Payoff
Enable both modules. Now you have to edit the text formats you want to use, such as Filtered HTML at admin/config/content/formats/filtered_html and Full HTML at admin/config/content/formats/full_html.
![]() Gotcha New tags and markup pairs provided by implementations of the replacement markup defaults hook will not have any effect until you edit a text format so that your default settings are imported, and save it.
Gotcha New tags and markup pairs provided by implementations of the replacement markup defaults hook will not have any effect until you edit a text format so that your default settings are imported, and save it.
The way Remarkup currently implements its defaults hook, it is true defaults—the moment you save a text format form, the values you provided are saved to the database. New default tags you add will be noticed, but updates to defaults that already have been saved once will not be seen. CTools-style exportables could be implemented to make in-code updates easy, but that's not an issue to cover in this chapter. Indeed, if it's something you want, you can file an issue in the Remarkup queue (drupal.org/project/issues/remarkup) and perhaps provide a patch! (A patch, as described in Chapter 38 and elsewhere, is a contribution of code in the form of an easily-applied file of changes from the existing code.)
Adding Custom Markup for Output
With the framework in place, you can add new tag and replacement markup definitions as you need them, as shown in Listing 33–47.
Listing 33–47. Additional Remarkup Definitions for Text Files, PHP Code, and Command-Line Steps
function dgd7glue_remarkup_defaults() {

  $rm = array();

// Removed code, see above for context.

  // A few rules are unique.

  $rm['[/file-txt]'] = array(

      'before' => '<code>',

      'after' => '</code>',

  );

  // Requires codefilter module, with its filter set to run after remarkup.

  $rm['[/file-php]'] = array(

      'before' => '<?php',

      'after' => '?>',

  );

  $rm['[/cli]'] = array(

    'before' => '<h4>Command-line steps</h4>

    <tt>',

    'after' => '</tt>',

  );

  return $rm;

}
Making Next and Previous Links That Mimic Book Navigation
When viewing any individual posts that can be seen as part of a series (blog posts, news articles, featured profiles), it's good usability and just plain nice to give readers a way to get to the next one or the previous one directly, without having to go back to a listing page. For reading through all the suggestions submitted to the dgd7.org site one-by-one to review them, next and previous link buttons were all but an absolute requirement.
This could be done in a theme, but being able to move to the next item is a matter of functionality more than presentation, which calls for a module. Also, in a module it's possible to make a more re-usable solution.
A search for “Drupal 7 next previous links” and related keywords turned up several projects, all in Drupal 6. Your author hadn't used custom_pagers in Drupal 6 and could not grok exactly what it was doing from its in-progress Drupal 7 port (on GitHub at the time of writing). It allowed PHP and Views in the administration of pagers, yet seemed to be calling SQL from a custom table to run the query—that is, storing SQL in SQL. It definitely seemed a heavy solution to port for the simple use case of being able to see the previous and next suggestions. Writing custom code seemed a reasonable choice.
Pulling the Information
You can look at api.drupal.org/node.api.php and decide hook_node_view() is how you want to add previous and next links to chosen nodes. The next step is to know how to get the links. Putting Devel module's dpm() function in an implementation of hook_node_view()— for the site-specific module used throughout this chapter, that function name would be dgd7glue_node_view()—will show you the data you have available. Consulting the database layer handbook gives static queries, with methods such as ->fetchAssoc() for returning results as an array, in examples on drupal.org/node/310072.
![]() Note If not using Devel's
Note If not using Devel's dpm(), be aware that because Drupal is a bit silly, calling debug($node) in an implementation of hook_node_view() does not work. In multiple places, such as where it loads taxonomy term entities, Drupalrecursion blows up the var_export() function used by debug() by default. You can instead call debug() with its optional third parameter (the second parameter is the label) set to TRUE, which makes it use the harder-to-kill print_r() function, for instance debug($node, 'Node when viewed', TRUE);.
Based on the information gathered, you can create a quick proof of concept. Note that while the code in Listing 33–48 tests two different things, it tests them independently. It does not try to query the database and use the result to add text to the node, because if that didn't work, you wouldn't know immediately where the problem lies. Doing both at once can wait until you are certain that both work separately. For now, use a debug function to show the result of the query and add straight markup.
Listing 33–48. Proof-of-Concept Code (with LIMIT Function that Is Not Cross-Database Compatible) for Querying the Database and Adding Text to Display on a Node
/**

 * Implements hook_node_view().

 */

function dgd7glue_node_view($node, $view_mode, $langcode) {

  // Print prev/next links on Suggestion node pages.

  if ($node->type == 'suggestion' && $view_mode == 'full') {

    $markup = 'i can print something';

    $next = db_query('SELECT title, nid FROM {node} WHERE nid > :nid AND status =

 1 LIMIT 1', array(':nid' => $node->nid))->fetchAssoc();

    debug($next, 'next'), // the query works

    $node->content['dgd7glue_prevnext'] = array(

      '#markup' => $markup,

      '#weight' => 100,

    );

  }

}
The code in Listing 33–48 prints out a node ID and title from the query and the static text assigned to #markup. It shows you that the query runs and that you can add things to the display of the node. It still needs to be updated to run a query that filters to show only suggestions, and the output needs to be based on this result, but the concept is proven.
While making it work correctly, the query should also be made cross-browser compatible. You may vaguely remember that LIMIT is not a part of SQL that works in a standard way across all types of databases, and that Drupal provides some assistance for getting around this. A grep for ‘LIMIT’ in Drupal core's modules directory shows that it is not used in an SQL query except for one commented out query in a testing file. Conclusion: Using LIMIT in SQL is not best practice. A grep for ‘limit’ (in lower case) to see where the code comments or anything are just talking about limits brings up a lot of results including this query in modules/user/user.install, shown in Listing 33–49.
Listing 33–49. Query in user.install Containing the Text Limit
$result = db_query_range('SELECT f.*, u.uid as user_uid FROM {users} u INNER JOIN

 {file_managed} f ON u.picture = f.fid WHERE u.picture <> 0 AND u.uid > :uid ORDER BY

 u.uid', 0, $limit, array(':uid' => $sandbox['last_uid_processed']))->fetchAllAssoc('fid',

 PDO::FETCH_ASSOC);
That gives you the function you want, db_query_range(), and pretty much shows you how to use it, too. You can look up more information about it at api.drupal.org/db_query_range. It also uses the ->fetchAllAsoc() method to return all the rows of the result at once as a nested associative array.
Moving from the proof of concept to working custom code takes a number of significant but not overwhelming changes. This code is still not generalized, but it is not meant to be a contributed module this time; it is site-specific code. The dgd7glue_nextprev_suggestion() function, defined second in the code in Listing 33–50, runs the query and returns an array with the node ID and the title. To this array, in the next line, is added a ‘text’ key with ‘Next >’ or ‘< Prev’ values.
Listing 33–50. Create and Display Previous and Next Links on Suggestion Node Pages
/**

 * Implements hook_node_view().

 */

function dgd7glue_node_view($node, $view_mode, $langcode) {

  // Print prev/next links on Suggestion node pages.

  if ($node->type == 'suggestion' && $view_mode == 'full') {

    $markup = '';

    $next = dgd7glue_nextprev_suggestion($node->nid);

    $next['text'] = t('Next >'),

    $prev = dgd7glue_nextprev_suggestion($node->nid, TRUE);

    $prev['text'] = t('< Prev'),

    $markup .= '<div class="nextprev">';

    $markup .= dgd7glue_format_link($prev);

    $markup .= ' | ';

    $markup .= dgd7glue_format_link($next);

    $markup .= '</div>';

    $node->content['dgd7glue_prevnext'] = array(

      '#markup' => $markup,

      '#weight' => 100,

    );

  }

}


/**

 * Get the next or previous suggestion node nid and title.

 */

function dgd7glue_nextprev_suggestion($nid, $previous = FALSE) {

  // Set the ORDER BY direction and the comparison operator ($co).

  if ($previous) {

    $direction = 'DESC';

    $co = '<';

  }

  else {

    $direction = 'ASC';

    $co = '>';

  }
  return db_query_range("SELECT title, nid FROM {node} WHERE nid $co :nid AND type =

 :type AND status = :status ORDER BY nid $direction", 0, 1, array(':nid' => $nid, ':type' =>

 'suggestion', 'status' => 1))->fetchAssoc();

}


/**

 * Format a next/prev link.

 */

function dgd7glue_format_link($link) {

  return l($link['text'], 'node/' . $link['nid'], array('attributes' => array('title' =>

 $link['title'])));

}
The method used to get an array from the query is ->fetchAssoc() as the query will always return only one record: there is no need to fetch all at once (nor iterate). A drush cc all on the live site or a visit to admin/config/development/performance for the Clear all caches button is necessary to make the prev/next links show up after adding your code to dgd7glue.module. Drupal is pretty aggressive with caching!
This works for most suggestion posts, but it doesn't account for the very first and last nodes in the series. Let's see what the array returned by the query looks like empty. (Again, the query is wrapped in the dgd7glue_nextprev_suggestion() function, but inside there it is the db_query_range() function with a ->fetchAssoc() method returning directly.) Immediately below it, you can add a debug($prev); statement.
If you go to node 90, the first suggestion that was made (pulled in from the live database, or you could make your own example), is at http://dgd7.localhost/node/90.
Viewing this page, the output in the message area is:
Debug:

false
That makes your test very easy. If any value is returned, print the link. If not, do not. This may be best fixed in the display, and it's time to take a second look at the theming. It is currently simple, but not consistent with anything else on the site.
Reusing Book Module Templates to Display Non-Book Navigation
The site is already using the Book module for the outline of chapters, so it would be good to borrow that navigation.
![]() Caution This is one of those ideas that might sound like a good idea but isn't— yet it can still prove workable.
Caution This is one of those ideas that might sound like a good idea but isn't— yet it can still prove workable.
Take a look inside modules/book. There is a template file called book-navigation.tpl.php. (There is no double-hyphen because this is not a suggestion for the book content type but its own template for navigation that is incorporated into the display of outline-enabled nodes.) The line in book.module that uses the book navigation template book-navigation.tpl.php is in an implementation of hook_node_view(), book_node_view(), shown in Listing 33–51
Listing 33–51. Calling the book-navigation.tpl.php file and Handing It the $node->book Array
      $node->content['book_navigation'] = array(

        '#markup' => theme('book_navigation', array('book_link' => $node->book)),

        '#weight' => 100,

      );
The key line is the #markup line. You aren't going to have $node->book for a non-book page, but you can make something that works the same. You can see in book-navigation.tpl.php what variables you'll have to provide to match the $node->book array.
![]() Note In the interest of ending this chapter, I won't show the many wrong and otherwise incorrect paths that eventually led to the solution shown. To see some of them, visit
Note In the interest of ending this chapter, I won't show the many wrong and otherwise incorrect paths that eventually led to the solution shown. To see some of them, visit dgd7.org/230.
The function template_preprocess_book_navigation() (seeapi.drupal.org/template_preprocess_book_navigation) is what prepares the variables for the book-navigation.tpl.php template, and it is what you will have to replace. It is possible to implement hook_theme_registry_alter() to tell Drupal to make such a substitution. The result is the ability to take the basic next and previous data and hand it the Book module's theme templates padded out with all the variables necessary to display; see Listing 33–52.
Listing 33–52. The Revised hook_node_view Implementation, Registry Alter, and the template_preprocess_book_navigation.tpl.php It Lets You Replace
/**

 * Implements hook_node_view().

 */

function dgd7glue_node_view($node, $view_mode, $langcode) {

  // Print prev/next links on Suggestion node pages.

  if ($node->type == 'suggestion' && $view_mode == 'full') {

    $next = dgd7glue_nextprev_suggestion($node->nid);

    $prev = dgd7glue_nextprev_suggestion($node->nid, TRUE);

    // Make a fake book link array.

    $link = array();

    $link['dgd7glue'] = TRUE;

    $link['prev'] = $prev;

    $link['next'] = $next;

    $node->content['dgd7glue_prevnext'] = array(

      '#markup' => theme('book_navigation', array('book_link' => $link)),

      '#weight' => 100,

    );

  }

}


/**

 * Implements hook_theme_registry_alter().

 */

function dgd7glue_theme_registry_alter(&$theme_registry) {

  // Replace the default preprocess function with our own.
  foreach ($theme_registry['book_navigation']['preprocess functions'] as $key => $value) {

    if ($value == 'template_preprocess_book_navigation') {

      $theme_registry['book_navigation']['preprocess functions'][$key] =

 'dgd7glue_template_preprocess_book_navigation';

      // Once it's found it we're done.

      break;

    }

  }

}


/**

 * Replaces template_preprocess_book_navigation() when using tpl for non-books.


 */

function dgd7glue_template_preprocess_book_navigation(&$variables) {

  if (!isset($variables['book_link']['dgd7glue'])) {

    // This is a normal book, just use the usual function.

    template_preprocess_book_navigation($variables);

    return;

  }

  // Use our fake book_link variable to provide all the same variables.

  $link = $variables['book_link'];

  $variables['book_id'] = 'dgd7glue-nextprev';

  $variables['book_title'] = t('Suggestions'),

  $variables['book_url'] = url('suggestions'),

  $variables['current_depth'] = 0;

  $variables['tree'] = '';

  $variables['has_links'] = TRUE;

  $variables['prev_url'] = NULL;

  $variables['next_url'] = NULL;

  if ($link['prev']) {

    $prev_href = url('node/' . $link['prev']['nid']);

    drupal_add_html_head_link(array('rel' => 'prev', 'href' => $prev_href));

    $variables['prev_url'] = $prev_href;

    $variables['prev_title'] = check_plain($link['prev']['title']);

  }


  $parent_href = $variables['book_url'];

  drupal_add_html_head_link(array('rel' => 'up', 'href' => $parent_href));

  $variables['parent_url'] = $parent_href;

  $variables['parent_title'] = $variables['book_title'];


  if ($link['next']) {

    $next_href = url('node/' . $link['next']['nid']);

    drupal_add_html_head_link(array('rel' => 'next', 'href' => $next_href));

    $variables['next_url'] = $next_href;

    $variables['next_title'] = check_plain($link['next']['title']);

  }

}
The dgd7glue_nextprev_suggestion() function is the same as it was when presented previously—most everything else is new or changed!
![]() Note Relying on functions provided by Book module means you should include Book module as a requirement to your .info file, with the line
Note Relying on functions provided by Book module means you should include Book module as a requirement to your .info file, with the line
dependencies[] = book
added to your dgd7glue.info file.
Configuration Clean-Up
Although you are not using a view to get next and previous links, you need to make a view to show the suggestions (built off-camera). To this view, you add a sort by node ID criteria. Its configuration page looks like that in Figure 33–9.
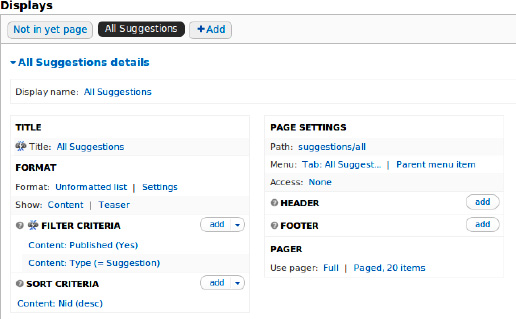
Figure 33–9. Suggestion view with sort by Node ID, descending
Creating a View to Make User Pages Have Hackable URLs
In the interest of hackable URLs (the ability to navigate a site by taking off everything after a / in the URL), you can use Pathauto module (drupal.org/project/pathauto) to give all user paths a sensible prefix and then provide a view of all users at that prefix. Pathauto settings, recall, are hidden under Administration ![]() Configuration
Configuration ![]() Search and metadata
Search and metadata ![]() URL aliases on a tab called Patterns (
URL aliases on a tab called Patterns (admin/config/search/path/patterns). The pattern for paths to user account pages is well down the page.
In the spirit of extreme optimism, figure that anyone who registers on the site is reading the book so make the prefix for user paths readers, followed by a slash separator and the token for the user's name: readers/[user:name]. Thus, a user account with the name Dries Buytaert would have the path readers/dries-buytaert. To have this work retroactively for users who are already on the site, go to the Bulk update tab of the path configuration (admin/config/search/path/update_bulk), checkmark User paths, and Update.
That path alias does nothing to make the path readers exist. If you go to readers, you will get Page not found. To improve user experience and assuage your own sense of feng shui as a web developer, you will need to put something sensible at this path, such as a list of all users.
Create a new view at admin/structure/views/add and, for a change, tell the wizard to Show Users.
![]() Tip Before creating a user (or any) view, check to see if Views has provided a default view to do generally or precisely what you want. There is no default User-based view, but there are views to take over Drupal core functionality such as a Comment-based view and a Node-based view that takes taxonomy term IDs.
Tip Before creating a user (or any) view, check to see if Views has provided a default view to do generally or precisely what you want. There is no default User-based view, but there are views to take over Drupal core functionality such as a Comment-based view and a Node-based view that takes taxonomy term IDs.
Give your Page display a Path of readers and a Display format of perhaps HTML List (this or Unformatted will need to be themed; Grid may look good without theming). Give it a big number such as 50 for Items per page. After you Continue and Edit, you can leave the filter set to User: Active Yes and add Fields for User: Picture in addition to User: Name. Uncheck the Create a label option so it won't display labels.
Whether or not you want to make a menu item for the view of users or not, if someone hacks the URL of a user from readers/john-smith to readers, just as if they hack the URL of a suggestion path aliased at suggestions/installing-drubuntu to suggestions, they will come to a sensible list and not page not found. It's a small detail to make it seem right to call the site complete.
In Conclusion
Calling this chapter “Completing a Site” was a little misleading. As long as you have a Drupal site, you will not be done. Drupal sites are about living communities, breathing with the information that content administrators and users contribute. They will surely want new features sooner or later. If truly no one is using your site, if visitors are only viewing it, export it to static HTML. See Chapter 7 for the bare minimum to keep contributed code up to date, see Chapter 13 for deploying new features, and subscribe to dgd7.org/signup to learn how any new features are added to the DefinitiveDrupal.org web site!
![]() Tip Discussion and updates pertaining directly to this chapter will be at
Tip Discussion and updates pertaining directly to this chapter will be at dgd7.org/other90.