![]()
Unit Testing
Unit tests are automatic tests that operate very close to actual business logic. The focus here is to test individual rules in isolation to certify that the intended result is achieved and maintained over the lifetime of an application.
This increases the overall quality of the system and reduces the number of bugs created because all changes are guarded by the existing suite of unit tests that certify that changes do not break the existing system. The feedback on unit tests is instant because they trigger and run automatically each time a change is checked in to the version control system.
Unit tests are programs written to run in batches to test other code. Each test typically sends a class a fixed message and verifies it returns the predicted answer. In practical terms this means that you write programs that test the public interfaces of all the classes in your application. This is not requirements testing or acceptance testing. Rather it is testing to ensure the methods you write are doing what you expect them to do.
What Is Test Driven Development?
Test Driven Development (TDD) is one of the core practices in eXtreme Programming, XP. Even if we do not practice XP we can still use this practice as a way to help developers write better code. In TDD, you write the tests before you write the code. When all your tests are working, you know that your code is functioning correctly, and as you add new features, these tests continue to verify that you haven’t broken anything.
Instead of designing a module, then coding it and then testing it, you turn the process around and do the testing first. To put it another way, you don’t write a single line of production code until you have a test that fails.
By working this way you are using a process called Coding by Intention. When practicing Coding by Intention, you write your code top-down instead of bottom-up. Instead of thinking, “I’m going to need this class with these methods”, you just write the code that you expect to be there before the class actually exists.
In traditional software development, tests were thought to verify that an existing bit of code was written correctly. When you do TDD, however, your tests are used to define the behavior of a class before you write it.
![]() Note With TDD we want to run our tests frequently to get continuous feedback about the code we write. A change in code that breaks assumptions (tests) is something we should become aware of immediately. In Visual Studio 2012 we can configure the environment to run unit tests after build so that as soon as we compile the code we will also run all tests and get feedback on their result.
Note With TDD we want to run our tests frequently to get continuous feedback about the code we write. A change in code that breaks assumptions (tests) is something we should become aware of immediately. In Visual Studio 2012 we can configure the environment to run unit tests after build so that as soon as we compile the code we will also run all tests and get feedback on their result.
Principles for Unit Testing
A good unit test should adhere to these basic rules:
- Must be able to run without user interaction. Use assertions to automatically validate the test outcome.
- Must be repeatable. Use initialize and cleanup methods to prepare and cleanup the tests.
- Must be fast. Use mock objects to remove external dependencies during test.
We will explore these rules throughout this chapter.
One of the biggest challenges you will face when writing units tests is to make sure that each test is only testing one thing. It is very common to have a situation where the method you are testing uses other objects to do its work. If you write a test for this method you end up testing not only the code in that method, but also code in the other classes. This is a problem. Instead we use mock objects to ensure that we are only testing the code we intend to test. A mock object emulates a real class and helps test expectations about how that class is used.
To get this to work, we are reliant on either of the following patterns (see description that follow):
- Separation of Concerns
- Inversion of Control
Each of these patterns is in turn dependent of the fact that our classes are loosely coupled. To achieve this, we need to work with interface-based programming when we want to use mock objects.
The key benefit of working with mock objects is that we get deterministic behavior from the object being mocked and thus we can focus on the code implementing the tests we are running and not the mocked layer.
Separation of Concerns (Object Factories)
Object factories are all about abstracting away the definition of behavior from implementation. This means defining generic interfaces representing a contract with anyone who implements it.
Once we have a separation of behavior and implementation, we can create a factory implementation that can serve up multiple implementations of the same interface. Some examples of this pattern are
- COM: We have an abstract class factory called CoCreateInstance that is driven by metadata in the registry, which means we only need to be aware of our programmatic identifier (i.e. ProgID) and then the rest is dynamic information because we are simply asking for a known interface (IUnknown).
- ADO: The programming model doesn’t change when we change the database implementation. This is because we have abstract definitions about what is possible to do with a database, then we create data sources that define which database we should talk to (metadata once again) and simply provide the identifier for our metadata when we are to connect.
Inversion of Control (Dependency Injection)
Dependency injection is about creating plug-in based implementations, which leads to creating assemblers (i.e. components that put together an instance of an object based on pluggable parts).
There are many ways to implement this, but two common approaches are
- Constructor Injection: Using this approach you need to expose a constructor that takes an interface supplying the pluggable implementation, then it becomes possible to supply different implementations when instantiating an object of this type.
- Setter Injection: In principle the same thing as constructor injection. The difference between the two is that we can create our objects and then post-creation we can inject the implementations needed. It is a more powerful approach because it means we can change the behavior of our object dynamically during the execution of our code.
We will look at how we can work with dependency injection for unit tests later in this chapter.
Now with the theory in place we can take a look at how to implement unit tests within our application. MSTest is the built-in test framework in Visual Studio that we can use for unit testing. MSTest can also drive other test types, as we will look at in Chapter 22. In Visual Studio 2012, the unit test framework has evolved to support other unit test and is now known as Visual Studio test (vstest).
Unit tests are just code with some test specific context added to it. To declare code as unit test code we need to reference the Microsoft.VisualStudio.QualityTools.UnitTestFramework.dll, which imports the unit test framework into our project. Next, we can annotate the code with the following attributes:
- TestClass: Indicates that the given class contains test methods.
- TestMethod: Indicates a method as a test method.
A core Visual Studio unit test would therefore be declared like the following:
[TestClass]
public class ExpenseReportTest
{
   [TestMethod]
   public void CreateNewExpenseReportGiven2LunchesExpectPendingApproval()
   {
   }
}
Often we need to setup initial state before a test run or clean up state after it is complete. The test attributes shown in Table 16-1 can be applied to a method to control the calling order of a test.
Table 16-1. Test Attributes to Control Test Sequences
| Test Attribute | Meaning |
|---|---|
| AssemblyInitialize | Method should be run before the first test in a given test assembly. The method signature for an assembly initialze method must be |
| [AssemblyInitialize] | |
| public static void Init(TestContext context) | |
| AssemblyCleanup | Method should be run after the last test in a given test assembly. The method must be declared as static void with no arguments: |
| [AssemblyCleanup] | |
| public static void Cleanup() | |
| ClassInitialize | Method that should be run before the first test in a test class. |
| ClassCleanup | Method that should be run after the last test in a test class. |
| TestInitialize | Method that should be run before every test method. |
| TestCleanup | Method that should be run after every test method. |
A unit test involves more than just running a method under test—we also need to verify that the tested functionality behaves as expected. So the testing framework contains a number of test attributes (see Table 16-2) which we can use to check various types of expectations.
Table 16-2. Help Classes for Unit Test Assertions
To put the preceding in context let’s look at the process of creating a good unit test in Visual Studio 2012.
- Create Unit Test project in your language of choice. A good convention is to create a unit test project for each project you write unit tests for. Name the unit test with the same namespace as the tested project + .UnitTest as suffix.
- Add a new Unit Test class to the project. Name the unit test after the class it is testing. Avoid including “Test” in the class name because it is already scoped by UnitTest by following Step 1.
- Add a TestMethod to the test class. Name the test method using the Feature-Given-Expect format for good readability in the test lists. It is much better to learn why a test is failing from its name instead of having to read (or worse, debug) the test code. For example:
ApproveExpenseReportGivenInvalidProjectExpenseExpectRejectedThis method tells us without reading the code that it is a test for the Approve Expense Report story, it tests what happens when approving an expense report with an invalid project code and expects that the expense report is rejected.
- Add Asserts to verify the test outcome. Try to test only one thing in a unit test, again to make it clear what the intention of the test is. If a test can be created to test multiple data sets, we can use data binding to connect the test with a data source. This is still okay to the rule because the test only tests one thing, but with different conditions.
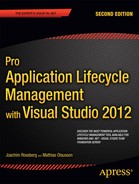
Figure 16-1 shows a complete Visual Studio Unit Test.
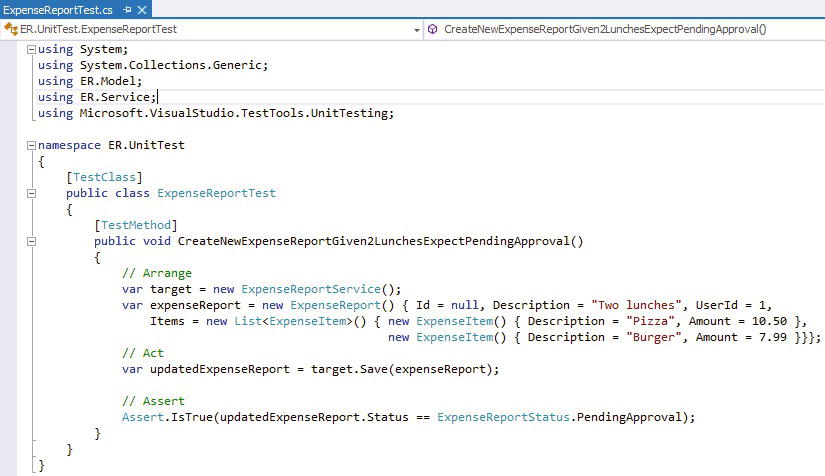
Figure 16-1. A complete unit test
We may need to control various aspects on how a test is run. To support this we have a context class in the framework, TestContext, which allows us to configure the test environment to affect the way the tests behave.
The TestContext contains static information that can be read from the test when run, including the following attributes:
- Owner. Specifies the person responsible for the test.
- DeploymentItem. Specifies dependent item for the test that gets deployed before the test is run. See the section “Managing Test Dependencies” later in this chapter for more details.
- Description. Documents the purpose of a test.
- Ignore. Marks that a test should not be run.
- Priority. Defines the priority for the test, which can be filtered on to run tests with a particular relevance.
- WorkItem. Specifies a work item associated with the test.
We can also use the TestContext in our tests to access the test execution environment.
- AddResultFile. Adds a file to the test result.
- StartTimer, EndTimer. Cannot be used with Unit Tests, these methods are only intended for creating transactions in load test runs. Use a System.Diagnostics.StopWatch and the TestContext.WriteLine to achieve the same result.
- CurrentTestOutcome. Gives us access to the outcome of the test.
- DataConnection. Gets the current data connection for the test.
- DataRow. Gives us access to the current data row for a data driven test. See the section “Data Driven Automated Tests” later in the chapter.
- DeploymentDirectory. Stores files deployed for the test run, typically a subdirectory of TestRunDirectory.
- FullyQualifiedTestClassName. Gets the full name of the class running the current test.
- Properties. Gives us access to test properties.
- ResultsDirectory. Gets the top-level directory that contains test results and test result directories for the test run, typically a subdirectory of TestRunDirectory.
- TestName. Gets the name of the test.
- TestResultsDirectory. Gets the directory for the test result files.
- TestRunDirectory. Gets the top-level directory for the test run that contains deployed files and result files.
- TestRunResultsDirectory. Gets the top-level directory for the test run result files, typically a subdirectory of ResultsDirectory.
- WriteLine. Writes messages to the test result.
To access the TestContext in a unit test we need to declare a property called TestContext wrapping a TestContext instance:
private TestContext testContextInstance;

public TestContext TestContext

{

   get { return testContextInstance; }
   set { testContextInstance = value; }
}
The test framework automatically sets the property for us. We can then use the property in our test code to interact with the TestContext. This example writes to the test output:
TestContext.WriteLine ("Expense Report updated to: {0}.", updatedExpenseReport.ToString());
The result is written to the output for the test run as shown in Figure 16-2.
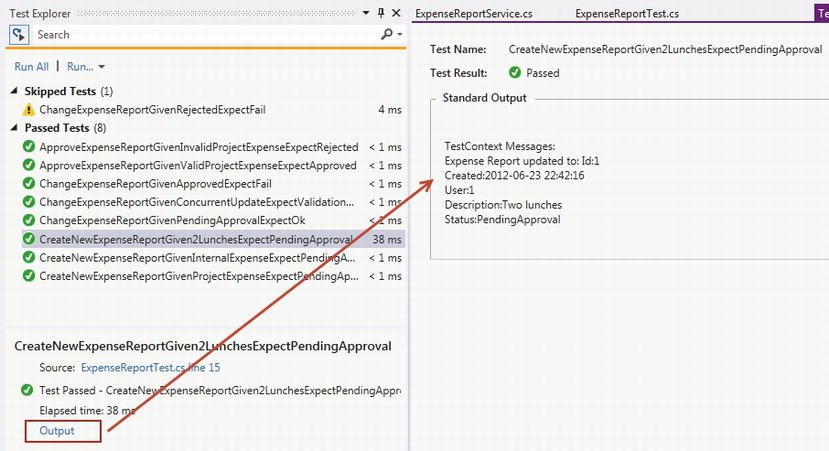
Figure 16-2. Using TestContext to write to the test result output
In Visual Studio 2012 unit tests are managed from the new Test Explorer window. The Test Explorer runs tests from any test framework as long as they provide a test adapter for the Visual Studio framework.
Running Tests
When we build our solution and its test project, the unit tests are displayed in the Test Explorer (see Figure 16-3). If the Test Explorer is not visible we can open it from the Test→Windows→Test Explorer menu.
The tests are grouped by four categories; Failed Tests, Skipped Tests, Passed Tests, and Not Run Tests. We can run tests from the menus in Test Explorer or by selecting one or more tests in the list. We can also start a debug session from the tests the same way.
The Test Explorer shows the status of the last run and only for the tests that ran. The color bar at the top of the window is shown in the color of the last test run and gives direct feedback to the test status in a nice way.
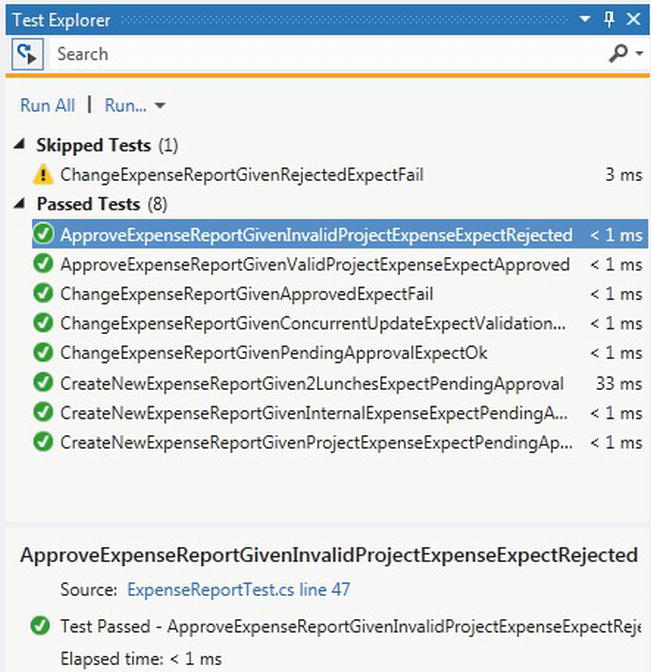
Figure 16-3. The Test Explorer
In true test driven spirit we can also select to run all tests after we build in Visual Studio. We can configure this behavior by clicking the Run Tests After Build button in Test Explorer or from the Test→Test Settings→Run Tests After Build menu (see Figure 16-4).
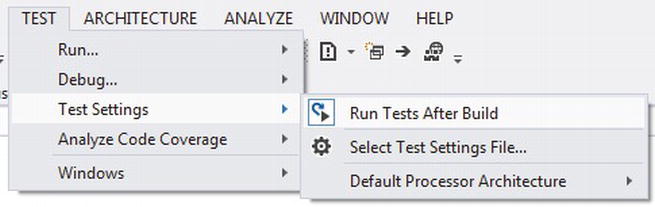
Figure 16-4. Configure to run test after build
The test status is shown in color next to the unit test together with the call time for each test. We can also select a test and view the details from the test run (including errors from a failing test) as shown in Figure 16-5.
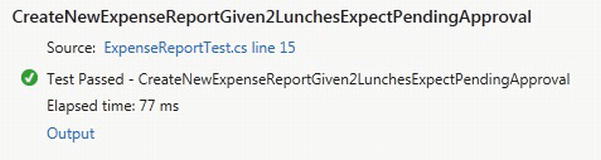
If output from the test run is available, an Output link is shown that takes us to the output view for the test run (see Figure 16-6).
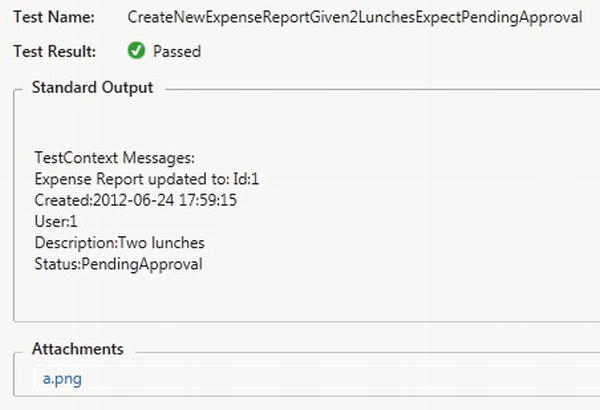
Figure 16-6. Unit Test result output
Code coverage is a concept where components are instrumented with logging points. When the components are executed (typically through automated tests), the execution paths are logged. The logs are then used to create statistics over how the components are used.
Code coverage of 100% does not mean that the quality is perfect, but a low number tells us that we have insufficient testing. Code coverage somewhere in the range of 85% is a good number to aim for.
![]() Note Code coverage requires Visual Studio 2012 Premium or Ultimate.
Note Code coverage requires Visual Studio 2012 Premium or Ultimate.
Adding Code Coverage to a Project
In Visual Studio 2012 unit tests can create code coverage data for all assemblies without any explicit configuration. All solution binaries that get loaded during unit test runs are analyzed by default.
We can customize the way code coverage works in our project, typically by excluding some assemblies and including others. The way to do this is different in Visual Studio 2012 compared to Visual Studio 2010. Visual Studio 2012 supports different unit test frameworks and the .testsettings file can only handle MSTest tests.
Using Runsettings to Configure Code Coverage
Visual Studio 2012 customizes how code coverage is collected by adding a .runsettings XML file to the solution and setting it as the default setting using the Test→Test Settings→Select Test Settings File.
At this point there is no designer for the .runsettings file so it needs to be edited as XML in Visual Studio. Below is a fragment of a .runsettings file that can be used to configure code coverage. For a complete description on how to create a .runsettings file see http://blogs.msdn.com/b/sudhakan/archive/2012/05/11/customizing-code-coverage-in-visual-studio-11.aspx:
<?xml version = "1.0" encoding = "utf-8"?>
<RunSettings>
. . .
    <Configuration>
    <CodeCoverage>
    <ModulePaths>
    <Include>
    <ModulePath > .*\UnitTestProject1.dll</ModulePath>
    </Include>
    <Exclude>
    <ModulePath > .*CPPUnitTestFramework.*</ModulePath>
    </Exclude>
    </ModulePaths>
    <UseVerifiableInstrumentation > True</UseVerifiableInstrumentation>
    <AllowLowIntegrityProcesses > True</AllowLowIntegrityProcesses>
    <CollectFromChildProcesses > True</CollectFromChildProcesses>
    <CollectAspDotNet > False</CollectAspDotNet>
. . .
</RunSettings>
Using Testsettings to Configure Code Coverage
If we share the projects between Visual Studio 2010 and 2012 and use MSTest as the testing framework, we can still use the Code Coverage configurations in a testsettings file. Figure 16-7 shows how to configure Code Coverage from the Data and Diagnostics section of the Test Settings file.
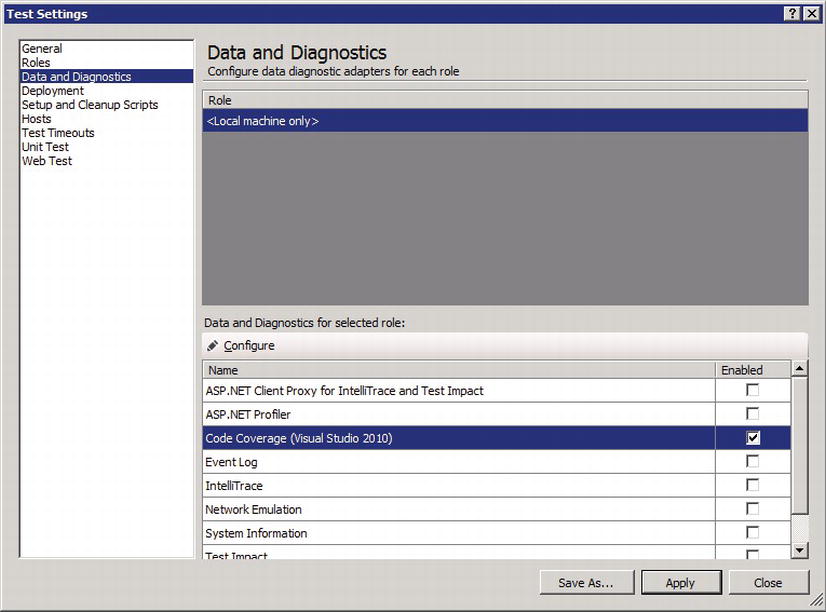
Figure 16-7. Enabling Code Coverage in a testsettings configuration
From the Code Coverage dialog we can then select configure and choose the assemblies to analyze code coverage for (see Figure 16-8).
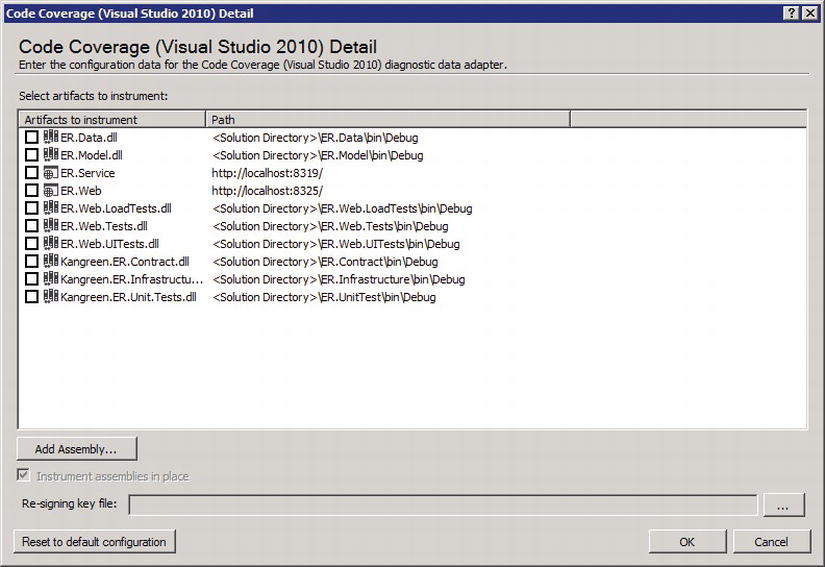
Figure 16-8. Configuring Code Coverage for selected assemblies
Analyzing Code Coverage Results
Regardless of how we gather the code coverage data we can analyze the result using the Code Coverage Results window in Visual Studio (see Figure 16-9). The result view shows us the assemblies analyzed and we can drill down into namespaces, classes, and methods.
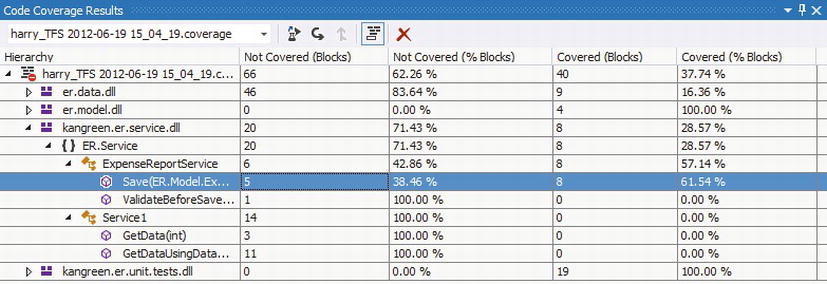
Figure 16-9. Code coverage results in Visual Studio 2012
The coverage data is shown by default as % Blocks measured. If you prefer % Lines covered, this can be shown by adding the additional columns to the result view (see Figure 16-10).
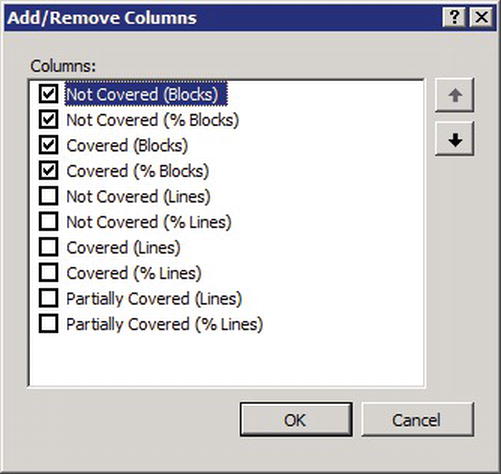
Figure 16-10. Code coverage configuration
Finally if we want to understand why a section of code has a particular coverage number, the best way is to show the coverage data inline with the code. The Show Code Coverage Coloring button enables coloring so when we click on a code item, the coverage information is shown in different shades of blue and red (see Figure 16-11). This is great feedback in many ways; it show us which paths we missed to test, something that can be a result of missing tests as well as unused code.
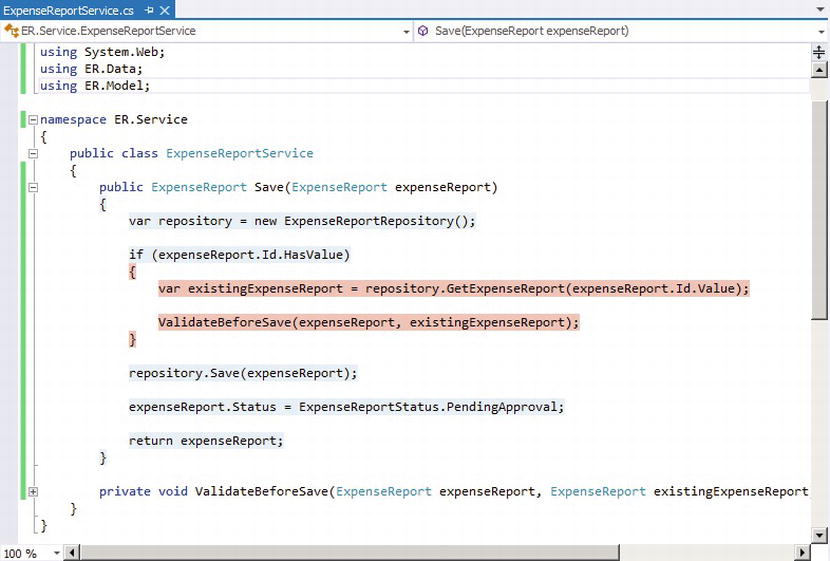
Figure 16-11. Code coverage result shown in source code
Configuring Code Coverage for a Build Definition
Code coverage is an important metric to track over time if you are interested in how the ratio of automated testing is compared to the amount of code being written. A good way to get the code coverage measured regularly is to include automated tests and code coverage in our automated build process.
We will look more at build and how to configure automated builds in Chapter 26, if you are eager to take a look feel free to jump over to that section right away.
Visual Studio unit tests contain a concept of data-driven tests. This is not to be confused with database testing; instead data-driven tests are used to map parameterized values in an external resource to a unit test (also known as data pools). There are several uses of data-driven tests; the most common is to use data pools for functions that will require many test permutations.
MSTest supports a number of data sources, such as CSV files, XML files, Excel files, and database tables that we will look at later in this chapter.
Some tests can be run multiple times with different data sets. Instead of having to implement a number of different tests permutations, we can instead bind the test to a data source and then access the current data row from the unit test.
We connect a unit test with a data source by adding the DataSource attribute to the test method. The DataSource attribute lets us specify the following arguments:
- ProviderName. The provider for the data source to use. See Table 16-3 for examples of provider names.
Table 16-3. Data Sources for Data-Driven Tests
Data Source Data Source Attribute CSV DataSource("Microsoft.VisualStudio.TestTools.DataSource.CSV", "|DataDirectory|\data.csv", "data#csv", DataAccessMethod.Sequential) Excel DataSource("System.Data.Odbc", "Dsn = Excel Files;Driver = {Microsoft Excel Driver (*.xls)};dbq = |DataDirectory|\Data.xls;defaultdir = .;driverid = 790;maxbuffersize =2048;pagetimeout = 5;readonly = true", "Sheet1$", DataAccessMethod.Sequential) Test Case DataSource("Microsoft.VisualStudio.TestTools.DataSource.TestCase", "http://tfs:8080/tfs/DefaultCollection;Agile", "30", DataAccessMethod.Sequential) Note: This data source will create a strong dependency to TFS and may not be suitable for pure unit tests. But for other automated test it’s can be a good alternative since it allows us to edit the test data from the test case parameters. XML [DataSource("Microsoft.VisualStudio.TestTools.DataSource.XML", "|DataDirectory|\data.xml", "Iterations", DataAccessMethod.Sequential) SQL Express [DataSource("System.Data.SqlClient", "Data Source = .\sqlexpress;Initial Catalog = tempdb;Integrated Security = True", "Data", DataAccessMethod.Sequential) - ConnectionString. The connection string to the data source (database, data file, etc.).
- TableName. Name of data table in the data source.
- DataAccessMethod. Specifies how the test data is drawn from the data pool. Can be either Sequential or Random.
To access the data row, we use the TestContext class. We get called by the test framework one time for each set of data in the DataSource so we only need to think about the current row when accessing data from the store. The code sample in Figure 16-12 shows a complete example of a data-driven unit test. The dependency to the data source should be handled using a DeploymentItem attribute so that the unit test can be run anywhere as long as the dependent item is deployed when the test is run. See “Managing Test Dependencies” in the next section.
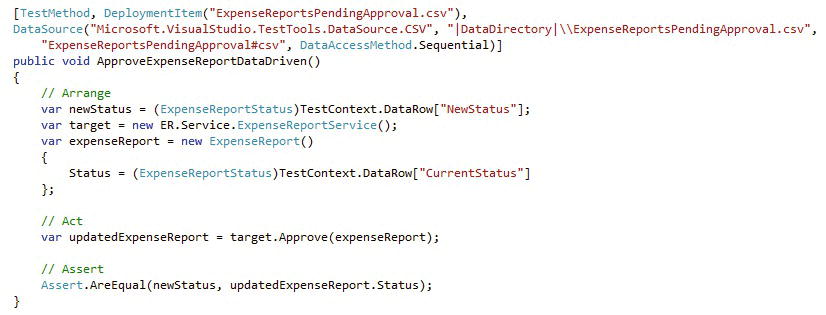
Figure 16-12. Data-driven unit test example
In theory a unit-test should have no external dependencies. However, in some situations it may be very effective to use external files as input for tests; one such scenario is to capture actual messages processed in the system and in a test replay those messages. The files in this case would replace the need for setting up the test scene in the test implementation.
If external files are used in tests, they should preferably be deployed as embedded resources in the test assembly to simplify deployment so that the tests can run automatically anywhere.
If external files are used to setup the context for tests, it is important to keep versioning in mind. When test data is captured in the files, they represent a snapshot of how data is exchanged in the system. If the structure of the data changes, the test data will be invalid. Sometimes the changes are very subtle, like for instance if two string elements change order. It may be difficult to trace the source of these errors and it may also be time-consuming to maintain the changes if a large number of files are used.
If a test has dependencies to files that do not come from the build process, we can instruct the framework to copy the dependencies when the test is run. By default the test assemblies and their dependent assemblies are created to the deployment folder for the test.
If we run tests in Visual Studio, a folder called TestResults is created directly under the solution folder. The TestResult folder contains subfolders for each test run. In the test run folders, two additional folders are created:
- Out: The out folder is the actual deployment folder and all files required by the test are copied here before the test is run.
- In: Certain test result files, such as code coverage files that are created as part of the test run, get copied to the in folder.
One option to deploy files to the test is to use a .testsettings file. Add a .testsettings file to the solution and open the designer. Switch to the Deployment tab and add files and folders as needed by the test (see Figure 16-13).

Figure 16-13. Adding deployment items using a .testsettings file
We can also use the DeploymentItem attribute on the test method level to define which files should be copied out before the test is run:
[TestMethod, DeploymentItem("ExpenseReportsPendingApproval.csv")]
public void ApproveExpenseReportDataDriven()
{

   // ...
}
Working with Other Test Frameworks
A new and interesting feature of the Visual Studio unit test framework is that it is now possible to mix unit test frameworks within the native tools in Visual Studio. We can even have multiple test frameworks in the same unit test project!
The unit test framework needs to implement a Visual Studio unit test adapter to become visible to the testing tools. If you are interested in authoring your own adapter, you can find a sample implementation here: http://blogs.msdn.com/b/bhuvaneshwari/archive/2012/03/13/authoring-a-new-visual-studio-test-adapter.aspx.
It is easiest to add more third-party frameworks from inside Visual Studio by using the Extension Manager (Tools→Extensions and Updates). Select the Online category and the Visual Studio Gallery and search for Testing (see Figure 16-14) and you will find many implementations, such as nUnit and xUnit adapters.
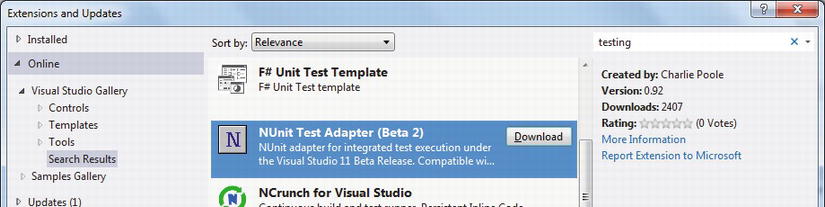
Figure 16-14. Adding third party Unit Test frameworks to Visual Studio using the Extension Manager
Implementing Mock Objects
We can implement a mock implementation just like any other piece of code and include it as part of our unit test code base; however, the mock code most of the time just mimics the interface it replaces and contains very simple code. For example, a mock implementation of a fetch operation only needs to implement the method signature to be usable as a stand-in for the real object. If we want to be able to control what the mock implementation returns we can add a backing list field that we can control from the unit test and prepare the data to suit the purpose of the test. The following code would do fine for a simple mock implementation of a ListCustomers method:
public List < Customer > Customers = new List < Customer > ();
public List < Customer > ListCustomers()
{
   return this.Customers;
}
We have several common options for how to create fakes for our unit tests:
- Hand crafted mock objects: This is the simplest approach as described previously. It should be noted that we are required to implement the complete interface to mock and not only the operations we want to test. This is of course time consuming and leads to more code to maintain.
- Mock frameworks: There are a number of good frameworks that help us creating fakes by dynamically substituting a type that we want to replace. Two popular open-source frameworks are moq (http://code.google.com/p/moq) and Rhino Mocks (http://hibernatingrhinos.com/open-source/rhino-mocks) which both offer dynamic mocking and fluent APIs.
- Visual Studio Fakes: Visual Studio 2012 comes with support for creating stubs to fake out an interface or abstract class.
Summary
In this chapter we have looked at unit testing as a development practice. Whether or not you choose to follow a test driven approach, a unit test should be the foundation of any test automation effort.
We may still benefit a lot from writing tests based on the unit test framework that is not strict unit testing but instead tests the code under the UI or against the APIs in the system.
See Chapter 20 for a discussion on agile testing and how a unit test framework can be used to implement different types of automated tests.