![]()
Software systems, the development processes. and project resources have a tendency to be distributed more and more in recent years. This also means that they have become more and more complex and specialized. Most often software products are in an ongoing development cycle with testing and releases integrated, making it even more complex to manage. We can also see that the platform our applications and system run on is becoming more and more complex with the addition of cloud-based systems. There are a lot of pieces that are floating around and must fit together as seamlessly as possible; otherwise we might not get the value or success we expect from our projects. This is why release management becomes more and more important.
Release Management
Release Management (RM) as a discipline is relatively new, but it is growing fast. RM is used to manage software releases. Many companies need to have one or more co-workers dedicated to oversee the integration and flow of development, testing, deployment, and support of the systems the organization has. In the past this has often been the job of project managers, but they rarely have the time or opportunity to focus on their projects and also look at company strategy when it comes to releases. Hence, the introduction of release managers.
Release managers must have a general knowledge of the software development process and all aspects of it; they also need to understand operating systems and platforms applications. What’s more, they should have some appreciation of the business side so that the releases can fulfill business needs.
Since agile development processes like Scrum have been more and more popular the number of releases of an application or system has increased. This further stresses the importance of release management and its friends in IT operations. One of the best benefits of the agile introduction (apart from better success rate in projects) is that development teams and operations teams have been forced to collaborate more closely in order to support release events.
Let’s take a look at the agile release planning from Chapter 8 again. The Product owner (Fiona) used the initial backlog to look for themes in the user stories. In our example she came up with a few:
- Expense report management
- Search functionality
- User management
- Customer management
- Project management
- Smartphone availability
Fiona quickly saw that three themes were going to be part of the first sprint. The Expense report management, User management, and Customer management were all part of the first sprint according to the initial sprint planning.
Considering that there were many chores in the first sprint, she knew that all three would not fit in. She aimed at getting the Expense report management theme done.
Fiona also knew the initial theoretical velocity (10 story points), which she used as an input for how much work she could expect in each sprint. With 44 story points in total, the project would take 4.4 sprints to complete. She rounded this up to 5 sprints (keep in mind that this is an extremely simplified example).
Using this information as an input, she could start to plan when to release what feature and came up with a release plan:
- Expense Report Management in Sprint 1 and 2
- User Management, Project management in Sprint 3
- Smartphone availability in Sprint 4
So even if the Product Owner is responsible for the release planning of a project with only one Scrum team, imagine the complexity if there was five, six, or more other projects ongoing with many teams working in parallel. This is why release management is so important. Figure 28-1 shows an example of a release plan using the TFS Web Access product backlog with forecasting enabled.

Figure 28-1. Release Planning in TFS Web Access
Release Management in Visual Studio 2012
Part of release management is the release planning. Besides planning, there are many other activities that the release manager needs to do that can be solved by tools in Visual Studio 2012.
As a way to get started with effective release management we have put together this short list of what we think are important practices (with cross-references to the chapters in this book where we cover the details):
- Implement an efficient version control system (Chapter 15).
- Implement a good branching strategy. This is something we will dive into later in this chapter.
- Implement automated builds (Chapter 26).
- Write unit tests (Chapter 16).
- Automate application deployment (Chapter 27).
- Automate database deployment (Chapter 27).
- Establish good procedures for managing test environments (Chapter 23).
- Automate build verification tests (Chapter 22).
- Automate inspections (Chapters 17, 26).
- Implement practices for feedback (Chapters 17, 26).
- Release notes.
- Requirement versioning.
- Test case versioning.
- Build versioning.
Release notes are documents that primarily describe the changes in a product between two releases. A release notes document should contain information about new features and corrections, as well as instructions on how to apply the update. These documents are distributed with the software, very often when the product is still in the development or test phases. If the product is already released to customers the release notes accompanies the product manual especially when a bug fix or an enhancement is being released to the product.
The release notes details the changes or enhancements made to the software and are communication documents that are shared with customers within as well as external to the organization (if the software is publicly available). The release notes are also intended for the people managing the configuration of different software installations and to those who deploy patches to installed software.
Previously release notes were written by technical writers, but nowadays more and more other members of the development team such as developers or testers write them. One of the reasons for this is that more and more teams use Scrum, which also mean that roles become more diffuse and the knowledge and skills are spread among all team members. Another reason is that writing release notes requires knowledge of the complete development process, including tests performed and if you are not part of the development team (including testers of course) these notes can be hard to write.
Let’s now see how Visual Studio can help us to get information we can use in our release documentation.
Release Notes in Visual Studio 2012
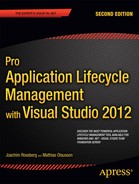
If we want to use Visual Studio and TFS as the source of release notes information we should implement the solution on work items and associations to. There is already implicit support for this in the standard templates, but we typically need to apply our model over the basic functionality. What we can use as a start is shown in Figure 28-2.
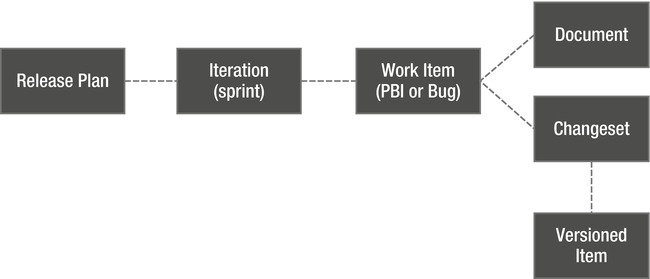
Figure 28-2. A model for managing release notes with TFS
The model should be read as follows:
- A release plan is modeled using Iterations (sprints) following the ideas around release planning described earlier in this chapter.
- Features and corrections (PBIs and Bugs work items) are assigned to the plan through the iterations.
- Implementation (documents, code, etc.) is associated with work items as links and changesets.
- Release note information is documented in the work items.
- Changesets contains the changed files in the repository.
Based on this convention we can query the TFS database and create reports like the Excel report in Figure 28-3. The query filters on the team project (Expense Reporting) and the current iteration (sprint 1). For the release notes we need to choose which PBIs to included in the report, typically we include only done PBIs (excluding not started and not completed PBIs) We cover custom reporting in TFS in Chapter 32 is you want to know more about that.
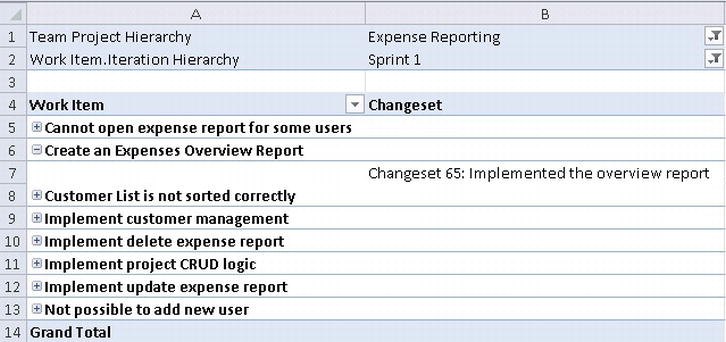
Figure 28-3. Release notes for a sprint using Excel and the TFS data warehouse
Change Details in the Build Report
One of the features of TFS build is that the build report can be used to see change information similar to the model described in Figure 28-2. The default behavior of a TFS build is to associate build information with changed work (work item and changesets) and include the delta changes between the current and the previous build in the build report. Figure 28-4 shows an example of a TFS build report.
Figure 28-4. Build report for a release build
This is not a replacement for a proper release notes report but it contains useful information that testers and change managers can take advantage of without running a separate report.
- Test run information: This section contains information about the tests run as part of the build. We can expand the section to look at the details and even download the test results to Visual Studio for further analysis (and trouble-shooting).
- Code coverage from test runs: Similar to the test run information this section shows code coverage gathered from the test runs. The code coverage data can also be downloaded to Visual Studio if we want to analyze the result at a finer detail.
- Associated Changesets: The associated changesets section lists the changesets committed to TFS since the last good build. This gives us a nice summary of what has been changed and can be used by change managers to understand what needs to be deployed if this build is to be released. We can click on the changeset links to get to the changeset details.
- Associated Work Items: The final section in the default report is the list of associated work items. The concept is the same as for the changesets and gives us a good log over which features have been resolved since the last good build. We can navigate to the work item if we want to look at details. Testers can use this section to understand whether the build contains enough new features to be deployed to a test environment.
TFS Build Extensions Build Notes
Because the data for release information is stored in TFS we can develop custom reports to show the information. Or we can create custom tools that give us data for deeper analysis. One nice example of this is the Build Notes feature in the TFS Build Manager, which is a part of the community driven project TFS Build Extensions (http://tfsbuildextensions.codeplex.com/).
The Build Notes tool works similar to the default build report but creates a Word document as a result. Figure 28-5 shows how we can generate a build notes report based on a build in TFS (using the TFS Build Manager).

Figure 28-5. Build Manager to generate build notes
We can select what information we want to include in the build notes report (see Figure 28-6). For instance, if we only care about work items and changeset information, then select that information.
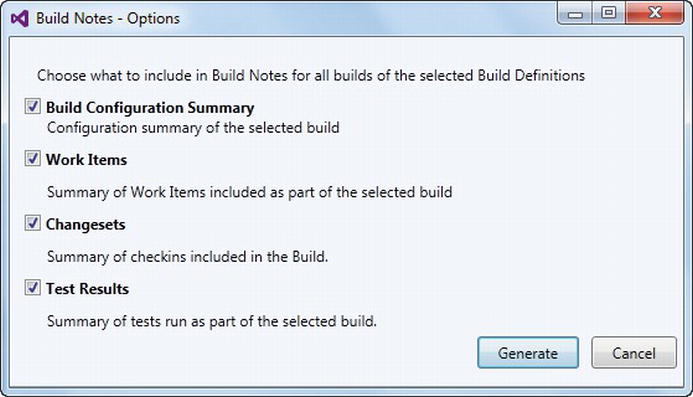
Figure 28-6. Available options for creating build notes
The tool then analyzes the build and generates a Word report such as the one shown in Figure 28-7.

Figure 28-7. A complete build notes report
An important aspect of release management is how to handle versioning of the artifacts we work with in our development and maintenance projects. In this section we look at how the major assets in a development project can be handled to support multiple versions, specifically requirements, source code, test cases, and builds.
The first category we will look at is requirements. In TFS we primarily have two ways of managing requirements; as a document in SharePoint or as Work Items.
Versioning Documents in SharePoint
SharePoint is a great tool for managing documents and document workflows. As a part of this feature set SharePoint also supports document versioning, which is something we can use in our strategy for document versioning.
To enable versioning on documents in SharePoint we can turn the feature on when we create a document library as shown in Figure 28-8.
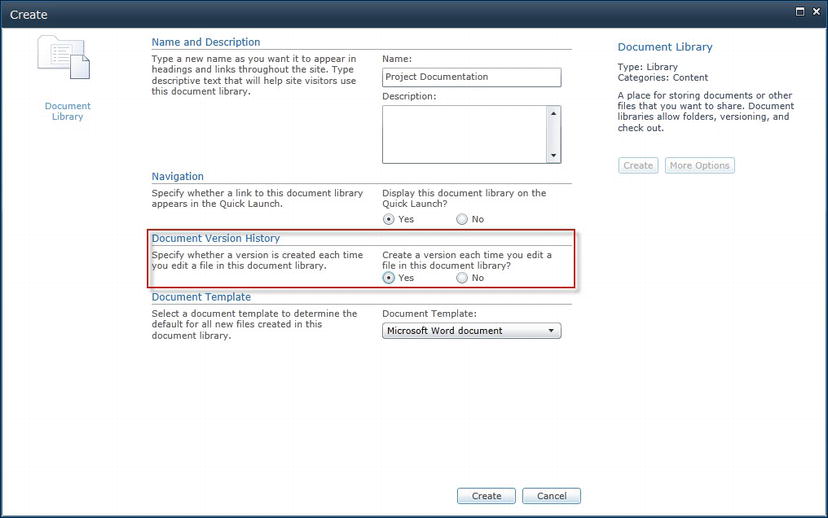
Figure 28-8. Enabling document versioning in SharePoint
Enabling versioning at this point sets the default settings for document versioning. If we want to change the versioning settings, enable versioning on a single document or on a document library at a later point, we can edit the settings as Figure 28-9 shows (navigate to Library Settings→Versioning settings→Document Version History for the settings for a document library).
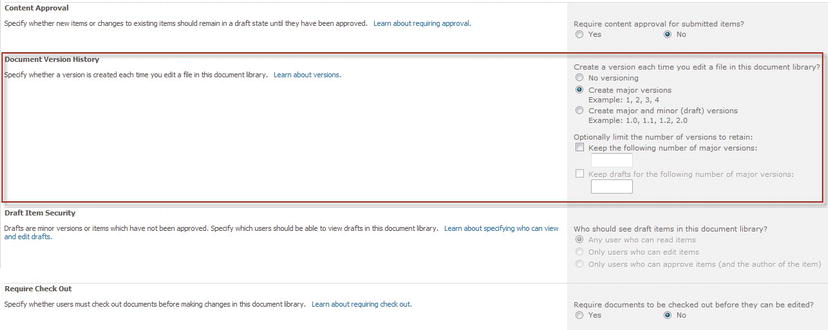
Figure 28-9. Configuring document versioning in SharePoint
If we then select the history for a versioned item in SharePoint we can see the version history (see Figure 28-10) and open a historical version to look at the earlier state.
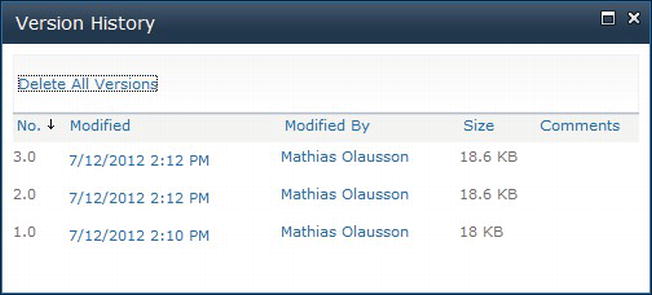
Figure 28-10. Viewing Ddocument Version History in SharePoint
There is no built-in support for generating the differences between two versions so this is something we need to solve on top of the versioning support in SharePoint. A good way to deal with this problem is to use the Track Changes feature in Microsoft Word (see Figure 28-11).

Figure 28-11. Using change tracking in Microsoft Word
A good versioning strategy can then be to use versioning in SharePoint with change tracking in Word. For each major release the tracked changes are resolved and we start with a clean document for the new release. If changes to the documents are too difficult to track over releases, then we can of course create copies of the documents but be aware of the manual work if we want to move changes from one document to another.
Another way to manage requirements in TFS is to use work items. It is very easy to get started with work items for requirement management (as described in Chapters 7 and 8), but it is not as easy to manage versions of work items. Sure we can view the history and figure out the changes between two updates, but that is not going to help much if we need to maintain multiple versions of requirements. Also, it is not possible to lock a work item, which is often desired for requirements.
One way to solve this problem is to copy work items when a breaking change is made. We can use the Create Copy of Work Item tool to quickly create a new work item from an existing as shown in Figure 28-12.

Figure 28-12. Copying a work item
When we copy a work item we can choose the target team project and work item type. This can of course lead to problems if the templates are incompatible but in this scenario it’s not a problem. The result of a copy is shown in Figure 28-13.

Figure 28-13. Result of copying a work item
Notice that not all data is copied, for instance only the Related and Tested By links are re-created and not links to for instance tasks. The idea here is that the re-created links are the static ones and the rest would be things we build up new in the cloned work item.
![]() Note It is also important to notice that the linked work items are not copied; we only get the links copied. So if we really wanted a copy of the related information, we need to copy each linked item and create a new link to the clone. If you need to do this more than occasionally, we recommend looking at the TFS API and automate the cloning.
Note It is also important to notice that the linked work items are not copied; we only get the links copied. So if we really wanted a copy of the related information, we need to copy each linked item and create a new link to the clone. If you need to do this more than occasionally, we recommend looking at the TFS API and automate the cloning.
The next area to cover is how we manage multiple versions of code. This is technically a simpler problem because TFS has support for creating multiple branches of our code base, which we can use to support the different version. We covered the fundamentals of branch and merge in Chapter 15, so if you want to know more about the practical use of the tools, jump back to that chapter.
Implementing a Branching Strategy
In the following section we will look at two ideas for managing concurrent work; a traditional branch pattern and a single branch approach.
Figure 28-14 shows a typical pattern for branching and merging. The figure contains the following different branch types:

Figure 28-14. A typical branch and merge pattern
- Main: The parent version of the code base representing a stable version used to produce the next release version.
- Development: This is a child branch from Main used for development work.
- Release: This is also a child branch from Main, this time for stabilizing and supporting a released product version. In the release branch we can make hot-fixes without risking mixing in new or changed features. We typically create one release branch for each release.
- Patch: A child branch from a Release branch. A Patch branch is used to create minor versions or service packs if we want to support multiple minor versions of our product.
When changes are made we can use the version control tools to merge changes from one branch to another. The principle we recommend is to only allow merging from more stable code to less stable code, which means we never merge from Main to a Release branch, if we want to port a feature from development into a released version we will implement the changes in each branch by hand. The main reason is to minimize the risk of accidentally merging incomplete work. Of course if we implement the new feature in the Release branch, we can merge to Main and then to Development using the merge tools as usual.
There is a problem with branching that becomes more of a problem when we want to implement a continuous delivery process. Merging code will never be possible to automate 100% because once in a while conflicts will occur. When this happens the process stops until the issue is resolved, this prevents a good flow in the delivery process. One way to address this is to avoid branching and do all development in one single branch. But how can we solve the problems that branching is there for us to fix? Well, instead of isolating work in branches we isolate it using feature toggles, or conditions, in the code base. We can then use the switch to enable a feature when it is ready but it may have been released to customers a long time ago. This approach has other interesting features: for instance we can develop a new functionality and release to customer. Then we can use the feature toggle to enable the new functionality to a pilot test group without having to setup dedicated environments for this.
Martin Fowler has written an article about feature toggles available here: http://martinfowler.com/bliki/FeatureToggle.html.
If you should use the typical branch model or go for the single branch approach depends to a great extent on the situation you have in your project. In general, the typical branch model is a safe bet. We pay a price for the branch maintenance, but it gives us a controlled way to handle changes in multiple versions of the code base.
TFS Branching and Merging Guide
The TFS Branching and Merging Guide is another Visual Studio ALM Ranger project. This project contains deep, practical guidance around code management using TFS with scenarios ranging from basic needs to multiversion maintenance configurations.
You can download the latest version of the guide from http://vsarbranchingguide.codeplex.com.
Next up is versioning of Test Cases. We focus on two scenarios: copy test cases from an existing plan to re-use a structure from one test plan in another. The other scenario is to clone test cases to create new versions of the test cases.
Copy Test Cases from an Existing Test Plan
To re-use assets in MTM we can use the copy test suites from another test plan function to import test plan structures we have created earlier. This is very convenient, especially when working with a concept where we evolve test suites over iterations as the product is implemented. Figure 28-15 shows how we can initiate a copy of test cases from an existing test plan

Figure 28-15. Import test cases from an existing test plan
Next we select the test plan and suite to copy (see Figure 28-16).
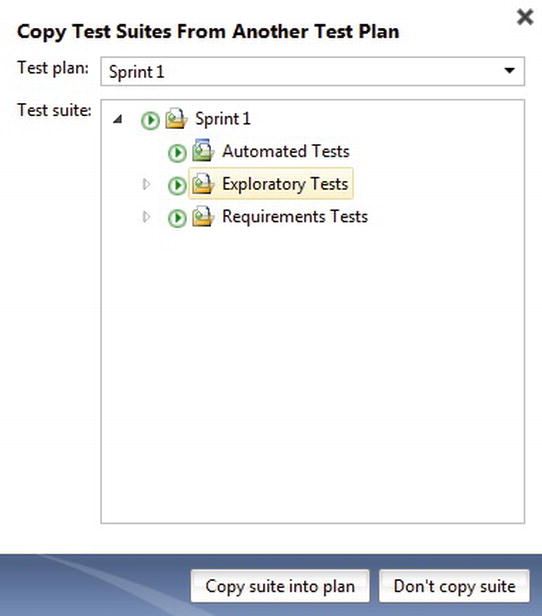
Figure 28-16. Import test cases from an existing test plan—selecing suite to copy
Finally, the test suite is copied into the current test plan (see Figure 28-17).
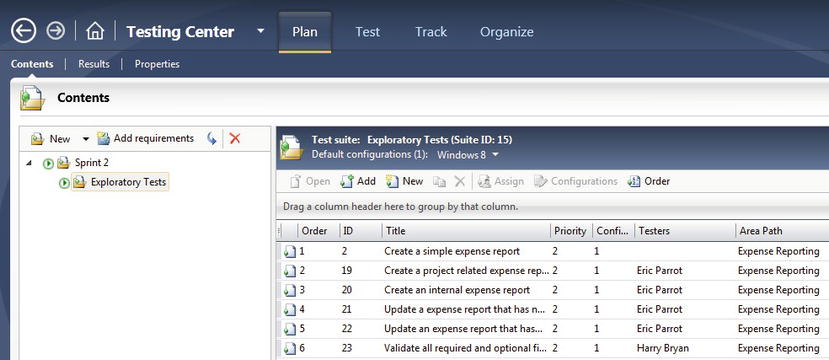
Figure 28-17. Import test cases from an existing test plan—complete
Be aware that it is the references to the test cases that get copied, not the test cases themselves. So changing a test case in one test plan will affect all other test plans!
If we want to version the test cases, we need to clone them, which is what we will look at next.
Earlier in this chapter we looked at versioning work items and how the copy work item command can be used to create a cloned work item. Unfortunately, linked items are not copied so versioning of work item structures needs to be solved by hand or using another tool.
For test cases this has been big enough a problem to have its own tool to solve the problem. We can use the tcm.exe command-line tool to clone a test suite instead of just copying.
To clone the test cases we need to have a source test suite to locate the test cases to clone. Then we need a target test suite in another test plan to insert the cloned items into. All test cases in the source suite get copied. We can also optionally set one field during the cloning, something we may use to distinguish the cloned item from the source if necessary.
Figure 28-18 shows an example of how to locate a test suite Id needed for the copy.
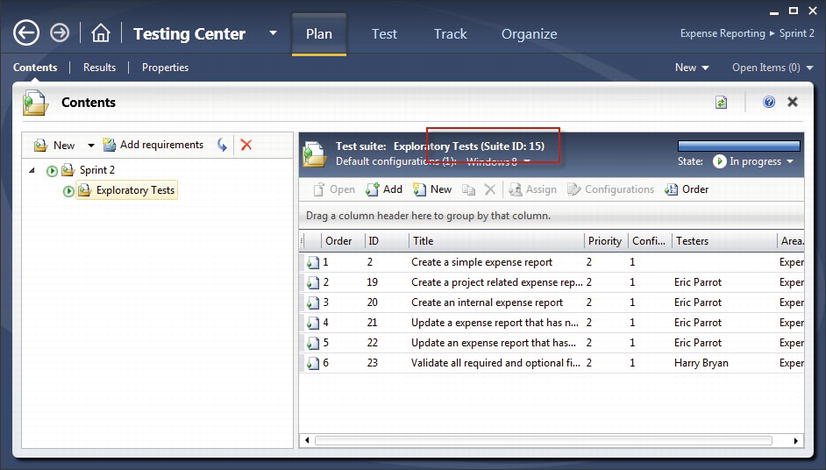
Figure 28-18. Finding the test suite id in MTM
With the details at hand we can now run the clone command:
tcm suites /clone /suiteid:15 /destinationsuiteid:18 /collection:http://tfs:8080/tfs/defaultcollection/teamproject:”Expense Reporting”
The clone operation can take some time on a large set of test cases; if we want to check the progress we can run the following command:
    tcm suites /clone /status:1 /collection:http://tfs:8080/tfs/defaultcollection /teamproject:”Expense Reporting”

    Clone operation 1 has succeeded. Summary information:
    Started on: 2012-07-13 00:41:19
    Started by: Administrator
    Test cases cloned: 6
    Shared steps cloned: 0
    Completed on: 2012-07-13 00:41:22
The result is shown in Figure 28-19. Note the new work item Ids as an indication of a successful cloning.

Figure 28-19. Result of cloning Test Cases
Versioning Builds
A small but important piece to keep in mind when implementing a versioning scenario is the builds. As we create new branches of our code we also need ways to easily build out a version of that branch.
The build name should match the branch name to make it easy to relate a built version to the branch it came from.
We recommend creating a build definition for each active branch. If a branch is not frequently changed it may be sufficient to keep the release build but the important thing is of course to have routines to that when needed it is easy to build a new version.
In Chapter 26 we looked at maintaining build definitions and how we can use the TFS Power Tools to clone a build definition. Whether we use a tool or not to clone a build definition we should to make the following adjustments for the new build:
- Change the name and description to match the branch.
- Change the workspace mapping to the new branch.
- Change the drop folder to reflect the new branch.
- Change the process settings to refer to items (projects typically) in the new branch.
Summary
Release management is an important part of any software organization, yet often this is something that is done with little attention. We typically spend much more time on requirement gathering, backlog grooming, and application design then on activities such as optimizing the release process, looking at how we work in concurrent versions, or how we promote changes between branches. Unfortunately we cannot avoid these tasks so it is a high risk that we get an error-prone or time consuming process around the release management activities.
In this chapter we have looked at important practices for effective release management and seen that many of the ALM activities we have looked at throughout this book are tied together in the release management process. For example, automating the release notes creation can not only reduce the time it takes to prepare a release but also enforce a unified way of working with requirements, work items, code, and builds. We also looked at versioning and how this is something that needs to be applied to the whole development process, not in practices in the respective practices. With a consistent way to manage versions, we can improve quality and speed up the delivery process.