
![]()
Integrating Feeds and Social Media
Almost every company today leverages social media sites such as Facebook and Twitter to reach their relevant audience and keep a relationship with them. When building a web site, access to and integration with these networks is very important. This chapter looks at different methods to integrate your social feeds as well as sharing from within your SharePoint site. The presence of these networks on your site, however added, is crucial to increase the interaction between your visitors and your brand. If someone chooses to follow you on Twitter or to like your Facebook page, they are choosing to stay within your reach by getting regular updates through these networks. In this chapter, we take a look at the different popular social networks and how they are different from one another. We then look at some of the different ways to have a site interact with these networks, from feeds to sharing as well as other techniques. Finally, we go through the steps to integrate these types of social networks in a SharePoint site.
Our Scenario
Because the Specter Group is launching a brand new responsive site with SharePoint 2013, they want to make sure that the social networks used by the company are accessible from the site. One of the objectives is to make sure a visitor can come to this web site as a central hub using all social portals Specter Group is using. Access to their Facebook page, YouTube videos, Twitter account, and Google+ page, along with any other or future networks is important. The Specter Group is very active on Twitter and requested that a feed of their Twitter account be shown on all pages of the site as well. Finally, as part of our business requirement and overall goal to increase the brand’s visibility online, sharing or recommending pages should be easily accessible to the user.
![]() Note In the scenario in which Specter Group adds social integration to the web site, it is assumed that each relevant network that has already been set up is being kept alive with content.
Note In the scenario in which Specter Group adds social integration to the web site, it is assumed that each relevant network that has already been set up is being kept alive with content.
As our work is to extend the web site to interact with a few of these social networks, it’s important to understand how they each work at a high level.
- Facebook: Organizations create Facebook pages and use them to share news, announcements, pictures, videos, promotions, and any other marketing material. The objective of the web site should always be to facilitate the process of liking the organization’s Facebook page.
- Twitter: Similarly, an organization will have a Twitter page with followers. Through our web site design, we want users to easily share pages on their own Twitter account, thus increasing our reach. Twitter can also be used to facilitate communication with our end users, so it’s important to understand and plan what you need to accomplish with Twitter before starting the design.
- LinkedIn: LinkedIn is geared toward a professional network, where members enter their work-related profiles and companies create their pages. As with other services, users can share their feed and follow company pages, but it also allows for profile card summaries, a company’s information and profile, and the ability to apply for a job. Of course there are other plug-ins such as “Jobs you may be interested in” and “Recommend with LinkedIn” available, but we use the more popular plug-ins for the Specter Group SharePoint site.
- Google+: Another social network available is Google’s very own Google+. Again the same principle is applied: The organization will create a business page, share its news, and allow Google+ users to follow the organization’s page. The distinctive Google+ feature is its +1 button, which allows users to recommend a page to their friends and followers.
Social
We could write an entire book on social networks and how to use them properly. Increasing search engine optimization (SEO) through the use of these tools on your site, building engagement models, targeting the right audience, and so much more fit under this broad title. Social networks have become very important when building a web site design and need more than a chapter to be explained. For the purposes of this book, we focus on basic integration of these networks on a site.
It goes without saying that there are many social media networks that can be relevant to an organization while being less relevant to others. When building the design of a site, even before thinking about the kind of integration that is required, you should know what social networks the organization is engaged in and define clear goals of what the web site should be using. Some organizations might be seeking an increase in Twitter followers, whereas others might seek to increase YouTube subscriptions and the sharing of videos. Once these goals are known, you can start identifying the types of integration you seek to add on your site.
![]() Note Social media in the heart of the enterprise has become a very broad and popular subject in the last years. We strongly recommend you learn about this and the different related topics from subject matter experts in the field before adding them in the site’s design.
Note Social media in the heart of the enterprise has become a very broad and popular subject in the last years. We strongly recommend you learn about this and the different related topics from subject matter experts in the field before adding them in the site’s design.
Levels of Social Media Integration
It’s important to understand that there are different levels of social media integration. As part of the planning of our web site design, we must choose how we want to leverage these networks. No two organizations are the same: The target market is very different for each of them and so is the way each organization chooses to communicate or interact with its market. We use the Specter Group site design to provide an example of one of the many possible mobile strategies you can use. We must first look at different possible integrations and see which might work for this site.
A basic but necessary way to integrate your organization’s social media on your web site is by adding hyperlinks to the organization’s pages on the respective social networks. A common practice is to add clickable icons that direct to your social pages (see Figure 13-1).
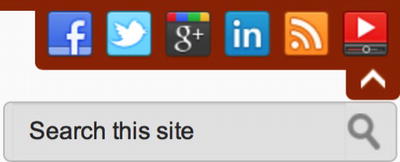
Figure 13-1. Social networks listed on a site as hyperlinks
![]() Note We look at how to add this social toolbar on the Specter Group site later in this chapter.
Note We look at how to add this social toolbar on the Specter Group site later in this chapter.
Subscribing: Following or Liking Social Pages
Another way of adding social networks on your site is through the notion of liking, subscribing, or following a social page (see Figure 13-2). Each social network has its own way of doing this. Note that there are differences in each network, such as liking a page on Facebook is not the same as following a page on Facebook.
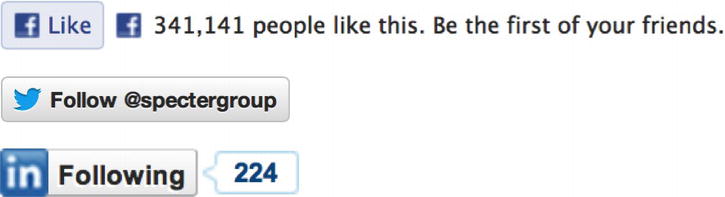
Figure 13-2. The Like and Follow buttons of Facebook, Twitter, and LinkedIn
Facebook is the social network most organizations get confused with. The popular comment is, “We need a Like button on our web site,” when what is really desired is a Follow button. The issue comes with the terminology used in day-to-day activities in using Facebook. When managing a Facebook page, we are seeking more Likes, which translates into users automatically seeing our updates on their feed. However, when we are on a web site, the Like button no longer means the same thing. When clicked, it tells Facebook that the user wants to tell his or her network that he or she likes this specific online web page. It has nothing to do with the brand it represents. If the requirement is to increase the company’s Facebook page’s number of followers, we need a Follow button.
All the different social plug-ins are available on the developer pages of each social network, the most popular of which are shown in Table 13-1.
Table 13-1. URLs for Social Network Plug-Ins
| Network | Developer Page |
|---|---|
| https://developers.facebook.com | |
| https://dev.twitter.com | |
| http://developer.linkedin.com | |
| Google+ | https://developers.google.com/+/ |
A common practice is to embed a Twitter feed of the organization’s account or to follow specific mentions and hashtags. In the example of social media integration shown in Figure 13-3, we added the Twitter feed in the footer of our site.

Figure 13-3. Footer with Twitter News displayed
![]() Note We look at how to add this social toolbar on the Specter Group site later on in this chapter.
Note We look at how to add this social toolbar on the Specter Group site later on in this chapter.
Sharing: Allowing Visitors to Share an Activity to Their Social Network
Also very popular, in this scenario the visitor can share what he or she is looking at, purchased or done to his or her social networks. This can be added in various contexts, from sharing the web site the visitor is on to announcements or blog posts inside the web site (see Figure 13-4). This aspect of integration has to be as quick and painless as possible to visitors, as otherwise they might just give up on their will to share.
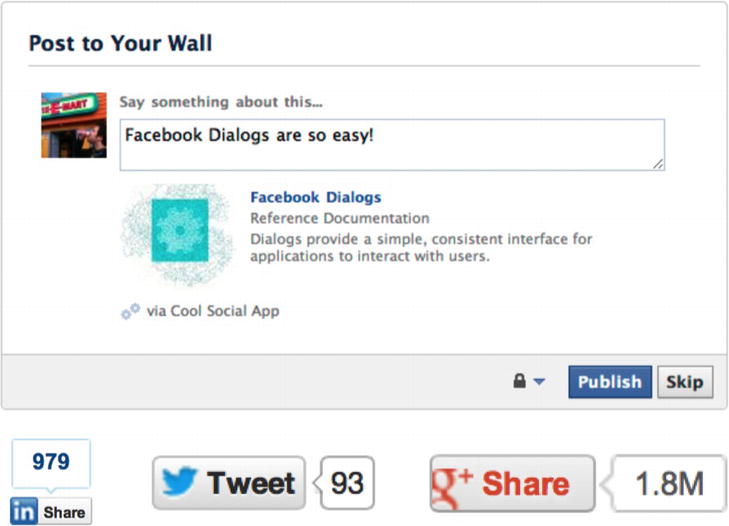
Figure 13-4. Social networks’ various share buttons
Every social network comes with its own special interactions. More often than not, you will find many different social plug-ins available through each social network’s developer page. For example, one might want to use the LinkedIn Recommend button for each of the team members on the web site.
Building the Basic Links to the Social Network Pages
Adding links to our social networks sounds like a trivial task. And as far as the integration part, in most cases it is fairly straightforward. What is often skipped is the actual planning that goes on before starting to write any code. Do you plan to add all your social networks? What is their expected behavior? Will they open in a separate window or tab? What is meant by the expected behavior is very important: We need to define how these links will be presented on our pages and how much real estate they will be given. This will be different for every organization.
One of the requirements for Specter Group was for the web site to be the central hub for visitors. From there, anyone should be able to visit Specter Group’s Facebook or Twitter page. However, the need for the links to the social networks was not so predominant that we would give them too much real estate on the page. We decided to go with a toggle menu that would show these networks if the visitor requested it.
Deciding where to put the links to the social networks can be challenging, especially in a responsive design. Obviously, the business requirements for the brand and the site have a large role to play in this. Are we trying to direct our audience to our Facebook and Twitter accounts where we have a strong established presence, or are we just providing links to them for those that are actively searching for them?
Having larger, more prominent links to the active social networks the company is using tends to lead the user away from our web site. This is done mostly when the type of service our site offers does not incite the user to visit often. Our company needs to keep a constant relationship with its audience and if there is no reason to come back to the site then the risk of losing that audience increases.
For these reasons, we decided that Specter Group did not need large accessible social network links because the audience will be coming back to visit the site often. For example, a clothing company will want users to visit and follow their Facebook page. The clothing company can then regularly update their site visitors and customers with new styles as seasons change.
Although we chose to limit the number of social networks shown on the social bar, we could not remove two very popular links, the RSS feed and a link to the YouTube channel. Although they are not necessarily considered social networks, they are often grouped with them and visitors have come to expect this presentation. The RSS feed allows visitors to subscribe to anything you have enabled an RSS feed for on your site. Most often this will be a blog or news section. YouTube, of course, is used to share videos.
Adding the Social Bar on a Site
We chose the social networks required for Specter Group and put them in a div that will only show up when requested. The best way to do this is to start without hiding them so that you can see the end result. In code shown in Listing 13-1 we add the HTML structure for our social bar, followed by the CSS in Listing 13-2 to style it. This social bar is added to the HTML master page we created in Chapter 4 and Chapter 5 so that it is available on all pages of the site.
Listing 3-1. Adding the HTML for the Social Bar
<div class="social cf down">
   <ul class="cf">
       <li>
           <a href="http://www.facebook.com/spectergroup">
               <img src="img/social/Facebook.png" alt="Facebook">
           </a>
       </li>
       <li>
           <a href="http://www.twitter.com/spectergroup">
               <img src="img/social/Twitter.png" alt="Twitter">
           </a>
       </li>
       <li>
           <a href="https://plus.google.com/u/0/b/12345678901234567890/">
               <img src="img/social/Google+.png" alt="Google+">
           </a>
       </li>
       <li>
           <a href="http://ca.linkedin.com/in/spectergroup">
               <img src="img/social/LinkedIn.png" alt="Linked In">
           </a>
       </li>
       <li>
           <a href="http://www.spectergroup.com/feed">
               <img src="img/social/RSS.png" alt="Blog">
           </a>
       </li>
       <li>
           <a href="http://www.youtube.com/user/spectergroup">
               <img src="img/social/YouTube.png" alt="YouTube">
           </a>
       </li>
   </ul>
   <a class="social-toggle" title="Follow Us">
      Toggle
   </a>
</div>
Listing 3-2. Adding the CSS for the Social Bar
/*social*/
header .social {
   position: absolute;
   top: -39px;
   right: 10px;
   height: 32px;
   padding: 0px 7px 7px;
   background: #993300 none;
   border-radius: 0px 0px 0px 5px;
   -moz-border-radius: 0px 0px 0px 5px;
   -webkit-border-radius: 0px 0px 0px 5px;
}
header .social ul {
   display: block;
}
header .social ul li {
   float: left;
   display: block;
   padding-left: 7px;
}
header .social ul li:first-child {
   padding-left: 0px;
}
header .social ul li a {
   display: block;
   width: 32px;
   height: 32px;
}
header .social a.social-toggle {
   position: absolute;
   bottom: -20px;
   right: 0px;
   display: block;
   padding: 0px 10px 8px 10px;
   height: 14px;
   width: 16px;
   background: #993300 url('../img/icon-arrows-vert.png') no-repeat 10px 0px;
   text-indent: -9999px;
   border-radius: 0px 0px 5px 5px;
   -moz-border-radius: 0px 0px 5px 5px;
   -webkit-border-radius: 0px 0px 5px 5px;
   -webkit-transition: all 0s ease;
   -moz-transition: all 0s ease;
   -o-transition: all 0s ease;
   transition: all 0s ease;
}
header .social a.social-toggle:hover {
   cursor: pointer;
}
header .social.down {
   top: 0px;
}
header .social.down a.social-toggle {
   background-position: 10px -25px;
}
.csstransforms.csstransitions header .social {
   -webkit-transition: top 500ms ease;
   -moz-transition: top 500ms ease;
   -o-transition: top 500ms ease;
   transition: top 500ms ease;
}
/*end social*/
Figure 13-5 shows the social bar that results from our code to this point.

Figure 13-5. The Social Networks bar expanded
As you can see, all of Specter Group’s networks were added in an unordered list inside a div. This div holds the list of icons as well as the toggle button we plan to use. To make the change as smooth as possible, add a class to your div called down that will simply change the top position of the div from off the screen to 0 from the top. With the help of the new CSS3 transition property and simple JavaScript with some jQuery to toggle the class down on or off, we have exactly what we need (see Listing 13-3).
Listing 3-3. Provide a Click Function to Display or Hide the Social Icon Bar
<script>
//social
jQuery(document).ready(function($) {
   $('header .social a.social-toggle').click(function() {
       if ($('header .social').hasClass('down')) $('header .social').removeClass('down'),
       else $('header .social').addClass('down'),
   });
});
</script>
The code in Listing 13-3 enables the social bar to be collapsed, as shown in Figure 13-6, or expanded as we saw previously in Figure 13-5.
Figure 13-6. The Social Networks bar collapsed
In this section, we built a simple social network bar that we added to the header of the Specter Group HTML master page. Now, in the next two sections let’s add a Facebook Follow button and embed a Twitter feed on our site.
Adding a Facebook Follow Button
The first thought that might come to mind is “Why not use a Like button instead?” and that is a very good question. The Facebook Like button only allows visitors to tell everyone on their feed that they “like” this specific page; it has nothing to do with subscribing to Specter Group’s Facebook page. If the goal is to increase the number of subscribers or followers, we need to choose the Facebook Follow social plug-in. Thankfully, you do not need to reinvent the wheel for this one: Facebook provides a lot of information, including a code builder. Simply take the code generated by Facebook and add it to your master page.
![]() Note All of the documentation and code generators are located on Facebook’s developer page at https://developers.facebook.com.
Note All of the documentation and code generators are located on Facebook’s developer page at https://developers.facebook.com.
Once on the Facebook developer page, click the Social Plugins link in the Docs section. From there, you can choose the Follow button from a list of social plug-ins for Facebook.
First, enter the URL of the Facebook page for which you need to create a Follow button. Next, choose the layout, if you need to show the profile pictures and some of the color and font schemes (see Figure 13-7).
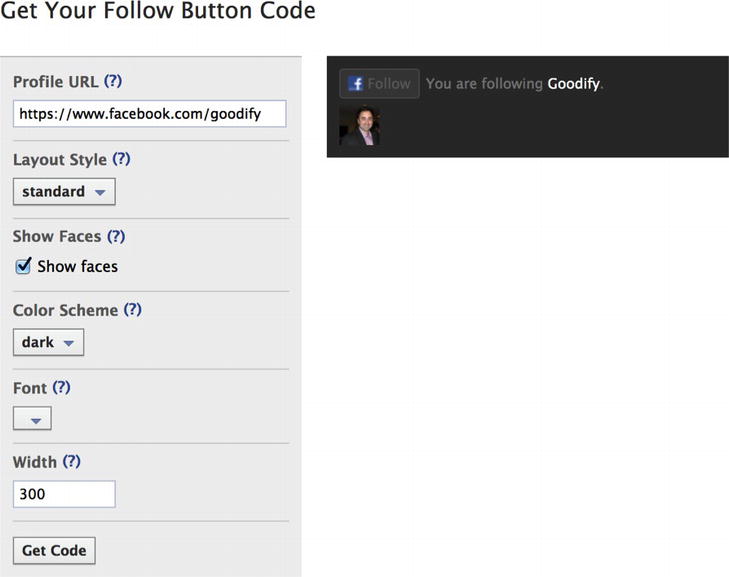
Figure 13-7. Facebook Follow button properties
Set the various properties for your Follow button:
- The Profile URL must have Follow enabled whether it’s a user or a page. Facebook pages have this enabled by default.
- Layout Style allows you to pick what the button looks like.
- Show Faces displays the profile picture of the logged-in visitor’s friends that follow this page.
- Color Scheme will make the widget with either a dark or light background.
- You may also set the font that should be used within the widget.
- We chose a width of 300 to make sure it always fits in our About Us column in the footer. Remember not to exceed a width of 320 pixels or otherwise this button might break on smaller viewports.
The code that Facebook generates uses a script that turns the social plug-ins into IFRAMES. Therefore we must be vigilant when implementing it to respect our responsive design.
Once you click Get Code, Facebook offers you the options to implement it in HTML5, XFBML, IFRAME, or URL (see Figure 13-8).
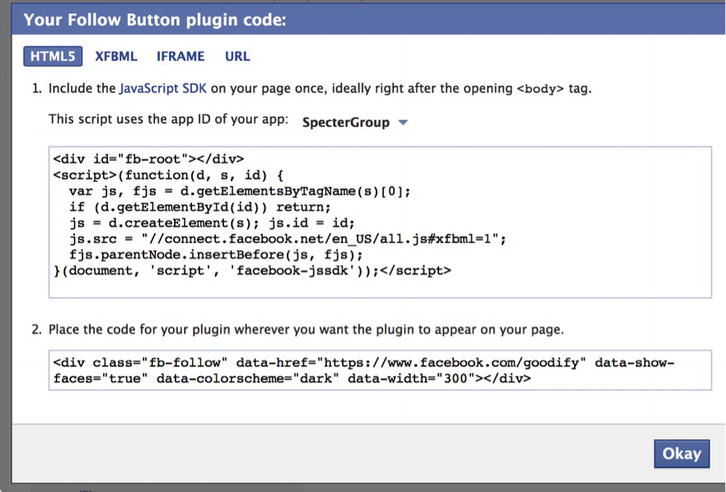
Figure 13-8. Facebook button plug-in code
![]() Note Facebook offers an extensive amount of documentation for each of these plug-in codes and languages at https://developers.facebook.com.
Note Facebook offers an extensive amount of documentation for each of these plug-in codes and languages at https://developers.facebook.com.
Make sure you have no JavaScript errors on your page before testing this as they might stop the Facebook Social plug-in from working. Also, Facebook suggests adding the div directly after the opening body tag. Although this is true on most public HTML sites, SharePoint is a little different. Ideally, place this code in your HTML master page after the opening div with an ID of s4-workspace. SharePoint adds a few tags of its own after the opening body tag that interfere with the expected values for the fb-root div.
To make sure this works with our tailored responsive column design in the footer, we add the Follow button HTML before the closing tag of the About Us fluid column (see Listing 13-4).
Listing 3-4. Follow Button div Added to Footer
<!—previous code of the footer not shown -->
<footer>
  ...
  <div class="span4">
    <h4>ABOUT US</h4>
    <p>Lorem ipsum dolor sit amet</p>
    <ul class="contact">
      <li class="phone">(800) 555-4321</li>
      <li class="email"><a href="mailto:[email protected]">[email protected]</a></li>
      <li class="fb"><a href="http://www.facebook.com">spectergroup</a></li>
    </ul>
    <div class="fb-follow" data-href="https://www.facebook.com/goodify" data-show-faces="true"
      data-colorscheme="dark" data-width="300">
  </div>
  ...
</footer>
Figure 13-9 shows the Follow button in the footer.

Figure 13-9. Facebook Follow button
Adding a Twitter Feed to the Site
Twitter has some of the easiest methods for developers to interact with when building a site. As mentioned earlier, Twitter also has a developer center, https://dev.twitter.com, where we can find all the information we need to start integrating feeds into our site. Feeds can show anything from an account’s tweets, to a hashtag, as well as lists. Hashtags are words in a tweet that begin with a pound sign (#), telling Twitter that this word is used to categorize the tweet. They help users find others talking about the same topic. A Twitter list allows the user to choose specific accounts to receive tweets from in a group. Many consider it to be grouping multiple accounts to make a single custom feed.
Building the Basic Feed
When deciding to add a Twitter feed to a site, you must look at what kind of interaction or customization you are looking for. The Twitter developer site offers a “widget” generator that will be an embedded timeline based on your settings (see Figure 13-10). You can find the generator at https://twitter.com/settings/widgets.
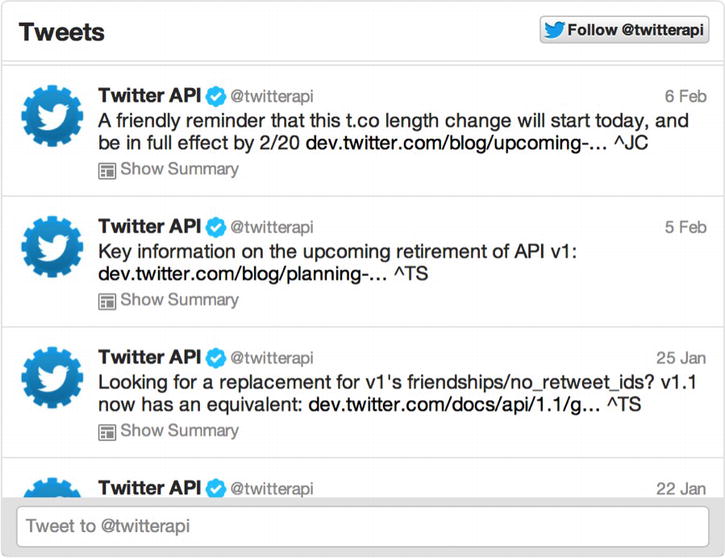
Figure 13-10. Tweet feed widget
![]() Note To use an embedded Twitter feed, we must generate the code by specifying the domain on which it will be used. This is a Twitter security measure. It does support “localhost,” which is not helpful for SharePoint.
Note To use an embedded Twitter feed, we must generate the code by specifying the domain on which it will be used. This is a Twitter security measure. It does support “localhost,” which is not helpful for SharePoint.
There are a few reasons we might use the embedded Twitter feed. It’s quick and easy to create with a widget generator. A major disadvantage is that like the Facebook Follow button we saw earlier, it adds itself through an IFRAME on our page. Not only does that make it almost impossible to brand, but it isn’t friendly to our responsive design. Lucky for us there are other ways to add a Twitter feed on our site.
Use jQuery to Display a Twitter Feed
For the Specter Group site, it was important for us to incorporate our look and feel for the company Twitter feed. The default embedded timeline Twitter offers makes us work with an IFRAME, which is not exactly desired in this situation. Of course, we could create our own feeds with the documentation available on http://dev.twitter.com. We can run a search on Twitter and load the results as just plain HTML on our page. See Listing 13-5 for the script used to fetch the Twitter feed information.
Listing 13-5. Add Twitter Feed Using jQuery
<!--we must link to the jQuery library if we have not already-->
<script type="text/javascript" src="//ajax.googleapis.com/ajax/libs/jquery/1.9.1/jquery.min.js"></script>

<div id="twitter_feed">
</div>
<script type="text/javascript">
   jQuery(document).ready(function($) {
      var script=document.createElement('script'),
      script.type='text/javascript';
      script.src=
         'http://search.twitter.com/search.json?&q=%23SharePoint&callback=processTheseTweets&_='
         + new Date().getTime();
      // Loading it in Body
      $("body").append(script);
   });
   function processTheseTweets(jsonData) {
      var shtml = '';
      var results = jsonData.results;
      if(results) {
         $.each(results, function(index,value){shtml += "<p class='title'><span class='author'>"
             + value.from_user
            + "</span>: " + value.text + "<span class='date'>" + value.created_at +
                "</span></p>";});
         // Load the HTML in the #twitter_feed div
         $("#twitter_feed").html( shtml );
      }
   }
</script>
Another solution would be to use one of the many already available jQuery libraries for Twitter feeds. For Specter Group, we used the open source project from Github called seaofclouds. It is available in the form of a jQuery library and all it requires is a few settings to let it know what you want to display. The advantage of using a plug-in such as this for your web site is the immense capability to customize the way the information is presented.
- Add the reference to the jQuery library in your master page or on the page to which you wish to add the Twitter feed. The code is shown in Listing 13-6.
Listing 13-6. Reference the jQuery Library
<script language="javascript" src="/tweet/jquery.tweet.js" type="text/javascript"></script> - Add the necessary settings in a script file or in a script tag in the head of your master page (see Listing 13-7).
Listing 13-7. Add Twitter Feed Using jQuery Plug-In seeofclouds
// Tweet feed
$("#tweets").tweet({
  count: 3,
  username: "spectergroup"
}); - Then simply create a div, in this case with an ID of tweets and a class of tweet (see Listing 13-8).
Listing 13-8. HTML for seaofclouds
<div id="tweets" class="footer-col tweet">
      <h4>TWITTER NEWS</h4>
</div> - Finally edit the CSS to get the look and feel for your Twitter feed, as shown in Listing 13-9.
Listing 13-9. Custom Styles to Control the Look of the Twitter Feed
/* Tweet widget CSS */
.tweet, .query { }
.tweet .tweet_list, .query .tweet_list {
   -webkit-border-radius: .5em;
   list-style-type: none;
   margin: 0;
   padding: 0;
   overflow-y: hidden;
}
.tweet .tweet_list .awesome,.tweet .tweet_list .epic,.query .tweet_list .awesome,.query
    .tweet_list .epic {
   text-transform: uppercase;
}
.tweet .tweet_list li, .query .tweet_list li {
   overflow-y: auto;
   overflow-x: hidden;
   padding: 1em ;
   background-image: url(../img/icon-bird.png);
   background-repeat: no-repeat;
   background-position: 6px 19px;
   padding-left: 40px;
}
.tweet a,.query  a {
}
.tweet .tweet_list .tweet_odd,.query .tweet_list .tweet_odd {
   background-color: rgba(0,0,0,0.2);
}
.tweet .tweet_list .tweet_avatar,.query .tweet_list .tweet_avatar {
   padding-right: .5em;
   float: left;
}
.tweet .tweet_list .tweet_avatar img, .query .tweet_list .tweet_avatar img {
   vertical-align: middle;
}
/*end tweets*/
Figure 13-11 shows the resulting feed.
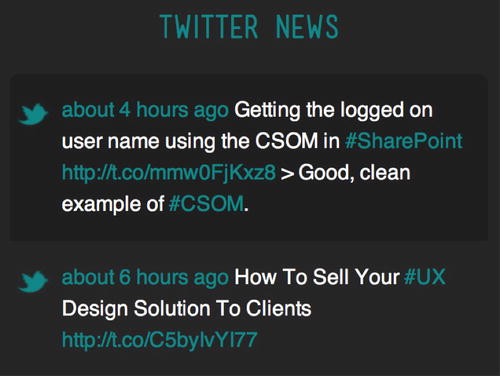
Figure 13-11. Styled Twitter feed using jQuery plug-in seaofclouds
![]() Note Find this library and all associated files at http://sprwd.com/87jm3mc.
Note Find this library and all associated files at http://sprwd.com/87jm3mc.
Choosing Between Sharing Tools and Building Your Own
Social sharing has become very popular if not mandatory today. Over time, certain third parties decided to create tools to help site designers quickly and easily integrate all the social sharing widgets they needed instead of managing them all manually. In this section, we look at the differences between these tools and building our own customized widgets.
Sharing Tools
Planning to add sharing to social network options on a site rarely involves just one social network. We always want to make sure that whichever social network the visitor is using, we make it possible for them to share it easily. The problem is it can be quite time consuming to get each social network’s code and add it to your site. To help developers integrate sharing to multiple social media sites at the same time, quickly and easily, a few solutions have surfaced on the market. Among them are two very popular ones today: ShareThis and AddThis.
![]() Note There are other sites that offer this service but these are the popular ones. See http://sharethis.com/ and http://www.addthis.com/.
Note There are other sites that offer this service but these are the popular ones. See http://sharethis.com/ and http://www.addthis.com/.
Using tools like ShareThis and AddThis can literally get social links up and running on your site, like the one in Figure 13-12, in under ten minutes.
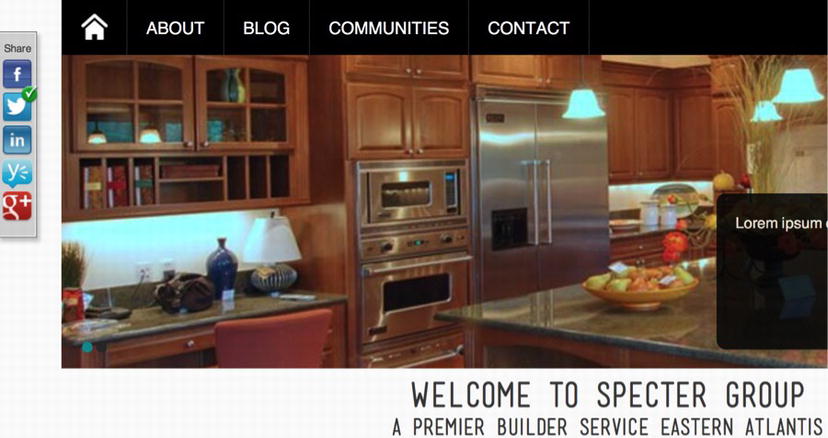
Figure 13-12. ShareThis used to add social feeds
Most sharing tools allow some customizations as well. For the sharing tools to appear above, we simply copied and pasted the references to their JavaScript library in the head tag of our master page and added the JavaScript code the sharing tool provided at the desired location. However, we tend to lose control over the experience the visitor has with sharing to social networks. Something to point out is that social networking sites often redirect the user to the login page instead of showing a pop-up. This can result in a very bad experience for s site visitor. That’s why we sometimes look at a more customized experience and create our own sharing buttons.
For example, after going through the first steps of building a custom ShareThis button, we received the script tags shown in Listing 13-10 and placed them in the head section of our master page.
Listing 13-10. ShareThis Script Tags
<script type="text/javascript">var switchTo5x=true;</script>
<script type="text/javascript" src="http://w.sharethis.com/button/buttons.js"></script>
<script type="text/javascript" src="http://s.sharethis.com/loader.js"></script>
And we put the code shown in Listing 13-11 right below the footer tags. Although you can add it anywhere, it is common to add it toward the closing </body> tag of your code.
Listing 13-11. ShareThis Script Tags
<script type="text/javascript">stLight.options({publisher: "8a70d7ad-79f0-4d6f-910c-
    619d9c964da2", doNotHash: false, doNotCopy: false, hashAddressBar: false});</script>

<script>
var options={ "publisher": "8a70d7ad-79f0-4d6f-910c-619d9c964da2", "position": "left", "ad": {
    "visible": false, "openDelay": 5, "closeDelay": 0}, "chicklets": { "items": ["facebook",
    "twitter", "linkedin", "yammer", "googleplus"]}};
var st_hover_widget = new sharethis.widgets.hoverbuttons(options);
</script>
Depending on the requirements of social networks and the importance of the design, this could be a very quick and viable option. Note that they do allow some customization through the use of their API, but that is outside the scope of this book.
Building your own sharing buttons can greatly enhance the user’s experience on your web site. From the image icon used to click to the pop-up window to write a custom message on their feed, everything can be reworked. If the design of the web site uses the new Microsoft Modern UI with tiles but the sharing buttons are traditional, your site design suddenly does not feel finished. The disadvantage to building your own sharing buttons is the time you invest in building and testing it to get the solution working exactly as defined in the design mockups. The end result is usually much more satisfying to the web site’s visitor.
As updates are added to the sharing tools like AddThis, much more visual customizations are added for the designer to play with. However easy and quick it is to get up and running certain facts remain. You depend on these external services, so if they are down so are your site’s sharing widgets, all at once. There is also a matter of performance as these tools are scripts loading more scripts. For the sake of the Specter Group site, we will look at adding a custom Share to Twitter button.
Adding a Custom Share to Twitter Button
To create a custom Share button, we’ll have to first investigate how this can be done. As mentioned earlier, there are various ways to build these solutions. We’re going to look straight at the source on the developer resource site that Twitter offers.
Building Your Own Twitter Button
Twitter offers different ways to communicate or share a message. We can easily add a Share button on a page, but the real value is in preparing the message for the user to post with the desired hashtags or mentions. A Twitter message’s reach is greatly increased when using these in a tweet. For Specter Group’s site, we want to allow visitors to contact the support team through Twitter in a quick and easy way.
First we look at the available Share buttons on the developer page of Twitter (see Figure 13-13).
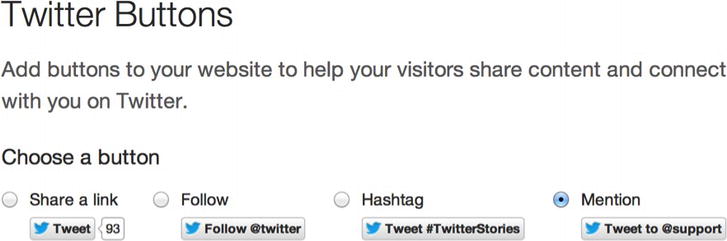
Figure 13-13. Available Twitter buttons
If you are planning to use the available Twitter share buttons, integration will be a breeze. Simply set your configurations, as shown in Figure 13-14, and copy and paste the code where needed.
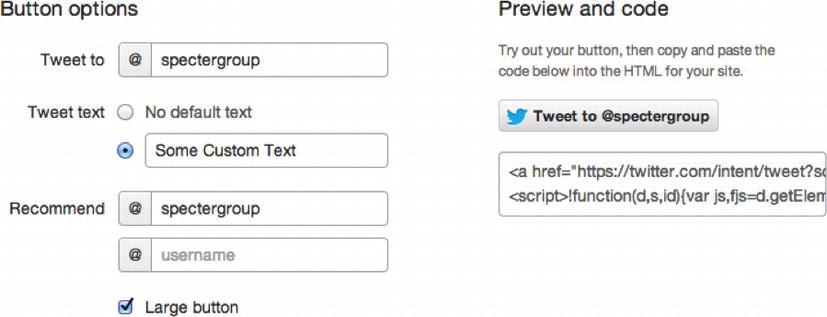
Figure 13-14. Twitter Share button options
In this example, we added the generated code before the closing tag of the About Us section in the footer. The result is shown in Figure 13-15.
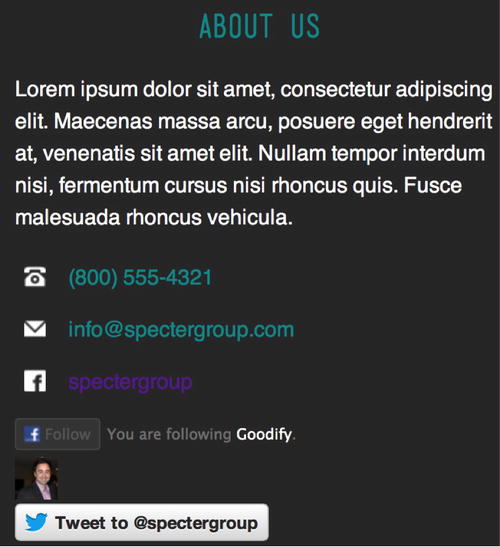
Figure 13-15. Twitter Share button added to footer
![]() Tip Generate a Twitter button at http://sprwd.com/57jvv3c.
Tip Generate a Twitter button at http://sprwd.com/57jvv3c.
When this button is clicked, the user is prompted to log in to Twitter and a message is already generated contacting the Specter Group support team (see Figure 13-16).
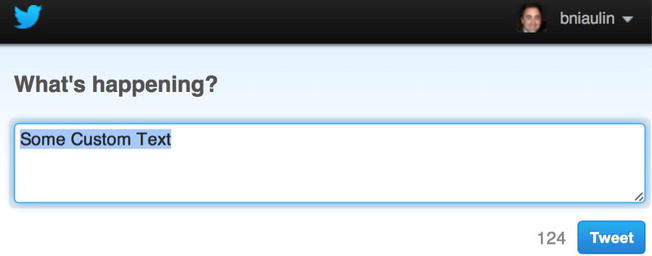
Figure 13-16. Twitter dialog to send a tweet to launching site's Twitter feed
![]() Note All of the information on customizing the button for Twitter can be found at http://sprwd.com/f9in5n7.
Note All of the information on customizing the button for Twitter can be found at http://sprwd.com/f9in5n7.
Creating Your Own Twitter Button
What’s fun with Twitter is that you have easy control over the button’s look and feel. You do not need to be a social media integration expert to get things running. Almost everything can be done with a hyperlink and some CSS. Let’s change the default Share button we added earlier to a custom one.
The CSS
Listing 13-12 shows the CSS we opted to use to style our custom Share button.
Listing 13-12. Style a Twitter Button
<style type="text/css" media="screen">
   #custom-tweet-button a {
      display: block;
      padding: 2px 5px 2px 40px;
      background: url('/_catalogs/masterpage/spectergroupbootstrap
          /img/icon-bird.png') 1px center no-repeat;
   }
</style>
A very simple div with a hyperlink will do the trick with Twitter (see Listing 13-13).
Listing 13-13. HTML for a Custom Twitter Button
<div id="custom-tweet-button">
   <a href="https://twitter.com/share?text=I%20made%20a%20custom%20Tweet%20Button!"
       target="_blank">Rock it!</a>
</div>
Figure 13-17 shows the result for the few lines of HTML and CSS we wrote.

Figure 13-17. Custom Twitter button added to footer
The Pop-Up Issue
There is one issue with the customized Twitter Share button for the user’s experience. Right now, it’s just a hyperlink with some CSS. This means that when users click on it, it will simply open a page and navigate to the login and share screen in full screen mode. We’ll need to go the extra mile and add some JavaScript to turn it into a friendly pop-up menu.
There are many different ways to do this, and as an example we used jQuery to provide a pop-up on click in Listing 13-14.
Listing 13-14. Create a New Window for the Custom Twitter Button When Clicked
<script>
jQuery(document).ready(function($) {
   $('.popup').click(function(event) {
      var width  = 575,
         height = 400,
         left   = ($(window).width()  - width)  / 2,
         top    = ($(window).height() - height) / 2,
         url    = this.href,
         opts   = 'status=1' +
                  ',width='  + width  +
                  ',height=' + height +
                  ',top='    + top    +
                  ',left='   + left;

      window.open(url, 'twitter', opts);

      return false;
   });
});
</script>
The script is saying to change the sizing of a window opened by a link that has the .popup CSS class. For the script to work, we need to go back and edit the HTML for the Share button we made earlier (see Listing 13-15).
Listing 13-15. Modified Listing 13-12 with Additional Class
<div id="custom-tweet-button">
  <a class="popup" href="https://twitter.com/share?text=
      I%20made%20a%20custom%20Tweet%20Button!&url=http%3A%2F%2Fspectergroup.com"
      target="_blank">Rock it!</a>
</div>
Now we have the expected behavior of a pop-up window when clicking on the custom Share button. Figure 13-18 shows the result of a traditional pop-up window.
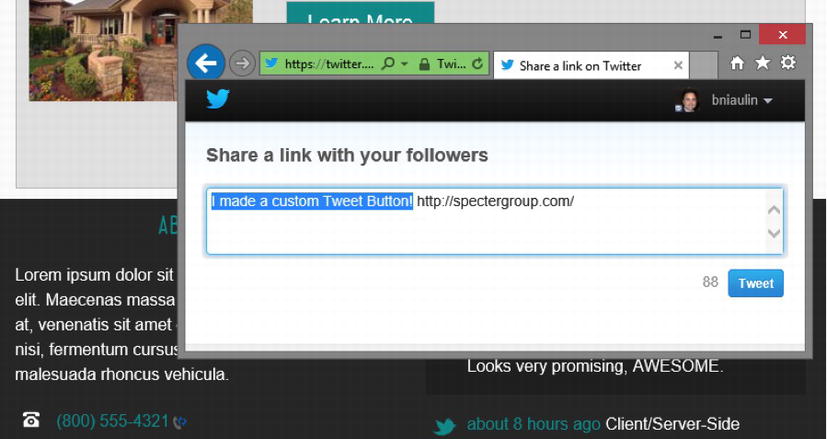
Figure 13-18. Custom Twitter button with pop-up window
Additionally we can find all the documentation necessary to build our own sharing buttons online for each social network:
- Twitter: https://dev.twitter.com/
- Facebook: http://developers.facebook.com/
- LinkedIn: https://developer.linkedin.com/
- Google+: https://developers.google.com/+/
- Yammer: https://developer.yammer.com/
There is a lot more that can be done with social integration for a given site and we hope this chapter has provided a good primer.
A good way to start is by browsing the web for prebuilt projects like the one we used; they can save you a lot of time and often offer very solid solutions. Make sure to always start with a plan for what is needed in your organization and how it should be implemented or experienced on your site, though. This step is often forgotten and yet is very important to the success of your site’s overall design
Summary
Social networking has become part of our everyday lives and companies know it. It has become part of marketing efforts to engage and reach the target audience. When building a new site it is important to consider which social network we are using and how we plan to integrate them into our site.
In this chapter, we started by understanding the business’s need for sharing with social networks. We then continued by exploring the different levels of social media integration like basic links or sharing buttons. Then we built our very own social bar, Facebook Follow button, and Twitter feed, and even looked at building our own custom Twitter sharing button over the prebuilt widgets. All the while, we considered our responsive web design. It is common for easy solutions to use IFRAMES that can be difficult to work with in a responsive design. Because SharePoint 2013 supports the new HTML5 doctype and so do most of these social sharing widgets, we should leverage them as much as possible or create our own custom solutions. Thankfully there is a lot of documentation available on this on each of the social network’s sites.