
![]()
Building a SharePoint HTML Master Page
If you have worked with past versions of SharePoint you will know firsthand that SharePoint has improved both dramatically and also gradually over the years. If you worked with Microsoft SharePoint 2003, you might recall that you had to use Microsoft FrontPage 2003 to brand a site. Although the tool was made for the task, it lacked ease of use and it was still difficult to brand multiple sites. With the release of WSS 3.0 and Microsoft Office SharePoint Server 2007, SharePoint was completely revamped on top of the .NET 2.0 framework, thus allowing SharePoint to make use of .NET 2.0 features such as master pages and page layouts. We were also given a new SharePoint site development and branding tool, SharePoint Designer 2007, a tool more integrated with SharePoint.
SharePoint 2010 brought more improvements in terms of branding capabilities. Web designers could now push the envelope and not only make SharePoint take on a corporate brand, but also include cutting-edge web site design trends by incorporating AJAX and other frameworks. SharePoint 2010 included the customization tool SharePoint Designer 2010, with additional capabilities to customize sites including the ability to aggregate various data sources to create custom views using XSLT and XML. Unfortunately it was still the only tool that could be used to customize SharePoint and it was not a tool that would always fit into the design process that many designers were accustomed to. For example, when a web designer wanted to take a Photoshop mockup and slice it into an HTML web page, he or she needed a prototype built first in a web design tool such as Adobe Dreamweaver. The process of combining a prototype and SharePoint still required yet another tool, SharePoint Designer.
Enter SharePoint 2013. The product has been enriched with new technologies including client-side APIs using standards such as REST and JSON, JavaScript, CSS, and HTML5. The branding capabilities and the process to brand a web site have also changed. SharePoint 2013 includes the new Designer Manager, a powerful new web-based designer tool available in SharePoint 2013 sites that have the Publishing feature by default. SharePoint 2013 introduces the new concept of HTML master pages and HTML page layouts. This is quite different from the previous master pages one could build on SharePoint 2010, which were built with the underlying .NET 2.0 master pages framework.
![]() Note Although we walk you through the process of creating an HTML master page, you can still build traditional master pages without the need to create an HTML master page by simply using an out-of-the-box master page as a starting point.
Note Although we walk you through the process of creating an HTML master page, you can still build traditional master pages without the need to create an HTML master page by simply using an out-of-the-box master page as a starting point.
In this chapter we dive into the Design Manager and see how we can take advantage of HTML master pages to make it easier to brand SharePoint. With this new model of generating master pages, SharePoint generates new, special markup when it converts an HTML design into an HTML master page, and we review this markup in detail. If you have customized SharePoint 2010 master pages, you are likely aware of content placeholders and how we had to manage them. In this chapter we also learn how with HTML master pages, SharePoint internally tracks all content placeholders for us. We review many tricks that will help you work with HTML master pages and finish with an overview of how Design Manager will also help us package our custom branding for easy redeployment to other site collections, such as moving our branding from a development environment to a production environment. Clearly, Microsoft realized that aligning SharePoint to the process designers are used to would provide value and increase overall adoption.
Our Scenario
In Chapter 3 we walked through the planning and design process recommended for any web site project. Using the fictitious Specter Group as a case study, we produced wireframes and design comps for the Specter Group web site. We ended with an HTML web site prototype based on the Specter Group requirements.
![]() Note You will notice that Chapter 3 did not cover the design activity of creating the CSS and HTML files from our PSD or Adobe Photoshop design file, as it is outside the scope of this book and in fact, part of a greater design process. Check out a great visual representation of this process at http://sprwd.com/73hvkga, and specifically Step D9. Download the entire Specter Group HTML prototype at https://github.com/SPRWD.
Note You will notice that Chapter 3 did not cover the design activity of creating the CSS and HTML files from our PSD or Adobe Photoshop design file, as it is outside the scope of this book and in fact, part of a greater design process. Check out a great visual representation of this process at http://sprwd.com/73hvkga, and specifically Step D9. Download the entire Specter Group HTML prototype at https://github.com/SPRWD.
In this chapter we walk through the process of transforming an HTML prototype (i.e., HTML, CSS, Images, and JavaScript) to a SharePoint 2013 HTML master page in a new SharePoint 2013 site with Publishing enabled. We will continue using our Specter Group case study as our working example. We introduce the new Snippet Gallery that we will use to add code snippets to further enhance an HTML master page with SharePoint-specific controls such as the login control, our standard SharePoint logo control, and a SharePoint search box. The outcome will be the following:
- A deployed master page with supporting artifacts that we will then use in Chapter 5 to convert our design to leverage responsive design features.
- In Chapter 6 we will learn how to include the horizontal and vertical navigation snippet to provide navigation in our HTML master page.
- The Specter Group also requires that a branding solution be easily transferred from a development environment to a production environment so we will introduce Design Manager’s Design Package, a new browser-based tool that provides us the ability to quickly package and deploy custom branding.
In our example, we have gone through the process of “cutting up” (which this book does not cover as it is outside the scope of the book) the design using Photoshop and Dreamweaver. We now have the HTML, JavaScript, CSS, and images files often returned to us from our design department all contained in a folder. See the Tip below for information on how to download this example package. In our scenario our web design team came back with an HTML5-ready, jQuery-enhanced site with all of the bells and whistles. They used standard grid-based coding techniques that have been common for the last few years, of course without responsive design in mind, as that is too foreign for them. No worries, we have you covered.
![]() Tip See Chapter 5 for insight on the standard grid coding techniques and making the Specter HTML master page responsive. Also be sure to download the web site HTML prototype and other source code at https://github.com/SPRWD/BookSourceCode as we will be using this throughout the book.
Tip See Chapter 5 for insight on the standard grid coding techniques and making the Specter HTML master page responsive. Also be sure to download the web site HTML prototype and other source code at https://github.com/SPRWD/BookSourceCode as we will be using this throughout the book.
Why Do We Need an HTML Master Page Anyway?
Being involved on SharePoint projects for many years now, we have certainly noticed the one aspect of the project that always ends up being a top priority for project sponsors is the branding of an intranet, public web site, or extranet built on top of SharePoint. It turns out that most companies do not want to have the out-of-the-box look and feel; they want to have the opportunity to personalize and brand their web site initiatives.
SharePoint allows for companies to brand their SharePoint web sites by building custom master pages or a template that handles the look and feel, header, and footer, thereby completely changing how the SharePoint web site looks.
![]() Note We do not cover themes or composed looks as part of our step-by-step guide in this book, primarily because this book focuses on building public-facing and more complex intranet and extranet solutions with SharePoint 2013. Themes and composed looks are the preferred branding tool for collaboration sites such as team sites, but do not provide the customization tools often needed for more sophisticated SharePoint 2013 sites.
Note We do not cover themes or composed looks as part of our step-by-step guide in this book, primarily because this book focuses on building public-facing and more complex intranet and extranet solutions with SharePoint 2013. Themes and composed looks are the preferred branding tool for collaboration sites such as team sites, but do not provide the customization tools often needed for more sophisticated SharePoint 2013 sites.
Getting Started
Before you are ready to convert a general HTML page design to an HTML master page, you will want to have your pure HTML web site prototype ready, which includes the sample pages, CSS, JavaScript, images, and other artifacts that the design uses.
![]() Tip One way to know your HTML site prototype is ready is to test it by opening up the index.html page on your browser. You should be able to browse the sample pages, scripts should be working, and CSS should be applied accordingly.
Tip One way to know your HTML site prototype is ready is to test it by opening up the index.html page on your browser. You should be able to browse the sample pages, scripts should be working, and CSS should be applied accordingly.
In Figure 4-1 you can see the folder structure of our HTML site prototype; it contains all of the site HTML sample pages, CSS, JavaScript, and images. We are now ready to convert our first HTML page to a SharePoint 2013 HTML master page.

Figure 4-1. HTML protoype site folder structure
Because we no longer are required to use SharePoint Designer to work with branding artifacts, we want to walk you through the branding experience using a common tool, and we chose Adobe Dreamweaver (CS6 in fact), as this tool is popular with web developers and designers. We are also executing our branding exercise on a MacBook Pro, as we know many designers use this platform in conjunction with the Adobe Creative Suite, and to demonstrate how the activity of branding SharePoint 2013 is no longer dependent on Microsoft tools. You might be wondering if Dreamweaver is officially supported by SharePoint 2013. We are happy to let you know that it is fully supported on both Mac and PC. With SharePoint 2013, the Web Distributed Authoring and Versioning (WebDAV) protocol now makes it possible to use tools such as Microsoft Expression Web, Adobe Dreamweaver, and Microsoft Visual Studio, in addition to SharePoint Designer 2013, to connect to and manipulate site files. Although WebDAV has been used since SharePoint 2001, it was used mostly to issue search queries, officially at least. With SharePoint 2013, Microsoft opened it up to allow other tools to communicate via this protocol with SharePoint and actually modify files for the purposes of branding.
![]() Note In December 2012, Microsoft announced that Expression Studio would no longer be a stand-alone product. Expression Blend would be wrapped into Visual Studio and Expression Web would no longer be upgraded; therefore we believe web designers will more likely be inclined to use Dreamweaver. If you run into a slow performance issue when using Dreamweaver, be sure to take a look at a potential resolution to this at http://sprwd.com/vvft7mi.
Note In December 2012, Microsoft announced that Expression Studio would no longer be a stand-alone product. Expression Blend would be wrapped into Visual Studio and Expression Web would no longer be upgraded; therefore we believe web designers will more likely be inclined to use Dreamweaver. If you run into a slow performance issue when using Dreamweaver, be sure to take a look at a potential resolution to this at http://sprwd.com/vvft7mi.
To get started, we give you an overview of the new Design Manager, which is the web-based tool we use throughout this exercise.
With the new process for branding SharePoint 2013 comes a new set of features that help execute this activity. Design Manager is one of those new features and is part of the improved Publishing feature available on publishing sites by default and on other sites such as team sites by activating the Publishing feature via Site Settings.
![]() Note Publishing is only available in SharePoint Server 2013 and above; that is, not in SharePoint Foundation 2013. Also, using Design Manager on nonpublishing sites (even after activating the Publishing feature) is not officially supported.
Note Publishing is only available in SharePoint Server 2013 and above; that is, not in SharePoint Foundation 2013. Also, using Design Manager on nonpublishing sites (even after activating the Publishing feature) is not officially supported.
Design Manager is one of the most exciting new features as it relates to the branding aspect of SharePoint. Design Manager is accessible directly from the new Settings menu (similar to the old Site Actions menu) as well as from the Site Settings page. When you navigate to the Design Manager page, you will notice there are several tasks, although in our opinion you do not have to perform them in that order, and you generally won’t. See Figure 4-2 for a view of the Design Manager’s left menu, specifically option 3, Upload Design Files. Designers can leverage this tool throughout the design cycle to carry out various tasks, such as creating and editing HTML master pages and deploying the supporting artifacts. In addition, the Design Manager interface allows you to manage device channels, edit display templates, edit page layouts, and create a design package.
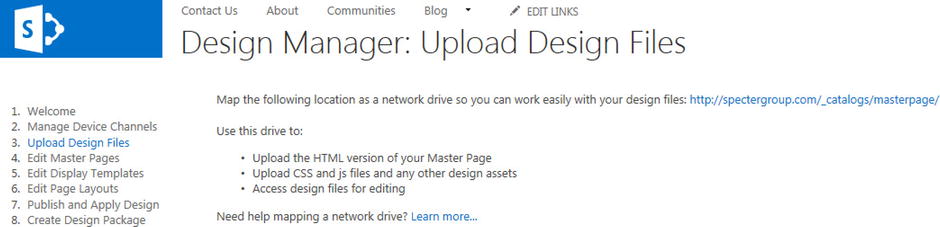
Figure 4-2. Design Manager tasks and guidance
![]() Tip To learn how to create display templates, see Chapter 9. See Chapter 7 to learn how to create page layouts.
Tip To learn how to create display templates, see Chapter 9. See Chapter 7 to learn how to create page layouts.
Because we review the many options available to us in Design Manager throughout this book, we jump right in here and start working on our master page. Don’t worry, we return to Design Manager many times and will learn all of the different tools available. To begin working with our master page, we will work through the first few steps, although the order of executing these steps does not necessarily reflect the numbered order shown in Figure 4-2. Our order reflects our experience of what is appropriate for most scenarios including ours and it is as follows:
- Prepare the HTML file for conversion to an HTML master page.
- Map the Master Page Gallery to a local drive and upload the Design folder that contains all of the site HTML, CSS, JavaScript, and Images.
- Create an HTML master page from an HTML prototype.
- Modify the HTML master page: Fix common warnings, clean up newly created HTML master page files, and make common CSS adjustments.
- HTML master page SharePoint-generated markup: Review the markup.
- Add snippets from the Snippet Gallery.
- Publish and assign the newly created HTML master page as the site master page.
- Create design package (optional) for reusability on other site collections.
Preparing an HTML File for Conversion to an HTML Master Page
The first step in building an HTML master page is to ensure that your HTML file meets all the following conditions:
- The HTML file must be XML-compliant, which unfortunately is not the same as HTML5 compliant. There are many simple XML validation tools available that can assist you, such as http://validator.w3.org/. As an example, HTML5 allows a doctype of <!doctype html> whereas to be XML-complaint for Design Manager, the doctype must be in all capital letters, such as <!DOCTYPE html>.
- Your <html> tag must be a simple <html> tag; you cannot use the popular IE conditional opening solution such as:
<!--[if lt IE 7]> <html class="no-js lt-ie7" lang="en"> <![endif]-->
<!--[if IE 7]>    <html class="no-js lt-ie8" lang="en"> <![endif]-->
<!--[if IE 8]>    <html class="no-js lt-ie9" lang="en"> <![endif]-->
<!--[if gt IE 8]><!--> <html class="no-js" lang="en"> <!--<![endif]-->
This should be just
<html class="no-js" lang="en"> - Be careful what styles you apply to the <html> and <body> tags, as all elements of a SharePoint page, including the ribbon, reside within the <body> block. You might want to consider applying your “global” styles to a main wrapper, or wait until after the conversion and apply your styles to the ID, s4-workspace or s4-bodyContainer, both added and used by SharePoint.
- The <head> code block should not contain any <style> tags. All styles should be placed in external style sheets, linked to by a <link> tag. All <style> tags in the <head> will be removed during conversion.
- A reference to a jQuery library should be place in the <head> section before the </head> tag. For SharePoint, one reason this is recommended is in case you need to dynamically load additional jQuery plug-ins within page layouts.
- If you intend to include a web font, in your HTML file, add ms-design-css-conversion="no" to your <link> tag:
<link rel='stylesheet' href='http://fonts.googleapis.com/css?family=Sintony'
ms-design-css-conversion="no" /> - Remove all <form> tags, as SharePoint allows only one <form> tag that it will handle for us.
- Review your HTML and place comments around blocks of HTML that will be replaced with snippets (more on snippets later in this chapter) such as where you will replace HTML from the HTML file with SharePoint components such as navigation, a search box, and the main content area. We use tags such as <!--search snippet--> and <!--end search snippet--> around an HTML block in our HTML file that we intend to replace with a Search Box snippet.
- Finally consider the file name of the HTML file you intend to use as your master page. Although index.html and default.html are both valid, they will create master pages named index.master and default.master. We are going to rename our sample HTML file we will convert later in this chapter to SpecterGroup.html.
Map the Master Page Gallery to a Local Drive and Upload Design Files
Before we convert our master page, we want to upload all other branding assets such as style sheets, images and JavaScript files. Uploading the files to our SharePoint site can be done in multiple ways. One option is to upload the entire folder and contents via a web browser, although this is only helpful when you are uploading multiple files using Internet Explorer due to the fact the ActiveX control to upload multiple files only exists on IE. A second option is using the steps we outline next that correspond to Step 3 in Design Manager, which involves mapping a local drive to the Master Page Gallery. A third option is to use SharePoint Designer 2013, which is similar to how we would have uploaded files with SharePoint Designer 2010.
An important consideration is the new recommendation that all branding assets now be added to the Master Page Gallery. This is very different than how we used to use the Style Library document library for storing branding assets such as style sheets and images.
![]() Tip To maintain organization of our branding files in the Master Page Gallery, we can create a subfolder in the Master Page Gallery for each branding initiate such as /_catalogs/masterpage/spectergroup. This is the approach we’ve chosen.
Tip To maintain organization of our branding files in the Master Page Gallery, we can create a subfolder in the Master Page Gallery for each branding initiate such as /_catalogs/masterpage/spectergroup. This is the approach we’ve chosen.
Map the Master Page Gallery to a Local Drive
To map the Master Page Gallery to a local drive on our MacBook Pro, we follow these steps. If you are on a PC, follow the traditional network drive mapping steps.
- Navigate to Design Manager in a browser and click on Step 3, Upload Design Files. On the Upload Design Files page shown in Figure 4-2, obtain the location of your Master Page Gallery. Although Figure 4-2 provides a location of http://www.spectergroup.com/_catalogs/masterpage, for this exercise, we are using the following URL: http://192.168.3.105:4500/_catalogs/masterpage. You will, of course, be provided your own local SharePoint location by Design Manager.
- We need to map this URL to a local drive, on the Mac, using the Finder, select Go
 Connect to Server or (Command + K).
 - In the Server Address text field, paste the URL from Step 1 and press + to add it to the Favorite Servers list as shown in Figure 4-3.
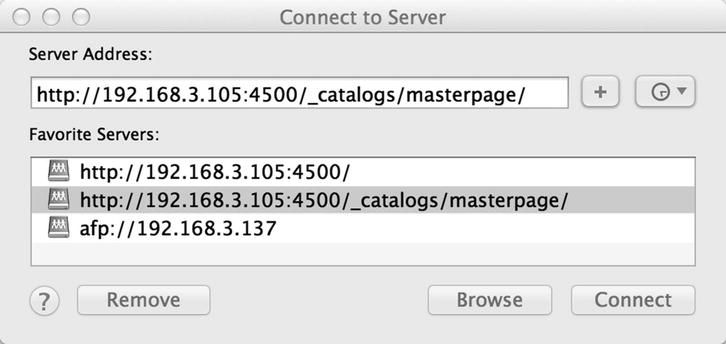
Figure 4-3. Mapping Master Page Gallery as a local drive dialog box on the Mac where Adobe Dreamweaver is installed
- Click Connect. A successful connection will open up the entire masterpage folder. You might get a credential box (see Figure 4-4); if so, simply provide your domain account and password.
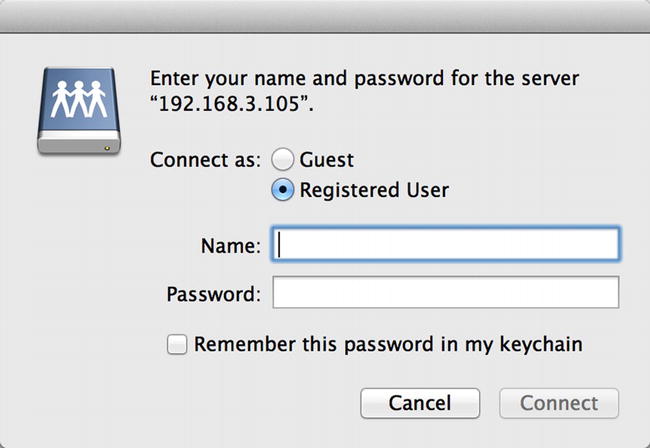
Figure 4-4. Credential box seen while mapping shared drive on a Mac
To authenticate with SharePoint, you must enter your domain credentials. For example, in the credentials box shown in Figure 4-4, one can type the username in the format of ContosoJames.Hall and the corresponding password. Be sure to select the Registered User option.
![]() Tip To map the Master Page Gallery to a network drive on a Windows platform, see http://sprwd.com/ywwpzx.
Tip To map the Master Page Gallery to a network drive on a Windows platform, see http://sprwd.com/ywwpzx.
Upload Design Files to the Master Page Gallery
Using the connection we created in the previous section, we may now upload our Design files to the Master Page Gallery.
Drag and drop your local folder with all branding artifacts; in our case this is a folder we named SpecterGroup which contains CSS, Images, and JavaScript files to the newly mapped drive. You do not want to copy over all of your HTML files yet, only the primary HTML page, the one we wish to use as our basis for our HTML master page.
![]() Note You might notice all Design files including the style sheets, images, and JavaScript files are being placed in the Master Page Gallery. This is different than in SharePoint 2010, where we would use the Style Library. Best practices with SharePoint 2013 are to now use the Master Page Gallery to store all branding assets including style sheets, images, and JavaScript files.
Note You might notice all Design files including the style sheets, images, and JavaScript files are being placed in the Master Page Gallery. This is different than in SharePoint 2010, where we would use the Style Library. Best practices with SharePoint 2013 are to now use the Master Page Gallery to store all branding assets including style sheets, images, and JavaScript files.
At this point, the Specter folder and all of its content is uploaded to the Master Page Gallery as shown in Figure 4-5.
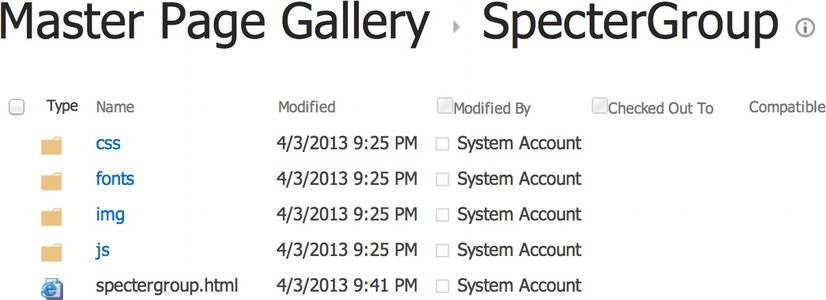
Figure 4-5. The Specter Group Design folder uploaded to the Master Page Gallery
![]() Tip We still must publish a major version of all branding assets before they are available to all users. We suggest publishing all the files in bulk via the Content and Structure Tool found in the Site Settings. You will need to go into each subfolder, as sadly SharePoint does not publish items recursively. You can also use the browser or SharePoint Design to publish files as well. A huge bonus is that we do not have to always check out, check in, and then publish any longer; we can skip ahead and just publish a major version.
Tip We still must publish a major version of all branding assets before they are available to all users. We suggest publishing all the files in bulk via the Content and Structure Tool found in the Site Settings. You will need to go into each subfolder, as sadly SharePoint does not publish items recursively. You can also use the browser or SharePoint Design to publish files as well. A huge bonus is that we do not have to always check out, check in, and then publish any longer; we can skip ahead and just publish a major version.
Design Manager does not cover this step; however now that we’ve mapped the SharePoint Master Page Gallery location to a local drive, we are able to create a Dreamweaver site and set the Local Site Root folder to the folder we previously uploaded.
Follow these steps:
- Launch Dreamweaver, and select Site Manage Sites. The New Site dialog box opens.
- On the bottom right of the dialog box, select New Site.
- Type the site name (something descriptive helps).
- Browse to the local mapped folder (the folder from our previous exercise) and select that as the Local Site Folder.
- In the Files pane, you should see all of your files. You are now ready to edit your files as shown in Figure 4-6.
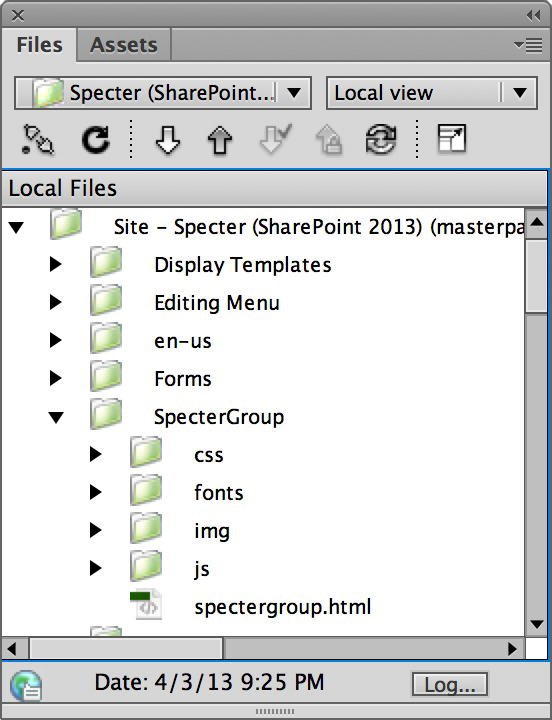
Figure 4-6. Adobe Dreamweaver site structure
At this point we have connected to the Master Page Gallery by mapping a local drive, which uses WebDAV in the background. We then used this mapped folder to upload our entire design folder. We created a site in Dreamweaver and mapped its root to the Master Page Gallery local drive that contains our Specter Group Design folder. So now we are able to quickly make edits to the HTML files and other artifacts directly in the Master Page Gallery. Our next task is to actually convert our HTML file into an HTML master page.
![]() Tip We uploaded only one .html file, spectergroup.html. We took index.html provided by the design team and renamed it spectergroup.html so that when the HTML master page is generated, it is named appropriately; that is, not index.html and index.master, respectively.
Tip We uploaded only one .html file, spectergroup.html. We took index.html provided by the design team and renamed it spectergroup.html so that when the HTML master page is generated, it is named appropriately; that is, not index.html and index.master, respectively.
Create an HTML Master Page from an HTML Prototype
We can now convert our HTML prototype to a SharePoint-friendly HTML master page. Navigate once again to Design Manager in a browser and select Step 4, Edit Master Pages. This page provides a list of currently available HTML master pages and presents us with two additional options as shown in Figure 4-7. You might also notice that Design Manager provides us two HTML master pages out of the box, oslo and seattle. We ignore these here, although they might come in handy if we want to see a working example of an HTML master page.
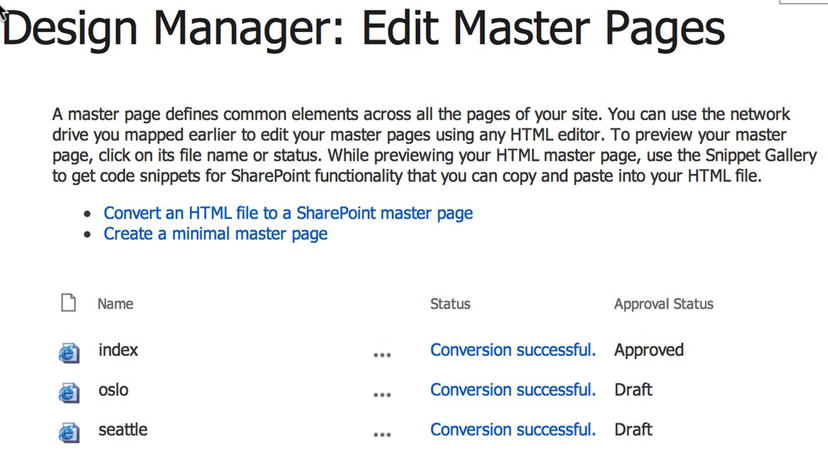
Figure 4-7. Design Manager's Edit Master Pages page
The first option is to convert an HTML file into a master page, which is what we will be doing throughout this guide. The second option allows us to start with the minimal master page, which allows for a designer to start from the bare minimum and progressively build the master page by incorporating the design.
Convert an HTML Prototype to an HTML Master Page
Proceed with the conversion: On the Edit Master Pages page (see Figure 4-7) click Convert an HTML file to a SharePoint master page. An Asset Picker modal dialog box appears. Browse to the folder where your HTML file is located (i.e., /_catalogs/masterpage/SpecterGroup), select the HTML file you wish to convert to an HTML master page, and click Insert. In our case we’ve selected the file called SpecterGroup.html within our folder, as shown in Figure 4-8.
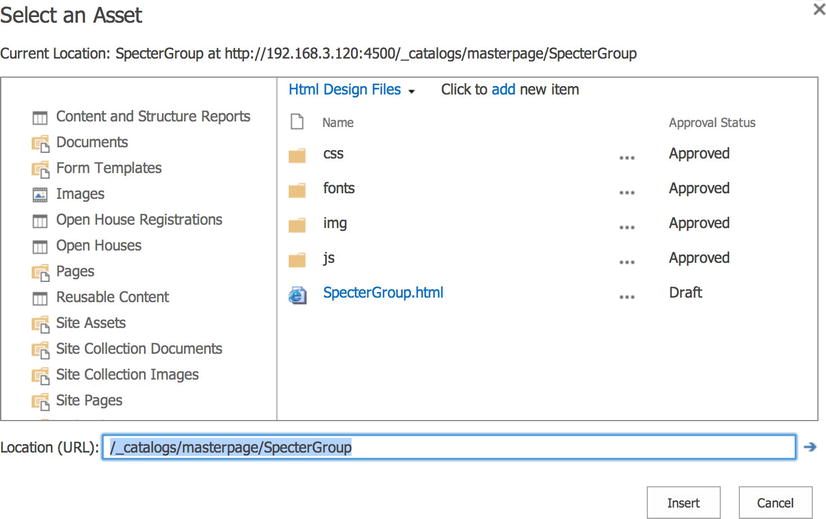
Figure 4-8. Selecting an HTML file to convert to an HTML master page via the Asset Picker modal dialog box
Once we select the HTML file, SharePoint then generates a .master file that it associates with the HTML file. The HTML file itself is now associated with a content type called HTML Master Page (new to SharePoint 2013). This content type has a column named Associated File that is used to flag the association, as shown in Figure 4-9. When you make changes to the .html file, for example, in Dreamweaver, the changes are automatically reflected in the linked .master file due to this new association.
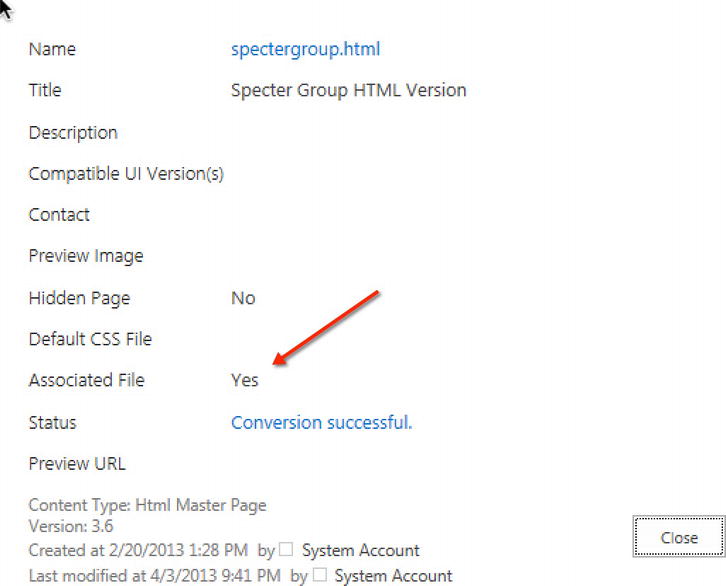
Figure 4-9. HTML master page properties: This HTML master page is associated with a corresponding .master file
Under the hood, during this initial conversion, SharePoint modifies the HTML file and adds various snippets and comments (more on this later), which, once saved, are converted to ASP.NET code in the .master file. The Design Manager (and Adobe Dreamweaver) effectively ignores any ASP.NET code in the HTML file.
![]() Caution Once an HTML file is associated with a .master file, you should never edit the .master file directly; SharePoint handles this file for us. If you ever wish to disassociate the HTML file from the .master file so that moving forward you only update the .master, simply change the value of the Associated File column and set it to NO in the page properties for the HTML master page. Doing so means that changes made to the HTML master page will not be reflected in the .master file.
Caution Once an HTML file is associated with a .master file, you should never edit the .master file directly; SharePoint handles this file for us. If you ever wish to disassociate the HTML file from the .master file so that moving forward you only update the .master, simply change the value of the Associated File column and set it to NO in the page properties for the HTML master page. Doing so means that changes made to the HTML master page will not be reflected in the .master file.
Work Directly with the .master Master Page
Once we have converted our HTML to an HTML master page, and the corresponding .master file has been created for us, there is no reason why we can’t work directly with the .master file. This, of course, means we have to disassociate the HTML file from the .master file, at which point only the .master file is the one to edit and update. In this case we would treat the .master just as we did with previous versions of SharePoint, as the .master is an ASP.NET master page, allowing us to add .NET components, and so on. Just be aware that we would also need to concern ourselves with required content placeholders as well as other SharePoint requirements. For this reason we stick with the HTML master page for the remainder of this book.
![]() Caution If you decide to reassociate the HTML master page file with the .master after it has been edited, all of your changes to the .master file will be overwritten.
Caution If you decide to reassociate the HTML master page file with the .master after it has been edited, all of your changes to the .master file will be overwritten.
Modifying an HTML Master Page
Once Design Manager completes the process of converting a general HTML page to an HTML master page, we will be returned to the Edit Master Pages page. This page shows a list of HTML master pages including the one we just converted. If all goes well, we will see a message next to our new HTML master page that reads Conversion Successful. If there was a problem converting an HTML page to an HTML master page, we will see a Warnings and Errors message, similar to Figure 4-10. To view details on these warnings and errors, click the link.
![]()
Figure 4-10. HTML master page listing with conversion issues
Fixing Common HTML Master Page Warnings and Errors
Fixing warnings and errors might be difficult or it might be easy. You might have to rewrite your original HTML file. If it was coded correctly, you will just need to massage it into place with SharePoint. You can make changes directly to your HTML master page in your web editor and as you save changes, refresh the Preview page in your browser to see if that helped fix your issues.
Click on the Name or Status of our new HTML master page to view any warnings and errors as well as preview the rendered HTML master page right from Design Manager. This is helpful to detect any problems that need to be fixed. Should your master page have any errors or warnings, these will also display in this area just below the black Ribbon for a particular HTML master page you preview. See Figure 4-11 for a sample error message.
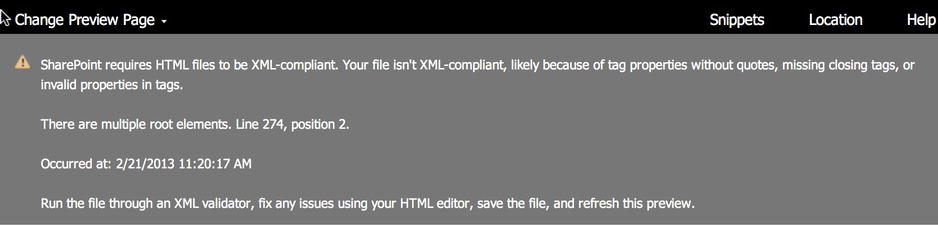
Figure 4-11. Sample errors and warnings message after an HTML master page conversion
Our web design team provided us an HTML file that was not quite in the format SharePoint 2013 requires, so our conversion had errors. You can see the exact message we get when clicking on the HTML master page in Figure 4-11.
![]() Note Our example master page was specially crafted to highlight common conversion errors even though the HTML file was created using standard, common HTML practices. We want to highlight the most common warnings and errors you might encounter. We did not follow our own advice previously in this chapter in the section “Preparing an HTML File for Conversion to an HTML Master Page”.
Note Our example master page was specially crafted to highlight common conversion errors even though the HTML file was created using standard, common HTML practices. We want to highlight the most common warnings and errors you might encounter. We did not follow our own advice previously in this chapter in the section “Preparing an HTML File for Conversion to an HTML Master Page”.
Let’s quickly investigate this error message as although it is cryptic, it does supply some valuable information. First, the message tells us that the HTML file must be XML-compliant. Even though we intend to use HTML5, Design Manager requires that HTML master pages be XML-compliant so that it can properly parse each file. Our first step might be to run our original HTML file through an XML validator. If we do this, we will find that our sample HTML file is in fact XML-compliant.
Let’s move on down the line and see that there are multiple root elements on line 274. Open the converted HTML master page, in our case SpecterGroup.html in Dreamweaver and look around line 274 for a problem. Review Listing 4-1 for a compact view of the converted HTML. Line 274 is at the bottom. The problem we immediately encountered is that SharePoint added a second <head> block to the end of the file. This was added because we did not define a proper <html> element after our DOCTYPE. SharePoint is quite strict and currently will not accept the popular technique of using IE <!--if--> comments to provide additional class elements for IE 8 and earlier.
![]() Tip Always make sure that you have a valid <head> opening tag, as Design Manager converts this to a special Head control in the associated .master file.
Tip Always make sure that you have a valid <head> opening tag, as Design Manager converts this to a special Head control in the associated .master file.
Listing 4-1. The HTML Source for the Newly Converted HTML Master Page (Some Code Has Been Removed for Simplicity)
<!DOCTYPE html>
<!-- paulirish.com/2008/conditional-stylesheets-vs-css-hacks-answer-neither/ -->
<!--[if lt IE 7]> <html class="no-js lt-ie9 lt-ie8 lt-ie7" lang="en"
      xmlns:mso="urn:schemas-microsoft-com:office:office"
      xmlns:msdt="uuid:C2F41010-65B3-11d1-A29F-00AA00C14882"> <![endif]-->
<!--[if IE 7]><html class="no-js lt-ie9 lt-ie8" lang="en"> <![endif]-->
<!--[if IE 8]><html class="no-js lt-ie9" lang="en"> <![endif]-->
<!--[if gt IE 8]><!--><html class="no-js" lang="en"><!--<![endif]-->
<head>
       <meta charset="utf-8" />
       <title>Specter Group HTML Version</title>
       <meta name="description" content="" />
       <!-- Rest of head section removed-->
</head>
<body>
       <!-- HEADER -->
       <header>
               <!--header removed-->
       </header>
       <!-- ENDS HEADER -->

       <!-- nav -->
       <nav id="topnav">
               <!--top nav removed-->
       </nav>
       <!-- ends nav -->

       <!-- MAIN -->
       <div role="main" id="main">
               <!--main content area removed-->
       </div>
       <!-- ENDS MAIN -->

       <footer>
               <!--footer removed-->
       </footer>
</body>
</html>
<head>
<!--[if gte mso 9]><xml>
<mso:CustomDocumentProperties>
<!--properties removed-->
</mso:CustomDocumentProperties>
</xml><!--[endif]-->
</head><!--[if gt IE 8]>
In our example, the first error we need to fix has to do with the duplicate <head> tag SharePoint added at the time of the conversion. The next thing we need to do is replace the top <head> section attempting to target IE versions with a standard <head> tag. So we will remove the additional <head> block added after the closing </html> tag and replace the first few lines of the HTML Master Page as seen in Listing 4-2.
Listing 4-2. Valid DOCTYPE, <html>, and <head> Tags for an HTML Master Page
<!DOCTYPE html>
<html class="no-js" lang="en">
<head>
After we save our HTML master page in our web editor and refresh the Preview page we get a successful conversion with no warnings or errors as shown in Figure 4-12.
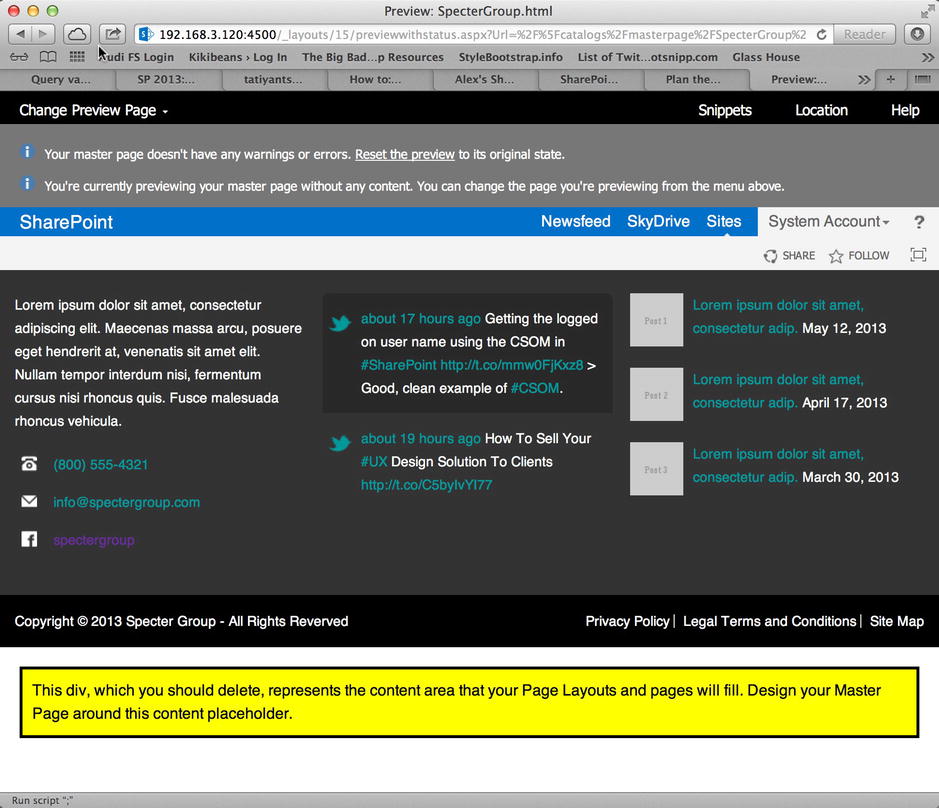
Figure 4-12. Successful HTML Master Page conversion: Note the yellow box at the bottom
You might encounter additional errors and warnings depending on how XML-compliant and valid your original HTML file is. You will need to work through each error message displayed until Design Manager reports no more errors with your HTML master page. As soon as the conversion is successful, Design Manager will completely rewrite your original HTML file, adding in a whole series of new tags, comments, and content blocks.
Clean Up a Newly Converted HTML Master Page
Once you have successfully converted an HTML file to an HTML master page, there are a few clean-up issues that you will want to handle before you get into adding additional SharePoint functionality such as snippets. First we look at the primary ContentPlaceHolder and second we look at common styling techniques.
Let’s look at our newly converted HTML master page, which you can see in Listing 4-3. Note that we have removed blocks of code that in general are required but decrease readability at this time. Pay special attention to a new <div> with a data-name of ContentPlaceHolderMain added at the bottom of Listing 4-3. This <div> created the yellow box shown at the bottom of Figure 4-12.
![]() Note We will review the different blocks of code added by SharePoint later in the section “HTML Master Page SharePoint-Generated Markup,” including how to parse what each block is adding.
Note We will review the different blocks of code added by SharePoint later in the section “HTML Master Page SharePoint-Generated Markup,” including how to parse what each block is adding.
Listing 4-3. Our Sample Converted HTML Master Page
<?xml version="1.0" encoding="utf-8"?>
<!--SPG:
This HTML file has been associated with a SharePoint Master Page (.master file) carrying the same name. While the files remain associated, you will not be allowed to edit the .master file, and any rename, move, or deletion operations will be reciprocated.

To build the master page directly from this HTML file, simply edit the page as you normally would. Use the Snippet Generator athttp://192.168.3.120:4500/_layouts/15/ComponentHome.aspx?... to create and customize useful SharePoint entities, then copy and paste them as HTML snippets into your HTML code.  All updates to this file will automatically sync to the associated Master Page.
-->
<!DOCTYPE html[]>
<html class="no-js" lang="en" xmlns:mso="urn:schemas-microsoft-com:office:office">
<head>
    <meta http-equiv="X-UA-Compatible" content="IE=10" />
    <!--CS: Start Page Head Contents Snippet-->
    <!--SPM:<%@Register Tagprefix="SharePoint" Namespace="Microsoft.SharePoint.WebControls" -->
    <!--SPM:<%@Register Tagprefix="WebPartPages"
        Namespace="Microsoft.SharePoint.WebPartPages" -->
    <!--SID:00 -->
    <meta name="GENERATOR" content="Microsoft SharePoint" />
    <meta http-equiv="Content-type" content="text/html; charset=utf-8" />
    <meta http-equiv="Expires" content="0" />
    <!--MS:<SharePoint:RobotsMetaTag runat="server">-->
    <!--ME:</SharePoint:RobotsMetaTag>-->
    <!--Remainder of head removed for brevity-->
</head>
<body>
    <!--CS: Start Ribbon Snippet-->
    <!--SPM:<%@Register Tagprefix="SharePoint"
        Namespace="Microsoft.SharePoint.WebControls" -->
    <!--SPM:<%@Register Tagprefix="wssucw" TagName="Welcome" -->
    <!--MS:<SharePoint:SPSecurityTrimmedControl runat="server"
            HideFromSearchCrawler="true">-->
        <!--Removed for brevity-->
    <!--ME:</SharePoint:SPSecurityTrimmedControl>-->
    <div id="ms-designer-ribbon">
        <!--Removed for brevity-->
    </div>
    <!--CE: End Ribbon Snippet-->
    <div id="s4-workspace">
        <div id="s4-bodyContainer">
            <!-- HEADER -->
            <header>
                <!--Removed for brevity-->
            </header>
            <!-- ENDS HEADER -->
            <!-- nav -->
            <nav id="topnav">
                <!--Removed for brevity-->
            </nav>
            <!-- ends nav -->
            <!-- MAIN -->
            <div role="main" id="main">
                <div class="wrapper">
                    <!--main content placerholder, use the following
                    html as sample content for content placeholder-->
                    <!--Removed for brevity-->
                    <!--end content placerholder-->
                </div>
            </div>
            <!-- ENDS MAIN -->
            <footer>
                <!--Removed for brevity-->
            </footer>
            <div data-name="ContentPlaceHolderMain">
                <!--CS: Start PlaceHolderMain Snippet-->
                <!--SPM:<%@Register Tagprefix="SharePoint"
                    Namespace="Microsoft.SharePoint.WebControls" -->
                <!--MS:<SharePoint:AjaxDelta ID="DeltaPlaceHolderMain"
                        IsMainContent="true" runat="server">-->
                    <!--MS:<asp:ContentPlaceHolder ID="PlaceHolderMain" runat="server">-->
                        <div class="DefaultContentBlock" style="border:medium black solid; background:yellow;
                                color:black;>
                            This div, which you should delete, represents the content area that your Page Layouts
                            and pages will fill. Design your Master Page around this content placeholder.
                        </div>
                    <!--ME:</asp:ContentPlaceHolder>-->
                <!--ME:</SharePoint:AjaxDelta>-->
                <!--CE: End PlaceHolderMain Snippet-->
            </div>
        </div>
    </div>
</body>
</html>
We first want to handle the yellow box added to the bottom of our HTML master page. Figure 4-13 shows the entire code for the ContentPlaceHolderMain <div> element, which essentially wraps the entire ASP.NET PlaceHolderMain element on our HTML master page.
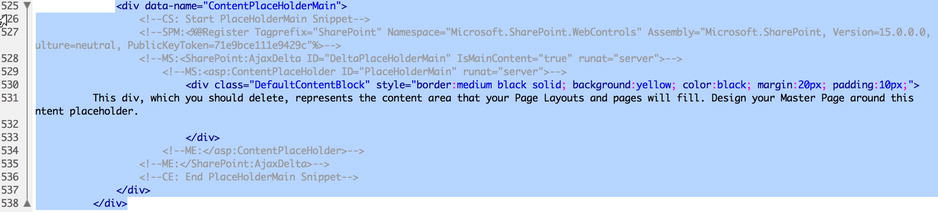
Figure 4-13. ContentPlaceHolder DIV element that corresponds to the .NET control ContentPlaceHolder
The block within <div data-name="ContentPlaceHolderMain"> is a ContentPlaceHolder snippet. We learn more about snippets later in this chapter. For now, this snippet maps directly to a ContentPlaceHolder .NET control that we are used to from SharePoint 2010.
A ContentPlaceHolder in a master page is essentially a .NET control that may be overwritten by a page layout. Most elements in a master page are fixed for all pages that utilize the master page but content placeholders provide a mechanism we can use to provide specific areas of a master page that a page layout can customize. Content placeholders may also contain default “content,” including additional .NET controls that a particular page will display by default but that a page layout might override.
![]() Note Learn how to customize the content in content placeholders in page layouts in Chapter 7.
Note Learn how to customize the content in content placeholders in page layouts in Chapter 7.
In our case, the ContentPlaceHolder with an ID of PlaceHolderMain is the primary ContentPlaceHolder used throughout SharePoint as the placeholder where all “Main” content will go.
Cut the entire <div> block highlighted in Figure 4-13 to your clipboard so that you can move it to its proper place in the HTML master page. In our case, we want this block contained within the <div class="wrapper"> block found within <div id="main">. Refer to Listing 4-3.
Within <div class="wrapper"> you will see two important comments,
<!--main content placerholder, use the following html as sample content for content placeholder-->
and
<!--end content placerholder-->
comments were added by the web design team and help us know where SharePoint components should go. We will see how they are useful to figure out where other snippets may go such as the logo snippet, the navigation snippet, and the search box snippet. These types of comments are also helpful within page layout code blocks as well, as there are also many snippets available to page layouts.
After we paste the <div> in our clipboard within the preceding comments we should see code similar to Listing 4-4.
Listing 4-4. ContentPlaceHolder PlaceHolderMain Moved to Within Our “Main” Div
<!-- MAIN -->
<div role="main" id="main">
    <div class="wrapper">
        <!--main content placerholder, use the following html as sample content for content placeholder-->
        <div data-name="ContentPlaceHolderMain">
            <!--CS: Start PlaceHolderMain Snippet-->
            <!--SPM:<%@Register Tagprefix="SharePoint" Namespace="Microsoft.SharePoint.WebControls" -->
            <!--MS:<SharePoint:AjaxDelta ID="DeltaPlaceHolderMain" IsMainContent="true" runat="server">-->
                <!--MS:<asp:ContentPlaceHolder ID="PlaceHolderMain" runat="server">-->
                    <div class="DefaultContentBlock" style="border:medium black solid; background:yellow;
                            color:black;>
                        This div, which you should delete, represents the content area that your page layouts'
                        and pages will fill. Design your master page around this content placeholder.
                    </div>
                <!--ME:</asp:ContentPlaceHolder>-->
            <!--ME:</SharePoint:AjaxDelta>-->
            <!--CE: End PlaceHolderMain Snippet-->
        </div>
        <!--end content placerholder-->
    </div>
</div>
<!-- ENDS MAIN -->
![]() Note You can replace the entire <div> block with the class "DefaultContentBlock" with preview content, possibly from your original HTML file. This “preview” content will only be displayed while previewing an HTML master page, as although it is the default content for PlaceHolderMain, this ContentPlaceHolder content will always be replaced by a SharePoint Page.
Note You can replace the entire <div> block with the class "DefaultContentBlock" with preview content, possibly from your original HTML file. This “preview” content will only be displayed while previewing an HTML master page, as although it is the default content for PlaceHolderMain, this ContentPlaceHolder content will always be replaced by a SharePoint Page.
After moving the <div> that represents the main PlaceHolderMain to the appropriate location within your HTML master page, your preview of your HTML master page will look similar to Figure 4-14.
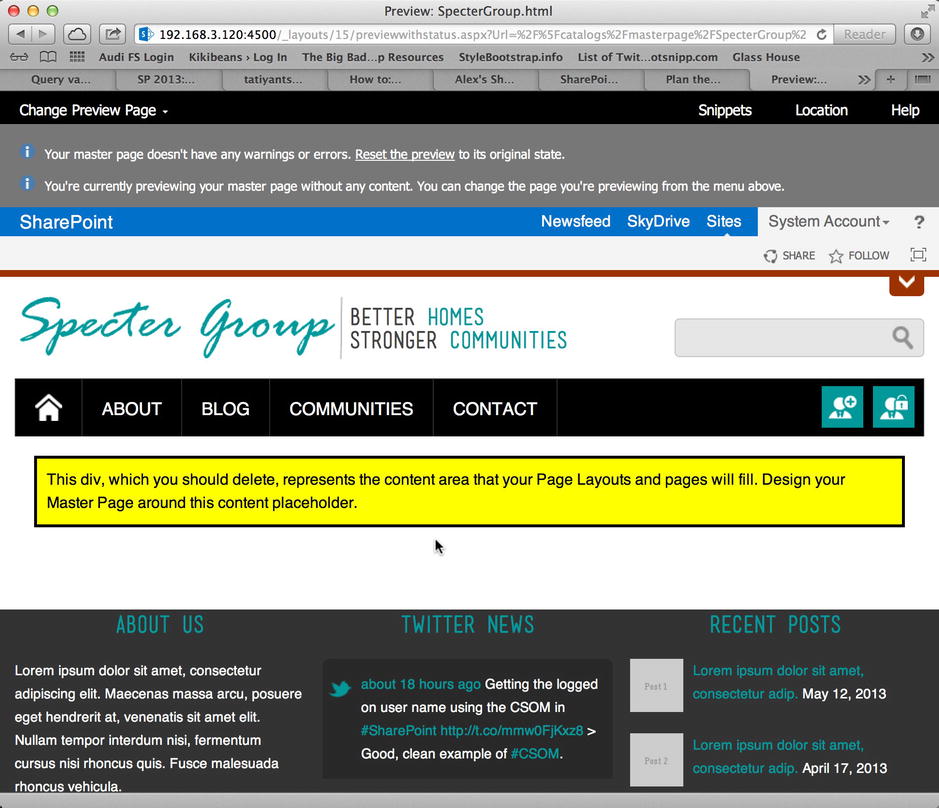
Figure 4-14. The PlaceHolderMain DIV within the correct location on our HTML master page
Common Style Sheet Adjustments for HTML Master Pages
When SharePoint converts your HTML master page, it adds a bunch of controls and other markup. These include the ribbon and the s4-workspace and s4-bodyContainer divs you might recognize from SharePoint 2010 days. These new components are contained within divs and as such have additional styling applied to them by SharePoint. As this styling might not work for us, we will review a few common aspects of an HTML master page you might wish to customize.
We will use Firebug in Firefox to help track down the styles we wish to change and provide any updated styles in our custom style sheet, that is, /∼catalogs/masterpage/SpecterGroup/css/styles.css. Using the techniques we review in the next two subsections, you should be able to track down any HTML element or style you wish to update on your custom HTML master page.
Often you might want a footer that reaches all of the way down to the bottom of the browser window. One of the changes that SharePoint makes to our HTML master pages appears to add additional padding to the bottom of our footer. Refer to Figure 4-15, where we can see this additional padding and notice how we use Firebug to find where this padding is coming from.
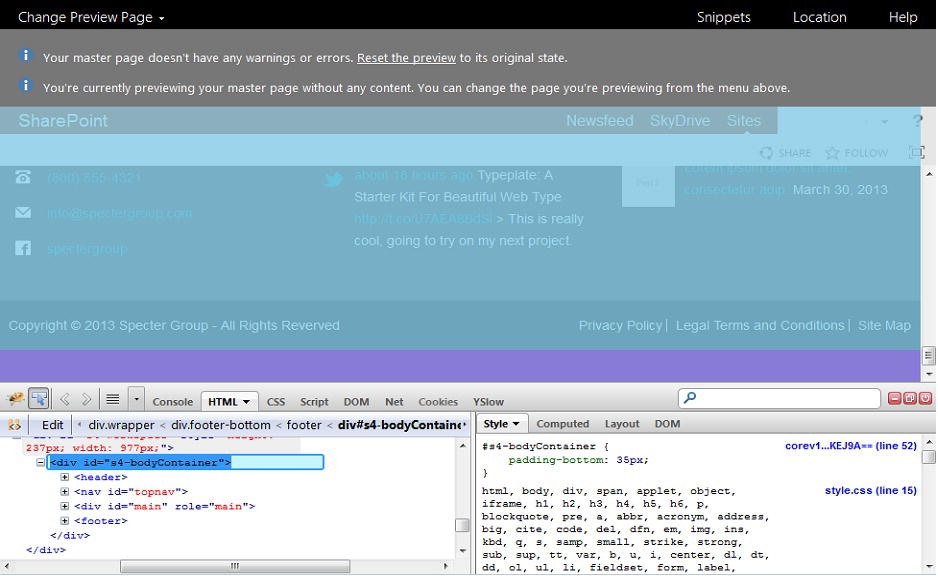
Figure 4-15. Additional padding added by SharePoint
We can see that the core15.css style sheet provided by SharePoint 2013 adds a bottom padding of 35px to the s4-bodyContainer div. Listing 4-5 shows the style we add to our custom style sheet to remove this bottom padding.
Listing 4-5. Remove the Bottom Padding from the s4-bodyContainer
#s4-bodyContainer {
       padding-bottom: 0px;
}
Changing the color of the Suite Bar to match your branding is another easy task using a browser developer tool such as Firebug and a few custom styles. Listing 4-6 shows the HTML generated by SharePoint for the Suite Bar, and using Firebug we can select these different elements until we find which elements define specific aspects of the ribbon.
Listing 4-6. Main HTML Generated by SharePoint to Generate the Ribbon and Inner Components That Include the Suite Bar
<div id="ms-designer-ribbon">
  <div>
    <div id="suiteBar" class="ms-dialogHidden noindex">
      <div id="suiteBarLeft">
        <!--Top row - left side -->
      <div id="suiteBarRight">
        <!--Top row - right side -->

      <div>
    </div>
    <div id="s4-ribbonrow" style="height: 35px;">
      <div id="globalNavBox">
        <!--second row-->
      </div>
    </div>
    <div id="notificationArea" class="ms-notif-box">
      <!--Notification box-->
    </div>
    <div id="DeltaPageStatusBar"></div>
  </div>
</div>
Using Firebug, we can see there are three primary divs that provide the building blocks for the Suite Bar on which we can change the color: IDs suiteBarleft, suiteBarRight, and globalNavBox. Using these IDs, you can create custom styles similar to Listing 4-7 that you can add to your custom style sheet to recolor the ribbon.
Listing 4-7. Custom Styles to Restyle the Suite Bar
#suiteBarLeft {
    background-color: #993300;
}
#suiteBarRight {
    background-color: #e5e5e5;
}
.ms-core-suiteLink-a:hover {
    background-color: #009899;
}
#globalNavBox, .ms-clientcontrol-chromeheader {
    background-color: #e5e5e5;
}
The styles in Listing 4-7 change the top left Suite Bar(#suiteBarLeft) from blue to our branding color of burgundy, the top right ribbon (#suiteBarRight) and the second bar of the ribbon (#globalNavBox, .ms-clientcontrol-chromeheader) to a darker gray, and then finally we change the color of the hover color for links in ribbon to a different dark gray. These results are shown in Figure 4-16.
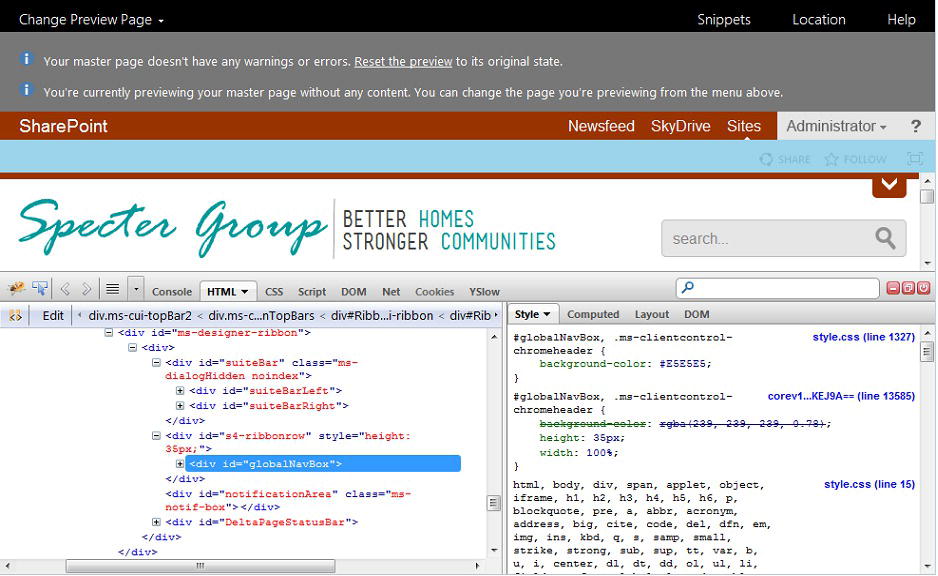
Figure 4-16. Suite Bar styles, second row highlighted by Element Selector in Firebug
We suspect one common need will be to change the ribbon’s text that appears on the top left (see Figure 4-16), which says SharePoint. In our case, we wanted to change it to read Specter Group. Our approach is to ask our PowerShell Guru to make a change via the SharePoint 2013 PowerShell command line.
The PowerShell command to execute is:
- Go to Start SharePoint 2013 Management Shell.
- On the command line, type the following:
$specterWebApp = Get-SPWebApplication "http://spectergroup.com"
$specterWebApp.SuiteBarBrandingElementHtml = "Specter Group"
$specterWebApp.Update()
After we execute this command and browse the web site we see the change as shown in Figure 4-17.
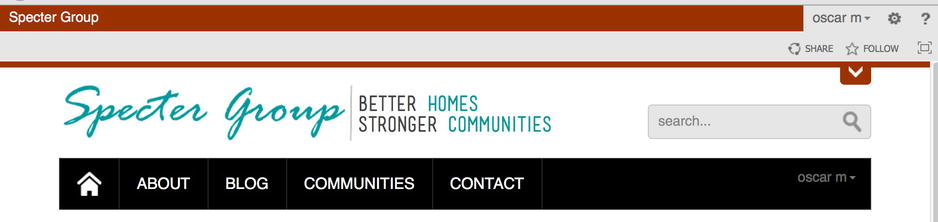
Figure 4-17. The new tagline or label now says Specter Group instead of SharePoint
HTML Master Page SharePoint-Generated Markup
Now we have converted an HTML file to an HTML master page and not only fixed a few common issues, but also saw how to use browser tools to help us customize additional SharePoint elements. Let’s take a closer look at what SharePoint did to our HTML master page. When we convert a plain HTML file into an HTML master page, there is a considerable amount of markup added to our file. This all is related to the new way of generating SharePoint .master master pages and keeping both the HTML master page and its associated .master file in sync.
Also all content added by SharePoint to a successfully converted HTML master page is contained within the standard HTML comment blocks, <!-- and -->. These comments are very important and how they start tells us a lot about for what SharePoint intends to use that particular comment. Let’s look at the special markup descriptions first, then review what is added to the <head> and <body> blocks.
The following list outlines the various types of markup with a brief explanation of what they are. We cover more detail on where exactly these appear within the HTML master page file shortly.
- <!--SPM:...-->: SharePoint Markup. This allows for registering the server-side controls that have the SharePoint namespace.
- <!--CS:...--> and <!--CE:...-->: Comment Start and Comment End. This is used throughout the code that SharePoint outputs so that it is easy to identify where each major component starts and ends such as the Head, Ribbon, and Main Content. Comments can be safely removed if you do not want them.
- <!--MS:...--> and <!--ME:...-->: Markup Start and Markup End. Markup Start allows you to start any valid HTML or .NET control tag that you want sent directly to the .master file without Design Manager touching it. Most often you will see this used to start and end a particular .NET control such as a ContentPlaceHolder or other SharePoint control, but it could also be used for HTML tags as well, such as <!--MS:<script type="text/javascript">--> and <!--ME:</script>-->. You will always need a Markup End command somewhere after a Markup Start command.
- <!--PS:...--> and <!--PE:...-->: Preview Start and Preview End. HTML tags within a Preview block are only used while previewing an HTML master page in the Preview view or within a web design tool such as Dreamweaver. Preview blocks are not required but might help while building an HTML master page as they provide what a particular snippet “could” look like.
- There are also two reserved ID tags, <!--SID:00 --> and <!--SID:02 -->. These are reserved snippets that make our HTML master page more readable.
Markup Added to the <head> Tag
The <head> tag includes various added markup blocks. The first block we’d like to point out is the Document Properties or <mso> tags, added just before the </head> tag. The Document Properties keep track of metadata including the file association and the conversion status. The Design Manager also uses these properties to determine and set those values once there are no errors on our page. Listing 4-8 shows this specific markup for our conversion.
![]() Note For the most part, we don’t need to edit the markup that is generated by SharePoint; our intention is to provide you with information about what this is. We do add snippets, however, and those use this markup.
Note For the most part, we don’t need to edit the markup that is generated by SharePoint; our intention is to provide you with information about what this is. We do add snippets, however, and those use this markup.
Listing 4-8. Sample <mso> Metadata Block Found in an HTML Master Page, Simplified
<!--[if gte mso 9]><xml>
<mso:CustomDocumentProperties>
    <mso:HtmlDesignFromMaster msdt:dt="string"></mso:HtmlDesignFromMaster>
    <mso:HtmlDesignStatusAndPreview msdt:dt="string">
        http://192.168.3.120:4500/_catalogs/masterpage/SpecterGroup/SpecterGroup.html, Conversion
        successful.</mso:HtmlDesignStatusAndPreview>
    <mso:ContentTypeId msdt:dt="string">
        0x0101000F1C8B9E0EB4BE489F09807B...</mso:ContentTypeId>
    <mso:HtmlDesignAssociated msdt:dt="string">1</mso:HtmlDesignAssociated>
    <mso:HtmlDesignConversionSucceeded msdt:dt="string">True</mso:HtmlDesignConversionSucceeded>
    <mso:HtmlDesignPreviewUrl msdt:dt="string">
        http://192.168.3.120:4500/pages/default.aspx, /pages/default.aspx</mso:HtmlDesignPreviewUrl>
</mso:CustomDocumentProperties>
</xml><![endif]-->
The other markup that is added to the <head> tag is a combination of comments and snippets that include the out-of-the-box SharePoint JavaScript and CSS as well as the registration of the required assemblies as shown in Listing 4-9. Again we have simplified some of the tags for readability. If you worked with SharePoint 2010 master pages you will likely recognize many of tags within the <!--MS--> blocks, and if you were to open the associated .master file, you will see how all of the Markup Start tags related one-to-one with .NET controls.
Listing 4-9. The Core <head> Content Markup Added by SharePoint
<!--CS: Start Page Head Contents Snippet-->
<!--SPM:<%@Register Tagprefix="SharePoint" Namespace="Microsoft.SharePoint.WebControls" %>-->
<!--SPM:<%@Register Tagprefix="WebPartPages" Namespace="Microsoft.SharePoint.WebPartPages" %>-->

<!--SID:00 -->
<meta name="GENERATOR" content="Microsoft SharePoint" />
<meta http-equiv="Content-type" content="text/html; charset=utf-8" />
<meta http-equiv="Expires" content="0" />
<!--MS:<SharePoint:RobotsMetaTag runat="server">-->
<!--ME:</SharePoint:RobotsMetaTag>-->
<!--MS:<SharePoint:PageTitle runat="server">-->
  <!--MS:<asp:ContentPlaceHolder id="PlaceHolderPageTitle" runat="server">-->
    <!--MS:<SharePoint:ProjectProperty Property="Title" runat="server">-->
    <!--ME:</SharePoint:ProjectProperty>-->
  <!--ME:</asp:ContentPlaceHolder>-->
<!--ME:</SharePoint:PageTitle>-->
<!--MS:<SharePoint:StartScript runat="server">-->
<!--ME:</SharePoint:StartScript>-->
<!--MS:<SharePoint:CssLink runat="server" Version="15">-->
<!--ME:</SharePoint:CssLink>-->
<!--MS:<SharePoint:CacheManifestLink runat="server">-->
<!--ME:</SharePoint:CacheManifestLink>-->
<!--MS:<SharePoint:PageRenderMode runat="server" RenderModeType="Standard">-->
<!--ME:</SharePoint:PageRenderMode>-->
<!--MS:<SharePoint:ScriptLink language="javascript" name="core.js" OnDemand="true" runat="server">-->
<!--ME:</SharePoint:ScriptLink>-->
<!--additional references to OOTB JavaScript files-->
<!--MS:<SharePoint:CustomJSUrl runat="server">-->
<!--ME:</SharePoint:CustomJSUrl>-->
<!--MS:<SharePoint:SoapDiscoveryLink runat="server">-->
<!--ME:</SharePoint:SoapDiscoveryLink>-->
<!--MS:<SharePoint:AjaxDelta id="DeltaPlaceHolderAdditionalPageHead" Container="false" runat="server">-->
  <!--MS:<asp:ContentPlaceHolder id="PlaceHolderAdditionalPageHead" runat="server">-->
  <!--ME:</asp:ContentPlaceHolder>-->
  <!--MS:<SharePoint:DelegateControl runat="server" ControlId="AdditionalPageHead">-->
  <!--ME:</SharePoint:DelegateControl>-->
  <!--MS:<asp:ContentPlaceHolder id="PlaceHolderBodyAreaClass" runat="server">-->
  <!--ME:</asp:ContentPlaceHolder>-->
<!--ME:</SharePoint:AjaxDelta>-->
<!--MS:<SharePoint:CssRegistration Name="Themable/corev15.css" runat="server">-->
<!--ME:</SharePoint:CssRegistration>-->
<!--MS:<SharePoint:AjaxDelta id="DeltaSPWebPartManager" runat="server">-->
  <!--MS:<WebPartPages:SPWebPartManager runat="server">-->
  <!--ME:</WebPartPages:SPWebPartManager>-->
<!--ME:</SharePoint:AjaxDelta>-->
<!--CE: End Page Head Contents Snippet-->
Markup Added to the <body> Tag
Within the <body> block, the major additions are found just after the opening <body> tag and one final block added to the bottom, which we reviewed earlier. In Listing 4-10 you can see the first block added to the <body> tag. Take special note of <!--SID:02 {Ribbon}-->, which we learned is a reserved, compressed snippet to ease readability, and the <!--MS:<SharePoint:SPSecurityTrimmedControl>--> tag, which we revisit later in the section “Sign In Snippet”.
Listing 4-10. Markup Added to <body> Tag, Simplified
<!--CS: Start Ribbon Snippet-->
<!--SPM:<%@Register Tagprefix="SharePoint" Namespace="Microsoft.SharePoint.WebControls" %>-->
<!--SPM:<%@Register Tagprefix="wssucw" TagName="Welcome" %>-->
<!--MS:<SharePoint:SPSecurityTrimmedControl runat="server" HideFromSearchCrawler="true"
EmitDiv="true">-->
<div id="TurnOnAccessibility" style="display:none" class="s4-notdlg noindex">
<a id="linkTurnOnAcc" href="#" class="ms-accessible ms-acc-button" onclick="...">
<!--MS:<SharePoint:EncodedLiteral runat="server" text="<%$Resources:wss, %>" >-->
<!--ME:</SharePoint:EncodedLiteral>-->
</a>
</div>
<div id="TurnOffAccessibility" style="display:none" class="s4-notdlg noindex">
<a id="linkTurnOffAcc" href="#" class="ms-accessible ms-acc-button" onclick="...">
<!--MS:<SharePoint:EncodedLiteral runat="server" text="<%$Resources:wss%>">-->
<!--ME:</SharePoint:EncodedLiteral>-->
</a>
</div>
<!--ME:</SharePoint:SPSecurityTrimmedControl>-->
<div id="ms-designer-ribbon">
<!--SID:02 {Ribbon}-->
<!--PS: Start of READ-ONLY PREVIEW (do not modify) -->
<div class="DefaultContentBlock" style="background:rgb(0, 114, 198); color:white; overflow:hidden;">
The SharePoint ribbon will be here when your file is either previewed on or applied to your site.
</div>
<!--PE: End of READ-ONLY PREVIEW -->
</div>
<!--MS:<SharePoint:SPSecurityTrimmedControl runat="server" AuthenticationRestrictions="...">-->
<!--MS:<wssucw:Welcome runat="server" EnableViewState="false">-->
<!--ME:</wssucw:Welcome>-->
<!--ME:</SharePoint:SPSecurityTrimmedControl>-->
<!--CE: End Ribbon Snippet-->
Right after the closing ribbon snippet comments, two <div> tags are added as well, as shown on Listing 4-11. All content is wrapped around these divs and again to those with experience with SharePoint 2010, these will look very familiar. The s4-workspace div is primarily used by SharePoint to control the scrolling space beneath the ribbon and is also used to replace the browser <body> scrollbars. SharePoint will handle the width and height of s4-workspace so we would recommend that most styling you might apply to the <body> tag be applied to s4-bodyContainer instead.
Listing 4-11. The Two Primary container <div>s Added to the <body> Tag
<div id="s4-workspace">
      <div id="s4-bodyContainer">
Previewing With a New or Existing Page
Notice the black ribbon at the top of the preview page. The Change Preview Page drop-down menu is on the left end and contains two options, Select Existing and Create New. The first option allows you to quickly select from an existing content page to preview your newly created HTML master page. The second option allows you to create a new page to preview your HTML master page.
When we select the first option, we are presented with a dialog box, shown in Figure 4-18, that allows us to either type a URL or use a Generic Preview, which omits some of the content placeholders. In our case, we chose to preview within an existing page so we can provide the full URL of http://192.168.3.105:4500/Pages/Default.aspx. This would populate our Preview with whatever content had been entered at our default.aspx page. Figure 4-19 shows the outcome.
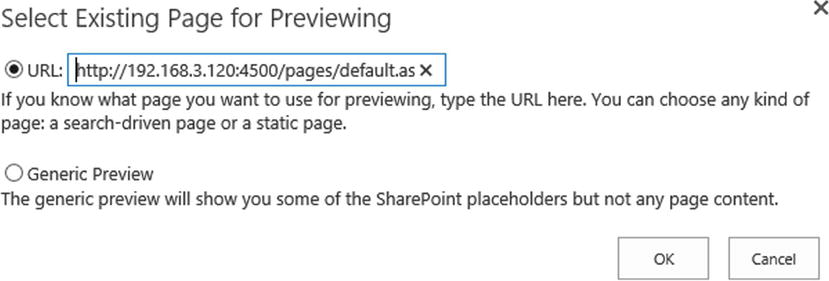
Figure 4-18. Select Preview Page modal dialog box
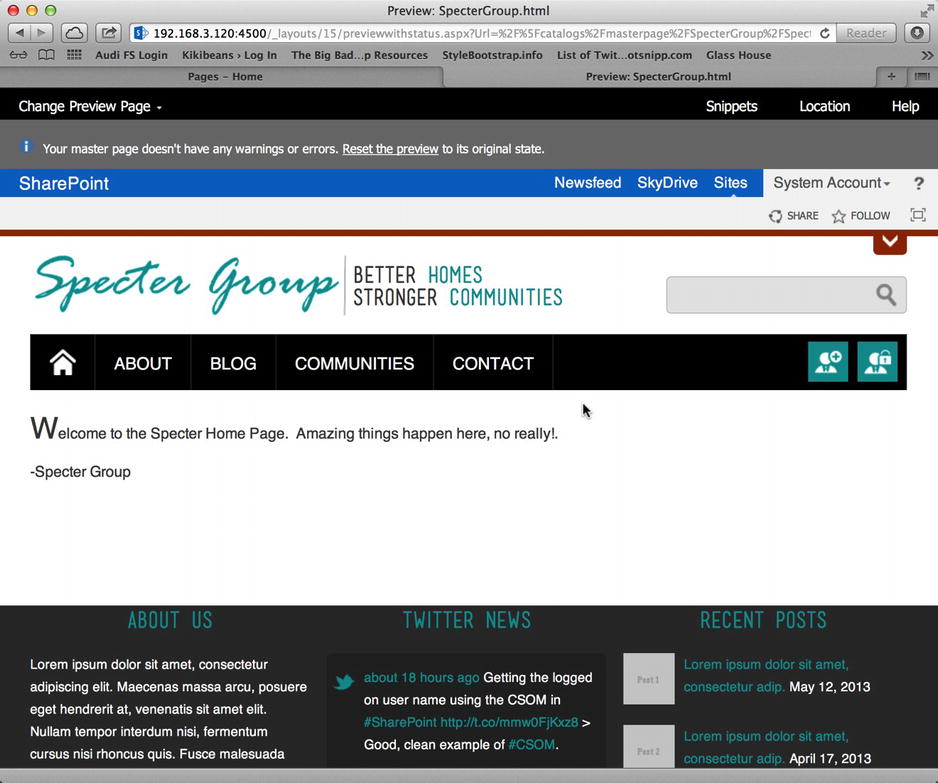
Figure 4-19. Prevewing the HTML master page by providing the URL of the Default.aspx page
Selecting the Create New option allows us to create a new page, select a page layout, and then preview our new master page.
![]() Note We learn all about page layouts in Chapter 7.
Note We learn all about page layouts in Chapter 7.
Snippets and the Snippet Gallery
HTML master pages only allow standard HTML; they do not allow for .NET or SharePoint controls. We have already been referring to them, but the Design Manager solves this issue by providing snippets, which allow us to customize our HTML master pages with SharePoint and .NET controls and components. Snippets allow us to insert various SharePoint ASP.NET controls wrapped within the snippet markup and configure them via the Design Manager web-based tool without the need to edit the master page (.master) directly as we were accustomed to with SharePoint 2010.
We can access the Snippet Gallery by clicking Snippets, found at the top right of the HTML master page Preview page. There are various components available to us, as shown in Figure 4-20. The components available to us are grouped into the categories of Navigation, Administration, Containers, WebParts, and Custom ASP.NET Markup.

Figure 4-20. Snippet Gallery snippets available to HTML master pages
![]() Note The Snippet Gallery was not designed to be an end-all, be-all for all .NET and SharePoint controls that can or should be added to a master page. These are intended to be the most widely used ones. Using the Custom ASP.NET Markup snippet allows us to convert any .NET or SharePoint control to a snippet for insertion into our HTML master page.
Note The Snippet Gallery was not designed to be an end-all, be-all for all .NET and SharePoint controls that can or should be added to a master page. These are intended to be the most widely used ones. Using the Custom ASP.NET Markup snippet allows us to convert any .NET or SharePoint control to a snippet for insertion into our HTML master page.
![]() Note Refer to Chapter 7 for an in-depth review of page layout snippets and the Snippet Gallery.
Note Refer to Chapter 7 for an in-depth review of page layout snippets and the Snippet Gallery.
Now that we have successfully created our HTML master page, we want to start adding in SharePoint components such as the Site Logo, Sign In and Search Box snippets.
![]() Tip We will leave a very important snippet, the Top Navigation snippet, until Chapter 6, where we will look into navigation in general and see how to fully utilize the Top Navigation snippet.
Tip We will leave a very important snippet, the Top Navigation snippet, until Chapter 6, where we will look into navigation in general and see how to fully utilize the Top Navigation snippet.
We start with a very simple snippet, the Site Logo snippet. Referring to Figure 4-20, we see that the Site Logo snippet is found in the Administration group.
- 1. Go to Design Manager and select Edit Master Pages.
- 2. Click your HTML master page, in our case SpecterGroup.html, which at this point should be in Draft state. Clicking takes you to the Preview Page.
- 3. Click on the Snippets Ribbon option on the top right.
- 4. On the Design Ribbon, under Administration, click Site Logo.
- 5. There are many settings that we can configure, and common ones include the following. Be sure to click Update after changing settings to update the HTML snippet.
- a. Under Customization - Site Logo (SPSimpleSiteLink), make the following changes:
Appearance
CssClass: Remove any classes, as we will provide our own styling to the logo link.Navigation
NavigateURL = ∼sitecollection (Valid values for NavigateURL include ∼site and ∼sitecollection). - b. Under Customization - Site Logo (SiteLogoImage), make the following changes:
Appearance
CssClass: Remove any classes, as we will provide our own styling to the logo image.Misc
LogoImageURL = /_catalogs/masterpage/spectergroup/img/logo.gif (You can change this URL to your own default logo location).
- 6. Copy the HTML snippet from the text box on the left and paste it into your HTML master page. Because this is the logo, we want to replace the logo block from our HTML prototype. Refer to Listing 4-12 for an example of the Site Logo HTML snippet added to our HTML master page.
![]() Note The container <div>, <div data-name="SiteLogo">, and the Comment Start Markup, <!--CS: Start Site Logo Snippet-->, are not required and can be removed. <!--PS:--> tags can be removed as well, but might affect Preview.
Note The container <div>, <div data-name="SiteLogo">, and the Comment Start Markup, <!--CS: Start Site Logo Snippet-->, are not required and can be removed. <!--PS:--> tags can be removed as well, but might affect Preview.
Listing 4-12. Site Logo Snippet Within HTML of HTML Master Page
<div id="logo">
  <!--logo snippet-->
  <div data-name="SiteLogo">
    <!--CS: Start Site Logo Snippet-->
    <!--SPM:<%@Register Tagprefix="SharePoint" Namespace="Microsoft.SharePoint.WebControls" %>-->
    <!--MS:<SharePoint:AjaxDelta runat="server" BlockElement="True">-->
      <!--PS: Start of READ-ONLY PREVIEW (do not modify)--><!--PE: End of READ-ONLY PREVIEW-->
      <!--MS:<SharePoint:SPSimpleSiteLink runat="server" CssClass="" ID="x531"
          NavigateUrl="∼sitecollection">-->
        <!--PS: Start of READ-ONLY PREVIEW (do not modify)--><!--PE: End of READ-ONLY PREVIEW-->
        <!--MS:<SharePoint:SiteLogoImage runat="server" CssClass=""
            ID="x1daed9c2757141c2a871aeda8b6384df"
            LogoImageUrl="/_catalogs/masterpage/spectergroup/img/logo.gif">-->
          <!--PS: Start of READ-ONLY PREVIEW (do not modify)-->
          <img id="ctl00_x1daed9c2757141c2a871aeda8b6384df" name="onetidHeadbnnr0"
              Src="/_catalogs/masterpage/spectergroup/img/logo.gif" alt="Specter Group" />
          <!--PE: End of READ-ONLY PREVIEW-->
        <!--ME:</SharePoint:SiteLogoImage>-->
        <!--PS: Start of READ-ONLY PREVIEW (do not modify)-->
        <!--PE: End of READ-ONLY PREVIEW-->
      <!--ME:</SharePoint:SPSimpleSiteLink>-->
      <!--PS: Start of READ-ONLY PREVIEW (do not modify)-->
      <!--PE: End of READ-ONLY PREVIEW-->
    <!--ME:</SharePoint:AjaxDelta>-->
    <!--CE: End Site Logo Snippet-->
  </div>
  <!--end logo snippet-->
</div>
- 7. Save the HTML master page and preview in Design Manager. The default Site Logo control now replaces the static link to our logo image, as shown in Figure 4-21.
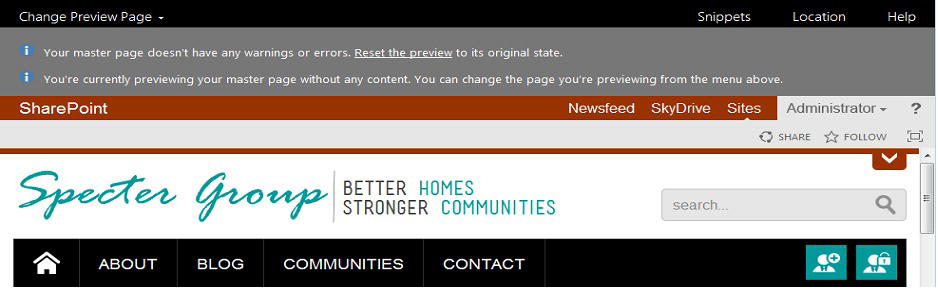
Figure 4-21. Site Logo snippet added to HTML master page
As you recall from Chapter 3, we are building a publishing public web site for Specter Group. Therefore, we need to allow users to log in. To do this, we can use the Sign In snippet, which is found in the Administration category on the Design Manager Ribbon, as shown in Figure 4-22. This is a security trimmed control and essentially the same as the previous SharePoint 2010 control, which was available via SharePoint Designer 2010.

Figure 4-22. Sign In snippet available in the Administration group
Follow these steps to add the Sign In snippet to your master page:
- Go to Design Manager and select Edit Master Pages.
- Click your HTML master page, in our case the SpecterGroup.html, which at this point should be in Draft state. Clicking takes you to the Preview page.
- Click the Snippets Ribbon option on the top right.
- On the Design Ribbon, under Administration, click Sign In.
- Copy the Snippet from the text box and paste it into your HTML master page, unless you need to provide any changes to the configuration first.
- Save the HTML master page and preview it in Design Manager.
Reuse Existing Sign In Snippet
If you refer back to Listing 4-10, near the bottom you will see a reference to a SharePoint:SPSecurityTrimmedControl tag and after that the same wssucw:Welcome we just saw with the Sign In snippet. This is true as SharePoint automatically provides a “Security Trim” snippet (see Figure 4-20) with a Sign In snippet within it for us so that an HTML master page will have a sign in link out of the box. We can reuse this.
In Figure 4-20, we can see two icons at the right of the top navigation bar, one for a Register button and another for a Login button. In Listing 4-13 we can see the original HTML used to create these links.
Listing 4-13. HTML from HTML Prototype for Registration and Login Buttons
<div class="site-access cf">
  <ul>
    <!--anonymous only snippet-->
    <li>
      <a href="#"><img src="img/icon-register.png" alt="Register" /></a>
    </li>
    <!--anonymous only snippet-->
    <li>
        <!--welcome / login snippet-->
        <a href="#"><img src="img/icon-login.png" alt="Login" /></a>
        <!--end login snippet-->
    </li>
  </ul>
</div>
![]() Tip Notice the <!--anonymous only snippet--> and <!--welcome / login snippet--> comments in Listing 4-13. Refer to the earlier section, “Preparing an HTML File for Conversion to an HTML Master Page” for an explanation of why we add these kinds of comments in HTML prototypes.
Tip Notice the <!--anonymous only snippet--> and <!--welcome / login snippet--> comments in Listing 4-13. Refer to the earlier section, “Preparing an HTML File for Conversion to an HTML Master Page” for an explanation of why we add these kinds of comments in HTML prototypes.
Let’s now move (not copy) the SharePoint:SPSecurityTrimmedControl snippet and its wssucw:Welcome snippet from Listing 4-10 into the HTML from Listing 4-13. The results can be seen in Listing 4-14 and Figure 4-23. You will notice in Figure 4-23 that the Registration button disappeared, which makes sense as the Security Trim snippet will hide the link for nonanonymous users, which we as designers are most definitely not. Therefore, we only see the Welcome control with the standard drop-down menu.
Listing 4-14. HTML Master Page With Snippets from Listing 4-10
<div class="site-access cf">
  <ul>
    <!--MS:<SharePoint:SPSecurityTrimmedControl runat="server"
        AuthenticationRestrictions="AnonymousUsersOnly">-->
      <li>
        <a href="#"><img src="img/icon-register.png" alt="Register" /></a>
      </li>
      <!--ME:</SharePoint:SPSecurityTrimmedControl>-->
      <li>
        <!--MS:<wssucw:Welcome runat="server" EnableViewState="false">--><!--ME:</wssucw:Welcome>-->
      </li>
    </ul>
  </div>
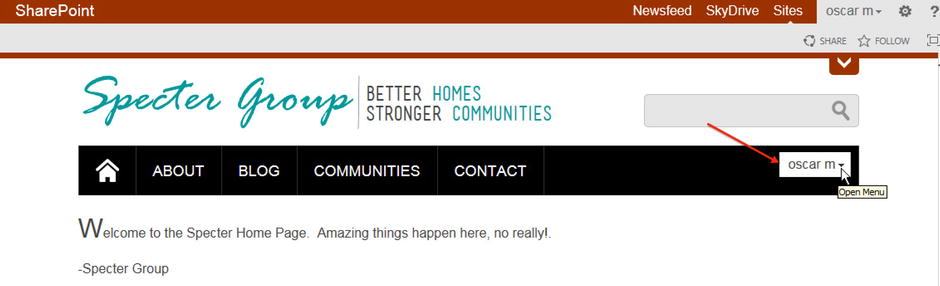
Figure 4-23. The Registration link and Sign In snippet
Style the Sign In Snippet
You can style the Sign In link or button a few different ways. One way is to provide a CssClass to the Sign In snippet before you add it and then provide that special class and its styles to your style sheet. Another method is to simply use the CssClass that the Welcome control will add for a Sign In link, .ms-signInLink.
In Listing 4-15 you can see how we reference the Sign In link only within our navigation bar. We provide a fixed width and height, forcing the element to display as a block. We then move the text outside of this block to hide the text and provide a background image. The result is the same as seen in Figure 4-23, but now the Sign In link actually directs a visitor to the site Sign In process.
Listing 4-15. Custom Style for Anonymous Sign In Link or Button
nav .site-access .ms-signInLink {
    width: 43px;
    height: 43px;
    display: block;
    text-indent: -1000px;
    overflow: hidden;
    background: transparent url('../img/icon-login.png') no-repeat 0 0;
    line-height: 1em;
    padding: 0px;
}
We end our foray into master page snippets for now with a look at the Search Box snippet. The Search Box snippet provides us access to SharePoint’s search box control so that we can provide a search box on our sites. In our HTML prototype, we provided a static search box that we can see in Listing 4-16. In Figure 4-21, you can view what this search box looks like.
Listing 4-16. Static Search Box from HTML Prototype
<div class="searchbox">
  <!--search snippet-->
    <div id="searchInputBox">
      <input id="header-search" name="header-search" type="text" autofocus="autofocus"
          placeholder="search..." accessKey="S" value="" />
      <a title="Search" href="javascript: {}"><img src="img/icon-search.png" alt="Search" /></a>
    </div>
  <!--end search snippet-->
</div>
Follow these steps to add the Search Box snippet to your master page:
- Go to Design Manager and select Edit Master Pages.
- Click your HTML Master Page, in our case the SpecterGroup.html, which at this point should be in Draft state. Clicking takes you to the Preview page.
- Click the Snippets Ribbon option on the top right.
- On the Design Ribbon, under Navigation, click Search Box.
- Copy the snippet from the text box and paste it into your HTML master page unless you need to provide any changes to the configuration first. We are going to provide styling to the Search Box based on existing classes and HTML. Refer to Listing 4-17 to view how this snippet appears in our HTML master page. Note that we removed the containing <div data-name="SearchBox"> and <!--PS:--> tags for simplicity.
Listing 4-17. Search Snippet in HTML Master Page
<div class="searchbox">
  <!--search box snippet-->
  <!--CS: Start Search Box Snippet-->
  <!--SPM:<%@Register Tagprefix="SearchWC" Namespace="Microsoft.Office.Server.Search.WebControls"
      Assembly="Microsoft.Office.Server.Search, Version=15.0.0.0, Culture=neutral,
      PublicKeyToken=71e9bce111e9429c"%>-->
    <!--MS:<SearchWC:SearchBoxScriptWebPart UseSiteCollectionSettings="true"
        EmitStyleReference="false" ShowQuerySuggestions="false" ChromeType="None"
        UseSharedSettings="true" TryInplaceQuery="false" ServerInitialRender="true" runat="server">-->
      <!--PS: Start of READ-ONLY PREVIEW (do not modify)-->
        <!--removed-->
      <!--PE: End of READ-ONLY PREVIEW-->
    <!--ME:</SearchWC:SearchBoxScriptWebPart>-->
    <!--CE: End Search Box Snippet-->
  <!--end search box snippet-->
</div> - Save the HTML master page and preview it in Design Manager. Refer to Figure 4-24.
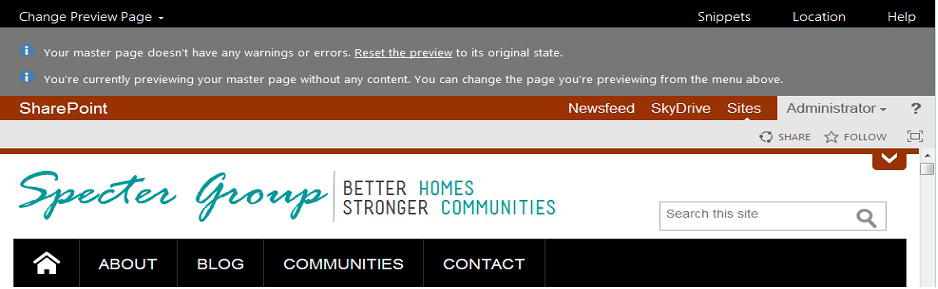
Figure 4-24. Search Box snippet added to HTML master page
We can see in Figure 4-24 that the styling from our HTML prototype search box did not transfer over to our Search Box snippet. This is not uncommon, as snippets often will code their contents using different HTML and class structure than a design team might expect. Styling the search box takes a little more work than styling a sign in button, as we need to override styling for the search container, the input box, and the search button. Using Firebug we can quickly drill into the HTML tags and find the styles that we need to override. Refer to Listing 4-18 for our overriding styles and Figure 4-25 for the end result.
Listing 4-18. Custom Styles to Style the Search Box Snippet
header #SearchBox .ms-srch-sb-border, header #SearchBox .ms-srch-sb-borderFocused {
    background: #e5e5e5 none;
    border: 1px #c2c2c2 solid;
    border-radius: 5px;
    -moz-border-radius: 5px;
    -webkit-border-radius:5px;
    height: 38px;
    display: block;
}
header #SearchBox .ms-srch-sb-borderFocused {
    border-color: #009899;
}
header #SearchBox .ms-srch-sb input[type=text]{
    border: 0px;
    width: 200px;
    height: 28px;
    padding: 5px 10px;
    font-size: 16px;
    line-height: 1em;
    color: #333;
    background: transparent none;
    display: inline-block;
    vertical-align: top;
}
.ms-srch-sb > .ms-srch-sb-searchLink {
    height: 24px;
    width: 22px;
    display: inline-block;
    margin: 0px;
    padding: 7px 0px 5px;
    vertical-align: top;
    -webkit-transition: all 0s ease;
    -moz-transition: all 0s ease;
    -o-transition: all 0s ease;
    transition: all 0s ease;
    background: transparent url('../img/icon-search.png') no-repeat 0px 6px;
}
.ms-srch-sb > .ms-srch-sb-searchLink:hover {
    background: transparent url('../img/icon-search.png') no-repeat 0px -70px;
}
.ms-srch-sb > .ms-srch-sb-searchLink img {
    display: none;
}

Figure 4-25. HTML master page with search styling from Listing 4-18 applied
In Listing 4-18, we include six primary overrides. The first CSS block overrides the styling for the search area container by providing a new background color, rounded border, and border color. The second block provides a new border color to the search box on hover. The third block provides styling to the actual input box itself, and the final three blocks modify how the search “go” link or search button display.
Publishing and Assigning a Site Master Page
Once you have reached a point in the design cycle where the HTML master page meets the design standards and requirements, you will need to publish a major version of your HTML master page (as well as all other branding assets). To publish your newly created master page and related artifacts, you can use SharePoint Designer or a browser. If you choose to use a browser, you can use the Content and Structure Tool located at /_layouts/15/sitemanager.aspx in your environment or found on the Site Settings page (Site Administration ![]() Content and structure). This allows for bulk publishing files instead of doing it one file a time. Once all files have been checked in and published you are ready to set your master page as the default.
Content and structure). This allows for bulk publishing files instead of doing it one file a time. Once all files have been checked in and published you are ready to set your master page as the default.
You only need to check in the HTML master page (i.e., SpecterGroup.html) and not the .master file (i.e., SpecterGroup.master). SharePoint will handle the publishing of the .master file for you if you check in and publish your HTML master page.
![]() Caution If for some reason you are not able to view certain images, or scripts are not working on your master page, ensure you have published a “major version” of all files. The Content and Structure Tool does not publish items recursively; therefore, you must publish files under each subfolder.
Caution If for some reason you are not able to view certain images, or scripts are not working on your master page, ensure you have published a “major version” of all files. The Content and Structure Tool does not publish items recursively; therefore, you must publish files under each subfolder.
After all assets including the HTML master page have been published, you now need to tell SharePoint to use it. To do this, simply go to the Site Settings ![]() Master Page under Look and Feel. You only change the Site master page for now as this is the same as the Custom master page that publishing pages use. The System master page is the master page used by system pages such as the Site Settings pages. We leave this as the default master page for now.
Master Page under Look and Feel. You only change the Site master page for now as this is the same as the Custom master page that publishing pages use. The System master page is the master page used by system pages such as the Site Settings pages. We leave this as the default master page for now.
The drop-down menu next to the Site master page should show your published master pages. If your custom master page(s) are not listed, go back and make sure you published a major version. See Figure 4-26 for our list of master pages. Select the SpecterGroup/SpecterGroup master page and save our settings. Our site should now be using the Specter Group master page on standard publishing pages found in the “pages” library.
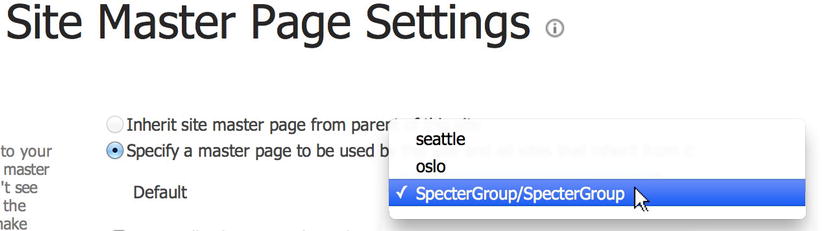
Figure 4-26. Published master page shown on the available drop-down menu
![]() Caution Although our custom master page resides in a folder we named SpecterGroup, it should still show up on the available ones via the drop-down list as shown in Figure 4-26. If you do not see your master page, please ensure you have published a major version.
Caution Although our custom master page resides in a folder we named SpecterGroup, it should still show up on the available ones via the drop-down list as shown in Figure 4-26. If you do not see your master page, please ensure you have published a major version.
More often than not, there is a need to share design artifacts across SharePoint instances, such as when moving a branding solution from a development farm to a production farm. When you need to, simply create a Design Package (Step 8 of Design Manager as shown in Figure 4-27). SharePoint creates a WSP or Solution file that contains all of your artifacts, such as images, JavaScript, CSS, and the master page. Once you save this file, it is available on the Solution Gallery of the Site Collection you are working on. In addition, you are given a link to download this Design Package right from the Design Manager.
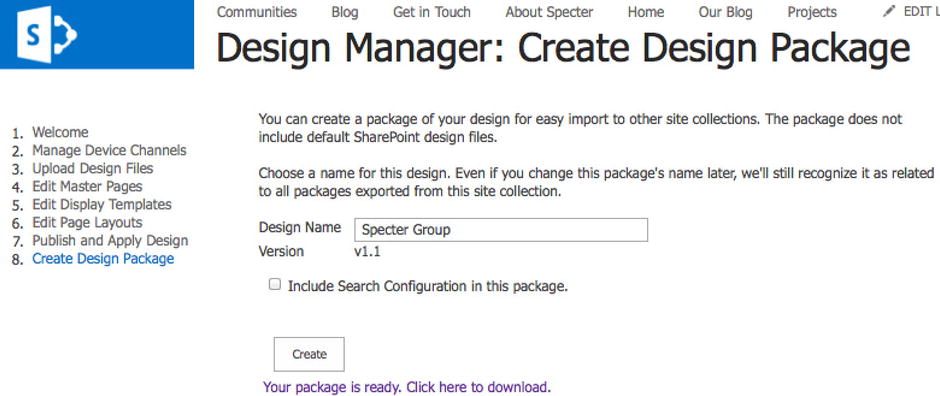
Figure 4-27. Create a Design Package via Design Manager
![]() Note A Design Package is supposed to contain only modifications (unghosted) assets and files in your SharePoint site including modifications to the Master Page Gallery (master pages, page layouts, images, CSS, and JavaScript files) as well as custom lists, libraries and even content types and content columns. We learn about page layouts and content types in Chapter 7.
Note A Design Package is supposed to contain only modifications (unghosted) assets and files in your SharePoint site including modifications to the Master Page Gallery (master pages, page layouts, images, CSS, and JavaScript files) as well as custom lists, libraries and even content types and content columns. We learn about page layouts and content types in Chapter 7.
Are you curious to know exactly what is included in the Design Package file? If so download the WSP file to your workstation and rename it with a .cab extension for Windows or .zip for a Mac. Open it using the appropriate application (we used Zipeg on the Mac). As shown in Figure 4-28, the contents of the solution include a feature that deploys all the actual files assigning them the Design File content type as expected.
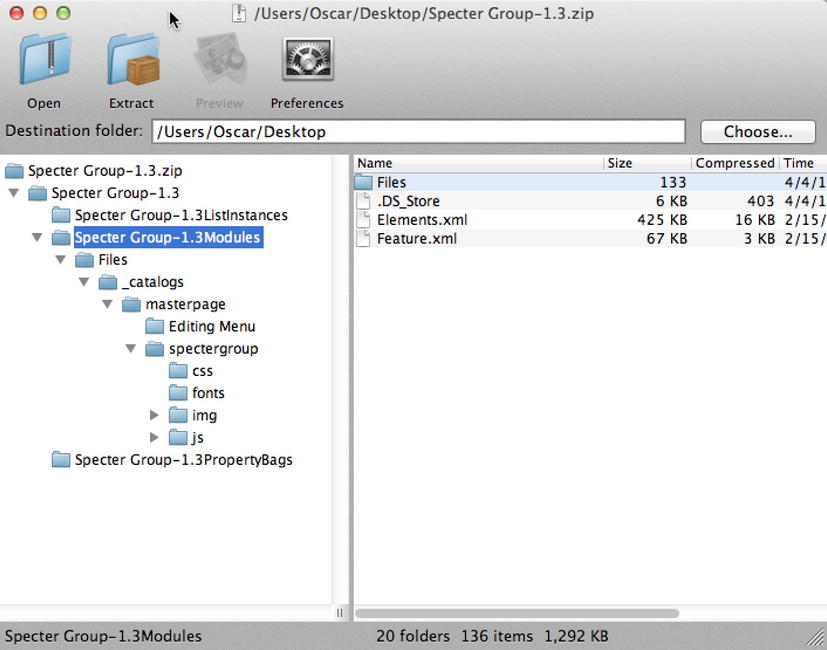
Figure 4-28. Contents of a sample Design Package
The Specter Group artifacts are within the original folder we uploaded, shown in Figure 4-29, which includes the HTML master page and the .master file as well as the JavaScript, CSS, and images.
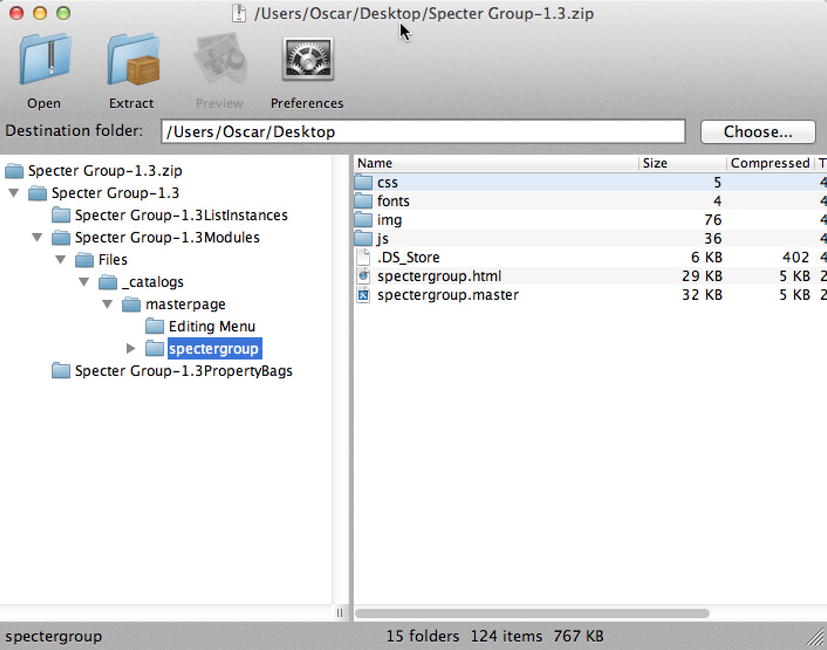
Figure 4-29. Design Package Master Page Gallery module contents
Each artifact is deployed with the corresponding content type; in the case of a CSS file it is deployed as a Design File, as shown on Figure 4-30, which was found in the elements.xml file for the Specter Group module.

Figure 4-30. Design File content type assigned to CSS files
Because a WSP file is just a .cab, we could also use a .cab builder to repackage the Design Package in case we want to make any additional changes. As an example, there might be a few branding assets included in the Design Package that you do not want to deploy to your production environment. You can unpackage the Design Package to your workstation, modify the module’s elements.xml file to remove the files you do not wish to deploy, and then finally repackage the cab using a .cab builder, renaming the final package with a .wsp extension. Please note that this is an advanced process that is not well supported. The recommended path to create a custom Design Package would be to use Visual Studio and create a feature.
Summary
In this chapter we walked through the steps necessary to create a SharePoint 2013 HTML master page from an HTML prototype. We showed you how to connect a development and design tool other than SharePoint Designer to a SharePoint site using WebDAV. Using this connection and the new Design Manager tool provided in SharePoint 2013, we uploaded our branding assets including our HTML prototype to our SharePoint site. Once the assets were uploaded we converted our HTML prototype to an HTML master page.
After running into and solving common conversion errors, we looked at the converted HTML master page to investigate what SharePoint had to do to associate our HTML master page with a .master master page. We continued on by leveraging the new Snippet Gallery to add snippets to our HTML master page and then concluded by publishing our master page and finally creating a Design Package to ease redeployment of our branding initiative.
In our next chapters we walk through the process of making an HTML master page responsive, followed by a look into navigation, page layouts, and content types.